4
DAP’s “Pause Membership” Feature
How It Works
Joe Member joins your site on 01/01/2011.
He stays a member for about 3 months. Let’s say it’s now mid March. He wants to take a couple of months break. So he goes on a 2 month break. Comes back end of May and wants to resume his membership.
DAP allows him to pick up right where he left off – which is continuing to receive content as of April (04/01/2011), even though today’s date is May 25th, 2011.
So while he took a break, other members who did not take a break in membership, continued to pay for those 2 months, and continued to receive content dripped through those months. So it is only fair that when he does come back end of May and resumes his subscription, he does not resume from June’s content, but from April’s content (when he last put his membership on “Pause”).
It’s ok if you’re not dripping content on a monthly-basis, but rather on a “day” basis. So to put it in terms of “days”, when Joe resumes his subscription, since he was already 90 days old in the system when he put his subscription “On Hold”, and comes back another 60 days later (roughly about 2 months), then DAP will start dripping Day #91 content onwards for him, and NOT Day #151 onwards (he didn’t pay for 2 months in between).
This is how DAP works right out of the box. Nothing special to configure. And DAP automatically takes care of pausing the dripping when he is not paying.
WARNING: Just remember that in order for you to put his actual payments on hold, you will need to have a payment gateway like Authorize.net or Paypal Website Payments Pro. Or you must be using a shopping cart like http://1SiteAutomation.com . Using something like Paypal Standard or ClickBank will not allow you to put the actual charging of his credit card on hold.
NOTE: If you actually did want him to start receiving current content even though he left for 2 months, then all you have to do is, once he comes back and starts paying again, just extend his access end date on his account (which will initially be showing 03/31/2011 – end of March, when he left) and modify it and make it 05/31/2011. So when his next payment comes in after he resumes, DAP will extend his access end date to 06/30/2011 – which means, he can now access all of the current content.
1
Exporting Users
You can export DAP user/member data in CSV format, from the Users > Manage screen, as shown below.
When you click on the “Go” button, you will see a pop-up appear that contains the exported data.
You may then copy it and save it to your desktop.
If you wish to bring that data into, say, an MS Excel spreadsheet, then save the file as a .csv file on your desktop, and then you will be able to import it into Excel.
4
Give Existing Users Access To A Product
This flow is only for giving access to an existing User to a Product. If you wish to add a new user manually to the system, then see this post.
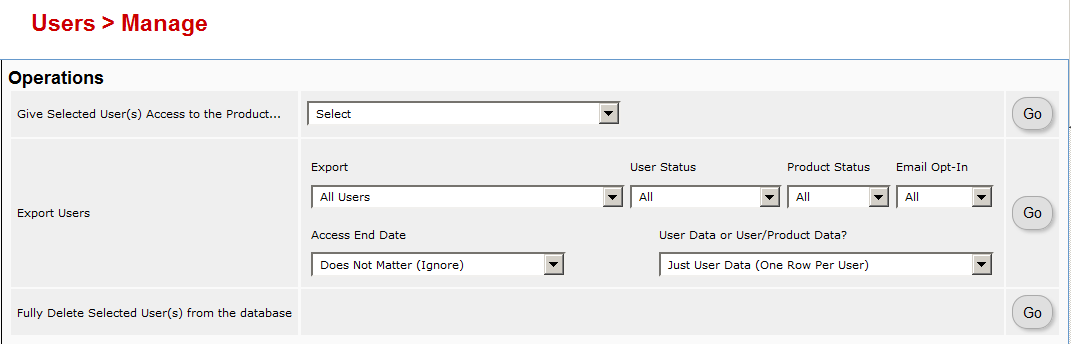
- Go to the Users > Manage screen.
- Search for the user by email id (or last name, user id, etc)
- Once you have found their information, check the check box in the first column next to their user id
- Then using the drop-downs in the top-right section, give them access to the new Product
- They’re initially added as a “Free” user by default. You may mark them as “PAID” if you want to have access to the product just like an actual paying member would.

18
GetResponse Integration
DAP integrates with GetResponse very easily.
DAP to GetResponse Integration
If you are on DAP 4.1, then DAP can connect with getresponse using the APIs provided by getresponse.
So when someone buys or signs up for that Product, then DAP will automatically notify your GetResponse list, and add the buyer or subscriber (if it’s a free sign-up) to your GetResponse list.
So basically, user gets added to DAP first, and then DAP adds them to GetResponse.
If you want the other flow (subscriber gets added to GR first, and then GR adds them to DAP, then see this GetResponse-to-DAP flow)
1) Retrieve the getresponse API Key from this URL:
http://www.getresponse.com/my_api_key.html
2) Then go to DAP > Products > Manage, select the product, go to “Notifications” tab, then in the Plugin Notification upon User “Add” field, add the following:
getresponse:<API Key>:<campaign name>
For example:
getresponse:89kjhjgjfh1734dap:fbsecrets
That’s it.
Now go to DAP admin -> add users page and add a brand new user / email and see what happens.
The added user should first receive the confirmation email from GetResponse, and upon confirmation, the user should get added to GetResponse.
If it does not work, then…
- Set the dap log level to 5,
- Go to DAP > System > Logs.
- Empty logs, and rerun the test.
- Then send us the log text from DAP > Sytem > Logs.
31
Mailchimp Integration
Subscriber Flow
The flow of subscriber is “FROM DAP TO Mailchimp“. User signs up at DAP first, then DAP automatically adds the user to Mailchimp list.. Admin removes the user’s access to a product, and DAP automatically removes the user from Mailchimp list. This feature is available starting DAP v4.1.
How it works
[s3mv]mailchimp.mp4,640,378,false,false[/s3mv]1. Login to your account at http://admin.mailchimp.com/account/api/ and note down the API Key.
Image 1:

2. Go to http://admin.mailchimp.com/lists/ and grab your List’s Unique Id. Click the “settings” link for the list – the Unique Id is at the bottom of that page.
Image 2:

3. Log in to your DAP Admin Dashboard -> Products Page and select the product (whose members you wish to add automatically to your Mailchimp list.
4. If the list Id of the mailchimp list that you want to integrate with a DAP product/membership is say “ffffffffff”, and say your Mailchimp API Key is ‘ffffffffffffffffffffffffffffff-us2’ then add the following to the “Notify Plugin upon User -> Product Activation (Add)” in DAP products page and HIT Save/Update Product.
mailchimp:ffffffffffffffffffffffffffffff-us2:ffffffffff
Image 3:

That’s it!
Save the product and this completes the DAP->Mailchimp integration.
How This Works
So let’s say you picked the list “ffffffffff” in your Mailchimp account, and the DAP Product “Example Subscription Product” (as shown in the screenshots above).
So once you add “mailchimp:ffffffffffffffffffffffffffffff-us2:ffffffffff” to the product’s “Notify plugin upon user->product activation” and “Notify plugin upon user->product de-activation” field and save it, every time someone gets access to the “Example Subscription Product” product (regardless of whether they buy it, or you give them access on the backend), DAP will automatically add them to the list – ffffffffff. And everytime you remove the user’s access to product (click on ‘Remove’ in DAP manage users page), DAP will automatically remove the user from the list.
df11c84ab4
4
User & Product Statuses
DAP assigns a status for the User itself (at a global, account level), as well as a User/Product level (specific to the user's access to that product).
So there's the User Status and then the User/Product Status
For eg., the User Status may be "Active", but a specific User/Product status may be "Inactive" – which means user can log in to their account, receive emails, etc, but cannot access any content that is part of this specific product (though they can access all other products they may have, that are "Active").
The bottom-line is this: In order for a user to access his/her account, and all the content in the Products that he/she's purchased, all the statuses have to be Active.
So here are the possible statuses, and what they mean.
User Status
These statuses apply to the User's account itself.
Inactive
If the user's status is inactive, then that means the user's entire account is inactive. User will not be able to even log in to their account. All outgoing broadcast and autoresponder emails will "exclude" them from the list, and they will not receive any emails from the system.
Active
Account is accessible, all emails are being sent.
Unconfirmed
They've just signed up for a product that requires "Double Optin". Which means, unless they "confirm" by clicking on the double-optin link, their account will not become active. Please note that once a user has already confirmed the double-optin link for one product, then their "User" status automatically becomes "Active". So even if they go on to sign up for another double-optin product, then their User status will never again change to "Unconfirmed" (unless specifically set so by the DAP Admin). For all future double-optin products, it is this user's "User/Product" status that will be "Unconfirmed", while the main "User" status remains "Active".
Locked
When an account receives login attempts from more than the number of IP addresses set in the "Setup > Config > Advanced > Max. # of User Logins From Different IP`s" field, then that user's main User status is changed to be "Locked". This is very similar to the "Inactive" status, except named different just so admin can distinguish between "Locked" and other users.
User/Product Status
These statuses specifically apply to a User's access with relation to a specific Product.
Inactive
User cannot access any content that is part of this product. However, User may access other products whose user/product status is "Active".
Active
There are no restrictions for this User to access content that is part of this product (of course, only whatever the user is eligible to see, based on the drip setup).
Troubleshooting Login Errors
Problem: When you go to http://YourSite.com/dap/ , you get redirected to a "Page Not Found – 404" error page.
Solution: This is happening because in DAP Config, you probably set up an invalid URL to be the default login page. So do this:
- First, log out of DAP by going to http://yoursite.com/dap/logout.php (manually type that in to your browser)
- Now log in to DAP via DAP's special login page – http://YourSite.com/dap/login.php
- Go to "Setup > Config > Advanced" screen
- Then where it says "Location of your login page (eg., if using WordPress). Should start with a forward slash (`/`)" – enter a valid URL there. Before entering any URL there, visit the URL separately in a separate browser tab (or window) and make sure you can actually get to it, and that it has a login form there. Then put that URL in to the above field, and click on "Update".
- Now in a separate browser (totally different browser) where you are not logged in to DAP or WP, try to go to http://YourSite.com/dap/ and see if it redirects to the right page. If not, revisit the steps above, and double check the login URL, that's all.
Troubleshooting Bulk-Add & Bulk-Import Of Users
Issue: You tried to bulk-add users to DAP (i.e., a bulk-import), and it is not working. No users have been added to the system.
Possible Solutions & Troubleshooting Tips
1. CSV File created?
First check if there's a .csv file that has been created in the folder /dap/bulk/ on your server. If there's more than one .csv file in there (from a previous import/bulk-add), then see if there's a file whose timestamp is close to the time when you actually did the "Users > Add > Bulk-add Multiple Users To A Product" action.
If there's no .csv file, then it's possible that the folder doesn't have the right permissions for DAP to be able to create the file. So CHMOD the "bulk" folder (in /dap/ folder) to 755. Then re-try the bulk-add again.
2. Is Cron job running?
You see a .csv file in there sitting for a few hours, but none of the users inside the .csv file have been added to DAP.
It's possible that the hourly cron job has either not been set up at all, or may have been setup incorrectly. Make sure the cron is setup and running correctly.
See both these links:
3. Error in CSV File
Sometimes, it is possible that the .csv file was actually created, but it was actually corrupt. And you won't know this until the cron runs and that specific bulk-add job shows an error.
When you look at the “System > Job Queue” screen, you see one line that shows this error…
Action: BulkAddCSVToProduct
Message: Error in CSV File
You were probably trying to to Bulk-Add Users to DAP. Or do a Broadcast email to a CSV file. In either case, there was an error in processing your request, because one of the following happened:
1) The CSV file could not be created in /dap/bulk/ folder because of a permission issue (try CHMOD 755), so when the cron task ran, it could not find the CSV file (or the file was corrupted for some reason).
2) The list of email addresses within the CSV file were not in the right format – Order should be: Email,FirstName,LastName ( LastName is optional)
How To Fix It
If a job fails, then there’s no way to “fix it and re-run it” right now. So you basically have to delete the job, and then submit a new one. So if a Bulk-Add job errors with the above message, then here’s what you need to do…
A) Click on the “Delete Jobs In Error” link on the “System > Job Queue” page. That will delete all jobs that have failed for whatever reason.
B) You should also clear out the /dap/bulk/ folder to make sure you delete any old, or errored out CSV files from that folder.
CSV File Error During Bulk-Add Users
When you look at the “System > Job Queue” screen, you see one line that shows this error…
Action: BulkAddCSVToProduct
Message: Error in CSV File
You were probably trying to to Bulk-Add Users to DAP. Or do a Broadcast email to a CSV file. In either case, there was an error in processing your request, because one of the following happened:
1) The CSV file could not be created in /dap/bulk/ folder because of a permission issue (try CHMOD 755), so when the cron task ran, it could not find the CSV file (or the file was corrupted for some reason).
2) The list of email addresses within the CSV file were not in the right format – Order should be: Email,FirstName,LastName ( LastName is optional)
How To Fix It
If a job fails, then there’s no way to “fix it and re-run it” right now. So you basically have to delete the job, and then submit a new one. So if a Bulk-Add job erros with the above message, then here’s what you need to do…
A) Click on the “Delete Jobs In Error” link on the “System > Job Queue” page. That will delete all jobs that have failed for whatever reason.
B) You should also clear out the /dap/bulk/ folder to make sure you delete any old, or errored out CSV files from that folder.
5
WishList Migration Kit
We get many requests from folks wanting to switch their existing membership site from WishList to DAP, or from Amember to DAP, from Magic Member, YourMembers, eMember, Membergate, etc. We’ve honestly lost count of the number of migrations we’ve done over the years. And every single one of those users who switched to DAP, has been thrilled with DAP and has continued to stay with DAP ever since.
In almost all cases, they all wanted to switch their main “bread-and-butter” membership site over to DAP, because of many things that DAP does that the others don’t. Or maybe because their current membership plugin doesn’t let them do what they want to do, or because their developers stopped supporting it (or support is non-existent), or they’ve gone out of business, or simply because the plugins just don’t scale well for a large membership site, like DAP can.
Anyway, we decided to write a blog post about how to do that for those of you considering doing it yourself.
[NOTE] You don’t have to do this yourself – we can do the migration for you for a fee. See this link for details about purchasing our WishList-To-DAP Migration. [/NOTE]
1) Migrating “Free Members”
Moving free members over to DAP is very simple. Export your old members as a CSV (comma-separated) file containing just email, first name and last name(optional) in the following order:
Email,FirstName,LastName
Lastname is optional. No spaces before or after the comma’s.
And then import them on the “Users > Add” screen.
You can read more about importing users into DAP in this post.
2) Migrating “Paying Members” With Current Subscriptions
This is a bit trickier than migrating just free members. You not only have to import existing member information, but you also need to migrate over their existing subscriptions to point to DAP.
How this is done, primarily depends on what payment processor you were already using, and wish to continue to use while making sure all new incoming subscription payments get processed by DAP.
But before you migrate over their existing subscriptions, you have to import all of them first using DAP’s “Users > Add” screen, which allows you to import multiple users into a Product, while also marking them as “Paid”.
Before you do the import, be sure to empty both the “Double Optin” and “Thank-you” email subject and body on the Product page, because you don’t want DAP sending out any double-optin or thank-you emails to the members you are about to import. We can send them a broadcast email at a later point, when we’ve fully set them up correctly in the system.
Then once you’ve imported them all, you can modify each of their records quickly to modify their start and end dates, to sync with wherever they were in your previous WL site.
Then once you have all of their dates set up, all that remains is to integrate DAP with your payment processor, such that both payments from both new members as well existing members, all get processed by DAP, so that DAP continue to manage their subscriptions, and start giving them access to the member’s area, going forward.
Paypal Integration
Your current WishList subscriptions are probably already pointing to a WishList specific “virtual” URL. Unfortunately, Paypal will not allow you to modify the IPN url in existing “stored” subscriptions that are current.
So you will need to put in a new rule into your .htaccess file at the root of your web site, to simply redirect all incoming IPN notifications (that come to your WL virtual URL) to DAP’s Paypal-specific file on your site, which is http://YourSite.com/dap/dap-paypal.php
Here’s the exact line of text to place within your .htaccess file that’s in your root…
RewriteRule ^index.php/register/pgiotv$ /dap/dap-paypal.php [L]
Be sure to replace the text “index.php/register/pgiotv$” by the IPN URL given to you by wishlist.
Once this is done, DAP will start processing all future subscription payments from existing members.
3) IMPORTANT
Before you create any DAP Products and start protecting content within DAP, make sure you have disabled the Wishlist plugin. Also be sure to disable any other “content protection” plugins, like “Maintenance Mode”, and Cache plugins.