Pay-Per-Post with DAP
One way of setting up Pay-Per-Post in DAP, is to create one product per post, and then sell access to each one separately.
However, if you have a lot of posts, this can be a lot of work.
An easier and more efficient way is to use our credits plugin, “Credit Store“.
Using the Credit Store plugin, you can setup individual pieces of content – like a post, page, category, or even a file – to be Redeemed via Credits, instead of cash. You sell credits, your members buy those credits, then use their credits towards redeeming individual content.
Just like when you buy an iTunes gift card and purchase individual songs or movies with it. Or like buying credits on a stock photo site and then redeeming it for individual images.
Whether that content is a bunch of content all bundled together, or individual posts/pages/files, is up to how you configure and set up your own Store.
The Credit Store plugin is a true game-changer, and allows you to be a lot more creative, and for your content to be delivered in a much more flexible yet powerful manner to your buyers and members.
We already have a few DAP users using the Credit Store (beta) this way, and they’re all loving the power and flexibility of this plugin.
See this for more details on the Credit Store:
http://wickedcoolplugins.com/the-plugins/dap-credit-store/
As the Credit Store is currently in Beta, if you wish to purchase it now, we will make it available for download in a few weeks and give you access to the plugin for a big discount compared to the price it will be launching at. So feel free to email us or open at ticket if you want more details.
Cache Plugin Setup
DAP works great with the WP Super Cache plugin. Probably works with others too – but we have officially tested it with just Super Cache at this time.
And this page below walks you through the full set up of the WP Super Cache plugin.
___________________________________________________________
Go to Settings > WP Super Cache
You are now on the “Easy” tab. Don’t do anything here just yet.
Go to Advanced tab.
Be sure to put a “Check” (or “Select” the radio button) next to each of the following items
Caching
Cache hits to this website for quick access. (Recommended)
Use mod_rewrite to serve cache files. (Recommended)
Miscellaneous
Compress pages so they’re served more quickly to visitors. (Recommended)
Don’t cache pages for known users. (Recommended)
Don’t cache pages with GET parameters. (?x=y at the end of a url)
Cache rebuild. Serve a supercache file to anonymous users while a new file is being generated. (Recommended)
Advanced
Clear all cache files when a post or page is published or updated.
Extra homepage checks. (Very occasionally stops homepage caching) (Recommended)
Only refresh current page when comments made.
List the newest cached pages on this page.
Click on Update Status button.
Keep scrolling down until you see the Accepted Filenames & Rejected URIs section.
You’ll see a big text area under the text “Add here strings (not a filename) that forces a page not to be cached”. +
There, add the following, one per line.
/dap/
/dap/.*\.php
/dap/admin/
/dap/admin/.*\.php
/login/
/members/
/my-profile/
/my-content/
Obviously, your member content page URL’s may be slightly different. So make sure you customize it to suit your own URL’s.
Next to back to Easy tab at the top.
Now you select the “Caching On” option and save.
That’s it for the setup.
Now, on to testing.
Content Organization Tips
If you organize all of your member content under a main parent page, say “members”, then all you need to exclude from caching, is /members/
For example, if your URLs include year and you don’t wish to cache last year posts, it’s enough to specify the year, i.e. /2004/. WP-Cache will search if that string is part of the URI and if so, it will not cache that page.
So basically, excluding just one single URL – /members/ – from caching, will make sure all of the following as well remain UN-CACHED.
/members/login/
/members/home/
/members/my-content/
/members/my-profile/
/members/my-affiliate-info/
/members/course-1/
/members/course-1/module-1/
/members/course-1/module2/
/members/course-2/module-1/
/members/course-2/module2/
You get the idea. When you exclude “/members/”, any URL that starts with that same text, will be excluded.
So here’s how you set up the “hierarchy” of the pages.
First, create the page “members“.
Then, when you create the “login” page, make sure you select the “parent” of the page, to be the “members” page.
So, instead of the login page URL looking like… http://YourSite.com/login/
… because the parent page is “members”, that also gets added to the URL, and the login page URL becomes like this:
http://YourSite.com/members/login/
If you created a page called “example” and made the “login” page as its parent, then the URL for this new page becomes:
http://YourSite.com/members/login/example/
So you see how that hierarchy works. Use that to arrange all of your member content under the main “ancestor”, which is “members”, here in our example.
But if you have already completed creation of all of your content, then you’re just going to have to do a little extra work to identify all of your pages and posts and exclude the member content from the list. DAP makes this a little bit easier as well.
Getting A Full List Of Pages & Posts
If you log in via FTP and go to the “dap” folder, inside, you will see a file called “dap_permalink_dump.php”. If you download that file to your desktop, and open it with any text editor (Notepad, Dreamweaver, etc), inside you will see a full list of URL’s of all posts and pages from your WordPress site. You can just take that list, remove separator text like “Posts” and “Pages”, and trim the list of URL’s down to just your member content, you can take that and paste it right into the WP Super Cache > Advanced tab > Accepted Filenames & Rejected URIs section.
Testing Caching Impact
Now open multiple browsers – like Firefox, Chrome and Internet Explorer (or Safari). Use at least 3 separate browsers.
Next, go to your login page in one of them, and then log in. Then go to same login page in another browser – make sure it doesn’t say “You are already logged in”. It should show you the DAP login form. Same on third browser.
Next go to the profile page while logged in as member. Do the same in other two browsers, while logging in as three different people. Each profile page should you show you different information.
If you crated 3 separate products, with 3 different users, then logging in as those 3 different users on the 3 different browsers, should show you 3 different sets of pages.
All this is just to make sure there’s no caching going on of your membership content, that’s all.
If all of this works, then you’re all set with caching for your non-membership content, and no caching for your dynamic member content.
Optimizing Your WordPress Blog For Speed
If you want to speed up your web site, you must address the core issue, which is — your web site is getting more traffic than your web server (web hosting account) can handle.
So here are a few ways in which you can speed up your web site:
- The easiest thing you can do is to revisit all of your plugins that you have enabled and see if you still need all of them. Remember that every single additional plugin running on your site, adds some overhead to (basically, “slows down”) your web site or blog. So use only as few plugins as you absolutely must. With so many cool plugins freely available for WordPress, it is very easy to get carried away, and install tens of plugins, most of them adding very little value, but sometimes causing the most overhead in terms of server resources. So keep only a bare minimum of other plugins (some social plugins are a real pain – making calls to third-party web sites to get their information from).
- Using a “cache” plugin for speeding up your site is like putting band-aid on a gaping wound. It’s only a temporary fix, and not a real long-term solution, but every bit helps. We recommend WP Super Cache, and be sure to whitelist all of your member pages from getting cached.
- Make sure you are always using the latest version of WordPress, or at worst, one version behind the very latest and greatest (you definitely want to be sure first that there are no conflicts with other critical plugins that you’re using on your site).
- Make sure you update all of the plugins and themes you’re using to their individual latest versions (get rid of every single plugin and theme that you’re not using).
- If you are hosting on a shared (a.k.a “cheap”) web host paying just a few dollars a month for hosting, then your web site is basically competing for server resources (like memory and bandwidth and database access) with possibly tens (or even hundreds) of other web sites on that same server (many may not belong to you, but to others with whom you are sharing the server – and hence the name “shared hosting”). Search for the keywords “digg effect” or “slashdot effect” on Google, and you’ll see how many WordPress sites crash when a link to the site appears among the top results in popular social sites like Digg.com, Reddit.com or Slashdot.com.If your traffic levels have outgrown your server, then the best thing you can do is to upgrade to a bigger server, or get a Virtual Private Server, or even get a dedicated host, depending on your budget. See our recommended web hosts list.
DAP Shopping Cart
WARNING
This is the old, deprecated version of the DAP Shopping Cart add-on. This is still here for archive purposes only, and should only be used with DAP versions 4.4.x or EARLIER.
If you are wanting to use the new DAP Shopping Cart Plugin that supports Stripe and has a unified checkout page, etc, then you can download it from http://digitalaccesspass.com/dappers/new-dap-shopping-cart-plugin/
__________________________________________________________
ARCHIVE ONLY:
This plugin replaces ALL files from both the “Paypal Payments Pro” Upsell-Tree plugin as well as the “Authorize.net” Upsell-Tree Plugin
Starting DAP v4.2, we have consolidated both the Authorize.net & Paypal Payments Pro Upsell-Tree Plugins into one simple set of files, and it has been named the DAP Shopping Cart, which will allow you to both accept one time and recurring payments, as well as do 1-Click Upsells.
This consolidated set of files is named DAPShoppingCart.zip , and is available for download from the members’ area at http://DigitalAccessPass.com/dap/ .
Upgrading from DAP v4.2
If you are upgrading to DAP v4.2 from a previous DAP version, and you’ve been using Authorize.net or Paypal Payments Pro to accept payments, then you must also upgrade to the new DAP Shopping Cart.
So all you need to is…
1) Download the DAPShoppingCart.zip file from the members area
2) Unzip it to your desktop
3) Upload all files inside directly to your main “dap” folder on your site. (do not upload the folder named DAPShoppingCart – upload only the files inside this folder)
Conflict With “Cache” Related Plugins
DAP Now Works With WP Super Cache
If you’re having weird issues – like members logging in and seeing other people’s profile information, or logging in as a valid user and being told “Sorry, you don’t have access to this content” – then it’s probably because of a “cache” plugin.
Do not use cache plugins on your membership site
DAP now fully works with WP Super Cache (and possibly other cache plugins too).
You just need to make sure that you exclude your member content (including the login page) from being cached.
Cleaning Up After Your Cache Plugin
Follow the steps below to clean up some the junk left behind by cache plugins (regardless of whether you see them in your plugins section, and regardless of whether they are currently active).
1) You wish to disable your cache plugin that is currently enabled
2) You previously had one enabled at some point in the past
3) You don’t believe you ever had a cache plugin enabled in the past
4) You were redirected to this page by the DAP support team because of potential caching-related issues
- De-activate the plugin if it is still active
- Open your wp-config.php file.
- If there are lines in there that look like this…
define(‘WP_CACHE’, true); //Added by WP-Cache Manager
define( ‘WPCACHEHOME’, ‘/home/wp-content/plugins/wp-super-cache/’ ); //Added by WP-Cache Manager - Then comment out both lines, by adding a “//” at the beginning of each line, like this.
- //define(‘WP_CACHE’, true); //Added by WP-Cache Manager
//define( ‘WPCACHEHOME’, ‘/home/wp-content/plugins/wp-super-cache/’ ); //Added by WP-Cache Manager - Go to your /wp-content/plugins/ folder. See if there’s a folder in there called “cache”. If yes, then rename it to “_cache”.
Now re-test whatever the issue was before, and it would have probably been resolved now.
That should do it.
If the issue still persists, let us know via a support ticket.
Troubleshooting DAP/WordPress Sync
The problem: DAP users are not being “sync”ed to WordPress.
Here’s how to troubleshoot.
What are your sync options in DAP Admin -> Setup -> Config -> WordPress Related Section?
Do you allow all users to be sync’d or just paid users?
Do you allow users to be synced only when they pick a username?
If you allow all users to be sync’d and do not want to force your users to pick a username before dap syncs to WP, then use these settings:
Sync DAP User Data to WordPress “Y”
Sync Paid Users Only “N”
Sync Only if Username Exists in DAP “N”
To test:
1) Add a user manually to DAP via dap admin panel
2) Note down the user’s dap login id/password
3) Open a new browser where you are not logged in to DAP as admin
4) Now login to DAP again but this time as the user you created in step 1.
5) Now visit any part of your blog. DAP will now sync user to WP.
6) Login to WP admin panel. Click on Users in the left sidebar and see if the new user was created.
DAP Plugin Framework
How To Setup Notifications/Triggers From DAP to 3rd Party APIs
We have now created a plugin framework that will allow DAP to trigger calls to 3rd party services when a user is added to a product (subscription/registration event) or when a user loses access to product (unsubscribe/unregister event).
In fact, we used the same framework to develop DAP -> Mailchimp integration in DAP 4.1.
Here’s the steps :
1) If you want DAP to trigger calls to the APIs/methods you wrote upon an addUserToProduct event or removeUserFromProduct event in DAP, then in the DAP products page – > notify plugin field, use the following format to integrate the APIs/class files. You can integrate multiple systems with DAP using this framework.
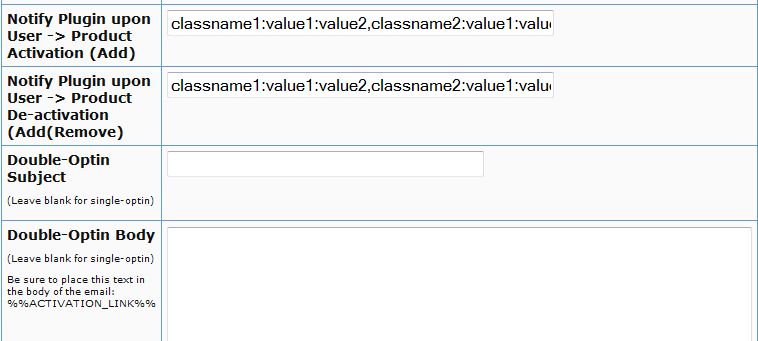
Say you want to integrate classname1 (that has the necessary APIs to register/unregister users to 3rd party service like Mailchimp ) and classname 2 (that has the necessary APIs to register/unregister users to another 3rd party service like GetResponse), then use this format in the notify plugins field above.
classname1:VALUE 1 you want to pass to the api: VALUE 2 you want to pass to the api: VALUE 3 you want to pass to the api
If you want DAP to call multiple APIs/ Classes, then just create a comma seperated list of classes that DAP should notify.
classname1:VALUE 1 you want to pass to the api: VALUE 2 you want to pass to the api: VALUE 3 you want to pass to the api,
classname2:VALUE 1 you want to pass to the api: VALUE 2 you want to pass to the api,
classname3:VALUE 1 you want to pass to the api
Whatever values (VALUE1, VALUE2.. ) you put next to the class name (all values should be “:” separated), DAP will forward those params/values to your APIs when a user is added to product or user is removed from product.
To integrate say classname1 which consists of the methods/apis to talk to your 3rd party services, create a folder called classname1 under /dap/plugins folder. Then under the classname1 folder, create a php script called classname1.class.php (just the way you notice a folder called mailchimp and under mailchimp a class file called mailchimp.class.php).
So you will have something like this:
/dap/plugins/classname1/classname1.class.php
Here’s what you need to have in classname1.class.php ( skleton class implementation ) :
< ?php
class classname1 {
function classname1() // constructor
{ }
//======== USER REGISTRATION===========
// this function is called by dap when a user is added to a product
function register($userId, $productId, $params) {
logToFile(“classname1.class.php: register(): “, LOG_INFO_DAP);
$dapuser = Dap_User::loadUserById($userId);
$email = trim($dapuser->getEmail());
$username = trim($dapuser->getUser_name());
$firstname = trim($dapuser->getFirst_name());
$lastname = trim($dapuser->getLast_name());
$data = explode(“:”,$params);
}
function unregister($userId, $productId, $params)
{
logToFile(“classname1.class.php: register(): “, LOG_INFO_DAP);
$dapuser = Dap_User::loadUserById($userId);
$email = trim($dapuser->getEmail());
$data = explode(“:”,$params);
}
}
?>
NOTE:
You MUST have same name methods (called register() and unregister() ) and the exact method signature as you see above.
You can call other methods/functions from register/unregister and/or
You can call 3rd party APIs from register/unregister methods and/or
You can include other class files.
Whatever values you pass (VALUE1, VALUE2 etc) via notify plugin, you can access those values in these methods. The values are available in the $params array.
That’s it.
You can add a test user to a product in DAP (via dap admin -> add users) and see if things work as expected.
Mailchimp Integration
Subscriber Flow
The flow of subscriber is “FROM DAP TO Mailchimp“. User signs up at DAP first, then DAP automatically adds the user to Mailchimp list.. Admin removes the user’s access to a product, and DAP automatically removes the user from Mailchimp list. This feature is available starting DAP v4.1.
How it works
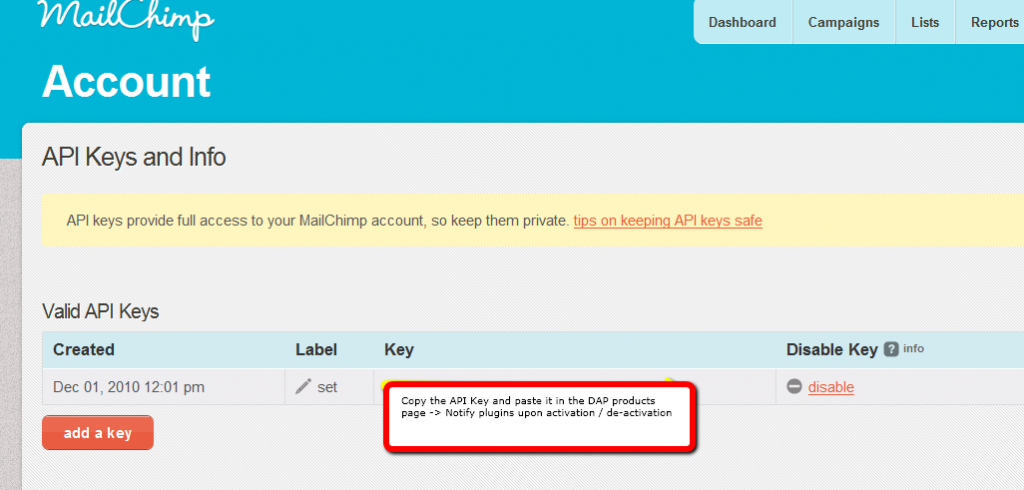
[s3mv]mailchimp.mp4,640,378,false,false[/s3mv]1. Login to your account at http://admin.mailchimp.com/account/api/ and note down the API Key.
Image 1:
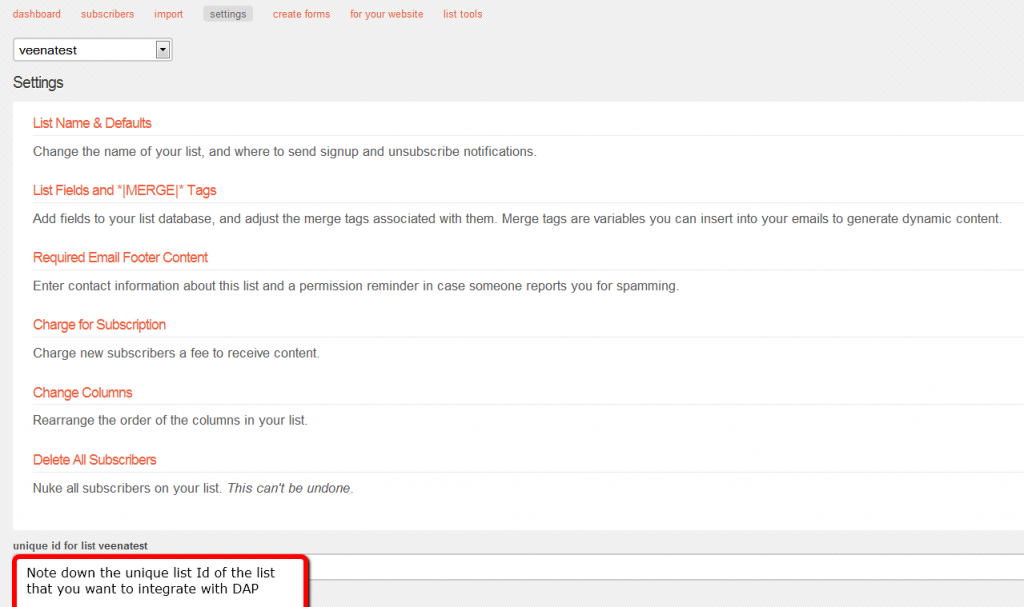
2. Go to http://admin.mailchimp.com/lists/ and grab your List’s Unique Id. Click the “settings” link for the list – the Unique Id is at the bottom of that page.
Image 2:
3. Log in to your DAP Admin Dashboard -> Products Page and select the product (whose members you wish to add automatically to your Mailchimp list.
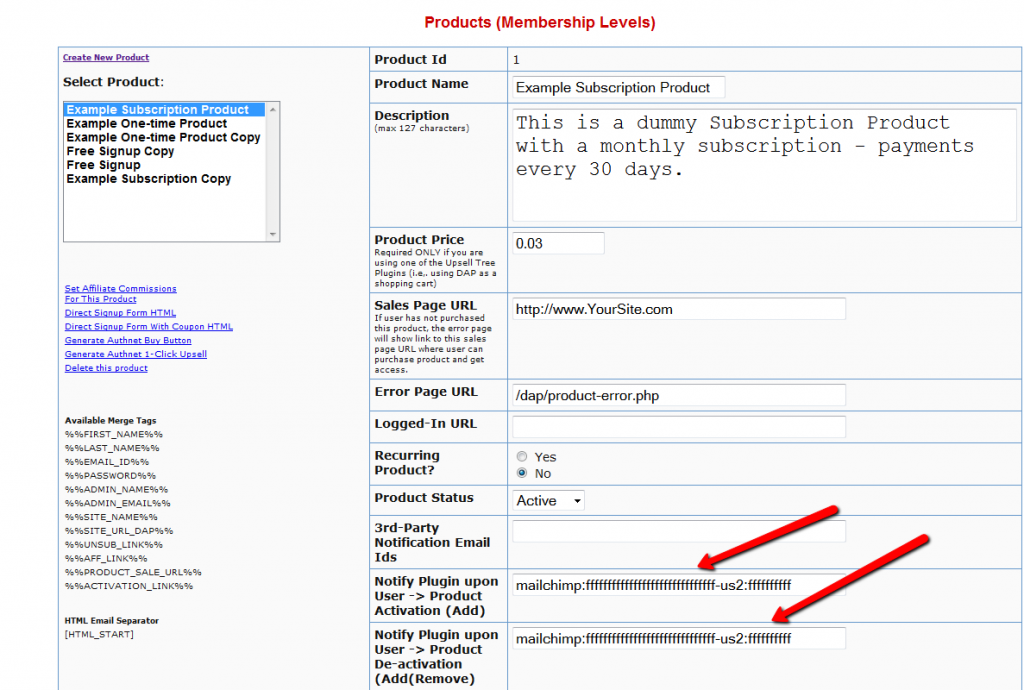
4. If the list Id of the mailchimp list that you want to integrate with a DAP product/membership is say “ffffffffff”, and say your Mailchimp API Key is ‘ffffffffffffffffffffffffffffff-us2’ then add the following to the “Notify Plugin upon User -> Product Activation (Add)” in DAP products page and HIT Save/Update Product.
mailchimp:ffffffffffffffffffffffffffffff-us2:ffffffffff
Image 3:
That’s it!
Save the product and this completes the DAP->Mailchimp integration.
How This Works
So let’s say you picked the list “ffffffffff” in your Mailchimp account, and the DAP Product “Example Subscription Product” (as shown in the screenshots above).
So once you add “mailchimp:ffffffffffffffffffffffffffffff-us2:ffffffffff” to the product’s “Notify plugin upon user->product activation” and “Notify plugin upon user->product de-activation” field and save it, every time someone gets access to the “Example Subscription Product” product (regardless of whether they buy it, or you give them access on the backend), DAP will automatically add them to the list – ffffffffff. And everytime you remove the user’s access to product (click on ‘Remove’ in DAP manage users page), DAP will automatically remove the user from the list.
Paypal Integration Summary
DAP supports 3 different types of Paypal Integration.
1) Paypal Hosted Buttons
2) DAP Generated Buttons For Paypal
3) DAP Shopping Cart with Upsells
Let’s get into more details about each one of them.
[s3mv]DAP-Paypal-Integration-Overview.mp4,640,350,false,false[/s3mv]1) Paypal Hosted Buttons
You generate the button within your Paypal account.
Click Here to find instructions to integrate DAP and Paypal Hosted Buttons.
If the integration is not working, Click Here to find troubleshooting instructions.
Note: you only need to set the following config items for Paypal hosted buttons.
a) If you want to use Paypal Sandbox for testing, then set the following to “Y”.
DAP Setup -> Config -> Paypal -> Use Paypal Sandbox: For initial testing only
If you want to connect to your Paypal live account, then set it to “No”.
b) If your site has trouble connecting to Paypal via CURL and you see this error in DAP orders page => Check Product and Price(Reprocessible), then update the config below to FOPEN.
DAP Setup -> Config -> Paypal -> 4) Paypal Communication Protocol: How DAP connects to and communicates with Paypal on the back-end.
That’s it.
The following config items are NOT needed if you use the Paypal hosted buttons.
Paypal API Username – Only needed if you use the DAP upsell tree plugins for Paypal Payments Pro or Paypal Standard.
Paypal API Password – Only needed if you use the DAP upsell tree plugins for Paypal Payments Pro or Paypal Standard.
Paypal API Signature – Only needed if you use the DAP upsell tree plugins for Paypal Payments Pro or Paypal Standard.
Paypal API Endpoint – Only needed if you use the DAP upsell tree plugins for Paypal Payments Pro or Paypal Standard.
Paypal Business Email ID – Only needed if you use the DAP generated button for Paypal (DAP Payments/Coupons -> Generate paypal button)
Merchant Payment Gateway API Login ID: Only needed if you use e-junkie or the DAP upsell tree plugin for Authorize.net
Merchant Payment Gateway Transaction Key: Only needed if you use e-junkie or the DAP upsell tree plugin for Authorize.net
The following fields in the DAP Products page ONLY need to be set if you use DAP upsell tree plugin or the DAP generated button for Paypal.
Recurring Count, Trial Amount and Product Price
If you are using regular paypal button, you can leave these empty. Even if these are not-empty, DAP will not use it for regular paypal hosted buttons.
2) DAP Generated Buttons For Paypal
With DAP 4.0, we have added support for DAP generated buttons for Paypal. You no longer have to generate buttons within Paypal.
You can generate the button for Paypal from within your DAP Admin Panel -> Payment Processing -> Generate Paypal Button page.
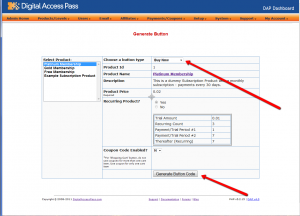
Click Here to find instructions to integrate the DAP generated button with Paypal.
3) DAP Shopping Cart / DAP Upsell Tree Plugins
1) Paypal Standard Upsell Tree Plugin
2) Paypal Payments Pro Upsell Tree Plugin / DAP shopping cart
Click Here for details.
Storing and Protecting Video, Audio and Other File Formats
=> Click here to see a demo of S3MediaVault Streaming video/audio player
Q1: What’s the difference between storing files on Amazon S3 (and serving it using the S3MediaVault.com plugin), compared to storing the files right on your own web site and having DAP serve them directly to your members?
A: See this post How and Why to use Amazon S3 to Deliver Audio, Video and PDF on your WordPress website
If all files are stored right on your web site, and you have a large amount of video, audio and other files, then a lot of people viewing and downloading them from your site will use up a lot of resources on your server – like site loading time, server memory, server bandwidth, etc – and your site could slow down considerably. Plus, on top of that, there may be bandwidth charges that your host will charge you with for all of those downloads, which are usually not very cheap.
And don’t put too much faith in your web host’s “Unlimited Bandwidth” clause, because if you read the fine-print carefully, you’ll see that as per their TOS, if you consume large amounts of bandwidth and use too much of the server resources, this could cause other web sites (belonging to others) on the same server to slow down and have a degrade in performance, especially if you are on a shared hosting account. And they could consider this abuse of their TOS, and could either slap you with huge bandwidth or server utilization fees, or may even ask you to take your web site elsewhere because you’re causing issues for other site owners on the same server.
Instead, if the files are stored on Amazon S3, then you don’t have to worry about your site slowing down, or you using up too much bandwidth and getting slapped with huge bandwidth fees, because the files are being served from Amazon’s huge S3 servers which have tons more resources and speed compared to your web host.
Plus in the long run, bandwidth is cheaper on S3 compared to your web host.
Q2: Can DAP protect content stored on an external site, like Amazon S3?
A: Not directly, not by itself. By default, DAP can only protect files (and any other content) that is on the same web site where DAP is also installed. For large files, we do recommend that you store files on a fast, scalable file server like Amazon S3. Now, the page or post itself (in which you post that Amazon S3 link) can be protected by DAP, and no un-authorized user can even see the content of the page (or the link within that page).
However, once a user has authorized access to a page because they’re a member, now they can see the page where you have that Amazon S3 link.
It’s similar to posting a public YouTube video on a protected DAP page on your web site. Sure, DAP can protect the page from un-authorized users, but authorized users can actually see the page, and see that it’s a YouTube video, and clicking on that video will directly take them to a page on YouTube.com, which DAP has no control over, and cannot protect once they leave your web site.
Similarly, DAP cannot directly protect that external link to your file stored on Amazon S3. And that’s where our Amazon S3 plugin S3MediaVault.com (S3MV) comes into the picture.
S3MV can make sure that your files on Amazon S3 cannot be accessed directly by anyone, even if the link were shared with others via email or on a forum, and can ONLY be accessed through a page or post on your web site (web site where you have installed the S3MV WordPress plugin).
NOTE: The S3MV plugin is included for free with your purchase of any DAP license, starting with the Unlimited-site license and above.
Q3: Can S3MediaVault prevent members from downloading the protected videos or audios?
A: Yes. S3MediaVault offers “true streaming”, as well as standard “Progressive Downloads”. You can choose either option for your videos and audio.
If you want them to be able to download the files, S3MediaVault allows you to do that.
And if you do NOT want them to be able to download the files, S3MediaVault help you prevent downloads as well.
S3MediaVault is the first-ever WordPress plugin that lets you create encrypted Streaming Video and Streaming Audio.
“Impossible to Download” Streaming Videos: We highly recommend allowing paying members to download your content for offline use. And S3MediaVault very much allows you to create secure download links for all of your content – Video, Audio, PDF, etc.
However, for some reason, if you do *not* want anyone to download your videos/audio, then S3MediaVault can do that too.
S3MediaVault allows you to create HLS Videos with industrial-strength AES 128-Bit Encryption for both your videos and audio. This is “True Streaming” at its best, with the strongest security available for streaming videos and audio.
None of your website visitors, subscribers, or members will be able to download your videos from your website. Even software like Internet Download Manager (IDM) or browser extensions like Video Downloader or Video DownloadHelper will not be able to download your streaming video or audio. S3MediaVault is the only WordPress plugin that can create this level of security. Check out our encrypted streaming demo here.
Multi-Resolution Streaming with “Resolution Switcher” and “Video Stream Optimization”: S3MediaVault allows you to create streaming video in multiple resolutions. You can choose the resolutions in the Settings page – 1080p, 720p, 360p, 240p and 144p. And S3MediaVault automatically encodes your video in all of those resolutions with a single click. And when the viewer clicks play on the video, the S3MediaVault video player will automatically choose the lowest-but-best resolution for the viewer based on their internet speed. So, if they’re watching from a device which has slow internet speeds (like 3G, or 4G or maybe they’re using a service that doesn’t offer high-speed internet, or maybe throttles mobile access), the player will serve them the most optimized quality of video. That means, your streaming videos will load quickly for them regardless of their internet speed, saving them on their bandwidth bill, as well as saving you on your AWS bandwidth bill (win/win FTW!).
In addition, just like you can do on YouTube, your viewers will be able to change the resolution to a higher or lower number, and the switch will happen seamlessly without affecting their viewership experience.
S3MediaVault is the most secure plugin that can secure your content and make sure it’s only available on your website.
Combine that with the Page/Post protection of DigitalAccessPass (DAP), which can make sure only certain people (like paid members, or free but registered users) can access the post or page where the S3MediaVault embed code is published.
Combine DAP + S3MediaVault, and you would have now completely locked down your content from any and every kind of unauthorized and illegal access.

