2
DAP Shopping Cart – Upsells only supported for Credit Card Payments
If you select “Allow Both CC and Paypal” option in the step 2 of button generation process, then on the checkout page you will find 2 options:
1. Pay with CC
2. Checkout with Paypal
The Pay-with-CC button on the DAP Cart Checkout page can be configured to lead users through a 1-click Upsell Funnel.
The “Checkout with Paypal” button on the DAP Cart Checkout page can’t do 1-Click Upsells but you can configure it to lead buyers to an upsell page with a ‘regular checkout with paypal’ button. If they click on it, it can send them to paypal to login and pay. It won’t be 1-click though. The user’s will be out of the DAP cart flow at this point. But that’s fine as the dap cart completes each individual transaction before sending users to the next page.
You could use our Paypal Upsell Tree Plugin for 2-click upsells with paypal, but this plugin is not integrated with DAP Shopping Cart. If you want to use this plugin, you will need 2 separate button on the sales page – pay with CC OR pay with Paypal instead of an integrated checkout option on the checkout page.
See – http://wickedcoolplugins.com/doc/paypal-upsell-tree-documentation/
[DAPAutoCancel]
This feature is not supported currently. It will be available in DAP 4.5 (upcoming release of dap). 1) User-facing Cancel Button: [DAPUserCancel showalltransactions=”Y” showcancel=”Y”][/DAPUserCancel] If you use the above shortcode in a WP page, it will show all active transactions and if it’s a paypal or authnet subscription, it will show cancel button. Your customers can cancel their authnet / paypal active subscriptions by clicking on the cancel button.Here’s how it works:
DAP picks up all the active products the user has.
For each active product, it checks if there is a purchase transaction (transaction Id > 0) associated with that user->product row in Manage Users page.
– if yes, the row is displayed with a cancel option.
– if no, the script will move on to the next product
Cancel button will only show for : – Transactions that are cancellation eligble (for ex – it will show for active subscriptions but not for one-time-purchases) – And only if the cancel-eligible transactions are from Paypal or Authnet. It will NOT show for other payment processors like Clickbank, Infusionsoft etc. Here’s how it will look (you can customize the table header names and the cancel button image) :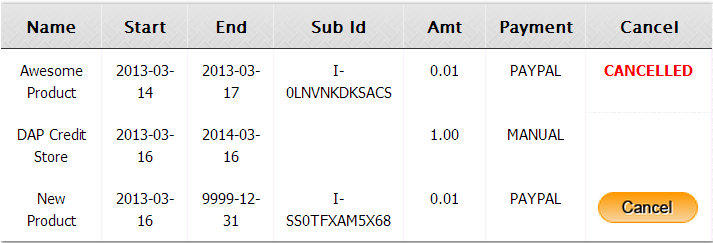
You can customize the ‘cancel success msg’, ‘cancel failure message’ and the ‘cancel image’ as shown below:
[DAPUserCancel showalltransactions=”Y” showcancel=”Y” cancelsuccess=”Subscription Cancellation Completed Successfully!” cancelfailed=”Sorry, could not cancel the subscription!” cancelimage=”http://YOURSITE.com/wp-content/plugins/DAP-WP-LiveLinks/includes/images/CancelButtonUp.gif”][/DAPUserCancel]2) [DAPUserCancel showalltransactions=”N” showcancel=”Y”][/DAPUserCancel]
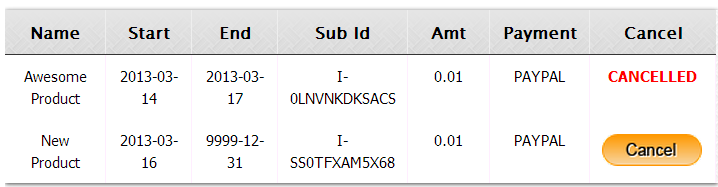
If you use this shortcode in a WP page, it will show transactions that are cancel-eligible (subscription transactions with paypal/authnet only).
Pick all the active products the user has.
For each active product, check if there is a purchase transaction (transaction Id > 0) associated with that user->product row in Manage Users page.
– if yes, check if it’s a subscription purchase (IPN received by dap from the payment processor contains recurring_payment_id, or sub_id or subscr_id) and if yes, show it with a cancel button.
Note:
– The cancel button will only show for authnet / paypal purchases. Auto-cancel not supported for other payment processors like Clickbank or Infusionsoft.– Only cancel eligible (or already cancelled) transactions will show (i.e. one-time purchases will not show)
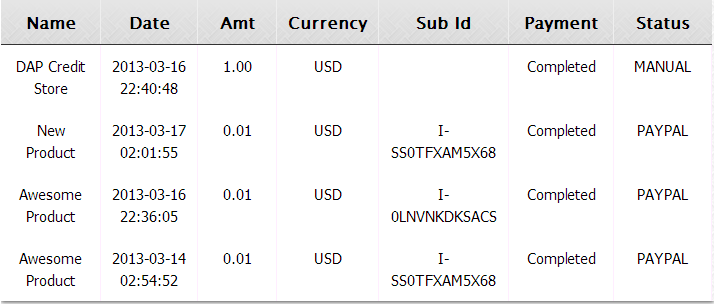
3) [DAPShowTransactions][/DAPShowTransactions]
You can use this shortcode to show ALL transactions (it’s just a dump of user’s transaction history. Shows every single transaction for that user).
10
Coupons
DAP allows you to create Coupon codes for use as long as you’re using the DAP Shopping Cart, and accepting payments via one of the following:
- Authorize.net
- Paypal Standard, and
- Paypal Website Payments Pro.
1. To create a Coupon code, go to DAP Admin > Payment Processing > Coupons

2. The Coupon options can then be setup on that page:

ADDITIONAL NOTES
You not only need to generate new Coupon codes, but you must also associate the Coupon to the DAP Products that should allow use of that Coupon. All of this can be done via the Coupons page.
Using Paypal Standard
If you are using paypal standard button, then create the DAP button with coupon enabled (under dap payment processing -> generate buy button page -> paypal standard tab) and put the coupon enabled button code on your sales page.
And when your prospect enters a valid coupon code in the form and clicks on the button, they will taken to the PayPal checkout page where they will see the discounted price
Using Auth.net or Paypal Pro
If you are using DAP Shopping Cart that connects with Authorize.net or Paypal Website Payments Pro, then in addition to setting up the actual Coupon, you must also go to DAP Admin > Payment Processing > Cart Options , and enable Coupons for the product(s) of your choice.

Now when your buyer clicks on the the DAP buy button, they will be taken to the checkout page where they can see the option to enter a Coupon Code.
Troubleshooting
If a Coupon is not working, check if the coupon code has actually expired, by going to DAP Admin > Payment Processing > Coupons page.
Check to see if Start Date and End Date are current.
Make sure the coupon’s Actual Usage is less than the coupon’s Max Usage.
12
Upgrading or Downgrading of Subscriptions
There are two main items that need to be addressed when it comes to a member wanting to Upgrade or Downgrade their Subscription from one membership “level” (a.k.a “Product” in DAP) to another.
1) Modifying the actual recurring payments to reflect the new amount
2) Giving them appropriate access as per the upgrade (or downgrade)
So let’s see how both of these are accomplished.
1) Modifying Recurring Payments
You do need to take some manual action for this. The way to do it is….
- Ask your members to sign up for the new product/level/subscription separately, like it were a new sign up
- Cancel their old subscription manually. When using Paypal standard, this can be done by both you (as the admin) and the member themselves. But with all of the other payment solutions, you (the admin) will have to log in to the payment gateway (Authorize.net or Paypal Website Payments Pro) and manually delete the member’s old subscription). DAP will not automatically remove users old subscription profile in your payment gateway.
2) Giving your member access to new level
Set up automation rules using DAP’s Product Chaining feature, so that if they sign up for one Product (or “level”), they’re automatically removed from another Product (or level).
So if they are currently signed up to your “Gold Membership”, then when they sign up afresh for the “Platinum Membership”, then set up a Product Chaining rule that says, “If member signs up for Platinum Membership, then remove them from Gold Membership”. This is just to make sure that they don’t have access to two products (or “levels”) at the same time.
5
DAP Shopping Cart
WARNING
This is the old, deprecated version of the DAP Shopping Cart add-on. This is still here for archive purposes only, and should only be used with DAP versions 4.4.x or EARLIER.
If you are wanting to use the new DAP Shopping Cart Plugin that supports Stripe and has a unified checkout page, etc, then you can download it from http://digitalaccesspass.com/dappers/new-dap-shopping-cart-plugin/
__________________________________________________________
ARCHIVE ONLY:
This plugin replaces ALL files from both the “Paypal Payments Pro” Upsell-Tree plugin as well as the “Authorize.net” Upsell-Tree Plugin
Starting DAP v4.2, we have consolidated both the Authorize.net & Paypal Payments Pro Upsell-Tree Plugins into one simple set of files, and it has been named the DAP Shopping Cart, which will allow you to both accept one time and recurring payments, as well as do 1-Click Upsells.
This consolidated set of files is named DAPShoppingCart.zip , and is available for download from the members’ area at http://DigitalAccessPass.com/dap/ .
Upgrading from DAP v4.2
If you are upgrading to DAP v4.2 from a previous DAP version, and you’ve been using Authorize.net or Paypal Payments Pro to accept payments, then you must also upgrade to the new DAP Shopping Cart.
So all you need to is…
1) Download the DAPShoppingCart.zip file from the members area
2) Unzip it to your desktop
3) Upload all files inside directly to your main “dap” folder on your site. (do not upload the folder named DAPShoppingCart – upload only the files inside this folder)
4
DAP’s “Pause Membership” Feature
How It Works
Joe Member joins your site on 01/01/2011.
He stays a member for about 3 months. Let’s say it’s now mid March. He wants to take a couple of months break. So he goes on a 2 month break. Comes back end of May and wants to resume his membership.
DAP allows him to pick up right where he left off – which is continuing to receive content as of April (04/01/2011), even though today’s date is May 25th, 2011.
So while he took a break, other members who did not take a break in membership, continued to pay for those 2 months, and continued to receive content dripped through those months. So it is only fair that when he does come back end of May and resumes his subscription, he does not resume from June’s content, but from April’s content (when he last put his membership on “Pause”).
It’s ok if you’re not dripping content on a monthly-basis, but rather on a “day” basis. So to put it in terms of “days”, when Joe resumes his subscription, since he was already 90 days old in the system when he put his subscription “On Hold”, and comes back another 60 days later (roughly about 2 months), then DAP will start dripping Day #91 content onwards for him, and NOT Day #151 onwards (he didn’t pay for 2 months in between).
This is how DAP works right out of the box. Nothing special to configure. And DAP automatically takes care of pausing the dripping when he is not paying.
WARNING: Just remember that in order for you to put his actual payments on hold, you will need to have a payment gateway like Authorize.net or Paypal Website Payments Pro. Or you must be using a shopping cart like http://1SiteAutomation.com . Using something like Paypal Standard or ClickBank will not allow you to put the actual charging of his credit card on hold.
NOTE: If you actually did want him to start receiving current content even though he left for 2 months, then all you have to do is, once he comes back and starts paying again, just extend his access end date on his account (which will initially be showing 03/31/2011 – end of March, when he left) and modify it and make it 05/31/2011. So when his next payment comes in after he resumes, DAP will extend his access end date to 06/30/2011 – which means, he can now access all of the current content.
12
Setting up Paypal IPN
1. Enabling Instant Payment Notification (IPN) within your Paypal account.
a) Log in to your Paypal account and click on the “Profile” link in the menu, then on the next page, click “My selling tools.”
b) Under “Getting paid and managing risk” section, click “Update” beside “Instant payment notifications”

c) If IPN is already enabled, you are all set. If IPN is not already enabled, then click on “Choose IPN Settings”

d) On the next screen, in the Notification URL field, enter…
http://YourSite.com/dap/dap-paypal.php
Don’t forget to replace “YourSite.com” with your actual web site’s domain name.
e) Make sure “Receive IPN Messages” is selected.

f) Click on “Save”.
13
DAP Login Xpress
What Is “Login Xpress”?
“Login Xpress” is a DAP feature that enables your members to be logged right into your membership site immediately upon completion of their purchase.
This is roughly how it works:
- Visitor arrives at your web site
- On your sales page, they click on any “Buy” button to purchase a Product (or Membership Level)
- They’re taken to the checkout page (depending on Payment processor being used) and they enter their payment information and hit “Submit”
- When they hit “Submit” to complete their payment, their payment is processed right away, and the buyer is immediately transferred back to your web site, in real time, and automatically logged in to your membership site, and they are taken to the “Welcome” page or “Members” page (you may choose what this page is going to be at a per-Product level)
Payment Processors That Work With Login Xpress
DAP supports this feature with the following payment processors:
- Paypal Standard (DAP-generated buttons only – will not work with Paypal-hosted buy buttons that you generate from within your Paypal account)
- 1Shoppingcart / 1SiteAutomation.com
- Authorize.net
If you use any of the payment options above, then you can set up your sales funnel in such a way that buyers are logged in right away immediately after purchase.
Payment Processors That DO NOT Work With Login Xpress (Yet)
- Paypal Website Payments Pro
- ClickBank
- e-Junkie
- WorldPay
DAP integrates with the above processors via some kind of “back-end payment notification” – similar to Paypal’s “IPN” (Instant Payment Notification). Which means the notification between the payment processor and DAP on your site only happens on the “back-end”. Which is why DAP can only deliver the login details to the buyer via an email, and cannot log them in right away (like it can do with “Login Xpress”), because the buyer’s information is available to DAP only when the payment processor sends out the IPN notification behind-the-scenes, so to speak.
So if you’re using the above processors to accept online payments, then what you need to do, is to redirect your buyers to a static “Thank You” page that has a message similar to the one below…
“Thank you for your purchase. In a few minutes, please check your email address used during purchase for your log in details to log in to the members’ area and access the product you just purchased.”
And behind the scenes, DAP would’ve already received the payment notification from the payment processor, and it would’ve created an account for your buyer, given them access to the purchased product, and sent them the “Thank-you Email” for the product(s).
23
2-Tier Affiliate Program
DAP supports (up to) a 2-tier affiliate program. So you could pay just one level (“tier”) of commissions (A gets paid when he refers B), or you could also set up DAP to pay 2 “tiers” of commissions (User 1 gets paid when he refers User 2 AND User 1 also gets paid something when User 2 refers User 3).
[NOTE: Paypal has an Acceptable Use Policy – especially for a product or service that could be considered “MLM” or “Pyramid”. Make sure you’re not violating their terms. For eg., requiring your members to keep paying subscription fees in order to remain an affiliate, could be considered a Pyramid scheme. So, in general (nothing to do with using DAP or paying 2 levels of commissions), if you are running an affiliate program and will be paying out commissions via Paypal, make sure you are not violating their terms.]
How The 2-Tier Affiliate Program Works
In a typical “1-Tier” affiliate program, when a buyer makes a purchase, the affiliate who referred the buyer is the only one who gets paid an affiliate commission. Which is why it’s called “1-tier”, because there’s only one level of commissions paid.
However, in a “2-tier” affiliate program, the “Affiliate’s Affiliate” (2nd level above) can also be paid a portion of the sale in commissions.
So consider this this example…
You are selling Product A that costs $100.
You’ve set up your commission structure for Product A as follows:
Tier 1: 50% Per Sale
Tier 2: 10% Per Sale
Joe Customer is referred by Charlie to your web site. Joe went on to purchase Product A for which commissions are set up above.
So Charlie (tier-1 affiliate) gets paid 50% of the sale – which is $50.
Now, normally a 1-tier affiliate program would stop there, and that would be the end of affiliate commissions for that purchase. But you have set up 2 tiers.
So now DAP looks at who referred Charlie, the affiliate. It finds that David originally referred Charlie to your web site (regardless of how Charlie got in to your membership site).
So now David (tier-2 affiliate) gets paid 10% of the sale – which is $10.
So for that one sale of $100, $50 was paid to Charlie, and $10 was paid to David, which totals $60.
So $40 is your earnings, as the site owner.
How To Set It Up
The 2-tier or “n” tier setup is the exact same as the 1-tier setup.
Only difference is, set up a new record on the “Affiliates > Set Commissions” page for each tier – one for Tier 1, one for Tier 2, and so on.

24
Paypal Integration Summary
DAP supports 3 different types of Paypal Integration.
1) Paypal Hosted Buttons
2) DAP Generated Buttons For Paypal
3) DAP Shopping Cart with Upsells
Let’s get into more details about each one of them.
[s3mv]DAP-Paypal-Integration-Overview.mp4,640,350,false,false[/s3mv]1) Paypal Hosted Buttons
You generate the button within your Paypal account.
Click Here to find instructions to integrate DAP and Paypal Hosted Buttons.
If the integration is not working, Click Here to find troubleshooting instructions.
Note: you only need to set the following config items for Paypal hosted buttons.
a) If you want to use Paypal Sandbox for testing, then set the following to “Y”.
DAP Setup -> Config -> Paypal -> Use Paypal Sandbox: For initial testing only
If you want to connect to your Paypal live account, then set it to “No”.
b) If your site has trouble connecting to Paypal via CURL and you see this error in DAP orders page => Check Product and Price(Reprocessible), then update the config below to FOPEN.
DAP Setup -> Config -> Paypal -> 4) Paypal Communication Protocol: How DAP connects to and communicates with Paypal on the back-end.
That’s it.
The following config items are NOT needed if you use the Paypal hosted buttons.
Paypal API Username – Only needed if you use the DAP upsell tree plugins for Paypal Payments Pro or Paypal Standard.
Paypal API Password – Only needed if you use the DAP upsell tree plugins for Paypal Payments Pro or Paypal Standard.
Paypal API Signature – Only needed if you use the DAP upsell tree plugins for Paypal Payments Pro or Paypal Standard.
Paypal API Endpoint – Only needed if you use the DAP upsell tree plugins for Paypal Payments Pro or Paypal Standard.
Paypal Business Email ID – Only needed if you use the DAP generated button for Paypal (DAP Payments/Coupons -> Generate paypal button)
Merchant Payment Gateway API Login ID: Only needed if you use e-junkie or the DAP upsell tree plugin for Authorize.net
Merchant Payment Gateway Transaction Key: Only needed if you use e-junkie or the DAP upsell tree plugin for Authorize.net
The following fields in the DAP Products page ONLY need to be set if you use DAP upsell tree plugin or the DAP generated button for Paypal.
Recurring Count, Trial Amount and Product Price
If you are using regular paypal button, you can leave these empty. Even if these are not-empty, DAP will not use it for regular paypal hosted buttons.
2) DAP Generated Buttons For Paypal
With DAP 4.0, we have added support for DAP generated buttons for Paypal. You no longer have to generate buttons within Paypal.
You can generate the button for Paypal from within your DAP Admin Panel -> Payment Processing -> Generate Paypal Button page.

Click Here to find instructions to integrate the DAP generated button with Paypal.
3) DAP Shopping Cart / DAP Upsell Tree Plugins
1) Paypal Standard Upsell Tree Plugin
2) Paypal Payments Pro Upsell Tree Plugin / DAP shopping cart
Click Here for details.