Adding A Manual Transaction
Once you have manually added a user, when you search for them on the Users > Manage page, you’ll see their row with “FREE” or “PAID” under the “Trans Id” column.
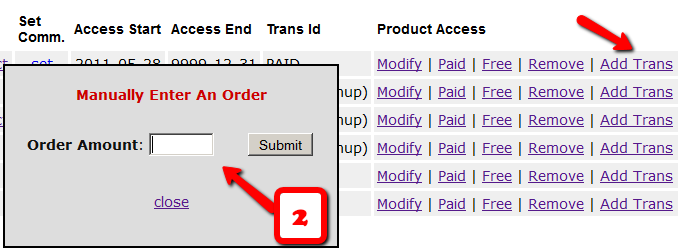
1) Enter an order (transaction) into the system by clicking on “Add Trans” (which stands for “Add Transaction”).

2) When you click on the “Add Trans” link, you will see a small popup appear (see image below) that allows you to manually enter an amount. So if the payment you received offline was say $97, then you would enter “97” or “97.00” in the “Order Amount” field and click on “Submit”.

3) Once you’ve entered a manual order, the “Trans Id” column will change from “FREE” or “PAID”, to an actual transaction id (or order id) – in the example below, it turns to Transaction Id “3”.
DAP Upsells With ClickBank PitchPlus
DAP integrates with ClickBank “PitchPlus”, which is their 1-Click Upsell process.
So you can basically start by selling one front-end product, and then if your buyer purchases that product, you can then upsell them more products right after, and since they’ve already entered their payment information once, ClickBank remembers this information and allows them to purchase further products without having to re-enter all of the information again.
Setting Up DAP & CB PitchPlus Integration
The basic idea is the same for DAP/CB integration, whether it’s one product, or multiple Upsell products .
- You start with CB integration as specified in this document: Integration DAP With ClickBank . That’s how you set up the first product.
- Now, if you were selling just one product, then you would normally send them to a static “Thank You” page where you would tell them to check their email inbox for login details, and by that time CB would have already notified DAP via their “Instant Notification Service” (INS – kind of like Paypal’s IPN), and DAP would have already sent them the welcome email to the buyer’s email address, which contains their login and password to the member’s area.
- But in this case, you are going to offer them an upsell. So instead of sending them to a thank-you page after the first purchase, you basically send them to the sales page of your next upsell, that’s all.
You basically do a one-time set up of INS and the secret key as explained here.
Once that’s done, then for every Front-end product or Upsell-product, they are all integrated with DAP the same way: You just make sure the “Item Name” in CB and the “Product Name” in DAP both match, that’s it!
And for the last product in your upsell, be sure to point it to a static page containing a message like “Thank You, please check your email inbox for login details”.
And since CB notifies DAP separately for each product purchased, right then and there, if they end up buying 3 products during checkout (1 main + 2 upsells), then DAP will send the user 3 separate welcome emails. Of course, that’s optional – you don’t have to send out a welcome email for all products, but we highly recommend that you do.
Plus since they would be using the same email id for all 3 purchases, DAP will give them access to all purchased products under a single DAP account. So they need to log in to just one account to access content from all products that they just purchased.
Affiliate Commissions For Offline Payments
DAP is one of the very few membership platforms that will let affiliates earn commissions on offline payments too.
And in fact, DAP will credit affiliates for not just offline payments, but for any payments that you accepted outside of the payment options listed on your web site.
So, for example, you’re using Paypal and Authorize.net buttons on your site. And someone wants to send you a check (cheque) in the mail, or they want to send you money via Western Union, or wire transfer, or they call you and you accept their credit card information by phone, or any other such offline methods.
In this case, DAP can still give credit to the right affiliate for the sale. Here’s how…
1) Add Manual Transaction
- First you add the user manually, by going to DAP Admin > Users > Add.
- Once you’ve added them to the product, come back to DAP Admin > Users > Manage.
- Search for the user by email
- On the user data row for that Product, initially, under Trans Id column, it will show PAID (see image below)
- Step 1: Enter a manual transaction by clicking on Add Trans (which stands for “Add Transaction”). That will record your offline payment in DAP. So now there’s an actual payment associated with that user’s sign up.

- When you click on the “Add Trans” link, you will see a small popup appear (see image below) that allows you to manually enter an order. So if the offline payment was for say $97, then you would enter “97” or “97.00” in the “Order Amount” field and click on “Submit”.

- Once you’ve entered a manual order, the “Trans Id” column will change from “PAID” to an actual transaction id.
That’s it.
By this time, the user would’ve received their “Welcome Email” from DAP, which will have their login info to log in to your site.
And when they log in, if they have an affiliate cookie set in their browser (which they would, if they had clicked on an affiliate link at some point before they contacted you and asked you about a non-standard, offline payment method), then when they first log in to your member’s area, DAP will pick up the referring affiliate’s id from the affiliate cookie, and give credit to them for the sale.
And when the DAP hourly cron runs at the top of the next hour, that affiliate will be credited with any commissions that you’ve set up for that product.
Give Existing Users Access To A Product
This flow is only for giving access to an existing User to a Product. If you wish to add a new user manually to the system, then see this post.
- Go to the Users > Manage screen.
- Search for the user by email id (or last name, user id, etc)
- Once you have found their information, check the check box in the first column next to their user id
- Then using the drop-downs in the top-right section, give them access to the new Product
- They’re initially added as a “Free” user by default. You may mark them as “PAID” if you want to have access to the product just like an actual paying member would.
Mailchimp Integration
Subscriber Flow
The flow of subscriber is “FROM DAP TO Mailchimp“. User signs up at DAP first, then DAP automatically adds the user to Mailchimp list.. Admin removes the user’s access to a product, and DAP automatically removes the user from Mailchimp list. This feature is available starting DAP v4.1.
How it works
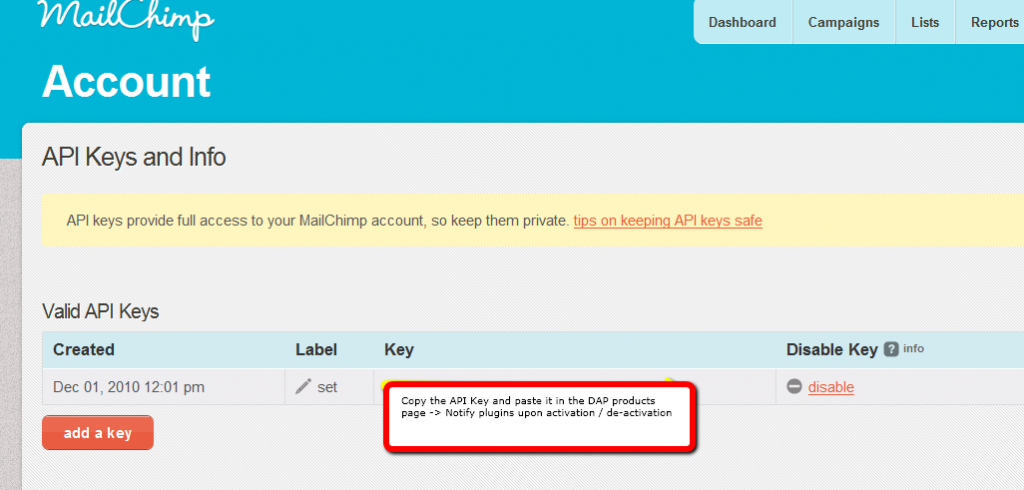
[s3mv]mailchimp.mp4,640,378,false,false[/s3mv]1. Login to your account at http://admin.mailchimp.com/account/api/ and note down the API Key.
Image 1:
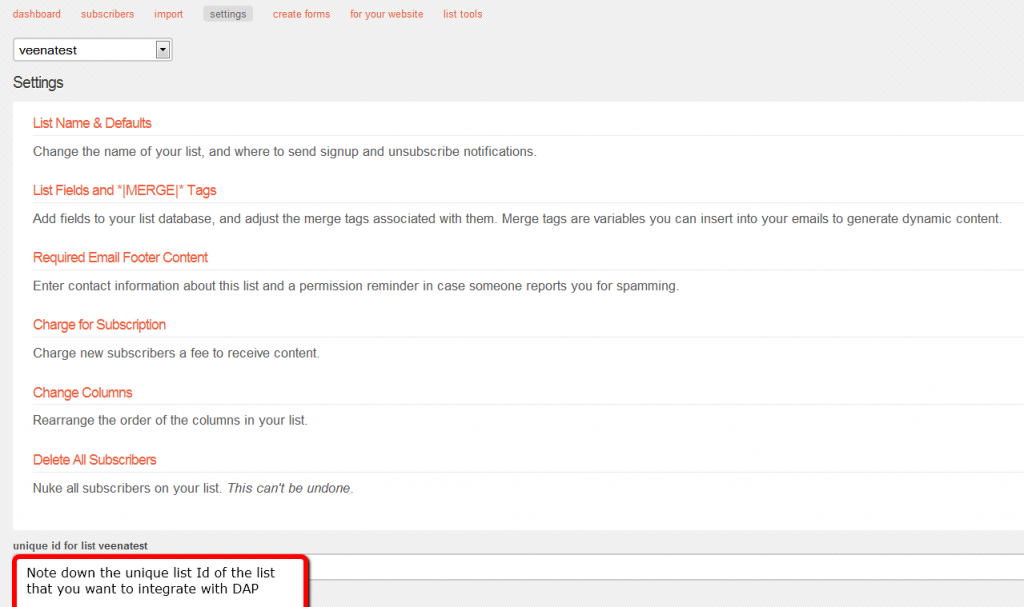
2. Go to http://admin.mailchimp.com/lists/ and grab your List’s Unique Id. Click the “settings” link for the list – the Unique Id is at the bottom of that page.
Image 2:
3. Log in to your DAP Admin Dashboard -> Products Page and select the product (whose members you wish to add automatically to your Mailchimp list.
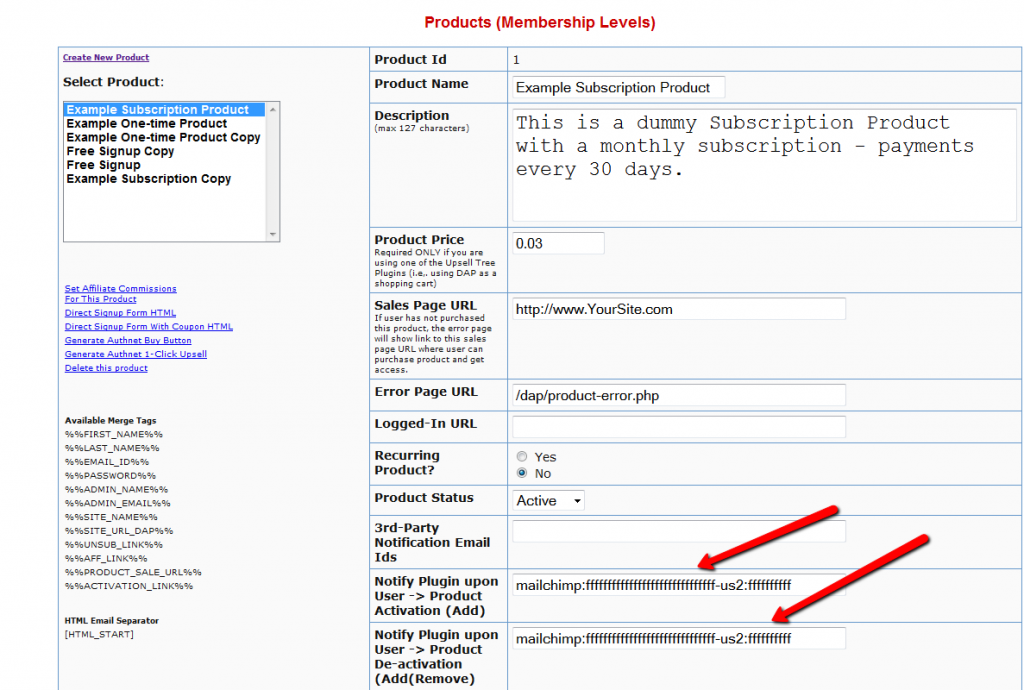
4. If the list Id of the mailchimp list that you want to integrate with a DAP product/membership is say “ffffffffff”, and say your Mailchimp API Key is ‘ffffffffffffffffffffffffffffff-us2’ then add the following to the “Notify Plugin upon User -> Product Activation (Add)” in DAP products page and HIT Save/Update Product.
mailchimp:ffffffffffffffffffffffffffffff-us2:ffffffffff
Image 3:
That’s it!
Save the product and this completes the DAP->Mailchimp integration.
How This Works
So let’s say you picked the list “ffffffffff” in your Mailchimp account, and the DAP Product “Example Subscription Product” (as shown in the screenshots above).
So once you add “mailchimp:ffffffffffffffffffffffffffffff-us2:ffffffffff” to the product’s “Notify plugin upon user->product activation” and “Notify plugin upon user->product de-activation” field and save it, every time someone gets access to the “Example Subscription Product” product (regardless of whether they buy it, or you give them access on the backend), DAP will automatically add them to the list – ffffffffff. And everytime you remove the user’s access to product (click on ‘Remove’ in DAP manage users page), DAP will automatically remove the user from the list.
CSV File Error During Bulk-Add Users
When you look at the “System > Job Queue” screen, you see one line that shows this error…
Action: BulkAddCSVToProduct
Message: Error in CSV File
You were probably trying to to Bulk-Add Users to DAP. Or do a Broadcast email to a CSV file. In either case, there was an error in processing your request, because one of the following happened:
1) The CSV file could not be created in /dap/bulk/ folder because of a permission issue (try CHMOD 755), so when the cron task ran, it could not find the CSV file (or the file was corrupted for some reason).
2) The list of email addresses within the CSV file were not in the right format – Order should be: Email,FirstName,LastName ( LastName is optional)
How To Fix It
If a job fails, then there’s no way to “fix it and re-run it” right now. So you basically have to delete the job, and then submit a new one. So if a Bulk-Add job erros with the above message, then here’s what you need to do…
A) Click on the “Delete Jobs In Error” link on the “System > Job Queue” page. That will delete all jobs that have failed for whatever reason.
B) You should also clear out the /dap/bulk/ folder to make sure you delete any old, or errored out CSV files from that folder.


