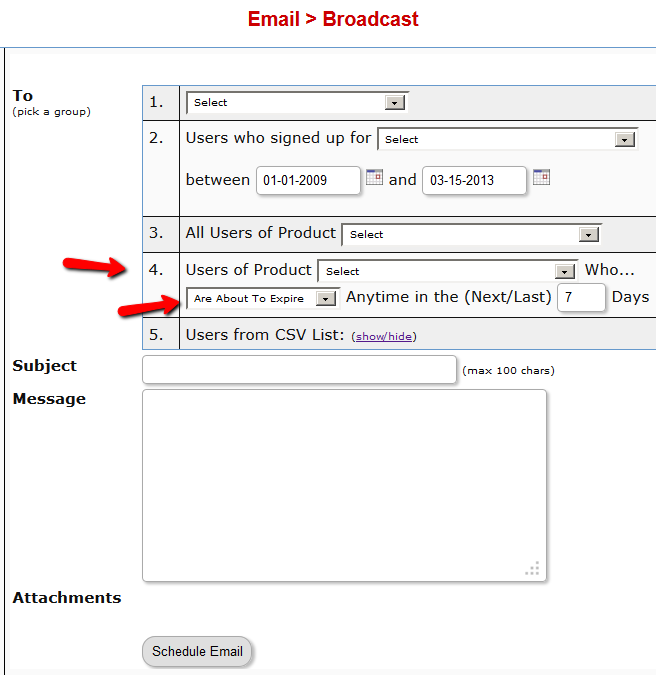
Emailing Expired Users
You can send an email broadcast to expired users of a product/level, on the DAP Admin > Email > Broadcasts page, by selecting Group #4.
The same feature works for sending emails to those who have “Cancelled” their subscription or trial.
Go to DAP Admin > Email > Broadcasts
Select Group #4.
1st drop-down: Select Product Name
2nd drop-down: Select “Have Already Expired”
3rd text field: Enter within how many days the users should’ve expired – as in, expired in the “Last X Days”
Once you’ve scheduled the broadcast, the emails will be sent out at the top of the hour when the DAP hourly cron runs.
5
Secure RSS Feeds
Once you protect a post in DAP, you can …
a) Make it completely disappear from your feed except for authorized users who have valid access to the post and are using a member-specific RSS feed URL
-OR-
b) You can show a “Summary” of every post, by turning on sneak-peek and making sure you have inserted the “<!–more–>” tag entered into each of your posts.
Troubleshooting RSS Feeds
If your blog post is showing in its entirety in your feed, then….
1) You may not have protected the post in DAP at all, so it’s an unprotected post, which will (and should) show up in your feed
-OR-
2) You have turned on Sneak-Peek and haven’t inserted the WordPress “more” tag (<!–more–>) into each of your posts. If you turn on Sneak-peek, then you must insert more tags into all posts. Also, if you have turned on Sneak-Peek, then you must also do this…
Go to “Settings > Reading” in WP admin, then set “For each article in a feed, show” to “Summary“.
If it is set to “Full text”, then it will show the full text in the feed, which is not what you want.

Custom RSS Feed Links For Members
Starting DAP v4.2, each of your members can now get their own unique RSS feed link that they can use with a feed reader (like Google Reader, FeedBlitz, iTunes, etc) to get a custom RSS feed with content that they’re eligible to view.
To give each of your members their own unique RSS Feed URL, just insert the following line of code into the top of the “Member Links” or “My Content” type page, or wherever you want your users to see their personalized RSS feed link…
If your blog is in the root…
http://YourSite.com/feed/?key=%%ACTIVATION_KEY%%
If your blog is in a sub-folder (say “/blog”)…
http://YourSite.com/blog/feed/?key=%%ACTIVATION_KEY%%
The text %%ACTIVATION_KEY%% in the above URL will be replaced with their own custom key, like…
http://YourSite.comcom/feed/?key=123456789
They can then copy that link, enter that into any feed reader, and it will show content specific to their account.
Custom Feed Link Security
Another useful feature we’ve added, is that the custom feed link also does IP count validation. So if they share the feed link with others, then after “X” unique IP login attempts (where “X” is configurable by you, the DAP Admin, in Setup > Config), their account will automatically get locked out.
4
User & Product Statuses
DAP assigns a status for the User itself (at a global, account level), as well as a User/Product level (specific to the user's access to that product).
So there's the User Status and then the User/Product Status
For eg., the User Status may be "Active", but a specific User/Product status may be "Inactive" – which means user can log in to their account, receive emails, etc, but cannot access any content that is part of this specific product (though they can access all other products they may have, that are "Active").
The bottom-line is this: In order for a user to access his/her account, and all the content in the Products that he/she's purchased, all the statuses have to be Active.
So here are the possible statuses, and what they mean.
User Status
These statuses apply to the User's account itself.
Inactive
If the user's status is inactive, then that means the user's entire account is inactive. User will not be able to even log in to their account. All outgoing broadcast and autoresponder emails will "exclude" them from the list, and they will not receive any emails from the system.
Active
Account is accessible, all emails are being sent.
Unconfirmed
They've just signed up for a product that requires "Double Optin". Which means, unless they "confirm" by clicking on the double-optin link, their account will not become active. Please note that once a user has already confirmed the double-optin link for one product, then their "User" status automatically becomes "Active". So even if they go on to sign up for another double-optin product, then their User status will never again change to "Unconfirmed" (unless specifically set so by the DAP Admin). For all future double-optin products, it is this user's "User/Product" status that will be "Unconfirmed", while the main "User" status remains "Active".
Locked
When an account receives login attempts from more than the number of IP addresses set in the "Setup > Config > Advanced > Max. # of User Logins From Different IP`s" field, then that user's main User status is changed to be "Locked". This is very similar to the "Inactive" status, except named different just so admin can distinguish between "Locked" and other users.
User/Product Status
These statuses specifically apply to a User's access with relation to a specific Product.
Inactive
User cannot access any content that is part of this product. However, User may access other products whose user/product status is "Active".
Active
There are no restrictions for this User to access content that is part of this product (of course, only whatever the user is eligible to see, based on the drip setup).
User Status “Unconfirmed”
The only time a new user shows up with the status “Unconfirmed” is if you have “Double Optin” turned on for that product to which he just got access.
When you have double-optin turned on, then their initial status is “Unconfirmed” because you want them to click on the “Double Optin” link and confirm their intent to get access to your product, after which their status is automatically changed to “Confirmed”.
So to make sure Users are always created with “Confirmed” status, just remove all text from the “Double Optin Body” and “Double Optin Subject” of the Product in question.
Sidebar
If your product is a “Paid” product, then obviously, you don’t want people who just bought your product by filling out a shopping cart, to have to go through another double-optin confirmation process. So for paid products, you should probably not force double-optin.
Double-optin is best when you’re signing up free users for a free product via the DAP Direct-signup Form.
14
Cancellation or Refund Requests
The Question
How does a customer, once they have signed up and become a member, cancel their membership (or get for a refund)?
Cancellations
If it’s Paypal, they could go into their Paypal account, and cancel their subscription themselves.
If it’s ClickBank, they can log in to their CB account, and cancel their subscription themselves.
If it’s any other payment processor or cart – like 1SiteAutomation.com, Authorize.net, Paypal Payments Pro, etc – then they have to ask you (the membership site owner) to cancel.
Refunds
Except with CB, in all other cases, they have to ask you for a refund
Action Steps For DAP Admin
Whether it’s a cancellation or a refund, log in to your Payment Processor (1shoppingcart, Authorize.net, etc), and make sure you perform the cancellation or refund there. DAP does not store any of the payment information of your subscriber. So both cancellations and refunds have to be performed at your Payment Processor.
Now that you’ve cancelled the actual charging of the customer at the payment processor level, you have to also take care of the customer within DAP – only for refunds.
Cancellation Of Ongoing Subscription in DAP
If this is the cancellation of an ongoing subscription, then no action required within the DAP Dashboard as far as the User is concerned. DAP already does “Pay As You Go” processing – which means, their account will automatically expire at the end of the current recurring period (eg., end of current month). The “Access End Date” of the user’s access to the Product will automatically expire if no new payments come in. And then they’ll automatically lose all access to the content that is part of that Product.
However, if this is the cancellation of a “trial”, where if the user comes back and signs up again for another trial a few weeks or months later, then you want the user to start all the way AT THE BEGINNING. So if it’s the cancellation of a “trial” then you must manually remove the user’s access to the product. So for that, follow the process below.
Refunds (and Cancellation of Trial) in DAP
If it’s a refund of the entire purchase, then…
- Search for that user by email on the “Orders” page, which will bring up their Order (a.k.a “Transaction”)
- Click on the “Refund” button on that screen. That will create a new negative transaction in the Orders table. Then it also roll-backs any affiliate commissions earned on that sale and make a negative entry in the database for that affiliate. Then it rolls back user access by the number of days entered in one of the “Recurring Cycles” entered on that Product’s page (depending on how far along they were in as a member).
- Now search for that user by email on the “Users > Manage” screen. Make sure that they no longer have access to the Product.
If it’s a refund of just one recurring payment from among a series of subscription payments, or the cancellation of a trial, then you can go into the “Users > Manage” screen, search for the user, and do a “Rollback Access for Selected User(s) to the Product by 1 Recurring Cycle“.
For a big-picture view, also see Cancellations & Refunds
19
Importing Users In Bulk Into DAP
DAP allows you to easily import users in bulk from an external system or database.
Importing users in bulk is the same as adding users one at a time using the single-user-add feature. So whichever way you manually add users, DAP is going to all of the following…
- Create a new account for them using the email with which they’re being added
- Auto-generate a random, unique password for them
- Give them access to the product (into which they’re being imported or being added to)
- Send out the Welcome Email as per the product’s settings (this welcome email can be configured to send them the email & password to the member’s area along with anything else you want)
- Add them to the autoresponder series configured for that product
- … and so on.
When you do a single-user-add, all of this is done for that user in real-time. When you do a bulk-add, then all of the above happens for each user being imported, one at a time, when the DAP hourly cron job runs at the top of every hour. That’s the main difference.
Simple Import
Prerequisites For Simple Import
1) You must have already created the DAP Product into which the users will be imported
2) The user list has to be in a CSV (comma separated) format (one user per line)
For doing a simple import of user data containing just email, first and/or last name, the format of data (per user, per line) should be like this:
Email,FirstName,LastName
Email and FirstName are mandatory. But LastName is optional. So your user data row could be just…
Email,FirstName
Example:
Joe@example.com,Joe,Customer
Jill@anothersite.com,Jill
Bob@another.com,Bob,Member
How to do the actual Import

- Go to Users > Add > “Bulk-Add Multiple Users To A Product”
- Paste your CSV list into the large text area
- Select the Product into which you want to import the users
- Check the “Mark Users as Paid” checkbox if you want them to have “Paid” access to the content (just as if they are actual paying members). If you don’t check it, they will all have access as a “Free” user (instead of a “Paid” user), which means they will only have access to content within the Product that you have marked as “Free”.
- Click on the “Bulk Add Users” button. That will first save this entire list as a CSV file in your /dap/bulk folder on your site. And then, the next time the Hourly cron (dap-cron.php) runs, it will add them one by one to the product, and send them emails as per your Product set up. So if your Product has the “Thankyou-Email” subject and body filled out, it will individually send out each of the users that thankyou email.
Extended Import
DAP will also allow bulk import of users with extended profile information. This includes their existing password and other profile data as detailed in this video (Bulk Add Users)
But please make sure you are using at least DAP v4.2.1 and LiveLinks v1.7, because what’s explained below is only available only since then.
Pre-requisites For Extended Import
1) You must have already created the Product into which the users will be imported
2) The user list has to be in a CSV (comma separated) format (one user per line), with the exact format being:
Email,Firstname,Lastname,Password,ProductName, Address,City,State,Zip,Country,Phone,Company, Flag (to indicate Paid or Free user), Access Start Date, Access End Date,UserName
Example:
joe@somesite.com,Joe,Member,test123,Example One-time Product,99 hill ave,Cityname,NY,10001,USA,,Plug and Play Inc,y,2011-03-16, 2012-03-15,JoeMember
The only required fields are Email, FirstName and ProductName. If you do not want to supply a value for any of the optional fields, but still wish to import certain others, then just leave those fields empty in the data row (but the commas should remain) as shown below.
Email,Firstname,,,ProductName,,,,,,,,Flag (to indicate Paid or Free user), Access Start Date, Access End Date,UserName
How to do the actual Import
Create a file with the name /dap/bulk/importusers.csv file so it has the users you want to import in the format specified above.
Run this script on your browser to complete the import, by visiting:
http://YourSite.com/dap/dap-bulkImport.php
Note:
* Replace “YourSite.com” with your actual domain name
* Limit the number of users you are importing with this method to not more than 500 users (rows) at a time. Otherwise the import may timeout, because the import occurs real time, because you’re running the script manually, and not via cron. If the user already exists in dap, then the script will just skip that user and move on to the next user in the bulk add list.
13
Unlocking Users
DAP has a feature where if a user logs in from more IP addresses than what you’ve configured as DAP Admin (default: 5) under “Setup > Config > Advanced > Max. # of User Logins From Different IP’s” , then the user’s account automatically gets “Locked”, and both the user and you (the admin) will get an email notifying you that the user’s account has been locked.
You could then unlock them yourself, or wait for the user to send you an email and ask to be unlocked.
How to Unlock Users
- Search for the User by email on the “Users > Manage” screen
- Click on the name or user id. You will now be taken to the “Edit User” screen where you can see the user’s full details
- Next to user’s name, you should see a button called “Unlock User” (you will see this only if the status of the user is “Locked”, and won’t see it for other regular users).
- Click on the “Unlock User” button. That’s it. When you click the “Unlock User” button, the user’s login records are deleted, and the previously recorded IP addresses are deleted. So user basically starts with a fresh, new login count.
TIP: If your users are getting locked out too frequently, and you don’t want the hassle of unlocking them regularly, simply set the count to a higher number – like 20. Or you can also disable login IP check for individual users, or for your entire web site as a whole.