Dripping Content
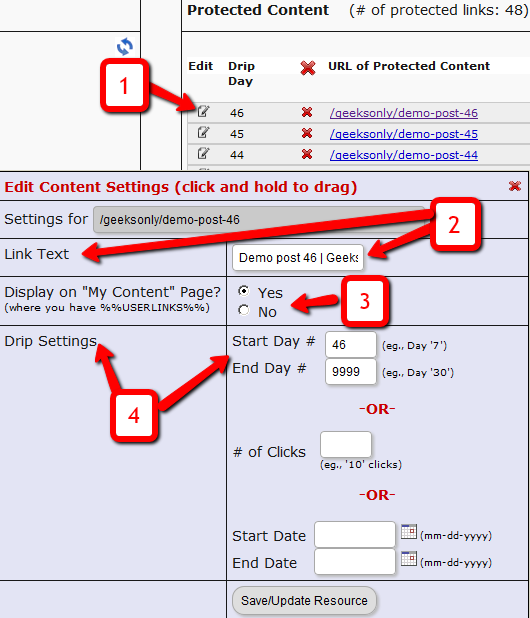
Once you have protected content by adding it from left-to-right on the “ContentResponder” tab of the Products > Manage page, you can set the dripping day/date and link display text and other drip options, by launching the “Drip Settings” popup (see “1” below) by clicking on the “Edit” icon next to the content you wish to drip.
By default, when you add any content (WP page/post or file), it is set to drip on day #1 by default. Which effectively means “no dripping” – and that the content is available to the member from day 1 of their purchase/signup.
1. Shows the “Edit” icon on the “ContentResponder” tab, and clicking it will bring up the “Drip Settings” popup (that shows 2, 3 & 4).
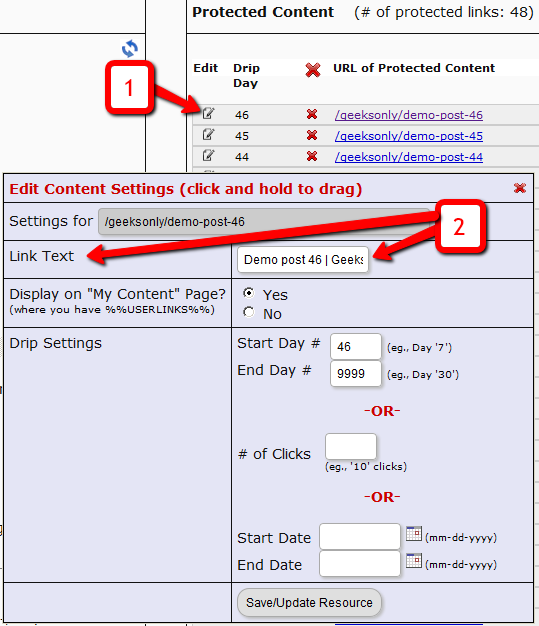
2. On the drip settings popup, the “Link Text” refers to the display text of the link that will be shown to the member on the “My Content” page.
3. If you wish to protect a link, but just NOT show it in the list of links on the “My Content” page, then set this to “No”.
4. Drip Settings: In DAP, you can drip content by Day, Date or restrict access by # of Clicks. You can only choose one method (eg., you cannot drip by day and date at the same time).
Modifying Link Text For Content
When you protect a page, post or file URL in DAP on the “ContentResponder” tab, every protected link – and eligible (for display, based on dripping) link will show up on the “My Content” page.
If you wish to modify the “Link Text” (the actual text that is displayed when the user sees the link), then…
1) Click on the “Edit” icon next to any protected link under the “Protected Content” section, and that will bring up the “Drip Settings” popup.
2) In that popup, you can customize the “Link Text” field with any text you want.
Protecting Draft Content
Now, normally, links to pages or posts show up in the left-hand side of the ContentResponder tab of the DAP Product only after they’ve been published.
But sometimes, for whatever reason, you may wish to protect pages or posts even before they are published – like in a “Draft” or “Pending Review” status. So here’s what you do.
As soon as you first create a new post or page, and tab out of the title field, and even before you save the post as a draft, or publish it, WordPress will create and display the permalink for that post/page, based on the text in your title.
So, if your page title is “Protecting Draft Pages”, then the default permalink will take on the structure http://YourSite.com/protecting-draft-pages – basically a lower-case version of the title, with hyphens separating the words. Like this…
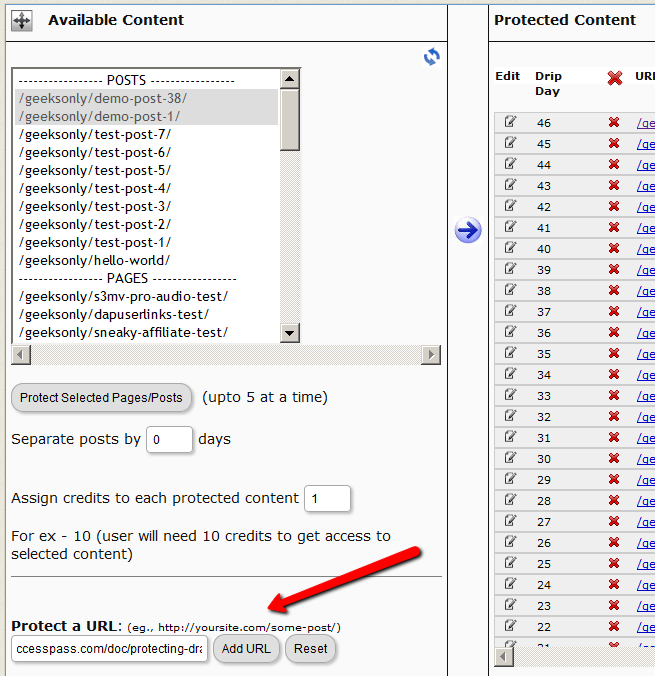
You can then copy that entire permalink from where it is displayed, go to the DAP Product’s ContentResponder section, scroll down to the section that says “Protect a URL”, and then paste the entire permalink there (http://YourSite.com/protecting-draft-pages), and click “Add URL”.
That will protect this page or post in advance of it being published.
Hiding Protected Links On Member Home Page
When you have hundreds of posts or pages protected as part of a DAP Product, the list of links on the DAP Member Home Page (that is the result of using the merge tag %%USERLINKS%%) can get quite long and unwieldy.
So you can choose to hide some of those links from being displayed on the member’s home page.
Here’s how you hide a link from being shown on the member’s home page…
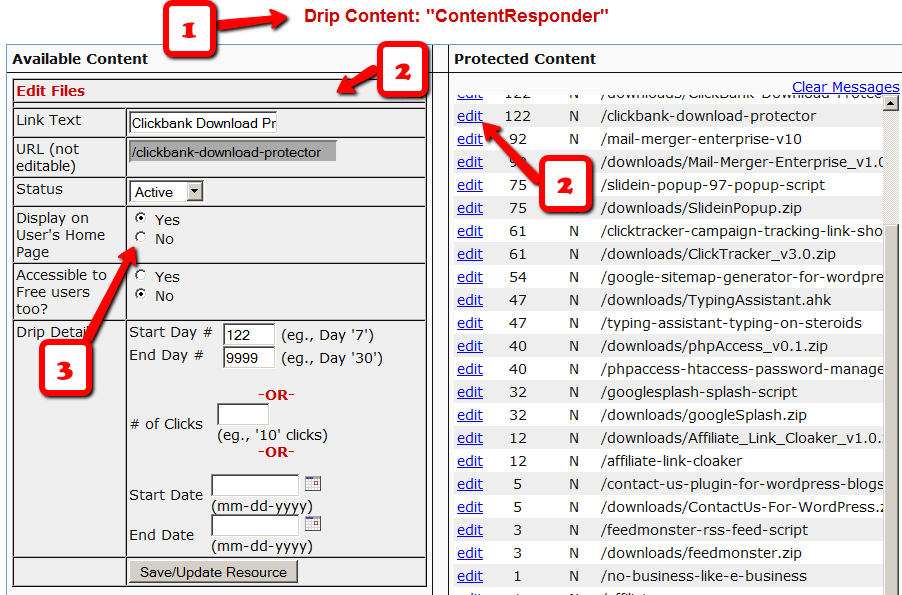
1) Go to the DAP Product in question, scroll down to the ContentResponder section
2) Click on the edit link next to the content in question on the right. The “Edit Files” popup will then show up on the left.
3) Set “Display On User’s Home Page” to “N”.
That’s it.
The content is still part of that product, it is still being protected, but the link simply won’t be displayed on the member home page.
CSV File Error During Bulk-Add Users
When you look at the “System > Job Queue” screen, you see one line that shows this error…
Action: BulkAddCSVToProduct
Message: Error in CSV File
You were probably trying to to Bulk-Add Users to DAP. Or do a Broadcast email to a CSV file. In either case, there was an error in processing your request, because one of the following happened:
1) The CSV file could not be created in /dap/bulk/ folder because of a permission issue (try CHMOD 755), so when the cron task ran, it could not find the CSV file (or the file was corrupted for some reason).
2) The list of email addresses within the CSV file were not in the right format – Order should be: Email,FirstName,LastName ( LastName is optional)
How To Fix It
If a job fails, then there’s no way to “fix it and re-run it” right now. So you basically have to delete the job, and then submit a new one. So if a Bulk-Add job erros with the above message, then here’s what you need to do…
A) Click on the “Delete Jobs In Error” link on the “System > Job Queue” page. That will delete all jobs that have failed for whatever reason.
B) You should also clear out the /dap/bulk/ folder to make sure you delete any old, or errored out CSV files from that folder.
Order Of Links On “My Links” page
[Updated 05/20/2012: Drag & Drop Re-ordering of links available since DAP v4.3.1]Ordering Links
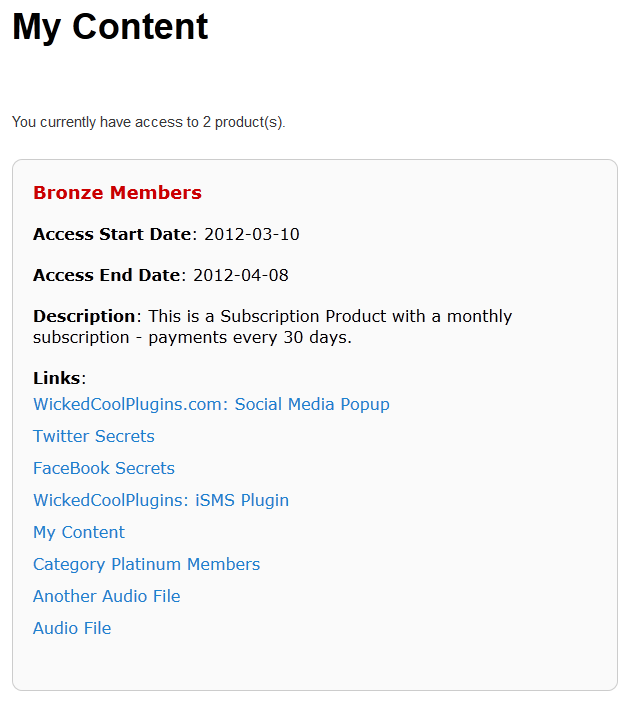
The ordering of links in the ContentResponder tab of a product is required ONLY if you have a “My Content” page (see example below – page uses the merge tag %%USERLINKS%%) and you want control over exactly how those links are displayed in that list:
Fig 1: Example “My Content” page which uses the merge tag %%USERLINKS%%
Ordering by Drip Day
The easiest way to organize links, is to set the dripping “day” for each link.
So if you’re setting up 5 links to be available on Day #1, 2, 3,4 & 5, then in the “My Links” section, DAP will display the links in “Newest On Top” order.
So the newest link (Day #5) will appear first, followed by Day #4, and so on, until Day #1.
Ordering When There Is No Dripping
If you have multiple links that you’re making available all on the same day (like say, all on Day #1), then once you’ve added the links from left to right in the ContentResponder tab of your DAP Product, you can then hold down any row from the Protected Content section, drag and drop and re-order it however you wish to.
Remember that the drag-and-drop re-ordering will only work within different links that are all set to drip on the same day. So for eg., dragging a day 1 link above a day 4 link (see screenshot below) will not work, and it will simply come back to it original position after refreshing the screen. But dragging one Day #1 link above or below another Day #1 link will re-order the links exactly in that order.
Fig 2. Screenshot showing drag-and-drop reordering in action
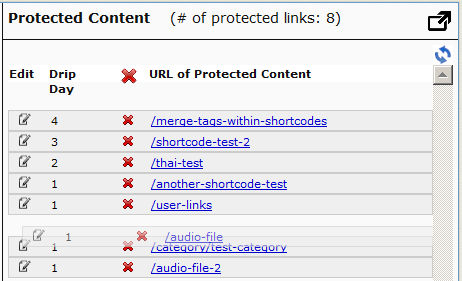
If you see the links order in the above screenshot, that’s the exact same order in which the links will appear when the member views their “My Content” page (or whatever you have called the user links page).
[DAPUserLinks] Shortcode
If you want even more control over how many links are displayed, order of the links, date format etc, then consider our new shortcode shown below:
[DAPUserLinks showProductName=”N” showAccessStartDate=”Y” showAccessEndDate=”Y” showDescription=”Y” showLinks=”Y” orderOfLinks=”NEWESTFIRST” howManyLinks=”10000″ errMsgTemplate=”SHORT” productId=”ALL” dateFormat=”YYYY-MM-DD”]NOTE: orderOfLinks can have one of two values…
NEWESTFIRST will drip newly dripped links at the top. So day 7 link will be above day 1 link.
OLDESTFIRST will drip newly dripped links towards the bottom. So day 1 link will be above day 7 link.
So, here’s another version of the DAPUserLinks shortcode:
[DAPUserLinks showProductName=”N” showAccessStartDate=”Y” showAccessEndDate=”Y” showDescription=”Y” showLinks=”Y” orderOfLinks=”OLDESTFIRST” howManyLinks=”10000″ errMsgTemplate=”SHORT” productId=”ALL” dateFormat=”YYYY-MM-DD”]Related: See more such shortcodes at DAP Shortcodes
Protecting Videos
There are many ways in which you can protect videos.
Case 1: The video file is stored on your web site
By default, DAP can only protect files that are stored on the same web site where DAP is installed.
So if you install DAP on YourSite.com , then your files must also be located on YourSite.com. DAP installed on YourSite.com cannot protect files (.mp4, .mp3, .html, .pdf, .doc) that are stored on AnotherSite.com.
So assuming the files are stored on the same site as DAP, you can (and should) protect both the actual video file, as well as the blog post or page in which the embed-code for your video is published, by adding both to a Product.
This gives you 2 levels of protection for your videos:
Level 1: The blog post or page containing the video player code, itself is accessible only by authorized members.
Level 2: When an authorized user gets legitimate access to the page where the video is published (because they’re a paying member, say), even if they try to do a view source and figure out the location of the video (eg., http://yoursite.com/videos/howtovideo1.mp4) , and pass it around by email to their friends (or post the link in an online forum), their friends still can’t view the video, because the video link itself is protected by DAP.
If you have some text that you want the casual visitor (and Google) to read, but wish to protect only the video, then you could turn Sneak-Peek on (in Setup > Config > Advanced), insert a WordPress more tag (<!–more–>) into your post just where you want the content to start being protected, and put the video player’s embed code after the more tag.
Case 2: Video file is stored on Amazon S3
The only 3rd-party-stored video files that DAP can protect at this time are videos (and other files) that are stored on Amazon S3. DAP cannot do this by itself, but uses a special WordPress plugin called S3MediaVault.com , which is a plugin we developed specifically to make Amazon S3 videos play in your WordPress blog posts/pages. So again you get 2 levels of protection for your videos…
Level 1: DAP protects the post/page where the special S3MV video player code is embedded
Level 2: The S3MediaVault plugin makes sure that even if someone tried to do a view source and figure out the actual link to your Amazon S3 video, they still won’t be able to view the video.
WARNING: Video stored on other 3rd party video sites
DAP cannot protect, say, videos that are embedded from other 3rd party web sites like YouTube or Hulu. Of course, DAP can always protect the blog post or page itself that contains the video, but once an authorized user gets valid access to that blog page, they can see that it is a YouTube video (say), and then pass that YouTube video link to their friends, in which case DAP cannot protect that external YouTube video link.
Check out my podcast episode at http://subscribeme.fm/video-hosting-for-your-membership-site/ which goes into detail about video hosting for your membership site.
Protecting Files
DAP File Protection
DAP is one of the few membership plugins that can protect all kinds of web site files on your web site. But this feature comes with a few caveats. Read this page completely before you decide.
DAP can protects files “in-place” – meaning, the exact same files that will actually be accessed by your members when they’re eligible to.
Most other membership plugins resort to all sorts of “gimmicks” – like hiding the real location of the main file, cloaking it, trying to obfuscate the link, etc.
Not only is it a inefficient way of securing files, but it’s also extremely insecure.
On top of that, with other membership plugins, you cannot send protected links via email, because that would then give away the location of the true file, which they are not protecting.
DAP is among the very, very few membership plugins that protect files in place, which means even if the true location of the file is passed around by your members to their non-member friends, the file cannot be accessed without having to log in first with a valid member account that is actually eligible to access that file.
DAP provides the ultimate security for your files – and ultimate peace of mind for you – like no other plugin can, knowing that your content can never be illegally shared online with un-authorized users.
And DAP can protect any kind of file – including videos, audio, images, reports, zip files, even Javascript files – with any kind of extension: like .pdf, .doc, .zip, .jpg. .js, .mp3, .mp4, .mov., etc etc.
RECOMMENDED: Amazon S3 File Storage
Highly Recommended
The ideal and best way to store files is to store them on Amazon S3, and then use a plugin like our own S3MediaVault.com to insert secure, expiring links to those files within your WordPress pages. That way, the page itself is protected by DAP, your files on Amazon S3 are protected by the S3MediaVault plugin, and you have two layers of protection for your content.
If you decide to store your files on Amazon S3, then ignore the rest of this article, and head over to Storing files on Amazon vs your Webhost
The steps below are only useful if you are going to use all of your files on your own web hosting account – which is not ideal and is not recommended.
Section I: Protecting Files Under WordPress
This is the easiest way to protect files on your server, in DAP.
1) Upload them to your WordPress blog when you are writing a new post. All such files will be stored in a folder called “wp-content/uploads/….“.
For large files, you could simply upload them directly using FTP, directly into the “wp-content/uploads/” folder and DAP is configured right off-the-shelf to “look” for any file inside the “wp-content/uploads/” folder. But once the file is under the “wp-content/uploads/…” folder (either directly under it, or under a sub-folder, like wp-content/uploads/videos/), you will now still need to let DAP know that this file is to be protected as part of a Product.
NOTE: You DO NOT have to upload files using the WP file uploader (like some of our competitors force you to do!). You can use regular, plain ol’ FTP, using a client like FileZilla or CuteFTP, or your webhost cPanel’s FTP feature.
2) Go to the product you wish to protect the file as part of, and then scroll down to the “ContentResponder” section.
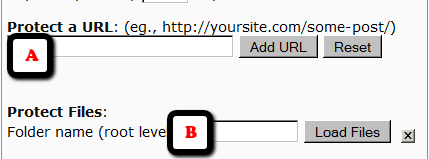
2.1) If you know (or can figure out) the full URL to your file – like http://www.YourSite.com/wp-content/uploads/coolreport.pdf – you can simply paste that directly into the field “A” (in the image below)
2.2) Or, if you can’t figure out the full URL, then you can enter “wp-content” (if your blog is directly in your root folder) – or “blog” or “members” (if your blog is not in your root, and is in a sub-folder) into field “B” below, and then click on “Load Files”, and it will show you all files under that folder. And you will be able to scroll through and look for your file. And there click on the “Add” link right next to that file name you wish to protect.
Once you do (2.1) or (2.2) above, the file will get added to the Product, and will now be protected.
Section 2: Protecting Files Outside of WordPress
This is NOT RECOMMENDED, unless you are technical and you know what you’re doing.
There is a one-time setup process involved, if you wish to protect files outside of your WordPress directory.
1. You need to add the following code to the .htaccess in the root of your web site. So, in your web site’s root folder (where you have your home page – like index.php or index.html for example)…
i) if you already have an existing .htaccess file there, then just open it, COPY the text from below and PASTE it at the very end of this file.
ii) If there is no .htaccess in your root folder, then create one, and then open it, COPY the text from below and PASTE it at the very end of this file.
NOTE: BE SURE TO MAKE A BACK-UP OF YOUR EXISTING .htaccess FILE FIRST
#Paste this at the very end of your .htaccess file

#in your web site's root folder
<IfModule mod_rewrite.c>

#dap

RewriteEngine On

RewriteBase /

RewriteCond %{REQUEST_FILENAME} -f

RewriteCond %{REQUEST_FILENAME} !-d

RewriteCond %{REQUEST_FILENAME} !dapclient.php

RewriteCond %{REQUEST_URI} !^/dap/

RewriteCond %{REQUEST_FILENAME} !(.*)(\.php|\.css|\.js|\.jpg|\.gif|\.png|\.txt)$

RewriteRule (.*) /dap/client/website/dapclient.php?dapref=/$1&plug=wp&%{QUERY_STRING} [L]
</IfModule>
Doing the above enables file protection for files outside your WordPress installation folders.
2) Now go to the DAP Product you wish to protect the file as part of, and then scroll down to the “ContentResponder” section. Then…
- If you know the full URL to your file – like http://www.YourSite.com/reports/coolreport.pdf – you could simply paste that directly into the field “A” from the image above (make sure you “visit” this URL first and verify that there is actually such a file at this link)
- OR… if you can’t figure out the full URL, then you can enter the text “reports” (the name of your top-level folder where your file is) into field “B” from the image above, and then click on “Load Files”, and it will show you all files under that folder. And you will be able to scroll through and look for your file. And there click on the “Add” link right next to that file name you wish to protect.
The file is then added to the Product, and will now be protected as part of that Product.
That’s it.
Testing File Protection
Open a different browser (not different window – a totally different browser – like, if you’re logged in as DAP admin in FireFox, then open IE) and try to access your file directly and see if DAP redirects you to the login screen.
If not, take a deep breath – it’s NOT DAP 🙂
It’s just that you probably missed something during the setup.
Revisit the steps above, and if you still can’t figure it out, you might want to think about uploading the file to Amazon S3.
This feature can be hit-or-miss depending on server software, PHP version, security software on your server, etc. So if it works, then great.
If it doesn’t work, then it is specific to your server. So if you want us to log in to your site and troubleshoot this, if you are a Platinum member, we can do this for free.
And if you’re not a Platinum member, you will have to purchase a premium support slot in order for us to log in to your site and troubleshoot this.
So while you can try it and see if it works, especially if you’re protecting just a couple of ebooks and reports, if it doesn’t work, then it’s in your best interest for the long-term, to switch to Amazon S3 for hosting your premium files.
Recommended Reading
If you have a number of large files to deliver to your members, then you should consider hosting your files on Amazon S3. And here’s why…
Protecting WordPress Posts & Pages
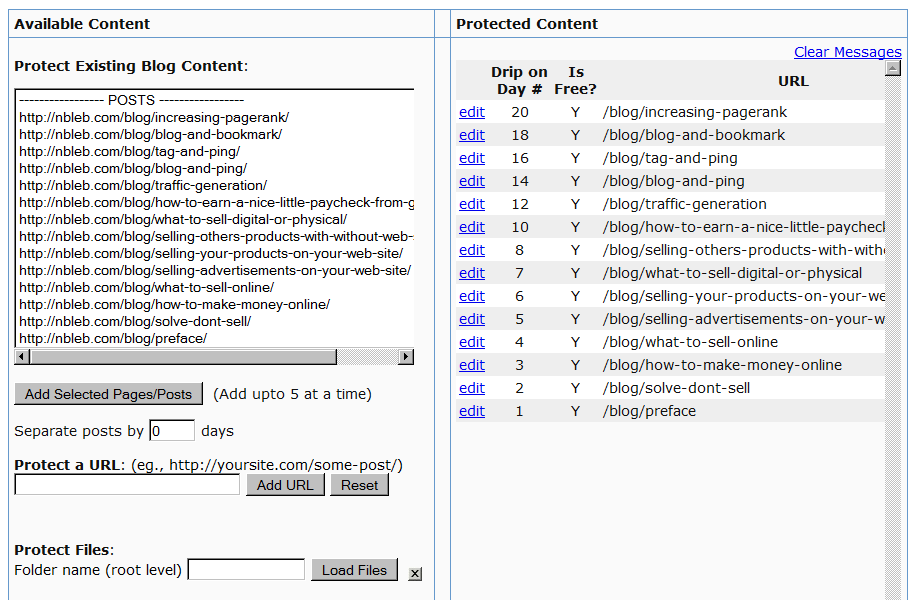
- Log in to DAP Dashboard and go to the “Products/Lists” page.
- Select the product to which you want this blog post/page to be a part of
- Scroll down to the “ContentResponder” section
- On the left, you will see a list of blog posts & pages that have been published (if you scroll down in the window where the list of “posts” show, you will also see list of “pages”)
- Select one or more (hold Ctrl + Click to select multiple)
- Click on “Add Selected Posts/Pages” to protect the posts/pages.
- The post(s)/page(s) will now show up on the right-hand side of the box.
- Click on “edit” next to each link to configure dripping for individual posts/pages.
What is a Product?
In DAP, a “Product” is the same as what some would call as a “Membership Level“.
We call it a “Product” because you really are selling access to this “Product/Membership Level” as an actual product on your web site.
A Product is basically a collection of…
1. “Content” (blog posts/pages/category links),
2. “Files” (.pdf, .mp3, .mp4, etc) and
3. “Emails“ (autoresponder emails)
Think of a Product as one big bucket, into which you add some content, you add some files, you add some autoresponder emails, you set up how the content should “drip”, how the files should drip, how the “emails” should drip, specify if this is a “Recurring” product or a “One-Time” product, specify the price, is there a trial, etc.
Basically, this “Product” is what your members “Buy” access to (or you can also give them access on the backend, without them having to buy – for eg., to your JV partners or business associates).
Whatever content you want your members to have access to when they become a member, is what you would add to this product.
For example, if you are running a subscription site on “How To Train Dogs”, you could give your product the same name “How to Train Dogs”. And to this product, you would add blog posts that you have created (like “Tools to buy”, “Dog Training 101”, “How to reward your dog”, etc).
You can set up Unlimited Products/Membership Levels in DAP. For instance, you can have 3 recurring membership levels (3 different products, called “Platinum Members”, “Silver Members” and “Gold Members”) – and you can add different content to each of these levels.
At the same time, you can have a 4th product – a one-time-sale product – called “Puppy Potty Training” where the buyer just gets access to 1 PDF report.
And you can have a 5th product – a one-time “Video” product – where the buyer gets access to a series of videos, all at the same time (no “dripping”).
A member can have access to one or more (unlimited) products at any given time.
Any time we say content, we mean WordPress blog posts, blog pages and regular files (PDF, zip, doc, mp3, mp4, swf, .jpg, etc).
Adding content/files means that as an admin, you can specify what content on your web site is part of this product, and you can go into each link and specify the access control for that file – like, is this content free or paid, when is it accessible to the user (on day #1, day #7, etc) – and for how long.
You can add content from your web site using the provided file browser within the “Manage Products” page, or you can also add using full URLs (like http://www.YourSite.com/dogtraining/protect-this-post.html).
Adding emails means you can setup an email autoresponse to be a part of this Product, and that email can be configured to go out to the user after “X” number of days after she has joined, or on a specific date (in case your email is date- or time- sensitive.

