Gift Subscriptions
There are two ways members can buy gift subscriptions for others.
1) Use the recipient’s email id (but their own name and billing info) during checkout. So when DAP creates the member account, it will send the welcome email to the recipient’s email id.
NOTE: Using the recipient’s email id may not be an option if the gift giver is paying for it using their own Paypal standard account, in which case their Paypal email id will be used by DAP to create the membership account. So, the best option is the one explained below.
2) BEST OPTION: Have the buyer make the purchase in their own name, and then forward the welcome email (which has the password to the member’s area) to the recipient. And the recipient can then log in using that information, and can change any and all profile information on the User Profile page.
NOTE: If this is a subscription product, then the recipient should not change the “Paypal Email” field in the profile, which will be having the buyer’s Paypal email id, because recurring subscriptions will continue to come in using the buyer’s Paypal email id. And since the recipient is not the one being charged, and it’s still going to be charged to the gift giver’s account, they need to leave that field in there. So you can use the [DAPUserProfile] shortcode and maybe not even show the “Paypal Email” field.
Access Expiration Options
In DAP 4.7, we have added a new feature to the hourly dap cron where once every day (it’s hardcoded to run ONCE between 10:00 PM – 11:00 PM PDT) the cron will look for users whose access expired that day.
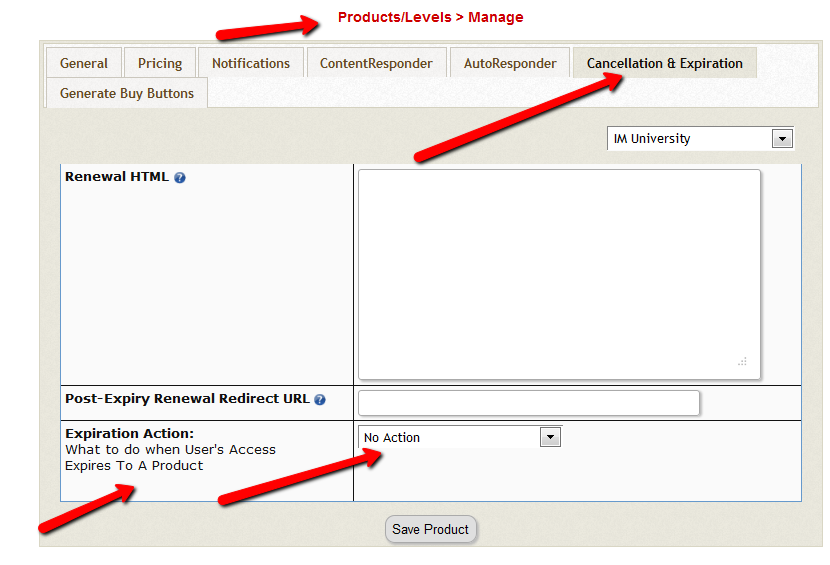
You can configure the Cancellation Options in DAP Products page -> Cancellation & Expiration tab.
Then based on these settings, the DAP Hourly Cron will check if the current time is between 10:00 – 11:00 pm PDT (Server time), and if yes, it will take a look at each product, pick up the ‘Expiration Action’ setting for that product, then get a list of ALL users whose access to that product has expired and apply the ‘Expiration Action’ to that user->product record in DAP users -> manage page.
The reason the DAP Cron checks the current time and runs the ‘expiration job’ only once a day is because running it too often will burden your server/resources as this job needs to pick up all products and then apply the cancellation rule to all users whose access has expired.
The main thing is to make sure it only runs once.. does not matter if that’s between 10 – 11 or 11 – 12 etc. We just picked the time to be between 10 – 11 PM (server time).
1) No Action
User’s access will auto-expire at the end of current recurring cycle. If the user re-signs, they will start from where they left off instead of starting over at day 1.
Infact this is how all older versions of dap already work.
If a user cancelled access to a subscription product before and say that the same user now wants to start back after a couple of months break.
If you have selected NO ACTION as this product’s expiration setting (in dap products page -> cancellation & expiration tab),
then when the user re-signs, they will start their dripping from where they left off and will not start fresh again from day 1.
Say a user’s access start date is 07/01/2014 and access end date is 07/30/2014, when the cron runs on 07/31/2012
and finds the user’s access has expired, it wont do anything.
If the same user re-signs for the same product on 08/30/2014 using the same email id, their access start date will be what it was before (07/01/2014) and their new access end date will simply be extended from what it was before. It will be set to previous access end date (07/30) + 30 days instead of new signup date (08/30) + 30 days. User’s access to product will remain expired. You will have to set post-expiry access to “Y” in dap setup->config page for access to ‘paid-for content’.
See this for more details: Cancellation
2) Remove From Product
If selected, dap will automatically find users whose access to this product has expired and remove user’s access to product completely for those users.
You will need this setting to prevent access for expired users. Users will completely lose access to product.
If these users signs up again, they will start over like a new member.
3) Set end date to previous day
To enable this option, you will have to first enter the following in /dap/dap-config.php file.
Please ftp to your site, find dap-config.php file, edit it and add this to your /dap/dap-config.php file:
Add it towards the top after php start tag (<?php) :
if(!defined(‘EXPIREACCESS’)) define(‘EXPIREACCESS’,’Y’);
IMPORTANT: Replace all occurrences of backticks in the line above with single or double quote character.
Then upload back to your site (under dap folder).
We are forcing the dap-config.php setup in DAP 4.7 so users do not pick this option by mistake. We also want this feature to be BETA tested fully (in DAP 4.7) and then we will remove the extra steps (to add lines to the dap-config.php).(
After you set this in dap-config.php, this dropdown option will be available in the ‘expiration action’ dropdown.
If you pick this option for a product, then DAP CRON will automatically find a list of expired users (whose access has expired to this product) nightly and move the expired user’s access start and end day (set the access end date to the previous date).
When the cron wakes up and runs this job once once every night at 10:00 PM, it will move the user’s access start / end date forward in such a way that user’s access will remain expired but the access end date will not be stuck somewhere in past. It will be always set to the previous date (from current date).
Say a user’s access start date is 07/15/2014 and access end date is 08/15/2014.
When the cron runs on 08/16/2014 and finds the user’s access has expired, it will set the access end date to previous date.
So first time when the cron runs after the user’s access expires, nothing will happen. The access end date will remain 08/15 as it’s already set to previous date.
When cron runs on 8/17, it will move forward the the access start and access end window, so the new access start date will be 07/16 (moved forward by 1 day) and end date will be 8/16 (moved forward by 1 day).
This way the user’s access is still expired (as it’s always set to previous date) but the access dates are not stuck in the past.
If they re-sign, when DAP extends access, the access end date will be in the future instead of being expired.
If the cancelled user re-signs, the user’s access will not remain expired as their access will be extended from the current access end date to a date in future and the dripping will continue from where they left off.
IMPORTANT: ADDITIONAL INFORMATION
1) EXPIRATION: SET ACCESS TO PREVIOUS DATE
We recommend that you enable this option ON a test product first. DO NOT use this option on an actual live product. Add a few test users to the test product. Move their access start/end date manually to a date in the past .Make a note of it. Enable the admin option to ‘move date to previous date’ for this product. Then run the cron manually. Go back to dap manage users page and check the new access start / end dates for these users. If all looks good, then use it for live products.
2) CRON JOB:
The dap cron (dap-cron.php) runs once every hour at the top of the hour… but it will only do the expiration job between 10- 11 PM (server time). The expiration part of the cron only executes once a day.
To force run the cron, run this command in a browser (dont run cron too close to the top of the hour as it will collide with the normal running of cron ).
http://yoursite.com/dap/dap-cron.php?forcerun=Y (replace yoursite.com with the name of your site)
AuthSMTP Integration
If you’re having email delivery issues on your host, you can connect DAP to 3rd-party email systems like Amazon SES and AuthSMTP.
In this article, you’ll see how to integrate DAP with AuthSMTP.
- Signup for an account at AuthSMTP
- Log in to your AuthSMTP account
- Go to Registered From Address tab
- Take the email id from DAP Admin > Setup > Config > From-Email Id and enter that email here and register it here (basically, you’re whitelisting your DAP Admin email id as a registered sender – if you don’t do this, AuthSMTP will reject and discard all emails sent via DAP). You will need to “Confirm” the registration by clicking on an activation link that they will be sending you.
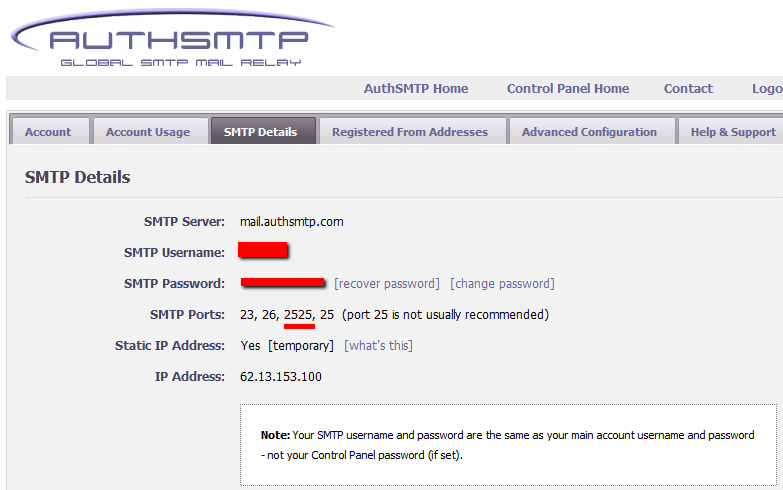
- In your AuthSMTP account, go to SMTP Details tab.
- Make a note of the SMTP Server (usually mail.authsmtp.com), SMTP Username, SMTP Password.
- Now log in to DAP Admin, and go to Email > SMTP
- On this screen, use the section Add a New SMTP Server to create a new SMTP row as follows:
Description: AuthSMTP
Server: mail.authsmtp.com (or from Step 6 above)
Port: 2525 (must be exactly that)
SSL: N (must be exactly that)
User Id: Your AuthSMTP Username (from Step 6 above)
Password: Your AuthSMTP Password (from Step 6 above)
Email Sending Limit Per Hour: 500
(Max 500 if on shared server. Max 2000 if VPS or dedicated server)
Activated: Y - Click on the “Add” button to create and save the new AuthSMTP server setting.
- And now you should see two rows under Manage Existing SMTP Servers: One for “Local Web Host” and another for “AuthSMTP”.
- For the “Local Web Host” row, be sure to set “Active” to “N” – because now that you have set up AuthSMTP, you want all instant welcome emails, autoresponder and broadcast emails to be sent out through AuthSMTP, and not your web host’s email server.
That’s it!
How To Test Member Access
We do NOT recommend testing what your regular member’s user-experience, while you are logged in as DAP/WP Admin.
Being logged in as DAP Admin and WP admin gives you certain privileges that your regular user/member won’t have. So you may see things that your members won’t be seeing. Or you may not see things that a regular user would normally see.
Either way, you may not be seeing what you’re supposed to see when you mix user testing with admin privileges.
So we recommend that you use two completely different browsers for testing: say, Chrome (or your primary browser) for WP & DAP Admin, and Firefox (or other) for logging in as regular user.
That way, you won’t have to keep logging in and out of DAP and or WP to test as both admin and user.
Keep them both separate.
If you are wondering how can the DAP Admin actually login as a member to see what they’re seeing – a critical feature during initial testing as well as troubleshooting a live site when a member says they’re having trouble accessing certain content, then continue reading.
You can use our “Login As Member” feature, where the DAP Admin would go to http://YourSite.com/dap/loginAs.php.
This page will present 3 form fields:
1) Email id of member you wish to log in as.
2) DAP Admin Email
3) DAP Admin Password
If you do not know what your DAP admin email / password is, you can click on your admin name in DAP Admin -> Users-> Manage page and update your admin password. The DAP Admin password is NOT the same as your WP admin password.
Once DAP verifies that it is indeed the DAP Admin trying to log in as someone else, DAP will log you into the site as that member whose email id you entered in (1) above.
NOTE: The Login As Member (LAM) feature does NOT mean that you can use just one browser to log in as both DAP Admin and regular member. You still need to use two separate browsers – one for DAP admin (like Chrome) another for regular member (Firefox). All LAM does is give you a workaround for logging in as someone else, because starting 4.4.x, the DAP Admin can no longer see what the member’s password is in order to log in as them.
Processing Offline Payments
DAP supports offline payments.
Your buyer does not have to necessarily pay using one of our supported payment processors. You can also use un-supported processors, like say a physical Check/Cheque, Western Union, Wire Transfer, Bank Deposit, etc.
So when someone pays you offline, if you just want to give them access to a product or membership level, then see:
If you also want to record (or book) the payment in DAP, so that DAP can include the payment in the Admin reports, then keep reading.
And normally, when the user logs in after they’ve received the login information from DAP, when they log in, if they had an affiliate cookie on their system, the affiliate will get credit for their purchase, and will get credited the commission within an hour of their logging in (when the hourly DAP cron runs).
But if you want to override this and manually give some other affiliate credit for the purchase, then see:
Affiliate Link Landing Page
Your DAP affiliate link (for DAP on your site, for your affiliates) by default will take the visitor to your home page.
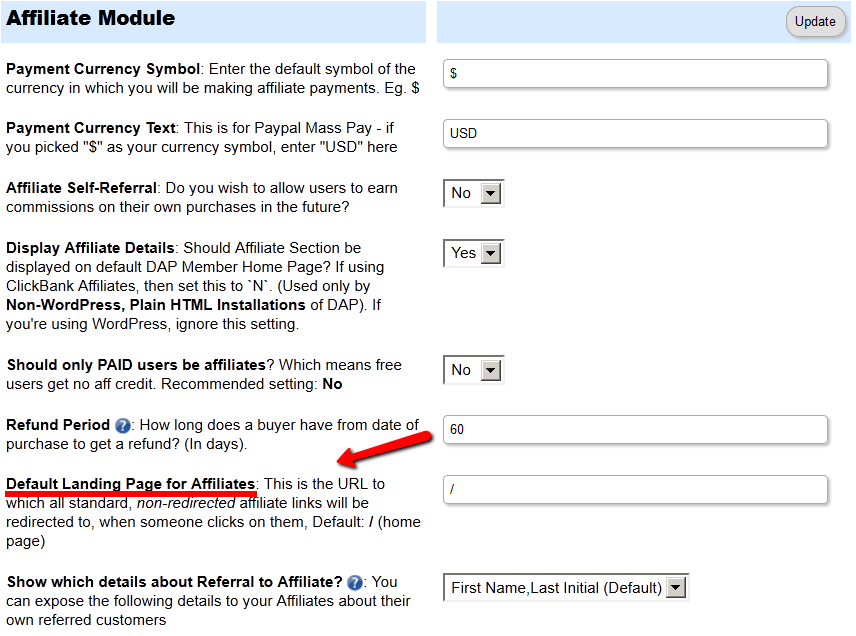
If you wish to point this default landing page to some other URL – like, say, your squeeze page at http://YourSite.com/squeeze-page/ – then you can change this default landing page URL setting at:
DAP Admin > Setup > Config > Default Landing Page for Affiliates
Please note that this will change the landing page for ALL “default” affiliate links – except those using special redirection.
So it will affect all default affiliate links that look like this:
http://YourSite.com/dap/a/?a=1234
But it will not affect affiliate links where they’re already setting a special landing page, like:
http://YourSite.com/dap/a/?a=1234&p=yoursite.com/some-cool-blog-post/
Modifying Link Text For Content
When you protect a page, post or file URL in DAP on the “ContentResponder” tab, every protected link – and eligible (for display, based on dripping) link will show up on the “My Content” page.
If you wish to modify the “Link Text” (the actual text that is displayed when the user sees the link), then…
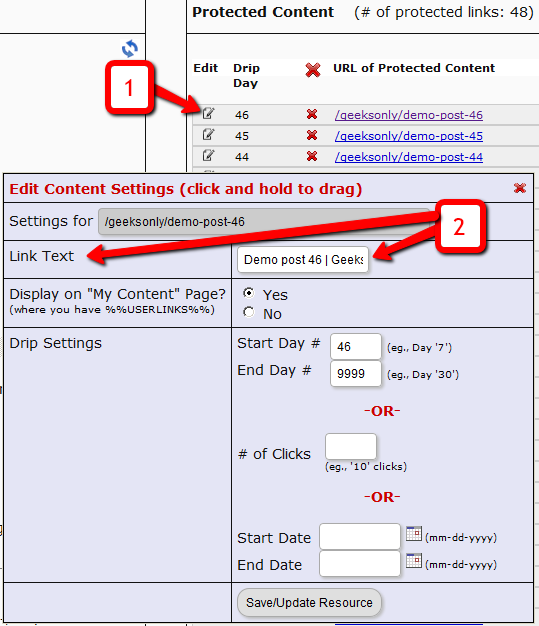
1) Click on the “Edit” icon next to any protected link under the “Protected Content” section, and that will bring up the “Drip Settings” popup.
2) In that popup, you can customize the “Link Text” field with any text you want.
DAP Upsells With ClickBank PitchPlus
DAP integrates with ClickBank “PitchPlus”, which is their 1-Click Upsell process.
So you can basically start by selling one front-end product, and then if your buyer purchases that product, you can then upsell them more products right after, and since they’ve already entered their payment information once, ClickBank remembers this information and allows them to purchase further products without having to re-enter all of the information again.
Setting Up DAP & CB PitchPlus Integration
The basic idea is the same for DAP/CB integration, whether it’s one product, or multiple Upsell products .
- You start with CB integration as specified in this document: Integration DAP With ClickBank . That’s how you set up the first product.
- Now, if you were selling just one product, then you would normally send them to a static “Thank You” page where you would tell them to check their email inbox for login details, and by that time CB would have already notified DAP via their “Instant Notification Service” (INS – kind of like Paypal’s IPN), and DAP would have already sent them the welcome email to the buyer’s email address, which contains their login and password to the member’s area.
- But in this case, you are going to offer them an upsell. So instead of sending them to a thank-you page after the first purchase, you basically send them to the sales page of your next upsell, that’s all.
You basically do a one-time set up of INS and the secret key as explained here.
Once that’s done, then for every Front-end product or Upsell-product, they are all integrated with DAP the same way: You just make sure the “Item Name” in CB and the “Product Name” in DAP both match, that’s it!
And for the last product in your upsell, be sure to point it to a static page containing a message like “Thank You, please check your email inbox for login details”.
And since CB notifies DAP separately for each product purchased, right then and there, if they end up buying 3 products during checkout (1 main + 2 upsells), then DAP will send the user 3 separate welcome emails. Of course, that’s optional – you don’t have to send out a welcome email for all products, but we highly recommend that you do.
Plus since they would be using the same email id for all 3 purchases, DAP will give them access to all purchased products under a single DAP account. So they need to log in to just one account to access content from all products that they just purchased.
Coupons
DAP allows you to create Coupon codes for use as long as you’re using the DAP Shopping Cart, and accepting payments via one of the following:
- Authorize.net
- Paypal Standard, and
- Paypal Website Payments Pro.
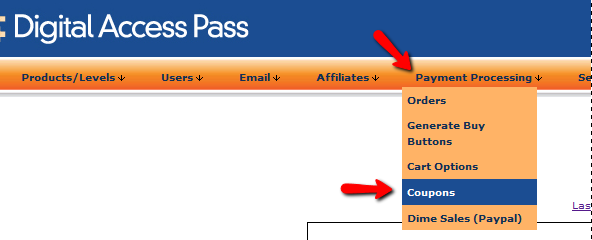
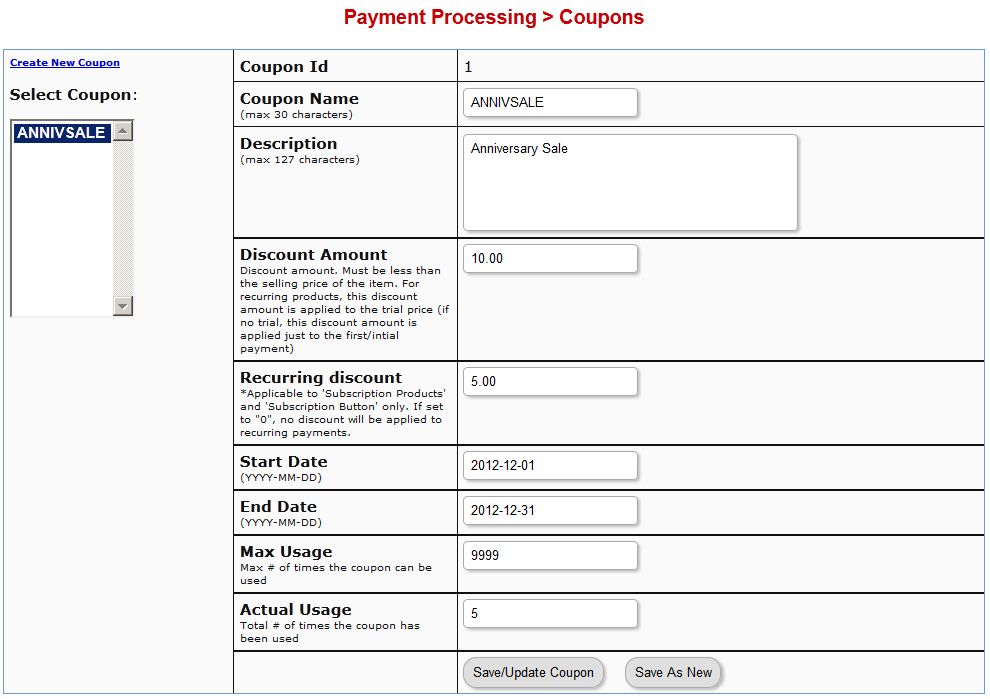
1. To create a Coupon code, go to DAP Admin > Payment Processing > Coupons
2. The Coupon options can then be setup on that page:
ADDITIONAL NOTES
You not only need to generate new Coupon codes, but you must also associate the Coupon to the DAP Products that should allow use of that Coupon. All of this can be done via the Coupons page.
Using Paypal Standard
If you are using paypal standard button, then create the DAP button with coupon enabled (under dap payment processing -> generate buy button page -> paypal standard tab) and put the coupon enabled button code on your sales page.
And when your prospect enters a valid coupon code in the form and clicks on the button, they will taken to the PayPal checkout page where they will see the discounted price
Using Auth.net or Paypal Pro
If you are using DAP Shopping Cart that connects with Authorize.net or Paypal Website Payments Pro, then in addition to setting up the actual Coupon, you must also go to DAP Admin > Payment Processing > Cart Options , and enable Coupons for the product(s) of your choice.
Now when your buyer clicks on the the DAP buy button, they will be taken to the checkout page where they can see the option to enter a Coupon Code.
Troubleshooting
If a Coupon is not working, check if the coupon code has actually expired, by going to DAP Admin > Payment Processing > Coupons page.
Check to see if Start Date and End Date are current.
Make sure the coupon’s Actual Usage is less than the coupon’s Max Usage.
Affiliate Commissions For Offline Payments
DAP is one of the very few membership platforms that will let affiliates earn commissions on offline payments too.
And in fact, DAP will credit affiliates for not just offline payments, but for any payments that you accepted outside of the payment options listed on your web site.
So, for example, you’re using Paypal and Authorize.net buttons on your site. And someone wants to send you a check (cheque) in the mail, or they want to send you money via Western Union, or wire transfer, or they call you and you accept their credit card information by phone, or any other such offline methods.
In this case, DAP can still give credit to the right affiliate for the sale. Here’s how…
1) Add Manual Transaction
- First you add the user manually, by going to DAP Admin > Users > Add.
- Once you’ve added them to the product, come back to DAP Admin > Users > Manage.
- Search for the user by email
- On the user data row for that Product, initially, under Trans Id column, it will show PAID (see image below)
- Step 1: Enter a manual transaction by clicking on Add Trans (which stands for “Add Transaction”). That will record your offline payment in DAP. So now there’s an actual payment associated with that user’s sign up.

- When you click on the “Add Trans” link, you will see a small popup appear (see image below) that allows you to manually enter an order. So if the offline payment was for say $97, then you would enter “97” or “97.00” in the “Order Amount” field and click on “Submit”.
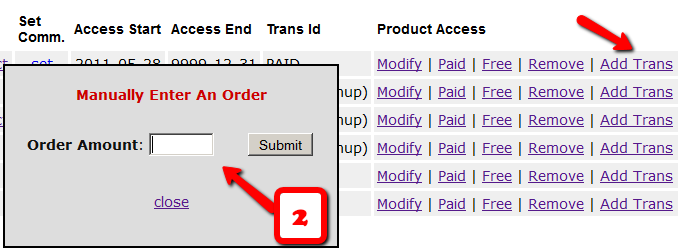
- Once you’ve entered a manual order, the “Trans Id” column will change from “PAID” to an actual transaction id.
That’s it.
By this time, the user would’ve received their “Welcome Email” from DAP, which will have their login info to log in to your site.
And when they log in, if they have an affiliate cookie set in their browser (which they would, if they had clicked on an affiliate link at some point before they contacted you and asked you about a non-standard, offline payment method), then when they first log in to your member’s area, DAP will pick up the referring affiliate’s id from the affiliate cookie, and give credit to them for the sale.
And when the DAP hourly cron runs at the top of the next hour, that affiliate will be credited with any commissions that you’ve set up for that product.

