4
Group Memberships And Sub-Accounts
So you want to use DAP to sell group memberships or sub-accounts.
Eg. 1) A group membership – or multi-user account – that a School/College/Teacher can buy on behalf of their students. It’s either a one-time product, or could be a subscription product. In that case, buyer keeps paying monthly, and when they stop paying, all sub-users (child accounts) get disabled.
Eg. 2) Company A pays $X for up to 20 of its employees to have individual memberships. To begin with, the money is collected in one lump sum and DAP grants 20 memberships. Then each month Company A pays the Corporate/Umbrella/Bulk Membership and DAP gives credit to the individual memberships. If Company A fails to pay, all the “sub” members underneath lose access.
How To Implement Group/Bulk Memberships
DAP doesn’t directly support sub-memberships or sub-accounts yet. We already have this on our humongous to-do list :-). And we definitely plan on implementing it soon. But for now, here’s a work-around for making this happen. It’s fairly simple, yet it is manual, and cannot be automated yet.
- You would set up a One-Time product in DAP called, say, “20-Seat Membership“. If you wish to sell different quantities of “seats” or “licenses”, then you have to create as many products (like “5 Seats”, “10 seats”, “50 seats”, etc).
- In the welcome email, you would instruct buyer to email you a CSV file with 20 (or as many as your product allows) names and email id’s, one per line, in this format (EMAIL,FIRST,LAST):student@gmail.com,John,Student
another@yahoo,com,Jill,Freshman
…
…
member20@yahoo,com,Joe,Senior - And then, using DAP’s bulk-import feature, in one fell-swoop, you can add all 20/50/100 to your membership site and give them all their own accounts, usernames and passwords, that they can all use to independently log in to your web site.
- If you see Step 1 above, we advised to make this a One-Time product. The reason for that, is you give life-time access first, and if they stop paying, then you cancel manually. So if the main buyer stops paying the subscription, this is the only time you will have some manual work hunting searching for those 20/50/100 email id’s on the Users > Manage page, and then clicking on “Remove” on their user row, so that they completely lose access.
Until we include this feature in DAP and make it automated, there are two ways to look at this.
One: You could say, it’s too much work to remove 20/50 emails when the main buyer cancels. OR…
Two: Since this is a group membership, you are hopefully charging them a good fee for this (if not, then you certainly should!). So you can always hire someone for $5 or $10 per hour on Odesk and have them do the removal of those email id’s. Removing 50 email id’s would take about 20 minutes at most. And you would need to do this only when they cancel, which can happen only once per group membership.
So hope that helps give you some ideas.
Hope this makes sense.
OptimizePress Issues
1) OptimizePress 1.x CSS Issue
Problem
You try to visit a protected page that you’re not eligible to view, and see an ugly page full of un-formatted links
Solution
- Create a custom error page in WP – like http://YourSite.com/error/
- When creating the above page, select the OptimizePress template “DAP Error Page”
- In the body of that error page, enter something like this:
Sorry, you do not have access to this content.
If you are already a member, click here to login.
If you are not a member yet, then click here to get access. - In the above example, link the text “click here to login” to your stand-alone DAP login page (eg., http://YourSite.com/login/). And link the “get access” text to your sales page.
- Then take this error page’s URL – which is http://YourSite.com/error/ – and enter it into the “Error Page URL” field of all DAP Products.
- Also enter this same URL into DAP Admin > Setup > Config > “Error Page URL (Global)”.
Save, and that will no longer display the ugly error page going forward. Instead, it will redirect the user to the above custom error page.
2) OptimizePress 2.x Content Protection Issue
Problem
You try to visit a protected page that you’re not eligible to view, yet you are still able to see all of the content. Or the page appears messed up with missing menu items or formatting issues.
Solution
- Make sure “Sneak-Peek” is turned OFF – it won’t work with OptimizePress 1.x or 2.x.
- Follow all of the same steps from Problem 1 and create a custom error page.
5
Gmail Integration With DAP
WARNING: Gmail integration may not work for everyone. Many factors – including, but not limited to, your physical location, the location associated with your Gmail account, location of server, IP address, etc – appear to play a role in whether or not this will work for you with your Gmail account. So please note, that if it doesn’t work for you, then there isn’t anything the DAP team can do to overcome or “fix” that. It’s Google, after all. We don’t know what rules and monitoring they have in place for this. So, if Gmail integration doesn’t work for you, then you may want to consider Amazon SES integration, which has a 100% success rate with DAP users at this time.
To increase deliverability of your autoresponder, broadcast and instant emails (like “Welcome” email), you can make DAP completely by-pass your web host’s email server, and send emails out through third-party email servers, like Gmail or Amazon SES. This article is about setting up DAP to send out emails through Gmail’s email servers.
Sending Email Through Google’s Gmail Servers
Before you start sending out mass emails through Google’s Gmail Servers, please note this…
Sending out emails through Gmail instead of your web host, will surely boost your deliverability, no doubt. But remember that Gmail is NOT meant to use for mass emails. It is not really meant to be used as a list service. Plus they have a very strict restriction of 500 emails per 24-hour period.
You exceed that quota even by one, and they probably will temporarily disable your Gmail account for about 24 hours. Sending a large number of un-deliverable emails (resulting in bounces) could also get your entire Gmail account permanently suspended. And if you lose your Google username, it may (no confirmation available) affect your other Google accounts too – like AdWords or AdSense.
Anyway, DAP has a round-robin emailing system – so you could set up and use multiple Gmail accounts – each with its own 500 email limit per day – and combine them to send out a larger broadcast. However, remember – we’re talking about Google here – which means they can suspend/cancel/delete your account for any reason at all, even more so when you’re going against their TOS.
So use Gmail with caution, and only for smaller lists. If you want a larger sending email limit, check out the DAP integration with Amazon SES which allows you to send out tens of thousands of emails a day.
- Log in to your DAP Admin Panel, and go to DAP Admin > Email > SMTP.
- On this screen, use the section Add a New SMTP Serverto create a new SMTP row as follows:Description: Gmail (can be anything really)
Server: tls://smtp.gmail.com (must be exactly that)
Port: 465 (must be exactly that)
SSL: N (must be exactly that)
User Id: youremail@gmail.com (your gmail email id)
Password: yourpassword (your gmail password)
Email Sending Limit Per Hour: 500 (don’t go more – less is ok) - Click on the Add button to create and save the new Gmail SMTP server setting.
- Once it is saved, now you will see 2 rows on the screen: One for “Localhost”, and the other is the new “Gmail”.
- Towards the end of each row, you’ll see a setting called “Activated?”. Set it to “N” for Localhost and “Y” for Gmail.
- That will now make all of your outgoing emails (listed below) go out only through Gmail, totally bypassing your web host’s email server. Which means, your email deliverability will go up substantially.
- List of outgoing emails for which your Gmail account will be used, include:
– Real-time Welcome Emails
– Third-party Notification Emails (to Admin, other third-parties, Aweber, etc)
– All notification and transactional emails to DAP Admin – like payment receipt, new user signup, error notifications, user unsubscription notifications, etc
– All autoresponder and broadcast emails
– etc…
37
Amazon Simple Email Service (SES) Integration With DAP
DAP/Amazon SES Integration
You can hook up DAP to Amazon’s Simple Email Service (Amazon SES) and have all of your emails go through Amazon’s beefed up, high-performance, high-deliverability email servers.
The document below explains how to connect DAP to Amazon SES. (troubleshooting info for DAP/SES integration)
- Go to http://aws.amazon.com/ses/ and sign up for Amazon SES. You must already have an Amazon account and you can add SES to that same account.
- Then go to https://console.aws.amazon.com/console/home , log in if required, and click on the SES link there.
- That will bring you to the SES “Dashboard”.

- When you first sign up for SES, you will be assigned a “Sandbox” account. Which means that you will only be able to send emails TO and FROM verified email addresses (a verified email address is something you add yourself to your SES account and then click on a confirmation link that Amazon sends you, to prove that you are the owner of that email id). Also, Sandbox access allows you to send out a maximum of just 25 emails per day, both FROM and TO verified email id’s only.
- So the first step is to add a Verified Sender. So click on the “Verified Senders” link in the menu on the left.

- That will bring you to this page. Click on the Verify a New Email Address link with the green check-mark next to it.

- In the popup, enter the email id that you wish to use as your FROM email id to send out emails. Please note that you can ONLY use verified email id’s to send out emails from your Amazon SES account. So whatever email id you wish to use in DAP Admin as the sender for outgoing emails (see DAP Admin > Setup > Config > From-Email Id : For all outgoing DAP emails), that’s the email id you should verify.IMPORTANT: The email address is case sensitive. So if you white-listed You@YourSite.com at Amazon SES, then you must enter the email address with the exact same cAsE within DAP Config too (You@YourSite.com is NOT the same as you@yoursite.com for the purposes of Amazon SES. Crazy, we know! But that’s how it is.)

- You will then receive an email from Amazon at that email id which has a confirmation link. Once you click on that link, your email id in your Amazon SES account is now “Verified” (also known as whitelisted). Please note that at this time, you still have Sandbox access. Which means you can send email both FROM and TO the same verified email id. Not very useful, but that’s ok. Now time to go back to the SES Dashboard and Request Production Access.
- Click on Request Production Access and you will be taken to a form that you need to fill out and submit. Amazon then reviews it, and it can take up to 48 hours for your account to be granted Production Access – which basically means, you can now use SES and start sending out real emails, and your per-day limit is now 10,000 emails per day.
- Now, you need to get a SMTP Username and SMTP password for sending out emails. This username & password is NOT the same as your Amazon account email and password. Neither does it have anything to do with your Amazon Public or Secret keys. This is a completely different (and new) username and password used JUST for sending emails, and it needs to be generated newly.
- To generate a new set of SMTP Username and Password, click on the SMTP Settings link in the menu. And then on the next page, click on Create My SMTP Credentials.

- In the resulting popup, click on Create.

- That will create your SMTP credentials. But to see it, you have to click on Show User SMTP Security Credentials

- Once you click on Show User SMTP Security Credentials, you will be shown your SMTP Username and Password.

- Be sure to note down the username and password in a safe place where you can get to it again, because Amazon will not show this same set of username and password ever again. If you lose them, of course, you can always generate a new set of username/password again for free, but you’ll never get the same pair again – it will be a fresh pair.
- Go to the SMTP Settings link in the menu and note down the Server Name.
It will be one of the following:
email-smtp.us-east-1.amazonaws.com (as in the image below)
email-smtp.us-west-1.amazonaws.com
email-smtp.eu-west-1.amazonaws.com (European Union users)
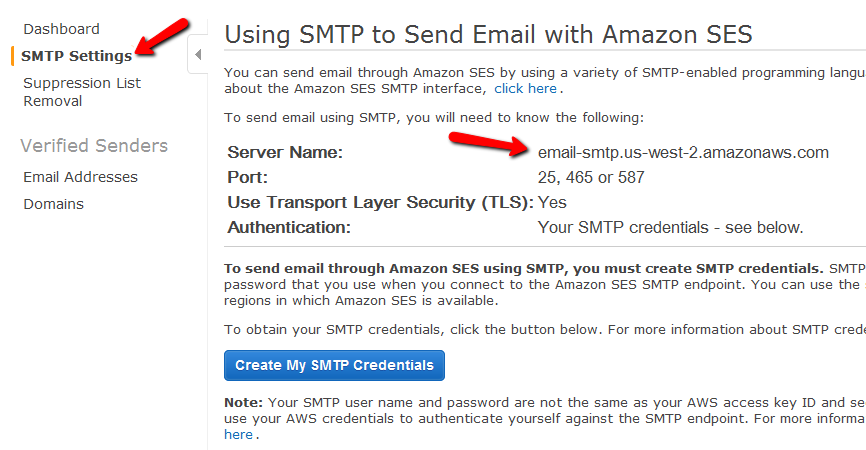 You need to determine what your host name is, and then add the text “ssl://” to it at the front.
So if the server name displayed in your Amazon SES account is this…
email-smtp.us-east-1.amazonaws.com…then the text you would enter into the DAP Email > SMTP page is this…
ssl://email-smtp.us-east-1.amazonaws.com - Now log in to your DAP Admin Panel, and go to DAP Admin > Email > SMTP.
- On this screen, use the section Add a New SMTP Server to create a new SMTP row as follows:

(Click on image above to see full-size screenshot)
Description: Amazon SES
Server: <what you noted down above>
Port: 465 (must be exactly that – ignore port numbers recommended by Amazon SES)
SSL: N (must be exactly that)
User Id: Amazon SMTP Username (that you generated and noted down in Step 15 above)
Password: Amazon SMTP Password (that you generated and noted down in Step 15 above)
Email Sending Limit Per Hour: 500 (ideal number – don’t go more – less is ok)Click on the “Add” button to create and save the new Amazon SES SMTP server setting in DAP. - Once it is saved, now you will see 2 rows on the “Email > SMTP” screen. One is for the server “Localhost”, and the other is the new “Amazon SES”.
- Towards the end of each row, you’ll see a setting called “Activated?”. Set it to “N” for Localhost and “Y” for Amazon SES.
- That will now make all of your outgoing emails (listed below) go out only through Amazon SES, totally bypassing your web host’s email server. Which means, your email deliverability will go up substantially.
- List of outgoing emails include:
– Real-time Welcome Emails
– All transactional emails to DAP Admin – like payment receipt, new user signup, error notifications, user unsubscription notifications, etc
– All autoresponder and broadcast emails
– etc…

Watch this video for details:
1
Leveraging Multiple Affiliate Networks
DAP is so powerful and flexible, that you can sell access to your membership through different payment processors, all at the same time.
And we often get asked how to leverage different affiliate networks like ClickBank and JVZoo and Warrior Plus at the same time while making sure no affiliate commissions are lost, and every affiliate gets credited their commissions for sending potential buyers to your site.
The Big Picture
1) If buyer arrives ONLY through DAP affiliate link, and ends up purchasing through ANY payment processor, then DAP affiliate will get credit.
2) If buyer arrives ONLY through CB affiliate link, and ends up purchasing through CB payment processor, but the buyer has a different DAP affiliate’s cookie from a link he clicked on at some point before (but did not purchase at that time, say), then both CB affiliate and DAP affiliate will get credit (double commissions on same purchase, but to two different affiliates).
If there’s no DAP cookie on his computer, then only CB affiliate will get the commission.
If the DAP affiliate “chains” two of his own affiliate links – his DAP affiliate link and CB affiliate link – like shown below, then same affiliate will get both CB commission as well as DAP commission. Again, double commissions but to same person.
http://YourSite.com/dap/a/?a=1234&p=http://hop.clickbank.net…./
3) If buyer arrives ONLY through JVZOO affiliate link, and ends up purchasing through JVZOO payment processor, but the buyer has a different DAP affiliate’s cookie from a link he clicked on at some point before (but did not purchase at that time, say), then both JVZOO affiliate and DAP affiliate will get credit (double commissions on same purchase, but to two different affiliates).
If there’s no DAP cookie on his computer, then only JVZOO affiliate will get the commission.
If the DAP affiliate “chains” two of his own affiliate links – his DAP affiliate link and JVZOO affiliate link – like shown below, then same affiliate will get both JVZOO commission as well as DAP commission. Again, double commissions but to same person.
http://YourSite.com/dap/a/?a=1234&p=http://jvzoo.com/c/1944/17
The Right Setup For Multiple Affiliate Networks
To make sure that you’re not paying double-commissions on purchases, and also to make sure that sales don’t get lost between affiliate networks (and your affiliates losing their commissions in the process), you have to set things up the right way.
The main thing to do, is to create a separate set of the following for each affiliate network:
- A separate DAP product
- A separate Sales Page
- A network-specific buy button on that sales page
- If it’s a product that is sold through CB or JVZoo or DigiResults (or any of the affiliate networks), then DO NOT set up commissions for that Product in DAP. So that will prevent you paying a commission to, say, a CB affiliate as well as a DAP affiliate for the same purchase.
So the net effect of this, is…
If a CB affiliate sends traffic to a page, that page must have a CB buy link ONLY on that page. If you have, say, a JVZoo button on that same page, and the buyer buys through the JVZoo link, then the CB affiliate will get no commissions for that purchase. Which means, they will stop promoting your product because you’re basically funnelling off their visitors to a different affiliate network.
Similarly, the landing page for JVZoo affiliates must have only JVZoo buy buttons.
Landing page for a regular payment processor – like Paypal or Authorize.net – should have only a Paypal and/or Authorize.net buy button (and no CB or JVZoo buy buttons). In this case, for these products in DAP, you should set up an affiliate commission row on the “Affiliates > Manage” screen, so that your DAP affiliates can get credited for sales made through your regular web site.
9
Google Checkout Integration with DAP
1) Update DAP Setup > Config -> Secret Authorization Key to be…
YourGCmerchant_id|YourGCmerchant_key
2) Point the Google Checkout IPN handler to
http://yoursite.com/dap/dap-gc-responsehandler.php
(replace yoursite.com with the name of your site).
3) Create a DAP product and make sure the item name that your GC Item Name exactly matches the DAP Product Name.
That’s it!
NOTE
You will find a file by name dap-gc-responsehandler.php in your dap folder.
Use this file as is, with no changes, during testing. Nothing to change.
But once you’re ready to go live, open the file, and find the line below:
$server_type = “‘sandbox”;
And change it to:
$server_type = “‘production”;
6
DigiResults.com Integration With DAP
1) Go to DigiResults.com “Manage” Listings tab at https://www.digiresults.com/manage/listings
2) Click on the List Name

3) Click on “Edit Product” below the Products section on the listings page.
4) In the Edit Product page, click on “Edit” next to Direct Receipts.

Set the Direct Receipt URL to point to the dap script on your site…
The direct receipt format should be set to Clickbank Instant Notification.
http://YOURSITE.com/dap/dap-digiresults.php

5) Create a product in DAP and make sure the dap Product Name exactly matches the digiresults Product Name.
That’s it!
Now run a test purchase via digiresults and see if the account gets created in dap automatically.
29
JVZoo Integration with DAP
DAP supports full fledged integration with JVZoo including automated login to membership where users can instantly get access without any manual action. No waiting for welcome email or having to pick a username/ password on the thank-you page after purchase. All automatic.
1) Auto-Login
If you want the users to be auto-logged-in to their membership right after purchase, then please do this step. Otherwise skip this step.
(Click image below to see enlarged version)
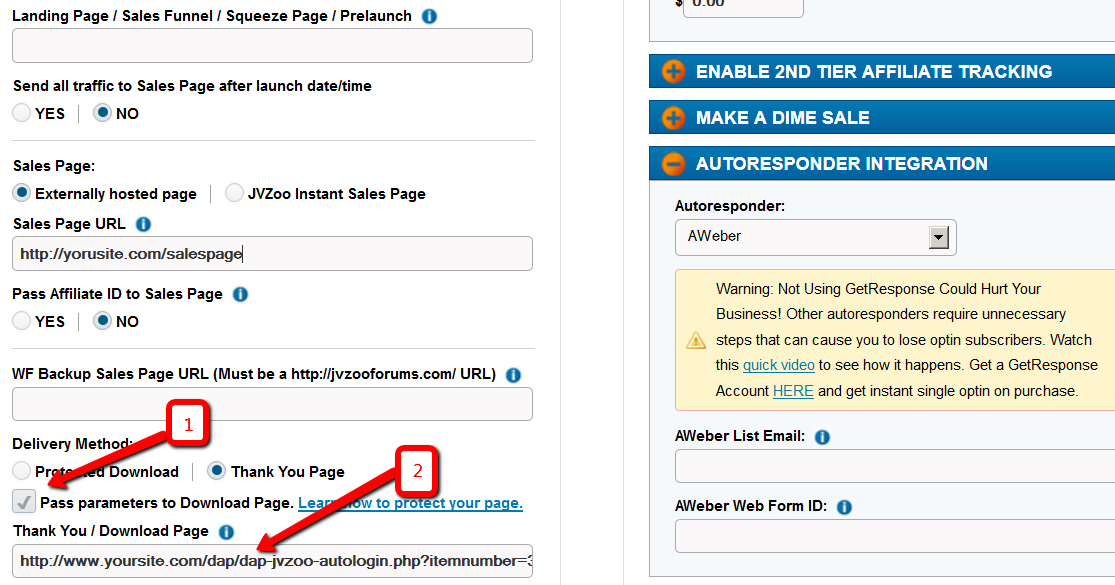
i. Delivery Method -> Pass Parameters : Make sure to check the box that says ‘Pass Parameters to Download Page‘
ii. Download Page: Say that after the purchase is complete, you want the users to land on a members area page where they can download/access their purchased content. Say the url of that page is http://YOURSITE.com/member-home
If you want DAP to auto-login the users to their membership and then redirect to /member-home, enter this in the Thankyou / Download Page textbox and then they can get redirected to the /member-home.
http://www.YOURSITE.com/dap/dap-jvzoo-autologin.php?itemnumber=3&redirect=member-home&errorurl=error-page
Please note:
Replace YOURSITE.com with the actual name of your site.
Here /member-home is just an example. You can enter the url of any page where you want users to be redirected after login.
In the autologin URL, we have omitted “/” in front of member-home and “/” in front of errorurl because JVZoo messes up the formatting if you include “/” in the querystring.
http://www.YOURSITE.com/dap/dap-jvzoo-autologin.php?itemnumber=3&redirect=member-home&errorurl=error-page
itemnumber=It should be the product ID of the DAP product you want the users to get access to
redirect=It should be the URL of the page where the users should land after they get logged-in. If you want them to go to /member-home after automated login, set redirect=/member-home (just the relative path is good, no need to enter full url).
errorurl=It should be the URL of the page where the users should land if there are any errors during account creation
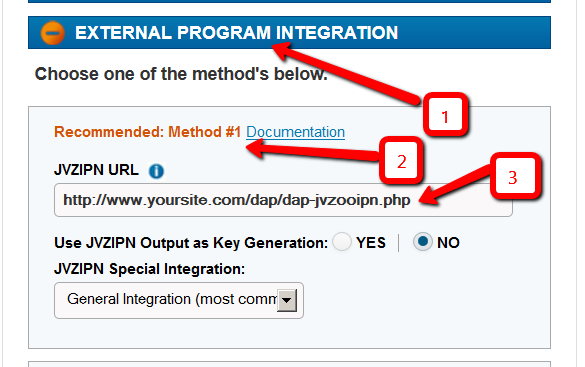
2) External Program Integration
Check the check box next to this field.
In that same section, set the Recommended: Method #1 field to the following URL:
http://yoursite.com/dap/dap-jvzooipn.php
(NOTE: replace yoursite.com with the actual domain name of your site).
NOTE 1: Make sure your JVZoo Product Name exactly matches your DAP Product Name
NOTE 2: Also make sure you have the “Welcome Email” Subject & Body configured in the DAP Product page with the right merge tags to send out user login/password.
3) Set your JVZoo and DAP Secret Key
Set the JVZoo My Account => JVZIPN Secret Key to match the Secret key in your DAP setup -> config -> Payment Processing => Secret Authorization Key.
You can pick any secret key you want. Just make sure it exactly matches in dap setup -> config area and the JVZoo My Account page.
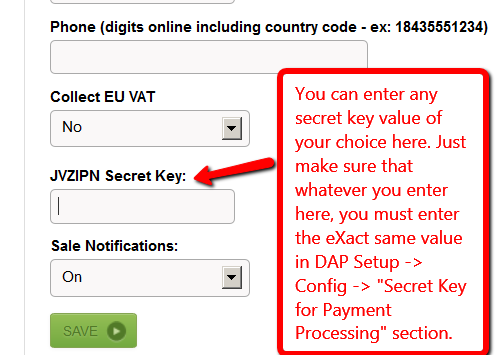
NOTE: You can put in ANYTHING you want in the DAP secret key (in dap setup -> config). Say that you set it to DAPKEY. Now when you go to JVZoo My Account => JVZIPN Secret Key, make sure to set the jvzoo secret key to DAPKEY there too. It has to EXACTLY match whatever you set the dap secret key to.
How it works
When a user completes purchase of the product, JVZoo will send payment notification to DAP to the IPN URL specified above. And if you have setup auto-login, then after the user completes the final purchase, JVZoo will land the users on the final receipt page where if they click on “Access My Purchase”, dap will auto-login the users to their membership and allow them instant access to the product.
UserFlow
NOTE: Use DAP to deliver/protect downloads by protecting the downloads/content in dap products page => ContentResponder section.
* Buyer clicks on the button (button created within your JVZoo account) on your sales page
* Buyer is taken to the JvZoo page where they can complete payment
* Buyer completes the payment successfully
* Buyer is transferred back to whatever you set in the thankyou URL in JvZoo for the product or to the upsell page
* In the meantime, JVZoo notifies DAP about the purchase via IPN
* DAP automatically creates the member account, and sends thankyou email (configured in your dap products page) with login info to the buyer.
* Now if regardless of whether you had 1 product in the sales funnel or multiple upsells/downsells, ultimately the users will land on the final receipt purchase where they will find the ‘access my purchase’ link. When they click on that, dap will automatically login the user to their membership account and allow them instant access to content. The users do NOT have to wait for welcome email to login to membership.
Make sure to setup the thankyou email in the DAP products page for all the products you deliver via DAP.
* When the users login to their membership area or are auto-logged-in, by default, they will be redirected to either product-level logged-in URL or global logged-in url based on whether they have access to just 1 product or multiple products. The product level logged-in url is used if the user has access to just 1 product. The global logged-in url (under dap setup -> config -> post-login redirect url) is used when user has access to multiple products.
If you want to send users to a different page, then just set the ‘redirect’ url in the ‘thank-you/download page’ in JVZoo to point to wherever you want them redirected (see step # 1 for detail at the top of this page) and dap will use that url for post-login-redirect.
* Note: You can create a members area page and redirect users to that page upon purchase. When the users login and access their members area, they can access the purchased products/downloads.
5
Customizing vBulletin Login For Single-Signon
Here’s what you need to do to disable the standard vB login form at the top-right corner of your forum pages, and customize it so that you force your members to log in via the DAP login form, so that they’re logged in to your membership site as well as DAP.
- Log in to VB Admin control panel at http://yoursite.com/forums/admincp/
- Go to Styles & Templates > Style Manager > Default (or whatever style you’re currently using)
- From the big list on the left, select the “header” template. Then on the right, under the “Controls” section, click on Edit
- On the resulting page, copy the full code from this text file and paste into the main “Template” body, and click on “Save”
- Next, download the file forums/register.php from your server, to your desktop and save the original copy somewhere safe.
- Replace the contents of that file with the contents of this text file.
That’s it!
11
Premium Web Cart Integration
Starting v4.2.1, DAP now integrates with Premium Web Cart (PWC)
PWC=>DAP integration is very simple to set up.
NOTE:
- If your DAP version is 4.2 or earlier, you must upgrade to DAP v4.2.1 & LiveLinks v1.7.
- If you are already using DAP v4.2.1, then download the very latest dap_v4.2.1 zip from the member’s area, unzip the contents to your desktop, and upload just the dap-pwc.php (within the main dap folder on your desktop) to the dap folder on your site.
Integration Steps
- Login to your PWC account.
- Go to Cart Settings > Advance Integration.
- Select PWC IPN tab.
- Set the PWC IPN URL to http://yoursite.com/dap/dap-pwc.php (Note: replace yoursite.com with the name of your site)
- Make sure the product name in PWC eXactly matches the Product Name in DAP.
User Flow
- Buyer clicks on the buy button (button created within your PWC account and published on your sales page).
- Buyer completes the payment successfully and is transferred to the thankyou page.
- PWC notifies DAP via IPN about the purchase.
- DAP automatically creates the member account, and sends thank-you email (configured in your dap products page) with login info to the buyer. NOTE: Make sure to setup the thankyou email in the DAP products page for all the products you sell via DAP.
- When the user logs in to their membership area, they will be redirected to either product-level logged-in URL or global logged-in url based on whether they have access to just 1 product or multiple products. The product level logged-in url is used if the user has access to just 1 product. The global logged-in url (under dap setup -> config -> advanced -> url to which user is redirected upon login) is used when user has access to multiple products.
Note: You can create a member’s area and redirect users to that page upon purchase.