2
DAP Shopping Cart – Upsells only supported for Credit Card Payments
If you select “Allow Both CC and Paypal” option in the step 2 of button generation process, then on the checkout page you will find 2 options:
1. Pay with CC
2. Checkout with Paypal
The Pay-with-CC button on the DAP Cart Checkout page can be configured to lead users through a 1-click Upsell Funnel.
The “Checkout with Paypal” button on the DAP Cart Checkout page can’t do 1-Click Upsells but you can configure it to lead buyers to an upsell page with a ‘regular checkout with paypal’ button. If they click on it, it can send them to paypal to login and pay. It won’t be 1-click though. The user’s will be out of the DAP cart flow at this point. But that’s fine as the dap cart completes each individual transaction before sending users to the next page.
You could use our Paypal Upsell Tree Plugin for 2-click upsells with paypal, but this plugin is not integrated with DAP Shopping Cart. If you want to use this plugin, you will need 2 separate button on the sales page – pay with CC OR pay with Paypal instead of an integrated checkout option on the checkout page.
See – http://wickedcoolplugins.com/doc/paypal-upsell-tree-documentation/
3
DAP Cart: Minimum Requirements
What are the min. requirements for the new DAP Shopping Cart?
1. Merchant Account / Payment Gateway
You need at least one of the following:
a) a Paypal Standard Account, or
b) an Authorize.net merchant account or
c) a Stripe.com account or
d) a Paypal Payments PRO account (only older version supported, read more here)
2. SSL/HTTPs Required:
If you’re using Authorize.net or Paypal Website Payments Pro or Stripe.com, then you need to have SSL (secure server) enabled on your web site. Please ask your web host to enable SSL/HTTPs for your site. SSL is NOT needed if you allow users to ONLY ‘Checkout with Paypal Standard’ option. It’s ONLY needed if you wish to allow users to enter Credit Card info on the checkout page right on your site.
3. DAP 4.5 + LiveLinks 1.9
You need to be on DAP 4.5 or above and DAP LiveLinks 1.9 (or above) to use the DAP Cart. If you are on DAP 4.4.3 or lower versions of DAP, please download DAP 4.5 / LL 1.9 from your members area on http://www.digitalaccesspass.com/dap and upload to your site.
See this for DAP upgrade instructions.
4. Credit Card Payments
If you want to use the DAP cart to allow users to pay using Credit Card on your site without getting transferred to a different site, you need to have one of the following:
a) an Authorize.net merchant account or
b) a Stripe.com account or
c) a Paypal Payments PRO account
5. Authorize.net
If you wish to sell subscription-based products using Authorize.net, then you also need Automated Recurring Billing (ARB) enabled in your Authorize.net account.
6. What type of Paypal account do I need to sell one-time and subscriptions products via DAP Cart?
If you have just a Paypal standard (business or premier) account, then your buyers can sign up to your subscription products using ONLY a Paypal account.
==> They can NOT sign up for a subscription using a credit card. <==
So if that’s ok with you, then all you need is a Paypal standard account (Business/Premier).
HOWEVER… If you want your buyers to be able to use EITHER a Paypal account OR sign up using just a credit card (without having a Paypal account for themselves), then you MUST have one of the following…
1) Paypal Enhanced Recurring Payments (which is an add-on to your existing Paypal standard account for around $20 per month – check paypal site for pricing)
-OR-
2) You need to sign up for Paypal Website Payments Pro ($40-$50 per month – check paypal site for pricing).
To Summarize:
If you want to use the DAP shopping cart and allow your users to purchase via CC on your site (without getting transferred to Paypal), use Paypal Payments PRO.
If you are ok with users getting transferred to Paypal for payment, but want to allow these users an option to pay using ‘CC’ on the Paypal site, then use Paypal Enhanced Recurring Payments.
If you do not care about ‘pay using CC’ and are ok with users always paying using their paypal account (even for subscription products), then go with Paypal standard.
Checkout with Paypal

Checkout with Credit Card

Checkout with Both Paypal and Credit Card

1
DAP Shopping Cart (Beta): Installation
Installation Steps – DAP Shopping Cart Plugin
1. Download the dapshoppingcart plugin (zip file) from your members area on wickedcoolplugins.com and upload it to WordPress via WP Admin – >Plugins -> Add New -> Browse for the zip file -> install OR upload it to WP via FTP to wp-content/plugins folder.
2. Download the WCP License plugin from your members area on wickedcoolplguins.com and upload it to WordPress via WP Admin – >Plugins -> Add New -> Browse for the zip file -> install OR upload it to WP via FTP to wp-content/plugins folder.
3) Activate DAPshoppingcart plugin in wp admin -> plugins.
4) Activate WCP License plugin in wp admin -> plugins.
5) Login to http://wickedcoolplugins.com/my-account/downloads/ and get your license key.
6) Go to WP admin -> settings -> Wicked Cool Plugins License -> Enter the license key.
That’s it.
Note: DAP v4.5 & LiveLinks v1.9 Required
You need to be on the latest version of DAP (as of today) – DAP v4.5 and LiveLinks v1.9 – for the DAP Shopping Cart to work. See below for new DAP installations or upgrading your existing DAP installation.
Related: Upgrading to DAPv4.5 and LiveLinks v1.9
Related: Installing a new version of DAP
[DAPAutoCancel]
This feature is not supported currently. It will be available in DAP 4.5 (upcoming release of dap). 1) User-facing Cancel Button: [DAPUserCancel showalltransactions=”Y” showcancel=”Y”][/DAPUserCancel] If you use the above shortcode in a WP page, it will show all active transactions and if it’s a paypal or authnet subscription, it will show cancel button. Your customers can cancel their authnet / paypal active subscriptions by clicking on the cancel button.Here’s how it works:
DAP picks up all the active products the user has.
For each active product, it checks if there is a purchase transaction (transaction Id > 0) associated with that user->product row in Manage Users page.
– if yes, the row is displayed with a cancel option.
– if no, the script will move on to the next product
Cancel button will only show for : – Transactions that are cancellation eligble (for ex – it will show for active subscriptions but not for one-time-purchases) – And only if the cancel-eligible transactions are from Paypal or Authnet. It will NOT show for other payment processors like Clickbank, Infusionsoft etc. Here’s how it will look (you can customize the table header names and the cancel button image) :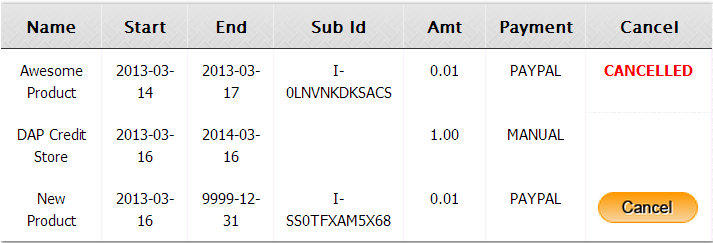
You can customize the ‘cancel success msg’, ‘cancel failure message’ and the ‘cancel image’ as shown below:
[DAPUserCancel showalltransactions=”Y” showcancel=”Y” cancelsuccess=”Subscription Cancellation Completed Successfully!” cancelfailed=”Sorry, could not cancel the subscription!” cancelimage=”http://YOURSITE.com/wp-content/plugins/DAP-WP-LiveLinks/includes/images/CancelButtonUp.gif”][/DAPUserCancel]2) [DAPUserCancel showalltransactions=”N” showcancel=”Y”][/DAPUserCancel]
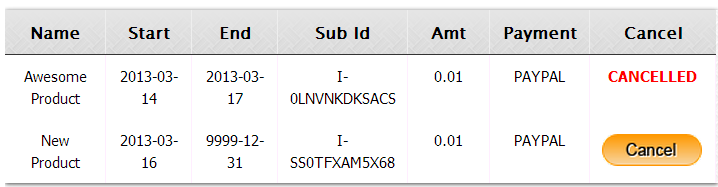
If you use this shortcode in a WP page, it will show transactions that are cancel-eligible (subscription transactions with paypal/authnet only).
Pick all the active products the user has.
For each active product, check if there is a purchase transaction (transaction Id > 0) associated with that user->product row in Manage Users page.
– if yes, check if it’s a subscription purchase (IPN received by dap from the payment processor contains recurring_payment_id, or sub_id or subscr_id) and if yes, show it with a cancel button.
Note:
– The cancel button will only show for authnet / paypal purchases. Auto-cancel not supported for other payment processors like Clickbank or Infusionsoft.– Only cancel eligible (or already cancelled) transactions will show (i.e. one-time purchases will not show)
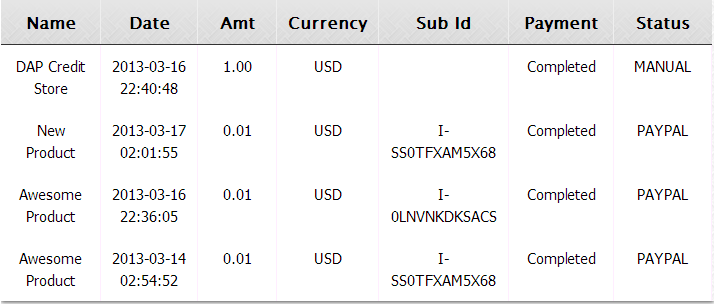
3) [DAPShowTransactions][/DAPShowTransactions]
You can use this shortcode to show ALL transactions (it’s just a dump of user’s transaction history. Shows every single transaction for that user).
10
Coupons
DAP allows you to create Coupon codes for use as long as you’re using the DAP Shopping Cart, and accepting payments via one of the following:
- Authorize.net
- Paypal Standard, and
- Paypal Website Payments Pro.
1. To create a Coupon code, go to DAP Admin > Payment Processing > Coupons

2. The Coupon options can then be setup on that page:

ADDITIONAL NOTES
You not only need to generate new Coupon codes, but you must also associate the Coupon to the DAP Products that should allow use of that Coupon. All of this can be done via the Coupons page.
Using Paypal Standard
If you are using paypal standard button, then create the DAP button with coupon enabled (under dap payment processing -> generate buy button page -> paypal standard tab) and put the coupon enabled button code on your sales page.
And when your prospect enters a valid coupon code in the form and clicks on the button, they will taken to the PayPal checkout page where they will see the discounted price
Using Auth.net or Paypal Pro
If you are using DAP Shopping Cart that connects with Authorize.net or Paypal Website Payments Pro, then in addition to setting up the actual Coupon, you must also go to DAP Admin > Payment Processing > Cart Options , and enable Coupons for the product(s) of your choice.

Now when your buyer clicks on the the DAP buy button, they will be taken to the checkout page where they can see the option to enter a Coupon Code.
Troubleshooting
If a Coupon is not working, check if the coupon code has actually expired, by going to DAP Admin > Payment Processing > Coupons page.
Check to see if Start Date and End Date are current.
Make sure the coupon’s Actual Usage is less than the coupon’s Max Usage.