User & Product Statuses
DAP assigns a status for the User itself (at a global, account level), as well as a User/Product level (specific to the user's access to that product).
So there's the User Status and then the User/Product Status
For eg., the User Status may be "Active", but a specific User/Product status may be "Inactive" – which means user can log in to their account, receive emails, etc, but cannot access any content that is part of this specific product (though they can access all other products they may have, that are "Active").
The bottom-line is this: In order for a user to access his/her account, and all the content in the Products that he/she's purchased, all the statuses have to be Active.
So here are the possible statuses, and what they mean.
User Status
These statuses apply to the User's account itself.
Inactive
If the user's status is inactive, then that means the user's entire account is inactive. User will not be able to even log in to their account. All outgoing broadcast and autoresponder emails will "exclude" them from the list, and they will not receive any emails from the system.
Active
Account is accessible, all emails are being sent.
Unconfirmed
They've just signed up for a product that requires "Double Optin". Which means, unless they "confirm" by clicking on the double-optin link, their account will not become active. Please note that once a user has already confirmed the double-optin link for one product, then their "User" status automatically becomes "Active". So even if they go on to sign up for another double-optin product, then their User status will never again change to "Unconfirmed" (unless specifically set so by the DAP Admin). For all future double-optin products, it is this user's "User/Product" status that will be "Unconfirmed", while the main "User" status remains "Active".
Locked
When an account receives login attempts from more than the number of IP addresses set in the "Setup > Config > Advanced > Max. # of User Logins From Different IP`s" field, then that user's main User status is changed to be "Locked". This is very similar to the "Inactive" status, except named different just so admin can distinguish between "Locked" and other users.
User/Product Status
These statuses specifically apply to a User's access with relation to a specific Product.
Inactive
User cannot access any content that is part of this product. However, User may access other products whose user/product status is "Active".
Active
There are no restrictions for this User to access content that is part of this product (of course, only whatever the user is eligible to see, based on the drip setup).
Troubleshooting Product Settings
Summary
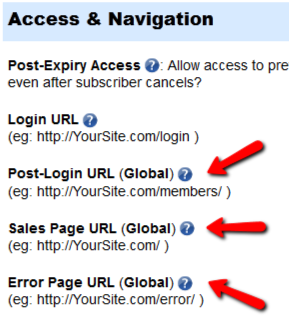
DAP has 3 fields which are applicable at a Product-level.
If a content (page/post) is part of just one single product, then the Product-level settings will apply.
But if a content (page/post) is part of multiple products, then DAP can’t figure out which product’s settings to use – so it falls back to the “GLOBAL” equivalent of that same setting under Setup > Config.
The 3 fields are…
- Post-Login URL
- Sales Page URL
- Error Page URL
All 3 of these have both a Product-level setting, plus a fall-back Global setting under Setup > Config.
1) Post-Login URL not redirecting to the right page
If the user has access to more than 1 DAP Product, then DAP cannot decide which Product’s Post-Login URL to redirect the user to. So it simply redirects the user to the global equivalent of that URL at Setup > Config > Post-Login URL (Global)
So if you’re testing the “Post-Login URL” field, make sure you create a test user with access to just that one product, and then log in as her and test.
2) Error Page URL not redirecting to the right page
If the content that user is trying to access, but is not eligible to access, is part of just one DAP product, then that product’s “Error Page URL” will apply. And this field is set to “/dap/product-error.php” by default. Even if you set this to blank, it will assume that to be the same as teh default value, and the default “In-page Error Message” will apply.
If the content that user is trying to access, but is not eligible to access, is part of more than 1 DAP Product, then DAP cannot decide which Product’s “Error Page URL” to use. So it simply uses the global equivalent under Setup > Config > Error Page URL (Global)
If you want to redirect the error page URL to a custom error page, then you have to enter that into each product, as well as one for the global one.
3) “Sales Page URL” on error page not pointing to right URL
(OR)
Lock message says “Sorry, this content is for members only. Click here to get access” but “Click here” points to my incorrect URL
If the content that user is trying to access, but is not eligible to access, is part of more than 1 DAP Product, then DAP cannot decide which Product’s “Sales Page URL” to show on the “In-Page Error Message” shown to the viewer. So it simply uses the global equivalent under Setup > Config > Sales Page URL (Global)
So make sure you have set up a URL in that field.
4) Clicking on a protected Category is not taking user to the correct “Error Page URL”
When you click on a category (instead of a single post), then because the category could contain many posts, each of which could be part of multiple Products. So DAP is unable to choose just 1 single Product from which to pick the “Error Page URL” and redirect the visitor to. So it just shows the error message with the padlock image, which can be customized. Click here for details.
| 3. The Lock, being generic, says “Sorry, this content is for members only.” but does not specify, as I (will) have several different types of members. It should say something like “Sorry, this content is for %%PRODUCT%% subscribers only.” Can this actually work? I am just guessing. | |||
|
|||
User Status “Unconfirmed”
The only time a new user shows up with the status “Unconfirmed” is if you have “Double Optin” turned on for that product to which he just got access.
When you have double-optin turned on, then their initial status is “Unconfirmed” because you want them to click on the “Double Optin” link and confirm their intent to get access to your product, after which their status is automatically changed to “Confirmed”.
So to make sure Users are always created with “Confirmed” status, just remove all text from the “Double Optin Body” and “Double Optin Subject” of the Product in question.
Sidebar
If your product is a “Paid” product, then obviously, you don’t want people who just bought your product by filling out a shopping cart, to have to go through another double-optin confirmation process. So for paid products, you should probably not force double-optin.
Double-optin is best when you’re signing up free users for a free product via the DAP Direct-signup Form.
Product Chaining
Product Bundling
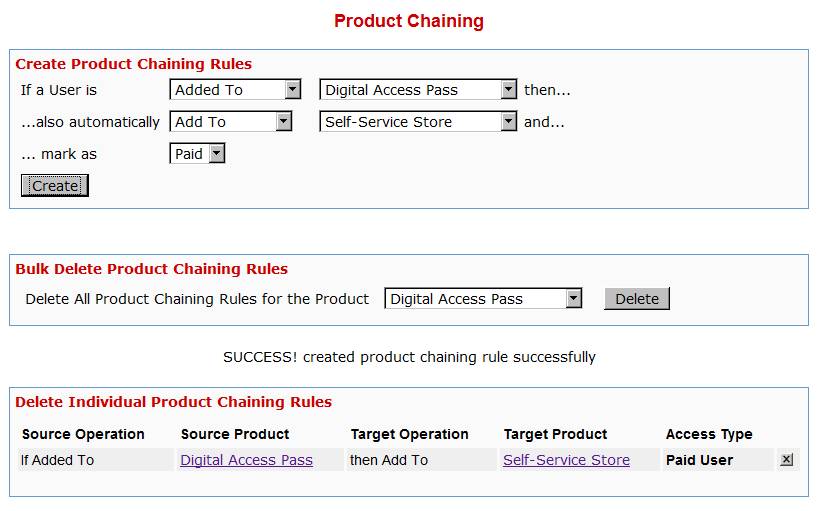
Any time someone gets access to PRODUCT A (either through direct signup, manual admin add, or purchase), then you can automatically give them access to PRODUCT B. And you can select whether they get PAID access to PRODUCT B or not.
Similarly, when someone is removed from PRODUCT A, you can also tell DAP to automatically remove their access to PRODUCT B.
Very useful for bundling products.
Product Access Automation
User signs up as free user to PRODUCT A.
Later on, user buys PRODUCT B (which is, say, paid version of PRODUCT A).
If you set up Product Chaining, then you can automatically remove them from PRODUCT A when they purchase PRODUCT B. So when you send an email to all PRODUCT A users asking them to purchase access to PRODUCT B, then you won’t be sending emails to those who have already purchased PRODUCT B.
Click on image below to open full size in a new window.
“ProductLinks” Widget: Product-Specific Content
You already know that you can create a “My Content” kind of page within WordPress, that will list all products that a user has access to, and then each product will list the content that they currently have access to (content that has already dripped on them).
But this page is a full-summary of all products, all listed on one page.
Instead, if you wished to create product-specific download pages, where you create a separate page for each product, that lists all the content within just that product alone, then that’s where DAP’s “ProductLinks” Widget comes in handy.
Here’s how you set it up.
- In WordPress admin, go to “Appearance > Widgets” and enable the “DAP ProductLinks” widget by dragging it onto a widgetized section of your theme’s sidebar.
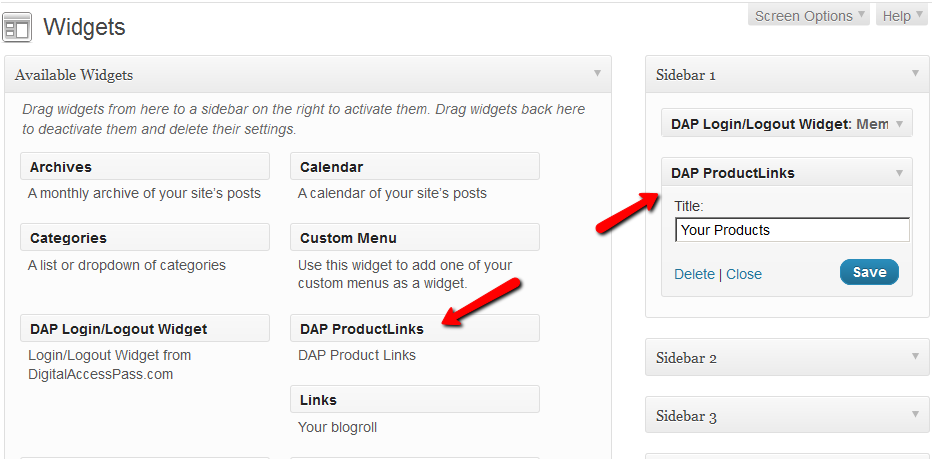
- As soon as you do that, the DAP ProductLinks widget will show up in your blog’s side bar.
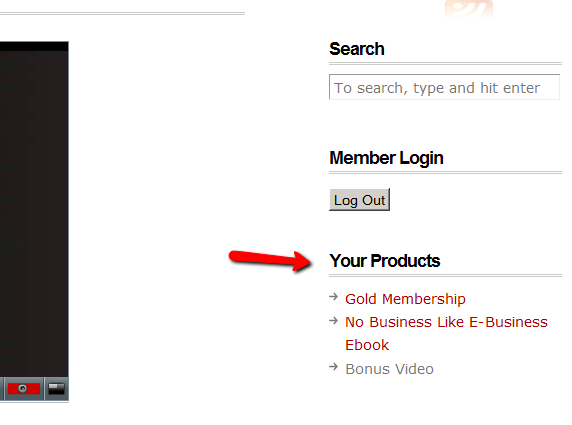
- By default, each of the product names – like “Gold Membership” in the above example – will link to whatever URL you put into the “Post-Login URL” for that particular product (DAP Dashboard > Products > Manage). So the next step is to create a separate page for each product, and then enter the permalink for this new page, into the Post-Login URL of that Product within DAP.
- Create a new page in WordPress – call it, “Gold Membership Content” (for example). In the body of the page, enter the following DAP merge tag:%%PRODUCT_DETAILS_<id>%%
Replace the entire text <id> with the actual Product id from DAP (Products > Manage)
So, if the product’s id is 6 in DAP, then the merge code becomes:
%%PRODUCT_DETAILS_6%%
Save the page. And if you gave the page the title “Gold Membership Content”, then the permalink for this page will be:
http://YourSite.com/gold-membership-content/ - Take the above permalink and enter it into the product “Gold Membership” in the “Post-Login URL” field. That’s it!
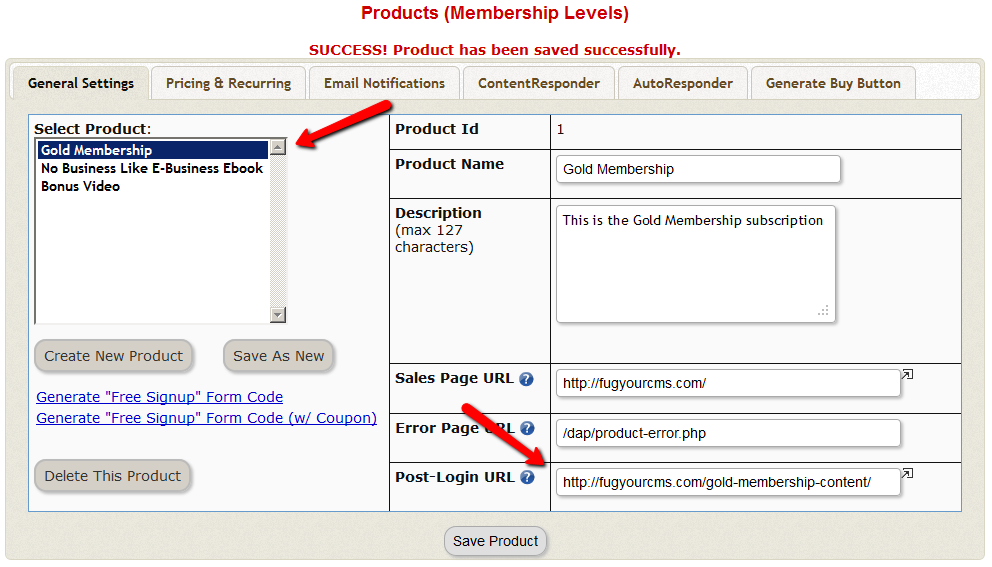
- Do the above for all products and you’re done.
End Result
- For each product that your member buys, the “Your Products” widget will show in the side-bar.
- It will list all of the products that the member has purchased.
- Each of the product names will link to it’s own specific content page
- When member goes to that page, the DAP merge tag you entered for that product will expand into product details and product-specific content links just for that product.
Importing Users In Bulk Into DAP
DAP allows you to easily import users in bulk from an external system or database.
Importing users in bulk is the same as adding users one at a time using the single-user-add feature. So whichever way you manually add users, DAP is going to all of the following…
- Create a new account for them using the email with which they’re being added
- Auto-generate a random, unique password for them
- Give them access to the product (into which they’re being imported or being added to)
- Send out the Welcome Email as per the product’s settings (this welcome email can be configured to send them the email & password to the member’s area along with anything else you want)
- Add them to the autoresponder series configured for that product
- … and so on.
When you do a single-user-add, all of this is done for that user in real-time. When you do a bulk-add, then all of the above happens for each user being imported, one at a time, when the DAP hourly cron job runs at the top of every hour. That’s the main difference.
Simple Import
Prerequisites For Simple Import
1) You must have already created the DAP Product into which the users will be imported
2) The user list has to be in a CSV (comma separated) format (one user per line)
For doing a simple import of user data containing just email, first and/or last name, the format of data (per user, per line) should be like this:
Email,FirstName,LastName
Email and FirstName are mandatory. But LastName is optional. So your user data row could be just…
Email,FirstName
Example:
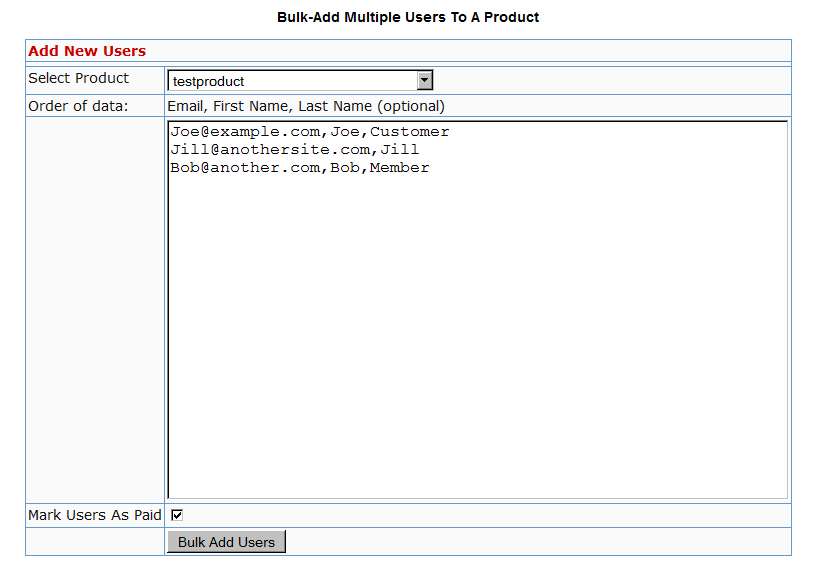
Joe@example.com,Joe,Customer
Jill@anothersite.com,Jill
Bob@another.com,Bob,Member
How to do the actual Import
- Go to Users > Add > “Bulk-Add Multiple Users To A Product”
- Paste your CSV list into the large text area
- Select the Product into which you want to import the users
- Check the “Mark Users as Paid” checkbox if you want them to have “Paid” access to the content (just as if they are actual paying members). If you don’t check it, they will all have access as a “Free” user (instead of a “Paid” user), which means they will only have access to content within the Product that you have marked as “Free”.
- Click on the “Bulk Add Users” button. That will first save this entire list as a CSV file in your /dap/bulk folder on your site. And then, the next time the Hourly cron (dap-cron.php) runs, it will add them one by one to the product, and send them emails as per your Product set up. So if your Product has the “Thankyou-Email” subject and body filled out, it will individually send out each of the users that thankyou email.
Extended Import
DAP will also allow bulk import of users with extended profile information. This includes their existing password and other profile data as detailed in this video (Bulk Add Users)
But please make sure you are using at least DAP v4.2.1 and LiveLinks v1.7, because what’s explained below is only available only since then.
Pre-requisites For Extended Import
1) You must have already created the Product into which the users will be imported
2) The user list has to be in a CSV (comma separated) format (one user per line), with the exact format being:
Email,Firstname,Lastname,Password,ProductName, Address,City,State,Zip,Country,Phone,Company, Flag (to indicate Paid or Free user), Access Start Date, Access End Date,UserName
Example:
joe@somesite.com,Joe,Member,test123,Example One-time Product,99 hill ave,Cityname,NY,10001,USA,,Plug and Play Inc,y,2011-03-16, 2012-03-15,JoeMember
The only required fields are Email, FirstName and ProductName. If you do not want to supply a value for any of the optional fields, but still wish to import certain others, then just leave those fields empty in the data row (but the commas should remain) as shown below.
Email,Firstname,,,ProductName,,,,,,,,Flag (to indicate Paid or Free user), Access Start Date, Access End Date,UserName
How to do the actual Import
Create a file with the name /dap/bulk/importusers.csv file so it has the users you want to import in the format specified above.
Run this script on your browser to complete the import, by visiting:
http://YourSite.com/dap/dap-bulkImport.php
Note:
* Replace “YourSite.com” with your actual domain name
* Limit the number of users you are importing with this method to not more than 500 users (rows) at a time. Otherwise the import may timeout, because the import occurs real time, because you’re running the script manually, and not via cron. If the user already exists in dap, then the script will just skip that user and move on to the next user in the bulk add list.
Troubleshooting 1ShoppingCart Integration
There are a few different reasons why this may not be working.
1. Check if Cron is running
The DAP email-processing cron that processes the 1SC emails may not be running. Check your webhost control panel -> Cron job settings. Make sure dap-emailorder.php is setup to run once every 10 minutes.
2. Incorrect Setup of Billing Email Id
The billing email id you have entered in DAP at Setup > Config > Payment Processing , should be entered into the “Order Notice Email – Primary Destination” field in your 1SiteAutomation/1Shoppingcart account, on the Setup > Orders > Notifications section. If by chance you enter it into the “Order Notice Email – Primary Destination” field, it WILL NOT WORK.
3. No Notification Emails from 1SC
The DAP cron is running but 1SC payment notification emails are not reaching your mail server. Check the email account where you expect to receive your 1SC payment notification emails and see if the order notification email from 1SC is in that mail box.
4. Incorrect Mail Server Settings
The cron is running and the 1SC order notification email is reaching your mail server – but you did not configure the mail server settings correctly in DAP Dashboard -> Setup -> Config -> Payment Processing.
Email Server Where Order Emails Come In
Email Server User Name
Email Server Password
5.”Read” Or Deleted Emails
DAP only processes order notification emails that are in the “Unread” status, to prevent previously processed emails and other non-DAP emails from being repeatedly processed.
Also, if you “pop” off the emails from that mail box (means, your email client like Outlook or Thunderbird or Gmail is “removing” your emails from the server when it retrieves them), it means that when DAP logs in to that billing email address, there are no emails there to be processed – the mailbox is empty, or the 1SC payment notification emails have somehow gotten deleted from that mailbox.
So it is possible that DAP is able to connect to your email server, but DAP is not finding any “unread” emails. Please login to your email server and mark all the payment emails that you want DAP to process… as “unread”. And also make sure that your email client does not remove the emails from that mail box.
6.Product Name Mismatch
There might be a “Product Name” mismatch. The product name has to be EXACTLY the same (including case, spaces, etc) in both DAP as well as in 1ShoppingCart. So if you have created a product by name “Widget A”, make sure your 1shoppingcart product also has the exact same name “Widget A”.
If everything is setup correctly, DAP cron will run every 10 minutes and try to process all 1SC emails.
The next time the DAP cron will run (every 10 minutes), it will pick up all the unread payment emails from 1SC.
7. Empty “Thankyou-Email Body/Subject”
Welcome email is not getting sent.
Select the product, and make sure there is some text in the “Thankyou-Email Subject” and “Thankyou-Email Body”. Whatever is in these fields is what gets sent immediately after someone purchases that product (or right after you give them access from the backend).
Now go to DAP Dashboard -> Users -> Add .
Select the product and manually add user. Now see if the thankyou email gets sent to that email id. If it got sent, then your product setup is correct.
Also check the DAP Dashboard -> Orders . Search for all orders, look up the order for the particular user in question by email.
Check the payment status and make sure there is no error there.
If you did all this and things are still not working, please do this:
1. Set DAP Dashboard > setup -> Config -> Log Level -> Log All activity
2. Re-run the 1SC test purchase
3. Check the DAP Logs (DAP Dashboard > System > Logs) and send us the log text in there for troubleshooting by pasting it into a new support ticket.
8. Sending Email & Password To Buyer
Make sure you have set the thank-you message with the right merge tags for Email and Password.
9. Manually Running Cron
First set DAP Dashboard > setup -> Config -> Log Level -> Log All activity
If you feel that the orders were not processed in dap, then just login to the 1SC email account where the sales/payment notification emails are sitting, and mark those orders/emails as UNREAD that you want dap to process.
Then manually run the cron script dap-emailorder.php cron by visiting the following link in the browser.
http://www.yoursite.com/dap/dap-emailorder.php
Replace yoursite.com with the name of your site.
It will just display an empty screen when complete.
Then check “Users > Manage” to see if user has been created.
– Veena Prashanth
Duplicating Products
If you have multiple products that have quite similar settings and content, you could save time by starting with just one product (either the lowest level, or the highest level), and then using the “Save As New” button to make an exact copy of that product, and then adding or removing content from this new copy to create new products.
So, let’s say you have say 3 membership levels: Silver, Gold and Platinum.
“Gold” will have all the content that “Silver” has, plus some more.
“Platinum” will probably have everything from “Gold”, plus some more.
So the way you could save time setting up all these 3 levels, is to either start with the lowest level, or the highest level.
Let’s say you start with the lowest level, “Silver”.
So create the “Silver” product fully, set up all the content dripping, email dripping etc.
And then once you’re done, while still editing the “Silver” product, click on the “Save as New” button (next to the “Save” button on the Product page).
That will create an exact duplicate of the “Silver” product – with all of its settings, content dripping and email dripping intact. And this copy will be called “Silver Copy” (just the text Copy added to the end). And this new copy will already be selected for you.
Now rename this new product from “Silver Copy” to “Gold”, save it, and then continue to add more content to it.
Then, finally, when “Gold” is fully ready, again do a “Save As New”, which would create a “Gold Copy” product.
Rename the “Gold Copy” product to “Platinum”, save it, and continue to add more content and emails to it.
Get the drift?
NOTE: On the flip site, you could also start by creating the “Platinum” product first, and then keep doing a “Save As New” and continue stripping out content to create the lower membership levels.
Silent Import
You wish to do what we call a “silent” import. Basically, you don’t want DAP to send out the instant “thanky-you” email to the users being imported.
You may want to do this, say, if you wanted to import a bunch of users into DAP first, without DAP sending them any kind of emails at all, do some preliminary testing, make sure their settings, product access, etc, are all correct, before notifying them of any changes.
Here’s how to do a “Silent Import” with DAP
1. Remove the “ThankYou-Email Subject” and “ThankYou-Email Body” from the Product into which you wish to import users. Save it in a text file for later, and save the Product.
2. Go ahead and do the bulk-add of users from “Users > Add > Bulk-Add Multiple Users To A Product”.
3. Wait for the DAP Hourly Cron to run and finish importing all users. Since the “ThankYou-Email Subject” and “ThankYou-Email Body” of the Product is empty at the time of import, DAP won’t send out those emails.
4. Once all the users have been imported, put back the “ThankYou-Email Subject” and “ThankYou-Email Body” text content, and save the Product.
OPTIONAL
5. At a later point, if you want, you can send out an Autoresponder email – or even better, a Broadcast email – with the merge codes for the email and password, if you want the newly imported users to get their passwords, or if you wish to notify them of anything at all (like the new system you’re using, their new account info, a general “what has changed recently” type of email, etc).
Free Signups: Adding Users Via DAP Signup Form
DAP allows you to create an opt-in form to directly sign-up users to your Product (which also acts as a “list” if you only want to drip or broadcast emails).
This is very similar to creating a sign-up form at Aweber or 1ShoppingCart, and allowing people to directly sign up by entering just their First Name & Email Id.
How To Generate Free Signup Form Code
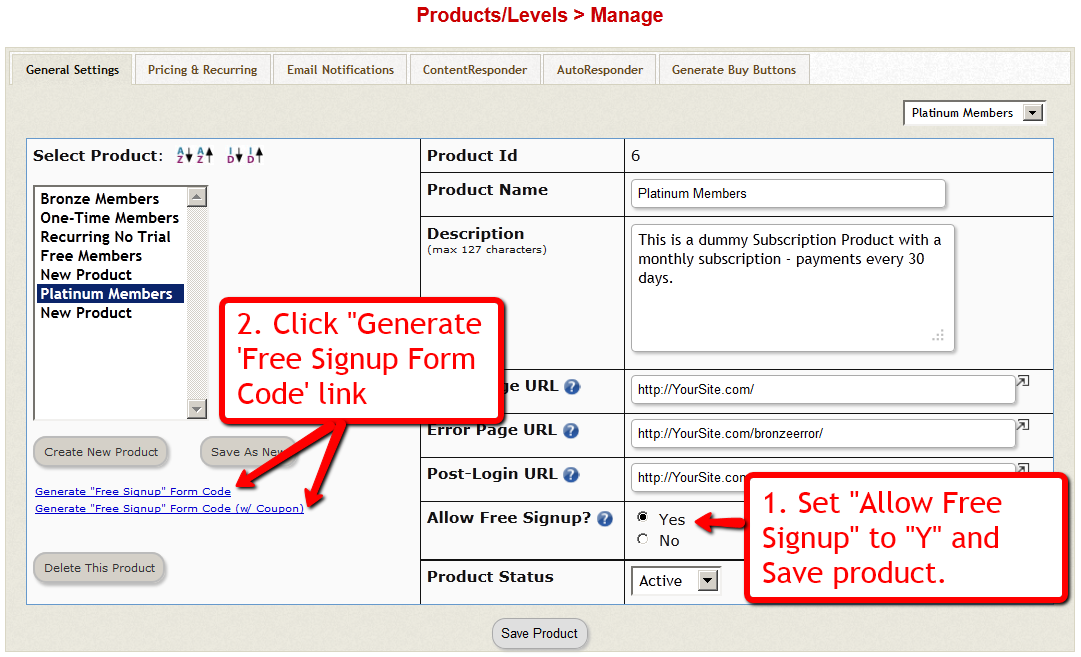
In the DAP Admin menu, go to Products > Manage , and pick the product for which you wish to create the free signup form
1) Set “Allow Free Signup” to “Y” and then first save the product.
2) Once product is saved and page reloads, now click on the first link that says Generate ‘Free Signup Form Code’ link.
(NOTE: This is for advanced DAP users only: Second one (that says w/ Coupon) generates the free signup form code along with an extra field for entering a coupon code – use this if you want the person signing up to also enter a coupon code before they can sign up for the product – you must have previously created the Coupon code under “Payment Processing > Coupons” page.
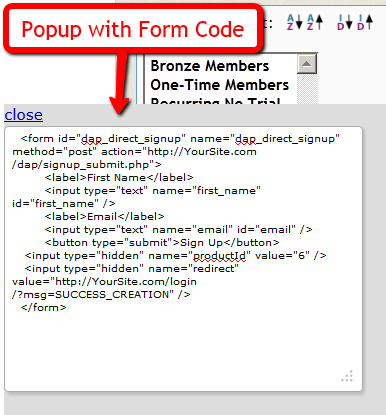
3) That will bring up a little pop-up that will have the HTML for the signup form.
4) The form looks something like this:
<form name=”dap_direct_signup” method=”post” action=”http://www.YourSite.com/dap/signup_submit.php”>
<table>
<tr><td>First Name: </td> <td><input type=”text” name=”first_name” size=”10″></td></tr>
<tr><td>Email:</td> <td><input type=”text” name=”email” size=”10″></td></tr>
<tr> <td colspan=”2″><input type=”submit” name=”Submit” value=”Sign Up”></td></tr>
</table>
<input type=”hidden” name=”productId” value=”1″>
<input type=”hidden” name=”redirect” value=”http://YourSite.com/login/?msg=SUCCESS_CREATION““>
</form>
Copy and Paste the above form into any HTML page, or WordPress Page or Post where you want the free sign-up form to appear.
The form already has all the code required to add the user to your member database, with “Free” access to the Product (for which you generated the HTML code)
That’s it!
Additional Fields On The Signup Form
We also allow the following additional fields to be accepted via the direct signup form:
first_name, last_name, user_name, email, address1, address2, city, state,zip,country, company,phone,fax,title,paypal_email
Take the direct signup form code from the dap products page, and to that, you can add additional attributes with the following names:
For ex:
If you want to accept the user’s paypal email address, the just that to the form code above:
<tr>
<td>Paypal Email:</td>
<td><input type=”text” name=”paypal_email” size=”10″></td>
</tr>
Frequently Asked Questions
Can this form be published on any site? Or can it be published only on the site where DAP is installed?
This form can be published on any web site – can be completely different from the site where DAP is installed. Please note that the above form submits to the url “http://www.YourSite.com/dap/signup_submit.php” – so doesn’t matter which site this form is published on, the user is always added to the site where DAP is installed, which is http://www.YourSite.com.
What happens after user signup?
If you note the text in bold in the above form (reproduced below)…
<input type=”hidden” name=”redirect” value=”http://YourSite.com/login/?msg=SUCCESS_CREATION“>
… you’ll see that the default form redirects to the page http://YourSite.com/login/?msg=SUCCESS_CREATION (which is the login page from your Setup > Config) and on that page, displays on the message “Success! Your membership account has been created. Check your email addresss in a few minutes for your password”.
After Sign up is complete, how to redirect to a link of my choice?
In the form, you can modify the field in the form named “redirect” to any URL of your choice. Here are some examples:
<input type=”hidden” name=”redirect” value=”http://www.SomeOtherNonDAPSite.com/thankyou.html“>
OR
<input type=”hidden” name=”redirect” value=”http://www.YourSite.com/2010/12/31/thank-you“>

