12
Aweber To DAP Integration
Follow the documentation below on this page for Aweber-to-DAP integration, only if you’re using DAP 4.4 or later. (For DAP v4.3.1 or older, click here)
Subscriber Flow
The flow of subscriber in this model, is “FROM Aweber TO DAP“. User gets added to Aweber first, then arrives at DAP via Aweber “thank you page”, at which point she gets added to DAP.
Now, if the flow is from DAP-to-Aweber, and are using email parsing to integrate DAP and Aweber, then your Aweber list will always be double-opt-in (as per Aweber policy, nothing to do with DAP).
But if you want your Aweber list to be single-opt-in, or you want your sign ups to be added to Aweber first and then to DAP, then use this flow. HEre, you can use an Aweber signup form on your squeeze page (instead of the DAP sign-up form) and then have Aweber add users to DAP.
NOTE: You cannot use this flow for Paid members – because paid members will need to have paid first, which means DAP needs to process their payment first, and if successful, it can add them to Aweber. So for paid members and paid content, always use the other DAP-to-Aweber flow.
But for free signups (say, like when you’re trying to build a list), you can add them to Aweber first using the flow explained below, just so you can take advantage of making your Aweber list single-optin, and then have Aweber add the subscriber to DAP on the other end. So this way, DAP can then create a free account for them, email them their login/password, and give them access to the “Free” content (that is, content available only to “Registered” users, so to speak), etc.
So here are the steps…
Aweber To DAP Integration
1. Go to DAP Dashboard > Products > Manage page.
2. Note down the Product Id of the product to which you want to sign-up the users (after adding them Aweber first, of course). Let’s call this PRODUCTID

Aweber List Is Single-Optin
If your Aweber list is single-optin, then follow the steps below. If not, skip ahead to “Aweber List Is Double-Optin” flow further below.
(The old steps 3 & 4 no longer exist. To keep the image below in sync, follow the rest of the steps starting Step 5.)
5. Now login to your AWeber account.
5A) From the “Current List” drop-down, select the list that you wish to sign up users to.
5B) Click on “Web Forms” in the menu at the top.
5C) Edit existing form by clicking on the name of the list.

6. On the next page – the list form generator page – click on ‘Go to Step 2’ towards the bottom of the page.

7. On the next, page…
7A) Click on the thankyou page dropdown and select ‘Custom’.
7B) Set the thank you Page URL to http://YourSite.com/dap/signup_submit.php?productId=PRODUCTID
Replace YourSite.com with the name of your site.
Replace PRODUCTID with the Product Id of the product you noted in step 2.
So, if the Product Id of the product in DAP is 2, then the thankyou page URL will be…
http://YourSite.com/dap/signup_submit.php?productId=2
7C) Where it says “Pass Form Data”, check the check box so that Aweber can “Forward subscriber information to your thank you page” – which essentially is DAP, so that DAP can add the subscriber to your membership site.

That’s it!
Aweber List Is Double-Optin
In this flow, set up your Web Form as usual, with no DAP-specific settings required.
Only change required is in the Aweber list’s main “List Settings” page.
5. Now login to your AWeber account.
6. From the “Current List” drop-down, select the list that you wish to sign up users to.
7. Go to My Lists > List Settings

8. Go to “Confirmed Opt-In” tab

9. Scroll down to “3: Success Page“.
9A) Set the “Confirmation Success Page URL” to http://YourSite.com/dap/signup_submit.php?productId=PRODUCTID
Replace YourSite.com with the name of your site.
Replace PRODUCTID with the Product Id of the product you noted in step 2.
So, if the Product Id of the product in DAP is 2, then the thankyou page URL will be…
http://YourSite.com/dap/signup_submit.php?productId=2
9B) Check the check-box that says “Pass subscriber info for personalizing this page”. Ignore the comment that says “Not recommended for WordPress users”, because this is going to point to a DAP script, and not a WordPress page.
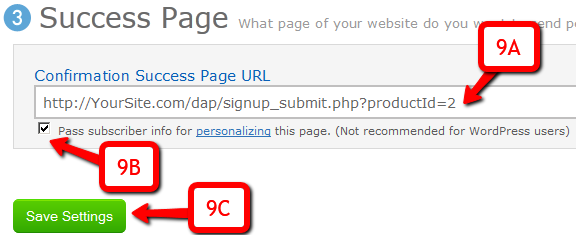
9C) Click on “Save Settings”.
That’s it!
Using Custom Redirect URL
If you want the user to be logged in automatically (either after single-optin or double-optin) and instead of being logged into the member’s area, you want the user to be redirect to your own custom URL, then your thank-you URL should be:
http://YourSite.com/dap/signup_submit.php?productId=PRODUCTID&redirect=http://yoursite.com/your-custom-thankyou-page
OR
http://YourSite.com/dap/signup_submit.php?productId=PRODUCTID&redirect=/your-custom-thankyou-page
Additional Notes
Now that you’ve set up DAP to integrate with your Aweber list (single- or double-optin), you may use the Aweber web form directly on your squeeze page for signing up subscribers
(instead of DAP’s “Direct Signup Form”).
Now, every time a subscriber signs up via the Aweber form, they will automatically be added to DAP.
If your list is single-optin, then the subscriber will be added to DAP instantly after sign-up.
If your list is double-optin, then the subscriber will be added to DAP only AFTER they’ve clicked on the Aweber double-optin confirmation link.
In both cases, if they’re a new user to DAP, they will be auto-logged in to the member’s area.
You may also configure the DAP Product’s “Welcome Email” to send out the DAP email and password via DAP itself.
-OR-
You can leave the Welcome Email in DAP Product page as blank. And then configure DAP to generate a default password (DAP Admin > Setup > Config > Default Password) as shown below, and then enter that same pre-chosen password in to your very first Aweber follow up email that goes out to your subscribers, so that they can receive their dap id/password details directly from your Aweber list.

For more details about this default password, please see this post.
PRODUCTID
1
Approving Users Before Access Is Enabled
Problem
“Will DAP allow me to manually approve members before their new accounts are activated? The process should be…
a) new user signs up, DAP prompts that the account is pending approval
b) Admin approves the account manually and email is sent to new member with their password and login details”
Solution
Yes, this can be achieved by enabling the “Double Optin” for a product.
So, normally, when a DAP Product is made “Double Optin” by entering the double-optin subject and email text on the “Email Notifications” tab of the product, and a user signs up for this product (whether as a free sign up or as a paid purchase or Admin-add), DAP will send them the content of this double-optin email first.
And usually, the body of this email would contain the %%ACTIVATION_LINK%% merge tag, which would become the confirmation link that the user has to click on first, before their product access status becomes “Active” (from “Inactive”). And as soon as the user clicks on the confirmation link, their product status becomes active, and then the “Welcome Email” is sent out right away, and now the user can log in and start accessing the content that is protected as part of that product.
Using Double-Optin To Force Approval
If you make the DAP product as double-optin, and remove the merge-tag %%ACTIVATION_LINK%% from the email body, what happens is that the user/member will get the email, but there’s really no activation link (confirmation link) in the email for them to self-activate their account. So the email would just say something like…
“Thank you for your purchase/signup. Your account needs to be activated by us. So appreciate your patience while we do so”.
Now, their account remains at “Inactive” status. And only you, the DAP Admin, can activate it.
By now, you would’ve gotten the admin notification email for this person’s signup. So you know their email id. If not, you can just go to DAP > Users > Manage and you’ll see all inactive users.
You would then click on “Modify” to activate product access. And if the user status is also “Inactive”, then you would edit the user info, and change their status to “Active” (from “Unconfirmed”).
And then make sure you’ve added an autoresponder email (that contains the user’s email and password – insert mergecodes %%EMAIL_ID%% and %%PASSWORD%% into the email) to go out on Day #2 for that product.
And assuming you will be approving this new user at some point within the first 2 days, the autoresponder email for day #2 will get triggered within the hour as soon as you activate their account, and the user will get their welcome email.
Or you can send them the password in the double-optin email itself, but tell them that they won’t be able to log in just yet until their account is activated. It’s all up to you – DAP is as flexible as you need it to be.
So that’s how you would use the Double-Optin feature to indirectly force an “Approval” process.
4
What “Free Installation” Means
As a courtesy to our customers, we offer a free installation service, where we will install DAP on your site for free. And we can do your free installation within 24 hours of your purchase.
However, many people are confused by what “Free Installation” really means. So this article is to give you more details about that.
Installation vs. Setup
To give you a real-world example, think of “DAP Installation” similar to “Delivering the boxed TV set to your doorstep”. That’s it!
We won’t take it out of the box, hook it up to your cable box, set up your channels, set up your DVR, hook up your game console, DVD player, Roku box, etc. All of those things fall under “Setup & Configuration”.
So if you want our help setting up your DAP site, then check out our “Membership Site In A Box” package that comes with “Concierge” sessions to help you set it all up.
What Free Installation Includes
- We will upload all DAP files to your server
- We will activate the dap plugin on one WordPress blog (the DAP-WP-LiveLinks plugin)
- Activating this plugin will create all of the dap tables in your WordPress database
- We will setup the Cron job(s) for you within your web hosting cPanel.
- If we see any hosting related configuration or installation issues, we will do our best to resolve them, if they are even resolvable (99% of the time, they are).
- We will then send you your new DAP Admin Email id and Password via the same support ticket you opened for installation.
That’s it. There’s nothing else involved in the free installation that we perform.
What Free Installation DOES NOT Include
- Installation or setup or configuration of your theme (like OptimizePress or Thesis)
- Installation, setup or configuration of other plugins
- Troubleshooting of your current WordPress installations
- Troubleshooting issues with any previous membership plugins that you may be using
- Doing an “Overview” of your web site and giving you ideas about what can or cannot be done using DAP
- etc… etc… but you get the idea 🙂
Hope this helps clarify what you’re getting as part of your purchase.
Please remember that get get only one free installation, regardless of which license you buy. Additional installations may be purchased at http://DigitalAccessPass.com/buynow.php#installation
If you want us to do it all for you, then check out our “Membership Site In A Box” package that comes with “Concierge” sessions to help you set it all up.
To get your first free installation, click here.
9
Troubleshooting Welcome Email Delivery
Problem: Someone buys a product from your site, and you can see in the DAP “Manage Users” page that they have been added as a user, but that user never gets an email with their login/password. All they get is the confirmation email from the payment processor.
You want to know: “How can I get my users to automatically receive a “welcome” email with their Id/password” from DAP?”
If the users got added and the user status is “A” in the DAP manage users page, but the user did not receive welcome email with their ID/Password, it could because:
No Thank-You Email Setup
[NOTE: In newer versions of DAP, “Thank-You Email” is now being called as “Welcome Email”. So wherever you see “Thank-You” below, please note that it’s the same as “Welcome”]
For that product, you did not set the ‘thank-you’ email subject/body in the DAP Products Page.
Select the product in DAP products page and set the thank-you message content as shown below.

Thank-You Email Setup, But Still No Email
You have set up the thank-you email message, but the email still did not get delivered.
Solution 1
The only time the Welcome Email is sent, is when a user is given access to a Product for the very first time. If you are trying to add a user to a product, and the user already has been given access to the product, then it won’t send out the welcome email the second (or subsequent) time(s). So make sure the user you’re testing with does not already have access to that Product. If she does, then remove access to the product before testing again.
Solution 2
Go to DAP Setup > Config > Basic and make sure the “Admin Email” is set to an ’email address that resides on your domain/hosting account where DAP is installed’ instead of say a gmail or hotmail or yahoo email address. Now, if you have done everything in terms of making sure there’s no reverse DNS lookup issues with your host but if there are still users who do not receive emails (and the email is not in their spam folder) :
Here’s what you can do:
1) Setup dap to generate default password (dap setup -> config -> advanced) and instruct users to change their password right after they log in.
OR
2) Set up an autoresponder email in DAP to drip day 1 with the merge tag for login id/password. So even if the thank-you email is not delivered right after purchase, when the cron runs at the top of the hour, it will send out the id/password again.. in case they did not receive it the first time.
You can have dap connect to 3rd party smtp service like AuthSMTP.com to send out all autoresponder/broadcast emails for better email deliverability.
BTW, if you have tried everything and still the emails are not getting delivered or is landing in the SPAM folder, then please checkout our documentation on troubleshooting email delivery here:
http://www.digitalaccesspass.com/doc/troubleshooting-email-delivery
User Status “Unconfirmed”
The only time a new user shows up with the status “Unconfirmed” is if you have “Double Optin” turned on for that product to which he just got access.
When you have double-optin turned on, then their initial status is “Unconfirmed” because you want them to click on the “Double Optin” link and confirm their intent to get access to your product, after which their status is automatically changed to “Confirmed”.
So to make sure Users are always created with “Confirmed” status, just remove all text from the “Double Optin Body” and “Double Optin Subject” of the Product in question.
Sidebar
If your product is a “Paid” product, then obviously, you don’t want people who just bought your product by filling out a shopping cart, to have to go through another double-optin confirmation process. So for paid products, you should probably not force double-optin.
Double-optin is best when you’re signing up free users for a free product via the DAP Direct-signup Form.
47
Aweber To DAP (<=4.3.1)
Follow this documentation page for Aweber-to-DAP integration only if you’re using DAP 4.3.1 or older.
(For DAP version 4.4 and newer, click here)
Subscriber Flow
The flow of subscriber in this model, is “FROM Aweber TO DAP“. User gets added to Aweber first, then arrives at DAP via Aweber “thank you page”, at which point she gets added to DAP.
Now, if the flow is from DAP-to-Aweber, and are using email parsing to integrate DAP and Aweber, then your Aweber list will always be double-opt-in (as per Aweber policy, nothing to do with DAP).
But if you want your Aweber list to be single-opt-in, then you can use an Aweber signup form on your squeeze page (instead of the DAP sign-up form) and then have Aweber add users to DAP.
Please note that you cannot use this flow for Paid members – because paid members will need to have paid first, which means DAP needs to process their payment first, and if successful, it can add them to Aweber. So for paid members and paid content, always use the other DAP-to-Aweber flow.
But for free signups (say, like when you’re trying to build a list), you can add them to Aweber first using the flow explained below, just so you can take advantage of making your Aweber list single-optin, and then have Aweber add the subscriber to DAP on the other end. So this way, DAP can then create a free account for them, email them their login/password, and give them access to the “Free” content (that is, content available only to “Registered” users, so to speak), etc.
So here are the steps…
Aweber To DAP Integration
1. Go to DAP Dashboard > Products > Manage page.
2. Note down the Product Id of the product to which you want to sign-up the users (after adding them Aweber first, of course)
3. There is a file called dap-aweber.php in the dap folder. Make a copy of that file and call it dap-aweber-PRODUCTID.php.
Replace with the text PRODUCTID with the actual Product Id you noted in the previous step.
So in the example above, Product Id is 2. So the name of the file copy should be dap-aweber-2.php.
4. Open this file (dap-aweber-2.php).
The first line of code in this file looks like this:
$default_product_id = 1; //Change this to any product id from DAP
Change the part shown in bold below:
$default_product_id = 2; //Change this to any product id from DAP
Upload this file back to /dap folder on your site.
Aweber List Is Single Optin
If your Aweber list is single-optin, then follow the steps below. If not, skip to “Aweber List Is Double-Optin” flow further below.
5. Now login to your AWeber account.
5A) From the “Current List” drop-down, select the list that you wish to sign up users to.
5B) Click on “Web Forms” in the menu at the top.
5C) Edit existing form by clicking on the name of the list.
6. On the next page – the list form generator page – click on ‘Go to Step 2’ towards the bottom of the page.
7. On the next, page….
7A) Click on the thankyou page dropdown and select ‘Custom’.
7B) Set the thank you Page URL to http://YourSite.com/dap/dap-aweber-PRODUCTID.php
Replace YourSite.com with the name of your site.
Replace PRODUCTID with the ProductId of the product you noted in step 2.
So, if the productId of the product in DAP is 2, then the thankyou page URL will be – http://yoursite.com/dap/dap-aweber-2.php
7C) Where it says “Pass Form Data”, check the check box so that Aweber can “Forward subscriber information to your thank you page” – which essentially is DAP, so that DAP can add the subscriber to your membership site.

That’s it!
Aweber List Is Double-Optin
In this flow, set up your Web Form as usual, with no DAP-specific settings required.
Only change required is in the Aweber list’s main “List Settings” page.
5. Now login to your AWeber account.
6. From the “Current List” drop-down, select the list that you wish to sign up users to.
7. Go to My Lists > List Settings
8. Go to “Confirmed Opt-In” tab
9. Scroll down to “3: Success Page“, and enter the URL of the special dap-aweber-2.php script (or whatever the file name is) you created back in Step #4 above.
Check the check-box that says “Pass subscriber info for personalizing this page”.
Ignore the comment that says “Not recommended for WordPress users”, because this is going to point to a DAP script, and not a WordPress page.

Click on “Save Settings”.
That’s it!
ADDITIONAL NOTES
Now that you’ve set up DAP to integrate with your Aweber list (single- or double-optin), you may use the Aweber web form directly on your squeeze page for signing up subscribers (instead of DAP’s “Direct Signup Form”).
Now, every time a subscriber signs up via the Aweber form, they will automatically be added to DAP.
If your list is single-optin, then the subscriber will be added to DAP instantly after sign-up.
If your list is double-optin, then the subscriber will be added to DAP only AFTER they’ve clicked on the Aweber double-optin confirmation link.
In both cases, they will be redirected to the DAP Login Form.
You may also configure the DAP Product’s “Welcome Email” to send out the DAP email and password via DAP itself.
-OR-
You can leave the Welcome Email in DAP Product page as blank. And then configure DAP to generate a default password (DAP Admin > Setup > Config > Default Password) as shown below, and then enter that same pre-chosen password in to your very first Aweber follow up email that goes out to your subscribers, so that they can receive their dap id/password details directly from your Aweber list.
For more details about this default password, please see this post.
NOTE: If you want to send the subscriber to a different page (instead of the DAP login page) upon sign-up, then do this:
- Open dap-aweber-2.php (or whatever the script name is)
- Look for this line :
$redirect = Dap_Config::get(“LOGIN_URL”); - Update it to point to any URL of your choice. For eg.,
$redirect = “http://yoursite.com/thankyou”;
This way you can redirect users after they complete the Aweber signup, to a landing page of your choice.
PRODUCTID
21
Moving DAP From One Host (or Domain) To Another
NOTE: We do not provide support for server or domain moves as part of Standard DAP Support that you get with your purchase of DAP. Please see our Terms Of Support which explains why. If you want our help with moving a DAP installation, you may purchase Premium Support slots from http://DigitalAccessPass.com/buynow.php#store (see “Installations & Support” tab)
Moving a DAP installation
DAP does not store the domain name anywhere in the database. So if you want to move an existing installation to a new domain, the only place where you need to change your domain name in the DAP installation (if you’re moving across domains) is in the dap-config.php file.
Moving a DAP installation consists of basically moving the files, and moving the database. Only 2 components.
- Log in to your web hosting control panel, go to “phpMyAdmin”, select your WordPress database (which is where the DAP tables are also installed, by default)
- Do an “Export” of just the DAP tables. Select the “SQL” option and select “Save as File”. All DAP database tables start with the text “dap_”. Save this file on your desktop – let’s say you call it “dapexport.sql” (it could also be “dapexport.txt” – does not matter what the exact extension is – .txt or .sql).
- Make a back up of the dap-config.php file (located in the “dap” directory on your old site/domain) on your desktop
- At your new site, install WordPress (if not already installed)
- Log in to your web hosting control panel of your new site, go to “phpMyAdmin”, select your WordPress database, go to the “SQL” tab, open the export file from above (dapexport.sql), copy the contents, paste into the SQL tab and hit “Go”. All dap data from your old site is now on your new site.
- Copy the database credentials (db name, db username, dp password and db host) from your new blog’s “wp-config.php” to the “dap-config.php” file stored on your desktop.
- If you’re also changing domain names, then open dap-config.php, and modify SITE_URL_DAP to point to your new domain name.
- Upload all dap files to your new site (don’t do full installation – just upload the files).
- Upload the DAP-WP-LiveLinks folder to wp-content/plugins/
- Upload the modified dap-config.php file from your desktop to the “dap” folder on your new site.
- Log in as WP admin, and activate the DAP-WP-LiveLinks plugin. It should give you a warning that DAP is already installed. That’s ok – that’s what we want it to say.
- That’s it. DAP is now moved over from your old site to your new site.
- Log into your DAP Dashboard using your old DAP admin login info, and you’re all set.
13
Unlocking Users
DAP has a feature where if a user logs in from more IP addresses than what you’ve configured as DAP Admin (default: 5) under “Setup > Config > Advanced > Max. # of User Logins From Different IP’s” , then the user’s account automatically gets “Locked”, and both the user and you (the admin) will get an email notifying you that the user’s account has been locked.
You could then unlock them yourself, or wait for the user to send you an email and ask to be unlocked.
How to Unlock Users
- Search for the User by email on the “Users > Manage” screen
- Click on the name or user id. You will now be taken to the “Edit User” screen where you can see the user’s full details
- Next to user’s name, you should see a button called “Unlock User” (you will see this only if the status of the user is “Locked”, and won’t see it for other regular users).
- Click on the “Unlock User” button. That’s it. When you click the “Unlock User” button, the user’s login records are deleted, and the previously recorded IP addresses are deleted. So user basically starts with a fresh, new login count.
TIP: If your users are getting locked out too frequently, and you don’t want the hassle of unlocking them regularly, simply set the count to a higher number – like 20. Or you can also disable login IP check for individual users, or for your entire web site as a whole.
65
DAP-to-Aweber Integration
UPDATE April 2, 2015: Starting DAP 4.8, DAP now integrates with Aweber via their API.
UPDATE July 23, 2014: The DAP-to-Aweber integration below has slightly changed – the documentation below has already been updated with the new information.
Subscriber Flow
The flow of subscriber in this model, is “FROM DAP TO Aweber“. User signs up at DAP first, then DAP adds her to Aweber.
If you are looking for the other way, i.e, “FROM Aweber TO DAP”, then click here.
Please Note
When DAP adds a subscriber to your Aweber list, it can currently “send” only the user’s Name and Email address to Aweber. DAP cannot (and does not) send the user’s unique password in DAP, or their affiliate id, etc. If you want Aweber to send out the password, then here’s how you can do it.
How it works
With the “DigitalAccessPass.com” Aweber Email Parser, integrating DAP with Aweber is a total breeze.
1. Login to your account at Aweber.com and from the “Current List” drop-down, pick the list to which you want DAP to add users to.
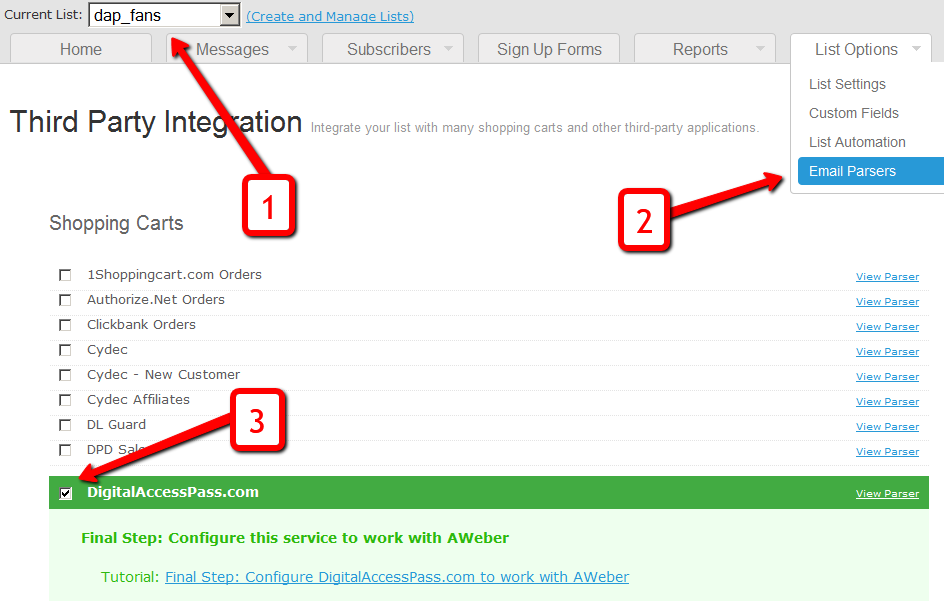
2. Click on “List Options”, and from the drop-down, select “Email Parser”
3. On the Email Parsers page, select the check-box next to the “DigitalAccessPass.com”
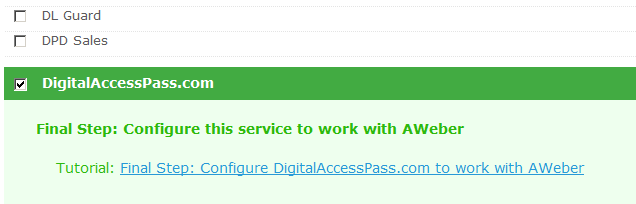
That’s it for the Email Parser activation at Aweber. You will be shown something like the image below – but note that there is no “Final Step”. So nothing further to do on this Aweber page.
4. Log in to your DAP Admin Dashboard and pick the product (whose members you wish to add automatically to your Aweber list from step 1 above)
This step is where things changed on Aweber’s end sometime in June/July 2014. So if you previously performed this step and your Aweber integration has stopped working, please double-check the steps here.
5. Go back to Aweber and select the right list. Then, under List Options > List Settings, under “Basic Information” section, you’ll see “List Name” and right below that, you’ll see “Unique List ID“.
In the image below, both appear to be the same. But on most Aweber accounts, especially new lists recently created, these may not be the same.
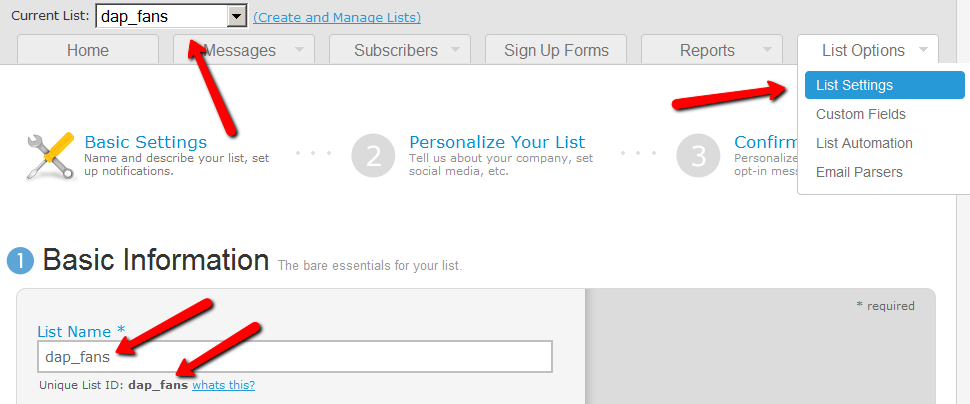
Take the “Unique List ID” (NOT THE “List Name”, like it used to be earlier)
Add the text “@aweber.com” to the end of that text – that now becomes your “Aweber List Email”. So if your list’s unique list id is “dap_fans”, then your Aweber List Email becomes “dap_fans@aweber.com”.
Copy this, go to the DAP Products > Manage page, and under the “Notifications” tab, add this Aweber List Email to the “3rd Party Notification” field, and save.
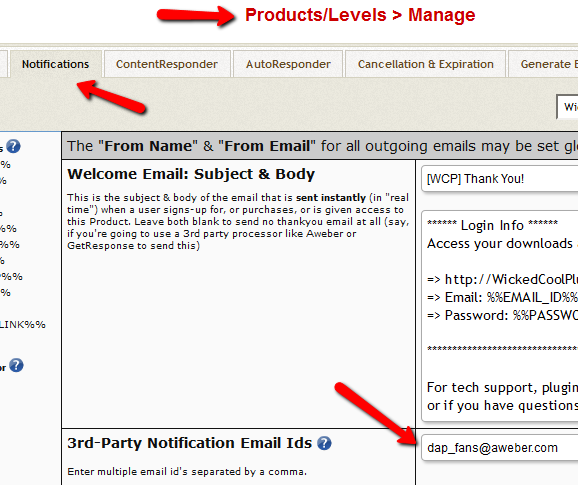
That’s it!
How This Works
So let’s say you picked the list “dap_fans” in your Aweber account, and the DAP Product “Example Subscription Product” (as shown in the screenshots above).
So once you add “dap_fans@aweber.com” to the product’s “3rd Party Notification Email Ids” field and save it, every time someone gets access to the “Example Subscription Product” product (regardless of whether they buy it, or you give them access on the backend), an email is sent out to the email id dap_fans@aweber.com , which looks like this:
From: Joe Subscriber <joe@subscriber.com>
Subject: New User Signup (3rd Party Notification)
Body:
Name: Joe Subscriber
Email: Joe@Subscriber.com
Product: Example Subscription Product
And because you have already activated the DigitalAccessPass.com parser in your “dap_fans” list, Aweber automatically adds “Joe Subscriber” with the email id (Joe@Subscriber.com) to your dap_fans list. And the parser has been written in such a way, that the product name will be used as your “Ad Tracking” field for the subscriber. So you will be able to group them and run reports on them in your Aweber account.
Frequently Asked Questions
Q: If I integrate DAP with Aweber and someone signs up to my membership site and then later on cancels or stops paying, can DAP automatically remove people from Aweber?
A: Short answer: No. Aweber doesn’t have a “Remove” parser, only an “Add” parser. So if someone who DAP automatically added to your Aweber list when they purchased a product, cancels or asks for a refund, you will have to manually remove them from the Aweber list. But wait, this may not be such a bad thing after all.
ExtraTip: As soon as someone cancels their subscription (or just doesn’t pay, or their credit card is declined), then their membership account in DAP automatically expires. Which means they can no longer access any content (unless you have specifically set DAP Config to deliberately give ex-members access to content that they paid for previously when they were a member).
So that means, their access in DAP has expired, but they are still on your Aweber list.
This may not be bad, because if you keep sending them emails (through Aweber) about new content and new videos and new stuff you are adding to your membership site even after they’ve cancelled, when they come back to your site through the link in your email, they won’t be able to access the actual content.
So it’s a great way of continuing to keep even ex-members curious and coming back to the site, only to be presented with a “Sorry, you don’t have access to this”, which may be a great incentive for them to come back and join your web site.
Of course, for this to work, you must put all the key content on your web site, and use the emails just to get them curious about the content, and eventually bring them back to the site to deliver the content. However, if you are going to send out all the good stuff in your emails (which doesn’t make sense anyway) then this may be an issue for you.
Q) Will DAP add only paid customers to Aweber? Or both Paid and Free members?
The link is really between the DAP Product and your Aweber List. So regardless of who gets access to that product – for free, by paying, or admin added – they will automatically be added to your Aweber list. So if you don’t want your free members to be added to your Aweber list, then keep your “Free” products and your “Paid’ products separate, and don’t set up this integration for the Free products.
Q) I have a question about how Aweber integrates with DAP. In this instance i am selling a monthly and yearly membership. The reader clicks on the subscribe button on my sales page and gets taken to Paypal. Assuming i have integrated Aweber properly, does the person get added to my Aweber List as well as the DAP list? Or is the only way they get added to Aweber is through a webform? I would like to be able to email the subscribers from time to time through Aweber but i am not using a Web form on my sales page, only a subscribe paypal button.
For paid products, here’s the flow:
Payment Processor (For ex – Paypal) == > DAP ==> Aweber
1) User pays via Paypal.
2) Paypal notifies DAP (ofcourse you need to integrate Paypal with DAP first either using Paypal hosted buttons (http://www.digitalaccesspass.com/doc/setting-up-your-paypal-button-and-paypal-ipn/) or using DAP generated button for paypal (http://www.digitalaccesspass.com/blog/2010/12/dap-v4-0/).
3) If the Paypal payment was successful, DAP creates the membership account and sends out the thankyou email to user with their membership login info (you can configure thankyou/welcome in the DAP products page).
4) In the DAP products page, you can select the product and set the Aweber list name in the 3rd party notification Ids field. In this field, you can specify a comma-separated list of email Ids.. one of the email ids can be your Aweber list email i.e. mylist@aweber.com
5) After DAP adds the user to purchased product, it sends out notifications to all email Ids listed in the 3rd party notification id field for that product.
Here’s more info on how to integrate DAP -> Aweber for paid products. Make sure to login to your Aweber account, Click on “My Lists†and within that, select “Email Parserâ€Â. On the Email Parsers page, check the check-box next to the parser named “DigitalAccessPass.com†as described above in this post.
First Name: Veena
Last Name: Prashanth
Email: veena@digitalaccesspass.com
Product: Digital Access Pass with WP LiveLinks