4
2) I have protected a blog post as part of a Product. The User’s account shows as having access to it when I look him up in the DAP Dashboard, but the actual user cannot access it in their browser.
4) I don’t want the links to all my protected blog posts showing up on my blog’s home page
Troubleshooting Content Access
User Can’t Access Content
By far, this is the most frequently asked support question. So let’s start by addressing that real quick…
If a User can’t access a piece of content (blog Post, Page, File, etc), then there are only a very few reasons for that…
- User doesn’t have any access to the DAP Product (where the content in question is protected as part of).
- User is a FREE user having FREE access to this specific Product, but the content within the Product itself has been marked as being available to PAID users ONLY.
- User does have access, but access has expired
- User account status is Inactive because they’ve not yet double-opted in
- User account status is Locked (because they reached the IP login limit, and got locked out of their account)
In all cases, the main place to start troubleshooting is with the Users > Manage page. Search for the user’s email id (who is reporting or experiencing the content-access issue). See what Products they have access to, check their Access Start & End dates, check their account status, etc.
So let’s go over some of the basics, and some more detailed solutions for such issues.
Important Basics
Use two different browsers for testing. Not two different browser tabs, but 2 completely different browsers – like Chrome and FireFox, or FireFox and Internet Explorer. Log in as DAP admin using one browser, and then as a regular user in another browser. That way, you keep the access separate, and your testing will be clean and easy.
If you are using, say, Firefox, you are logged in to DAP admin, and are browsing your blog or trying to access content on your blog, then you will only have access to the content that the admin user has access to. You, as the DAP Admin, DO NOT have automatic access to every product by default. You will have to manually give yourself access to every product you create. And if you want yourself to have “PAID” access, then you have to mark yourself as “PAID”.
That is because, if DAP gave you automatic access to all products, then you will go ahead and protect a blog post, try to access that blog post, and DAP will give you access to that content because you as admin have automatic access to the product. And then you will wonder “Hey, I protected a blog post, but I’m still seeing it.
It’s Probably Not DAP
We realize that your first gut reaction is to blame DAP :-). That’s what we would’ve done too, if we hadn’t developed DAP.
But please note that whatever issue it is, you can be 99% sure that it’s not a bug. Because access-related bugs are extremely rare. We also do a lot of pre-release testing, then we release a beta version, then we get hundreds, if not thousands of people to try the beta, iron out the issues, and then release the final version to everyone else. So if there were a bug, it would’ve been caught a long time before it gets to you.
So we request you to approach things with an open mind, and try to think through calmly (and logically  why a certain user does not have access to a certain piece of content.
Now, on to more specific issues and specific answers…
1) I have protected a blog post as part of a Product. But I can still access it.
Short Answer: If you have protected a post/page/file, try to access it, and are able to do it, then it means you DO have access to it. Now let’s troubleshoot so that you understand the “how” and the “why”.
- Have you protected the page/post by adding it to a Product? If you don’t add it to a DAP Product, the post/page/file won’t be protected.
- Who are you logged in as? As DAP Admin? Or as a regular member?
- Now by logging in as DAP Admin, if you search for this logged-in user by email id or last name on the “Users > Manage” page, you will see that the user probably does have access to the product to which the post belongs
- Are you already logged in a a user who has access to that link?
- Maybe logged in as DAP Admin, who maybe already has access to the Product, which is why you are able to access the link? If so, either log out of DAP, or visit your blog in a completely new browser (if you’re logged in as DAP Admin in FireFox, then visit your blog using Internet Explorer).
2) I have protected a blog post as part of a Product. The User’s account shows as having access to it when I look him up in the DAP Dashboard, but the actual user cannot access it in their browser.
Short Answer: If you have protected a post/page/file, try to access it, and are able to do it, then it means you DO NOT have access to it. Now let’s troubleshoot so that you understand the “how” and the “why”.
- Who are you logged in as? As DAP Admin? Or as a regular member?
- Whoever you are logged in as, make sure that user (admin user or regular user) has access to the product to which the post belongs
- Have you added the post as a “PAID” or as “FREE”?
- If you have marked the post as “PAID”, make sure the user also is a “PAID” user (either there must have been a real transaction, or you must have manually marked him as “PAID”). Because free users cannot access content that has been marked as “PAID”.
- Maybe the user’s access to the product has expired. Check the user’s “Access Start Date” and “Access End Date” for that product. The start date should be current (not be in the future) and the end date should be current (shouldn’t be in the past, which means his access to the product has expired)
3) Free user can’t see protected content
You’ve created a free product with pages or posts that are only accessible to this membership type. The problem is that the users can’t actually access this content.
1. Log into your DAP system and go to the Products/Levels > Manage page.
2. Select your product in the General Settings tab, then click the ContentResponder tab.
3. In the Content Responder tab, you’ll see “edit” hyperlinks beside each of the pages/posts you’ve protected. Click the one for the page that’s causing the problems.
4. The “Drip Settings” popup will open now. In that popup, set “Is Free? (i.e., Accessible toFree users too?” to “YES”.
5. Click Save/Update resource.
4) I don’t want the links to all my protected blog posts showing up on my blog’s home page
Make sure you have “Sneak-Peek” turned off in the DAP Admin Config section. Once you do that, posts that are protected will not be displayed on the home page as well as if someone tried to visit the link directly.
5) Why do I see the “Lock” symbol on my blog’s home page?
It’s possible that you have no published posts (it’s a new blog), or you have probably protected all of the posts by adding them all to a DAP Product.
6) I have protected a blog post, but the entire blog post shows up, with the lock image at the very bottom
This is probably because you have turned on “Sneak-Peek”, but have not inserted the “More” tag into the post/page in question.
- Do you want a part of the protected content (like a “snippet”) to show even for users who are not eligible to access the post or page? If yes, then go to “Setup > Config > Advanced > WordPress Sneak Peek: Show snippets of post (upto the `More` break) even for protected posts?” and change the setting to “Y”, and save.
- If you turn on Sneak-Peek, then you *must* insert the WordPress “More” tag into every single blog post and page that you currently have protected.
So for the above issue, do one of the following…
1) Turn Sneak-Peek to off (set it to “N”)
– OR-
2) Insert the WordPress “More” tag into the post/page.
Doing either one should resolve this issue.
7) Members getting locked out because access end date is in the past
The only time a member’s access end date goes into the past, if their recurring payments are no longer coming in.
Which means, either they have canceled (or gotten a refund), or your membership level’s lifecycle has ended (like, if your Product/Level was a micro-continuity subscription program that lasts only for 6 months).
If the payments are still coming in, their end dates should keep getting extended by DAP automatically.
If payments are coming in, but the dates are not getting extended, then the payment link between DAP and your Payment Processor somehow broke, and you need to visit the Payment Processor integration documentation for your specific payment processor, and troubleshoot why the payments are coming in fine, but DAP is not processing them.
To ensure members’ access does not stop, make sure that their payments do not stop, and the recurring cycles in the product match that of your payment processor. Say, if your payment processor is processing recurring payments every 30 days, then DAP’s recurring cycles (on the Product page) should also be 30. If it’s 31, then DAP’s should also be 31.
Tip: It’s not a bad idea to set DAP’s recurring cycle day to 1 more than your payment processor’s recurring cycle, just in case your payment processor takes an extra day to process the actual payments. So in that case, if you have set your Payment processor to charge every 30 days, you could set DAP’s recurring cycle to 31 (one extra day grace period, just in case the recurring payment does not get processed on time).
8) I have newly setup DAP. Protected a blog post as part of a Product. But I can still access it, and I am not logged in.
If this is a new site that has just setup DAP, it is possible that the DAP changes that need to go into your .htaccess file at the main folder of your blog in question, didn’t go in correctly.
- Step AA: Open the .htaccess file at the root of your blog, then see if there’s text that looks like this:
#—– START DAP —–
RewriteCond %{REQUEST_FILENAME} -f
RewriteCond %{REQUEST_FILENAME} !-d
RewriteCond %{REQUEST_FILENAME} !(.*)(\.php|\.css|\.js|\.jpg|\.gif|\.png|\.txt)$
RewriteCond %{REQUEST_FILENAME} (.*)/wp-content/uploads/(.*)
RewriteRule (.*) /dap/client/website/dapclient.php?dapref=%{REQUEST_URI}&plug=wp&%{QUERY_STRING} [L] #—– END DAP —–If you see it, then simply open a ticket, and we’ll troubleshoot. - Step BB: If you don’t see it, then log in as WP Admin, go to “Settings > Permalinks”. Then pick a permalink structure OTHER than “default”. Then save the setting. Even if something other than “default” is already picked, simply hit the save button anyway. That’s when the .htaccess gets updated. Now go to Step AA above and verify the text in the .htaccess file. If it’s still not there, just open a ticket.
9) After a member logs in, they’re unable to view the member page – they get a “Sorry, cannot access” type error.
Some questions to ask that will hopefully lead you to the answer…
- Did you log in as them in a fresh browser and was your experience the same problem? Or is it a user-error on their behalf?
- What product did they purchase?
- Do they have valid “non-expired” access to the product?
- What is the “Logged-In URL” field of that Product in DAP? Is that the right URL to which they should be going to after they log in?
- If so, then is the “Logged-In URL” page or post actually protected as part of that same product that they actually purchased?
- If that field is empty, what is the value of the global setting under “Setup > Config > URL to which user is redirected to, right after log in” field?
- What is the actual URL that they’re “Supposed” to see after they login? If you went there directly, what do you see?
NOTES
1) DAP Admin does not have access to content by default. You need to give access to the DAP admin to the products in the DAP Manage Users Page.
2) If a user reports they cannot access content, it could be because their access has expired. So…
a) Login as DAP Admin, go to DAP Users > Manage page, search for user by email id (or other).
b) Make sure they have “valid” access to the product
c) Look at their access start and end dates. If access end date is earlier than the current date then you can manually extend access for legitimate users by clicking on the ‘Modify link’ under ‘Product Access’ in DAP manage users page.
d) Make sure that if it’s a PAID USER, then the user record is marked as ‘Paid or has a transaction Id’ under the ‘Trans Id’ column in DAP manage users page.
Users marked as “FREE” can only access content that is marked as “Free” in the DAP products page -> Content Protection area.
26
DAP Scenarios (Use Cases)
The Basics
When you configure a product as “Free”, you can use a “Free Signup Form” to sign up users for that Product.
If not, then the only way for people to get access to that Product, is to either buy it, or for the DAP Admin to give them access to it manually.
Now, let’s see the different ways in which you can use DAP.
Case 1: How to use DAP as an Email List
- Create and save a Product (a DAP “Product” is same as “Membership Level” same as “Email List”)
- Just add the Autoresponder email sequence to this product.
- No need to add any content, because you’re not dripping content, but dripping just emails.
- Click on the “Direct Signup HTML” link and copy the HTML
- Publish the HTML on any page of your site, just like you would publish a signup form from Aweber or GetResponse.
- The form collects “First Name” and “Email” from your visitor
- Anyone who signs up through this form is given access to that Product, and added as a “Free” user
- You can continue to drip autoresponder emails on them, and also send them email broadcasts.
Case 2: Free Sign-up. Then Promote Paid One-off Products
- There are no time limits or trials here. User signs up for free. You continue to promote your products to them.
- You will need to create 2 products here – 1 Free and 1 Paid
- Create your paid Product – “Paid Product 1” as a Non-Subscription product (Is Recurring = No)
- Set up the content protection, dripping (if any) and emails.
- Create a new free Product – “Free Product” – (which contains just free content and autoresponder emails)
- Use Direct-Signup to signup users for “Free Product”.
- “Joe Customer” signs up for free through this form, and becomes a free member.
- Keep dripping free content and emails on them. In the emails, you can promote the sales page(s) for your Paid Product(s).
- When Joe Customer eventually buys “Paid Product 1”, then now Joe automatically get access to “Paid Product 1”.
- When you search for Joe Customer’s email on the Users > Manage screen, you will see that Joe now has access to 2 products: “Free Product” and “Paid Product 1”
Case 3: Free Trial with Forced Continuity Forever
- You offer a 30-day free trial. After trial, subscription payments every 30 days, forever, until they cancel their subscription.
- Set up a Product in DAP as…
Is Recurring: Yes
Recurring Cycle 1: 30
Recurring Cycle 2: 30
Recurring Cycle 3: 30 - You can’t really do a “free” trial. You must charge at least 1 penny ($0.01) [because otherwise, Paypal (for instance) doesn’t send the right information in the IPN. And credit card processors won’t even validate the credit card if you try to charge $0.00, so when it’s time for the subscription to be charged after a month, you will see a lot of declines and rejected cards].
- Set up your buy button (in Paypal, ClickBank, 1ShoppingCart, etc) to match the above subscription set up in DAP (from Step #2 above): A $0.01 trial for 30 days, then recurring payments of $X every 30 days, forever (never ends).
- Make sure you use the same Product Name in both DAP and in your buy button.
- Publish the button on your sales page. When someone clicks on the button and signs up (you’ve already set up the payment processor integration during setup), DAP will automatically give them access to this product for 30 days (Recurring cycle 1).
- After 30 days, if subscription payment comes in as scheduled, then the user’s “Access End Date” is extended by another 30 days. So they will get access to all the dripped content from Day #31 to Day #60.
- If user cancels before the trial is over (or their subscription payment fails for some reason), then their “Access End Date” stays the same, which means it automatically expires.
Case 4: Paid Monthly Recurring Product with No Free Trial
- Create a Product in DAP as…
Is Recurring: Yes
Recurring Cycle 1: 30
Recurring Cycle 2: 30
Recurring Cycle 3: 30 - Set up your buy button (in Paypal, ClickBank, 1ShoppingCart, etc) to match the above subscription set up in DAP (from Step #1 above): Instant payment of $X + Recurring payments of $Y every 30 days, with an forever (never ends).
- Make sure you use the same Product Name in both DAP and in your buy button.
- Publish the button on your sales page. When someone clicks on the button and signs up (you’ve already set up the payment processor integration during setup), DAP will automatically give them access to this product for 30 days (Recurring cycle 1).
- After 30 days, if subscription payment comes in as scheduled, then the user’s “Access End Date” is extended by another 30 days. So they will get access to all the dripped content from Day #31 to Day #60.
- If user cancels before the trial is over (or their subscription payment fails for some reason), then their “Access End Date” stays the same, which means it automatically expires.
Case 5: All Free Content, Available only to “Registered” Members, Dripped Content
- You wish to make all of your content available for free, but users must “Register” first (i.e., sign-up using their email id) so that you can continue to send them emails and drip content so that they don’t get it all on day #1 and then un-subscribe from your list.
- Create a Product, say, called “Marketing Tips”.
- Set “Is Recurring” to “N”.
- Add content to this product (blog posts, files, etc). Set up the drip for this content (day #1, day #7, etc)
- Set up email autoresponders, if any, and add to this product.
- Click on “Direct-Signup HTML” on the Product page, copy signup-form HTML, publish on any page of your web site.
- “Joe Member” signs up for free through this form, and becomes a free member.
- DAP will keep dripping free content and emails on members.
Case 6: All Free Content, Available only to “Registered” Members,All available Day 1
- Almost everything is the same as Case 5 above.
- Except when you set up the dripping, set all of your content to be available on Day #1.
- So when user signs up through your squeeze page, they have access to all of the content right away.
Case 7: Packaging Same Content In Different Ways
So you would like the ability for a reader to buy access to a single blog post, or purchase a “Day Pass” to view all posts, or purchase a “Month Pass” or even a “Annual Pass”.
Here’s how you would do it:
1) Create a separate product for each scenario. So you end up with 4 Products:
i) “Single Post“: Has just one blog post as part of it
ii) “One-Day Pass“: Contains all blog posts, dripping for all set to start on Day #1, and also end on Day #1 itself
iii) “One-Month Pass“: Contains all blog posts, dripping for all set to start on Day #1, and end on Day #30
iv) “Annual Pass“: Contains all blog posts, dripping for all set to start on Day #1, and end on Day #365
Create 4 buy-buttons and publish them all on your sales page. Whichever product your reader purchases access to, DAP will automatically give them access to all of the content within that product, and drip it on them just the way you have set it up.
Case 8: Selling An Ebook/Report/Zip/Doc
So you would like the ability for a visitor to buy your ebook/PDF/report
Here’s how you would do it:
1) Create a separate product for your ebook – call it “Super-Duper-Report” .
2) Create a single WP page/post that has some copy about the ebook, and then directly links to the ebook from the page/post itself.
3) Protect both WP page/post as well as the direct link to your ebook on your server (like http://YourSite.com/wp-content/uploads/super-duper.pdf) as part of the product from Step 1.
4) Set the “Logged-In URL” for the Product to be the WP page that talks about and links to the ebook.
5) Create buy-button for DAP Product, and publish it on your sales page.
Case 9: Upgrading From Lower-level to Higher-level
So you would like the ability for a member to upgrade from one membership level to another (lower level to higher level – eg., Silver to Gold).
Please note that if a member is already subscribed via, say, Paypal, and their subscription is already stored as say 9.99 a month, then there’s no way to automatically upgrade them to another level that requires a payment of $19.99. There’s no way to modify the stored monthly amount in Paypal from 9.99 to 19.9 – Paypal won’t allow you to modify stored subscriptions.
So your only option is to get them to sign up newly for the higher-level, and then cancel their subscription to the lower level. Or if you’re using say a payment gateway like Authorize.net, then you can log in to your merchant back-office, and modify the subscription to start charging 19.99 going forward. That’s one of the greatest flexibilities offered by having your own merchant account.
Case 10: Selling New Product To Existing Members
So you would like the ability for an existing member/buyer to buy a new product from you (one-time or subscription).
This is exactly the same as when you set up the first product. No difference. Somewhere near the buy button, just let them know to use their existing member email during the purchase, if they’re a current member, that’s all.
As long as they use the same email id from their existing DAP account, then DAP will simply add the access to the new product to their existing account once they’ve purchased it.
Case 11: “Magazine Subscription” Model
You want to deliver content as if it were a monthly magazine. Only those who were in for that month, should be able to access that month’s content, and keep access to that content going forward.
You want to set up content to drip for a month.
So, for example…
a) For the month of April, you want only those who joined in April to get access to April’s content and onwards (if they stayed on, of course).
b) Those who joined any time in May should only get access to May content and onwards (but nothing before May).
So here’s what you do…
1) Make sure you set “Setup > Config > Advanced > Give access to previously paid for content” to “Y”.
2) Then, for each piece of content, you would set You also set up actual access start and end dates (note: “dates”, not “days”).
Then, for a post, you would set up…
Start Date: 04-01-2011
End: 04-31-2011
That way, anyone who joins in the month of April, will get access to April content now and onwards.
But anyone who joins on or after 05-01-2011, won’t get access to April content, but they’ll get access to May content now and onwards.
Case 12: Trial Sign-up. Then Promote Manual “Recurring” Upgrade
This assumes that your recurring is not forced-continuity. You want people to sign up for a trial first, and then manually “upgrade” to a recurring subscription. If they don’t do anything at the end of the trial, then their access to the trial product will automatically expire. But you can continue marketing to them to make them upgrade. We will set it up so that once they upgrade, they will be “moved” from the “Trial” product to the “Recurring” product (using “Product Chaining”). So they will no longer receive emails asking them to upgrade.
- You will need to create 2 products here: 1 Trial and 1 Recurring
- Create a new One-time Product (Is Recurring = No) called “Trial” and set access duration to be (say) 14 days (assuming 14 day trial)
- This contains all content and autoresponder emails that should be available to them during the trial period
- Generate buy button for this “Trial” product and put it on your sales page.
- Create a new product, “Monthly Subscription” (Is Recurring = Yes) which is a (say) monthly recurring subscription, with payments every 30 days.
- Generate buy button for “Monthly Subscription” product and put it on same or different sales page.
- Set up a Product Chain that says “If added to Monthly Subscription, remove from Trial”, so if someone upgrades to monthly, then they will no longer have access to trial product. So it makes it easier for you to keep marketing to your trial subscribers without any overlap or confusion.
- “Joe Customer” arrives at your web site and signs up for for the trial. He is given access to “Trial” product.
- DAP starts dripping content and emails on them. In the emails, you can promote the sales page(s) for your subscription product
- Joe eventually signs up for “Monthly Subscription”, then now Joe automatically get access to “Monthly Subscription”, and thanks to the Product Chain that you set up earlier, his access to the “Trial” product is removed. So he is no longer in that trial group.
- When you search for Joe Customer’s email on the Users > Manage screen, you will see that Joe now has access to just 1 product: “Monthly Subscription”.
- So basically, users will have access to any one of the two distinct products at any given time, which segments them so that marketing to them is straightforward, as you know who you are marketing to.
Case 13: One-Time Offer (or Page) After Free Signup
Q: I am wanting to collect some information from subscriber, but not until they have completed free registration. But page should be shown only once and only the first time they’re logging in.
- Create free product in DAP and generate signup form code
- In the form code, you will see the hidden form field “request” which will allow you to redirect new subscriber to any page immediately after signup (they will already be logged in to DAP by that time). Set that “request” URL to your page where you have created a set of custom profile fields form them to fill out (see this link for creating custom fields, and see this link for customizing profile page and showing only certain fields on a page).
- You can even drip that custom profile page so that it’s available only on first day (start day: 1, end day: 1)
That’s it! So subscriber signs up through your signup form, automatically gets logged in, lands on custom profile page which only shows a few fields that you want them to sign up, and once they submit the form, at the bottom of the form, you can have a link that says “Click here to enter member’s area”, and once they move away from that page, they will never see that page again because there’s no link to that page anywhere in your navigation menus.
Creating a new site (WP) where I would like the ability for a reader to
buy access to
a single blog post,
or purchase a "Day Pass" to view all posts,
or purchase a "Month Pass" or even a "Annual Pass".
33
How Do Members Get Added To Your Membership Site
(OR) How do members get access to the content
(OR) How does someone become a member?
With DAP, you can add users to your membership site in 3 different ways.
1. PURCHASE: Someone buys your product or subscribes (“Paid” member with access to both free and paid content)
2. FORM SIGNUP: Someone signs up through a signup form (“Free” members with access to only free content)
3. ADMIN ADDED: You add them as a member directly through the DAP Admin Control Panel (you can mark them as either “free” or “paid”)
All three are explained in detail below.
1. PURCHASE
*You first create a “Sales Page”.
On your sales page, depending on which payment processor you use, you go to Paypal/1ShoppingCart/ClickBank and create a new product with the EXACT same name as the product you created within DAP, and get the ‘Buy Button’ link from your Payment Processor. Publish this “Buy Button” on your sales page.
* Your visitor goes to your sales page
* They purchase your product
* Your payment process (Paypal/1ShoppingCart/ClickBank) notifies DAP that you have a new purchase.
* If the product names match, DAP automatically creates an account for them, generates a random password, and sends them an email with their email/password. You can customize the contents of this email on the “Templates” screen in your DAP Admin Control Panel. Integration with your shopping cart explained elsewhere (see documentation for setup).
That’s it!
That’s how “buyers” get added to your membership site and get access to the product they just purchased.
2. FORM SIGNUP:
You wish to give someone a “Free” membership.
NOTE: “Free” members who do not have a payment associated in DAP (which means they have not purchased anything) will have access only to content that you have marked as “Free”.
Once you have created a Product in DAP, and have added content (blog post/page links, links to files, etc), and have saved it, on the Product page, below the Product name list, you will see a link called “Direct Signup HTML”. (See image below). You must first select a Product before you can copy the correct form HTML.
Fig 1. Direct Signup Link on Products page

Fig 2. Form HTML that you get on clicking the Direct Signup Link

This HTML gives you the full HTML form code that you can publish on any page of your web site. This form only collects an email address and a first name.
Take this HTML code and publish it on page of your web site where you want sign up users. This could be a WP page or post too.
Note: When you see the above HTML code, there’s a field in there that looks like this:
<input type=”hidden” name=”redirect” value=”http://YourSite/Your-login-page-link/?msg=Success!%20Your%20membership account%20has%20been%20created.%20%20Check%20your%20email%20address%20in%20a%20few%20minutes%20for%20your%20password“>
Don’t forget to change the text above, where it says “http://YourSite/Your-login-page-link/?…” to point to your actual domain name and to your actual login page (if you have customized it).
Then, when someone enters their email address and first name and signs up through the signup form, DAP creates an account for them using that email address, creates a random password, and sends them an email with their email/password.
After that, you can drip any content or emails on them that are marked as “Free” (when adding content or emails).
At some later point, if they purchase any of your “Paid” products (see the “1. Purchase” section above), then as long as they use the same email id during purchase, DAP will automatically give them access to all of the “Paid” content in the Product that they just purchased.
3. ADMIN ADDED:
If you wish to directly give someone access to a Product and all its content and emails, you can add them directly from the DAP Admin screen (Users > Add/Edit).
You just need their email id and their first name (both of which they can change subsequently) to add them to a Product.
While adding them, you have the option of marking them as a “Paid” user by checking the “Mark as Paid” checkbox.
If you don’t check this check box, then they will be added as a “Free” user and get access only to “Free” resources (content/emails).
But if you check the “Mark as Paid” checkbox, then they will get access to all “Paid” content and emails, just like someone who is actually a “Paid” member.
19
Protecting WordPress Posts & Pages
- Log in to DAP Dashboard and go to the “Products/Lists” page.
- Select the product to which you want this blog post/page to be a part of
- Scroll down to the “ContentResponder” section
- On the left, you will see a list of blog posts & pages that have been published (if you scroll down in the window where the list of “posts” show, you will also see list of “pages”)

- Select one or more (hold Ctrl + Click to select multiple)
- Click on “Add Selected Posts/Pages” to protect the posts/pages.
- The post(s)/page(s) will now show up on the right-hand side of the box.
- Click on “edit” next to each link to configure dripping for individual posts/pages.
13
Creating New Users Manually
In DAP, to add a new a user to your site on the backend, you must give the user access to some product – any product.
What that means is, that you can’t create stand-alone new users who have access to no products.
So, to add a new user…
1) Go to “DAP Admin > Users > Add”.
2) Under the “Add New User“ section of the page, select a Product. Enter first name and email (both mandatory) . Last name and Username are optional.
3) If this user has paid you previously, or paid offline, then you may check the “Mark as Paid“ checkbox. If you do not check it, then the user is added as a “Free” user by default. The “Free” or “Paid” status for this product access is only a matter of internal reporting. It doesn’t really matter if a user is marked as free or paid – they will still get the exact same access to the product depending on valid access start and access end dates, whether you are dripping content, etc. So the “FREE” or “PAID” status is mainly for your own purpose, just to be able to differentiate someone you gave free access, and someone who paid you offline and you just want to note them as a paid user, that’s all.
4) Click “Add User To Product” button. At that very moment, the “Welcome Email” configured for that product, is sent to the user in real time. If no welcome email is configured, then nothing is sent.
That’s it.
PS: You can also mark a user as “Paid“ from the “Users > Manage“ screen after you’ve searched for them by email or last name.
PPS: And here’s how you can also add a manual transaction for that user
55
Paypal Hosted Buy Buttons
DAP can process Paypal payments using Paypal IPN (Instant Payment Notification). All you need to basically do is to enable IPN within your Paypal account and create your Buy button with a few extra parameters. It’s all explained below.
So here’s what you need to do to process orders through Paypal using IPN, and have your buyers automatically added to DAP on your site.
1. Enable IPN within your Paypal account.
Follow this post to enable IPN first, and then come back here to this post.
2. Create your “Buy Now” or “Subscribe” or “Add to Cart” button
- Log in to your Paypal account.
- Click on Profile => Profile and Settings => My selling tools => Paypal Buttons => Update

- Click on the “Create New Button”

On the Create New Button Page:
Step 1: Choose a button type and enter your payment details
1: Choose any one of the following button types based on the type of product you wish to sell.
* Shopping Cart (for multiple-item purchases)
* Buy Now (for one-time products)
* Subscriptions (for subscription-based recurring products)
2: After selecting the button type, enter item name and price.

- “Item Name”
Make sure the Paypal “Item Name” EXACTLY matches the “Product Name” that you created within DAP. In fact, login as DAP admin, edit the product, copy the text from the “Product Name” field, then paste this into your Paypal “Item Name” field, so that there are no typos. If the product names don’t match, DAP will ignore any IPN posts coming in from Paypal, which means no account will be created for your new member.
Step 3: Customize advanced features (optional)
- just add a custom variable to the button as follows:
Under “Step 3: Customize advanced features (optional)” tab, within the “Advanced Variables” text box, enter the following (change the text YourSite.com below to your domain name).
notify_url=http://YourSite.com/dap/dap-paypal.php
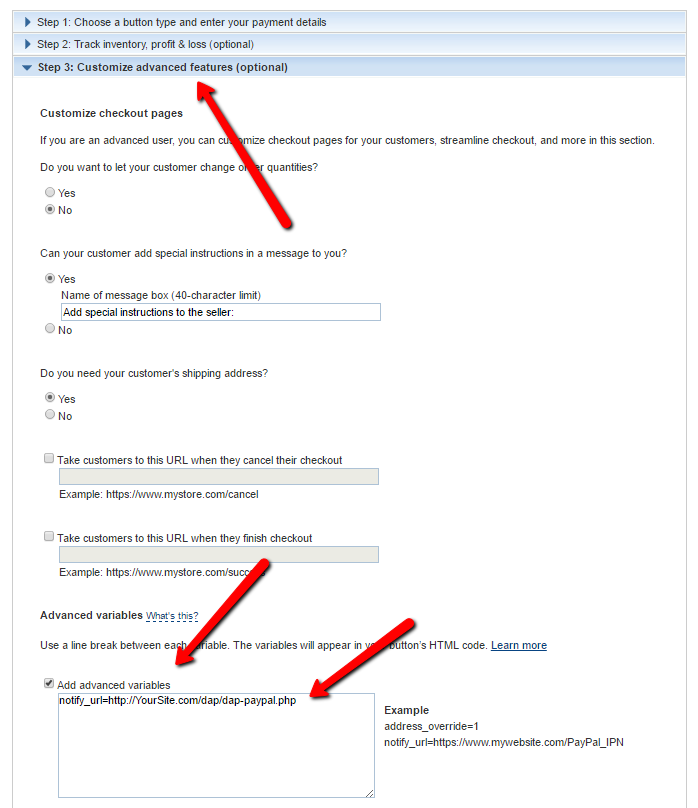
(change the text YourSite.com to your domain name).
Save the button.
4. Copy the HTML code for this button
5. Publish the code on your web site’s sales page
..or WP page or post.
That’s it!
So when someone subscribes to, or purchases your product using this button, Paypal will send an IPN notification to your web site to the above link. DAP will then verify the product and payment status, and then will automatically add give the buyer/subscriber access to that product.
If the email id used in this purchase is not already associated with an account on your site, then DAP automatically creates a new account, and sends the buyer an “activation” email that requires them to click on a link to confirm and activate their account.
But If this email id belongs to someone who already has an account in DAP (existing buyer, purchased a different product this time), then DAP doesn’t create a new account for this user. It simply gives the existing account access to this new product.
So when the user logs in, they will see that they now have access to TWO products, with each product and the available URL’s listed separately.
Note: If you’re going to be using Paypal to process payments, then you don’t need to set up the Email Processing info in your DAP Admin > Config > Payment Processing screen. You don’t need to set up the DAP Email Order cron job either.
24
1ShoppingCart Email Order Processing
If you’re using 1ShoppingCart or 1SiteAutomation.com (our private label of 1SC), if you want your users to be automatically logged in to their DAP membership area upon completion of purchase, then refer to this documentation on how to setup Login Xpress with 1ShoppingCart.
If you only sell one-time products, then the 1SC Login Xpress is the only thing you will need to integrate DAP and 1SC.
However, if you sell RECURRING products via 1SC, then you need to set up the email parsing of orders to allow DAP to process recurring payment notification from 1SC, as described below.
The reason for this, is that 1ShoppingCart, while very robust as a cart, does not trigger payment notification messages on the backend (like Paypal can do with IPN) when recurring payments comes in for a member.
So, we at DAP have created an exclusive “Email Order Processing” feature, where DAP will log in to your billing email inbox (where your 1SC email notifications come in) and then check your emails as if it were your personal assistant, and then process any orders that match your DAP Product names.
That is how DAP is able to do automated processing of Cancellations and Failed Recurring Payments.
For 1ShoppingCart and ClickBank, DAP does “Email Parsing” of orders.
Setting Up “Email Parsing”
Basically all you will be doing here is telling DAP where your payment notification emails from 1SC come in, and how to go fetch those emails so the recurring payments can be processed automatically, without you having to lift a finger.
1. Log in to your 1SC account. Then go to “Setup > Orders”. Copy the email id that you have entered into the “Order Notice Email – Primary Destination” field. Please note that 1SC DOES NOT send recurring billing notifications to the email id in the “Secondary Destination”. So be sure you use the email id from the “Primary Destination” field.

So let’s say you have set the primary destination email currently, to point to say ‘billing@yoursite.com’. Now make sure that the emails in your billing@yoursite.com inbox remain in ‘Unread‘ status, because when DAP logs in to check your recurring notifications, it will be looking at only Unread emails. It will not touch the ones that are already read.
2. Go to DAP Admin Dashboard > Setup > Config > Payment Integration .
3. On this screen, configure the following fields…
Email Server Where Order Emails Come In : mail.yoursite.com
Email Server Protocol (pop3/imap) : imap (no need to change this)
Email Server Port : 143 (probably won’t need to change this)
Email Server Protocol (ssl/nossl) : nossl (probably won’t need to change this)
Email Server User Name : billing@yoursite.com (enter email id copied from Step #1 above)
Email Server Password : yourpassword (the password to your email inbox for the above email address)
That’s it as far as setup is concerned.
Additional Notes
4. Set up your sales page as you would normally do when accepting payment through 1ShoppingCart. The only thing you need to make sure is to use the exact same “Product Name’ in your cart as well as within DAP.
So, if you set up a product called “My Membership Site” within DAP, then use the same name “My Membership Site” in your 1SC product name.
5. During installation, a Cron job (dap-emailorder.php) would have already been set up in your web hosting cpanel, to run every 10 minutes. So, every 10 minutes, DAP will automatically check the email id specified in Email Server User Name (the email id from Step 1).
If there is a payment notification (first time or recurring payment) for a product name that matches a product name in DAP, then it will automatically add that customer to DAP as a member if they’re a new member, or if they’re an existing member and it was a recurring payment notification, then DAP will “extend” their membership access by a month (or whatever your recurring cycle is), so that they will continue to get access to your membership site until the next payment comes in.
Testing
Try out some test purchases first. Make sure you try out the full purchase and full user experience, end-to-end.
WARNING 1: If you ever change the name of your product in 1ShoppingCart, or within DAP, make sure that both DAP and 1SC Product names are in sync.
WARNING 2: Do not use SKU in 1SC while defining the product. DAP will not parse the emails correctly if you use SKU.
5
Products: Random Stuff
The Product Name within DAP should be the exact same (even the case) as the Product Name in your Shopping Cart.
So if you were using a 1ShoppingCart (or private label) to accept payment for selling your digital info product or for access to your membership site, then the Product Name you use in your 1ShoppingCart admin panel should be the exact same name as what you use within DAP.
This is the only way for DAP to know about a new purchase through your 1ShoppingCart cart. And when it parses your 1ShoppingCart notification email, it can figure out that your buyer who purchased that product needs to be added to DAP, so that your buyer can get access to either your info product files, or to your subscription-based site.
12
Creating a Product
The “Products/Levels > Manage” page has 3 sections.
1. Product details
2. ContentResponder
3. Email Autoresponder
All three are explained below.
1. Product Details

1. Product Id
This is an internal number assigned to every product that is created. Nothing for you to do. It will automatically show a number after you save a new product.
2. Product Name (reqd):
Obviously, this is the name you give your product. So if you are creating a product (subscription-based, or one-time purchase) about how to make money online, then you would call it “How to make money online”. This name will be used by DAP on various screens, emails and reports. So, name it something intuitive, and not something cryptic.
3. Description (reqd)
Use this to expand on what your product does. This field is used on auto-generated error pages and such.
4. Product Price
Required only if you are using DAP itself as a shopping cart, by using one of our “Upsell Tree” Plugins. If you are using a 3rd party cart (like http://1SiteAutomation.com, e-junkie, Paypal standard where the buttons are hosted at Paypal), then you don’t need to enter anything here. Just leave it at 0.00
5. Sales Page URL (optional)
When a user who doesn’t have access to the links in this product, DAP shows her a default error page with a “Lock” symbol, and on that error page, it will say something to the effect of “Sorry, you don’t have access to this Product. Click here to get access.”. And the text “Click here” will point to this “Sales Page URL” will be shown, which the user can then follow to read your sales page and then purchase the product.
6. Error Page URL (optional)
Default value: /dap/product-error.phpIf you leave at this default value above, then DAP will show the default error page when a user tries to access a URL that she doesn’t have access to yet, URL to which access has expired, or she hasn’t purchased the product of which the URL is a part of.
Is this a recurring product? (optional):
Pick “Yes” or “No” depending on if this product is a recurring product for which you expect periodic payments to come in.
If you pick “No”, then when the user purchases this product (or you give her direct access from the admin area), then the user is given access from Day 1 to Day 9999.
Price
Enter the price of your product, regardless of whether it is one-time or recurring. This price is used only if you are using the Authorize.net plugin. If you’re using direct Paypal, ClickBank or 1ShoppingCart, then this field is ignored by DAP.
Billing Cycle (optional):
Applicable only if recurring is set to yes. If this is a recurring product, then you need to enter how often billing is done (in days). So, if your product is available for a monthly subscription, then enter “30” (as in, billing occurs once every “30” days).
Product Status (optional):
If you want to temporarily take this product offline, thus revoking access to this product by all users, then change the status to “Inactiveâ€Â.
3rd Party Notification Email Ids
If you want DAP to send email notifications to 3rd party email addresses (like autoresponder services – eg., Aweber – or to JV partners), then enter one or more email addresses here. Separate multiple email addresses by a comma.
Every time a user subscribes to this product (by paying, or because Admin gave her access), an email is sent out by DAP to all of these email addresses. The “From name” is the subscriber’s name, and the “From email” is the subscriber’s email address.
This is very useful for automatically adding your subscriber to a 3rd party list service that has a “subscribable” email address – like yourlist@aweber.com or 1sa-listid@1siteautomation.com.
Once you fill out the fields, click on the “Save/Update Product” button to save the changes.
Use the same form to make changes to the fields as well.
Integrating With A Payment Processor
The Product Name within DAP should be the exact same (even the case) as the Product Name in your Shopping Cart.
So if you were using a 1ShoppingCart (or private label) to accept payment for selling your digital info product or for access to your membership site, then the Product Name you use in your 1ShoppingCart admin panel should be the exact same name as what you use within DAP.
This is the only way for DAP to know about a new purchase through your 1ShoppingCart cart. And when it parses your 1ShoppingCart notification email, it can figure out that your buyer who purchased that product needs to be added to DAP, so that your buyer can get access to either your info product files, or to your subscription-based site.
13
What is a Product?
In DAP, a “Product” is the same as what some would call as a “Membership Level“.
We call it a “Product” because you really are selling access to this “Product/Membership Level” as an actual product on your web site.
A Product is basically a collection of…
1. “Content” (blog posts/pages/category links),
2. “Files” (.pdf, .mp3, .mp4, etc) and
3. “Emails“ (autoresponder emails)
Think of a Product as one big bucket, into which you add some content, you add some files, you add some autoresponder emails, you set up how the content should “drip”, how the files should drip, how the “emails” should drip, specify if this is a “Recurring” product or a “One-Time” product, specify the price, is there a trial, etc.
Basically, this “Product” is what your members “Buy” access to (or you can also give them access on the backend, without them having to buy – for eg., to your JV partners or business associates).
Whatever content you want your members to have access to when they become a member, is what you would add to this product.
For example, if you are running a subscription site on “How To Train Dogs”, you could give your product the same name “How to Train Dogs”. And to this product, you would add blog posts that you have created (like “Tools to buy”, “Dog Training 101”, “How to reward your dog”, etc).
You can set up Unlimited Products/Membership Levels in DAP. For instance, you can have 3 recurring membership levels (3 different products, called “Platinum Members”, “Silver Members” and “Gold Members”) – and you can add different content to each of these levels.
At the same time, you can have a 4th product – a one-time-sale product – called “Puppy Potty Training” where the buyer just gets access to 1 PDF report.
And you can have a 5th product – a one-time “Video” product – where the buyer gets access to a series of videos, all at the same time (no “dripping”).
A member can have access to one or more (unlimited) products at any given time.
Any time we say content, we mean WordPress blog posts, blog pages and regular files (PDF, zip, doc, mp3, mp4, swf, .jpg, etc).
Adding content/files means that as an admin, you can specify what content on your web site is part of this product, and you can go into each link and specify the access control for that file – like, is this content free or paid, when is it accessible to the user (on day #1, day #7, etc) – and for how long.
You can add content from your web site using the provided file browser within the “Manage Products” page, or you can also add using full URLs (like http://www.YourSite.com/dogtraining/protect-this-post.html).
Adding emails means you can setup an email autoresponse to be a part of this Product, and that email can be configured to go out to the user after “X” number of days after she has joined, or on a specific date (in case your email is date- or time- sensitive.