Bounces and Invalid Emails
There are many reasons why an email is not delivered to the recipient.
- Auto-responses and Vacation Replies
- Email delivered to “Junk” or “Spam” folder of recipient
- General undeliverable emails with no error specified by recipient’s server
- Recipient email server is down or unreachable
- “Connection timed out”
- Recipient mail box full
- Recipient email address not found
- Temporary non-delivery (server will keep trying for a few more days)
- Your server IP is blocked by recipient’s ISP (“Relaying Denied”)
- Your server IP is blacklisted for suspected spam
And the list goes on!
That should give you an idea why email delivery is so tricky and complicated, which is what created a niche for the email delivery industry, and which is why companies like Aweber, MailChimp and GetResponse even came into existence and have thrived while charging a hefty fee for what you would think is the simple act of delivering email over the interwebs.
When you use DAP for sending out emails (whether autoresponder or broadcast emails), the “From Name” and “From Email” you set up in the DAP Config are used to send out the emails.
If you use your own web host as the “carrier”, then your web host’s email server is the one that carries the email and tries to deliver to the inbox of the recipient. And web hosts are generally not very good at the intricate science of email delivery, which is why if you’re going to use DAP, we recommend that you bypass your web host and have a third-party email system like Amazon SES deliver your emails.
Regardless of the carrier (web host, Amazon SES, AuthSMTP.com, etc), all bounced and undeliverable emails come back to the “From Email” that you have used under DAP Config.
DAP by itself does not do anything with those emails, as those emails don’t come back to DAP, but they go straight to the inbox of whatever “From Email” you have specified.
We will surely address this in the future. But for now, you will have to manually review those email bounces, see which one of them sound more serious (like, say, recipient email id not found, or domain no longer in use, etc), and then de-activate those email id’s from your DAP database.
When you use Amazon SES, Amazon by itself also monitors email id’s that have a consistent history of bouncing back, and will automatically suppress those email id’s and won’t even deliver email to those email id’s even if DAP did send the actual email to those id’s.
1
Automated Reminder Emails For Admin
In DAP, you can not only send automated pre-scheduled emails to your members (Autoresponders), but you can also set up similar pre-scheduled “Reminder” emails to be sent to you (the admin) every time a member reaches a day milestone.
Eg: Let’s say you (the admin) want DAP to send you or someone on your team a reminder email to follow up with each member by email once they reach day #7 – meaning, it’s been 7 days since they signed up for a specific product.
This is how you do it in DAP:
- Go to DAP Admin > Emails > Autoresponders
- Click on “Compose New Email“
- For subject, enter (say) “Follow Up with %%FIRST_NAME%%”
- In the body of that email, you may use merge-tags for the member – like “Be sure to email %%FIRST_NAME %%LAST_NAME%% , ask them about their progress, see how they’re doing and upsell Platinum Coaching program. Their email id is: %%EMAIL_ID%%”
- Further below on that page, in the “Send to 3rd Party (instead of member)” field, select “Yes (like admin or staff)” and you will see an additional text box show up below, where you can enter your (or your staff’s) email id where you want the reminder to be sent.
- Save the email.
- Go to the DAP Product where you want this email to be added to the sequence.
- Go to “ContentResponder” tab.
- Add this new email to the product, click on the “Edit” icon, and set it to be dripped on Day #7.
That’s it!
Now for each member that signs up for that product, regardless of when they join, every time they reach day #7, the reminder email will be sent to the 3rd party email id specified for that message (instead of being sent to member).
Reverse Dripping
If you want to be sent this same email say 3 days before member’s access expires to that Product, then set the email to be dripped on day “-3”. (See Expiration Notifications / Renewal Reminders)
Expiration Notifications / Renewal Reminders
We have a new feature starting DAP v4.4: “Reverse Dripping”
This is where you can drip emails “X” days (where “X” is a number of your choice) before the access to a product ends for a member. So this is what you would use to send expiration notification / renewal reminder emails to your members.
To setup a renewal reminder email, you would set up the email as usual, and drip it as a negative day. So if you set up the email to drip on Day “-1”, then it means the email will be sent out 1 day prior to product expiry (for that product).
If you set it up to drip on “-3”, it will be sent out 3 days prior to access end date.
If you set it up to drip on “-7”, it will be sent out 1 week prior to access end date.
Renewal Reminder Email Setup
Warning: This is something you should set up only for recurring products that require manual renewal. Do not set up these emails to go out for automated subscription products, because the members will be charged automatically on the designated day every month, and asking them to renew will only confuse them.
- Create a new Autoresponder email with the product expiration notice, at Email > Autoresponders. In this email, you would say something like “Hey, your subscription is expiring in 1 week, so click on this link to renew… (followed by link to renewal page)”.
- Create another email that says “Hey, your subscription is expiring tomorrow…”.
- Go to Products > Manage and choose product for which you wish to set up renewal reminder.
- Switch to “Autoresponder” tab.
- Select the 7-day renewal reminder email from step 1 and add it to the product.
- Then click on the “Edit” link and set the drip day as -7
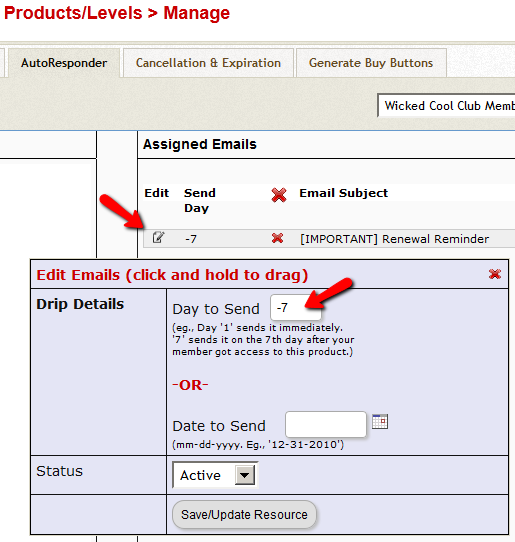
- Do the same for the 1-day reminder email as well, and this time set the dripping to be “-1”.
That’s it!
Troubleshooting Amazon SES Integration
DAP’s Amazon SES integration has been heavily tested, and we use it ourselves at DigitalAccessPass.com . So you can rest assured that there are no “bugs” of any kind.
Here are some troubleshooting steps if SES integration is not working even after you’ve followed the documentation exactly.
Troubleshooting SES
- MOST COMMON MISTAKE: Have you whitelisted the DAP “From” email in Amazon? And have you used exact same “case” for the email id in both places (DAP and Amazon)? Double-check spelling and case in both DAP and Amazon – they must be EXACTLY the same. For eg., you@yoursite.com is NOT the same as You@YourSite.com as far as Amazon is concerned. So if you’ve set the “From Email” in DAP to be you@yoursite.com, then you must whitelist exactly the same email id you@yoursite.com within your Amazon SES account as well. If you are not sure, delete the whitelisted email in your SES account, then COPY the from-email from DAP config (be sure to copy, and not re-type) and then PASTE the exact from-email into your Amazon SES account and whitelist it again.
- IMPORTANT: Have you requested Amazon for “Production Access” to your SES account? Being in “Sandbox” mode has its disadvantages (you can only send “from” and “to” whitelisted” emails ONLY). So your account MUST, MUST, MUST be in “Production” mode before Amazon SES lets you send emails to your customers.
- Are you using the exact ports as mentioned in our documentation? Ignore the port #s that Amazon recommends.
- IMPORTANT: Double-check with your web host to make sure that they actually allow a plugin like DAP to connect to a third-party server like Amazon SES to send out emails. Some hosts don’t even allow that to begin with (like BlueHost, for eg.)
- Turn on the logs by setting DAP > Setup > Config > Log Level to “Log All Activity”.
- Then go to System > Logs and clear the logs. Then go to one of your test accounts, and edit the user.
- On the “User Edit” page, click on “Resend Login/Password”.
- Check the email inbox to see if you got the email. If you didn’t, go to System > Logs and take the entire logs shown there, and paste it into a support ticket, and don’t forget to give us your WP login info and FTP info (and if possible, Amazon login info as well), and we’ll troubleshoot it.
3
Troubleshooting: Paypal Coupon Error Emails
Problem: You see emails sent to your DAP Admin email account that look like this:
paypalCoupon.php: missing item_name
-or-
paypalCoupon.php: No such Product found – SomeProductNameHere
This could be happening because….
a) Some robot software somewhere is auto-posting to that URL.
b) It’s possible that a search engine spider or spambot is hopping from link to link, submitting the form repeatedly from the backend, and because the form is being submitted in an illegal/invalid fashion, DAP is complaining about a missing coupon code.
So for now, if everything else is working ok, and the annoying email is the the only issue, then you can just ignore those emails. Or better yet, simply put a filter on that email subject and have it directly sent to the trash folder in your email client.
Strange Characters In Emails
If you or your members are noticing strange characters in emails – especially where there should normally be a single or double quote, then these are due to what are known as “Smart Quotes”.
These special characters always show up when you copy text from a WordPress blog (some themes use these characters) or a Microsoft Word document.
Single quote:
'(correct)
`(incorrect)Double quote:
"(correct)
``(incorrect)
The single quote that works correctly is located next to the “Enter” key.
The incorrect one is located next to the “1” number key.
So copy your email text to a text editor, like notepad. Then change all single quotes to be ‘ and all double-quotes to be “ in your emails. Then put them back into DAP, and then test.
The “strange characters” issue should then be resolved.
NOTE: In a future version, we will implement an enhancement in DAP so that DAP can handle this automatically, but for now, the above solution is your only option.
Troubleshooting Cron
The Problem
- Your autoresponder or broadcast emails are not going out (hourly cron job dap-cron.php)
- Your Affiliates aren’t being credited with sales (hourly cron job dap-cron.php)
- Your 1SiteAutomation/1ShoppingCart Orders are not being processed. (10-minute cron job dap-emailorder.php)
The Solution
One possible solution is that your cron job(s) aren’t running correctly.
DAP has two cron jobs. One that runs once an hour (dap-cron.php), and one that runs every 10 minutes (dap-emailorder.php).
You can see how to set them up here.
But in this post, we will see how to make sure your cron is actually set up correctly, or if it’s running correctly.
How To Know If Cron Is Running
- Go to System > Logs and click on “Empty Logs”. That will fully clear out all logs.
- Go to Setup > Config and set “Log Level” to “Log All Activity (during troubleshooting)” and click “Update“.
- Wait for the top of the hour for the hourly cron job to run. So if the time when you’re doing this, is say 11:20 AM, then wait for 12:00 Noon. If time is 3:45 PM, then wait for 4:00 PM.
- A few minutes past the top of the hour and go back to the System > Logs screen.
- If you see hundreds of lines of text in the logs, then that means your cron job is running correctly. If you only see maybe 10-20 lines of text, then your cron job is NOT running correctly, and you need to make sure the cron job is actually set up correctly.
10
Troubleshooting Email Delivery
Sending Email Through Your Web Site: The Basics
DAP is not an email service (like, say, Aweber).
DAP is just a script – a tool – like Microsoft Outlook or Thunderbird – that simply sends out email using your web host’s email server.
It is your web host’s mail server that actually sends out the email to the recipient. So once DAP notifies your mail server about a email that is to be sent, it has absolutely no control over what happens next.
It’s like when you put an envelope with a letter (regular mail) into the mailbox (post box). It is up to the Postal Service to actually pick up your letter, and deliver to the destination address. Your web host is like the Postal Service. If it doesn’t pick up and deliver the (e)mail, then DAP doesn’t have any say in it.
So if the emails that DAP sends out are not getting delivered to your recipients (or landing in the spam/junk folder of the recipient), there could be more than one reason for that.
Improving Email Delivery
DAP uses your web host’s email servers to send out emails.
Here are some ways to improve email deliverability and also avoid your email landing in the recipient’s junk/spam folder.
- Check with your web host to make sure they have “Reverse DNS” setup and configured correctly for your domain. If not, then this is most likely the cause of emails not getting delivered.
- Do not use a Gmail or Yahoo or some other web based email as the “From” email id (under DAP Admin > Setup > Config).
- Instead, use a domain-based email id – like You@Yoursite.com or Support@Yoursite.com – as the “From” email id
If you are on a shared host, you may even consider totally by-passing sending emails through your web host, and instead use DAP’s “SMTP” feature to send emails out through an external email system – like Amazon’s SES (Simple Email Service) , Gmail or AuthSMTP.com.
Welcome Emails Not Going Out
If Admin notifications are going out ok, but the welcome email to the buyer/member is not being delivered, then see Troubleshooting Welcome-Email Delivery
Autoresponder Emails Not Going Out
If yours is a new site setup, then this is usually because the hourly cron-job has not been setup.
However, if the emails were going out fine previously, and suddenly stopped going out, then it usually is because…
- Something changed on your host that caused the cron to stop working.
- There is an error in the job queue, because of which DAP is unable to proceed with the remaining non-error emails. This could have happened if you tried to send out a broadcast to a CSV list, and there was an error in one of the emails from the CSV list.
- You’re trying to use a third party “SMTP” server to send out the emails, and your server is unable to connect to that server because the authentication settings you’ve configured on “Email > SMTP” are incorrect.
Steps to troubleshoot
- Make sure that the hourly cron (dap-cron.php) is still running – you need to look at your web hosting control panel for that.
- Go to “System > Job Queue” and scroll through any items there, and see if there are any scheduled messages there with the status “Error”. If yes, then click on the “Delete Jobs In Error” link. That will delete any jobs that can’t be processed because of an error in the email id or in the import process. Also be sure to click on “Delete Successful Jobs (till yesterday)” just to clear up old, sent emails.
- Also go to “System > Logs” and empty the logs.
- Go to “System > Config” and set “DAP Log Level” to “5”. That will start logging all the details you/we may need for troubleshooting.
- Wait for the top of the next hour and then re-visit the queue and see if emails are going out.
- If they still aren’t going out, go back to “System > Logs”, copy paste all text there, and open a new ticket with that info, of course, also giving us more details about the problem, what you have tried, etc, along with your login info for: FTP, WP Admin, DAP Admin, and Web Host Control Panel.
Server Blacklisting
If your inexpensive (read as cheap 🙂 shared web host is hosting a large number of sites on one server, and one of them knowingly sends out spam (or mistakenly gets flagged for spam), that will put the email deliverability of every web site on that server in jeopardy, because your site now shares the same IP address as that of an “alleged” spammer.
So your emails get sent to junk/spam folder by Gmail and Yahoo. Or worse, they just totally disappear into the ether.
Hourly Email-Sending Limits
Almost all shared hosts have hourly email sending limits. For example, DreamHost has an outgoing limit of 300 emails per hour. Which means, a total of only 300 emails can be sent out per hour through any web site hosted on DreamHost. All of the following count towards the 300 limit:
- Emails sent by any scripts on your site – like DAP
- Your WordPress blog notification emails
- Your WordPress admin emails,
- WP forgot password emails,
- WP comment notification emails,
- Forum notification emails,
- Forum emails sent to each other by your users,
- Forum-software Admin notification emails,
- Support software user and admin notification emails
- Tell-a-friend emails
- Viral-inviter type emails
- Emails sent through Outlook or Thunderbird where you have set the outgoing SMTP server to be your web site’s SMTP server
- Emails sent by others using the same SMTP server to send out emails- like your business partners, employees, etc
- DAP User welcome emails, Payment notification emails, Forgot password emails, Autoresponder emails, Broadcast emails, etc
So do you see how quickly you can go over that hourly limit of 300 emails per hour?
But here comes the worst part…
Once you go over that limit, any emails that are actually sent by you or the scripts running on your site, will not actually result in any kind of error. The mail server will respond by saying that the email(s) has been sent successfully, but in reality, on the backend, it quietly “snuffs out” the email. Which means, it doesn’t go anywhere – just gets sent to a “blackhole”. So you keep thinking that you sent out the email. DAP keeps thinking it has sent out the email. But in reality, the emails never actually get sent.
This is the same as you actually putting your letter into the mailbox at the Post Office. But then, imagine this: The postal worker who comes to pick up your mail, quietly goes to the back of the post office and dumps it all into one giant trash can, and destroys all of the mail. So you’re thinking you actually mailed out that important check to pay your utility bill. But the utility company never gets your check, and they slam you with a late fee.
Possible Solutions
1) BEST OPTION: DAP + 3rd party SMTP service provider like Amazon SES, AuthSMTP.com or SMTP.com. (much less expensive than Aweber, and very reliable too)
2) DAP + Aweber (more expensive, very reliable)
3) DAP + Good web host (cheapest option, but can lead to mixed results – depends on your host).
You could always use DAP and external SMTP service provider like Amazon SES, AuthSMTP.com or SMTP.com to send out bulk mail through DAP while totally bypassing your web host’s email system. This is probably the first best option where DAP controls the composition and sending of the email, the 3rd party service controls the deliverability.
Next best option is using a service like Aweber or GetResponse.
And if you can’t afford even that, then simply use DAP on a good web host. We ourselves use just DAP and LiquidWeb’s email servers to send out emails to all of our users.
And DAP also has built-in job queues to schedule outgoing emails while also making sure that you don’t exceed your web host’s hourly email sending limits (dreamhost’s limit is 300 emails/hour, I think). We use multiple SMTP servers from our own other web sites, all combined to be able to send a few thousand emails per hour.
But even with a lot of planning, it is easy to go over the hourly limit.
So the next time you see in your Job Queue that emails were sent out successfully, but the recipient never received it, here are some things to check:
1) It landed in your recipient’s junk/spam folder. Ask them to whitelist or add your email address to their contacts list.
2) You have overshot the limit, so you would have to actually send out the email again.
3) Try to send out broadcasts during a low-traffic time – say like later in the night – when you’re not actively sending out emails, and using up precious email counts from that hourly quota.
http://DigitalAccessPass.com/documentation/?page=/doc/troubleshooting-email-delivery/
2
Silent Import
You wish to do what we call a “silent” import. Basically, you don’t want DAP to send out the instant “thanky-you” email to the users being imported.
You may want to do this, say, if you wanted to import a bunch of users into DAP first, without DAP sending them any kind of emails at all, do some preliminary testing, make sure their settings, product access, etc, are all correct, before notifying them of any changes.
Here’s how to do a “Silent Import” with DAP
1. Remove the “ThankYou-Email Subject” and “ThankYou-Email Body” from the Product into which you wish to import users. Save it in a text file for later, and save the Product.
2. Go ahead and do the bulk-add of users from “Users > Add > Bulk-Add Multiple Users To A Product”.
3. Wait for the DAP Hourly Cron to run and finish importing all users. Since the “ThankYou-Email Subject” and “ThankYou-Email Body” of the Product is empty at the time of import, DAP won’t send out those emails.
4. Once all the users have been imported, put back the “ThankYou-Email Subject” and “ThankYou-Email Body” text content, and save the Product.
OPTIONAL
5. At a later point, if you want, you can send out an Autoresponder email – or even better, a Broadcast email – with the merge codes for the email and password, if you want the newly imported users to get their passwords, or if you wish to notify them of anything at all (like the new system you’re using, their new account info, a general “what has changed recently” type of email, etc).
21
Using Custom Fields In DAP Emails
Merge Tags For Email
Here are the merge-tags that you can use in outgoing autoresponder and broadcast emails sent through DAP.
%%FIRST_NAME%%
This will be replaced by the first-name of the user.
%%LAST_NAME%%
This will be replaced by the first-name of the user.
%%EMAIL_ID%%
This will be replaced by the email id of the user.
%%PASSWORD%%
This will be replaced by the password of the user.
%%SITE_NAME%%
This will be replaced by whatever text you have entered in “Setup > Config > Basic > Site Name” in your DAP Dashboard.
%%ADMIN_NAME%%
This will be replaced by whatever text you have entered in “Setup > Config > Basic > Admin Name” in your DAP Dashboard.
%%ADMIN_EMAIL%%
This will be replaced by whatever text you have entered in “Setup > Config > Basic > Admin Email” in your DAP Dashboard.
%%AFF_LINK%%
This will be replaced by the actual affiliate link of the member (Eg., http://yoursite.com/dap/a/?a=1234)
%%SITE_URL_DAP%%
Replaced by your actual web site url (Eg., http://yoursite.com)
%%UNSUB_LINK%%
This is replaced by a 1-click Unsubscribe link that you can add to the bottom of your outgoing broadcast and autoresponder emails.
Using Custom Fields In DAP Emails
You can send custom field values in the DAP emails by using merge tags like this – %%custom_tax_id%%
Add ‘custom_’ in front of the custom field’s database field name.
So if you have defined a custom field called tax_id in your database, to include this field in the autoresponder/broadcast email, just add this – %%custom_tax_id%% to the body of your email.
That’s it. When the user receives the email, dap will automatically replace the merge tag with the user’s tax id value.
So if your email message body contains the following text:
Your Tax Id: %%custom_tax_id%%
When the user receives the message, it will look like this (in this example, the user’s taxId = 9999):
Your Tax Id: 9999
Related Links:
Click here for full documentation about Custom Fields
Click here for merge tags you can use in WordPress posts/pages
This will be replaced by whatever text you have entered in “Setup > Config > Basic > Admin Email” in your DAP Dashboard.