Custom Error Page-1
Problem
You try to visit a protected page that you’re not eligible to view, and don’t see the proper error message you are supposed to see.
Solution
- Create a custom error page in WP – like http://YourSite.com/error/
- In the body of that error page, enter something like this:
Sorry, you do not have access to this content.
If you are already a member, click here to login.
If you are not a member yet, then click here to get access. - In the above example, link the text “click here to login” to your DAP login page (eg., http://YourSite.com/login/). And link the “get access” text to your sales page.
- Then take this error page’s URL – which is http://YourSite.com/error/ – and enter it into the “Error Page URL” field of all DAP Products.
- Also enter this same URL into DAP Admin > Setup > Config > “Error Page URL (Global)”.
Save the changes.
Now, in a different browser, first visit your logout link – http://YourSite.com/dap/logout.php – so that the config changes can be reloaded. Now go back to that original protected page, and you should now be redirected to the above custom error page you created above.
OptimizePress Issues
1) OptimizePress 1.x CSS Issue
Problem
You try to visit a protected page that you’re not eligible to view, and see an ugly page full of un-formatted links
Solution
- Create a custom error page in WP – like http://YourSite.com/error/
- When creating the above page, select the OptimizePress template “DAP Error Page”
- In the body of that error page, enter something like this:
Sorry, you do not have access to this content.
If you are already a member, click here to login.
If you are not a member yet, then click here to get access. - In the above example, link the text “click here to login” to your stand-alone DAP login page (eg., http://YourSite.com/login/). And link the “get access” text to your sales page.
- Then take this error page’s URL – which is http://YourSite.com/error/ – and enter it into the “Error Page URL” field of all DAP Products.
- Also enter this same URL into DAP Admin > Setup > Config > “Error Page URL (Global)”.
Save, and that will no longer display the ugly error page going forward. Instead, it will redirect the user to the above custom error page.
2) OptimizePress 2.x Content Protection Issue
Problem
You try to visit a protected page that you’re not eligible to view, yet you are still able to see all of the content. Or the page appears messed up with missing menu items or formatting issues.
Solution
- Make sure “Sneak-Peek” is turned OFF – it won’t work with OptimizePress 1.x or 2.x.
- Follow all of the same steps from Problem 1 and create a custom error page.
Conflict With “Cache” Related Plugins
DAP Now Works With WP Super Cache
If you’re having weird issues – like members logging in and seeing other people’s profile information, or logging in as a valid user and being told “Sorry, you don’t have access to this content” – then it’s probably because of a “cache” plugin.
Do not use cache plugins on your membership site
DAP now fully works with WP Super Cache (and possibly other cache plugins too).
You just need to make sure that you exclude your member content (including the login page) from being cached.
Cleaning Up After Your Cache Plugin
Follow the steps below to clean up some the junk left behind by cache plugins (regardless of whether you see them in your plugins section, and regardless of whether they are currently active).
1) You wish to disable your cache plugin that is currently enabled
2) You previously had one enabled at some point in the past
3) You don’t believe you ever had a cache plugin enabled in the past
4) You were redirected to this page by the DAP support team because of potential caching-related issues
- De-activate the plugin if it is still active
- Open your wp-config.php file.
- If there are lines in there that look like this…
define(‘WP_CACHE’, true); //Added by WP-Cache Manager
define( ‘WPCACHEHOME’, ‘/home/wp-content/plugins/wp-super-cache/’ ); //Added by WP-Cache Manager - Then comment out both lines, by adding a “//” at the beginning of each line, like this.
- //define(‘WP_CACHE’, true); //Added by WP-Cache Manager
//define( ‘WPCACHEHOME’, ‘/home/wp-content/plugins/wp-super-cache/’ ); //Added by WP-Cache Manager - Go to your /wp-content/plugins/ folder. See if there’s a folder in there called “cache”. If yes, then rename it to “_cache”.
Now re-test whatever the issue was before, and it would have probably been resolved now.
That should do it.
If the issue still persists, let us know via a support ticket.
Troubleshooting Email Broadcasts
* When you schedule a broadcast email, it’s added to the job queue with a status of NEW
* When the cron job runs at the top of the hour, then the job status changes to COMPLETE (C) and the emails get sent.
So to test it, do this.
- set up an email broadcast to a test user using the CSV format (option # 5)
- Go to DAP Admin > System > Job Queue and see if the job was added with a status of NEW
- Now manually run the cron by running this cron script in a browser (just for testing)
http://yoursite.com/dap/dap-cron.php (replace yoursite.com with the name of your site) - Then go back to the job queue and see if the status for the email job has changed to ‘C’ (complete)
- If yes, check if the email was received.
Troubleshooting “Payload Format Incorrect” Error
If you see this error when trying to send out a broadcast to a default group from the Email > Broadcast page, then the most plausible cause for this is that there are some special, non-standard characters in the body of the email that you’re trying to broadcast.
This could happen if you copied text that you composed in a Microsoft Word doc, or you cut/pasted from a WordPress blog post. And both Word and WordPress (some themes) are famous for creating special characters out of normal characters.
Example:
If you take a closer look at the body of your email, especially the single quotes and double-quotes characters, you will find that these may not be the standard single quote and double quote characters that you get from a plain text editor.
And these special characters trip up the DAP email broadcasting system.
So please take a closer look at all of the following characters:
- Single quotes
- Double quotes
- Hyphens
- Special symbols like trademark and copyright
And just type over them again just to be sure with the normal equivalent using your keyboard, and try the broadcast again.
And this time, it should work.
Email Body Showing Up Partially On Job Queue
When you view the broadcast emails that you just scheduled on the System > Job Queue page, if you see that the email body in the saved job has been randomly cut off at one point (usually at the point where there would normally be a single or double quote), then that’s also an indication of non-standard characters in the email that you tried to send out. So see the above example for how to weed out any non-standard single or double quotes or hyphens, and try the test again with just one test email, and see if it goes out to just that one email. Because if it fails for one email, then it will fail for all emails being sent via the DAP Broadcast system.
Strange Characters In Emails
If you or your members are noticing strange characters in emails – especially where there should normally be a single or double quote, then these are due to what are known as “Smart Quotes”.
These special characters always show up when you copy text from a WordPress blog (some themes use these characters) or a Microsoft Word document.
Single quote:
'(correct)
`(incorrect)Double quote:
"(correct)
``(incorrect)
The single quote that works correctly is located next to the “Enter” key.
The incorrect one is located next to the “1” number key.
So copy your email text to a text editor, like notepad. Then change all single quotes to be ‘ and all double-quotes to be “ in your emails. Then put them back into DAP, and then test.
The “strange characters” issue should then be resolved.
NOTE: In a future version, we will implement an enhancement in DAP so that DAP can handle this automatically, but for now, the above solution is your only option.
Troubleshooting Login Errors
Problem: When you go to http://YourSite.com/dap/ , you get redirected to a "Page Not Found – 404" error page.
Solution: This is happening because in DAP Config, you probably set up an invalid URL to be the default login page. So do this:
- First, log out of DAP by going to http://yoursite.com/dap/logout.php (manually type that in to your browser)
- Now log in to DAP via DAP's special login page – http://YourSite.com/dap/login.php
- Go to "Setup > Config > Advanced" screen
- Then where it says "Location of your login page (eg., if using WordPress). Should start with a forward slash (`/`)" – enter a valid URL there. Before entering any URL there, visit the URL separately in a separate browser tab (or window) and make sure you can actually get to it, and that it has a login form there. Then put that URL in to the above field, and click on "Update".
- Now in a separate browser (totally different browser) where you are not logged in to DAP or WP, try to go to http://YourSite.com/dap/ and see if it redirects to the right page. If not, revisit the steps above, and double check the login URL, that's all.
CSV File Error During Bulk-Add Users
When you look at the “System > Job Queue” screen, you see one line that shows this error…
Action: BulkAddCSVToProduct
Message: Error in CSV File
You were probably trying to to Bulk-Add Users to DAP. Or do a Broadcast email to a CSV file. In either case, there was an error in processing your request, because one of the following happened:
1) The CSV file could not be created in /dap/bulk/ folder because of a permission issue (try CHMOD 755), so when the cron task ran, it could not find the CSV file (or the file was corrupted for some reason).
2) The list of email addresses within the CSV file were not in the right format – Order should be: Email,FirstName,LastName ( LastName is optional)
How To Fix It
If a job fails, then there’s no way to “fix it and re-run it” right now. So you basically have to delete the job, and then submit a new one. So if a Bulk-Add job erros with the above message, then here’s what you need to do…
A) Click on the “Delete Jobs In Error” link on the “System > Job Queue” page. That will delete all jobs that have failed for whatever reason.
B) You should also clear out the /dap/bulk/ folder to make sure you delete any old, or errored out CSV files from that folder.
Data Loading Errors
Progress Bar Never Stops
You’re seeing the green “Loading… Please Wait” progress bar continuosly running – it never stops and comes back with any data.
If this is a new setup, then it’s possible that your web host does not have a library called “JSON” enabled. Just ask them to enable it for your server. It’s rather simple to do, and we’ve never seen a host that won’t do this for their customers.
If it’s an old setup, and it was working previously, then your host made some changes that caused the library to stop working. So you still need their help in resolving the issue.
Error Message: “There was an error returning data'”.
One possibility is that your database or web site is temporarily down, slow, or plain not responding for some reason. So DAP cannot connect to your database, and comes back with this error.
Or it could also be the “Progress Bar Never Stops” issue from above.
Troubleshooting 1ShoppingCart Integration
There are a few different reasons why this may not be working.
1. Check if Cron is running
The DAP email-processing cron that processes the 1SC emails may not be running. Check your webhost control panel -> Cron job settings. Make sure dap-emailorder.php is setup to run once every 10 minutes.
2. Incorrect Setup of Billing Email Id
The billing email id you have entered in DAP at Setup > Config > Payment Processing , should be entered into the “Order Notice Email – Primary Destination” field in your 1SiteAutomation/1Shoppingcart account, on the Setup > Orders > Notifications section. If by chance you enter it into the “Order Notice Email – Primary Destination” field, it WILL NOT WORK.
3. No Notification Emails from 1SC
The DAP cron is running but 1SC payment notification emails are not reaching your mail server. Check the email account where you expect to receive your 1SC payment notification emails and see if the order notification email from 1SC is in that mail box.
4. Incorrect Mail Server Settings
The cron is running and the 1SC order notification email is reaching your mail server – but you did not configure the mail server settings correctly in DAP Dashboard -> Setup -> Config -> Payment Processing.
Email Server Where Order Emails Come In
Email Server User Name
Email Server Password
5.”Read” Or Deleted Emails
DAP only processes order notification emails that are in the “Unread” status, to prevent previously processed emails and other non-DAP emails from being repeatedly processed.
Also, if you “pop” off the emails from that mail box (means, your email client like Outlook or Thunderbird or Gmail is “removing” your emails from the server when it retrieves them), it means that when DAP logs in to that billing email address, there are no emails there to be processed – the mailbox is empty, or the 1SC payment notification emails have somehow gotten deleted from that mailbox.
So it is possible that DAP is able to connect to your email server, but DAP is not finding any “unread” emails. Please login to your email server and mark all the payment emails that you want DAP to process… as “unread”. And also make sure that your email client does not remove the emails from that mail box.
6.Product Name Mismatch
There might be a “Product Name” mismatch. The product name has to be EXACTLY the same (including case, spaces, etc) in both DAP as well as in 1ShoppingCart. So if you have created a product by name “Widget A”, make sure your 1shoppingcart product also has the exact same name “Widget A”.
If everything is setup correctly, DAP cron will run every 10 minutes and try to process all 1SC emails.
The next time the DAP cron will run (every 10 minutes), it will pick up all the unread payment emails from 1SC.
7. Empty “Thankyou-Email Body/Subject”
Welcome email is not getting sent.
Select the product, and make sure there is some text in the “Thankyou-Email Subject” and “Thankyou-Email Body”. Whatever is in these fields is what gets sent immediately after someone purchases that product (or right after you give them access from the backend).
Now go to DAP Dashboard -> Users -> Add .
Select the product and manually add user. Now see if the thankyou email gets sent to that email id. If it got sent, then your product setup is correct.
Also check the DAP Dashboard -> Orders . Search for all orders, look up the order for the particular user in question by email.
Check the payment status and make sure there is no error there.
If you did all this and things are still not working, please do this:
1. Set DAP Dashboard > setup -> Config -> Log Level -> Log All activity
2. Re-run the 1SC test purchase
3. Check the DAP Logs (DAP Dashboard > System > Logs) and send us the log text in there for troubleshooting by pasting it into a new support ticket.
8. Sending Email & Password To Buyer
Make sure you have set the thank-you message with the right merge tags for Email and Password.
9. Manually Running Cron
First set DAP Dashboard > setup -> Config -> Log Level -> Log All activity
If you feel that the orders were not processed in dap, then just login to the 1SC email account where the sales/payment notification emails are sitting, and mark those orders/emails as UNREAD that you want dap to process.
Then manually run the cron script dap-emailorder.php cron by visiting the following link in the browser.
http://www.yoursite.com/dap/dap-emailorder.php
Replace yoursite.com with the name of your site.
It will just display an empty screen when complete.
Then check “Users > Manage” to see if user has been created.
– Veena Prashanth
Customizing Error Messages On Protected Pages
When an unauthorized visitor tries to access a protected page or post, you can choose from among two things that can happen:
1) Display an “In-Page Error Message“: They can be presented with an error message that shows a “lock” image. You can show the standard DAP version, or you can customize this message and add your own text.
-OR-
2) Redirect to Error Page: They can be redirected to any other page of your choice (WordPress page or post, or a completely non-WP page)
1. Display “In-Page” Error Message
“In-Page” basically means that this message will be shown on the same page that the user is trying to access (to which they do not have access). So basically, the content of the very post or page they’re trying to access, will be replaced by this “In-Page” error message.
The default error messages shown by DAP are as follows.
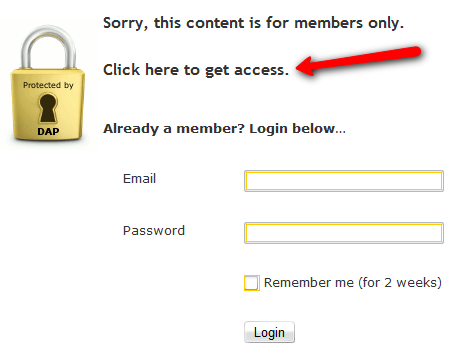
A) If a visitor is NOT logged in, then they will see…
(Image A)
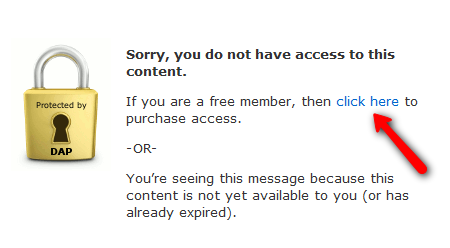
B) If a visitor IS logged in, then they will see…
(Image B)
If you see Image A above, there is a line of text that says: “Click here to get access”.
And in Image B above, there is a line of text that says: “If you are a free member, then click here to purchase access”.
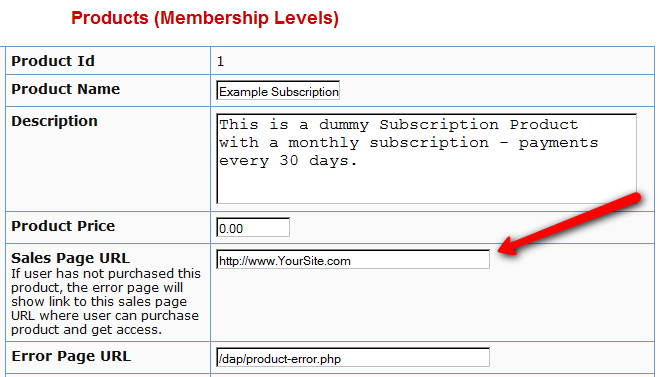
In both cases, the text “click here” is actually a link. And by default, that link will point to whatever you put in the “Sales Page URL” in your DAP Product (to which the above post/page is part of). See Image C below.
(Image C)
Displaying Custom Error Message
If you wish to customize the above standard error messages, then here’s what you need to do:
- Go to /dap/inc/ folder. There are two files there:error-loggedin.php , and
error-notloggedin.php - Make a copy of both files on your computer, and add the text ‘custom‘ to the front of each of the file names of the newly copied files. So the new files are now called: customerror-loggedin.php , and
customerror-notloggedin.php
- Open customerror-loggedin.php and customerror-notloggedin.php and modify them as you please, change the text, formatting, font size, color, etc.
- Upload the new files to the same folder – /dap/inc/ – as the original error files.That’s it. DAP will then ignore the old error files, and start displaying your new “custom” error messages.
2. Redirect to Error Page
Instead of showing an error page (default or custom, from (1) above) you can also redirect the un-authorized user to a completely new page/post of your choice.
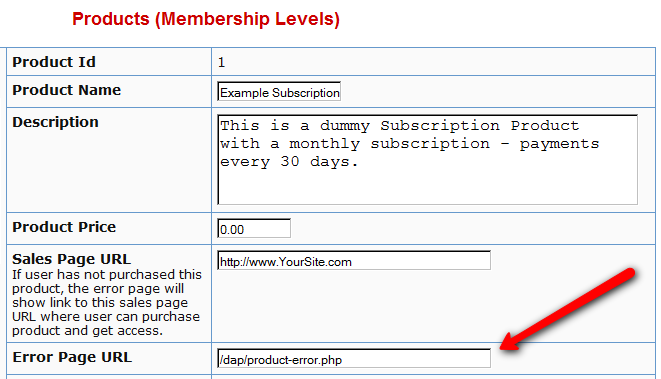
If you see Image D below, you will see that on the DAP Products page, there is a field called “Error Page URL“.
By default, this is pointing to /dap/product-error.php
(Image D)
Change this to any link you want. Examples…
http://YourSite.com/myerrorpage.html , or
http://YourSite.com/myerrorpage/
Whatever you put in the above field (Error Page URL) is what page the user will be redirected to, when they access a page that they don’t have access to (either because they have not logged in, or because they are logged in, but don’t have access to it yet).


