Author Archives: DAP Admin
Author Archives: DAP Admin
DAP has a security check to prevent password sharing.
And starting DAP v4.4, you can turn this off at both a per-user level and also at a global site-wide leve.

This user will now be excluded from login IP check.
NOTE: If the user’s account is currently already locked, then you also need to unlock it this one time, but going forward, the account is now whitelisted, and will not get locked again.
If you wish to permanently disable this for all users in your membership site, then here’s how to do it:
That’s it!
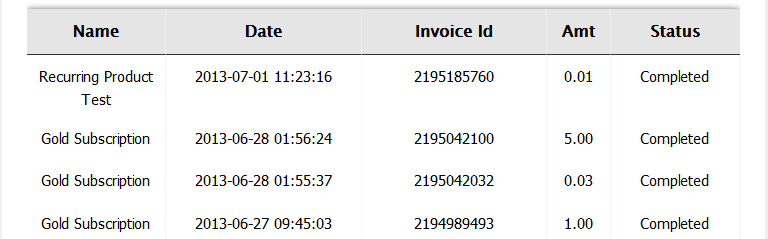
[DAPShowTransactions][/DAPShowTransactions]
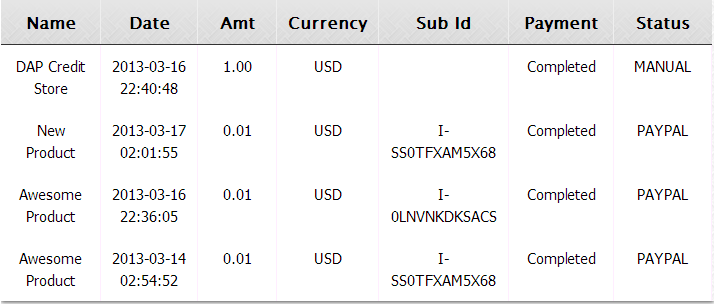
1) You can use this shortcode to show ALL transactions (it’s just a dump of user’s transaction history. Shows every single transaction for the logged-in user). Currently only one transaction template is available (template1).
2) You can also use this shortcode to show an ‘invoice’ link per user order / transaction. When the users click on the invoice link, a new window will open where the invoice will be displayed in pdf format. You can set the DAPShowTransactions shortcode to use invoice template1 or template2.
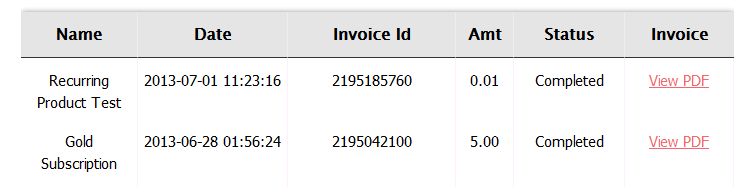
The invoice pdf that opens up when the users click on the invoice hyperlink (View PDF) depends on whether the shortcode is set to invoicetemplate=template1 or invoicetemplate=template2.
PDF Example:
Shortcode with Invoice template 1:
[DAPShowTransactions template=”template1″ invoicetemplate=’template1′ adminemail=’joe@example.com’ companyname=’DigitalAccessPass.com’ showinvoice=’Y’ logo=’/home/mysite/mysite.com/wp-content/plugins/DAP-WP-LiveLinks/includes/transactions/invoices/template1/images/logo.png’ showinvoice=’Y’][/DAPShowTransactions]
IMPORTANT NOTE:
Make sure the “logo” field is set correctly in the shortcode. It should contain the FULL path to the logo image.
If you add logo image to a folder called images at the root of your site. Then the logo image should be set to point to the FULL path of this image.
For ex- /home/mysite/mysite.com/images/logo.png
If you do not know how to get the full path to a folder on your site, your webhost can help with it.
Shortcode with Invoice template 2:
[DAPShowTransactions template=”template1″ invoicetemplate=’template2′ adminemail=’joe@example.com’ companyname=’DigitalAccessPass.com’ showinvoice=’Y’ logo=’/home/mysite/mysite.com/wp-content/plugins/DAP-WP-LiveLinks/includes/transactions/invoices/template1/images/logo.png’ showinvoice=’Y’][/DAPShowTransactions]
Here’s the list of all shortcode options:
‘template’ => ‘template1’
– only valid value is ‘template1’
‘invoicetemplate’ => ‘template1’
– valid values are ‘template1′,’template2’
‘adminemail’=> => ‘joe@example.com’
– Admin Email displayed in the invoice pdf report
‘companyname’=> ‘Your Site Name’
– Company name displayed in the invoice pdf report
‘companyurl’=> ‘http://YOURSITE.com’
– Company website link displayed in the invoice pdf report
‘logo’=>’/home/mysite/mysite.com/wp-content/plugins/DAP-WP-LiveLinks/includes/transactions/invoices/template1/images/logo.png’
– Company logo
‘notranmsg’=> ‘Sorry, no transactions found’
– If there are no orders / payment transactions for the user, this message will be displayed
‘showinvoice’ =>’Y’
– if set to “N”, invoice column with hyperlink to the pdf report will not be displayed
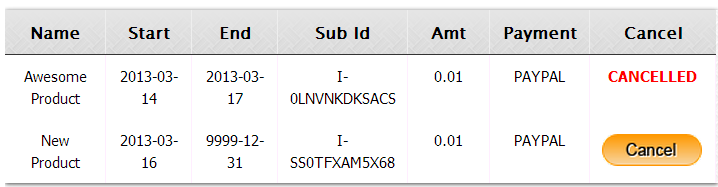
DAP picks up all the active products the user has.
For each active product, it checks if there is a purchase transaction (transaction Id > 0) associated with that user->product row in Manage Users page.
– if yes, the row is displayed with a cancel option.
– if no, the script will move on to the next product
Cancel button will only show for : – Transactions that are cancellation eligble (for ex – it will show for active subscriptions but not for one-time-purchases) – And only if the cancel-eligible transactions are from Paypal or Authnet. It will NOT show for other payment processors like Clickbank, Infusionsoft etc. Here’s how it will look (you can customize the table header names and the cancel button image) :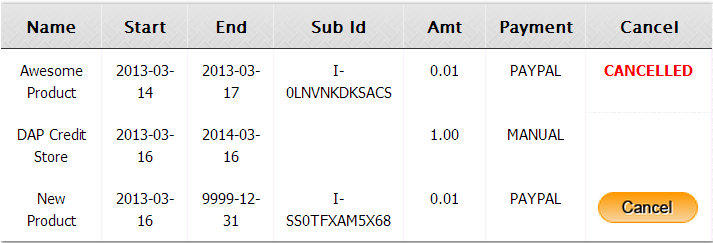
You can customize the ‘cancel success msg’, ‘cancel failure message’ and the ‘cancel image’ as shown below:
[DAPUserCancel showalltransactions=”Y” showcancel=”Y” cancelsuccess=”Subscription Cancellation Completed Successfully!” cancelfailed=”Sorry, could not cancel the subscription!” cancelimage=”http://YOURSITE.com/wp-content/plugins/DAP-WP-LiveLinks/includes/images/CancelButtonUp.gif”][/DAPUserCancel]2) [DAPUserCancel showalltransactions=”N” showcancel=”Y”][/DAPUserCancel]
If you use this shortcode in a WP page, it will show transactions that are cancel-eligible (subscription transactions with paypal/authnet only).
Pick all the active products the user has.
For each active product, check if there is a purchase transaction (transaction Id > 0) associated with that user->product row in Manage Users page.
– if yes, check if it’s a subscription purchase (IPN received by dap from the payment processor contains recurring_payment_id, or sub_id or subscr_id) and if yes, show it with a cancel button.
Note:
– The cancel button will only show for authnet / paypal purchases. Auto-cancel not supported for other payment processors like Clickbank or Infusionsoft.– Only cancel eligible (or already cancelled) transactions will show (i.e. one-time purchases will not show)
3) [DAPShowTransactions][/DAPShowTransactions]
You can use this shortcode to show ALL transactions (it’s just a dump of user’s transaction history. Shows every single transaction for that user).
You can send an email broadcast to expired users of a product/level, on the DAP Admin > Email > Broadcasts page, by selecting Group #4.
The same feature works for sending emails to those who have “Cancelled” their subscription or trial.
Go to DAP Admin > Email > Broadcasts
Select Group #4.
1st drop-down: Select Product Name
2nd drop-down: Select “Have Already Expired”
3rd text field: Enter within how many days the users should’ve expired – as in, expired in the “Last X Days”
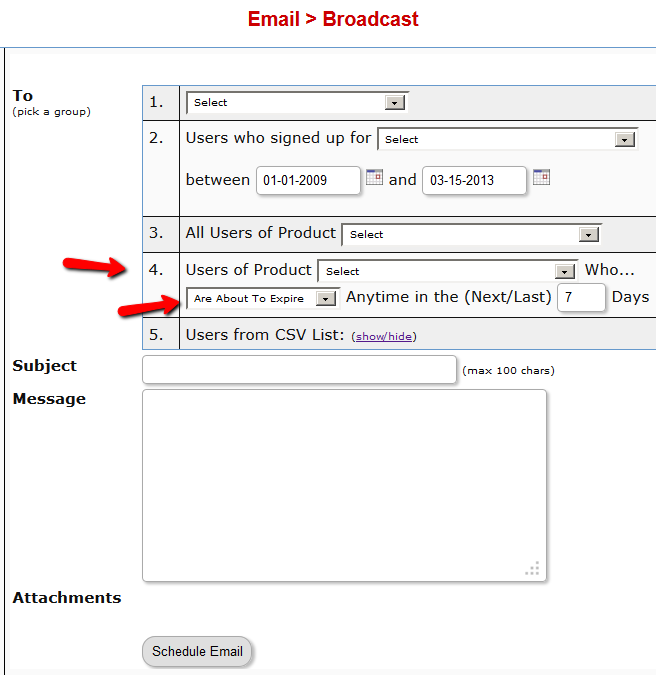
Once you’ve scheduled the broadcast, the emails will be sent out at the top of the hour when the DAP hourly cron runs.
Upsells, Downsells and OTO’s are now extremely simple to implement using the “Upsell Tree” plugin for DAP.
And this particular plugin works with Paypal Standard! Which means you don’t need a merchant account any more. All you need is a regular Paypal Standard / Business Account.
On every upsell page, you must also include a “No, Thank You” button or link that will allow your buyer to skip your upsell or downsell, and go to the next part of the sale.
For all upsells that are not the last upsell, you can link this button or link to the next upsell in the chain. So basically, on Upsell 1, they can either take the upsell1 (whatever your offer is) by clicking on the buy button, or click on the “No, Thank You” button/link, and you could then either taken them to the URL of Upsell2, or Downsell 1, or if this is the last upsell in the flow, then you could send them directly to the Paypal Upsell Summary Page /Confirmation Page (WP-based confirmation page created in step 28).
That’s it.
While it looks like a LOT of steps, that is only because we have to explain the steps in detail so they are clear. In reality, it is very simple to set up, and starting from scratch, if you have DAP & SSL already installed, it shouldn’t take you more than 1/2 hour to set up your 1-Click Upsells/Downsells/OTO’s. And if you’re not using Upsells/Downsells, then it can be done even faster.
If you have any further questions, feel free to open a support ticket, and we will assist you in getting this going.
This post is dedicated just to the [DAPUserProfile] shortcode. To see the rest of the DAP Shortcodes, click here.
This is the shortcode that displays all of the user profile fields on a page. Simply enter it on a WordPress page, save it, and when you view it when logged in as a user, it will display the DAP user profile form, with the logged-in user’s information displayed in the form fields.
As DAP Admin, you can customize which profile fields to show to your members, and which ones to hide. Just set the profile field that you don’t want displayed, to “N” in the tag below.
[DAPUserProfile showFirstName="Y" showLastName="Y" showUserName="Y" showEmail="Y" showPassword="Y" showAddress1="Y" showAddress2="Y" showCity="Y" showState="Y" showZip="Y" showCountry="Y" showPhone="Y" showFax="Y" showCompany="Y" showTitle="Y" showPaypalEmail="Y" showOptedOut="Y" showCustomFields="Y"]
Default is "Y". So Leaving out the text (for eg.) showLastName="Y" entirely from the shortcode, is the same as setting it "Y", which means it will be displayed.
Entering just [DAPUserProfile] into a page, will show ALL fields.
To hide just Phone and Fax, you would do something like this:
[DAPUserProfile showPhone="N" showFax="N"]
So all other fields will be displayed, except those two.
To show (say) just First, Last, Username, Password and Email, this is the shortcode:
[DAPUserProfile showFirstName="Y" showLastName="Y" showUserName="Y" showEmail="Y" showPassword="Y" showAddress1="N" showAddress2="N" showCity="N" showState="N" showZip="N" showCountry="N" showPhone="N" showFax="N" showCompany="N" showTitle="N" showPaypalEmail="N" showOptedOut="Y" showCustomFields="N"]
Related: [DAPUserLinks] shortcode
This post is dedicated just to the [DAPUserLinks] shortcode. To see the rest of the DAP Shortcodes, click here.
This is the shortcode that shows the user a list of all of the products that they have access to, and details about each product – like name, description, links that have already been dripped, etc.
This is similar to %%USERLINKS%%, but more advanced and more customizable.
You can customize most of the elements of this shortcode, as shown below.
You can even customize this to show details of a specific product (instead of all products).
[DAPUserLinks showProductName="Y" showAccessStartDate="Y" showAccessEndDate="Y" showDescription="Y" showLinks="Y" orderOfLinks="NEWESTFIRST" howManyLinks="10000" errMsgTemplate="SHORT" productId="ALL" dateFormat="YYYY-MM-DD" showProductCount="Y" hideProductId="3,4"]
Most of the elements are self-explanatory. Here are a couple explained in detail.
orderOfLinks can have one of two values…
NEWESTFIRST will drip newly dripped links at the top. So day 7 link will be above day 1 link.
OLDESTFIRST will drip newly dripped links towards the bottom. So day 1 link will be above day 7 link.
showproductcount=”N” will disable the heading “You have access to (X) products” at the top of the “My Content” section.
So, here’s another version of the DAPUserLinks shortcode that shows oldest links at th top, and does not show the product-count heading.
[DAPUserLinks showProductName="Y" showAccessStartDate="Y" showAccessEndDate="Y" showDescription="Y" showLinks="Y" orderOfLinks="OLDESTFIRST" howManyLinks="10000" errMsgTemplate="SHORT" productId="ALL" dateFormat="YYYY-MM-DD" showproductcount="N"]
productId is by default set to “ALL” which means details for all products that a user has access to, will be displayed on that page. You can also configure it to show for just one product (productId="8") or a few select products (productId="8,11").
hideproductid
This was introduced in DAP v4.5. It allows you to suppress all listed product id’s (either just one, or multiple product id’s separated by commas) from being displayed in the list.
[DAPUserLinks ... hideproductid="3" ...]
Related: [DAPUserProfile] shortcode
Question: Is there any way to adjust the image size of the items within the credits store? 60×90 is quite small.
Answer:
You can update it directly in the /wp-content/plugins/dapcreditstorefront/categories/html/1column/template.html.
Look for :
<input type=”image” src=”[REDEEMSRC]” align=”right” name=”[CHILDIDCREDITS]” id=”[CHILDIDCREDITS]” onClick=”purchaseChildProduct([FORMNAME], ‘[CHILDID]’, ‘[CREDITS]’);” value=”Redeem”>
You can try and add “width” and “height” attribute to it and see if it takes affect.
Upsells, Downsells and OTO’s are now extremely simple to implement using the “Upsell Tree” plugin for DAP.
And this particular plugin works with Paypal Standard! Which means you don’t need a merchant account any more. All you need is a regular Paypal Standard / Business Account.
On every upsell page, you must also include a “No, Thank You” button or link that will allow your buyer to skip your upsell or downsell, and go to the next part of the sale.
For all upsells that are not the last upsell, you can link this button or link to the next upsell in the chain. So basically, on Upsell 1, they can either take the upsell1 (whatever your offer is) by clicking on the buy button, or click on the “No, Thank You” button/link, and you could then either taken them to the URL of Upsell2, or Downsell 1, or if this is the last upsell in the flow, then you could send them directly to the Paypal Upsell Summary Page /ConfirmationPage (WP-based confirmation page created in step 29) OR /dap/PaypalCheckoutConfirm.php
Button to take them to next Upsell/Downsell:
<form name=”nothankyou”>
<input type=”button” name=”nothankyoubutton” value=”No, thank you, I wish to skip this incredible offer” onClick=”location.href=’https://YourSite.com/dap/continue.php?url=/dap/upsell2.html‘;”>
</form>
Feel free to copy the above HTML button code for the no-thankyou button. However, paste it into a text editor and be careful and don’t delete any of the HTML code, and only change actual URL’s or the button’s value (which is the text your buyer will see on the button).
Button to take them to final Checkout Summary page (Default confirmation page)
<form name=”nothankyou”>
<input type=”button” name=”nothankyoubutton” value=”No, thank you, please complete my order” onClick=”location.href=’/dap/PaypalCheckoutConfirm.php‘;”>
</form>
Button to take them to final Checkout Summary page (WP based confirmation page)
<form name=”nothankyou”>
<input type=”button” name=”nothankyoubutton” value=”No, thank you, please complete my order” onClick=”location.href=‘/confirmationpage‘;”>
</form>
Link to take them to next Upsell/Downsell:
<a href=”https://YourSite.com/dap/continue.php?url=/dap/upsell2.html“>No, thank you, I wish to skip this incredible offer</a>
Link to take them to final Checkout Summary page:
<a href=”/dap/PaypalCheckoutConfirm.php“>No, thank you, please complete my order</a>
Link to take them to final WP based Checkout Summary page:
<a href=”/ConfirmationPage“>No, thank you, please complete my order</a>
That’s it.
While it looks like a LOT of steps, that is only because we have to explain the steps in detail so they are clear. In reality, it is very simple to set up, and starting from scratch, if you have DAP & SSL already installed, it shouldn’t take you more than 1/2 hour to set up your 1-Click Upsells/Downsells/OTO’s. And if you’re not using Upsells/Downsells, then it can be done even faster.
If you have any further questions, feel free to open a support ticket, and we will assist you in getting this going.
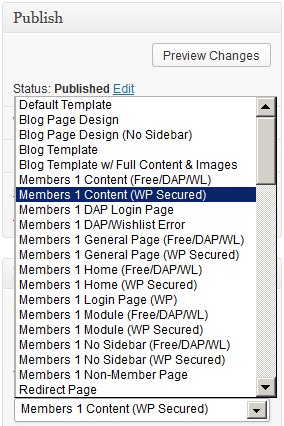
If you’re using OptimizePress as your theme, make sure you’re only using membership templates that have the word “DAP..” in them.
DO NOT USE any template that has the words “WP” or “WP Secured“. That will cause members logging in via DAP, to not be able to access those pages.
Those templates are meant for OP’s own internal membership functionality, or built for other membership plugins. Those will not work with DAP.
For the other squeeze page/sales page templates, it doesn’t matter which ones you pick.
This restriction applies only to the “Members…” templates.