Author Archives: DAP Admin
Author Archives: DAP Admin
When you protect a page or post in DAP, and try to test whether the page or post is actually protected…
a) Instead of showing you a “Sorry…” message with the DAP padlock image, you instead see a “Hello World” post – or the content of some post completely irrelevant.
b) The formatting of the page appears messed up with missing menu items or post content.
This has something to do with some special feature of either your theme or one of the plugins you are using, which is causing a conflict with the way DAP “replaces” protected content with an in-page error message that says “Sorry, you don’t have access to this content”.
The workaround for this is very simple.
Now, in a new browser where you are not logged in as DAP admin or WordPress Admin, first visit the following logout URL:
http://YourSite.com/dap/logout.php
This is so that any cached URL’s will be flushed, and the DAP config will be reloaded.
Now, in that same browser window, go to any protected page, and you should now be automatically redirected to the above custom error page that you created above.
Upsells and Downsells are now extremely simple to implement using OUR NEW “Paypal Standard Upsell Tree” plugin for DAP.
Which means you do not need a merchant account any more. All you need is a regular Paypal (Standard) Business/Premier Account.
Paypal API Username, Paypal API Password, and Paypal API Signature. Cick “Update” and save the changes.
Make sure to test the entire purchase flow, and every upsell/ downsell / no, thanks button before you go LIVE.
To test, you can either create a new Paypal account that is different from your SELLER account OR you can create a Paypal Sandbox account.
If you want to use Paypal Sandbox account for testing, please remember to switch back to your LIVE account before you go LIVE.
For Paypal Sandbox testing, please make the following changes to DAP Config.
DAP Setup => Config => Payment Processing: Paypal => Use Paypal Sandbox => “YES”
DAP Setup => Config => Payment Processing: Paypal => Paypal API Endpoint -> https://api-3t.sandbox.paypal.com/nvp
NOTE: Remember to change back to original settings before you GO LIVE.
While all of this looks like a LOT of steps, that is only because we have tried to explain the steps in detail so they are clear. In reality, it is very simple to set up, and starting from scratch, if you have DAP & SSL already installed, it shouldn’t take you more than 1/2 hour to set up your 1-Click Upsells/Downsells/OTO’s. If you have any further questions, feel free to open a support ticket, and we will assist you in getting this going.
You are NOW ready to launch your UPSELL-Powered Sales Funnel!
If you find something not right with the numbers on the admin home page reports, then it’s probably because…
1) You’ve not chosen a wide enough date range at the top of the page. So make sure you select a wider date range and click “Run All Reports” to load all reports on that page for the new date range
-OR-
2) You have manipulated some dates for one or more users, which is making the earnings report not match the member summary report. In that case, keep reading.
On the DAP Admin Home page, the Earnings Report by Product basically reports on all actual orders (payments received) based on transactions listed on the “Payment Processing > Orders” page.
However, the Member Summary report shows a summary of members based on start date, end date, and trans id (free/paid/actual number) of the users on the Users > Manage page.
So let’s a new member joined today.
Normally, on the Admin home page, if you chose the date range for all reports for just today’s date, then the order would show up under Earnings Report by Product for today’s date, and also shows as a new paid member under the Member Summary report.
However, if you went to the Users > Manage page, and manipulated the user’s start date to some date from last month, then the new order will still continue to show under Earnings Report by Product for today’s date, but now under Member Summary, number of new PAID members who joined today, would show as ZERO. That’s because you manipulated the dates such that DAP will now be reporting an extra member joining last month.
So if you truly want the data to match under both reports, then don’t manipulate the user’s data (so user paid today, but you moved his start date back by a few months just to test dripping or just to give him extra access).
By default, the DAP Admin User does not have access to all of the products you create.
This is a deliberate feature, because every time you protect content in DAP and try to visit it yourself while logged in as DAP admin and WP admin, we want you to see that the content is actually protected.
So, in order to be able to “see” the locked content yourself, you need to give yourself – the DAP Admin user – access to all of the DAP Products you create.
1) When you log in to DAP admin dashboard, click on the “Welcome <admin name>” link towards the top left corner of the DAP dashboard screen.
2) That will take you to the User > Edit page, where you can see the email id of the DAP Admin user. Copy the email id.
3) Go to Users > Manage page, and search for the email id.
4) Give yourself access to all of the products, one by one.
Or also called as network builder. And we introduced this feature in DAP v4.4.
We call it DAP “Upline” – basically a shortcode called [DAPUpline] that allows you (site admin) to display the person’s upline’s affiliate code to the person. So in effect, it is a downline builder.
1) John joins your site
2) John fills out profile with (say) his ClickBank nickname
3) John refers Adam
4) When Adam logs in, he sees affiliate link to some xyz third party product, but CB nick in the affiliate link is replaced with John’s CB nickname.
5) Adam fills out his profile with his own CB nickname
6) Adam refers Jill
7) When Jill logs in, she sees affiliate link to same third party product, but cbnickname is replaced with Adam’s CB nickname.
This can be done with any number of third-party programs, as long as the nickname can be easily replaced with the info provided by the upline affiliate.
DAP even takes this one step further.
When Jill joins through Adam’s DAP affiliate link, if Adam has not filled out his CB nickname in his profile, then the third-party CB link shows CB Nickname of Site Admin in its place.
So if an affiliate fails to claim his affiliate link, then site admin gets credit for it (and all such links).
Here’s the documentation for [DAPUpline]
Q: How to automatically add a new user in DAP to a 1SiteAutomation.com (1SA) list (or other 1Shoppingcart – 1SC – private label)?
A: Every list in 1SA/1SC gets a unique email id – like 1sc-12345@autocontactor.com ).
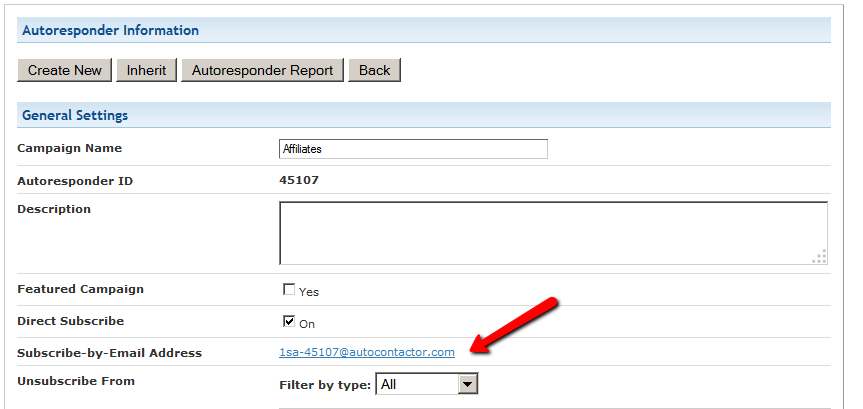
Add that to the “3rd-Party Notification Email Ids” field of the DAP product (under Products > Manage > “Notifications” tab)
And make sure you set the “Direct Subscribe” field in your 1SA/1SC list to be “On”.
If you are using double-optin for your DAP product, then you would normally have entered the text %%ACTIVATION_LINK%% in your email body, which is replaced by a unique confirmation link specific to that user.
Normally, when that activation link is clicked, the user is redirected to your login page configured under Setup > Config > Login URL.
But if you wanted them to be redirected elsewhere to a page of your choice, then in your double-optin email body, where you normally enter %%ACTIVATION_LINK%% , enter this instead:
%%ACTIVATION_LINK%%&redirect=http://link/to/landing/page/
Where “http://link/to/landing/page/” is the URL where you want them to be redirected to after they click on the double-optin activation link.
 If the user clicks on ‘Cancel‘ Link/Image, DAP will automatically cancel their current subscription with Paypal Standard or Authorize.net.
The ‘Cancel’ feature will ONLY work with :
1) dap-generated-button-for-paypal-standard AND
2) dap-shopping-cart that integrates with Authorize.net or Paypal Payments PRO or Stripe.com.
It will not work with any other payment processors or shopping carts.
If the user clicks on ‘Cancel‘ Link/Image, DAP will automatically cancel their current subscription with Paypal Standard or Authorize.net.
The ‘Cancel’ feature will ONLY work with :
1) dap-generated-button-for-paypal-standard AND
2) dap-shopping-cart that integrates with Authorize.net or Paypal Payments PRO or Stripe.com.
It will not work with any other payment processors or shopping carts.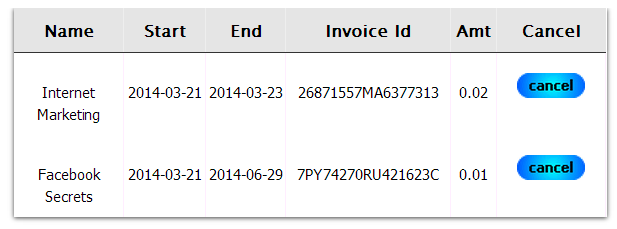 Attributes:
a) showalltransactions=”N”
If set to “Y”, the DAPUserSubscriptions shortcode will show the latest transactions (one transaction per product) and not just the Paypal / Authnet / Stripe ones.
If set to “N”, the DAPUserSubscriptions shortcode will show the latest ‘Paypal / Authnet / Stripe subscription’ transactions only.
b) showcancel=”Y”
If set to “Y”, a user-facing-cancel link will show up next to cancel-able transactions (authnet / paypal / stripe subscription).
This will allow users to cancel their own subscription. Only authnet / paypal / stripe transactions can be cancelled by users using this feature.
The cancel link/button will ONLY show up for Paypal / Authnet “Subscription/Recurring” transactions.
c) template=”template1″ OR template=”template2″
You can use template1 or template2 depending on your preferred display style. The template1 uses a horizontal layout. The template2 uses vertical layout.
Template1 layout:
Attributes:
a) showalltransactions=”N”
If set to “Y”, the DAPUserSubscriptions shortcode will show the latest transactions (one transaction per product) and not just the Paypal / Authnet / Stripe ones.
If set to “N”, the DAPUserSubscriptions shortcode will show the latest ‘Paypal / Authnet / Stripe subscription’ transactions only.
b) showcancel=”Y”
If set to “Y”, a user-facing-cancel link will show up next to cancel-able transactions (authnet / paypal / stripe subscription).
This will allow users to cancel their own subscription. Only authnet / paypal / stripe transactions can be cancelled by users using this feature.
The cancel link/button will ONLY show up for Paypal / Authnet “Subscription/Recurring” transactions.
c) template=”template1″ OR template=”template2″
You can use template1 or template2 depending on your preferred display style. The template1 uses a horizontal layout. The template2 uses vertical layout.
Template1 layout:
 Template2 layout:
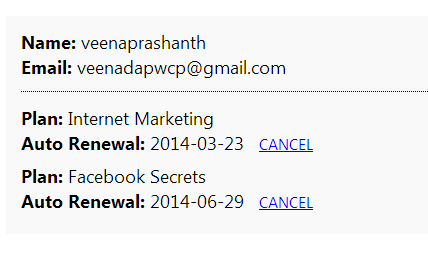 d) bgcolor=”#f9f9f9″ (Only applicable to template 2)
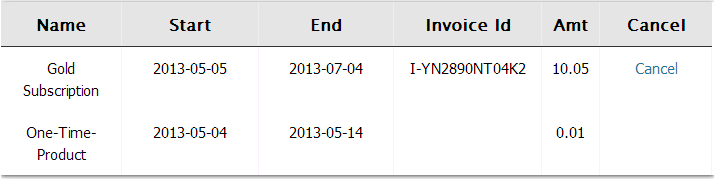 Cancel button will only show for :
– Transactions that are cancellation eligble (for ex – it will show for active subscriptions but not for one-time-purchases)
– And only if the cancel-eligible transactions are from Paypal or Authnet or Stripe. It will NOT show for other payment processors like Clickbank, Infusionsoft etc.
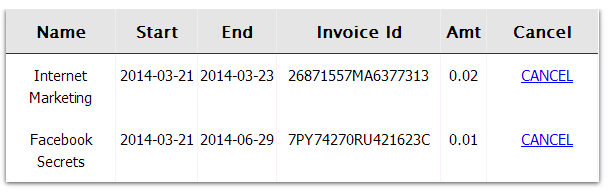
You can customize the table header names and the cancel button image. The template1 files are under /wp-content/plugins/DAP-WP-LiveLinks/includes/cancel/template1 folder.
Cancel button will only show for :
– Transactions that are cancellation eligble (for ex – it will show for active subscriptions but not for one-time-purchases)
– And only if the cancel-eligible transactions are from Paypal or Authnet or Stripe. It will NOT show for other payment processors like Clickbank, Infusionsoft etc.
You can customize the table header names and the cancel button image. The template1 files are under /wp-content/plugins/DAP-WP-LiveLinks/includes/cancel/template1 folder.– Only cancel eligible (or already cancelled) transactions will show (i.e. one-time purchases will not show)
=====================================================================================
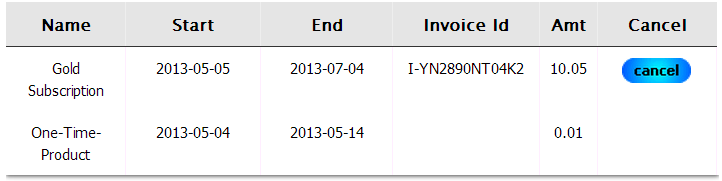
You can customize the ‘cancel success msg’, ‘cancel failure message’ and the ‘cancel image’ as shown below:
[DAPUserSubscriptions showalltransactions=”Y” showcancel=”Y” cancelsuccess=”Subscription Cancellation Completed Successfully!” cancelfailed=”Sorry, could not cancel the subscription!” cancelimage=”http://yoursite.com/wp-content/plugins/DAP-WP-LiveLinks/includes/images/CancelButtonUp.gif” template=”template1″][/DAPUserSubscriptions]
Please NOTE:
If showalltransactions=”Y”, then DapUserSubscriptions shortcode will show list of all products the users has from dap->manage users page.
If a product does not show up even though the user has access, it could be because:
– No transactionId ( number > 0) exists in dap users manage for this user->product (check Trans Id) field. Only paid products end up on this page where you have the shortcode.
– If the trans Id field says ‘FREE’ or ‘PAID’ (admin added), then these products will not be displayed in the DAPUSersSubscritpions page. This page will only show products that have a transaction associated with it (paid purchase).
– The product status is inactive.
– Manually added transaction
In simple terms, it shows a user their referring Affiliate’s (a.k.a Sponsor’s) information. It could also be called a downline builder.
And you can display any data from the member’s affiliate profile, on a page.
So when a user visits the page that has this shortcode, it will determine who the visitor/member’s affiliate is, from…
1) Affiliate Cookie (if it exists), or
2) If they’re already a member, and have logged in to DAP, then it will show their current Affiliate’s information. Or,
3) If neither the cookie is set, nor the user has an Affiliate attached to their account already in DAP, then it will show the info of the DAP Admin.
So you can use it to show the user information of the person (affiliate) who referred them to the page.
Think of it as a “Your Sponsor” tag.
Consider this example:
1) John joins your site
2) John fills out his profile with (say) his ClickBank nickname
3) John later refers Adam
4) When Adam logs in, he sees affiliate link to some third-party product, but CB nickname in the affiliate link is replaced with John’s CB nickname. So if Adam goes on to purchase that third-party CB product, then John will get the affiliate commissions for that purchase.
5) Now Adam fills out his profile with his own CB nickname
6) Adam refers Jill
7) When Jill logs in, she sees affiliate link to same third party product, except this time, the CB nickname is replaced with Adam’s CB affiliate nickname.
This can be done with any number of third-party programs, as long as the nickname can be easily replaced with the info provided by the upline affiliate. And it’s not just one field – you can create multiple profile fields for the affiliate to fill out – like ClickBankNick, CommissionJunctionNick, JVZooId, GoogleAnalyticsId, etc.
DAP actually even takes this one step further.
When Jill joins through Adam’s DAP affiliate link, if Adam has not filled out his CB nickname in his profile, then the third-party CB link shows CB Nickname of Site Admin in its place.
So if an affiliate fails to claim his affiliate link, then site admin gets credit for it (and all such links).
Hope this helps.
For eg., to show affiliate’s first name on a page, insert this into page:
[DAPUpline showField="first_name"]
Full list of available fields from sponsor’s or affiliate’s profile:
[DAPUpline showField="first_name"]
[DAPUpline showField="last_name"]
[DAPUpline showField="user_name"]
[DAPUpline showField="email"]
[DAPUpline showField="address1"]
[DAPUpline showField="address2"]
[DAPUpline showField="city"]
[DAPUpline showField="state"]
[DAPUpline showField="zip"]
[DAPUpline showField="country"]
[DAPUpline showField="phone"]
[DAPUpline showField="fax"]
[DAPUpline showField="company"]
[DAPUpline showField="title"]
[DAPUpline showField="paypal_email"]
Showing Custom fields:
[DAPUpline showField="custom_"]
Eg: To show affiliate’s/sponsor’s custom SSN field (say “ssn”):
[DAPUpline showField="custom_ssn"]
NOTE: You should’ve already created the custom field “ssn” before you can do this, of course.
In DAP, you can not only send automated pre-scheduled emails to your members (Autoresponders), but you can also set up similar pre-scheduled “Reminder” emails to be sent to you (the admin) every time a member reaches a day milestone.
Eg: Let’s say you (the admin) want DAP to send you or someone on your team a reminder email to follow up with each member by email once they reach day #7 – meaning, it’s been 7 days since they signed up for a specific product.
This is how you do it in DAP:
That’s it!
Now for each member that signs up for that product, regardless of when they join, every time they reach day #7, the reminder email will be sent to the 3rd party email id specified for that message (instead of being sent to member).
Reverse Dripping
If you want to be sent this same email say 3 days before member’s access expires to that Product, then set the email to be dripped on day “-3”. (See Expiration Notifications / Renewal Reminders)