Author Archives: DAP Admin
Author Archives: DAP Admin
1. Merchant Account / Payment Gateway
You need at least one of the following:
a) a Paypal Standard Account, or
b) an Authorize.net merchant account or
c) a Stripe.com account or
d) a Paypal Payments PRO account (only older version supported, read more here)
2. SSL/HTTPs Required:
If you’re using Authorize.net or Paypal Website Payments Pro or Stripe.com, then you need to have SSL (secure server) enabled on your web site. Please ask your web host to enable SSL/HTTPs for your site. SSL is NOT needed if you allow users to ONLY ‘Checkout with Paypal Standard’ option. It’s ONLY needed if you wish to allow users to enter Credit Card info on the checkout page right on your site.
3. DAP 4.5 + LiveLinks 1.9
You need to be on DAP 4.5 or above and DAP LiveLinks 1.9 (or above) to use the DAP Cart. If you are on DAP 4.4.3 or lower versions of DAP, please download DAP 4.5 / LL 1.9 from your members area on http://www.digitalaccesspass.com/dap and upload to your site.
See this for DAP upgrade instructions.
4. Credit Card Payments
If you want to use the DAP cart to allow users to pay using Credit Card on your site without getting transferred to a different site, you need to have one of the following:
a) an Authorize.net merchant account or
b) a Stripe.com account or
c) a Paypal Payments PRO account
5. Authorize.net
If you wish to sell subscription-based products using Authorize.net, then you also need Automated Recurring Billing (ARB) enabled in your Authorize.net account.
6. What type of Paypal account do I need to sell one-time and subscriptions products via DAP Cart?
If you have just a Paypal standard (business or premier) account, then your buyers can sign up to your subscription products using ONLY a Paypal account.
==> They can NOT sign up for a subscription using a credit card. <==
So if that’s ok with you, then all you need is a Paypal standard account (Business/Premier).
HOWEVER… If you want your buyers to be able to use EITHER a Paypal account OR sign up using just a credit card (without having a Paypal account for themselves), then you MUST have one of the following…
1) Paypal Enhanced Recurring Payments (which is an add-on to your existing Paypal standard account for around $20 per month – check paypal site for pricing)
-OR-
2) You need to sign up for Paypal Website Payments Pro ($40-$50 per month – check paypal site for pricing).
To Summarize:
If you want to use the DAP shopping cart and allow your users to purchase via CC on your site (without getting transferred to Paypal), use Paypal Payments PRO.
If you are ok with users getting transferred to Paypal for payment, but want to allow these users an option to pay using ‘CC’ on the Paypal site, then use Paypal Enhanced Recurring Payments.
If you do not care about ‘pay using CC’ and are ok with users always paying using their paypal account (even for subscription products), then go with Paypal standard.
Checkout with Paypal

Checkout with Credit Card

Checkout with Both Paypal and Credit Card

Stripe is quickly gaining popularity as the go-to payment processor. It wins points for its incredible ease of use. Stripe charges a fee of 2.9% + $0.30 per successful charge.
Starting DAP v4.5, you can hook up the DAP Shopping Cart to Stripe.com for payments.
This document explains how to connect Stripe to the DAP Cart.
Please NOTE (IMPORTANT) :
1. Subscription Product:
If you sell subscription products using DAP + Stripe, you MUST define a PLAN with the EXACT same name as the DAP product, in your Stripe Account. Both the PLAN ID as well as the PLAN NAME in Stripe MUST match the DAP product name. The plan ID in stripe cannot be a number. It needs to match the product name in dap otherwise Stripe will not charge the user’s credit card automatically every recurring cycle.
2. Coupon Code
If you use coupons, make sure to create coupon codes both in DAP and in Stripe, including for one-time paid DAP products, and even if Stripe says that Coupons are for Subscriptions.


If you only want to sell one-time purchase products, then you just need to create the product as a one-time product in DAP products page (set recurring to “NO” in price&recurring tab). You do not have to create product in Stripe.
If you only want to sell one-time purchase products, then you can skip this step. If you want to sell Subscription/Recurring products using Stripe, then please read this section.

 ID/Name Both ID and Name should eXactly match the ‘Product Name’ in DAP. So if the DAP product name is GOLD SUBSCRIPTION, then the Stripe plan Id = GOLD SUBSCRIPTION and the Stripe plan name should also be GOLD SUBSCRIPTION.
If the product name in DAP is EXAMPLE SUBSCRIPTION PRODUCT, then create a plan in your Stripe account with :
Stripe plan id: EXAMPLE SUBSCRIPTION PRODUCT
Stripe plan name: EXAMPLE SUBSCRIPTION PRODUCT
The plan Id in Stripe cannot be a number. It needs to match the dap product name.
Trial Period Days: If you want to offer trial for 7 days, set trial period to 7 and set initial recurring cycle in DAP to 7 days.. The actual trial amount can be set in DAP products page -> Price tab.Interval : If you set it to monthly, set the ‘Subsequent recurring cycle’ in DAP to 30 days.Amount: This should be set to ‘Subscription / Recurring’ amount. If you want to charge a different trial / initial amount, you can set that in DAP products page -> price tab -> Trial Amount.You can’t set that in Stripe because Stripe only allows for subscription amount.But the good news is… if you use DAP with Stripe, you can set the trial / initial amount in DAP and DAP will make sure the user gets charged the trial/initial amount first and then the recurring amount will be charged at the end of trial period.Lets take a look at DAP products -> Price&Recurring tab setup for 3 usecases:
– $0 Trial + $49.99 Monthly Subscription
– $10 Trial (14 day) + $29.99 Monthly Subscription
– No Trial + $9.99 Monthly Subscription
$0 trial for 7 days + $49.99 monthly (30 day) subscription
DAP setup :

Trial Price: $0
NOTE: If you do NOT want to offer trial OR if you want to offer $0 (FREE) trial, in both cases, set the Trial price = 0. During the payment button generation, you will be asked if the trial amount is set to 0 because it’s a FREE ($0) trial or if there is NO Trial. The button will be generated based on your input.
Recurring Price: $49.99
Recurring Count: 999
NOTE: The recurring count should be 999 or more (unlimited) because Stripe does not support limited recurring.
Recurring Cycle #1 : 7
NOTE: Set Recurring Cycle #1 (initial) to 7 for a ‘7 day’ trial. If there is no trial, then if you want to charge users every 30 days, set it to 30.
Subsequent Recurring Cycles: 30
Set subsequent recurring cycle to 30 for billing every 30 days (month)
$10 trial for 14 days + $29.99 monthly (30 day) subscription
DAP setup :
Trial Price: $10
Recurring Price: $29.99
Recurring Count: 999
NOTE: The recurring count should be 999 or more (forever/unlimited) because Stripe does not support limited recurring. The user will be charged every month until cancellation.
Recurring Cycle #1 : 14
Subsequent Recurring Cycles: 30
No Trial + $9.99 Monthly Subscription
DAP setup :
Trial Price: $0
If there is NO trial and you want to charge the user $9.99 upfront + 9.99 every month, then set trial price = 0 and during button generation when you are prompted with ‘do you want to offer free trial’, you can say NO and button will be setup correctly.
Recurring Price: $9.99
Recurring Count: 999
NOTE: The recurring count should be 999 or more (forever/unlimited) because Stripe does not support limited recurring. The user will be charged every month until cancellation.
Recurring Cycle #1 : 14
Subsequent Recurring Cycles: 30
Please NOTE: Make sure to first test each payment button before you go live.
Please read this document on DAP Cart Installation.
You can generate ‘BuyNow’ button OR generate ‘AddToCart’ button.
If you want to allow users to purchase individual products directly, create Buy-Now button.
If you want to allow users to purchase add multiple items to a CART first and then checkout, use Add-To-Cart button.
Please see this document for more on buynow button generation.
Please see this document for more on add-to-cart button generation.
1) Trial Amount allowed
Normally Stripe prevents users from setting a trial amount that is different from ‘Subscription amount’. If you want to sell a subscription product where say your users pay $100 upfront and then $30 every month, you cannot do that with Stripe. Normally you only have 2 options with Stripe –
Free trial followed by subscription payments
OR
No trial, just subscription payments.
So you can do $0 for 30 days and then $30/month OR you can do $30 every month including first month.
But the GOOD NEWS is that with DAP -> Stripe integration, we will make it possible to do Trial + Subscription. You can do $0 free trial or you can do a trial with ANY AMOUNT of your choice for your subscription products. The ‘trial amount’ can be different from the ‘subscription amount’ because dap will make it possible.
2) Instant Charge
If you sell subscription products with Stripe, Stripe will store the credit card info and ensure it can be charged before returning a response. BUT it can take up to one hour for the invoice to be actually charged. If you have a membership site where you want to allow INSTANT access to content after purchase and you want to make sure you received payment BEFORE you allowed access, then DAP will make it possible with Stripe by making sure the users are charged the first/initial fee INSTANTLY without delay before the access is granted to the product/content.
3) Access extended only upon successful subscription payment
DAP uses pay-as-you-go-model with Stripe. Users get access only to what they paid for. If it’s a monthly subscription, they will get access only to the first month’s content upon initial payment. DAP integrates with Stripe Webhooks for subscription payments. When the next subscription payment goes through successfully, dap will automatically extend access by another 30 days (recurring cycle).
If a user cancels payment, DAP will no longer extend access as no more payments will come in, so the user will automatically lose access to product/content at the end of current recurring cycle.
4) Coupons
You can use the DAP Cart’s coupon feature and integrate it with Stripe coupons so users will see the discounted amount in the shopping cart after they apply a coupon and then Stripe will charge the correct discounted amount. You just have to match the coupon names and discount amounts in DAP and in Stripe. The DAP cart will support coupons for both multiple-items purchase (add-to-cart button) as well as single-item purchase (buy-now button).
5) Unlimited 1-click upsells / downsells
You can do an Unlimited number of Upsells and Downsells, and increase your sales by up to 30% with your existing products. Easy to configure. This feature offers Unlimited options and potential to grow your business.
6) Payment on your site
Users will stay on your site for Credit Card Payments. They will not get transferred to another site to make the payment.
7) PCI Compliance
DAP does not store the Credit Card information on your site so you do not have to worry about PCI compliance issues.
8) Paypal Integration
Integrated Credit Card (via Stripe) and Paypal (via Paypal Standard) payment option on the Checkout page. The users can pay using their Paypal account or using their Credit Card. So you will not lose sales from people that do not want to pull out a Credit Card for making the payment.
9) Pick your password
Allow your buyers to pick their OWN password for their membership account before purchase. DAP will use the user-picked password instead of generating a password for them.
10) Pre-registration / Capture email
Allow Pre-Registration (User account will be created with a status of “P”) even if the payment fails so you will still have a way to communicate with these users.
11) Automated card expiration email
The email will get sent ‘configured number of days’ before the card expires. DAP will now allow you to proactively communicate with a customer when their card is about to expire. DAP will pre-determine when a card is going to expire and send an automated e-mail to inform the member it is time to update their credit card info on file.
12) Customer facing interface for “Update CC and Billing”
Your users can update their Credit Card and Billing Info themselves without having to hand it to you to update. It will take you just a couple minutes to set this up on your site.
13) Single and Multiple item purchases
Multiple items can be added to cart (via Add-To-Cart button) before final checkout. Or you can create simple buy now buttons for single-item purchases.
14) Custom fields
Add any number of Custom Fields to your Checkout Page. As long as these fields have been defined as custom fields in DAP, you can capture them in the checkout page. It will be stored in the user’s profile.
15) Automated login
Users do not have to wait for ‘welcome email’ for their login / download credentials. They will get auto-logged-in to the member’s area upon purchase, and can be sent straight to the downloads page or welcome page.
16) Existing users login
Allow existing users to ‘log in’ on the checkout page itself, so the new product purchase can be attached to their existing membership account. Their existing billing and profile info gets pre-populated on the checkout page upon login.
You can integrate DAP and SendReach in 2 different ways.
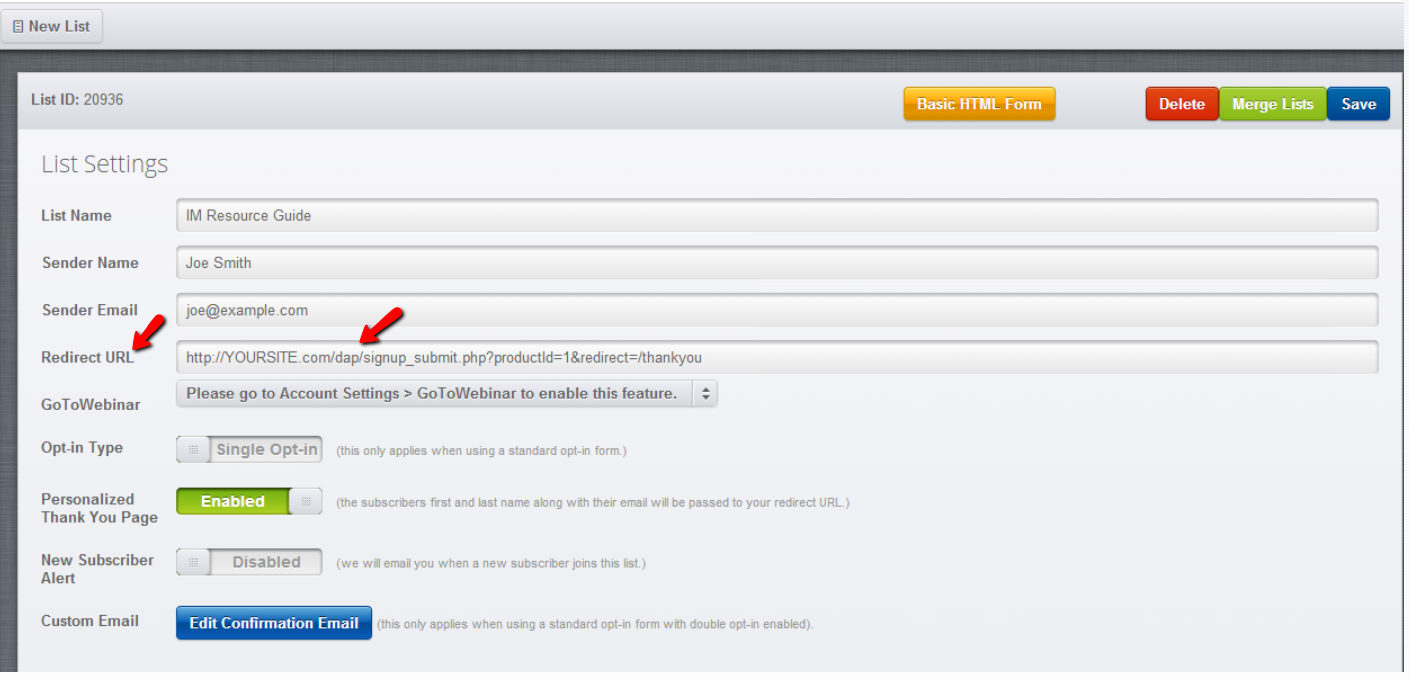
You can set the redirect URL in SendReach list settings to :
http://www.yourwebsite.com/dap/signup_submit.php?productId=1&redirect=/thankyou
NOTE:
i) Set the productId in the URL above to the product ID of the DAP product you want to integrate the SR form with.
ii) Set the redirect tag to the URL of the page you want the users to be redirected to upon signup.
For e.g. If you want the users to land on thankyou page (http://YOURSITE.com/thankyou) after signup, then you can just set the redirect tag to /thankyou.
iii) If you want the users to be auto-logged-in to DAP upon signup, then make the DAP product a single-opt-in product (and not a double-optin product).
This way after the users sign-up via SR opt-in form, DAP will automatically create a membership account, give user access to the content under the free product, and also auto-login users to their membership.
You can integrate both DAP free and paid products with your SR list using these steps.
i) Login to SendReach to get API info.
Create an APP called “DAP” under Sendreach Account Settings / My App
Then get the API Key and Secret for the DAP App in SendReach.
Get the List Id(s) for the list(s) you want to integrate with DAP.
ii) Login to DAP admin panel to integrate DAP and Sendreach
Select the DAP product that you want to integrate with SendReach.
Click on Notifications tab.
Say your App Id=1421, Secret Key=DSXI, UserId=10 and ListId=188275
The format for entering in DAP is:
sendreach:app-id:secretkey:userid:listid
So add the following line of text to the “DAP Product > Notifications tab > Plugin Notification upon User Add” field.
sendreach:1421:DSXI:10:188275
Now when a user gets added to DAP (via free dap signup or via payment), if the product is integrated with SendReach, then DAP will automatically add the user to the right SendReach list.
That’s it.
One way of setting up Pay-Per-Post in DAP, is to create one product per post, and then sell access to each one separately.
However, if you have a lot of posts, this can be a lot of work.
An easier and more efficient way is to use our credits plugin, “Credit Store“.
Using the Credit Store plugin, you can setup individual pieces of content – like a post, page, category, or even a file – to be Redeemed via Credits, instead of cash. You sell credits, your members buy those credits, then use their credits towards redeeming individual content.
Just like when you buy an iTunes gift card and purchase individual songs or movies with it. Or like buying credits on a stock photo site and then redeeming it for individual images.
Whether that content is a bunch of content all bundled together, or individual posts/pages/files, is up to how you configure and set up your own Store.
The Credit Store plugin is a true game-changer, and allows you to be a lot more creative, and for your content to be delivered in a much more flexible yet powerful manner to your buyers and members.
We already have a few DAP users using the Credit Store (beta) this way, and they’re all loving the power and flexibility of this plugin.
See this for more details on the Credit Store:
http://wickedcoolplugins.com/the-plugins/dap-credit-store/
As the Credit Store is currently in Beta, if you wish to purchase it now, we will make it available for download in a few weeks and give you access to the plugin for a big discount compared to the price it will be launching at. So feel free to email us or open at ticket if you want more details.
1) DAP Admin Dashboard Tour
2) Managing Users
3) Email Autoresponders & Broadcasts
4) Affiliate Module
5) Payment Processing
Installation Steps – DAP Shopping Cart Plugin
1. Download the dapshoppingcart plugin (zip file) from your members area on wickedcoolplugins.com and upload it to WordPress via WP Admin – >Plugins -> Add New -> Browse for the zip file -> install OR upload it to WP via FTP to wp-content/plugins folder.
2. Download the WCP License plugin from your members area on wickedcoolplguins.com and upload it to WordPress via WP Admin – >Plugins -> Add New -> Browse for the zip file -> install OR upload it to WP via FTP to wp-content/plugins folder.
3) Activate DAPshoppingcart plugin in wp admin -> plugins.
4) Activate WCP License plugin in wp admin -> plugins.
5) Login to http://wickedcoolplugins.com/my-account/downloads/ and get your license key.
6) Go to WP admin -> settings -> Wicked Cool Plugins License -> Enter the license key.
That’s it.
You need to be on the latest version of DAP (as of today) – DAP v4.5 and LiveLinks v1.9 – for the DAP Shopping Cart to work. See below for new DAP installations or upgrading your existing DAP installation.
Related: Upgrading to DAPv4.5 and LiveLinks v1.9
Related: Installing a new version of DAP
If you are on DAP v4.4.3 or above, you can use the New DAP Shopping Cart Plugin! The document below explains how to setup the DAP Shopping Cart.
Setting up Add To Cart Payment Button
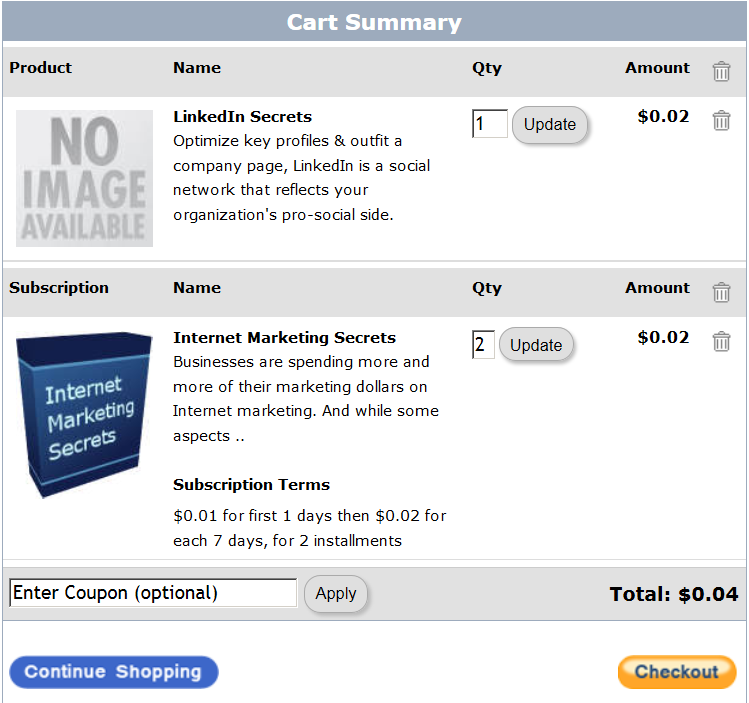
STEP 1: Create Cart Summary page.
This is how the cart summary page will look :
You can use the default values for the parameters in the shortcode above OR you can update any of these parameters in the shortcode:
Cancel Image (cancelimg), Continue Image (continueshopping), Checkout Image (checkoutimg), Cart Empty Message (cartemptymessage), Cart Empty Image (cartemptyimage), Update Cart Message (updatecartmsg), Update Cart Success Message (updatecartsuccessmsg) and Coupon Success Message (couponsuccessmsg).
Note: Currently only 1 template is supported, so please leave the template as template1.
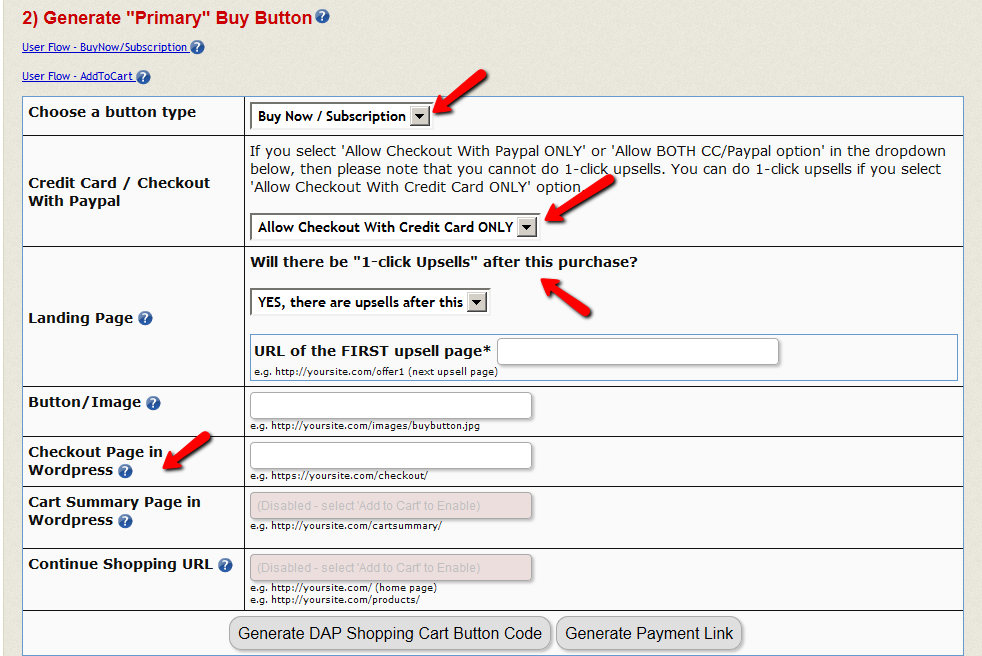
STEP 2: Create Payment Button
Go to DAP admin -> Payment Processing > Generate Buy Buttons -> Authnet & Paypal PRO tab -> do the following on this page
1. Select Product.
2. Select Payment Processor.
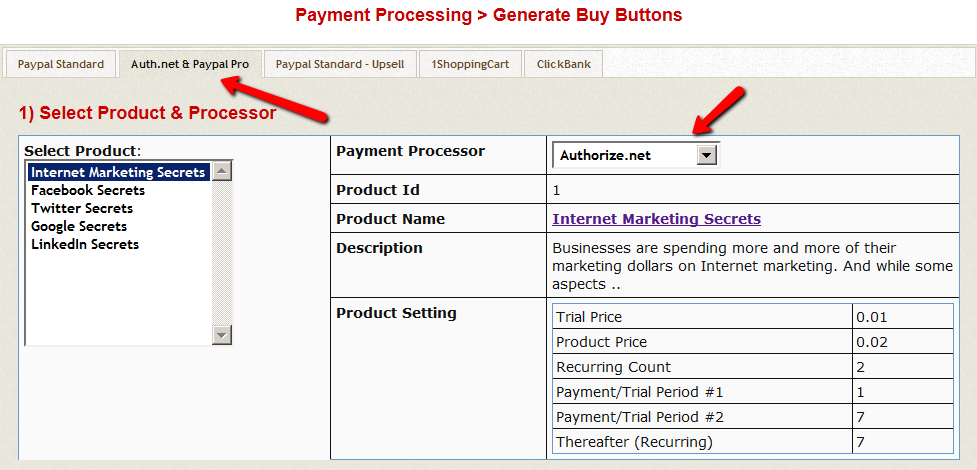
3. Choose a button type (BuyNow/Subscription, AddToCart).
4. Configure payment method. 5. Set the . If you are going to send the users to an upsell page after they click on checkout/buynow, then set the landing page URL to point to your upsell page. Say the upsell page is called http://YOURSITE.com/upsell1. You can set the landing page url to /upsell1. If no upsells, then you can set this to point to a thank you page.
Set the Checkout page in WordPress to http://YOURSITE.com/buynow (check STEP 1 in this document for how to create buynow page). If you do not have a WP based Checkout page, you can set it to : http://YOURSITE.com/wp-content/plugins/dapshoppingcart/buynow.php.
Set the to http://YOURSITE.com/cartsummary (check STEP 1 in this document for how to create cartsummary page). If you do not have a WP based Cart Summary page, you can set it to : http://YOURSITE.com/wp-content/plugins/dapshoppingcart/cartSummary.php. Set the Continue Shopping to point to the page where you have more Add To Cart buttons.
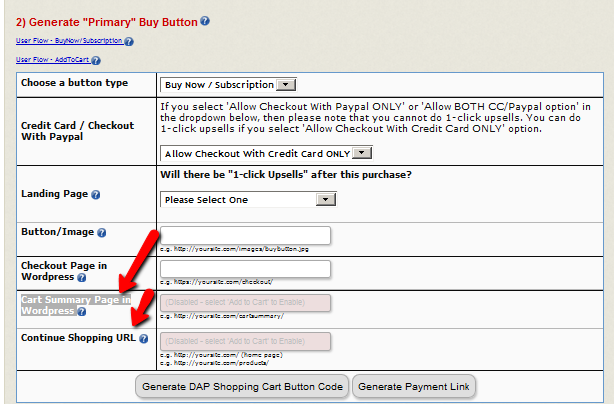
6. Now you can generate a AddToCart Payment Button or a Payment Link.
PLEASE NOTE : The buynow/checkout page must be on HTTPs/SSL. Your entire site does not need to be SSL enabled but the checkout/buy now page where Credit Card is collected MUST BE on https for SECURITY reasons. If you ONLY configure ‘Checkout With Paypal’ to show up on Checkout Page, then you DO NOT need https. You only need to have HTTPs enabled checkout page if you offer Credit Card checkout option. Your web host can enable HTTPs for your site. The exact cost of SSL is web host dependent. Please check the pricing details with your web host.
TESTING: If you are waiting on your web host to enable SSL but want to start testing the CART, you can look for ‘https’ in the button code and update all occurrences of https with http for testing. Please remember to change back to https before you go LIVE with the button.
STEP 3: Upsells – Create Upsell Button
* If you want to offer upsells, please ONLY use the Credit Card payment option on the checkout page. Do not offer ‘Checkout with Paypal’. Upsells will not work with Paypal Standard checkout.
* Say your first upsell page URL is http://YOURSITE.com/firstupsell. Use the URL of the FIRST upsell page (/firstupsell) as the ‘LANDING PAGE URL’ when you generate your MAIN/INITIAL button for the sales page. This way, when the users click on the main payment button, the user’s payment will be processed, and instead of users getting redirected to the thank you page, they will land on the FIRST upsell page.
* You need to have 2 buttons on the upsell page:
Add To Order (Yes, I want to add this to my purchase) / No, Thanks (No, I will skip this wonderful offer)
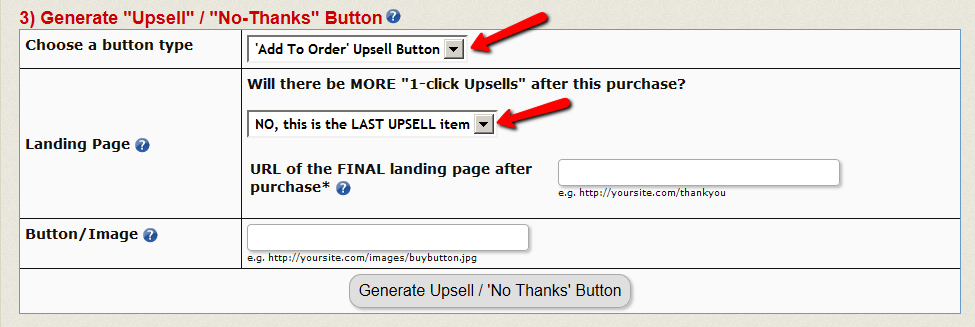
* You can generate the UPSELL / DOWNSELL buttons for all your upsell / downsell offers in the DAP admin -> Payment Processing > Generate Buy Buttons -> Authnet & Paypal PRO tab. Make SURE to select the RIGHT product in the button generation page BEFORE you generate button.
STEP 4: CART OPTIONS
Last STEP in your checkout page configuration process.
– Go to DAP admin -> Payment Processing > Cart Options page.
You will find several checkout page customization options on this page including options for ‘Choose a Password (pre-registration)’, ‘Require Billing Info for Paypal’, ‘Custom fields’ etc. You can enable options as needed for your site for the product you are trying to sell. Remember to first select the product in the select box on the left before picking options.

This concludes the AddToCart setup. Your shopping cart is now ready to be tested!
If you are on DAP v4.5 / DAPLiveLinks 1.9 or above, you can use the New DAP Shopping Cart Plugin! The document below explains how to setup the DAP Shopping Cart.
Setting up Buy Now / Subscription Payment Button
STEP 1: Install DAP Shopping Cart
See this document on how to install the DAP Shopping Cart. See this document on the minimum requirements to use the DAP Cart.
STEP 2: Create buynow/checkout page.
See this document on how-to-create-checkout-page-in-Wordpress.
STEP 2: Create Payment Button
1. Select Product.
2. Select Payment Processor.
3. Choose a button type (BuyNow/Subscription, AddToCart).
4. Configure payment method. 5. Set the . If you are going to send the users to an upsell page after they click on checkout/buynow, then set the landing page URL to point to your upsell page. Say the upsell page is called http://YOURSITE.com/upsell1. You can set the landing page url to /upsell1. If no upsells, then you can set this to point to a thank you page.
Set the Checkout page in WordPress to http://YOURSITE.com/buynow (check STEP 1 above on how to create buynow page). If you do not have a WP based Checkout page, you can set it to : http://YOURSITE.com/wp-content/plugins/dapshoppingcart/buynow.php.
6. Now you can generate a Payment Button or a Payment Link.
PLEASE NOTE : The buynow/checkout page must be on HTTPs/SSL. Your entire site does not need to be SSL enabled but the checkout/buy now page where Credit Card is collected MUST BE on https for SECURITY reasons. If you ONLY configure ‘Checkout With Paypal’ to show up on Checkout Page, then you DO NOT need https. You only need to have HTTPs enabled checkout page if you offer Credit Card checkout option. Your web host can enable HTTPs for your site. The exact cost of SSL is web host dependent. Please check the pricing details with your web host.
TESTING: If you are waiting on your web host to enable SSL but want to start testing the CART, you can look for ‘https’ in the button code and update all occurrences of https with http for testing. Please remember to change back to https before you go LIVE with the button.
STEP 3: Upsells – Create Upsell Button
* If you want to offer upsells, please ONLY use the Credit Card payment option on the checkout page. Do not offer ‘Checkout with Paypal’. Upsells will not work with Paypal Standard checkout.
* Say your first upsell page URL is http://YOURSITE.com/firstupsell. Use the URL of the FIRST upsell page (/firstupsell) as the ‘LANDING PAGE URL’ when you generate your MAIN/INITIAL button for the sales page. This way, when the users click on the main payment button, the user’s payment will be processed, and instead of users getting redirected to the thank you page, they will land on the FIRST upsell page.
* You need to have 2 buttons on the upsell page:
Add To Order (Yes, I want to add this to my purchase) / No, Thanks (No, I will skip this wonderful offer)
* You can generate the UPSELL / DOWNSELL buttons for all your upsell / downsell offers in the DAP admin -> Payment Processing > Generate Buy Buttons -> Authnet & Paypal PRO tab. Make SURE to select the RIGHT product in the button generation page BEFORE you generate button.
STEP 4: CART OPTIONS
Last STEP in your checkout page configuration process.
– Go to DAP admin -> Payment Processing > Cart Options page.
You will find several checkout page customization options on this page including options for ‘Choose a Password (pre-registration)’, ‘Require Billing Info for Paypal’, ‘Custom fields’ etc. You can enable options as needed for your site for the product you are trying to sell. Remember to first select the product in the select box on the left before picking options.
That’s it for BuyNow or Subscription buttons. Instructions for AddToCart button will be covered later in this document.
You try to visit a protected page that you’re not eligible to view, and don’t see the proper error message you are supposed to see.
Save the changes.
Now, in a different browser, first visit your logout link – http://YourSite.com/dap/logout.php – so that the config changes can be reloaded. Now go back to that original protected page, and you should now be redirected to the above custom error page you created above.
DAP works great with the WP Super Cache plugin. Probably works with others too – but we have officially tested it with just Super Cache at this time.
And this page below walks you through the full set up of the WP Super Cache plugin.
___________________________________________________________
Go to Settings > WP Super Cache
You are now on the “Easy” tab. Don’t do anything here just yet.
Go to Advanced tab.
Be sure to put a “Check” (or “Select” the radio button) next to each of the following items
Caching
Cache hits to this website for quick access. (Recommended)
Use mod_rewrite to serve cache files. (Recommended)
Miscellaneous
Compress pages so they’re served more quickly to visitors. (Recommended)
Don’t cache pages for known users. (Recommended)
Don’t cache pages with GET parameters. (?x=y at the end of a url)
Cache rebuild. Serve a supercache file to anonymous users while a new file is being generated. (Recommended)
Advanced
Clear all cache files when a post or page is published or updated.
Extra homepage checks. (Very occasionally stops homepage caching) (Recommended)
Only refresh current page when comments made.
List the newest cached pages on this page.
Click on Update Status button.
Keep scrolling down until you see the Accepted Filenames & Rejected URIs section.
You’ll see a big text area under the text “Add here strings (not a filename) that forces a page not to be cached”. +
There, add the following, one per line.
/dap/
/dap/.*\.php
/dap/admin/
/dap/admin/.*\.php
/login/
/members/
/my-profile/
/my-content/
Obviously, your member content page URL’s may be slightly different. So make sure you customize it to suit your own URL’s.
Next to back to Easy tab at the top.
Now you select the “Caching On” option and save.
That’s it for the setup.
Now, on to testing.
If you organize all of your member content under a main parent page, say “members”, then all you need to exclude from caching, is /members/
For example, if your URLs include year and you don’t wish to cache last year posts, it’s enough to specify the year, i.e. /2004/. WP-Cache will search if that string is part of the URI and if so, it will not cache that page.
So basically, excluding just one single URL – /members/ – from caching, will make sure all of the following as well remain UN-CACHED.
/members/login/
/members/home/
/members/my-content/
/members/my-profile/
/members/my-affiliate-info/
/members/course-1/
/members/course-1/module-1/
/members/course-1/module2/
/members/course-2/module-1/
/members/course-2/module2/
You get the idea. When you exclude “/members/”, any URL that starts with that same text, will be excluded.
So here’s how you set up the “hierarchy” of the pages.
First, create the page “members“.
Then, when you create the “login” page, make sure you select the “parent” of the page, to be the “members” page.
So, instead of the login page URL looking like… http://YourSite.com/login/
… because the parent page is “members”, that also gets added to the URL, and the login page URL becomes like this:
http://YourSite.com/members/login/
If you created a page called “example” and made the “login” page as its parent, then the URL for this new page becomes:
http://YourSite.com/members/login/example/
So you see how that hierarchy works. Use that to arrange all of your member content under the main “ancestor”, which is “members”, here in our example.
But if you have already completed creation of all of your content, then you’re just going to have to do a little extra work to identify all of your pages and posts and exclude the member content from the list. DAP makes this a little bit easier as well.
If you log in via FTP and go to the “dap” folder, inside, you will see a file called “dap_permalink_dump.php”. If you download that file to your desktop, and open it with any text editor (Notepad, Dreamweaver, etc), inside you will see a full list of URL’s of all posts and pages from your WordPress site. You can just take that list, remove separator text like “Posts” and “Pages”, and trim the list of URL’s down to just your member content, you can take that and paste it right into the WP Super Cache > Advanced tab > Accepted Filenames & Rejected URIs section.
Now open multiple browsers – like Firefox, Chrome and Internet Explorer (or Safari). Use at least 3 separate browsers.
Next, go to your login page in one of them, and then log in. Then go to same login page in another browser – make sure it doesn’t say “You are already logged in”. It should show you the DAP login form. Same on third browser.
Next go to the profile page while logged in as member. Do the same in other two browsers, while logging in as three different people. Each profile page should you show you different information.
If you crated 3 separate products, with 3 different users, then logging in as those 3 different users on the 3 different browsers, should show you 3 different sets of pages.
All this is just to make sure there’s no caching going on of your membership content, that’s all.
If all of this works, then you’re all set with caching for your non-membership content, and no caching for your dynamic member content.