Disabling Login IP Security Check
DAP has a security check to prevent password sharing.
And starting DAP v4.4, you can turn this off at both a per-user level and also at a global site-wide leve.
Disabling IP Check For Individual Users
- Search for the user on the Users > Manage page
- Click on their email or user id, and you will now be taken to the “User Edit” page
- There, on their user profile, towards the bottom, set the field “Exclude from Login IP Check” to “Yes” and save.
This user will now be excluded from login IP check.
NOTE: If the user’s account is currently already locked, then you also need to unlock it this one time, but going forward, the account is now whitelisted, and will not get locked again.
Disabling IP Check For All Users (Site-wide)
If you wish to permanently disable this for all users in your membership site, then here’s how to do it:
- Go to DAP Admin > Setup > Config
- Set “IP Login Limit: Max. # of User Logins From Different IP’s” to a high number – like “100″.
- Set “Flush Login IP Records How Often? Every….. ?” to “Day” so that any accumulated IP records gets flushed every day.
That’s it!
Customizing User Profile Fields
The old shortcode for displaying the user profile on a page, was %%USERLINKS%% which just displayed the entire user profile with all fields, without the ability to customize which fields to show.
That one is still valid. But starting DAP v4.4.3, we have a new shortcode to display userprofile.
[DAPUserProfile]
Allows you to selectively display profile fields on a page. Entering just the shortcode [DAPUserProfile] within a WP page, will show the default user profile form with all default fields being displayed.
So entering just [DAPUserProfile] on a pagem is the same as entering the full version below:
[DAPUserProfile showFirstName=”Y” showLastName=”Y” showUserName=”Y” showEmail=”Y” showPassword=”Y” showAddress1=”Y” showAddress2=”Y” showCity=”Y” showState=”Y” showZip=”Y” showCountry=”Y” showPhone=”Y” showFax=”Y” showCompany=”Y” showTitle=”Y” showPaypalEmail=”Y” showOptedOut=”Y” showCustomFields=”Y”]Not Show Certain Fields
Just set the profile field that you don’t want shown to “N” in the shortcode.
Default is “Y”. So Leaving out the text showLastName=”Y” entirely from the shortcode, is the same as setting it “Y”, which means it will be displayed.
To NOT SHOW Phone and Fax
[DAPUserProfile showPhone=”N” showFax=”N”]So all other fields will be displayed, except those two.
To SHOW just First Name, Last Name and Email
[DAPUserProfile showFirstName=”Y” showLastName=”Y” showUserName=”N” showEmail=”Y” showPassword=”N” showAddress1=”N” showAddress2=”N” showCity=”N” showState=”N” showZip=”N” showCountry=”N” showPhone=”N” showFax=”N” showCompany=”N” showTitle=”N” showPaypalEmail=”N” showOptedOut=”N” showCustomFields=”N”]To SHOW just Password field
[DAPUserProfile showFirstName=”N” showLastName=”N” showUserName=”N” showEmail=”N” showPassword=”Y” showAddress1=”N” showAddress2=”N” showCity=”N” showState=”N” showZip=”N” showCountry=”N” showPhone=”N” showFax=”N” showCompany=”N” showTitle=”N” showPaypalEmail=”N” showOptedOut=”N” showCustomFields=”N”](both main password field and repeat password will always be displayed together)
Log In As Member
Starting DAP v4.4, all passwords are encrypted. Previously, one of the main reasons that we had made it open, was because of many DAP admins asking for it to be that way so that they could log in “as” one fo their members to see what they’re seeing, for troubleshooting, etc.
But since the passwords are now encrypted, we have provided an alternate way for DAP admin to log in as a regular user/member.
Log In As Member (LIAM)
- If your primary browser is say Firefox where you’re normally logged in as WP admin and DAP admin, then open a separate browser window (like in Chrome or Safari)
- Go to http://YourSite.com/dap/loginAs.php
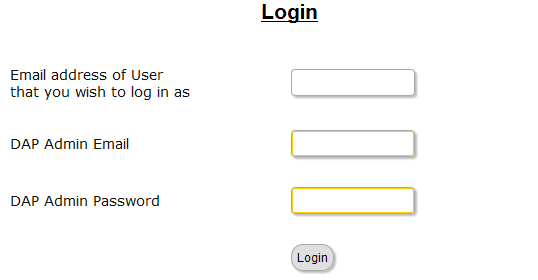
On that page, you will see 3 form fields as shown in the image below:
1) Email address of user/member that you wish to log in as
2) DAP Admin Email
3) DAP Admin Password
So once DAP verifies that it is indeed the DAP Admin trying to log in as someone else, DAP will log you into the site as that member whose email id you entered in (1) above.
NOTE: The Log In As Member (LIAM) feature does NOT mean that you can use just one browser to log in as both DAP Admin and regular member. You still need to use two separate browsers – one for DAP admin (like Chrome) another for regular member (Firefox). All LIAM does is to give you a workaround for logging in as someone else, because starting 4.4, the DAP Admin can no longer see what the member’s password is in order to log in as them.
Gift Subscriptions
There are two ways members can buy gift subscriptions for others.
1) Use the recipient’s email id (but their own name and billing info) during checkout. So when DAP creates the member account, it will send the welcome email to the recipient’s email id.
NOTE: Using the recipient’s email id may not be an option if the gift giver is paying for it using their own Paypal standard account, in which case their Paypal email id will be used by DAP to create the membership account. So, the best option is the one explained below.
2) BEST OPTION: Have the buyer make the purchase in their own name, and then forward the welcome email (which has the password to the member’s area) to the recipient. And the recipient can then log in using that information, and can change any and all profile information on the User Profile page.
NOTE: If this is a subscription product, then the recipient should not change the “Paypal Email” field in the profile, which will be having the buyer’s Paypal email id, because recurring subscriptions will continue to come in using the buyer’s Paypal email id. And since the recipient is not the one being charged, and it’s still going to be charged to the gift giver’s account, they need to leave that field in there. So you can use the [DAPUserProfile] shortcode and maybe not even show the “Paypal Email” field.
Adding A Manual Transaction
Once you have manually added a user, when you search for them on the Users > Manage page, you’ll see their row with “FREE” or “PAID” under the “Trans Id” column.
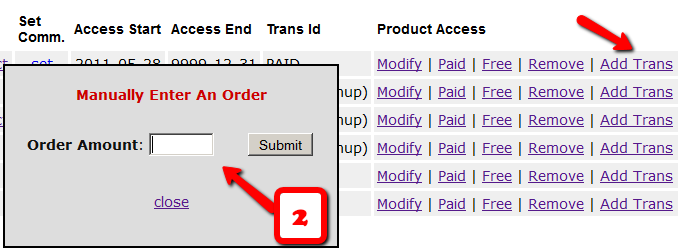
1) Enter an order (transaction) into the system by clicking on “Add Trans” (which stands for “Add Transaction”).

2) When you click on the “Add Trans” link, you will see a small popup appear (see image below) that allows you to manually enter an amount. So if the payment you received offline was say $97, then you would enter “97” or “97.00” in the “Order Amount” field and click on “Submit”.

3) Once you’ve entered a manual order, the “Trans Id” column will change from “FREE” or “PAID”, to an actual transaction id (or order id) – in the example below, it turns to Transaction Id “3”.
DAP Upsells With ClickBank PitchPlus
DAP integrates with ClickBank “PitchPlus”, which is their 1-Click Upsell process.
So you can basically start by selling one front-end product, and then if your buyer purchases that product, you can then upsell them more products right after, and since they’ve already entered their payment information once, ClickBank remembers this information and allows them to purchase further products without having to re-enter all of the information again.
Setting Up DAP & CB PitchPlus Integration
The basic idea is the same for DAP/CB integration, whether it’s one product, or multiple Upsell products .
- You start with CB integration as specified in this document: Integration DAP With ClickBank . That’s how you set up the first product.
- Now, if you were selling just one product, then you would normally send them to a static “Thank You” page where you would tell them to check their email inbox for login details, and by that time CB would have already notified DAP via their “Instant Notification Service” (INS – kind of like Paypal’s IPN), and DAP would have already sent them the welcome email to the buyer’s email address, which contains their login and password to the member’s area.
- But in this case, you are going to offer them an upsell. So instead of sending them to a thank-you page after the first purchase, you basically send them to the sales page of your next upsell, that’s all.
You basically do a one-time set up of INS and the secret key as explained here.
Once that’s done, then for every Front-end product or Upsell-product, they are all integrated with DAP the same way: You just make sure the “Item Name” in CB and the “Product Name” in DAP both match, that’s it!
And for the last product in your upsell, be sure to point it to a static page containing a message like “Thank You, please check your email inbox for login details”.
And since CB notifies DAP separately for each product purchased, right then and there, if they end up buying 3 products during checkout (1 main + 2 upsells), then DAP will send the user 3 separate welcome emails. Of course, that’s optional – you don’t have to send out a welcome email for all products, but we highly recommend that you do.
Plus since they would be using the same email id for all 3 purchases, DAP will give them access to all purchased products under a single DAP account. So they need to log in to just one account to access content from all products that they just purchased.
Affiliate Commissions For Offline Payments
DAP is one of the very few membership platforms that will let affiliates earn commissions on offline payments too.
And in fact, DAP will credit affiliates for not just offline payments, but for any payments that you accepted outside of the payment options listed on your web site.
So, for example, you’re using Paypal and Authorize.net buttons on your site. And someone wants to send you a check (cheque) in the mail, or they want to send you money via Western Union, or wire transfer, or they call you and you accept their credit card information by phone, or any other such offline methods.
In this case, DAP can still give credit to the right affiliate for the sale. Here’s how…
1) Add Manual Transaction
- First you add the user manually, by going to DAP Admin > Users > Add.
- Once you’ve added them to the product, come back to DAP Admin > Users > Manage.
- Search for the user by email
- On the user data row for that Product, initially, under Trans Id column, it will show PAID (see image below)
- Step 1: Enter a manual transaction by clicking on Add Trans (which stands for “Add Transaction”). That will record your offline payment in DAP. So now there’s an actual payment associated with that user’s sign up.

- When you click on the “Add Trans” link, you will see a small popup appear (see image below) that allows you to manually enter an order. So if the offline payment was for say $97, then you would enter “97” or “97.00” in the “Order Amount” field and click on “Submit”.

- Once you’ve entered a manual order, the “Trans Id” column will change from “PAID” to an actual transaction id.
That’s it.
By this time, the user would’ve received their “Welcome Email” from DAP, which will have their login info to log in to your site.
And when they log in, if they have an affiliate cookie set in their browser (which they would, if they had clicked on an affiliate link at some point before they contacted you and asked you about a non-standard, offline payment method), then when they first log in to your member’s area, DAP will pick up the referring affiliate’s id from the affiliate cookie, and give credit to them for the sale.
And when the DAP hourly cron runs at the top of the next hour, that affiliate will be credited with any commissions that you’ve set up for that product.
Group Memberships And Sub-Accounts
So you want to use DAP to sell group memberships or sub-accounts.
Eg. 1) A group membership – or multi-user account – that a School/College/Teacher can buy on behalf of their students. It’s either a one-time product, or could be a subscription product. In that case, buyer keeps paying monthly, and when they stop paying, all sub-users (child accounts) get disabled.
Eg. 2) Company A pays $X for up to 20 of its employees to have individual memberships. To begin with, the money is collected in one lump sum and DAP grants 20 memberships. Then each month Company A pays the Corporate/Umbrella/Bulk Membership and DAP gives credit to the individual memberships. If Company A fails to pay, all the “sub” members underneath lose access.
How To Implement Group/Bulk Memberships
DAP doesn’t directly support sub-memberships or sub-accounts yet. We already have this on our humongous to-do list :-). And we definitely plan on implementing it soon. But for now, here’s a work-around for making this happen. It’s fairly simple, yet it is manual, and cannot be automated yet.
- You would set up a One-Time product in DAP called, say, “20-Seat Membership“. If you wish to sell different quantities of “seats” or “licenses”, then you have to create as many products (like “5 Seats”, “10 seats”, “50 seats”, etc).
- In the welcome email, you would instruct buyer to email you a CSV file with 20 (or as many as your product allows) names and email id’s, one per line, in this format (EMAIL,FIRST,LAST):student@gmail.com,John,Student
another@yahoo,com,Jill,Freshman
…
…
member20@yahoo,com,Joe,Senior - And then, using DAP’s bulk-import feature, in one fell-swoop, you can add all 20/50/100 to your membership site and give them all their own accounts, usernames and passwords, that they can all use to independently log in to your web site.
- If you see Step 1 above, we advised to make this a One-Time product. The reason for that, is you give life-time access first, and if they stop paying, then you cancel manually. So if the main buyer stops paying the subscription, this is the only time you will have some manual work hunting searching for those 20/50/100 email id’s on the Users > Manage page, and then clicking on “Remove” on their user row, so that they completely lose access.
Until we include this feature in DAP and make it automated, there are two ways to look at this.
One: You could say, it’s too much work to remove 20/50 emails when the main buyer cancels. OR…
Two: Since this is a group membership, you are hopefully charging them a good fee for this (if not, then you certainly should!). So you can always hire someone for $5 or $10 per hour on Odesk and have them do the removal of those email id’s. Removing 50 email id’s would take about 20 minutes at most. And you would need to do this only when they cancel, which can happen only once per group membership.
So hope that helps give you some ideas.
Hope this makes sense.
Deleting A User
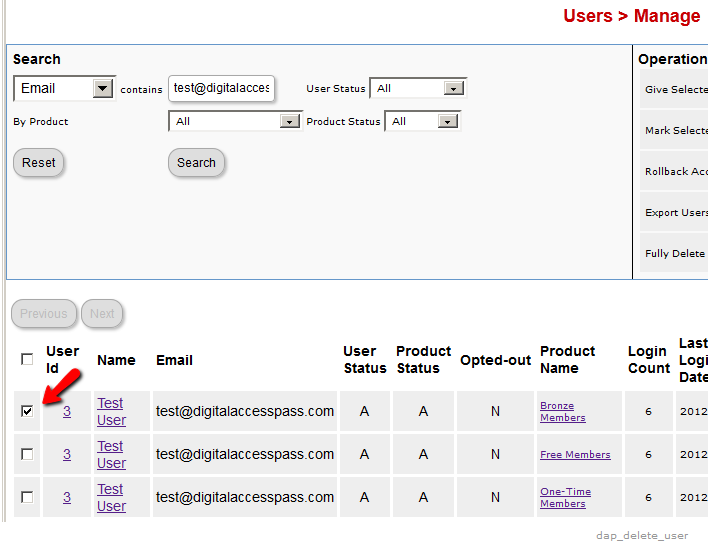
- Go to DAP Admin > Users > Manage
- Search for the user by email or name or id
- Once you find the user, in the search results, check the checkbox next to user’s name
- On the to-right section (Operations), the last row is Fully Delete Selected User(s) from the database. Click on the Go button next to it.
Click image below to enlarge
Merging User Accounts
User ID 111 has been created with email id ABC123@somewhere.com
Same user buys a different product using a completely new (Paypal) email id. and DAP creates User ID 999 with PayPal email XYZ789@anothersite.com
User now has 2 accounts and wants only ABC123@somewhere.com (user ID 111) to be active.
So here’s what you should do:
- Place XYZ789@anothersite.com in the PayPal email field of User ID 111 and save.
- Give User ID 111 access to all products that User ID 999 currently has active, with matching start and end dates.
- Delete User ID 999 fully from the system.
If User ID 111 purchases additional products through Paypal, and her primary Paypal email id is still XYZ789@anothersite.com, then that Paypal email id will be recognized by DAP, and all purchased products will be activated under User ID 111 and no additional User IDs will be created.
However, if User ID 111 has changed their primary Paypal email id to be something else like XYZ123@yetanother.com, then the next time they make a purchase, DAP will not know it’s the same person, and will end up creating a completely new user id for the buyer. Which means, you will have to do the merge again, and replace the old Paypal email id in DAP with the new Paypal email id of the buyer.


