Author Archives: DAP Admin
Author Archives: DAP Admin
You can pick from 2 different credit storefront template.
1) Single Product Per Row Layout
OR
2) Multiple Products Per Row Layout
See this video for more detail on how the storefront will look like if you use one product or multiple products per row layout.
Go to DAP Admin -> Credit Store -> Add/Edit Product Category page
Create a product category. It’s only required for display purpose in the Credit Storefront.
Please see this for more on product categories.
This is a blockbuster plugin which offers tremendous value for a low price. It’s a unique one-of-a-kind addition to your membership. You will not find another plugin that can do what the Credit Store Plugin offers.
You can instantly enhance your membership with credits/points based system so there’s reward for different types of action (blog comment, facebook comment, social media likes, affiliate referrals, subscription purchase, free signup etc). So there’s much better chance of converting the visitor or getting the user to take action as every action has a redeem-able reward associated with it.
It’s packed with features, an awesome, appealing, eye-catching and responsive user interface, several customization options, and pagination support. It has everything you can imagine and more to grow your business. It’s an actual tool that will take less than an hour for full setup and can completely change the way you do business.
There is simply no excuse to not get this plugin. Here’s the list of features and why it’s a must-have plugin:
Credits are tokens / points that can be exchanged for any redeem-able product / content in the store. The credit store plugin will allow you to instantly setup a credits based membership site where you can sell credits for cash, offer credits as reward for certain actions and set up an instant online store where users can redeem credits. Members receive credits that can be used as currency on your site and applied to any purchase of products that you have made available in your store. Members can go to the online store and redeem the credits they have accumulated in their account towards available content/products.
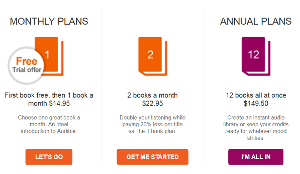 |
Audible.com issues credits/tokens when users join membership. Depending on the membership plan, users receive a certain number of credits each month, or each year. And the credits can be exchanged for books, magazines, newspapers and more on Audible.com! | |
Say you signup for an audible.com membership plan where you are awarded one audible.com credit a month. Most of the books on Audible can be “bought” for one credit, so you can get at least one book a month with your membership or you can accumulate credits for a few months and then go to the store to buy whatever products you want in exchange for credits. You can setup a similar storefront and rewards-program for your members instantly using our credit store plugin.
 |
Credit Card Rewards programs let you rack up points every time you use your credit card. Cardholders can typically exchange their points for cash and/or use them to pay for travel or certain retail items and services, which are usually listed on the card’s website. |
With our NEW Credit Store Plugin, you can offer credits as an incentive for different types of user action. You can award credits for – Blog Comments, Social Media LIKE, Affiliate Referrals, Free Signup, Paid product purchase (one-time or subscription product) etc. Offer credits as a reward for taking action, and then your members can “Redeem” those credits towards the purchase of any content/product you’ve made available in your Store.
 |
The Credit Store plugin enables “Content On Demand“. Instead of you dripping content on your members in a pre-determined fashion, they choose the modules they want, and the order in which they want them. You just give them the credits putting the power of choice at their fingertips. |
 |
You can instantly enhance your membership with credits/points based system so there’s reward for different types of action. So there’s a better chance of converting the customer or getting the customer to take action as every action has a redeem-able reward associated with it. | |
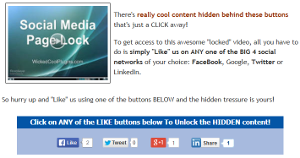
Users can LIKE a page/post to a Social Media Source (Facebook, Twitter, Linkedin, G+) and earn assigned credits. You can assign different number of credits for each Social Media Source. For ex- Facebook like can be assigned 10 credits, Twitter can be assigned 5 credits etc. Only upon a successful LIKE, the credits will be deposited to the user’s dap membership account.
Please Note : this is NOT part of the core Credit Store Plugin. You will need our LikeToUnlockWithCredits plugin to enable Social Media credits.
Users can comment on a credit enabled page and if comment is approved (or if set to auto-approve), the user will earn assigned credits. This is NOT part of the core Credit Store Plugin. You will need our Comments plugin to enable this feature.
 |
You can configure the Affiliate Commissions to Pay Affiliates by credits (for leads and sale) which they can then use to pay for their own purchases and subscriptions on your site. |
You can setup the Affiliate commissions to be just Cash, just Credits or BOTH.
Affiliate Lead Credits: Affiliates can earn credits for referrals that lead to signup (provided you have setup credits for the product in the DAP admin -> Affiliate -> Commissions page)
Affiliate Sale Credits: Affiliates can earn credits for referrals that lead to sale.
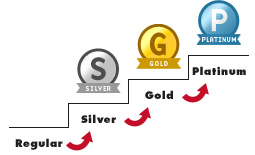 |
Say you offer Silver, Gold and Platinum Monthly Membership Programs. You can incentivize your customers by offering more free credits as bonus for purchasing higher level membership. |
Charge more for your platinum membership than gold but offer more free credits as bonus along with additional premium content. These users can then use the earned credits to browse your store and get content of their choice. You can quickly setup a rewards program where you reward users based on the membership plan and your users will get automatic access to the rewards program when they enroll so they can start earning points and redeeming them at your store right away.
 |
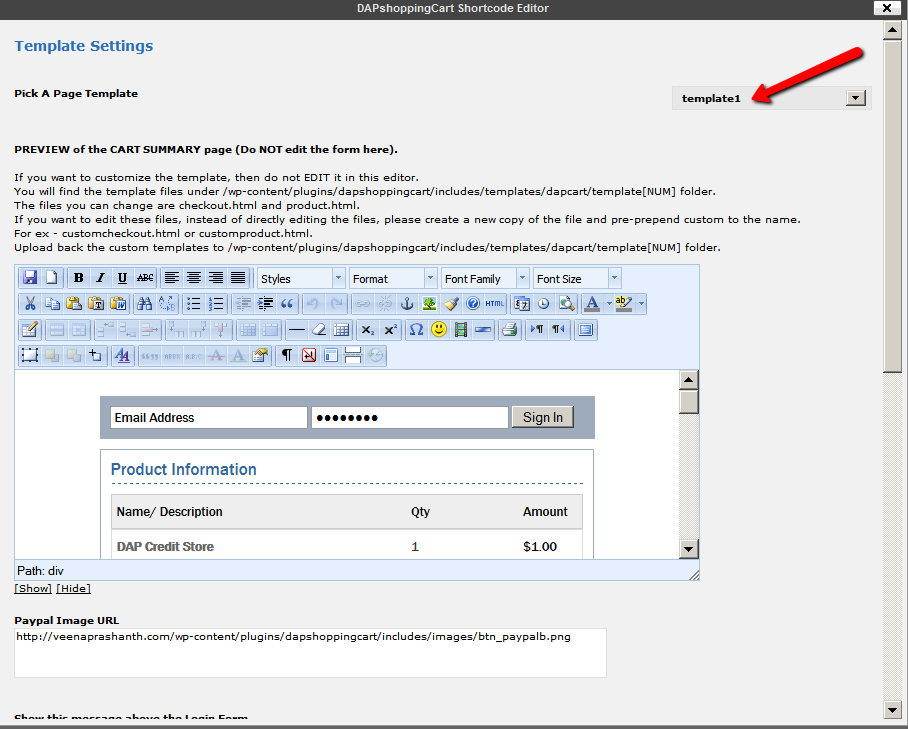
With the credit store plugin, setting up a storefront page (where your users can buy the product of their choice using credits) is a breeze. You can literally setup a storefront page in less than 5 minutes. |
1) You (Site Owner) can configure the products that can be redeemed for credits and displayed on this page.
2) Your users can come to this page to Redeem their Earned Credits/Points.
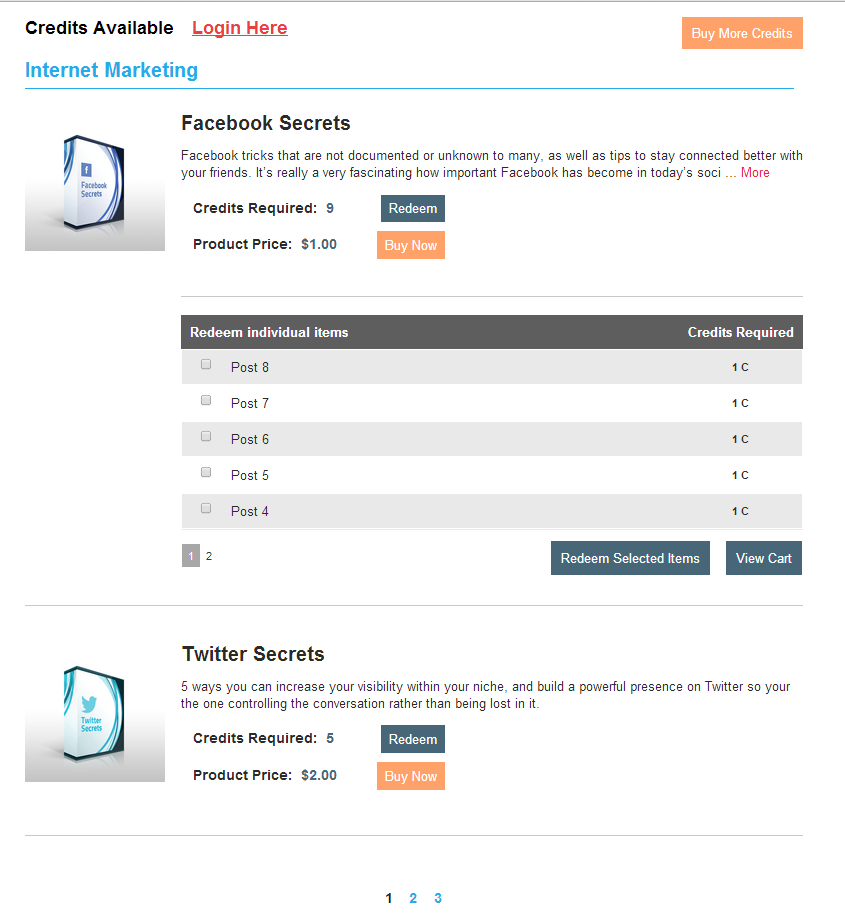 |
You can create a ONE product per row layout OR you can use MULTIPLE Products per row layout for your credit store front-end page. This is easily configurable via the Credit Store Editor Icon (CS) in your WP Admin -> Add/Edit Pages -> Visual Tab. This image represents single product / row layout. |
If you have ‘content-level-credits’ enabled (pay-per-post) for any of your child product, then you can ONLY use ONE product per row layout because MULTIPLE Products per row layout will only allow for simple product boxes per row, it wont allow the complex layout that products that allow content-level-credits require.
Click on the image above to see a larger Single-product-per-row image.
|
You can create MULTIPLE Products per row layout for your credit store front-end page. This is easily configurable via the Credit Store Editor Icon (CS) in your WP Admin -> Add/Edit Pages -> Visual Tab. This image represents Multiple products / row layout for the storefront page. Click on the image on the left to see a larger Multiple-products-per-row image. |
|
Very Powerful Feature! Instead of allowing users to just redeem the ENTIRE product, if you enable content-level credits, the users can redeem individual content of their choice rather than the entire product. Instead of you dripping content on your members in a pre-determined fashion, they can choose the modules they want, and the order in which they want them. You just have to provide a way for your users to purchase or earn credits and then the power of choice is at their fingertips. |
You can attach credits to each individual content / download (for ex – page, post, pdf, video, files etc) and allow users to pick the content they want to download or view when they want and in the order they want instead of a pre-determined / set dripping decided by Admin.
See the ‘Redeem Individual Items’ section in the image above to see how pay-per-post will look in the storefront page.
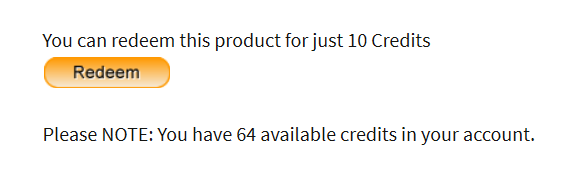 |
Another Great Feature! If you want a redeem button to show up on your sales page or any other page to allow users to redeem access to a product, then just place the REDEEMCREDITS shortcode on the page and automatically a redeem button will appear on the page. We also have shortcodes for CREDITSAVAILABLE and CREDITSREQUIRED that you can place on any WP page. |
|
Another Powerful Feature! If you have a lot of products in the store, then you can spread out the products across multiple pages instead of crowding one page with all the products. Similarly if you do pay-per-post-via-credits by allowing users to redeem individual content via credits, then you can control how many items show up per page and spread it across multiple pages. |
|
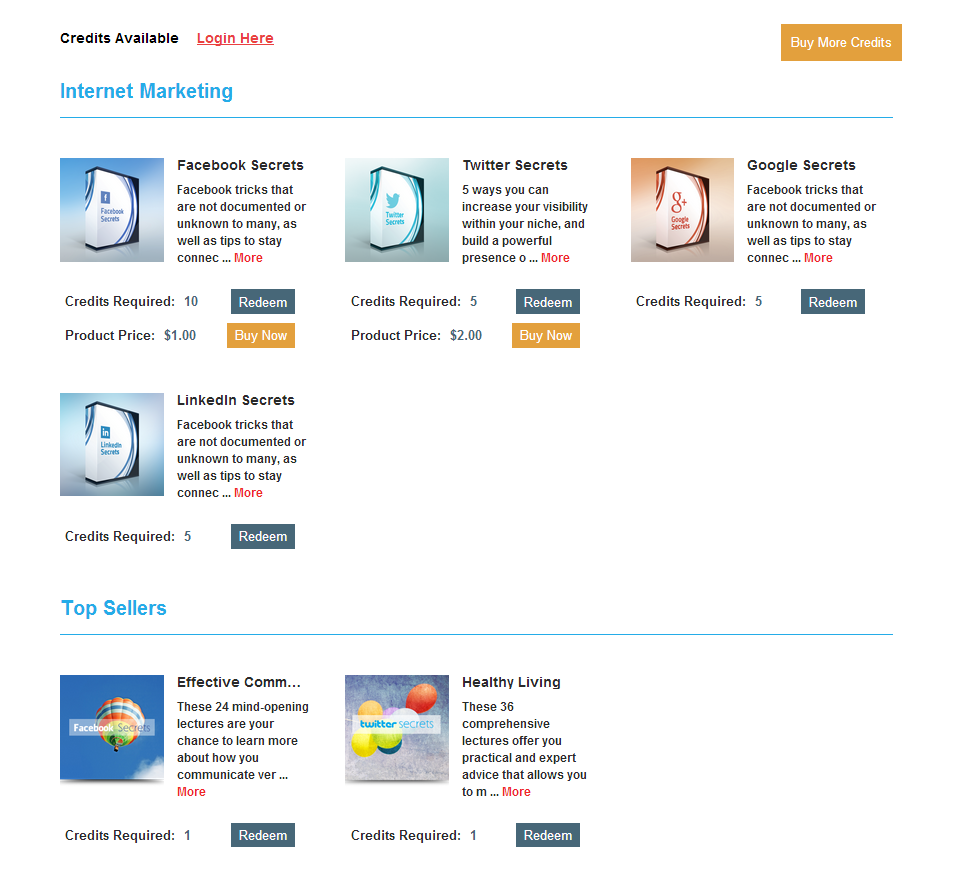
You can configure redeemable child products to show up with both ‘Buy Now’ as well as a ‘Redeem’ button in the store as you can see in the image. Users can purchase the product for cash or redeem for credits. Users will get instant access to product upon purchase via cash or credits. |
Please note that when you sell the ‘same’ product for both cash and credits in the store, you cannot use content dripping for the product. You can only drip content for not-redeemable regular DAP products.
Click on the image above to see a larger Single-product-per-row image.
The credit storefront page employs clean, flat, optimal and responsive web design. It’s mobile friendly.
Incentivize the visitors to provide you with their email Id offering credits as bonus for signup (you can setup the FREE product as master and assign credits to it in DAP products/levels- >Credit Store Front Settings page).
 |
If you have a one-time (free or paid) or a subscription product, and you want to allow your users to earn credits when they buy the product or when a recurring payment comes in, then all you need to do is define / designate the product as Master in DAP products/levels- >Credit Store Front Settings page and ‘Assign Credits’ to that product (initial credits and recurring credits) in that page. |
By default, if a user has already purchased a product, it will automatically disappear from that user’s view of the credit store. If you want the users to be able to redeem the same product for credits again, then set resell product setting to Y in the DAP admin -> Credit Store page.
The master product can be a regular full-fledged dap product that you sell. You can drip content (if reqd) under the master like any normal dap product. The only thing with product that you have set as master is in addition to doing everything a regular dap product does, this master product will allow your users to earn credits. If a user gets access to this product (via free signup or via purchase), they will get the credits assigned to this product. So you can use credits during a special promo and tell your users that if they signup or buy the product, they will earn credits in addition to the content that they are buying and they can use the credits in the store towards available child products. Or you can simply setup a master as a way for your users to purchase credits. It can be a dummy product setup just to allow your users to purchase credits. You can setup the payment button for master like you would for any dap product. DAP will know to automatically award credits to the user when the purchase is complete. You will find the assigned credits to user in the dap users->manage page under ‘Credits’ column.
Users that purchase the product designated as master, will earn credits assigned to that product and in addition, will also get access to any dripped content under the master.
Master product can be a one-time or a recurring/subscription product.
User-Level-Credits. The credits the users earn will be accumulated in the user’s account and they can use the accumulated credits towards ANY redeemable child products in the credit store.
Option to assign recurring credits : The users will earn recurring credits (if configured under DAP products/levels- >Credit Store Front Settings page) upon each subscription payment.
Installation Steps – DAP Credit Store
1. Download the dapcreditstorefront plugin (zip file) from your members area on wickedcoolplugins.com and upload it to WordPress via WP Admin – >Plugins -> Add New -> Browse for the zip file -> install OR you can upload it to WP using FTP. Upload it to wp-content/plugins folder.
2. Download the WCP License plugin from your members area on wickedcoolplugins.com and upload it to WordPress via WP Admin – >Plugins -> Add New -> Browse for the zip file -> install OR you can upload it to WP using FTP. Upload it to wp-content/plugins folder.
3) Activate DAPCreditStoreFront plugin in wp admin -> plugins.
4) Activate WCP License plugin in wp admin -> plugins.
5) Login to http://wickedcoolplugins.com/my-account/downloads/ and get your license key.
6) Go to WP admin -> settings -> Wicked Cool Plugins License -> Enter the license key.
That’s it.
You need to be on the latest version of DAP (as of today) – DAP v4.5.2 (or above) and LiveLinks v1.9.2 (or above) – for the DAP Shopping Cart to work. See below for new DAP installations or upgrading your existing DAP installation.
Related: Upgrading to DAPv4.5.2 and LiveLinks v1.9.2
Related: Installing a new version of DAP
You can use OAP Registration Form and integrate it with a DAP Product.
(1) Login to your Office Auto Pilot account.
(2) Go to Admin->Manage SmartForms
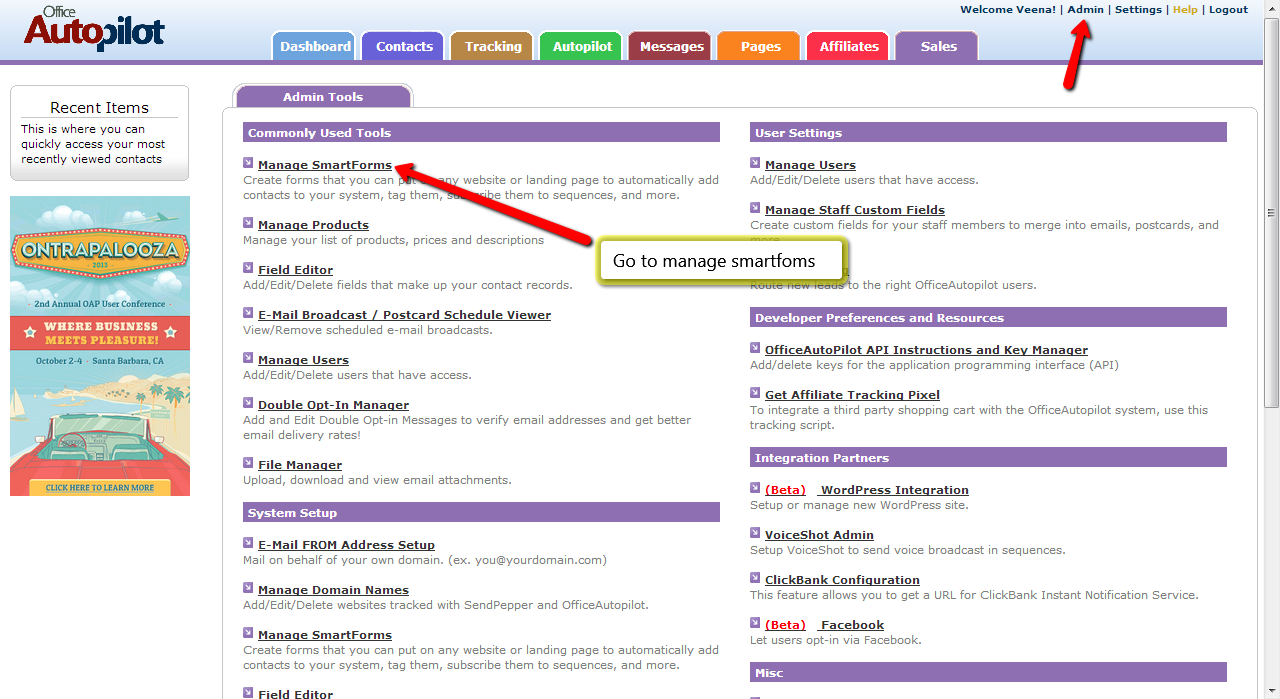
(3) Add a new smartform or edit the existing one
(4) Go to Smartform -> Settings tab and select Opt-in settings >And set ‘Custom URL’ to http://YOURSITE.com/dap/signup_submit.php?productId=1&redirect=/thankyou&oap=1
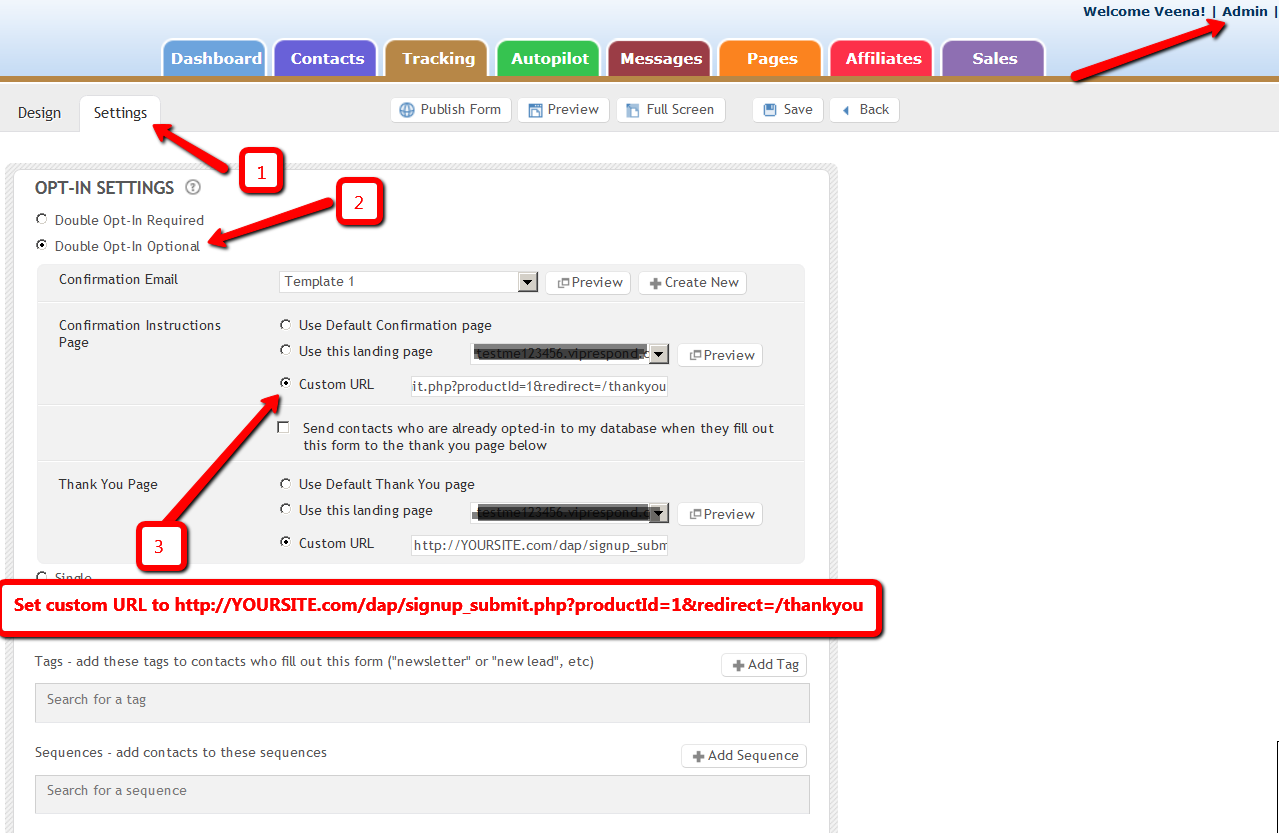
Please NOTE:
Set productId to the Id of the DAP product you want to integrate with OAP.
Set redirect tag to the URL of the page where you want the users to land after they complete confirmation. In the example above, the redirect tag is set to /thankyou but you can change it to the URL of the page where you want the users to go after they complete confirmation.
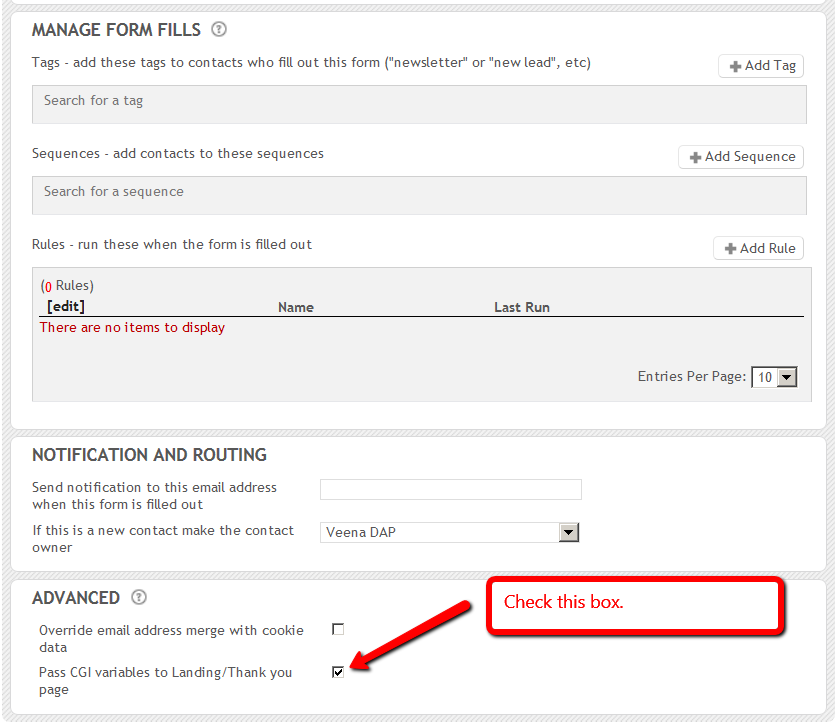
(5) On this page, towards the bottom of the page, under Advanced, check the box to “Pass CGI variables to Landing/Thank you page”.
(6) Save and publish the form.
(7) Copy the code and paste it into your WordPress squeeze page.
(8) Visit this page in a new browser where you are not already logged in to DAP.
(9) Fill the information and submit .
(10) The user should receive a confirmation email from OAP upon signup. When they click on the confirmation link in the email, the user account will get created in dap automatically and user will land at the page that you have set above (step 4).
You can use DAP Free Signup Form and integrate it with OAP list.
(1) Create your FREE product in DAP Products Page.
(2) Make sure that “Allow Free Signup” is set to “Yes” in DAP Products page.
(3) In Products/Levels -> Manage -> Notification tab -> Plugin Notification upon User “Add”, enter data in this format:
oap:<APPID>:<KEY>:<GROUP NAME>:<SEQUENCE NAME>
For example, say APPID=87JKSNLA, KEY=KLAcjTmdk, GROUP NAME=mylist, SEQUENCE NAME=myseq
oap:87JKSNLA:KLAcjTmdk:mylist:myseq
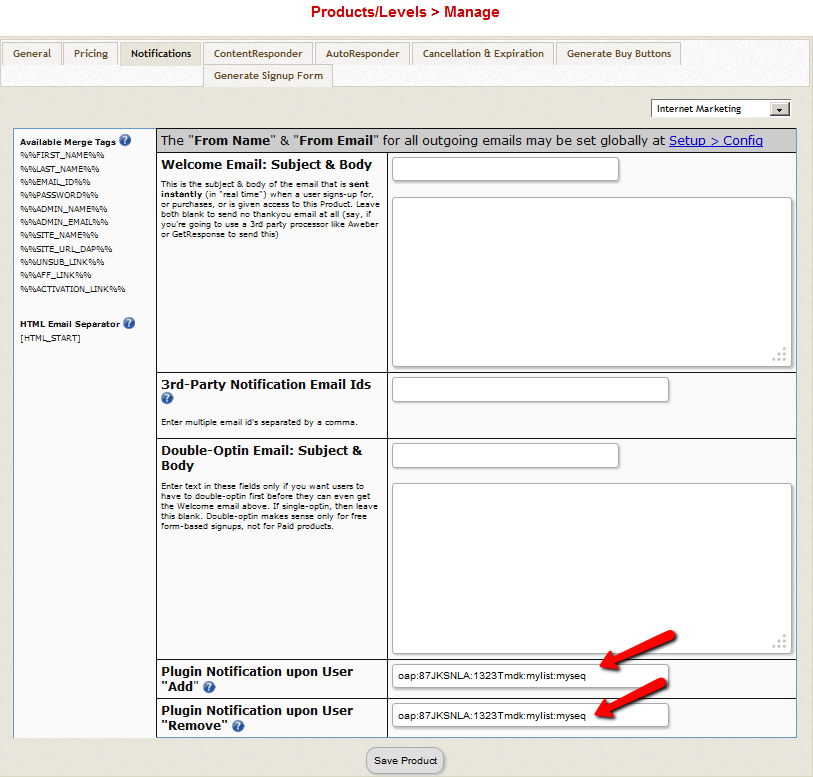
(4) In Products/Levels > Manage->Notification tab->Plugin Notification upon User “Remove” enter the value as like:
oap:<APPID>:<KEY>:<GROUP NAME>:<SEQUENCE NAME>
For example, say APPID=87JKSNLA, KEY=KLAcjTmdk, GROUP NAME=mylist, SEQUENCE NAME=myseq
oap:87JKSNLA:KLAcjTmdk:mylist:myseq
(1) Add a new user manually to the DAP FREE product (integrated with OAP) using Users > Add/Edit ->Add New Single User To Product
(2) Go to DAP Admin -> Users -> Manage page and see if the new user got added to dap and if yes then go to your OAP account and check under Contacts. The new user/subscriber should have gotten added to your OAP subscriber list.
(3) To remove a user from the list, go to DAP Admin -> Users > Manage -> Find the user and click on ‘Remove’ to remove user’s access to the product. It will trigger the ‘remove’ call to OAP.
The integration between DAP->OAP will work if you sell using a payment button that’s integrated with dap but not generated in OAP. If you use OAP to sell / generate payment button, it will not integrate with DAP. But if you use say paypal buttons directly or use dap shopping cart or some other shopping cart that’s integrated with dap, then the users will be first added to dap and you can use the same steps to integrate DAP to OAP that you used above to integrate the DAP free product to OAP.
– In Products/Levels -> Manage -> Notification tab -> Plugin Notification upon User “Add”, enter data in this format:
oap:<APPID>:<KEY>:<GROUP NAME>:<SEQUENCE NAME>
For example, say APPID=87JKSNLA, KEY=KLAcjTmdk, GROUP NAME=mylist, SEQUENCE NAME=myseq
oap:87JKSNLA:KLAcjTmdk:mylist:myseq
– In Products/Levels -> Manage -> Notification tab -> Plugin Notification upon User “Remove”, enter data in this format:
oap:<APPID>:<KEY>:<GROUP NAME>:<SEQUENCE NAME>
For example, say APPID=87JKSNLA, KEY=KLAcjTmdk, GROUP NAME=mylist, SEQUENCE NAME=myseq
oap:87JKSNLA:KLAcjTmdk:mylist:myseq
That’s it. This completes the integration of paid product in DAP with OAP.
(1) Add a new user manually to the DAP PAID product (integrated with OAP) using Users > Add/Edit ->Add New Single User To Product
(2) Go to DAP Admin -> Users -> Manage page and see if the new user got added to dap and if yes then go to your OAP account and check under Contacts. The new user/subscriber should have gotten added to your OAP subscriber list.
(3) To remove a user from the list, go to DAP Admin -> Users > Manage -> Find the user and click on ‘Remove’ to remove user’s access to the product. It will trigger the ‘remove’ call to OAP.
IMPORTANT: PLEASE NOTE
The latest version of Paypal Payments Pro (called PAYFLOW) is not compatible with DAP and Recurring Billing Cycles, You will have to open a Paypal account with the older version of their Payments Pro Merchant service that is compatible with DAP. Please make sure to use the older version of PPP which has to be specially requested through their support team. In a future DAP release, we will make it compatible with the new version of PPP.
Please read this for more on Payflow and Paypal Payments PRO :
http://www.digitalaccesspass.com/forums/threads/1044-Recurring-transaction-failed-in-paypal?highlight=payflow
1. Login to your Paypal.com account
2. Go to Paypal Profile -> My Selling Tools -> API access -> Update -> Click Request API Credentials -> Click Request API signature -> Click Agree and Submit.
If you had done this before, then just click on ‘View API Signature’.

3. Copy and paste the API username, password, and signature into DAP Setup -> Config -> Payment Processing: Paypal -> Items 7 through 9.
| 7) Paypal API Username | |
| 8) Paypal API Password | |
| 9) Paypal API Signature | |
| 10) Paypal API Endpoint | |
4. Login to your Paypal account -> Paypal Profile => Instant Payment Notification (IPN) -> Click on Update -> make sure IPN is enabled

Click on Update and set the IPN URL to point to :
http://YOURSITE.com/dap/dap-paypal.php (replace YOURSITE.com with the name of your site)
5. Create the Product that you want to sell in DAP products page. Set the pricing and recurring options for the product in DAP products page -> price & recurring tab.
6. Set the ‘welcome’ email in DAP products page -> Notifications tab.
7. Set the content that you want to protect/drip under this product in DAP Products page -> Content Responder tab.
Now read this document to complete the rest of the DAP cart setup on your site.
If you have an authorize.net merchant account, then please read this document on how to setup the DAP Shopping Cart integration with Authorize.net:
1) Login to your Authorize.net account. Click on ACCOUNT.
2) Click on API Login ID and Transaction Key. Make a note of the API Login Id and Transaction Key.
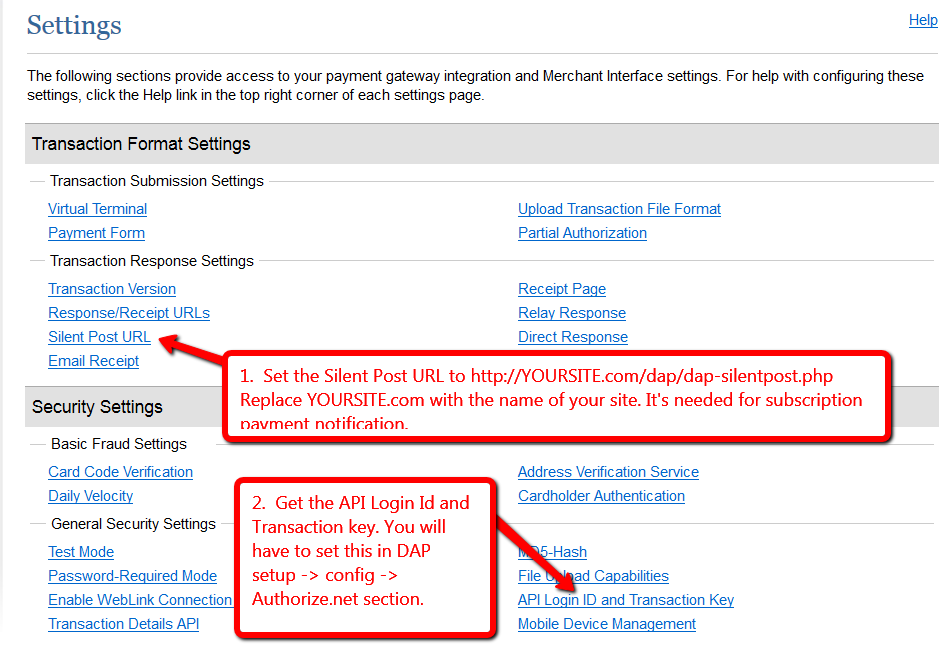
3) Set the Silent Post URL in your authorize.net account to http://YOURSITE.com/dap/dap-silentpost.php
NOTE: Replace YOURSITE.com above with the actual name of your site.
The Silent Post setting is required for DAP to process ‘recurring payment notification’ from Authorize.net. This allows DAP to automatically ‘extend’ user’s access to subscription/recurring product upon successful subscription payment.
4) Login to your DAP Admin Dashboard -> go to Setup -> Config -> Payment Processing – Authorize.net section. And enter the Authnet API key and login Id that you got from Authorize.net above (step #2).
| API Login ID (get by logging in to your Authorize.net account) | |
| Transaction Key (get by logging in to your Authorize.net account) |
5) Create the Product that you want to sell in DAP products page. Set the pricing and recurring options for the product in DAP products page -> price & recurring tab.
6) Set the ‘welcome’ email in DAP products page -> Notifications tab.
7) Set the content that you want to protect/drip under this product in DAP Products page -> Content Responder tab.
Now read this document to complete the rest of the DAP cart setup on your site.
![]()
Please NOTE:
This user-facing interface for updateCC&Billing will ONLY work with Stripe.com and Authorize.net.
You can use this shortcode on a WordPress Page to automatically create a User Facing interface that will allow users to UPDATE their Credit Card info and / or Billing Info themselves.
[DAPUpdateCCProfile template='template1' payment_gateway='authnet' successmsg='Update Completed Successfully!' submitimage='/dap/images/updatecartimage.jpg' updateconfirmmsg='Are you sure you want to proceed with the update?' validationfailedmsg='Sorry, validation failed. Please fix the messages in the red text above.' noteligiblemsg='Sorry, this page is only visible to users with active authorize.net subscription'][/DAPUpdateCCProfile]

Please NOTE: Currently this feature will work only when DAP cart is used with Authorize.net OR Stripe.com.
It’s not supported if you integrate DAP Cart => Paypal Payments PRO.
If you use the DAP shopping cart to sell your products, then you will be able to configure DAP to automatically send out ‘Credit Card Expiration’ email before a user’s credit card expires. The email will get sent ‘configured number of days’ before the card expires. DAP will pre-determine when a card is going to expire and if it reaches the ‘configured number of days’, then DAP will send an automated e-mail to inform the member it is time to update their credit card info on file.
Please read the following instructions on how-to-setup the automated sending of card expiration emails.
1) Configure when (in days) the ‘card expiration’ emails should be sent to the users.
You can set this in DAP Setup -> Config -> Miscellaneous -> Send an automated expiration email
NOTE: If you want an email sent 7 days before the card expires, set this field to 7. If you want to send multiple reminders say 10 days and 3 days before card expires, then set this field to 10,3

2) Reporting – you can find all the users that were sent these emails in the DAP System -> Job Queue

3) Customize the contents of the email.
You can customize the contents of the card expiration reminder email in DAP Setup -> Templates -> Email: Card Expiration Reminder Subject/Body

Please NOTE: This feature will work with all purchases via the DAP cart => Stripe and DAP cart -> Authorize.net.
Currently it does not work with DAP Cart->Paypal PRO. We will support Automated Card Expiration with Paypal PRO in the next release of DAP Cart.
When a user makes a purchase via the DAP Cart, DAP stores the expiration date (month & year) in an internal custom field. The DAP cron job is configured to run once every day at 4:00 AM (server time). It will get a list of all the users whose card is set to expire in the ‘configured number of days’ (set in dap setup -> config), and then it send out an automated email to those users. If the email is sent out successfully, it inserts a record (with status=success) in the DAP System -> Job Queue for reporting purposes. If the email could not be sent, it is still recorded in the job queue with a status of ‘ERROR’ and the actual error message is also recorded in the job queue.
Login to the DAP admin dashboard.
If you want to find ‘when’ a user’s card is set to expire, then search that user in DAP users->manage page, find the ‘userId’ of the user. Say the userId=10.
Visit this URL in a browser – http://YOURSITE.com/dap/findCardExpInDays.php?userId=10
It will display when the user’s card is currently set to expire. Say it says 50 days.
Then to test, you can simply go to DAP setup -> config page-> Miscellaneous section -> Send an automated expiration email, and set it to 50.
This way when you manually run the cron, it will send out card expiration emails to everyone whose card is set to expire in 50 days.
Please note: this is just for testing purpose to see if the card expiration is working currently and if the users are going to receive the expiration email automatically before the card expires.
By default the cron will run at 4:00 AM and send the emails due.
But for testing, you can FORCE RUN a cron by visiting this url in a browser:
http://YOURSITE.com/dap/dap-cron.php?forcerun=Y
When the cron job completes, it will show a blank page.
Now check the DAP system -> job queue to see if the CRON actually sent the email. If not, it’s likely that the card is not set to expire in the configured number of days for the user.
If you want to make the card expiration match your config setting for sending out reminders (to test if the email reminders go out), then go to DAP users->manage page, click on that user’s name, it will bring up edit users page -> you will find a custom field called ‘Cart Info’ on this page. That field will contain the user’s card expiration date in MMYYYY format.
Say you have set the DAP config to send out automated email when there is 3 days left for card to expire.
Say today is 10/25. Say for testing, you set the user’s card expiration to 112013 (Nov 2013) by updating the ‘Card Info’ custom field in the user’s profile, then DAP will assume the actual expiration date is Nov 1st, 2013 (Expiration only has month and year, so dap makes the date to be the first day of the expiration month).
So in this case, the card will expire in 7 days (10/25, 10/26, 10/27, 10/28, 10/29, 10/30, 10/31). As long as you have set the card expiration email to go out ‘7 days’ before card expires (in dap setup -> config), then when the cron runs for the day, it will send out the email.
Or you can force run the cron as described above to test if the emails got sent and then visit the job queue to check the report.
The feature will allow you to notify the members ‘before’ their card expires. This way the members can go to dap ‘update cc/profile page’ and update their cc info there. This will update authnet before their CC expires so the users should get charged when the time comes for subscription payment. Now.. if the users do not take action and update their cc info, then their account in dap will expire as the subscription payment will fail.
If they update their CC after card expires, then authnet will NOT automatically charge the user until the next payment is due.
See – http://www.digitalaccesspass.com/doc/update-cc-billing-info/
See – http://www.digitalaccesspass.com/doc/automated-card-expiration-email/