Coupons
DAP allows you to create Coupon codes for use as long as you’re using the DAP Shopping Cart, and accepting payments via one of the following:
- Authorize.net
- Paypal Standard, and
- Paypal Website Payments Pro.
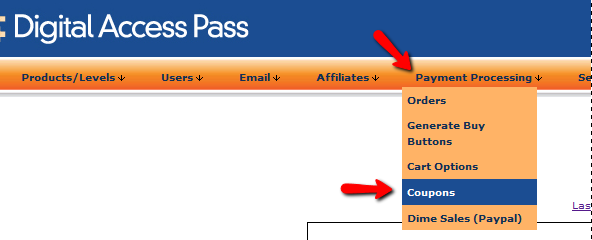
1. To create a Coupon code, go to DAP Admin > Payment Processing > Coupons
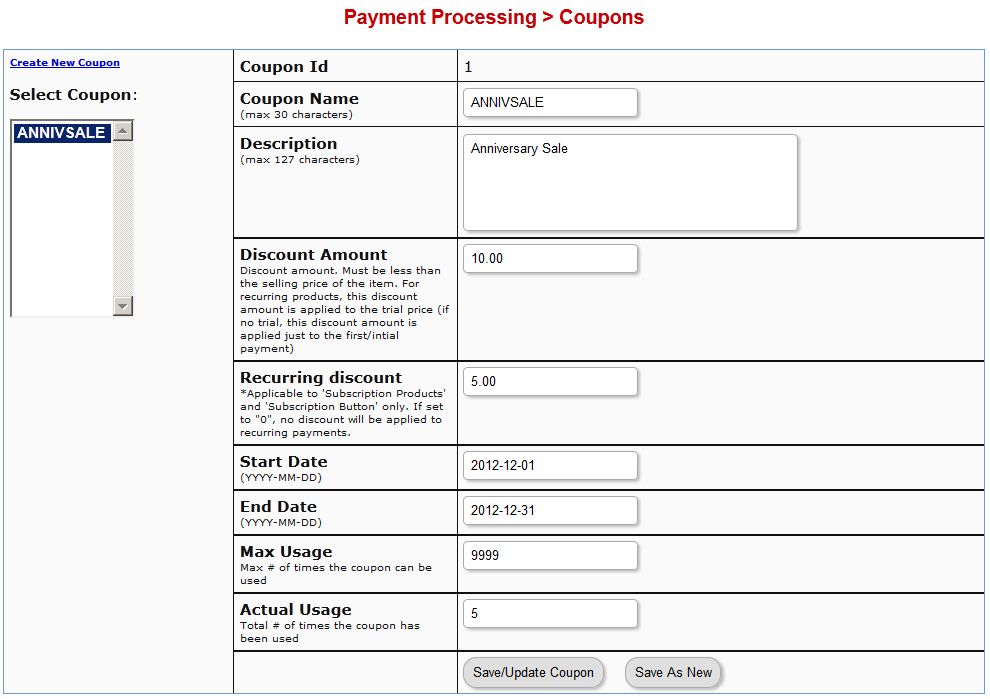
2. The Coupon options can then be setup on that page:
ADDITIONAL NOTES
You not only need to generate new Coupon codes, but you must also associate the Coupon to the DAP Products that should allow use of that Coupon. All of this can be done via the Coupons page.
Using Paypal Standard
If you are using paypal standard button, then create the DAP button with coupon enabled (under dap payment processing -> generate buy button page -> paypal standard tab) and put the coupon enabled button code on your sales page.
And when your prospect enters a valid coupon code in the form and clicks on the button, they will taken to the PayPal checkout page where they will see the discounted price
Using Auth.net or Paypal Pro
If you are using DAP Shopping Cart that connects with Authorize.net or Paypal Website Payments Pro, then in addition to setting up the actual Coupon, you must also go to DAP Admin > Payment Processing > Cart Options , and enable Coupons for the product(s) of your choice.
Now when your buyer clicks on the the DAP buy button, they will be taken to the checkout page where they can see the option to enter a Coupon Code.
Troubleshooting
If a Coupon is not working, check if the coupon code has actually expired, by going to DAP Admin > Payment Processing > Coupons page.
Check to see if Start Date and End Date are current.
Make sure the coupon’s Actual Usage is less than the coupon’s Max Usage.
Leveraging Multiple Affiliate Networks
DAP is so powerful and flexible, that you can sell access to your membership through different payment processors, all at the same time.
And we often get asked how to leverage different affiliate networks like ClickBank and JVZoo and Warrior Plus at the same time while making sure no affiliate commissions are lost, and every affiliate gets credited their commissions for sending potential buyers to your site.
The Big Picture
1) If buyer arrives ONLY through DAP affiliate link, and ends up purchasing through ANY payment processor, then DAP affiliate will get credit.
2) If buyer arrives ONLY through CB affiliate link, and ends up purchasing through CB payment processor, but the buyer has a different DAP affiliate’s cookie from a link he clicked on at some point before (but did not purchase at that time, say), then both CB affiliate and DAP affiliate will get credit (double commissions on same purchase, but to two different affiliates).
If there’s no DAP cookie on his computer, then only CB affiliate will get the commission.
If the DAP affiliate “chains” two of his own affiliate links – his DAP affiliate link and CB affiliate link – like shown below, then same affiliate will get both CB commission as well as DAP commission. Again, double commissions but to same person.
http://YourSite.com/dap/a/?a=1234&p=http://hop.clickbank.net…./
3) If buyer arrives ONLY through JVZOO affiliate link, and ends up purchasing through JVZOO payment processor, but the buyer has a different DAP affiliate’s cookie from a link he clicked on at some point before (but did not purchase at that time, say), then both JVZOO affiliate and DAP affiliate will get credit (double commissions on same purchase, but to two different affiliates).
If there’s no DAP cookie on his computer, then only JVZOO affiliate will get the commission.
If the DAP affiliate “chains” two of his own affiliate links – his DAP affiliate link and JVZOO affiliate link – like shown below, then same affiliate will get both JVZOO commission as well as DAP commission. Again, double commissions but to same person.
http://YourSite.com/dap/a/?a=1234&p=http://jvzoo.com/c/1944/17
The Right Setup For Multiple Affiliate Networks
To make sure that you’re not paying double-commissions on purchases, and also to make sure that sales don’t get lost between affiliate networks (and your affiliates losing their commissions in the process), you have to set things up the right way.
The main thing to do, is to create a separate set of the following for each affiliate network:
- A separate DAP product
- A separate Sales Page
- A network-specific buy button on that sales page
- If it’s a product that is sold through CB or JVZoo or DigiResults (or any of the affiliate networks), then DO NOT set up commissions for that Product in DAP. So that will prevent you paying a commission to, say, a CB affiliate as well as a DAP affiliate for the same purchase.
So the net effect of this, is…
If a CB affiliate sends traffic to a page, that page must have a CB buy link ONLY on that page. If you have, say, a JVZoo button on that same page, and the buyer buys through the JVZoo link, then the CB affiliate will get no commissions for that purchase. Which means, they will stop promoting your product because you’re basically funnelling off their visitors to a different affiliate network.
Similarly, the landing page for JVZoo affiliates must have only JVZoo buy buttons.
Landing page for a regular payment processor – like Paypal or Authorize.net – should have only a Paypal and/or Authorize.net buy button (and no CB or JVZoo buy buttons). In this case, for these products in DAP, you should set up an affiliate commission row on the “Affiliates > Manage” screen, so that your DAP affiliates can get credited for sales made through your regular web site.
Upgrading or Downgrading of Subscriptions
There are two main items that need to be addressed when it comes to a member wanting to Upgrade or Downgrade their Subscription from one membership “level” (a.k.a “Product” in DAP) to another.
1) Modifying the actual recurring payments to reflect the new amount
2) Giving them appropriate access as per the upgrade (or downgrade)
So let’s see how both of these are accomplished.
1) Modifying Recurring Payments
You do need to take some manual action for this. The way to do it is….
- Ask your members to sign up for the new product/level/subscription separately, like it were a new sign up
- Cancel their old subscription manually. When using Paypal standard, this can be done by both you (as the admin) and the member themselves. But with all of the other payment solutions, you (the admin) will have to log in to the payment gateway (Authorize.net or Paypal Website Payments Pro) and manually delete the member’s old subscription). DAP will not automatically remove users old subscription profile in your payment gateway.
2) Giving your member access to new level
Set up automation rules using DAP’s Product Chaining feature, so that if they sign up for one Product (or “level”), they’re automatically removed from another Product (or level).
So if they are currently signed up to your “Gold Membership”, then when they sign up afresh for the “Platinum Membership”, then set up a Product Chaining rule that says, “If member signs up for Platinum Membership, then remove them from Gold Membership”. This is just to make sure that they don’t have access to two products (or “levels”) at the same time.
DAP Shopping Cart
WARNING
This is the old, deprecated version of the DAP Shopping Cart add-on. This is still here for archive purposes only, and should only be used with DAP versions 4.4.x or EARLIER.
If you are wanting to use the new DAP Shopping Cart Plugin that supports Stripe and has a unified checkout page, etc, then you can download it from http://digitalaccesspass.com/dappers/new-dap-shopping-cart-plugin/
__________________________________________________________
ARCHIVE ONLY:
This plugin replaces ALL files from both the “Paypal Payments Pro” Upsell-Tree plugin as well as the “Authorize.net” Upsell-Tree Plugin
Starting DAP v4.2, we have consolidated both the Authorize.net & Paypal Payments Pro Upsell-Tree Plugins into one simple set of files, and it has been named the DAP Shopping Cart, which will allow you to both accept one time and recurring payments, as well as do 1-Click Upsells.
This consolidated set of files is named DAPShoppingCart.zip , and is available for download from the members’ area at http://DigitalAccessPass.com/dap/ .
Upgrading from DAP v4.2
If you are upgrading to DAP v4.2 from a previous DAP version, and you’ve been using Authorize.net or Paypal Payments Pro to accept payments, then you must also upgrade to the new DAP Shopping Cart.
So all you need to is…
1) Download the DAPShoppingCart.zip file from the members area
2) Unzip it to your desktop
3) Upload all files inside directly to your main “dap” folder on your site. (do not upload the folder named DAPShoppingCart – upload only the files inside this folder)
DAP’s “Pause Membership” Feature
How It Works
Joe Member joins your site on 01/01/2011.
He stays a member for about 3 months. Let’s say it’s now mid March. He wants to take a couple of months break. So he goes on a 2 month break. Comes back end of May and wants to resume his membership.
DAP allows him to pick up right where he left off – which is continuing to receive content as of April (04/01/2011), even though today’s date is May 25th, 2011.
So while he took a break, other members who did not take a break in membership, continued to pay for those 2 months, and continued to receive content dripped through those months. So it is only fair that when he does come back end of May and resumes his subscription, he does not resume from June’s content, but from April’s content (when he last put his membership on “Pause”).
It’s ok if you’re not dripping content on a monthly-basis, but rather on a “day” basis. So to put it in terms of “days”, when Joe resumes his subscription, since he was already 90 days old in the system when he put his subscription “On Hold”, and comes back another 60 days later (roughly about 2 months), then DAP will start dripping Day #91 content onwards for him, and NOT Day #151 onwards (he didn’t pay for 2 months in between).
This is how DAP works right out of the box. Nothing special to configure. And DAP automatically takes care of pausing the dripping when he is not paying.
WARNING: Just remember that in order for you to put his actual payments on hold, you will need to have a payment gateway like Authorize.net or Paypal Website Payments Pro. Or you must be using a shopping cart like http://1SiteAutomation.com . Using something like Paypal Standard or ClickBank will not allow you to put the actual charging of his credit card on hold.
NOTE: If you actually did want him to start receiving current content even though he left for 2 months, then all you have to do is, once he comes back and starts paying again, just extend his access end date on his account (which will initially be showing 03/31/2011 – end of March, when he left) and modify it and make it 05/31/2011. So when his next payment comes in after he resumes, DAP will extend his access end date to 06/30/2011 – which means, he can now access all of the current content.
DAP Login Xpress
What Is “Login Xpress”?
“Login Xpress” is a DAP feature that enables your members to be logged right into your membership site immediately upon completion of their purchase.
This is roughly how it works:
- Visitor arrives at your web site
- On your sales page, they click on any “Buy” button to purchase a Product (or Membership Level)
- They’re taken to the checkout page (depending on Payment processor being used) and they enter their payment information and hit “Submit”
- When they hit “Submit” to complete their payment, their payment is processed right away, and the buyer is immediately transferred back to your web site, in real time, and automatically logged in to your membership site, and they are taken to the “Welcome” page or “Members” page (you may choose what this page is going to be at a per-Product level)
Payment Processors That Work With Login Xpress
DAP supports this feature with the following payment processors:
- Paypal Standard (DAP-generated buttons only – will not work with Paypal-hosted buy buttons that you generate from within your Paypal account)
- 1Shoppingcart / 1SiteAutomation.com
- Authorize.net
If you use any of the payment options above, then you can set up your sales funnel in such a way that buyers are logged in right away immediately after purchase.
Payment Processors That DO NOT Work With Login Xpress (Yet)
- Paypal Website Payments Pro
- ClickBank
- e-Junkie
- WorldPay
DAP integrates with the above processors via some kind of “back-end payment notification” – similar to Paypal’s “IPN” (Instant Payment Notification). Which means the notification between the payment processor and DAP on your site only happens on the “back-end”. Which is why DAP can only deliver the login details to the buyer via an email, and cannot log them in right away (like it can do with “Login Xpress”), because the buyer’s information is available to DAP only when the payment processor sends out the IPN notification behind-the-scenes, so to speak.
So if you’re using the above processors to accept online payments, then what you need to do, is to redirect your buyers to a static “Thank You” page that has a message similar to the one below…
“Thank you for your purchase. In a few minutes, please check your email address used during purchase for your log in details to log in to the members’ area and access the product you just purchased.”
And behind the scenes, DAP would’ve already received the payment notification from the payment processor, and it would’ve created an account for your buyer, given them access to the purchased product, and sent them the “Thank-you Email” for the product(s).
Troubleshooting 1-Click Upsells
1) Problem: Getting an error that looks like this after purchase – using 1-Click Upsells.
Warning: file_get_contents(/home/mysite/dap/upsell1.html) [function.file-get-contents]: failed to open stream: No such file or directory in /home/mysite/dap/continue.php(1) : eval()'d code on line 20
Solution: Create missing file.
Every buy button generated by DAP for Auth.net or Paypal Payments Pro, will look something like this…
<form name=”generate_authnet” method=”post” action=”https://www.DigitalAccessPass.com/dap/buy.php”>
<input type=”hidden” name=”item_name” value=”DAP Upsell Tree – Auth.net (T)”/>
<input type=”hidden” name=”description” value=”DAP Upsell Tree For Authorize.net” />
<input type=”hidden” name=”amount” value=”97.00″ />
<input type=”hidden” name=”trial_amount” value=”0.01″ />
<input type=”hidden” name=”total_occurrences” value=”1″ />
<input type=”hidden” name=”is_recurring” value=”Y” />
<input type=”hidden” name=”recurring_cycle_1″ value=”365″ />
<input type=”hidden” name=”recurring_cycle_2″ value=”365″ />
<input type=”hidden” name=”recurring_cycle_3″ value=”365″ />
<input type=”hidden” name=”payment_succ_page” value=”https://www.YourSite.com/dap/continue.php?url=/dap/upsell1.html” />
<input type=”hidden” name=”payment_gateway” value=”authnet” />
<input type=”hidden” name=”is_submitted” value=”Y” />
<input type=”submit” value=”Buy Now” />
</form>
If you see the line in bold above, you will see the field…
payment_succ_page
… pointing to the first upsell…
https://www.YourSite.com/dap/continue.php?url=/dap/upsell1.html
What this essentially means, is that once the payment for the front end order is complete, you want the contents of the page /dap/upsell.html to be presented as the first upsell.
So…
a) Either create an HTML page called upsell1.html in the dap folder.
b) Or change the name of the file in the buy-button form code above, to be whatever your actual file name is.
c) Or if you don’t wish to do any upsells, then put the URL of your final thank you page in that field’s value.
2) Question: How do I use my own button with the shopping cart script?
Look for this in the DAP generated button code:
input type=”submit” value=”Buy Now”
Replace it with your own image :
For example –
input type=”image” src=”/images/btn-order.png” value=”Buy Now”
If images folder is at the root of your site, set src = /images/btn-order.png. If it’s under dap folder, the src tag should be set to “/dap/images/btn-order.png”.
Buy Buttons, 1-Click Upsells, Downsells & OTO’s using Authorize.net
Selling through Authorize.net, 1-Click Upsells, Downsells and One-Time Offers (OTO’s) are all now extremely simple to implement using the new Shopping Cart Plugin for DAP.
This post explains how to create buy buttons for selling through Authorize.net.
Your site visitors never have to leave your site in order to make a purchase, if you are selling through Authorize.net. DAP itself will act as your shopping cart, and buyers can checkout and make purchases by staying right on your web site.
The DAP Shopping Cart itself is your actual shopping cart that connects to Authorize.net. You need to install this plugin whether you wish to accept one-time or subscription payments via Authorize.net, or whether you wish to do Upsells, and Downsells.
What you need before you can use this plugin
- You need an Authorize.net merchant account
- If you want to sell subscription-based products, then you also need Automated Recurring Billing (ARB) enabled in your Authorize.net account.
- You must have SSL (secure server) enabled on your web site. Ask your web host to enable SSL for your site.
- You must have a working version of DAP 3.5+.
Installation & Setup of UpsellTree
- You need be using at least DAP v3.5 for this.
- If you haven’t installed DAP already, then install DAP first.
- Log in to our member’s area and download the plugin file, DAPShoppingCart.zip .
- Unzip DAPShoppingCart.zip to your desktop. It will unzip the files to a new folder on your desktop, called DAPShoppingCart.
- Upload ALL of the files inside, DIRECTLY to your “dap” folder on your web site. DO NOT upload the folder itself – just the files inside.
- Log in to your Authorize.net account, and go to the “Settings” page.
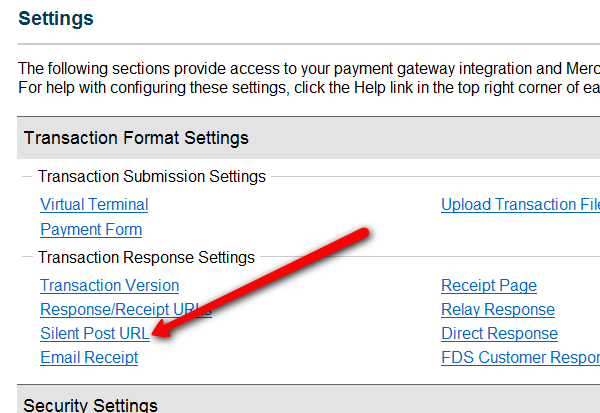
- Click on Silent Post URL.
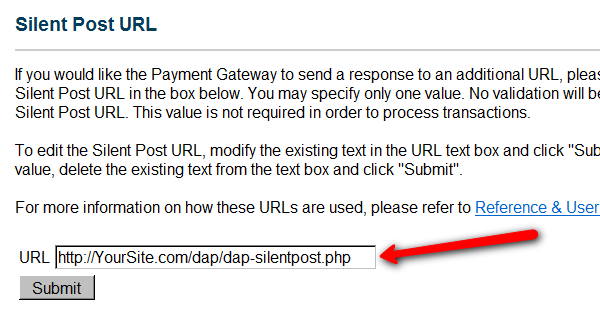
- On the next page, set the URL field, to http://YourSite.com/dap/dap-silentpost.php . Be sure to change the text “YourSite.com” to your actual domain name. Click “Submit”. It will take you back to the Settings page.
- On the Settings page, now click on the “API Login ID and Transaction Key” link towards the bottom.
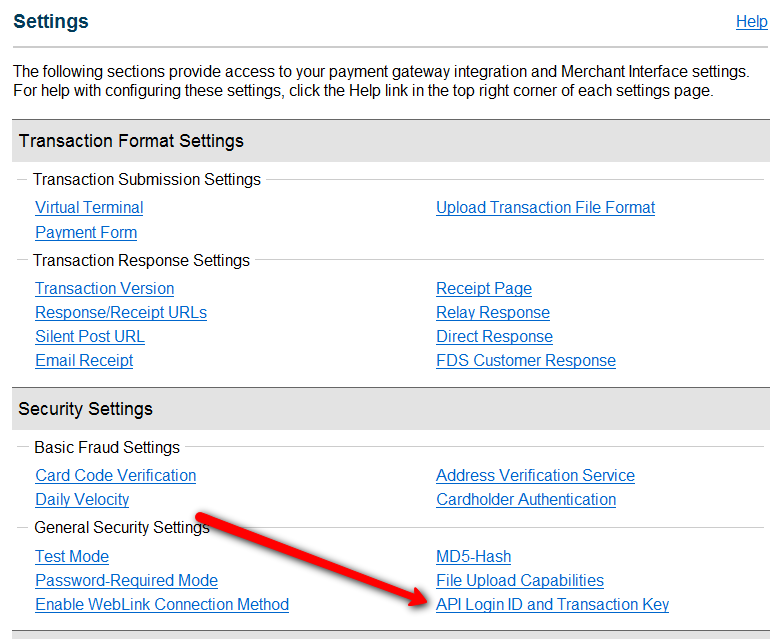
- On the next page, make a note of your “API Login ID” and “Transaction Key” on a piece of paper (or copy/paste it into a text file). That page also lets you create a new Transaction key or modify your existing one.
- That’s it for Authnet.
- Now, log in to your DAP Dashboard on your side, and go to “DAP Admin > Setup > Config > Payment Processing“.
- Enter the “API Login ID” and “Transaction Key” that you noted down earlier (Step #9 above) into the respective fields, and click “Update” next to the fields to save the changes.

- This step applies to you only if you are already using 1ShoppingCart with DAP (if not, skip to next step):
Be sure to remove the “Email Order” cron job from your web hosting control panel (“Cron Jobs” screen), because you don’t want your orders to be double-processed. - Go to the Products > Manage.
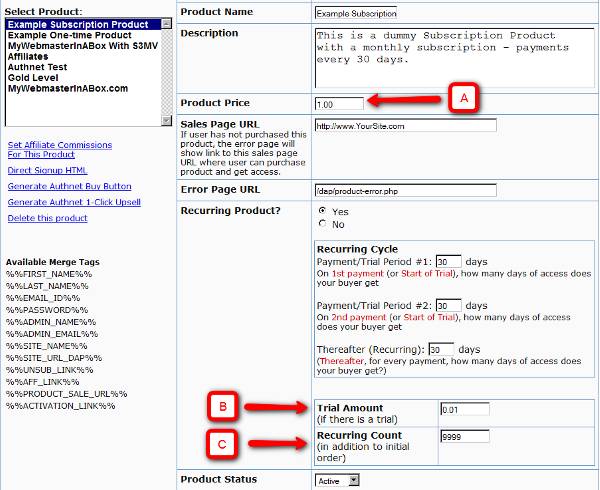
A) Product Price: For a 1-time purchase product, this is the product’s purchase price. For a recurring product, this is the “recurring” price (what the customer gets charged month after month).
B) Trial Amount: This is only if there’s a trial amount. If no trial, leave this empty.
C) Recurring Count: How long is your subscription? If you said “Forever”, then enter the number 9999 here. If it ends after 6 months, then enter 6 here. - Set these fields to valid values.
- NOTE: The DAP Authorize.net allows 1 trial. So in the recurring cycle fields, make sure “Payment/Trial Period #2” and “Payment/Trial Period #3” are both the same (set to same number of days: like 30). Example below shows the setting for a “7 day” trial period, followed by recurring payments every “30 days”.
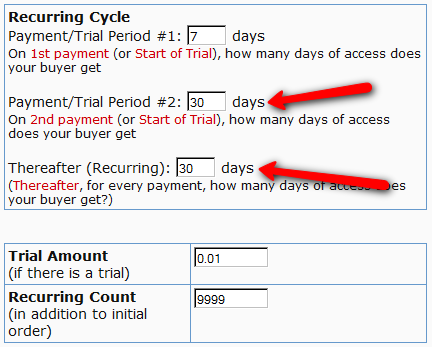
- If you are not offering a trial, then just set the Trial Amount to $0.00. But if you really wanted to offer a FREE TRIAL, then you must set the Trial Amount to at least $0.01 (1 penny).
- Once you’ve saved the product, you can now click on any of the two new “Generate… Button Code” links that are located right below the product list combo box.
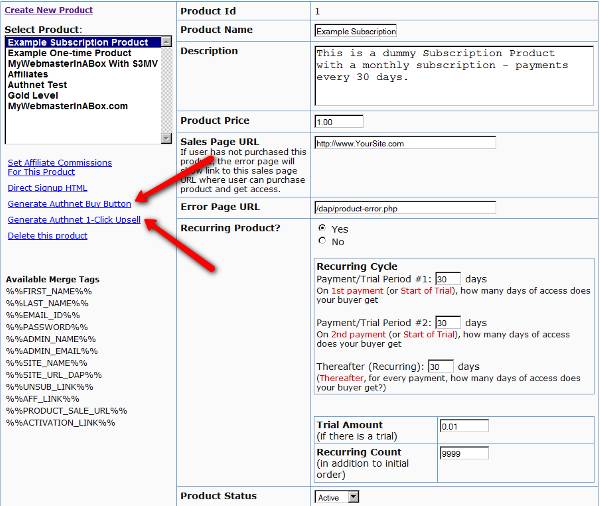
- “Generate Authnet Buy Button” link:
This generates the buy button HTML code for your product, which you can then directly paste into your sales page. When you click on this link, you will get a pop-up that shows the actual HTML code for your button. The price, trial price, and recurring options are all taken from your Product settings. So make sure you have saved your Product changes before you click on this link.
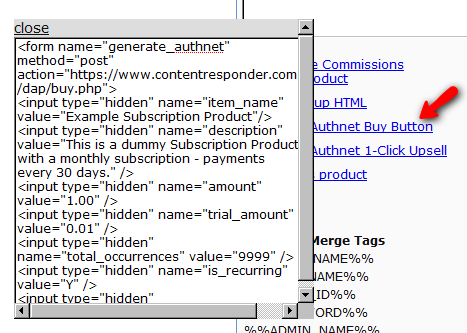
- Here’s what the HTML code looks like:
<form name="generate_authnet" method="post" action="https://www.contentresponder.com/dap/buy.php">

<input type="hidden" name="item_name" value="Example Subscription Product"/>

<input type="hidden" name="description" value="This is a dummy Subscription Product with a monthly subscription - payments every 30 days." />

<input type="hidden" name="amount" value="1.00" />

<input type="hidden" name="trial_amount" value="0.01" />

<input type="hidden" name="total_occurrences" value="9999" />

<input type="hidden" name="is_recurring" value="Y" />

<input type="hidden" name="recurring_cycle_1" value="30" />

<input type="hidden" name="recurring_cycle_2" value="30" />

<input type="hidden" name="recurring_cycle_3" value="30" />

<input type="hidden" name="payment_succ_page" value="https://www.contentresponder.com/dap/continue.php?url=/dap/upsell1.html" />

<input type="hidden" name="payment_gateway" value="authnet" />

<input type="hidden" name="is_submitted" value="Y" />

<input type="submit" value="Buy Now" />

</form> - If you’re doing upsells, the only thing you need to do is, look for the “payment_succ_page” field in the above form. By default it is pointing to:
https://www.contentresponder.com/dap/continue.php?url=/dap/upsell1.html - Modify the “upsell1.html” file within your dap folder, to make your 1-Click Upsell offer. Or if you don’t wish to use 1-Click upsells, you can make just about any kind of upsell offer on that page. The upsell1.html that comes with the plugin has a sample upsell page already created for you, just so you get an idea of what that will look like.
- On the upsell page, if you want to upsell say, Product B, then make sure you set up “Product B” ahead of time in DAP, and set up the price and recurring options. Then for upsell products only, click on the “Generate Authnet 1-Click Upsell” link to generate the 1-Click Upsell Buy button code, as the upsell buy button is slightly different than the ‘regular’ buy button code. Now take the upsell buy button code like you did before, and paste it in upsell1.html. That’s it.
- You can repeat this process for unlimited upsells, downsells and one-time offers. No limits.
That’s it.
While it looks like a LOT of steps, that is only because we have to explain the steps in detail so they are clear. In reality, it is very simple to set up, and starting from scratch, if you have DAP & SSL already installed, it shouldn’t take you more than 1/2 hour to set up your 1-Click Upsells/Downsells/OTO’s. And if you’re not using Upsells/Downsells, then it can be done even faster.
If you have any further questions, feel free to open a support ticket, and we will assist you in getting this going.

