17

Buy Buttons, 1-Click Upsells, Downsells & OTO’s using Authorize.net

Selling through Authorize.net, 1-Click Upsells, Downsells and One-Time Offers (OTO’s) are all now extremely simple to implement using the new Shopping Cart Plugin for DAP.

This post explains how to create buy buttons for selling through Authorize.net.

Your site visitors never have to leave your site in order to make a purchase, if you are selling through Authorize.net. DAP itself will act as your shopping cart, and buyers can checkout and make purchases by staying right on your web site.

The DAP Shopping Cart itself is your actual shopping cart that connects to Authorize.net. You need to install this plugin whether you wish to accept one-time or subscription payments via Authorize.net, or whether you wish to do Upsells, and Downsells.

What you need before you can use this plugin

  1. You need an Authorize.net merchant account
  2. If you want to sell subscription-based products, then you also need Automated Recurring Billing (ARB) enabled in your Authorize.net account.
  3. You must have SSL (secure server) enabled on your web site. Ask your web host to enable SSL for your site.
  4. You must have a working version of DAP 3.5+.

Installation & Setup of UpsellTree

  1. You need be using at least DAP v3.5 for this.
  2. If you haven’t installed DAP already, then install DAP first.
  3. Log in to our member’s area and download the plugin file, DAPShoppingCart.zip .
  4. Unzip DAPShoppingCart.zip to your desktop. It will unzip the files to a new folder on your desktop, called DAPShoppingCart.
  5. Upload ALL of the files inside, DIRECTLY to your “dap” folder on your web site. DO NOT upload the folder itself – just the files inside.
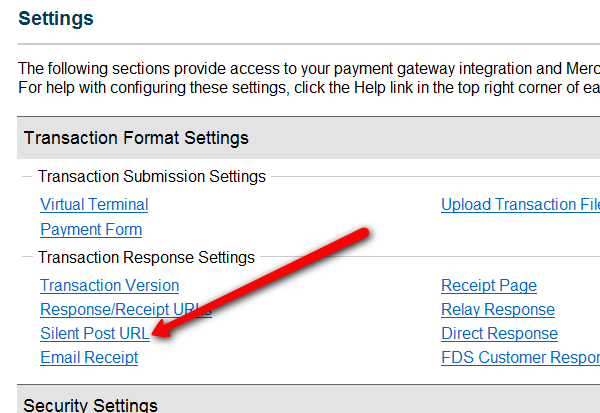
  6. Log in to your Authorize.net account, and go to the “Settings” page.
  7. Click on Silent Post URL.
    authnet_silentpost
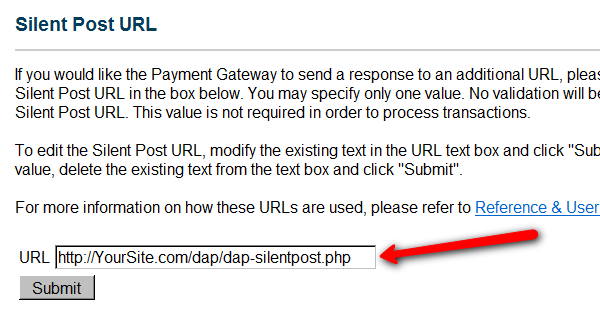
  8. On the next page, set the URL field, to  http://YourSite.com/dap/dap-silentpost.php . Be sure to change the text “YourSite.com” to your actual domain name. Click “Submit”. It will take you back to the Settings page.
    authnet_silentpost_submit
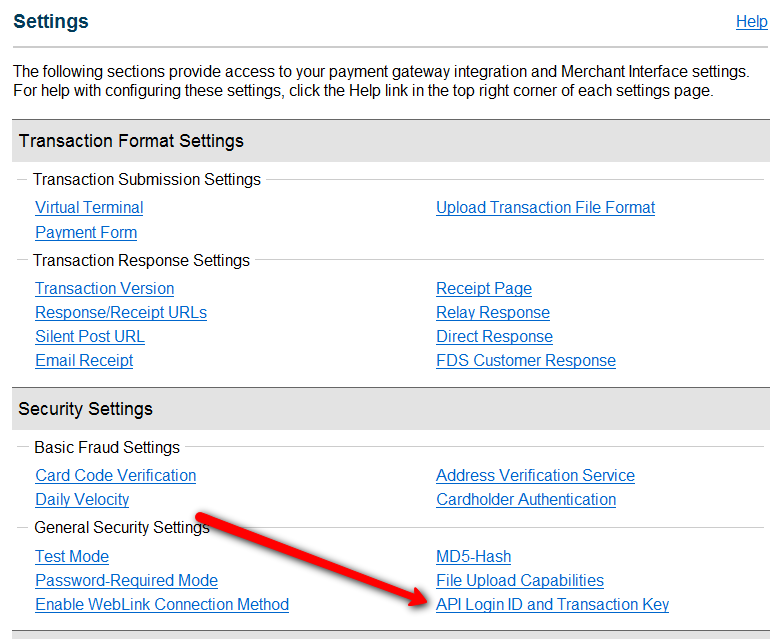
  9. On the Settings page, now click on the “API Login ID and Transaction Key” link towards the bottom.
    authnet_settings
  10. On the next page, make a note of your “API Login ID” and “Transaction Key” on a piece of paper (or copy/paste it into a text file). That page also lets you create a new Transaction key or modify your existing one.
  11. That’s it for Authnet.
  12. Now, log in to your DAP Dashboard on your side, and go to “DAP Admin > Setup > Config > Payment Processing“.
  13. Enter the “API Login ID” and “Transaction Key” that you noted down earlier (Step #9 above) into the respective fields, and click  “Update” next to the fields to save the changes.
    authnet_dap_config
  14. This step applies to you only if you are already using 1ShoppingCart with DAP (if not, skip to next step):
    Be sure to remove the “Email Order” cron job from your web hosting control panel (“Cron Jobs” screen), because you don’t want your orders to be double-processed.
  15. Go to the Products > Manage.
    newproductspage
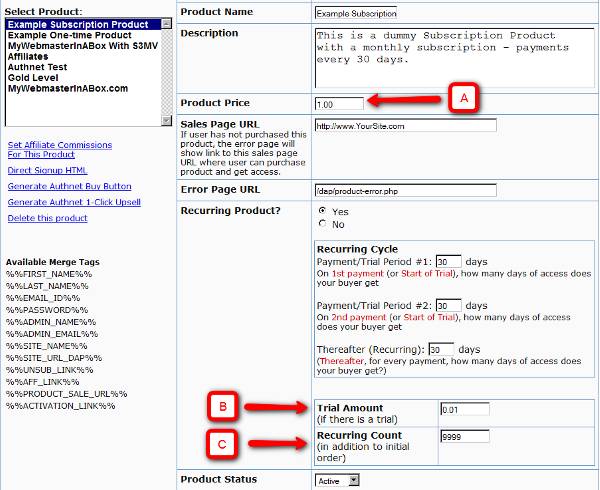
    A) Product Price: For a 1-time purchase product, this is the product’s purchase price. For a recurring product, this is the “recurring” price (what the customer gets charged month after month).
    B) Trial Amount: This is only if there’s a trial amount. If no trial, leave this empty.
    C) Recurring Count: How long is your subscription? If you said “Forever”, then enter the number 9999 here. If it ends after 6 months, then enter 6 here.
  16. Set these fields to valid values.
  17. NOTE: The DAP Authorize.net allows 1 trial. So in the recurring cycle fields, make sure “Payment/Trial Period #2” and “Payment/Trial Period #3” are both the same (set to same number of days: like 30). Example below shows the setting for a “7 day” trial period, followed by recurring payments every “30 days”.
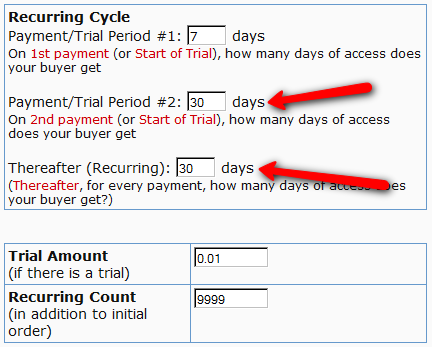
    authnet_recurring_cycle
  18. If you are not offering a trial, then just set the Trial Amount to $0.00. But if you really wanted to offer a FREE TRIAL, then you must set the Trial Amount to at least $0.01 (1 penny).
  19. Once you’ve saved the product, you can now click on any of the two new “Generate… Button Code” links that are located right below the product list combo box.
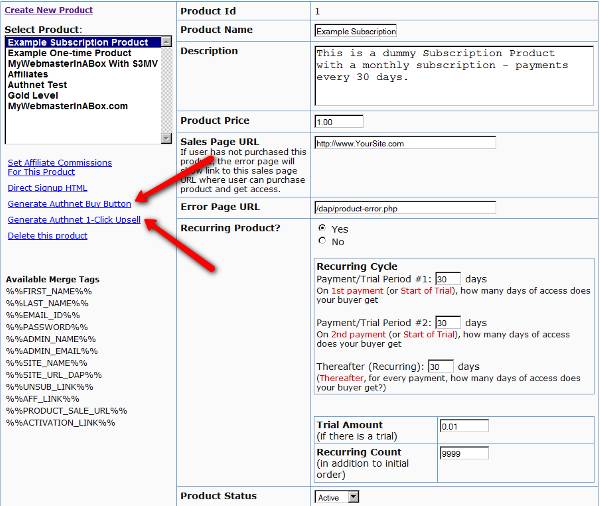
    newproductspage2
  20. “Generate Authnet Buy Button” link:
    This generates the buy button HTML code for your product, which you can then directly paste into your sales page. When you click on this link, you will get a pop-up that shows the actual HTML code for your button. The price, trial price, and recurring options are all taken from your Product settings. So make sure you have saved your Product changes before you click on this link.
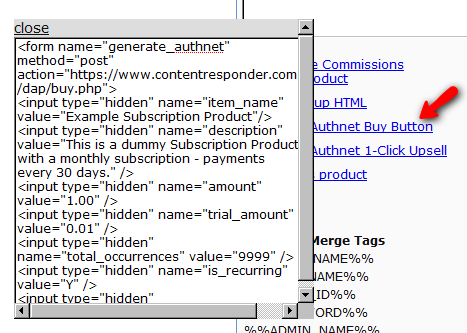
    authnet_buybutton_code
  21. Here’s what the HTML code looks like:
    <form name="generate_authnet" method="post" action="https://www.contentresponder.com/dap/buy.php">
    <input type="hidden" name="item_name" value="Example Subscription Product"/>
    <input type="hidden" name="description" value="This is a dummy Subscription Product with a monthly subscription - payments every 30 days." />
    <input type="hidden" name="amount" value="1.00" />
    <input type="hidden" name="trial_amount" value="0.01" />
    <input type="hidden" name="total_occurrences" value="9999" />
    <input type="hidden" name="is_recurring" value="Y" />
    <input type="hidden" name="recurring_cycle_1" value="30" />
    <input type="hidden" name="recurring_cycle_2" value="30" />
    <input type="hidden" name="recurring_cycle_3" value="30" />
    <input type="hidden" name="payment_succ_page" value="https://www.contentresponder.com/dap/continue.php?url=/dap/upsell1.html" />
    <input type="hidden" name="payment_gateway" value="authnet" />
    <input type="hidden" name="is_submitted" value="Y" />
    <input type="submit" value="Buy Now" />
    </form>
  22. If you’re doing upsells, the only thing you need to do is, look for the “payment_succ_page” field in the above form. By default it is pointing to:
    https://www.contentresponder.com/dap/continue.php?url=/dap/upsell1.html
  23. Modify the “upsell1.html” file within your dap folder, to make your 1-Click Upsell offer. Or if you don’t wish to use 1-Click upsells, you can make just about any kind of upsell offer on that page. The upsell1.html that comes with the plugin has a sample upsell page already created for you, just so you get an idea of what that will look like.
  24. On the upsell page, if you want to upsell say, Product B, then make sure you set up “Product B” ahead of time in DAP, and set up the price and recurring options. Then for upsell products only, click on the “Generate Authnet 1-Click Upsell” link to generate the 1-Click Upsell Buy button code, as the upsell buy button is slightly different than the ‘regular’ buy button code. Now take the upsell buy button code like you did before, and paste it in upsell1.html. That’s it.
  25. You can repeat this process for unlimited upsells, downsells and one-time offers. No limits.

That’s it.

While it looks like a LOT of steps, that is only because we have to explain the steps in detail so they are clear. In reality, it is very simple to set up, and starting from scratch, if you have DAP & SSL already installed, it shouldn’t take you more than 1/2 hour to set up your 1-Click Upsells/Downsells/OTO’s. And if you’re not using Upsells/Downsells, then it can be done even faster.

If you have any further questions, feel free to open a support ticket, and we will assist you in getting this going.

Click Here to Leave a Comment Below 17 comments
Tweets that mention Upsell Tree: 1-Click Upsells, Downsells & OTO’s using Authorize.net — DAP Documentation -- Topsy.com - January 16, 2010

[…] This post was mentioned on Twitter by Ravi Jayagopal, Ravi Jayagopal. Ravi Jayagopal said: DAP "Upsell Tree" w/ Unlimited 1-Click Upsells: http://www.digitalaccesspass.com/doc/upsell-tree-1click-upsells-downsells-otos/ #in […]

Reply
Seth - January 16, 2010

I just opened a merchant account with PowerPay and a gateway with Authorize.net. I’m new at setting up my own payment processing. I’ve only ever used paydotcom and clickbank before. So, I have a few basic questions. Do you need more than one Authnet account if I wanted to set up several totally different sites? And where does Powerpay come in during the sales process? I’m still trying to grasp the whole gateway to merchant account to bank account thing.

Thanks

Reply
Ravi Jayagopal - January 16, 2010

Seth,

>>Do you need more than one Authnet account if I wanted to set up several totally different sites

No, you need just one Authnet account. Of course, with each one costing about $50 per month, I don’t think you want more than one 🙂

>>And where does Powerpay come in during the sales process
Nowhere. All you need is DAP + Authorize.net

– Ravi Jayagopal

Reply
Ravi Jayagopal - January 16, 2010

Seth,

Or maybe Powerpay is helping you get an Authorize.net merchant account? Powerpay is probably just the reseller. Either way, all you need is your final Authorize.net merchant account.

– Ravi

Reply
DAP v3.5, LiveLinks v1.1 and UpsellTree — The DAP Blog - January 20, 2010

[…] Have you checked out our spanking new “Upsell Tree” video? Also check out the new documentation for installing Upsell-Tree. […]

Reply
Tom - June 13, 2010

Ravi & Veena,
Looking at this plugin as a replacement for our current 1SC setup. How hard to export/import clients/orders out of 1SC into DAP? Would the SSL be needed because we are storing CC numbers locally? Would we use authorize.net’s recurring function or does your plugin provide all the recurring function we have with 1SC?
Thanks

Reply
Veena Prashanth - June 14, 2010

Tom,
>> How hard to export/import clients/orders out of 1SC into DAP?

All you need to do is point the authorize.net silent post to point to DAP. That way all payment notifications (including recurring payment notifications for existing subscribers that purchased product out of 1sc -> authnet) will reach DAP and DAP will automatically update the membership record.

>> Would the SSL be needed because we are storing CC numbers locally?
Yes, still needed because the CC info will be collected and sent to authnet.

>> Would we use authorize.nets recurring function or does your plugin provide all the recurring function we have with 1SC?

You will still need authorize.net’s ARB function enabled for recurring function to work on the authnet side.

Reply
Tom - June 15, 2010

R&V,

Hope its OK to respond here, this may be of use to the community..

>>You will still need authorize.nets ARB function enabled for recurring function to work on the authnet side.

Actually, we are not using this, as I understand 1SC recurring function precludes it. Is that true?

>>Yes, still needed because the CC info will be collected and sent to authnet.

Does ‘collected’ mean credit card numbers will be stored in our WordPress database?

Thanks!

Reply
stephan - July 15, 2010

how do you tie the upsell1.html file to a wordpress page instead? it seems more logical to build the thank-you pages, etc. in wordpress versus regular html…then the template can be wrapped around for a more professional look.

Reply
Rick Wilkes - July 28, 2010

I was under the impression that DAP does not store ANY credit card information locally. https is required because our site hosts the data entry page and transmits that information to the processor. Correct?

Upsell: This is really an “additional” sell, not something that replaces the previously purchased product?

Reply
Veena Prashanth - September 5, 2010

Stephan,
>> how do you tie the upsell1.html file to a wordpress page instead? it seems more logical to build the thank-you pages, etc. in wordpress versus regular html¦then the template can be wrapped around for a more professional look. << Currently the upsell pages cannot be tied to a wordpress page as the wordpress pages are pseudo-static (wordpress pulls content from its database to generate web pages). DAP requires a static html page for upsells. But it is something we will incorporate in a future version of DAP.

Reply
Veena Prashanth - September 5, 2010

Rick,
>> I was under the impression that DAP does not store ANY credit card information locally. https is required because our site hosts the data entry page and transmits that information to the processor. Correct? << Correct. DAP does not store any credit card information locally. HTTPs is only needed for security purposes as your site would collect security-sensitive data and transmit it to the payment processor. >> Upsell: This is really an additional sell, not something that replaces the previously purchased product? << Correct. It's an additional sell. It does not replace the previously purchased product.

Reply
Veena Prashanth - September 5, 2010

Tom,
>> Does ‘collected mean credit card numbers will be stored in our WordPress database? << The credit card numbers are not stored in the dap/wordpress database. It will be captured (not stored) and transmitted to the payment processor.

Reply
Jason - August 16, 2012

If Authorize.net only allows 1 silent post URL, how do our 2nd, 3rd, 4th, nth sites receive data from Authorize.net? Or, is it just needed if we have an existing setup that we are migrating?

Reply
Veena Prashanth - August 17, 2012

You will have to use a redirect script to redirect the request from 1 authnet account to multiple sites.

Our IPN redirect script does exactly that.

Pls read:
http://www.digitalaccesspass.com/forums/threads/765-IPN-Redirect-redirect-notification-to-multiple-sites

You can purchase the IPN Redirect script here:

http://wickedcoolplugins.com/the-plugins/ipn-redirect/

Reply
Marites - March 6, 2013

Hello Veena,

We have an Annual Subscription product where we charge xxx amount. If we want to offer a free 3-month subscription, I’ve read in your documentation that we have to put 0.01 in the trial price so the user will be charge .01 by Authorize.net. My problem is that our Authorize.net account has a Advanced Fraud Detection Suite where we can’t charge less $1 or less.

What’s your suggestion for a work around on this?

Many thanks 🙂

Reply
Veena Prashanth - March 23, 2013

Hi Marites,
You will have to set the trial price to $1 if your authnet account prevents you from charging less than $1 trial.

Thanks,
Veena

Reply

Leave a Reply: