Author Archives: DAP Admin
Author Archives: DAP Admin
A: See this post How and Why to use Amazon S3 to Deliver Audio, Video and PDF on your WordPress website
If all files are stored right on your web site, and you have a large amount of video, audio and other files, then a lot of people viewing and downloading them from your site will use up a lot of resources on your server – like site loading time, server memory, server bandwidth, etc – and your site could slow down considerably. Plus, on top of that, there may be bandwidth charges that your host will charge you with for all of those downloads, which are usually not very cheap.
And don’t put too much faith in your web host’s “Unlimited Bandwidth” clause, because if you read the fine-print carefully, you’ll see that as per their TOS, if you consume large amounts of bandwidth and use too much of the server resources, this could cause other web sites (belonging to others) on the same server to slow down and have a degrade in performance, especially if you are on a shared hosting account. And they could consider this abuse of their TOS, and could either slap you with huge bandwidth or server utilization fees, or may even ask you to take your web site elsewhere because you’re causing issues for other site owners on the same server.
Instead, if the files are stored on Amazon S3, then you don’t have to worry about your site slowing down, or you using up too much bandwidth and getting slapped with huge bandwidth fees, because the files are being served from Amazon’s huge S3 servers which have tons more resources and speed compared to your web host.
Plus in the long run, bandwidth is cheaper on S3 compared to your web host.
A: Not directly, not by itself. By default, DAP can only protect files (and any other content) that is on the same web site where DAP is also installed. For large files, we do recommend that you store files on a fast, scalable file server like Amazon S3. Now, the page or post itself (in which you post that Amazon S3 link) can be protected by DAP, and no un-authorized user can even see the content of the page (or the link within that page).
However, once a user has authorized access to a page because they’re a member, now they can see the page where you have that Amazon S3 link.
It’s similar to posting a public YouTube video on a protected DAP page on your web site. Sure, DAP can protect the page from un-authorized users, but authorized users can actually see the page, and see that it’s a YouTube video, and clicking on that video will directly take them to a page on YouTube.com, which DAP has no control over, and cannot protect once they leave your web site.
Similarly, DAP cannot directly protect that external link to your file stored on Amazon S3. And that’s where our Amazon S3 plugin S3MediaVault.com (S3MV) comes into the picture.
S3MV can make sure that your files on Amazon S3 cannot be accessed directly by anyone, even if the link were shared with others via email or on a forum, and can ONLY be accessed through a page or post on your web site (web site where you have installed the S3MV WordPress plugin).
NOTE: The S3MV plugin is included for free with your purchase of any DAP license, starting with the Unlimited-site license and above.
A: Yes. S3MediaVault offers “true streaming”, as well as standard “Progressive Downloads”. You can choose either option for your videos and audio.
If you want them to be able to download the files, S3MediaVault allows you to do that.
And if you do NOT want them to be able to download the files, S3MediaVault help you prevent downloads as well.
S3MediaVault is the first-ever WordPress plugin that lets you create encrypted Streaming Video and Streaming Audio.
“Impossible to Download” Streaming Videos: We highly recommend allowing paying members to download your content for offline use. And S3MediaVault very much allows you to create secure download links for all of your content – Video, Audio, PDF, etc.
However, for some reason, if you do *not* want anyone to download your videos/audio, then S3MediaVault can do that too.
S3MediaVault allows you to create HLS Videos with industrial-strength AES 128-Bit Encryption for both your videos and audio. This is “True Streaming” at its best, with the strongest security available for streaming videos and audio.
None of your website visitors, subscribers, or members will be able to download your videos from your website. Even software like Internet Download Manager (IDM) or browser extensions like Video Downloader or Video DownloadHelper will not be able to download your streaming video or audio. S3MediaVault is the only WordPress plugin that can create this level of security. Check out our encrypted streaming demo here.
Multi-Resolution Streaming with “Resolution Switcher” and “Video Stream Optimization”: S3MediaVault allows you to create streaming video in multiple resolutions. You can choose the resolutions in the Settings page – 1080p, 720p, 360p, 240p and 144p. And S3MediaVault automatically encodes your video in all of those resolutions with a single click. And when the viewer clicks play on the video, the S3MediaVault video player will automatically choose the lowest-but-best resolution for the viewer based on their internet speed. So, if they’re watching from a device which has slow internet speeds (like 3G, or 4G or maybe they’re using a service that doesn’t offer high-speed internet, or maybe throttles mobile access), the player will serve them the most optimized quality of video. That means, your streaming videos will load quickly for them regardless of their internet speed, saving them on their bandwidth bill, as well as saving you on your AWS bandwidth bill (win/win FTW!).
In addition, just like you can do on YouTube, your viewers will be able to change the resolution to a higher or lower number, and the switch will happen seamlessly without affecting their viewership experience.
S3MediaVault is the most secure plugin that can secure your content and make sure it’s only available on your website.
Combine that with the Page/Post protection of DigitalAccessPass (DAP), which can make sure only certain people (like paid members, or free but registered users) can access the post or page where the S3MediaVault embed code is published.
Combine DAP + S3MediaVault, and you would have now completely locked down your content from any and every kind of unauthorized and illegal access.
There are many reasons for wanting to have more control over the affiliate program – or even completely disable it for the entire web site.
1) You simply don’t wish to let people know that you have an affiliate program – maybe it is because you don’t want to confuse the mom-and-pop niche that you are in with crazy words like “Affiliate” and “Commission” :-). Or you just don’t need affiliates and don’t wish to pay commissions
2) You want to allow only certain users to be affiliates. You don’t want every member to automatically become affiliates.
3) You are using a 3rd party affiliate service – like ClickBank – and don’t wish to use DAP’s built-in affiliate program.
This is easy to do. Don’t announce any affiliate program. Don’t say anywhere that you have one, or that you’re offering commissions. Do not setup commissions for your products. Do not create an “Affiliate Info” page, so no one will know what their affiliate link is, and since no commissions are set, no one will get paid anything.
Basically, don’t do anything to set up any of the the affiliate stuff, and that’s as good as having no affiliate program.
If you do not want all members to become affiliates, and only want people you want – like your business associates and JV partners – to be the only affiliates, then…
a) Create a separate product called Affiliates. But do not publish a public sign-up form for that product. So no one can sign-up for that, and the only way to get access to it is if you manually added them in from the DAP Admin Users > Add screen.
b) Create the Affiliate Info page that displays all of the affiliate information and stats. But add that page only to this Affiliates product, and not to any other product. So only those with access to the Affiliates product can even get to the Affiliate Info page.
If you are using DAP with a non-WordPress site, or simply using the the default http://YourSite.com/dap/index.php page as your members’ area, then all you have to do is go to…
DAP Admin > Setup > Config > Display Affiliate Details
… and set it to “N”.
That will essentially “hide” the affiliate section from showing up on the default DAP home page (at http://YourSite.com/dap/index.php)
—
NOTE: In a future version of DAP, we will have the ability to selectively turn off an individual’s ability to use their affiliate link, so DAP will completely ignore all referrals from the affiliate, and won’t track anything from them.
DAP has a feature where you can ask DAP to always generate a pre-determined, default password of your choice for all new members.
So all new users will be assigned the same default password, which of course, they can change as soon as (or any time after) they login.
This is especially useful if you want a third-party service like Aweber – instead of DAP – to send out the new member’s “Welcome Email” which contains their email and password.
Since DAP is unable to pass the randomly generated password to Aweber, instead, you can setup a default password by going to
Setup > Config > Default Password
This can be found under the Miscellaneous section on that page.
So if you set this password to say, changethis, then DAP will give out the same password to all new users.
Then, in the welcome email you configure at, say, Aweber, you would put the Aweber merge code for email id, and then enter this pre-selected password (because you already know what it is) into your Aweber email, like this:
Hello {!firstname},
Welcome to Example.com. You may log in to your member’s area at:
Email: {!email}
Password: changethisThank you,
– Admin from Example.com
And if you ever change the default password in DAP, don’t forget to also change it in your welcome email at Aweber (or 3rd party email service).
Also, don’t use the default password in any subsequent emails, other than the Welcome email (very first email sent to member through Aweber), because the member may have already changed their password by then.
WARNING: You must have also set up DAP/Aweber integration first before you attempt to do this.
Follow this documentation page for Aweber-to-DAP integration only if you’re using DAP 4.3.1 or older.
The flow of subscriber in this model, is “FROM Aweber TO DAP“. User gets added to Aweber first, then arrives at DAP via Aweber “thank you page”, at which point she gets added to DAP.
Now, if the flow is from DAP-to-Aweber, and are using email parsing to integrate DAP and Aweber, then your Aweber list will always be double-opt-in (as per Aweber policy, nothing to do with DAP).
But if you want your Aweber list to be single-opt-in, then you can use an Aweber signup form on your squeeze page (instead of the DAP sign-up form) and then have Aweber add users to DAP.
Please note that you cannot use this flow for Paid members – because paid members will need to have paid first, which means DAP needs to process their payment first, and if successful, it can add them to Aweber. So for paid members and paid content, always use the other DAP-to-Aweber flow.
But for free signups (say, like when you’re trying to build a list), you can add them to Aweber first using the flow explained below, just so you can take advantage of making your Aweber list single-optin, and then have Aweber add the subscriber to DAP on the other end. So this way, DAP can then create a free account for them, email them their login/password, and give them access to the “Free” content (that is, content available only to “Registered” users, so to speak), etc.
So here are the steps…
1. Go to DAP Dashboard > Products > Manage page.
2. Note down the Product Id of the product to which you want to sign-up the users (after adding them Aweber first, of course)
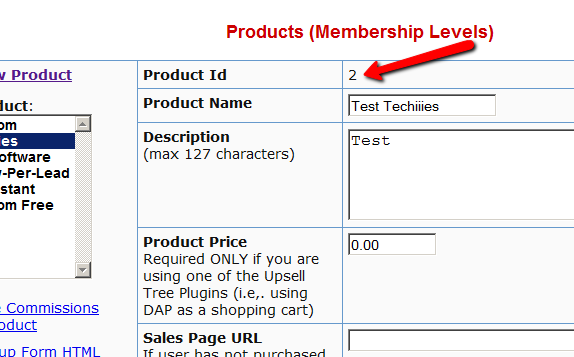
3. There is a file called dap-aweber.php in the dap folder. Make a copy of that file and call it dap-aweber-PRODUCTID.php.
Replace with the text PRODUCTID with the actual Product Id you noted in the previous step.
So in the example above, Product Id is 2. So the name of the file copy should be dap-aweber-2.php.
4. Open this file (dap-aweber-2.php).
The first line of code in this file looks like this:
$default_product_id = 1; //Change this to any product id from DAP
Change the part shown in bold below:
$default_product_id = 2; //Change this to any product id from DAP
Upload this file back to /dap folder on your site.
If your Aweber list is single-optin, then follow the steps below. If not, skip to “Aweber List Is Double-Optin” flow further below.
5. Now login to your AWeber account.
5A) From the “Current List” drop-down, select the list that you wish to sign up users to.
5B) Click on “Web Forms” in the menu at the top.
5C) Edit existing form by clicking on the name of the list.
6. On the next page – the list form generator page – click on ‘Go to Step 2’ towards the bottom of the page.
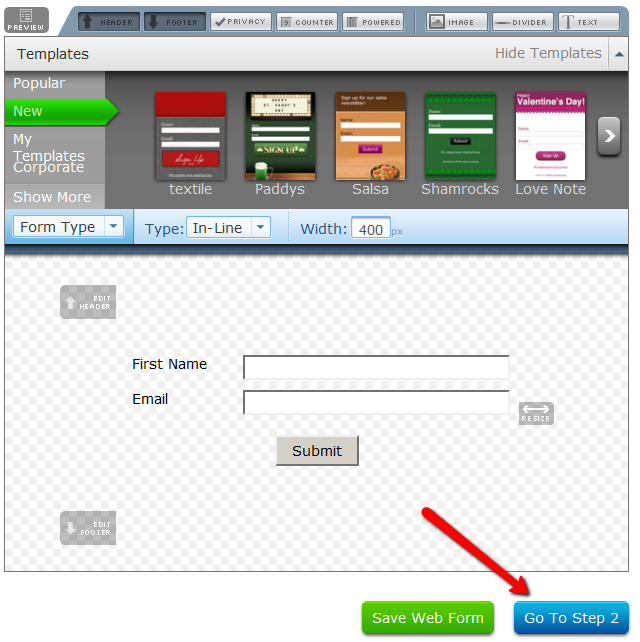
7. On the next, page….
7A) Click on the thankyou page dropdown and select ‘Custom’.
7B) Set the thank you Page URL to http://YourSite.com/dap/dap-aweber-PRODUCTID.php
Replace YourSite.com with the name of your site.
Replace PRODUCTID with the ProductId of the product you noted in step 2.
So, if the productId of the product in DAP is 2, then the thankyou page URL will be – http://yoursite.com/dap/dap-aweber-2.php
7C) Where it says “Pass Form Data”, check the check box so that Aweber can “Forward subscriber information to your thank you page” – which essentially is DAP, so that DAP can add the subscriber to your membership site.
That’s it!
In this flow, set up your Web Form as usual, with no DAP-specific settings required.
Only change required is in the Aweber list’s main “List Settings” page.
5. Now login to your AWeber account.
6. From the “Current List” drop-down, select the list that you wish to sign up users to.
7. Go to My Lists > List Settings
8. Go to “Confirmed Opt-In” tab

9. Scroll down to “3: Success Page“, and enter the URL of the special dap-aweber-2.php script (or whatever the file name is) you created back in Step #4 above.
Check the check-box that says “Pass subscriber info for personalizing this page”.
Ignore the comment that says “Not recommended for WordPress users”, because this is going to point to a DAP script, and not a WordPress page.
Click on “Save Settings”.
That’s it!
Now that you’ve set up DAP to integrate with your Aweber list (single- or double-optin), you may use the Aweber web form directly on your squeeze page for signing up subscribers (instead of DAP’s “Direct Signup Form”).
Now, every time a subscriber signs up via the Aweber form, they will automatically be added to DAP.
If your list is single-optin, then the subscriber will be added to DAP instantly after sign-up.
If your list is double-optin, then the subscriber will be added to DAP only AFTER they’ve clicked on the Aweber double-optin confirmation link.
In both cases, they will be redirected to the DAP Login Form.
You may also configure the DAP Product’s “Welcome Email” to send out the DAP email and password via DAP itself.
-OR-
You can leave the Welcome Email in DAP Product page as blank. And then configure DAP to generate a default password (DAP Admin > Setup > Config > Default Password) as shown below, and then enter that same pre-chosen password in to your very first Aweber follow up email that goes out to your subscribers, so that they can receive their dap id/password details directly from your Aweber list.
For more details about this default password, please see this post.
NOTE: If you want to send the subscriber to a different page (instead of the DAP login page) upon sign-up, then do this:
This way you can redirect users after they complete the Aweber signup, to a landing page of your choice.
When you use the merge tag %%LOGIN_FORM%% in a WordPress page, the tag is replaced by a login form that your member can use to log in to your membership site.
If you wish to customize the look & feel or text of the form, then rename the file…
wp-content/plugins/DAP-WP-LiveLinks/DAP-WP-LoginForm.html
To…
wp-content/plugins/DAP-WP-LiveLinks/customDAP-WP-LoginForm.html
Basically you are adding the text “custom” to the beginning of the file name, that’s it.
And this new file will also reside in the same directory.
Once you have this new file in the directory, DAP will ignore the old, default file, and will only use your new custom version.
Any time someone gets access to PRODUCT A (either through direct signup, manual admin add, or purchase), then you can automatically give them access to PRODUCT B. And you can select whether they get PAID access to PRODUCT B or not.
Similarly, when someone is removed from PRODUCT A, you can also tell DAP to automatically remove their access to PRODUCT B.
Very useful for bundling products.
User signs up as free user to PRODUCT A.
Later on, user buys PRODUCT B (which is, say, paid version of PRODUCT A).
If you set up Product Chaining, then you can automatically remove them from PRODUCT A when they purchase PRODUCT B. So when you send an email to all PRODUCT A users asking them to purchase access to PRODUCT B, then you won’t be sending emails to those who have already purchased PRODUCT B.
Click on image below to open full size in a new window.
You already know that you can create a “My Content” kind of page within WordPress, that will list all products that a user has access to, and then each product will list the content that they currently have access to (content that has already dripped on them).
But this page is a full-summary of all products, all listed on one page.
Instead, if you wished to create product-specific download pages, where you create a separate page for each product, that lists all the content within just that product alone, then that’s where DAP’s “ProductLinks” Widget comes in handy.
Here’s how you set it up.
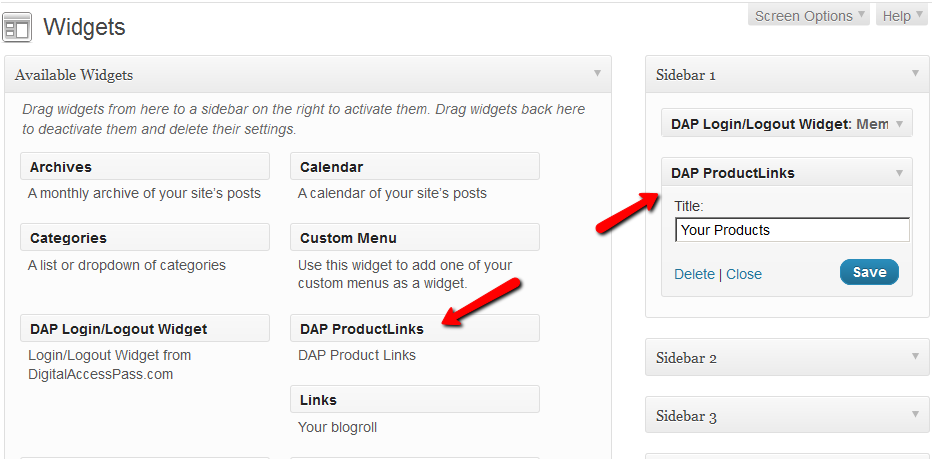
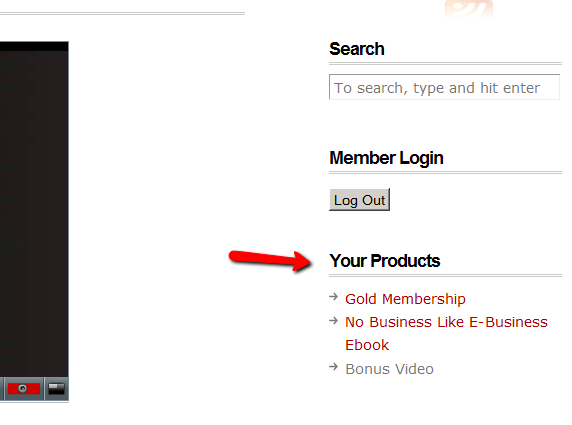
Replace the entire text <id> with the actual Product id from DAP (Products > Manage)
So, if the product’s id is 6 in DAP, then the merge code becomes:
%%PRODUCT_DETAILS_6%%
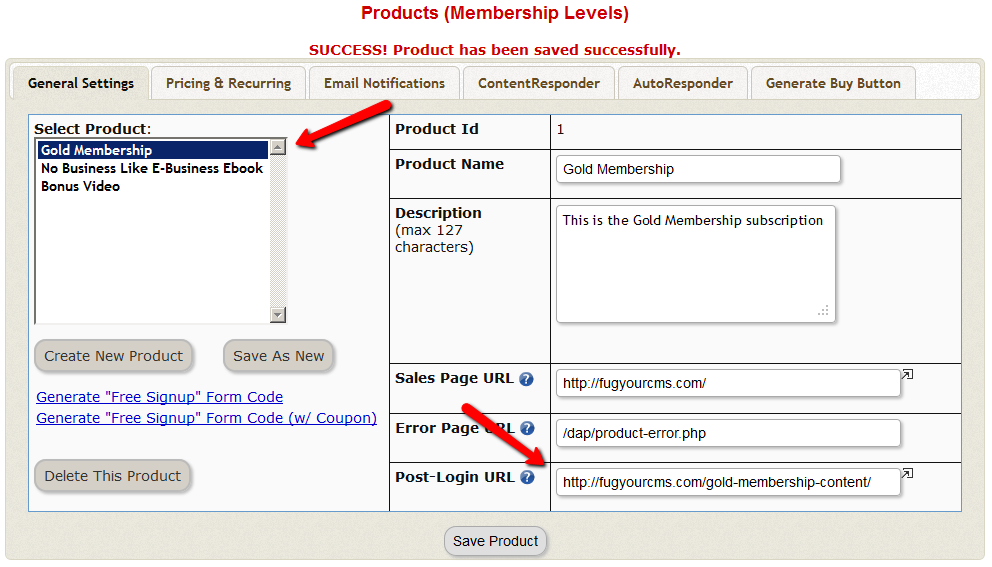
Save the page. And if you gave the page the title “Gold Membership Content”, then the permalink for this page will be:
http://YourSite.com/gold-membership-content/
The reason why your affiliate program may not be working as intended, is almost always because of incorrect setup and/or testing parameters.
Here are some more troubleshooting steps:
There could be many reasons for why the affiliate was not credited to the sale.
a) Buyer didn’t click on any affiliate links before purchasing the product
b) Buyer did click on an affiliate link, but somehow (intentionally – or not) cleared her cookies before buying the product
c) If you haven’t set up Login Xpress, then buyer needs to log in to your membership site – which they probably haven’t done yet (if this is the case, see if DAP supports Login Xpress for your payment processor)
d) The hourly cron job on your DAP site hasn’t run yet (hourly cron has to have run *after* the buyer has logged in to their account)
e) You have not set up any affiliate commissions for the Product on the “Affiliates > Set Commissions” page
Short answer: You’re not using “Login Xpress”. And you probably forgot to initially set up the affiliate commission for the Product in question, under “Affiliates > Commissions“, and only set up the commission record 7 days (or more) after the actual sale happened (the sale for which your affiliate got the “Lead”, but not the “Sale” (and in effect, no commissions). We call this the “7 Day Commission Cutoff Period”. So affiliate will not be awarded the commission. You just have to pay them offline.
Long answer: DAP has two ways of awarding commissions:
a) Using Login-Xpress, where affiliates are attached to buyers instantly after purchase, and when the cron job runs at the top of the next hour, the affiliate commissions are credited to the affiliate’s account.
b) In situations where Login-Xpress is not possible (due to restrictions with the specific payment processor), the affiliate is attached to the buyer only when the buyer actually logs in to your membership site. Believe it or not, not everyone logs in the same day (sometimes not even for a few days after) they’ve purchased your product. So it’s possible that the affiliate/buyer connection is not made by DAP until a couple of days later.
Now consider these scenarios…
Case X: Buyer clicked on affiliate link at work. They purchased the product at work. You don’t have Login-Xpress setup. So only way for affiliate/buyer connection to be made, is when your member logs in to your site for the first time. So they went home that evening, logged in for the first time from home, but there’s no affiliate cookie at home. Normally your affiliate is screwed. But DAP goes the extra mile to be fair to affiliates. If your buyer logs in to your membership site even a couple of days later from work, since the cookie is still on their work computer, the affiliate and buyer are now connected, and affiliate gets credit for the sale.
Case Y: Buyer never clicked on any affiliate link. They bought your product. You did not have Login-Xpress setup. So only way for affiliate/buyer connection to be made, is when your member logs in to your site for the first time. So since they never clicked on any affiliate link, there’s no affiliate cookie. They buy your product, log in to your site, and their account has no affiliate attached to it. Then a couple of days later, they’re surfing the web, and happen to read an article from one of your affiliates, and intentionally or not, click on that affiliate’s link. Now that affiliate’s cookie is stored on their computer. The next time they login, DAP thinks “Ah, this is the same as Case X (above): No affiliate attached already, but now finding affiliate cookie – same as the buy at work/login at home example. So DAP will go ahead and give that affiliate credit for the sale, even though the referral was not made prior to purchase. So to avoid awarding affiliates incorrectly (after the sale), DAP is deliberately programmed to look for transactions only for the last 7 days, every time the DAP hourly cron job runs.
So you created an “Affiliate” product, created a free sign-up form, and an affiliate signed up to this product, and is trying to log in and access the page, but is unable to, and is getting the “Sorry, you don’t have access to this product” error.
There could be many reasons for that (main one is #1 below):
a) Anyone who signs up through the “Direct Signup HTML Form” is added as a “Free” user. Which means, they can only access content that has been marked as free. So if you have created an “Affiliate” Product, and have added the affiliate-info page to that product, make sure that page is accessible by free users too, by clicking on the “edit” link next to the page, and on the resulting popup, set “Accessible to
Free users too?” to “Y”.
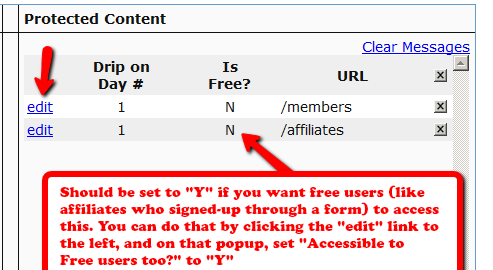
b) You have not even made the affiliate-info page protected under the “Affiliate” product
This is not really a double-credit for the same purchase, even though it appears to be so.
Sometimes you may enter a manual transaction for a purchase around the same time that DAP is processing an automated transaction for that purchase.
That means, there are now two transactions in DAP for the same purchase – one manual, and one automated – which can cause problems in accounting.
That’s usually how you end up crediting double commissions to the affiliate who referred the user, because all affiliate commissions are calculated from sales, and if you have two separate transactions for the same purchase, then the affiliate will get credited twice for the same referral.
So if you see two credits for the affiliate, you must first note that it is not for the same transaction, but for different transactions (note the different Trans Id‘s) on the Affiliates > Reports page.
So be careful when you’re entering Manual transactions. Those are meant only for when there is no way to automate the recording of a purchase (because they paid offline) and you’re unable to bring the transaction into DAP automatically.
If you see two affiliate commission credits (one for the automated transaction that DAP picked up, and one for the Manual transaction that you entered), then just refund the manual transaction in DAP. There will probably be a change to the user’s access because of the refund. So make a note of the current access of the user BEFORE you do the refund, and then AFTER you’ve processed the refund, go back to the User’s details on the Users > Manage page, and manually adjust their access to make sure it’s accurate.
How does a customer, once they have signed up and become a member, cancel their membership (or get for a refund)?
If it’s Paypal, they could go into their Paypal account, and cancel their subscription themselves.
If it’s ClickBank, they can log in to their CB account, and cancel their subscription themselves.
If it’s any other payment processor or cart – like 1SiteAutomation.com, Authorize.net, Paypal Payments Pro, etc – then they have to ask you (the membership site owner) to cancel.
Except with CB, in all other cases, they have to ask you for a refund
Whether it’s a cancellation or a refund, log in to your Payment Processor (1shoppingcart, Authorize.net, etc), and make sure you perform the cancellation or refund there. DAP does not store any of the payment information of your subscriber. So both cancellations and refunds have to be performed at your Payment Processor.
Now that you’ve cancelled the actual charging of the customer at the payment processor level, you have to also take care of the customer within DAP – only for refunds.
Cancellation Of Ongoing Subscription in DAP
If this is the cancellation of an ongoing subscription, then no action required within the DAP Dashboard as far as the User is concerned. DAP already does “Pay As You Go” processing – which means, their account will automatically expire at the end of the current recurring period (eg., end of current month). The “Access End Date” of the user’s access to the Product will automatically expire if no new payments come in. And then they’ll automatically lose all access to the content that is part of that Product.
However, if this is the cancellation of a “trial”, where if the user comes back and signs up again for another trial a few weeks or months later, then you want the user to start all the way AT THE BEGINNING. So if it’s the cancellation of a “trial” then you must manually remove the user’s access to the product. So for that, follow the process below.
Refunds (and Cancellation of Trial) in DAP
If it’s a refund of the entire purchase, then…
If it’s a refund of just one recurring payment from among a series of subscription payments, or the cancellation of a trial, then you can go into the “Users > Manage” screen, search for the user, and do a “Rollback Access for Selected User(s) to the Product by 1 Recurring Cycle“.
For a big-picture view, also see Cancellations & Refunds
NOTE: We do not provide support for server or domain moves as part of Standard DAP Support that you get with your purchase of DAP. Please see our Terms Of Support which explains why. If you want our help with moving a DAP installation, you may purchase Premium Support slots from http://DigitalAccessPass.com/buynow.php#store (see “Installations & Support” tab)
DAP does not store the domain name anywhere in the database. So if you want to move an existing installation to a new domain, the only place where you need to change your domain name in the DAP installation (if you’re moving across domains) is in the dap-config.php file.
Moving a DAP installation consists of basically moving the files, and moving the database. Only 2 components.