Author Archives: DAP Admin
Author Archives: DAP Admin
DAP is so powerful and flexible, that you can sell access to your membership through different payment processors, all at the same time.
And we often get asked how to leverage different affiliate networks like ClickBank and JVZoo and Warrior Plus at the same time while making sure no affiliate commissions are lost, and every affiliate gets credited their commissions for sending potential buyers to your site.
1) If buyer arrives ONLY through DAP affiliate link, and ends up purchasing through ANY payment processor, then DAP affiliate will get credit.
2) If buyer arrives ONLY through CB affiliate link, and ends up purchasing through CB payment processor, but the buyer has a different DAP affiliate’s cookie from a link he clicked on at some point before (but did not purchase at that time, say), then both CB affiliate and DAP affiliate will get credit (double commissions on same purchase, but to two different affiliates).
If there’s no DAP cookie on his computer, then only CB affiliate will get the commission.
If the DAP affiliate “chains” two of his own affiliate links – his DAP affiliate link and CB affiliate link – like shown below, then same affiliate will get both CB commission as well as DAP commission. Again, double commissions but to same person.
http://YourSite.com/dap/a/?a=1234&p=http://hop.clickbank.net…./
3) If buyer arrives ONLY through JVZOO affiliate link, and ends up purchasing through JVZOO payment processor, but the buyer has a different DAP affiliate’s cookie from a link he clicked on at some point before (but did not purchase at that time, say), then both JVZOO affiliate and DAP affiliate will get credit (double commissions on same purchase, but to two different affiliates).
If there’s no DAP cookie on his computer, then only JVZOO affiliate will get the commission.
If the DAP affiliate “chains” two of his own affiliate links – his DAP affiliate link and JVZOO affiliate link – like shown below, then same affiliate will get both JVZOO commission as well as DAP commission. Again, double commissions but to same person.
http://YourSite.com/dap/a/?a=1234&p=http://jvzoo.com/c/1944/17
To make sure that you’re not paying double-commissions on purchases, and also to make sure that sales don’t get lost between affiliate networks (and your affiliates losing their commissions in the process), you have to set things up the right way.
The main thing to do, is to create a separate set of the following for each affiliate network:
So the net effect of this, is…
If a CB affiliate sends traffic to a page, that page must have a CB buy link ONLY on that page. If you have, say, a JVZoo button on that same page, and the buyer buys through the JVZoo link, then the CB affiliate will get no commissions for that purchase. Which means, they will stop promoting your product because you’re basically funnelling off their visitors to a different affiliate network.
Similarly, the landing page for JVZoo affiliates must have only JVZoo buy buttons.
Landing page for a regular payment processor – like Paypal or Authorize.net – should have only a Paypal and/or Authorize.net buy button (and no CB or JVZoo buy buttons). In this case, for these products in DAP, you should set up an affiliate commission row on the “Affiliates > Manage” screen, so that your DAP affiliates can get credited for sales made through your regular web site.
If you wish to change the default “Logout” button that shows up in the Login/Logout sidebar widget, then here’s what you need to do…
Rename the file
wp-content/plugin/DAP-WP-LiveLinks/DAP-WP-LogoutHTML.html
To…
wp-content/plugin/DAP-WP-LiveLinks/customDAP-WP-LogoutHTML.html
Open this new file customDAP-WP-LogoutHTML.html and inside you’ll see just this one line…
<input type=’button’ name=’dap-logout-button’ value=’Log Out’ onClick=”javascript:location.href=’/dap/logout.php’;” style=”margin-top:5px” />
Change that to…
<input type=’image’ src=”/path/to/button/image.jpg” name=’dap-logout-button’ value=’Log Out’ onClick=”javascript:location.href=’/dap/logout.php’;” style=”margin-top:5px” />
1) Update DAP Setup > Config -> Secret Authorization Key to be…
YourGCmerchant_id|YourGCmerchant_key
2) Point the Google Checkout IPN handler to
http://yoursite.com/dap/dap-gc-responsehandler.php
(replace yoursite.com with the name of your site).
3) Create a DAP product and make sure the item name that your GC Item Name exactly matches the DAP Product Name.
That’s it!
NOTE
You will find a file by name dap-gc-responsehandler.php in your dap folder.
Use this file as is, with no changes, during testing. Nothing to change.
But once you’re ready to go live, open the file, and find the line below:
$server_type = “‘sandbox”;
And change it to:
$server_type = “‘production”;
1) Go to DigiResults.com “Manage” Listings tab at https://www.digiresults.com/manage/listings
2) Click on the List Name

3) Click on “Edit Product” below the Products section on the listings page.
4) In the Edit Product page, click on “Edit” next to Direct Receipts.

Set the Direct Receipt URL to point to the dap script on your site…
The direct receipt format should be set to Clickbank Instant Notification.
http://YOURSITE.com/dap/dap-digiresults.php

5) Create a product in DAP and make sure the dap Product Name exactly matches the digiresults Product Name.
That’s it!
Now run a test purchase via digiresults and see if the account gets created in dap automatically.
DAP supports full fledged integration with JVZoo including automated login to membership where users can instantly get access without any manual action. No waiting for welcome email or having to pick a username/ password on the thank-you page after purchase. All automatic.
If you want the users to be auto-logged-in to their membership right after purchase, then please do this step. Otherwise skip this step.
(Click image below to see enlarged version)
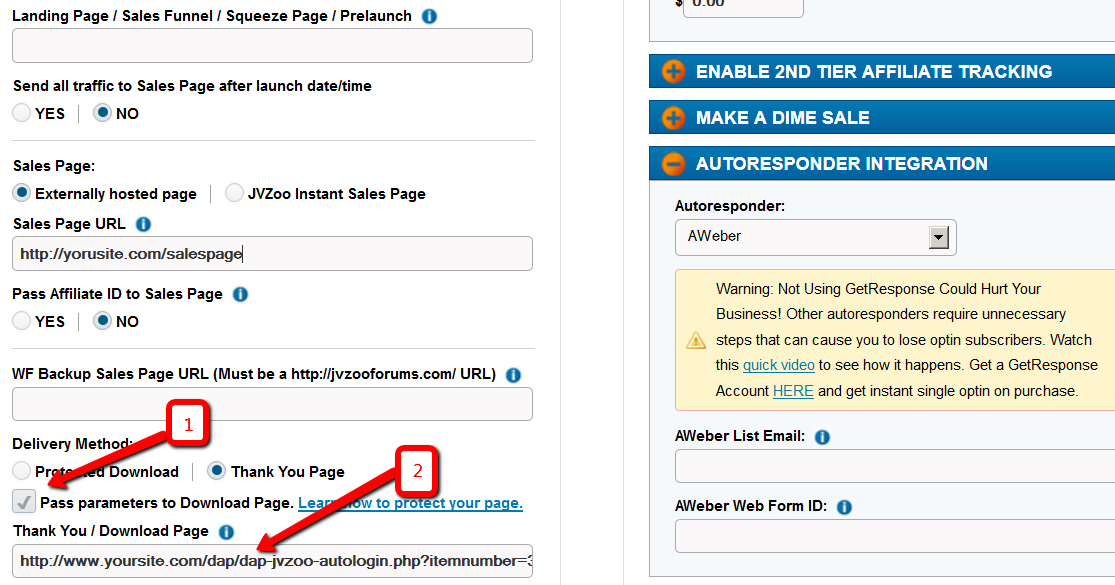
i. Delivery Method -> Pass Parameters : Make sure to check the box that says ‘Pass Parameters to Download Page‘
ii. Download Page: Say that after the purchase is complete, you want the users to land on a members area page where they can download/access their purchased content. Say the url of that page is http://YOURSITE.com/member-home
If you want DAP to auto-login the users to their membership and then redirect to /member-home, enter this in the Thankyou / Download Page textbox and then they can get redirected to the /member-home.
http://www.YOURSITE.com/dap/dap-jvzoo-autologin.php?itemnumber=3&redirect=member-home&errorurl=error-page
Please note:
Replace YOURSITE.com with the actual name of your site.
Here /member-home is just an example. You can enter the url of any page where you want users to be redirected after login.
In the autologin URL, we have omitted “/” in front of member-home and “/” in front of errorurl because JVZoo messes up the formatting if you include “/” in the querystring.
http://www.YOURSITE.com/dap/dap-jvzoo-autologin.php?itemnumber=3&redirect=member-home&errorurl=error-page
itemnumber=It should be the product ID of the DAP product you want the users to get access to
redirect=It should be the URL of the page where the users should land after they get logged-in. If you want them to go to /member-home after automated login, set redirect=/member-home (just the relative path is good, no need to enter full url).
errorurl=It should be the URL of the page where the users should land if there are any errors during account creation
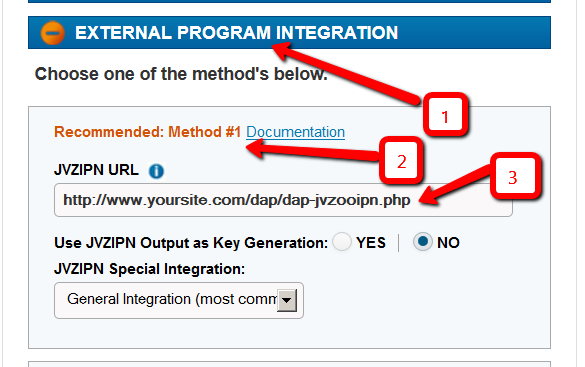
Check the check box next to this field.
In that same section, set the Recommended: Method #1 field to the following URL:
http://yoursite.com/dap/dap-jvzooipn.php
(NOTE: replace yoursite.com with the actual domain name of your site).
NOTE 1: Make sure your JVZoo Product Name exactly matches your DAP Product Name
NOTE 2: Also make sure you have the “Welcome Email” Subject & Body configured in the DAP Product page with the right merge tags to send out user login/password.
Set the JVZoo My Account => JVZIPN Secret Key to match the Secret key in your DAP setup -> config -> Payment Processing => Secret Authorization Key.
You can pick any secret key you want. Just make sure it exactly matches in dap setup -> config area and the JVZoo My Account page.
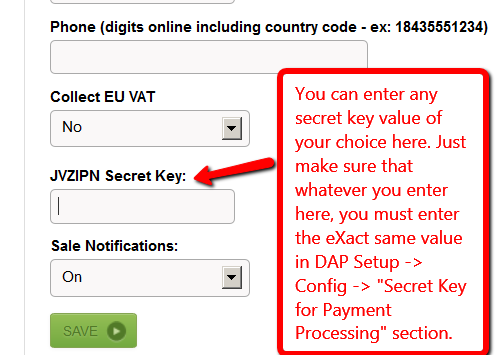
NOTE: You can put in ANYTHING you want in the DAP secret key (in dap setup -> config). Say that you set it to DAPKEY. Now when you go to JVZoo My Account => JVZIPN Secret Key, make sure to set the jvzoo secret key to DAPKEY there too. It has to EXACTLY match whatever you set the dap secret key to.
When a user completes purchase of the product, JVZoo will send payment notification to DAP to the IPN URL specified above. And if you have setup auto-login, then after the user completes the final purchase, JVZoo will land the users on the final receipt page where if they click on “Access My Purchase”, dap will auto-login the users to their membership and allow them instant access to the product.
UserFlow
NOTE: Use DAP to deliver/protect downloads by protecting the downloads/content in dap products page => ContentResponder section.
* Buyer clicks on the button (button created within your JVZoo account) on your sales page
* Buyer is taken to the JvZoo page where they can complete payment
* Buyer completes the payment successfully
* Buyer is transferred back to whatever you set in the thankyou URL in JvZoo for the product or to the upsell page
* In the meantime, JVZoo notifies DAP about the purchase via IPN
* DAP automatically creates the member account, and sends thankyou email (configured in your dap products page) with login info to the buyer.
* Now if regardless of whether you had 1 product in the sales funnel or multiple upsells/downsells, ultimately the users will land on the final receipt purchase where they will find the ‘access my purchase’ link. When they click on that, dap will automatically login the user to their membership account and allow them instant access to content. The users do NOT have to wait for welcome email to login to membership.
Make sure to setup the thankyou email in the DAP products page for all the products you deliver via DAP.
* When the users login to their membership area or are auto-logged-in, by default, they will be redirected to either product-level logged-in URL or global logged-in url based on whether they have access to just 1 product or multiple products. The product level logged-in url is used if the user has access to just 1 product. The global logged-in url (under dap setup -> config -> post-login redirect url) is used when user has access to multiple products.
If you want to send users to a different page, then just set the ‘redirect’ url in the ‘thank-you/download page’ in JVZoo to point to wherever you want them redirected (see step # 1 for detail at the top of this page) and dap will use that url for post-login-redirect.
* Note: You can create a members area page and redirect users to that page upon purchase. When the users login and access their members area, they can access the purchased products/downloads.
Here’s what you need to do to disable the standard vB login form at the top-right corner of your forum pages, and customize it so that you force your members to log in via the DAP login form, so that they’re logged in to your membership site as well as DAP.
That’s it!
DAP now integrates with 2CO!
To integrate DAP with your 2CO account, pls update the IPN in your 2CO account to point to http://yoursite.com/dap/dap-2co.php (replace yoursite.com with the name of your site) for the following events:
– Order Created
– Fraud Status Changed
– Recurring Installment Success
– Recurring Installment Failed
– Recurring Restarted
NOTE: When you create products in 2CO to sell, make sure you create products by the EXACT same name in DAP otherwise the transaction will not be processed by DAP.

Here’s how the script will work:
1) Order Created
DAP will create and activate the membership account at the time of purchase.
DAP will look for the message type of ORDER_CREATED and invoice_status of “approved” to automatically create the membership account. The user will receive the welcome email with full access to the purchased items (based on content drip settings in dap products page) upon purchase completion.
2) Fraud Status Changed
2CO approves or disapproves a purchase inmediately. If the purchase is approved, DAP will receive an “Order created” message via IPN from 2CO; if not, 2CO will not send any message. After that, 2CO has a “second tier” fraud check. Upon the completion of Fraud Check, 2CO will send out FRAUD_STATUS_CHANGED message. DAP will not take any action if fraud_status = “pass”. But if fraud_status in NOT “pass”, then dap will set the user’s product status in DAP to INACTIVE. So the user will not be able to access the DAP product any more.
3) Recurring Installment Success
Upon successful recurring payment notification from 2CO, DAP will simply extend the user’s access end date based on the ‘recurring cycle’ setting in dap products page -> Price/Recurring tab for the product.
4) Recurring Installment Failed
DAP will reset the access end date to current date if recurring payment fails so user will not be able to access content past the failed date.
5) Recurring Restarted
DAP will start back from where the user last left off. The user’s access end date will be extended from whatever it was set to previously. The access end date is extended based on the recurring period settings in the dap products page -> Price/Recurring tab for the product.
(For information about the MSIAB Pro package, click here.)
Here’s how the MSIAB “Starter” Concierge sessions work:
* Please note that with the “Starter” Concierge service, you get a total of *3 hours* of 1-on-1 setup and configuration and DAP walk-thru. So you’re free to manage those 3 hours of time you’re getting, by guiding us to focus on the things most important to you (like MailChimp Integration, Content Protection, Affiliate Setup, etc).
* Any time left over from either the 1-on-1 call or the offline time, may not be re-used for any other purposes (like, asking us to additional software installation, etc). Any time left unused will be forfeited if not used within 6 months (180 days).
* The bonuses or time provided may not be transferred to others.
* So after you purchase the MSIAB license, pls open a ticket at http://DigitalAccessPass.com/support/ with all of the following site credentials that we will need for installaing DAP on your site.
* Then we set up a 2-hour call with you, give you a crash-course in using DAP, set up end-to-end of a product, set up your various member-facing pages, go over all of your questions, etc.
* And then, we recommend that you take a few days to use DAP by yourself, play with the different settings and options, set up the rest of of your actual content, create your actual products, decide on the pricing, create your sales pages, squeeze pages, etc.
* By this time, you will have more questions, and more ideas. So, at that point, contact us via the same ticket as before, and request your final 1-hour Concierge session. During this final call, we can go over any other questions you may have, or anything else you may need help with in completing the set up of your membership site.
While we actually don’t require anything to be setup ahead of the calls, the more components you have already set up (or have made some progress on, or have at least given a thought to) going into the call – like your theme look & feel, your nav menu, your pages, sub-pages, Aweber email sequence, etc), the quicker you will be able to launch after the calls.
The only thing we really need is for you to have absolutely every third-party component’s login and password information handy and available – like Aweber login, WP admin, FTP, Authorize.net/Paypal/ClickBank/other, Web hosting cPanel, etc).
We may need most of it during setup (you don’t *have* to give it to us – you must at least be able to log in yourself and follow our instructions on the call – we can help you by allowing you to share your screen and walking you through the steps).
And you’ll really benefit from watching some of our videos ahead of time – like the tutorial videos we have added, at http://DigitalAccessPass.com/documentation/ (at the top on the menu on the left, look under the “DAP Tutorials: End-to-End” section).
So, to summarize, here’s a list of things that we can and cannot do.
What we CAN do:
* Set up your member pages: Login page, “My Content” page, “My Affiliate” page and “Profile” page
* Setup up to 6 different products or “levels”
* Set up any free products, and show you how to sign up free members
* Set up the DAP shopping cart if required and connect it to a supported payment gateway
* Create buy buttons for your various products, and set it all up so that people can go from your site to buying your product to being logged in to the member’s area
* Walk you through end-to-end testing of your sales funnel
* Integrate DAP with your payment processor or 1SiteAutomation.com cart
* Setup 1-Click Upsells if you’re going to offer them
* Set up “Self-Service Store” – which is our “Credits” plugin and integrate it with your products and your content, so that you can award your members with “Credits”
* Setup and install vBulletin and integrate it with your membership levels or products so that certain members can access certain forums only
* Set up full content protection, content dripping, product chaining
* Set up email autoresponders and show you how to do broadcasts
* Set up your affiliate program, commissions for your various products, set up the affiliate info page for your members, and show you how to run reports and also pay your affiliates, etc
What we WILL NOT be doing:
* Designing your web site headers, graphics, skins, css, etc
* Create any kind of web site content, videos, write articles, blog posts or pages, etc
* Create your navigation, menu, organizing or arranging your content, etc
* Setup your squeeze pages, launch funnel, etc
(For information about the MSIAB Starter package, click here.)
* Please note that with the purchase of the MSIAB Pro service, you get a total of *6 hours* of our time.
* You get 4 hours of 1-on-1 setup and configuration and DAP walk-thru. You’re free to manage those 4 hours of time you’re getting, by guiding us to focus on the things most important to you (like, say, MailChimp Integration, Content Protection, Affiliate Setup, etc).
* You also get up to 2 hours of offline setup, all inclusive.
– vB installation: 1 hour
– OptimizePress installation: 15 minutes
– SSS installation: 15 minutes
– WordPress installation: 15 minutes
– S3MediaVault installation: 15 minutes
Depending on how many of the above services you will be using, you get up to a maximum of 2 hours of offline setup and installation.
* Any time left over from either the 1-on-1 call or the offline time, may not be re-used for any other purposes (like, asking us to additional software installation, etc). Any time left unused will be forfeited if not used within 6 months (180 days).
* The bonuses or time provided may not be transferred to others.
* If you already own OptimizePress, you can get a $50 discount on your purchase of MSIAB Pro.
* So after you purchase our MSIAB Pro license, pls open a ticket at http://DigitalAccessPass.com/support/ with all of the following site credentials that we will need for installing DAP on your site.
* Then we set up a 2-hour call with you, give you a crash-course in using DAP, set up end-to-end of a product, set up your various member-facing pages, go over all of your questions, etc.
* And then, we recommend that you take a few days to use DAP by yourself, play with the different settings and options, set up the rest of of your actual content, create your actual products, decide on the pricing, create your sales pages, squeeze pages, etc. During this time, you can also have us do any offline work that may be required – like vBulletin installation, SSS installation, etc.
* By this time, you will have more questions, and more ideas. So, at that point, contact us via the same ticket as before, and request your final 2-hour Concierge session. During this final call, we can go over any other questions you may have, or anything else you may need help with in completing the set up of your membership site.
While we actually don’t require anything to be setup ahead of the calls, the more components you have already set up (or have made some progress on, or have at least given a thought to) going into the call – like your theme look & feel, your nav menu, your pages, sub-pages, Aweber email sequence, etc), the quicker you will be able to launch after the calls.
The only thing we really need is for you to have absolutely every third-party component’s login and password information handy and available – like Aweber login, WP admin, FTP, Authorize.net/Paypal/ClickBank/other, Web hosting cPanel, etc).
We may need most of it during setup (you don’t *have* to give it to us – you must at least be able to log in yourself and follow our instructions on the call – we can help you by allowing you to share your screen and walking you through the steps).
And you’ll really benefit from watching some of our videos ahead of time – like the tutorial videos we have added, at http://DigitalAccessPass.com/documentation/ (at the top on the menu on the left, look under the “DAP Tutorials: End-to-End” section).
NOTE: We’re not graphic designers and we do not do any kind of work related to “Look & Feel” of your web site.
So, to summarize, here’s a list of things that we can and cannot do.
What we CAN do:
* Set up your member pages: Login page, “My Content” page, “My Affiliate” page and “Profile” page
* Setup up to 6 different products or “levels”
* Set up any free products, and show you how to sign up free members
* Set up the DAP shopping cart if required and connect it to a supported payment gateway
* Create buy buttons for your various products, and set it all up so that people can go from your site to buying your product to being logged in to the member’s area
* Walk you through end-to-end testing of your sales funnel
* Integrate DAP with your payment processor or 1SiteAutomation.com cart
* Setup 1-Click Upsells if you’re going to offer them
* Set up “Self-Service Store” – which is our “Credits” plugin and integrate it with your products and your content, so that you can award your members with “Credits”
* Setup and install vBulletin and integrate it with your membership levels or products so that certain members can access certain forums only
* Set up full content protection, content dripping, product chaining
* Set up email autoresponders and show you how to do broadcasts
* Set up your affiliate program, commissions for your various products, set up the affiliate info page for your members, and show you how to run reports and also pay your affiliates, etc
What we WILL NOT be doing:
* Designing your web site headers, graphics, skins, css, etc
* Create any kind of web site content, videos, write articles, blog posts or pages, etc
* Create your navigation, menu, organizing or arranging your content, etc
* Setup your squeeze pages, launch funnel, etc
PWC=>DAP integration is very simple to set up.
NOTE:
Note: You can create a member’s area and redirect users to that page upon purchase.