Author Archives: DAP Admin
Author Archives: DAP Admin
Now, normally, links to pages or posts show up in the left-hand side of the ContentResponder tab of the DAP Product only after they’ve been published.
But sometimes, for whatever reason, you may wish to protect pages or posts even before they are published – like in a “Draft” or “Pending Review” status. So here’s what you do.
As soon as you first create a new post or page, and tab out of the title field, and even before you save the post as a draft, or publish it, WordPress will create and display the permalink for that post/page, based on the text in your title.
So, if your page title is “Protecting Draft Pages”, then the default permalink will take on the structure http://YourSite.com/protecting-draft-pages – basically a lower-case version of the title, with hyphens separating the words. Like this…

You can then copy that entire permalink from where it is displayed, go to the DAP Product’s ContentResponder section, scroll down to the section that says “Protect a URL”, and then paste the entire permalink there (http://YourSite.com/protecting-draft-pages), and click “Add URL”.

That will protect this page or post in advance of it being published.
DAP integrates with ClickBank “PitchPlus”, which is their 1-Click Upsell process.
So you can basically start by selling one front-end product, and then if your buyer purchases that product, you can then upsell them more products right after, and since they’ve already entered their payment information once, ClickBank remembers this information and allows them to purchase further products without having to re-enter all of the information again.
The basic idea is the same for DAP/CB integration, whether it’s one product, or multiple Upsell products .
You basically do a one-time set up of INS and the secret key as explained here.
Once that’s done, then for every Front-end product or Upsell-product, they are all integrated with DAP the same way: You just make sure the “Item Name” in CB and the “Product Name” in DAP both match, that’s it!
And for the last product in your upsell, be sure to point it to a static page containing a message like “Thank You, please check your email inbox for login details”.
And since CB notifies DAP separately for each product purchased, right then and there, if they end up buying 3 products during checkout (1 main + 2 upsells), then DAP will send the user 3 separate welcome emails. Of course, that’s optional – you don’t have to send out a welcome email for all products, but we highly recommend that you do.
Plus since they would be using the same email id for all 3 purchases, DAP will give them access to all purchased products under a single DAP account. So they need to log in to just one account to access content from all products that they just purchased.
DAP allows you to create Coupon codes for use as long as you’re using the DAP Shopping Cart, and accepting payments via one of the following:
1. To create a Coupon code, go to DAP Admin > Payment Processing > Coupons

2. The Coupon options can then be setup on that page:

You not only need to generate new Coupon codes, but you must also associate the Coupon to the DAP Products that should allow use of that Coupon. All of this can be done via the Coupons page.
If you are using paypal standard button, then create the DAP button with coupon enabled (under dap payment processing -> generate buy button page -> paypal standard tab) and put the coupon enabled button code on your sales page.
And when your prospect enters a valid coupon code in the form and clicks on the button, they will taken to the PayPal checkout page where they will see the discounted price
If you are using DAP Shopping Cart that connects with Authorize.net or Paypal Website Payments Pro, then in addition to setting up the actual Coupon, you must also go to DAP Admin > Payment Processing > Cart Options , and enable Coupons for the product(s) of your choice.

Now when your buyer clicks on the the DAP buy button, they will be taken to the checkout page where they can see the option to enter a Coupon Code.
If a Coupon is not working, check if the coupon code has actually expired, by going to DAP Admin > Payment Processing > Coupons page.
Check to see if Start Date and End Date are current.
Make sure the coupon’s Actual Usage is less than the coupon’s Max Usage.
DAP is one of the very few membership platforms that will let affiliates earn commissions on offline payments too.
And in fact, DAP will credit affiliates for not just offline payments, but for any payments that you accepted outside of the payment options listed on your web site.
So, for example, you’re using Paypal and Authorize.net buttons on your site. And someone wants to send you a check (cheque) in the mail, or they want to send you money via Western Union, or wire transfer, or they call you and you accept their credit card information by phone, or any other such offline methods.
In this case, DAP can still give credit to the right affiliate for the sale. Here’s how…
1) Add Manual Transaction
That’s it.
By this time, the user would’ve received their “Welcome Email” from DAP, which will have their login info to log in to your site.
And when they log in, if they have an affiliate cookie set in their browser (which they would, if they had clicked on an affiliate link at some point before they contacted you and asked you about a non-standard, offline payment method), then when they first log in to your member’s area, DAP will pick up the referring affiliate’s id from the affiliate cookie, and give credit to them for the sale.
And when the DAP hourly cron runs at the top of the next hour, that affiliate will be credited with any commissions that you’ve set up for that product.
So you want to use DAP to sell group memberships or sub-accounts.
Eg. 1) A group membership – or multi-user account – that a School/College/Teacher can buy on behalf of their students. It’s either a one-time product, or could be a subscription product. In that case, buyer keeps paying monthly, and when they stop paying, all sub-users (child accounts) get disabled.
Eg. 2) Company A pays $X for up to 20 of its employees to have individual memberships. To begin with, the money is collected in one lump sum and DAP grants 20 memberships. Then each month Company A pays the Corporate/Umbrella/Bulk Membership and DAP gives credit to the individual memberships. If Company A fails to pay, all the “sub” members underneath lose access.
DAP doesn’t directly support sub-memberships or sub-accounts yet. We already have this on our humongous to-do list :-). And we definitely plan on implementing it soon. But for now, here’s a work-around for making this happen. It’s fairly simple, yet it is manual, and cannot be automated yet.
Until we include this feature in DAP and make it automated, there are two ways to look at this.
One: You could say, it’s too much work to remove 20/50 emails when the main buyer cancels. OR…
Two: Since this is a group membership, you are hopefully charging them a good fee for this (if not, then you certainly should!). So you can always hire someone for $5 or $10 per hour on Odesk and have them do the removal of those email id’s. Removing 50 email id’s would take about 20 minutes at most. And you would need to do this only when they cancel, which can happen only once per group membership.
So hope that helps give you some ideas.
Hope this makes sense.
You try to visit a protected page that you’re not eligible to view, and see an ugly page full of un-formatted links
Save, and that will no longer display the ugly error page going forward. Instead, it will redirect the user to the above custom error page.
You try to visit a protected page that you’re not eligible to view, yet you are still able to see all of the content. Or the page appears messed up with missing menu items or formatting issues.
Click image below to enlarge

FACT: Anything that you put out on the web, can be downloaded – one way or the other.
FACT: People who are out to steal stuff, will steal it no matter what.
FACT: By taking security too far, you will only annoy and irritate 99% of your members who have absolutely no intention of ripping you off or stealing your content in any way.
DAP provides built-in security for files and video and just about any other type of file extension – like .pdf, .zip, .doc, etc. DAP will make sure that even if the URL to the actual file gets passed around, the person trying to access the file will have to log in first before they can access the content. So your content is safe from un-authorized users, with DAP protecting it.
However, what about a valid, paying member? When they get access to a protected PDF or .zip or even a video, can DAP prevent them from downloading the file to their desktop? If a paying member who has legitimate access to a PDF file, can download the PDF to their desktop, can they not then turn around and upload it to their own web site, or send it as an attachment via email to their friends? Is there any way to make files not downloadable at all?
Sure they can. But trying to build a Fort Knox around your content, is not really the best thing for your members.
Like we mentioned above, anything that’s out there on the web, can be duplicated, copied, downloaded – in one way or the other. Nothing is 100% secure.
So can your content be “too secure”? Absolutely. You can make it too hard for 99% of your legitimate members, just to prevent the 1% from stealing it (but they’re going to find a way to steal anyway). What’s the point, really? Those who want to steal, know how to pick your lock. So why make it harder for your real members?
Can people pass on their username/password to their friends to log in to your member’s area? Sure. But DAP will lock their account from further access, if it detects an account getting logins from more than, say “5” (or whatever you set as admin) IP addresses.
Can people download your videos from your site after getting legit access to it, using screen-capture tools, then re-upload to a torrent or black-hate site? Sure, they can.
Can people break your “password-lock”, “print-lock” or any other kind of restriction you place on your PDF files, within seconds? Sure, they can.
No, your content can never be 100% secure. Any one who tells you so, is either lying, or doesn’t have a clue.
Your only goal should be to make it hard for the “casual” abusers, that’s all. Not to make it so hard that even your legitimate members have to jump through hoops to get to it.
The best membership sites we have seen, provide access to their content in multiple formats.
Do you publish video content? Then right below the video, also give them a link to “download” the video and “watch it at their leisure”, publish an “Audio Version” in .mp3 format, publish a “PDF Transcript” of everything said in the video, so they can even “read” the content from your video.
Is your content mostly text? Then offer a PDF version of your blog post or page, so they can download it, print it, and read it offline. Or make a “Read Aloud” version of your blog post and offer it as a .mp3 file, so they can “listen” to your content while at the gym, or while going for a walk, or while driving in their car.
Bottom-line: Don’t worry about the 1% who will never pay you, probably will steal your content, and pass it on to others one way or the other. Just focus on creating great value for the 99% of your paying members who pay you, support you, promote you, and keep coming back month after month after month. And that’s the best use of your time and resources, and that’s the only way to build a successful membership site.
WARNING: Gmail integration may not work for everyone. Many factors – including, but not limited to, your physical location, the location associated with your Gmail account, location of server, IP address, etc – appear to play a role in whether or not this will work for you with your Gmail account. So please note, that if it doesn’t work for you, then there isn’t anything the DAP team can do to overcome or “fix” that. It’s Google, after all. We don’t know what rules and monitoring they have in place for this. So, if Gmail integration doesn’t work for you, then you may want to consider Amazon SES integration, which has a 100% success rate with DAP users at this time.
To increase deliverability of your autoresponder, broadcast and instant emails (like “Welcome” email), you can make DAP completely by-pass your web host’s email server, and send emails out through third-party email servers, like Gmail or Amazon SES. This article is about setting up DAP to send out emails through Gmail’s email servers.
Before you start sending out mass emails through Google’s Gmail Servers, please note this…
Sending out emails through Gmail instead of your web host, will surely boost your deliverability, no doubt. But remember that Gmail is NOT meant to use for mass emails. It is not really meant to be used as a list service. Plus they have a very strict restriction of 500 emails per 24-hour period.
You exceed that quota even by one, and they probably will temporarily disable your Gmail account for about 24 hours. Sending a large number of un-deliverable emails (resulting in bounces) could also get your entire Gmail account permanently suspended. And if you lose your Google username, it may (no confirmation available) affect your other Google accounts too – like AdWords or AdSense.
Anyway, DAP has a round-robin emailing system – so you could set up and use multiple Gmail accounts – each with its own 500 email limit per day – and combine them to send out a larger broadcast. However, remember – we’re talking about Google here – which means they can suspend/cancel/delete your account for any reason at all, even more so when you’re going against their TOS.
So use Gmail with caution, and only for smaller lists. If you want a larger sending email limit, check out the DAP integration with Amazon SES which allows you to send out tens of thousands of emails a day.
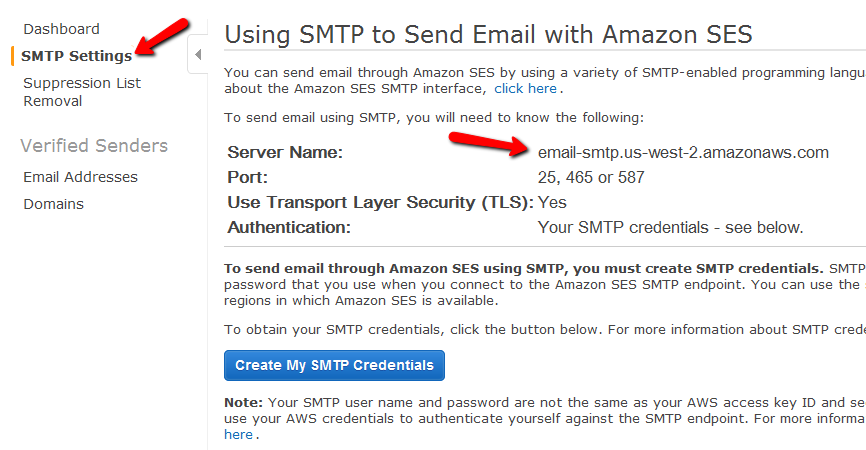
You can hook up DAP to Amazon’s Simple Email Service (Amazon SES) and have all of your emails go through Amazon’s beefed up, high-performance, high-deliverability email servers.
The document below explains how to connect DAP to Amazon SES. (troubleshooting info for DAP/SES integration)


 You need to determine what your host name is, and then add the text “ssl://” to it at the front.
So if the server name displayed in your Amazon SES account is this…
email-smtp.us-east-1.amazonaws.com
…then the text you would enter into the DAP Email > SMTP page is this…
ssl://email-smtp.us-east-1.amazonaws.com

Watch this video for details: