Author Archives: DAP Admin
Author Archives: DAP Admin
DAP has a very powerful, flexible and easy-to-use log in flow for your users and members.
And we call it the Smart Login, because the login process will work differently under different conditions, all designed to make the user-experience for your member more smooth and consistent with general login standards around the web.
So let’s see the various possible login locations in DAP.
But first, it is important to note that DAP has two main types of logins.
This is where it is considered a “generic” login by your member. For eg., a member came to your web site, and then just generally wants to log in to the member’s area – so they have no “context” – it’s NOT as if they were trying to view a specific page or post, got challenged with a login form, and then logged-in from there. That makes this a “Primary Login“.
Examples of this are…
a) Dedicated Login Page: You have a dedicated login page, like http://YourSite.com/login/ – which is what you’ve entered in to “Setup > Config > Login URL“. The body of this page has the DAP merge tag for the login form, which is %%LOGIN_FORM%%
b) Login/Logout Widget on any page of your web site. This is also considered a primary login. The reasoning here is that if they’re logging in through a sidebar widget, it means that they just want to log in to the member’s area, so it is considered primary login.
This is a login action that HAS “context”. Say, a member landed deep into your site (not the home page, not the dedicated login page) and were challenged by the “In Page Error Message” that says something like “Sorry, you must log in before you can view this content” and are presented with a login form right on that very same page. They were trying to read something before they were asked to log in first – which means, they must be returned to the same page they were trying to view BEFORE they were asked to login. So that makes this a “Secondary Login“.
Examples of this are…
a) Any custom “Error Page”, where you have inserted the DAP merge tag for the login form, %%LOGIN_FORM%%.
b) DAP’s “In-Page Error Message” which says “Sorry, this is private content – you must log in first before you can view this”.
c) Log in form showing up on a page when “Sneak-Peek” is enabled.
Based on whether it’s a Primary Login or a Secondary Login, your member will be redirected to a different location.
1) If it is a Primary Login action, then…
a) They’re taken to the “Post-Login URL” if set at a Product-level AND they have access to just one Product.
b) They’re taken to the GLOBAL “Post Login URL” (under Setup > Config) if you have NOT set anything at a Product-level, OR if they have access to more than one Product.
This scenario is the only one where the Post-Login URL is ever used (whether it’s the Product-level or Global-level).
1) If it is a Secondary Login action, then…
They’re always redirected back to the same page they were on (or were trying to access) before they were challenged to log in first to view the content.
Bottom-line:
Primary Login is predictable, and you (the DAP Admin) control where they go right after they login.
Secondary Login depends on “context”, and they’re taken back to whatever page they were on, before they logged in.
I just upgraded to DAP 4.x. The login page when clicked after successful login shows the message
[MSG_ALREADY_LOGGEDIN_1 MSG_ALREADY_LOGGEDIN_2]
Did you previously customize the dap/inc/language/english.php and save it as dap/inc/language/custom.php? (you have done this for internationalization, or for customizing DAP’s messages).
A) If you answered “NO”, then simply delete the file dap/inc/language/custom.php from your server.
B) If you answered “YES”, then then there are new messages in dap/inc/language/english.php that you need to copy over to dap/inc/language/custom.php
Once you protect a post in DAP, you can …
a) Make it completely disappear from your feed except for authorized users who have valid access to the post and are using a member-specific RSS feed URL
-OR-
b) You can show a “Summary” of every post, by turning on sneak-peek and making sure you have inserted the “<!–more–>” tag entered into each of your posts.
If your blog post is showing in its entirety in your feed, then….
1) You may not have protected the post in DAP at all, so it’s an unprotected post, which will (and should) show up in your feed
-OR-
2) You have turned on Sneak-Peek and haven’t inserted the WordPress “more” tag (<!–more–>) into each of your posts. If you turn on Sneak-peek, then you must insert more tags into all posts. Also, if you have turned on Sneak-Peek, then you must also do this…
Go to “Settings > Reading” in WP admin, then set “For each article in a feed, show” to “Summary“.
If it is set to “Full text”, then it will show the full text in the feed, which is not what you want.

Starting DAP v4.2, each of your members can now get their own unique RSS feed link that they can use with a feed reader (like Google Reader, FeedBlitz, iTunes, etc) to get a custom RSS feed with content that they’re eligible to view.
To give each of your members their own unique RSS Feed URL, just insert the following line of code into the top of the “Member Links” or “My Content” type page, or wherever you want your users to see their personalized RSS feed link…
http://YourSite.com/feed/?key=%%ACTIVATION_KEY%%
http://YourSite.com/blog/feed/?key=%%ACTIVATION_KEY%%
The text %%ACTIVATION_KEY%% in the above URL will be replaced with their own custom key, like…
They can then copy that link, enter that into any feed reader, and it will show content specific to their account.
Another useful feature we’ve added, is that the custom feed link also does IP count validation. So if they share the feed link with others, then after “X” unique IP login attempts (where “X” is configurable by you, the DAP Admin, in Setup > Config), their account will automatically get locked out.
=> Coupon support
=> Add Custom Fields to Your Order/checkout Form
=> Support for Order/Checkout Form customization at product level. For ex – Show “Coupon Code”, Show “How did you hear about us?”, Show “Comments”, CART header/footer html, Show “Ship-To Address on Checkout”, Show “Terms And Conditions”, Request “Phone” on Checkout?, Request “Address2” on Checkout? etc
=> FULLY integrated with WordPress so your order/checkout page will carry the look&feel of your wordpress theme.
=> Multiple cart items support – (you can now use ADD-TO-CART button to allow buyers the option to add multiple items before they finalize purchase)
=> Unlimited Upsells
1. You need an Authorize.net merchant account or Paypal Payments PRO account
2. If you want to sell subscription-based products, then you also need Automated Recurring Billing (ARB) enabled in your Authorize.net account.
3. You must have SSL (secure server) enabled on your web site. Ask your web host to enable SSL/HTTPs for your site.
1) Buy Now
2) Add-to-cart
1) Buy Now
2) Add-to-cart
=> Create the product that you want to sell in DAP Admin => Products / Levels => Manage Products Page
=> Customize the cart/order page in DAP Admin => Payment Processing => Cart Options Page
=> Generate the Primary Buy Button in DAP Admin => Payment Processing => Generate Buy Button Page
NOTE: If you do not want to offer upsells, just set the ‘Payment Success Page’ to point to the final landing page. Otherwise point it to the next upsell page in the flow.
=> If you want the checkout and checkout confirmation pages to have the look&feel of your wordpress theme, then create the following wordpress pages and use the URL of these pages in the button generation page above:
– A WordPress page with the merge tag %%DAPCART%% (this is the page where Credit Card and other info is collected from the user).
– A WordPress page with the merge tag %%DAPCARTSUMMARY%% (this is the page where users can see the items added to their cart.. just applies to add-to-cart button).
=> Generate the Upsell/No Thanks Button in DAP Admin => Payment Processing => Generate Buy Button Page
If you want to offer more upsells, just point the ‘Payment Success Page’ to the next upsell page in the flow.
This is the old, deprecated version of the DAP Shopping Cart add-on. This is still here for archive purposes only, and should only be used with DAP versions 4.4.x or EARLIER.
If you are wanting to use the new DAP Shopping Cart Plugin that supports Stripe and has a unified checkout page, etc, then you can download it from http://digitalaccesspass.com/dappers/new-dap-shopping-cart-plugin/
__________________________________________________________
ARCHIVE ONLY:
This plugin replaces ALL files from both the “Paypal Payments Pro” Upsell-Tree plugin as well as the “Authorize.net” Upsell-Tree Plugin
Starting DAP v4.2, we have consolidated both the Authorize.net & Paypal Payments Pro Upsell-Tree Plugins into one simple set of files, and it has been named the DAP Shopping Cart, which will allow you to both accept one time and recurring payments, as well as do 1-Click Upsells.
This consolidated set of files is named DAPShoppingCart.zip , and is available for download from the members’ area at http://DigitalAccessPass.com/dap/ .
If you are upgrading to DAP v4.2 from a previous DAP version, and you’ve been using Authorize.net or Paypal Payments Pro to accept payments, then you must also upgrade to the new DAP Shopping Cart.
So all you need to is…
1) Download the DAPShoppingCart.zip file from the members area
2) Unzip it to your desktop
3) Upload all files inside directly to your main “dap” folder on your site. (do not upload the folder named DAPShoppingCart – upload only the files inside this folder)
In DAP 4.1, the credits could only be redeemed at product level. So if you wanted to allow users to redeem their earned credits/points towards individual videos, posts, pages etc., you had to create separate child product for each piece of content you wanted to sell because in the self-service-store, the users did not have the option to purchase individual content. They had to purchase the entire child product.
Good news is that DAP 4.2 will allow users to redeem credits at individual content level !!!
DAP 4.2 will support content-on-demand. Users DO NOT have to purchase the entire child product. They can redeem credits towards individual content (that are part of a child product), and pick their own content release schedule rather than a SET drip schedule. So week 1, they can redeem credits toward video 1 and week 2, they can redeem credits towards video 3 skipping video 2. Or they can redeem credits towards both video 1 and video 3 on week 1. They can control how the content is released.
1) Say you have 2 master products – Master Product A (10 credits) and Master Product B (20 credits).
2) Say you added video 1/ video 2 / post 1 / post 2 under the child product C. Say that you assigned 5 credits to Child Product C. So to purchase Child product C, the user will have to spend 5 credits.
Make sure you added / associated the child product C to master product A.
3) Say you added video 3/ video 4 / post 3 / post 4 under a child product D. Say that you assigned 12 credits to Child Product D. So to purchase Child product D, the user will have to spend 12 credits.
Make sure you added / associated the child product D to master product B.
4) User 1 purchases Master Product A. The user will get 10 credits.
5) User 1 purchases Master Product B. The user will get 20 credits.
NOTE: The total credits are at master level and the credits earned towards a master can only be redeemed towards child products that are associated to that master.
So when a user buys Master Product A., user will have 10 credits that the user can use towards any child products that are associated to the Master Product A.
When a user buys Master Product B, user will have 20 credits (you can check by clicking on ‘Credits’ in manage users page for that master). The user can use the credits earned by purchase of Master Product B towards any child products that are associated to the Master Product B.
The user cannot use the credits earned from Master Product A towards child products of Master Product B.
You can assign multiple child products to a master. You can assign the same child to multiple masters.
6) User 1 logs in and visits the self-service-store page :
The user will see child product C listed under Master Product A.
The user will see child product D listed under Master Product B.
Now the user can redeem the credits earned from the purchase of Master Product A (10 credits) to purchase the child product C (5 credits). The user can redeem the credits earned from the purchase of Master Product B (20 credits) to purchase the child product D (12 credits).
THE USERS CANNOT PURCHASE INDIVIDUAL CONTENT IN DAP 4.1. THEY HAVE TO PURCHASE THE ENTIRE CHILD PRODUCT.
1) Say you have 2 master products – Master Product A (10 credits) and Master Product B (20 credits).
2) In DAP 4.2, you can decide whether you want credits to be redeemed at content level for your store (In DAP admin => Self-Service-Store => Select your child product => Allow credits to be redeemed at content level). By default the users can only redeem credit towards the entire child product. But you can configure the child products to allow credits to be redeemed at content level.
If you decide to allow credits to be redeemed at content level for 1 child, then do the same for all child products to keep the look&feel of your store consistent. Otherwise the store will look messy.
3) Say you allow credits to be redeemed at content level in your store.
In this case you will have to assign content level credits in the DAP admin => Self-Service-Store page ( Self Service Content: “ContentResponder” area).
DAP automatically protects content that you add in the content responder area.
You CANNOT have the same product participate in both self-service-store as well as participate in dripping in dap products page. If you want to have the same child product participate in both self service store and the regular content dripping outside of store, then create a copy/clone of the child product (in dap products page) and give it a different name.
Make sure you added / associated the child product C to master product A.
Make sure you added / associated the child product D to master product B.
4) Say you added video 1/ video 2 / post 1 / post 2 under the child product C. Say that you assigned 1 credit to each content. So to purchase the entire Child product C, the user will have to spend 4 credits (video 1 + video 2 + post 1 + post 2).
OR the user can purchase individual content for 1 credit each.
3) Say you added video 3/ video 4 / post 3 / post 4 under a child product D. Say that you assigned 2 credits to the videos (video 3 & 4) and 4 credits to the posts (post 3 & 4). So to purchase Child product D, the user will have to spend 2+ 2+ 4+ 4 = 12 credits.
4) User 1 purchases Master Product A. The user will get 10 credits.
5) User 1 purchases Master Product B. The user will get 20 credits.
NOTE: The total credits are at master level and the credits earned towards a master can only be redeemed towards child products that are associated to that master.
So when a user buys Master Product A., user will have 10 credits that the user can use towards any child products or contents under the child products that are associated to the Master Product A.
When a user buys Master Product B, user will have 20 credits (you can check by clicking on ‘Credits’ in manage users page for that master). The user can use the credits earned by purchase of Master Product B towards any child products or contents under the child products that are associated to the Master Product B.
The user CANNOT use the credits earned from Master Product A towards child products of Master Product B.
You CAN assign multiple child products to a master. You CAN assign the same child to multiple masters.
6) User 1 logs in and visits the self-service-store page :
The user will see child product C listed under Master Product A. User will see the individual content listed under child product C and they can purchase individual content or the entire child product.
The user will see child product C listed under Master Product B. User will see the individual content listed under child product D and they can purchase individual content or the entire child product.
Now the user can redeem the credits earned from the purchase of Master Product A (10 credits) to purchase the child product C (4 credits) or purchase individual content under child product C (video 1/ video 2 / post 1 / post 2). The user can redeem the credits earned from the purchase of Master Product B (20 credits) to purchase the child product D (12 credits) or purchase individual content under child product C (video 3/ video 4 / post 3 / post 4).
Here’s how you test emails in the system before making them live.
Selling through Authorize.net, and doing 1-Click Upsells, Downsells and One-Time Offers (OTO’s) are all now extremely simple to implement using the DAP shopping cart plugin, included for free with your purchase of DAP. This post explains how to create buy buttons for selling through Authorize.net.
If you are selling through Authorize.net. DAP itself will act as your shopping cart, and buyers can checkout and make purchases by staying right on your web site. Your site visitors never have to leave your site in order to make a purchase.
Starting DAP v4.2, you can…
1) Customize the shopping cart checkout page (for ex – turn off or on the collection of shipping info in the checkout page, display terms & conditions etc).
2) Get the checkout page to display right within a WordPress page, so the same look & feel as your WP theme is retained on the checkout page.
Setup & Config


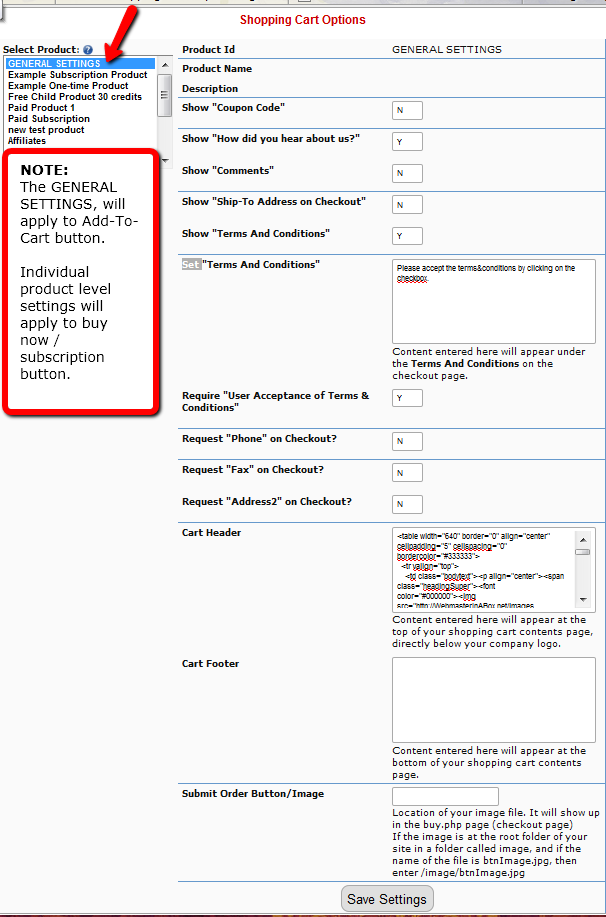
In the main DAP Admin menu, go to the “Payment Processing > Cart Options’ page. Here, you can customize the DAP shopping cart checkout page options. The customization needs to be done at a product level (if you want to generate a ‘BUY NOW’ button for your products) AND/OR customize at cart level (select General Settings in the products dropdown on the Cart Optionspage) if you want to generate ADD-TO-CART type of button.

Say that these were your settings for a product called ‘Paid Product 1’.
Show “Coupon Code” N
Show “How did you hear about us?” Y
Show “Comments” Y
Show “Ship-To Address on Checkout” N
Show “Terms And Conditions” Y
Set “Terms And Conditions” – Please accept the terms&conditions by clicking on the checkbox.
Require “User Acceptance of Terms & Conditions” N
Request “Phone” on Checkout? N
Request “Fax” on Checkout? Y
Request “Address2” on Checkout? Y
Here’s how the checkout page will look for the above cart options.
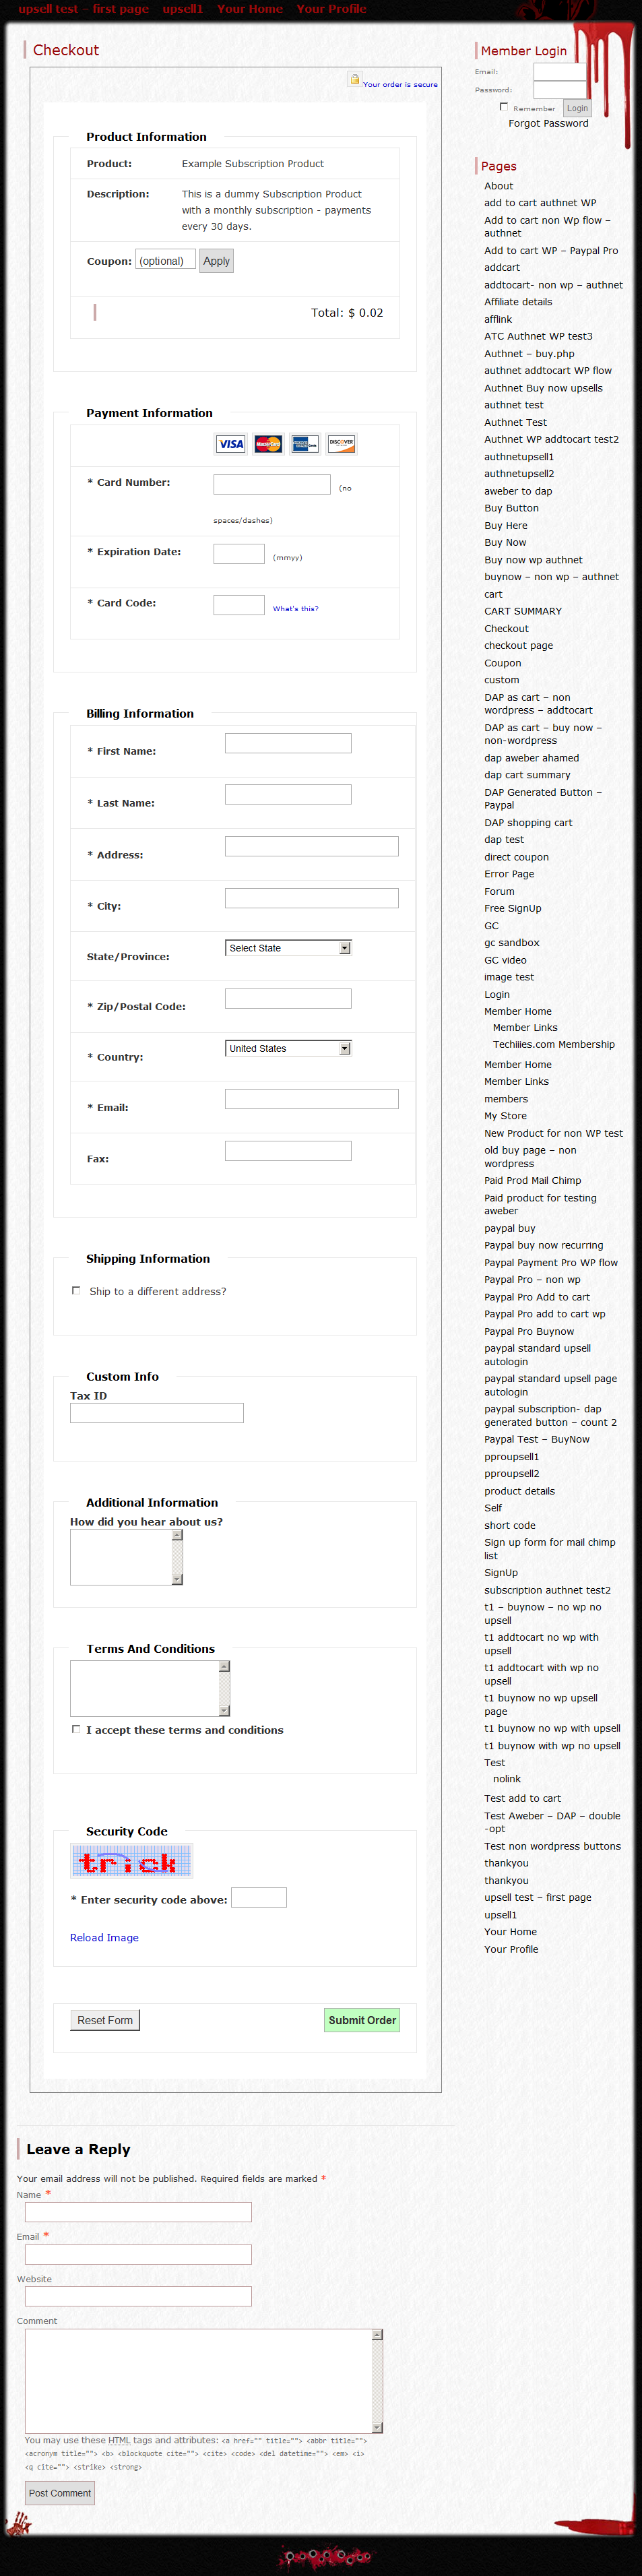
A) Checkout page – BuyNow button – NON-Wordpress version of the Checkout Page

As you can see, shipping info is not there in the checkout page and the ‘howdidyouhearaboutus‘, ‘comments‘, ‘terms&conditions‘ got added to the checkout page based on the settings in the Cart Options page above.
B) Checkout page – BuyNow button – WordPress version of the Checkout Page (on a test site with Mystique theme)

As you can see, the checkout page is now rendered withing a wordpress page. The fields – ‘howdidyouhearaboutus’, ‘comments’, ‘terms&conditions’ got added to the checkout page based on the settings in the Cart Options page above.
Say that these were your settings for ‘General Settings’ in the Cart Options page. These settings will be utilized if you use add-to-cart buttons.
Show “Coupon Code” Y
Show “How did you hear about us?” Y
Show “Comments” N
Show “Ship-To Address on Checkout” N
Show “Terms And Conditions” Y
Set “Terms And Conditions” – Please accept the terms&conditions by clicking on the checkbox.
Require “User Acceptance of Terms & Conditions” Y
Request “Phone” on Checkout? N
Request “Fax” on Checkout? N
Request “Address2” on Checkout? N
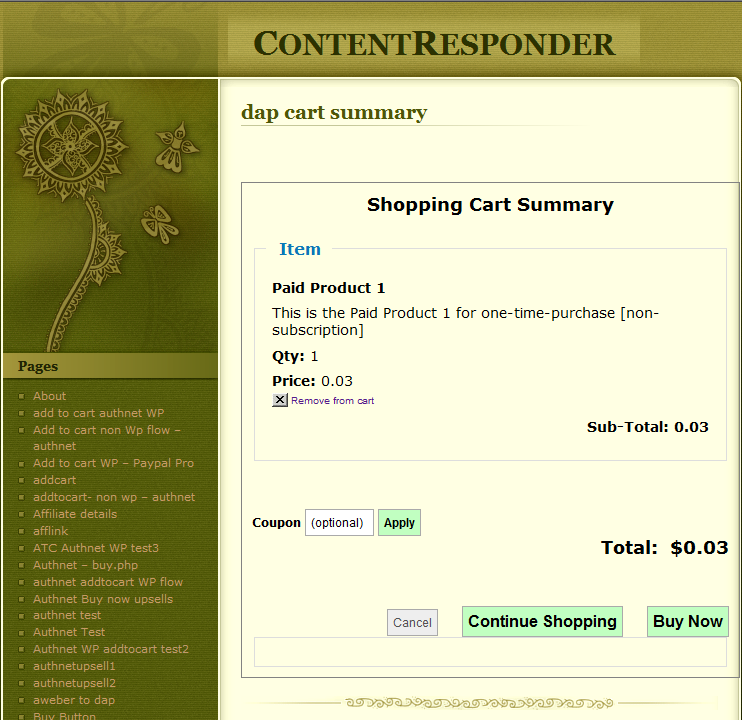
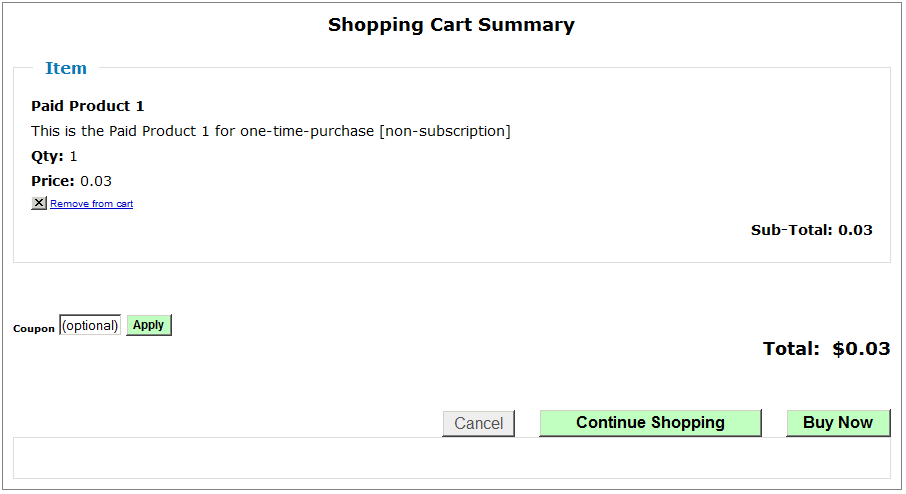
A) Checkout CONFIRM page – AddToCART button – NON-Wordpress version of the Checkout CONFIRMATION Page

As you can, the coupon option shows up on the checkout confirmation page as per the CART options above.
The coupon will be applied to each individual item in the cart.
The coupon will only be applied to the products that have been associated to the coupon in the dap admin => add/edit coupons page.
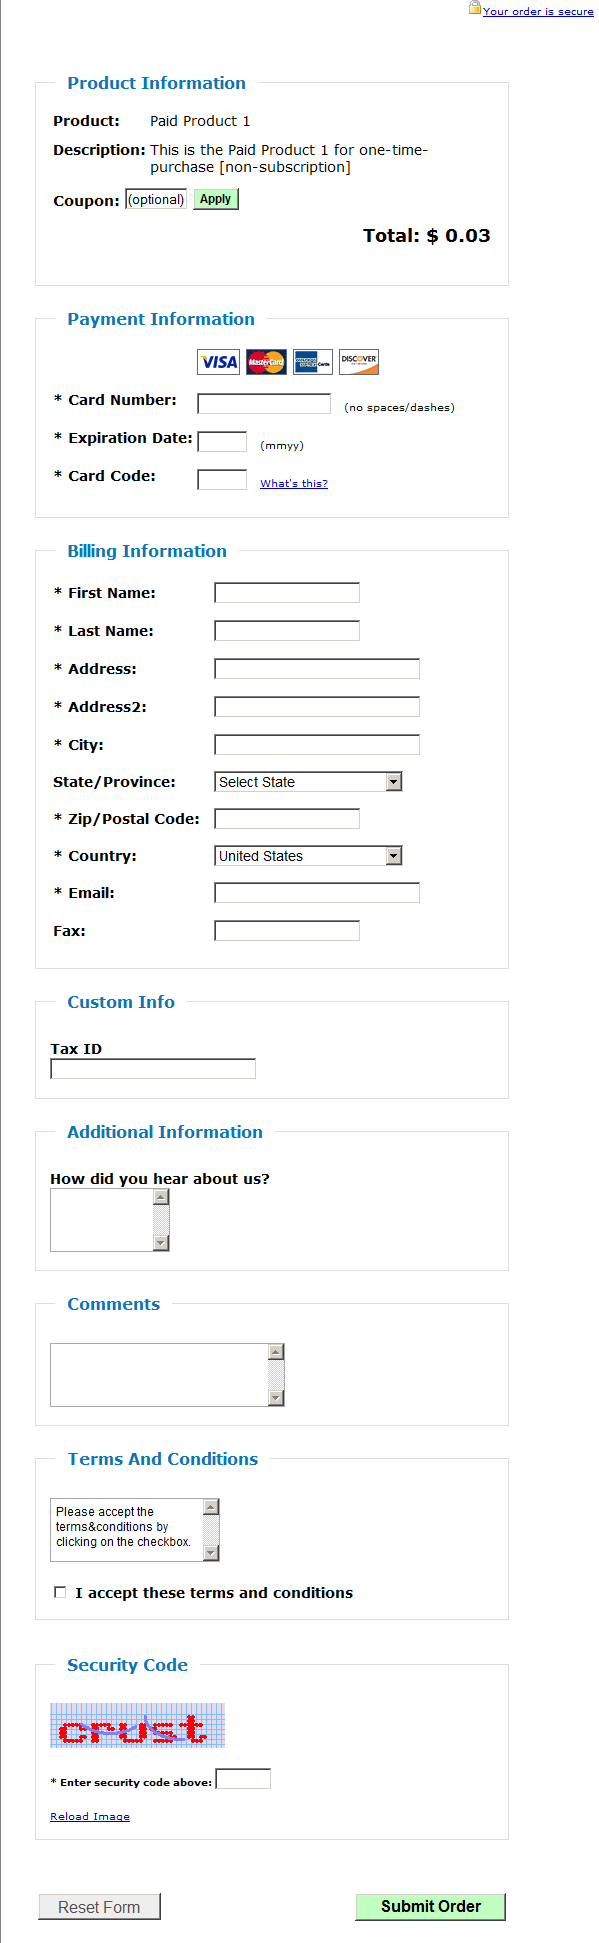
Now when the user clicks on the BuyNow button in the checkout confirmation page then the checkout page will show up like this :
(Checkout page – AddToCART button – NON-Wordpress version of the Checkout Page)

B) Checkout CONFIRM page – AddToCART button – WordPress version of the Checkout CONFIRMATION Page

Generate Authnet Buy Button
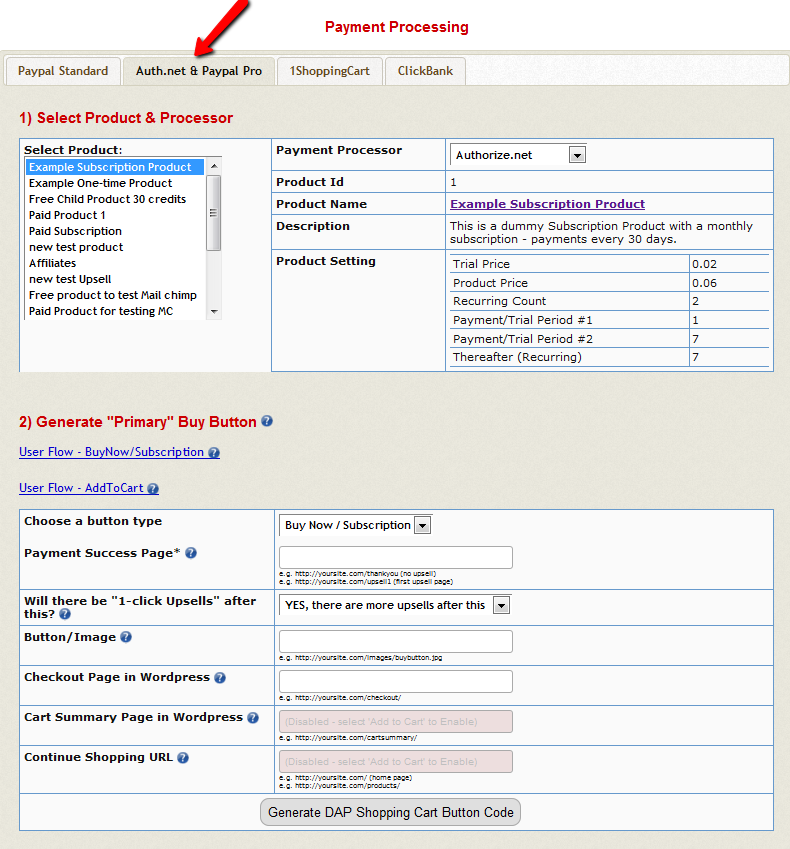
14. Now it’s time to generate a customized buynow or add-to-cart button. Go to DAP Payment Processing => Generate Buy Button page and click on the ‘Auth.net & Paypal Pro’ tab.
Here’s how the page looks:

Follow the steps on that page to complete the button generation.
Step 1 (select product & processor)
a) first select the product for which you want to generate the button
b) next select the payment processor (set it to authorize.net if you want to use authorize.net as your payment gateway).
Step 2 (generate primary buy button)
a) Now you can generate the button code. First select the button type (addtocart or buynow). Use buynow for subscription products as well as one-time buy products.
b) The Payment Success Page/URL is very critial part of shopping cart flow. DAP uses the URL set in this field to redirect users upon purchase to that page. If you do not want to offer upsells and just want to use basic shopping cart feature without upsells, then just set the URL of your thankyou page in this field. DAP will automatically login the users upon purchase completion to their membership area and then redirect users to whatever you set in the Payment Success Page. If you do want to offer upsells, then set the payment success page to the URL of the first upsell page in the flow.
Ex – http://yoursite.com/thankyou
Ex – http://yoursite.com/myupsellpage
c) Button/Image
If you set the Button/Image to point to the location of buynow or addtocart image, dap will use that image for the button.
Ex – /dap/image/buy.jpg
Ex – /dap/image/addtocart.jpg
If you do not have any image, then leave it blank.
d)
If you want the DAP checkout page (where users enter CC, address etc, to have your WordPress theme look & feel, instead of a basic HTML page’s look & feel, then create a WP page with the merge tag %%DAPCART%% in the page body, save it, and enter the URL of that page here.
Enter the full URL to the page here.
For ex – http://yoursite.com/checkout-page/ (note: this wordpress page just needs to have %%DAPCART%% )
This is how the page will look when it renders in wordpress (button type is ‘BuyNow’)
NOTE: If you leave the field empty, dap will use the non wordpress version of the checkout page.
e) Cart Summary Page in WordPress
Only needed if the button type is “Add To Cart“. Not needed for ‘BuyNow/Subscription‘ button.
If you want the “Add To Cart” Summary Page (where users can see all the cart items, quantity, amount etc) to have your WordPress theme’s look & feel, instead of a basic HTML page’s look & feel, then create a WordPress page with the merge tag %%DAPCARTSUMMARY%% in the page body, save it, and put the URL of that page here.
Enter the full URL to the page in this field.
This is how the page will look when it renders in wordpress for button type = AddtoCart.
You cannot leave this field empty for ‘addtocart’ buttons.
NOTE: If you leave the field empty, dap will use the non wordpress version of the summary page.
f)
Only applicable to button type = “Add To Cart“. Not used for ‘BuyNow/Subscription‘ button. This should contain the URL of the page to which you want to take the users if they add items to cart and then want to ‘go back to shopping’… they are not ready to checkout yet.
You can put the full url of the page where you have other ‘add-to-cart’ buttons so the user can continue shopping.
You cannot leave this field empty for ‘addtocart’ buttons.
=====================================
ALL SET.
Now generate the BuyNow /AddToCart / Subscription button HTML code for your product, which you can then directly paste into your sales page.
Note: The price, trial price, and recurring options are all taken from your Product settings from DAP products page.
authnet_buybutton_code
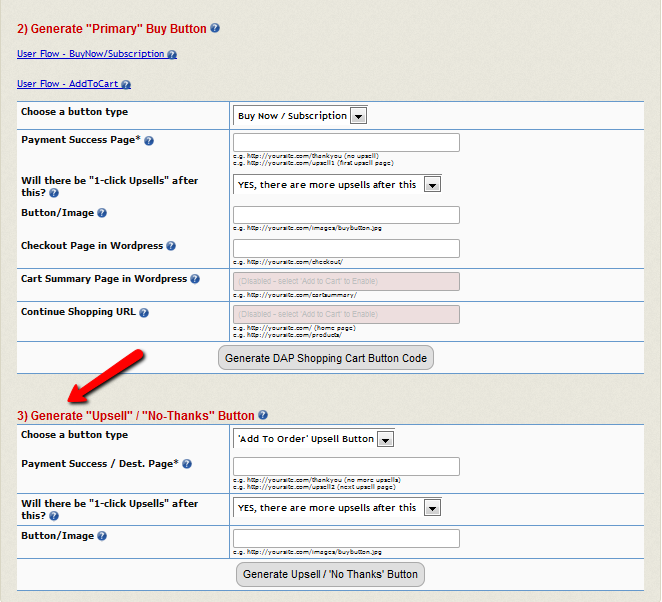
Generate Authnet Upsell Page Buy Button / No Thanks code
15. If you’re doing upsells, the only thing you need to do is, set the “payment_succ_page” field in button code generated above to the upsell page.
for ex – Payment Succ Page URL = https://yoursite.com/myupsellpage
Now to generate the button code for the upsell page, go to DAP Admin => Payment Processing => Generate Buy Button page. Click on Auth.net & Paypal Pro tab.
Then go to section 3 – Generate “Upsell” / “No-Thanks” Button
a) Choose the right button type –
AddtoOrder (to allow the user to add the upsell item to cart) OR
No Thanks (the upsell item on this upsell page will be ignored, the transaction will be completed with the current cart items).
b)
User is directed after ‘AddToOrder’ or after ‘No, Thanks’ to whatever you set in the Payment Succ Page. If you want to offer more upsells, then set the url of the next upsell page in this field. DAP will first add this order to the cart, then redirect users to the next upsell page. If no more upsells, you can set the url of the thankyou page in this field. DAP will first add this order to the cart, then redirect users to the thankyou page.
For ‘No, Thanks’, you can set the url of the next upsell page in this field or set the URL of final thankyou page in this field. If the URL of next upsell page is set, DAP will just ignore the current product being upsold to the user and redirect user to the next upsell page. If no more upsells, you can set the url of the FINAL thankyou page in this field. DAP will redirect users to the thankyou page.
NOTE:
You can repeat this process for unlimited upsells, downsells and one-time offers. No limits.
Product Price:
For a 1-time purchase product, this is the product’s purchase price. For a recurring product, this is the “recurring” price (what the customer gets charged month after month).
B) Trial Amount: This is only if there’s a trial amount. If no trial, leave this empty.
C) Recurring Count: How long is your subscription? If you said “Forever”, then enter the number 9999 here. If it ends after 6 months, then enter 6 here.
16. Set these fields to valid values.
17. NOTE: The DAP Authorize.net allows 1 trial. So in the recurring cycle fields, make sure “Payment/Trial Period #2” and “Payment/Trial Period #3” are both the same (set to same number of days: like 30). Example below shows the setting for a “7 day” trial period, followed by recurring payments every “30 days”.
authnet_recurring_cycle
18. If you are not offering a trial, then just set the Trial Amount to $0.00. But if you really wanted to offer a FREE TRIAL, then you must set the Trial Amount to at least $0.01 (1 penny).
19. Once you’ve saved the product, you can now click on any of the two new “Generate… Button Code” links that are located right below the product list combo box.
newproductspage2
That’s it. The upsell page can be a wordpress page or a static HTML page.
While it looks like a LOT of steps, that is only because we have to explain the steps in detail so they are clear. In reality, it is very simple to set up, and starting from scratch, if you have DAP & SSL already installed, it shouldn’t take you more than 1/2 hour to set up your 1-Click Upsells/Downsells/OTO’s. And if you’re not using Upsells/Downsells, then it can be done even faster.
If you have any further questions, feel free to open a support ticket, and we will assist you in getting this going.
| Content entered here will appear under the Terms And Conditions on the checkout page. | ||
In DAP 4.2, we have added the support for admin defined custom-fields. You can define your own custom fields in DAP admin panel, accept/store the custom fields via DAP Free Signup/Registration form and it can be viewed/managed in the DAP admin panel.
We have also added the ability to allow the admins to refer to the custom field values via merge tags within DAP email messages (auto-responder/broadcast).
Here’s a screenshot of the DAP admin panel => Users => Custom Fields page.
(Click to enlarge)

Here’s the steps to define your own ‘custom’ field in DAP admin panel => Users => Custom Fields page.
Step 1: Database Field Name
Define the fieldname. DAP will use the name defined here to manage this field. The database field name is also used within the dap direct signup form/html so when the user’s enter a value for the field during sign-up, DAP will store it in the right database field.
If you want to accept any custom field via the DAP direct signup form, then use the database field name defined here as the field name in the direct signup HTML code generated from DAP products page.
Ex –
<tr>
<td>Tax ID:</td>
<td>
<input type=”text” name=”custom_tax” size=”10″></td>
</tr>
<tr>
Step 2: Label (will appear on User-Facing Pages)
The Label will appear on the user’s profile page. The database field name is only for internal use… the label is what the user’s will see.
Screenshot of user profile page with sample custom fields – Social Security and Tax ID.
Here the label names are Social Security and Tax ID.
(Click to enlarge)

Step 3: Description
Just for Admin User to describe the custom fields. Not displayed to the user.
Step 4: Show Field Only To Admin
NOTE: If you want the users to see and update the custom field, set ‘Show Field Only To Admin’ to ‘N’.
If this is set to “Y”, then only admin will see this field in the DAP admin -> manage users page (when you click on the user’s name).
Say you want to include a field called “Tax Id” in your Free Signup Form that you generated in DAP Products page.
So first define a custom field with the database field name tax_id in the Custom Fields page in DAP Admin (as shown above).
Here’s the default free signup form code generated from dap products page (if your form code looks different, see the last section at the end of this post).
<div id=”stylized” class=”dap_direct_signup_form”>
<form id=”dap_direct_signup” name=”dap_direct_signup” method=”post” action=”http://techizens.com/dap/signup_submit.php”>
<label>First Name</label>
<input type=”text” name=”first_name” id=”first_name” />
<label>Email</label>
<input type=”text” name=”email” id=”email” />
<button type=”submit”>Sign Up</button>
<input type=”hidden” name=”productId” value=”1″ />
<input type=”hidden” name=”redirect” value=”http://yoursite.com/login/?msg=SUCCESS_CREATION” />
</form>
</div>
Just add this to the signup form code:
<label>Tax Id</label>
<input type=”text” name=”custom_tax_id” id=”custom_tax_id” />
So basically, you add the word ‘custom_‘ in front of the custom field’s database field name. So if the database field name is “tax_id“, then in the form, it becomes custom_tax_id (as you see above)
So your final free signup form will look like this:
<div id=”stylized” class=”dap_direct_signup_form”>
<form id=”dap_direct_signup” name=”dap_direct_signup” method=”post” action=”http://techizens.com/dap/signup_submit.php”>
<label>First Name</label>
<input type=”text” name=”first_name” id=”first_name” />
<label>Email</label>
<input type=”text” name=”email” id=”email” />
<label>Tax Id</label>
<input type=”text” name=”custom_tax_id” id=”custom_tax_id” />
<button type=”submit”>Sign Up</button>
<input type=”hidden” name=”productId” value=”1″ />
<input type=”hidden” name=”redirect” value=”http://yoursite.com/login/?msg=SUCCESS_CREATION” />
</form>
</div>
That’s it.
Put the signup form code on your WP page/post/sidebar, and the form is displayed like this…

You can do the same for each custom field you want to accept in the dap free signup form:
1) Create the custom field in DAP Admin -> Users -> Custom Fields Page
2) Add the field to the free signup form as shown in the example above for tax_id.
You can display the value of the user’s own custom fields on your pages, using the merge tag like this:
%%DAPCUSTOMFIELD_tax_id%%
You can send custom field values in the DAP emails by using merge tags like this – %%custom_tax_id%%
Add ‘custom_’ in front of the custom field’s database field name.
So if you have defined a custom field called tax_id in your database, to include this field in the autoresponder/broadcast email, just add this – %%custom_tax_id%% to the body of your email.
That’s it. When the user receives the email, dap will automatically replace the merge tag with the user’s tax id value.
So if your email message body contains the following text:
Your Tax Id: %%custom_tax_id%%
When the user receives the message, it will look like this (in this example, the user’s taxId = 9999):
Your Tax Id: 9999
If you are using an older version of DAP < 4.4.3, then see the section below.
Your default code will look like this…
<form name=”dap_direct_signup” method=”post” action=”http://contentresponder.com/dap/signup_submit.php”>
<table>
<tr> <td>First Name: </td> <td><input type=”text” name=”first_name” size=”10″></td></tr>
<tr> <td>Email:</td> <td><input type=”text” name=”email” size=”10″></td></tr>
<tr> <td colspan=”2″><input type=”submit” name=”Submit” value=”Sign Up”></td></tr>
</table>
<input type=”hidden” name=”productId” value=”1″><input type=”hidden” name=”redirect” value=”/blog/login?msg=SUCCESS_CREATION”>
</form>
Add this to your code
<tr>
<td>Tax ID:</td>
<td>
<input type=”text” name=”custom_tax_id” size=”10″></td>
</tr>
<tr>
Final version looks like this
<form name=”dap_direct_signup” method=”post” action=”http://contentresponder.com/dap/signup_submit.php”>
<table>
<tr> <td>First Name: </td> <td><input type=”text” name=”first_name” size=”10″></td></tr>
<tr> <td>Email:</td> <td><input type=”text” name=”email” size=”10″></td></tr>
<tr> <td>Tax ID:</td> <td><input type=”text” name=”tax_id” size=”10″></td></tr>
<tr> <td colspan=”2″><input type=”submit” name=”Submit” value=”Sign Up”></td></tr>
</table>
<input type=”hidden” name=”productId” value=”1″><input type=”hidden” name=”redirect” value=”http://yoursite.com/login/?msg=SUCCESS_CREATION”>
</form>