4

User & Product Statuses

DAP assigns a status for the User itself (at a global, account level), as well as a User/Product level (specific to the user's access to that product).

So there's the User Status and then the User/Product Status

For eg., the User Status may be "Active", but a specific User/Product status may be "Inactive" – which means user can log in to their account, receive emails, etc, but cannot access any content that is part of this specific product (though they can access all other products they may have, that are "Active").

The bottom-line is this: In order for a user to access his/her account, and all the content in the Products that he/she's purchased, all the statuses have to be Active.

So here are the possible statuses, and what they mean.

User Status

These statuses apply to the User's account itself.

Inactive

If the user's status is inactive, then that means the user's entire account is inactive. User will not be able to even log in to their account. All outgoing broadcast and autoresponder emails will "exclude" them from the list, and they will not receive any emails from the system.

Active

Account is accessible, all emails are being sent.

Unconfirmed

They've just signed up for a product that requires "Double Optin". Which means, unless they "confirm" by clicking on the double-optin link, their account will not become active. Please note that once a user has already confirmed the double-optin link for one product, then their "User" status automatically becomes "Active". So even if they go on to sign up for another double-optin product, then their User status will never again change to "Unconfirmed" (unless specifically set so by the DAP Admin). For all future double-optin products, it is this user's "User/Product" status that will be "Unconfirmed", while the main "User" status remains "Active".


Locked

When an account receives login attempts from more than the number of IP addresses set in the "Setup > Config > Advanced > Max. # of User Logins From Different IP`s" field, then that user's main User status is changed to be "Locked". This is very similar to the "Inactive" status, except named different just so admin can distinguish between "Locked" and other users.


User/Product Status

These statuses specifically apply to a User's access with relation to a specific Product.

Inactive

User cannot access any content that is part of this product. However, User may access other products whose user/product status is "Active".

Active

There are no restrictions for this User to access content that is part of this product (of course, only whatever the user is eligible to see, based on the drip setup).

Troubleshooting Login Errors

Problem: When you go to http://YourSite.com/dap/ , you get redirected to a "Page Not Found – 404" error page.

Solution: This is happening because in DAP Config, you probably set up an invalid URL to be the default login page. So do this:

  • First, log out of DAP by going to http://yoursite.com/dap/logout.php (manually type that in to your browser)
  • Now log in to DAP via DAP's special login page – http://YourSite.com/dap/login.php
  • Go to "Setup > Config > Advanced" screen
  • Then where it says "Location of your login page (eg., if using WordPress). Should start with a forward slash (`/`)" – enter a valid URL there. Before entering any URL there, visit the URL separately in a separate browser tab (or window) and make sure you can actually get to it, and that it has a login form there. Then put that URL in to the above field, and click on "Update".
  • Now in a separate browser (totally different browser) where you are not logged in to DAP or WP, try to go to http://YourSite.com/dap/ and see if it redirects to the right page. If not, revisit the steps above, and double check the login URL, that's all.
12

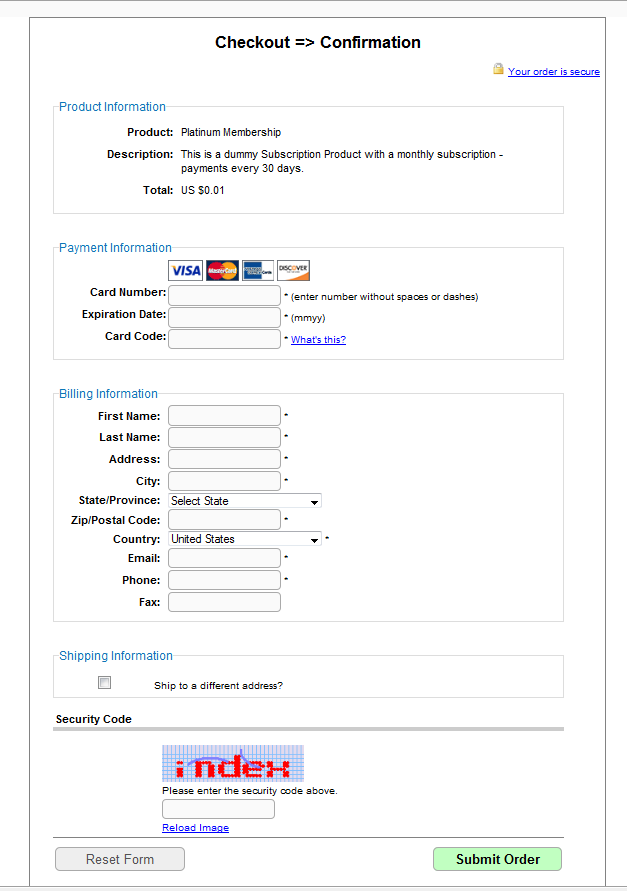
DAP Shopping Cart Checkout page

Here’s a screen-shot of how the DAP checkout page looks if you use the DAP internal shopping cart.

You can always add your own header (/dap/inc/cartheader.php) and footer (/dap/inc/cartfooter.php) to the checkout page.


1SiteAutomation.com Upsell Express

DAP integrates with 1SiteAutomation.com‘s (our private label of 1shoppingcart) Upsell Express.

So if you are using 1Shoppingcart or our private label 1SiteAutomation.com to accept payments, then you cannot use DAP’s own free Upsell-Tree plugin. You will have to sign-up for 1SiteAutomation.com’s Upsell Express add on, which has a monthly fee associated with it.

Don’t have a 1shoppingcart account yet, and thinking of signing up for one? You certainly don’t want to do that till you check out our “Get DAP For Free” offer.

2

DAP-1SC Login Xpress

DAP Supports instant auto-login to the member’s area immediately after completing the 1ShoppingCart (or private label) purchase. We call this Login Xpress with 1ShoppingCart (Read more about Login Xpress)

The documentation below will show you how to setup 1ShoppingCart and DAP, so that your buyers can be automatically logged in to your “Member’s Area” upon completion of their purchase.

Note About Processing Recurring Orders via 1SC

If you only sell ONE-TIME products at this time, then the Login Xpress flow below is all you will need to setup as far DAP & 1SC integration is concerned.

If you are selling RECURRING products via 1SC , but DO NOT WANT your users to be automatically logged in to the “Members’ Area” right after their purchase, and you prefer sending them their membership login info (email & password) via email, then you DO NOT need to read this post any further – simply head over to this post: 1ShoppingCart Recurring Payment Processing via Email

But if you sell RECURRING products via 1SC and you DO WANT your users to be automatically logged in to the “Members’ Area” right after their purchase, then continue reading this post for Login Xpress setup.

Login Xpress Setup

1) Set up your sales page as you would normally do when accepting payment through 1ShoppingCart.

Make sure to use the exact same Product Name in 1SC as well as within DAP.

So, if you set up a product called “Platinum Members” within DAP, then use the exact same namePlatinum Members” as your 1SC  product name. In fact, just to be sure, copy the product name from DAP and paste it into the product name field within 1SC (or vice-versa). That way, there will be no typos.

2) Log in to your 1ShoppingCart account.

Go to Products > Manage Products. Edit the Product you are setting up.

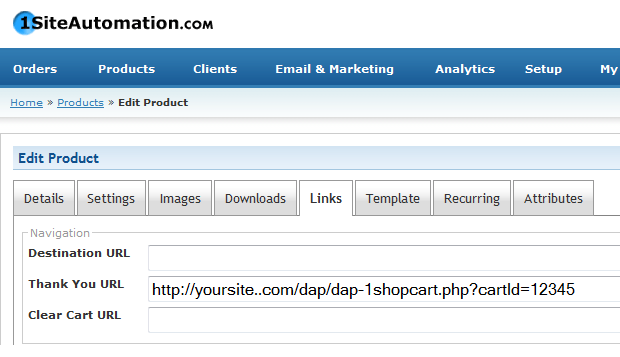
Go to the “Links” tab of that Product.

Set up the Thank You URL to point to this DAP script on your site, as shown below:

http://YourSite.com/dap/dap-1shopcart.php?cartId=SecretKey

YourSite.com should be replaced by the name of your site

SecretKey should be set to the same value that you set in  DAP Dashboard > Setup > Config > Secret Key For Payment Processing

This secret key can be alphanumeric. No special characters or spaces.

For eg., if you set Secret Key For Payment Processing in DAP to be 12345

Then your 1ShoppingCart Thank You URL would look like this:

http://YourSite.com/dap/dap-1shopcart.php?cartId=12345

DAP Secret Key Setup (under DAP Admin > Setup > Config)

3) Now open a brand new browser session where you are not logged in as DAP admin or WP admin.  Complete a test purchase using an email id that is not already in your DAP.  If the integration worked correctly, then a new user account will automatically get created in DAP, and you (the buyer) will also be automatically logged in to DAP, and will be redirected to one of the following URL’s:

a) If this buyer has access to just 1 product, then user will be redirected to the Post-Login URL set up under that Product, at DAP Admin > Products > Manage

-OR-

b) If this buyer has previously purchased other products, then for security reasons, buyer will be redirected to the login URL that you have set up under DAP Admin > Setup > Config > Login URL. And at the same time, the buyer will be sent the Welcome Email from the Product’s settings.

Redirecting To A Custom URL After Checkout

The above setup will log new members right into the member’s area immediately after completing their purchase through your 1SiteAutomation.com or 1Shoppingcart check out page.

But if you wanted them to be redirected to a different page of your choice after the purchase, then set up the thank-you URL like this:

http://YourSite.com/dap/dap-1shopcart.php?cartId=SecretKey&redirect=yoursite.com/another-page/

So basically you are just adding the text in red to the end of the standard DAP/1SC thank-you page URL.

Now note that even though user is being redirected to “another-page” in the above example, they have been logged in to your membership site already. So if you publish a link to your member’s area somewhere on “another-page”,  then they can go right to that page without having to log in, because they’re already auto-logged in at this point.

NOTE:

If you are setting up a recurring subscription product, then after completing the above Login Xpress set up, next step is to set up DAP to process RECURRING payment notifications from 1SC as described here.

Un-Installing & De-Activating DAP

While DAP is extremely well integrated with WordPress, all of that integration is achieved via code, and not the back-end database.

DAP stores all of your member and product and content information in its own database tables. It does not store anything in your wordpress database, or modify it in any way.

So when you stop using DAP, your wordpress blog (i.e, data) goes back to being what it was before DAP was ever installed. It’s like DAP was never installed. So disabling or removing DAP from your site will not affect your web site or blog in any way.

De-Activating DAP

It is ok to de-activate the DAP-WP-LiveLinks WordPress plugin either temporarily or permanently.

You will not lose any of the data stored in the DAP database. Everything will remain intact. Only thing to note is that de-activating the plugin will “un-protect” all protected content on your blog during that time, and all of the protected content now becomes “publicly viewable”. You may enable all of the content protection simply by re-activating the plugin.

Un-Installing & Removing DAP

For this, there are couple of steps:

  1. De-activate the DAP-WP-LiveLinks plugin
  2. Delete the DAP-WP-LiveLinks folder from wp-content/plugins/
  3. Open the .htaccess file in your root folder of your web site. You should see a few lines in there related to DAP. It should look something like this…

    #—– START DAP —–
    RewriteCond %{REQUEST_FILENAME} -f
    RewriteCond %{REQUEST_FILENAME} !-d
    RewriteCond %{REQUEST_FILENAME} (.*)/wp-content/uploads/(.*)
    RewriteCond %{REQUEST_FILENAME} !(.*)(\.php|\.css|\.js|\.jpg|\.gif|\.png|\.txt)$
    RewriteRule (.*) /dap/client/website/dapclient.php?dapref=%{REQUEST_URI}&plug=wp&%{QUERY_STRING}  [L] #—– END DAP —–

  4. Just delete all of the above lines, and re-upload the .htaccess file back to your site root folder.
  5. Delete the “dap” folder from the root of your web site.
  6. If you wish to also delete the dap tables from your database, then you must log in to your web hosting control panel, go to your database via the “phpMyAdmin” link, and then “drop” all of the database tables that start with “dap_”. That will delete all the DAP database tables and the data within.
  7. Finally, go in to your web hosting cpanel, go to the “Cron” section, and remove any cron jobs related to dap (you’ll see towards the end of the cron job text fields, that the script running will either be dap-cron.php and/or dap-emailorder.php.

Unplugging Your Payment Systems

Make sure your payment systems (like Paypal and Authorize.net) and shopping carts (like 1ShoppingCart or Infusionsoft) are no longer notifying DAP when payments come in.

Go to our documentation section, look for the setup documentation specific to your payment processor, and then do the opposite – basically just un-do whatever is in the setup – the reverse of whatever is the actual setup process.


DAP does not modify any wordpress tables. So deleting DAP tables won’t affect your wordpress installation.
14

vBulletin FAQ / Usecases

1) Can I import my existing vB users to DAP with their existing vB username ?

Answer.

Sure. If you want to import your existing VB users to DAP, then you can go to DAP Add Users ->Bulk-Add Multiple Users To A Product and add the users to be imported in CSV format.

Format: Email, First Name, Last Name (optional), User Name (optional – used for VB only)

For ex:
joe1@webmasterinabox.net,joe,,smith (here lastname is empty)
joe2@webmasterinabox.net,joe,smith,joesmith2 (here lastname = smith and username=joesmith2)
joe3@webmasterinabox.net,joe (here both lastname and username are empty)
joe4@webmasterinabox.net,joe,smith (here username is empty)

When you complete the bulk add, these users will be added to DAP System -> Job Queue. When the DAP cron runs at the top of the hour, it will add these users to DAP and sync to VB.

You can manually run cron by clicking on this link in the browser – http://www.yoursite.com/dap/dap-cron.php

Note: Replace yoursite.com above with the name of your site

Make sure you setup the FORUM rules in DAP Product -> VB forum Mapping BEFORE you import the users to DAP.

2) Can I configure DAP to automatically create users in vB when they purchase a membership product?

Answer.

Sure. In /dap/dap-config.php, update the following setting to “Y”
define (‘AUTO_CREATE_VB_ACCOUNT_UPON_DAP_REG’, ‘Y’);

Note:
If the value is not set to “Y”, then by default DAP will NOT auto-create user accounts in VB.
If the value is set to “Y”, then this is how it will work.

1. When a new user is created in DAP, DAP will try to use the user’s firstname.lastname to create a VB user account automatically for the user.

2. If in step #1, DAP was able to successfully create / sync username to VB, then the username will also be updated in DAP.

You can check that in DAP profile page (click on User’s fullname in DAP manager users page to go to user’s profile settings).

3. If in step #1, DAP was NOT able to successfully create / sync username (= firstname.lastname) to VB (because the username was already taken by another user), then the username will be empty in DAP. You can check that in DAP profile page.

4. If the username is already set in DAP, then the user CANNOT change it.

5. If the username is already set in DAP, then the user can request the DAP Admin to change it.

6. The DAP admin can change an existing user’s vB username by going to DAP admin panel -> Manage Users -> Click on users fullname -> it will bring admin to the users profile page -> admin can update username to a different username

– if the username is being changed to an username that already exists in VB and is tied to the SAME email id as the one in DAP, then DAP will just sync the user to VB using the forum rules defined in DAP

– if the username is being changed to an username that already exists in VB but is tied to a DIFFERENT email id and DOES NOT match the one in DAP, then DAP will report an error that the new username is already in use (by a different user). It will not sync the user.

– if the username is blanked out in DAP, then it will be blanked out just in DAP. DAP will not erase the VB username/account.

Hope this helps.

If there are any issues:

Set DAP Setup -> config -> log level to 5

Go TO System -> logs -> Empty Log Content

Rerun the test case.

Send us the log snippet (from DAP system -> logs) for troubleshooting.

14

vBulletin Setup

Starting DAP v3.9, DAP supports full fledged integration with vBulletin forum. You can limit access to specific forums based on the users membership level.

We also offer full vBulletin installation and DAP->vBulletin integration services. Contact Us for more details

You can download DAP 3.9 from your membership area.

Click here to download latest version of DAP

Here’s how you can enable DAP->vBulletin integration:

1. Install vB on your site per this documentation


Note: vBulletin 4.0 and higher requires PHP 5.2.0 or greater and MySQL 4.1.0 or greater

2. You can install VB in a completely new database, or it can be installed in your existing WP/DAP database.

3. Login to your VB admin panel

For Ex – http://www.yoursite.com/forum/admincp/index.php

Update the cookie domain setting under Setting Options => Cookie and HTTP Header Options

Use Custom setting and update the cookie domain to yoursite.com.

For ex – if the name of the site is contentresponder.com, then the cookie domain should be set to contentresponder.com

Cookie Domain Setting

4. Update dap-config.php under the dap folder

Run the following command – http://www.yoursite.com/dap/getpath.php (replace yoursite.com with the name of your site)

Say that it returns – /home/crespond/contentresponder.com/dap

Just get rid of /dap and instead append your forum folder name – /home/crespond/contentresponder.com/forum

Now add the following lines to /dap/dap-config.php file

define(‘VBFORUMPATH’, ‘/home/crespond/contentresponder.com/forum’); // path to your forum

define (‘TABLE_PREFIX’, ‘vb_’); // vb table prefix in your database.

define (‘AUTO_CREATE_VB_ACCOUNT_UPON_DAP_REG’, ‘N’); //set value to ‘Y’ if you want DAP to auto-create user account in VB using firstname.lastname during DAP registration

Note:

1)  add the VBFORUMPATH and TABLE_PREFIX just above this line require_once(“dap-settings.php”); That’s it.

2) In the TABLE_PREFIX above, use the VB table prefix that you set in your VB config file (/includes/config.php in your forum folder).

If you set it to ”, then set it to ” in dap-config.php above.

define (‘TABLE_PREFIX’, ”);

It you set it to ‘vb’ in config.php during VB installation, then set it to ‘vb’ in dap-config.php as well.

define (‘TABLE_PREFIX’, ‘vb’);

VERY IMPORTANT:

Also, replace all occurrences of backticks (`) with single quote (‘) in all the define statements above. Even when we save this doc with single quote, wordpress converts it to backticks(`). So pls make sure  when you add the above define statements to dap-config.php, replace all ` with ‘.


Now go back to your DAP admin panel. You will find the vB forum option under Products/Levels.

BTW, there is a known vB issue that affects the running of command line cron stuff. Workaround for that is described here

Hope this helps.

For more details on vB, click here to see the video

4

Creating A Ready-Made Affiliate Toolbox

You already know that DAP has a built-in affiliate program, and everyone who joins your site (or gets a free or paid account) is automatically made into an “Instant Affiliate”.

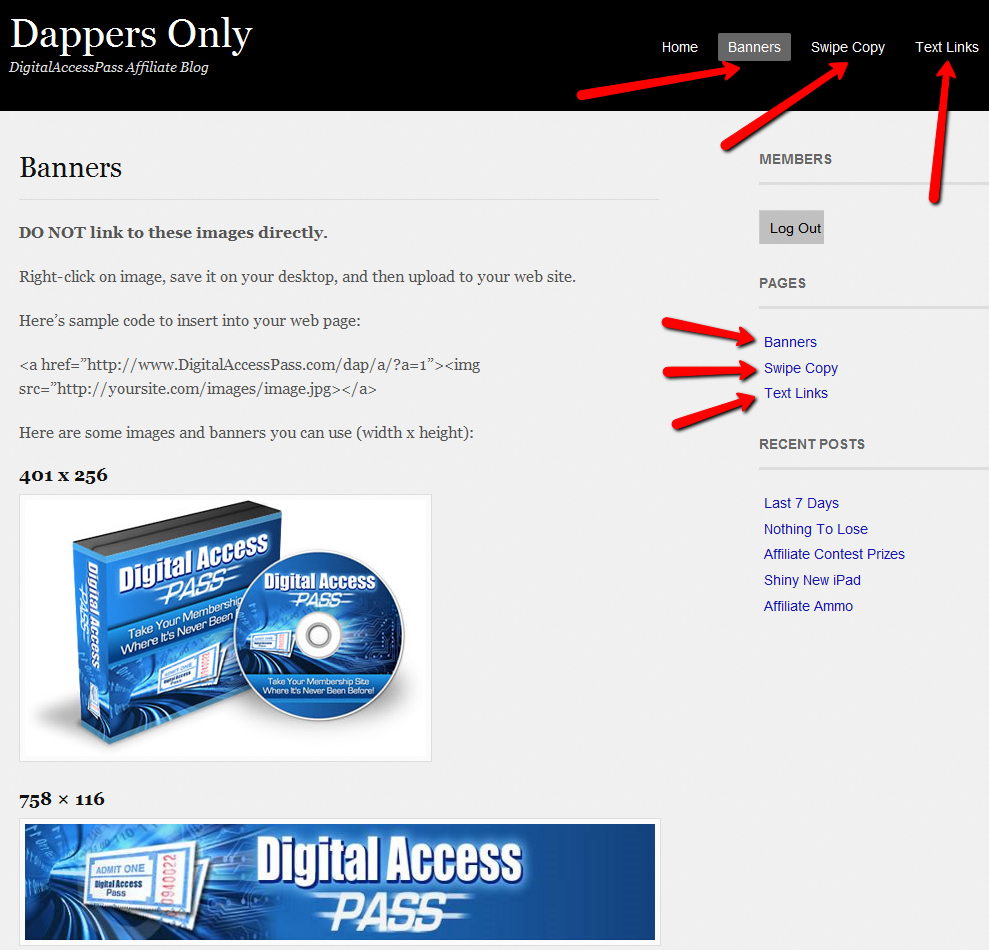
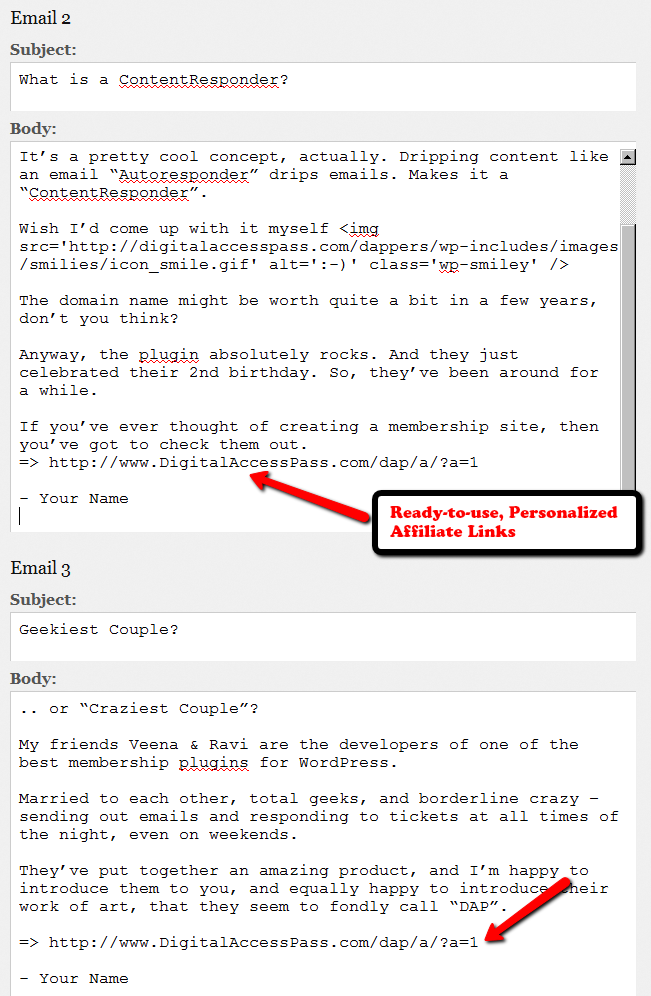
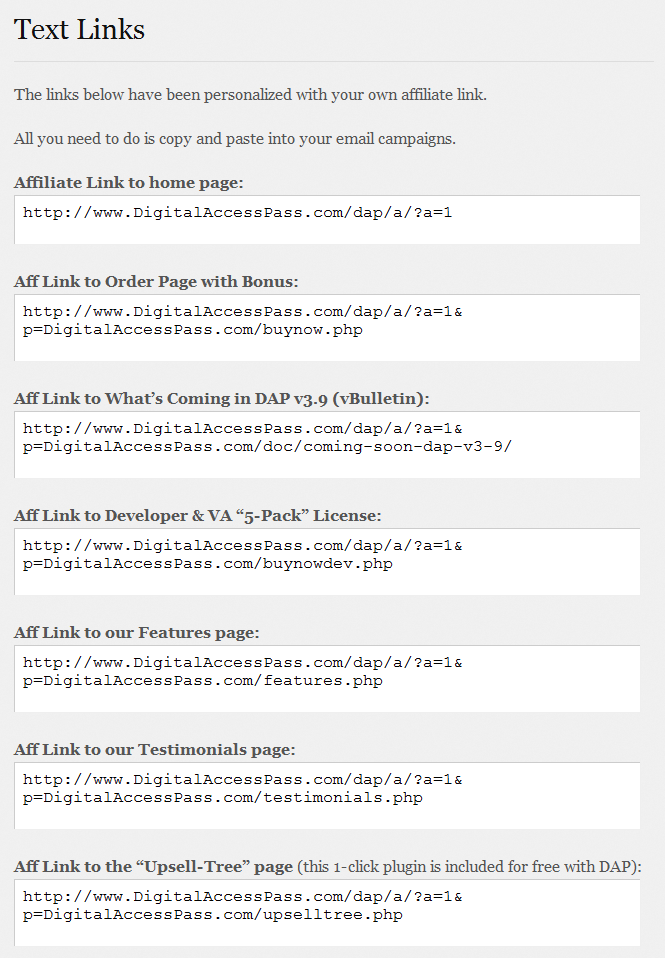
DAP also lets you create an Affiliate Tool Box for your affiliates, with ready-to-use banners, emails, subjects, signatures and text links – all with their own personalized affiliate link embedded into it already.

So all they have to do is copy, paste, and hit send.

See the sample screen-shots below that show what our own affiliate tool box looks for DAP affiliates who wish to promote DigitalAccessPass.com to others.

Banners

Email Copy

Text Links


How To Create The Affiliate Tool Box

Create as many different pages you want on your blog – like “Banners”, “Email Swipe Copy” or “Text Links”.

Or create just one big page for all of this – like “Affiliate Tool Box”.

Download this text file which has all of the ready-made HTML code that you need to insert into the WordPress pages.

Feel free to modify the text as required, and be careful not to delete any of the special characters that are in there just for the formatting.

=> Download Sample Affiliate ToolBox Code

Troubleshooting Bulk-Add & Bulk-Import Of Users

Issue: You tried to bulk-add users to DAP (i.e., a bulk-import), and it is not working. No users have been added to the system.

Possible Solutions & Troubleshooting Tips

1. CSV File created?

First check if there's a .csv file that has been created in the folder /dap/bulk/ on your server. If there's more than one .csv file in there (from a previous import/bulk-add), then see if there's a file whose timestamp is close to the time when you actually did the "Users > Add > Bulk-add Multiple Users To A Product" action.

If there's no .csv file, then it's possible that the folder doesn't have the right permissions for DAP to be able to create the file. So CHMOD the "bulk" folder (in /dap/ folder) to 755. Then re-try the bulk-add again.

2. Is Cron job running?

You see a .csv file in there sitting for a few hours, but none of the users inside the .csv file have been added to DAP.

It's possible that the hourly cron job has either not been set up at all, or may have been setup incorrectly. Make sure the cron is setup and running correctly.

See both these links:

i) Setting up Cron

ii) All about Cron

3. Error in CSV File

Sometimes, it is possible that the .csv file was actually created, but it was actually corrupt. And you won't know this until the cron runs and that specific bulk-add job shows an error.

When you look at the “System > Job Queue” screen, you see one line that shows this error…

Action: BulkAddCSVToProduct
Message: Error in CSV File

You were probably trying to to Bulk-Add Users to DAP. Or do a Broadcast email to a CSV file. In either case, there was an error in processing your request, because one of the following happened:

1) The CSV file could not be created in /dap/bulk/ folder because of a permission issue (try CHMOD 755), so when the cron task ran, it could not find the CSV file (or the file was corrupted for some reason).

2) The list of email addresses within the CSV file were not in the right format – Order should be: Email,FirstName,LastName ( LastName is optional)

How To Fix It

If a job fails, then there’s no way to “fix it and re-run it” right now. So you basically have to delete the job, and then submit a new one. So if a Bulk-Add job errors with the above message, then here’s what you need to do…

A) Click on the “Delete Jobs In Error” link on the “System > Job Queue” page. That will delete all jobs that have failed for whatever reason.

B) You should also clear out the /dap/bulk/ folder to make sure you delete any old, or errored out CSV files from that folder.

1 22 23 24 25 26 35