Creating A Ready-Made Affiliate Toolbox
You already know that DAP has a built-in affiliate program, and everyone who joins your site (or gets a free or paid account) is automatically made into an “Instant Affiliate”.
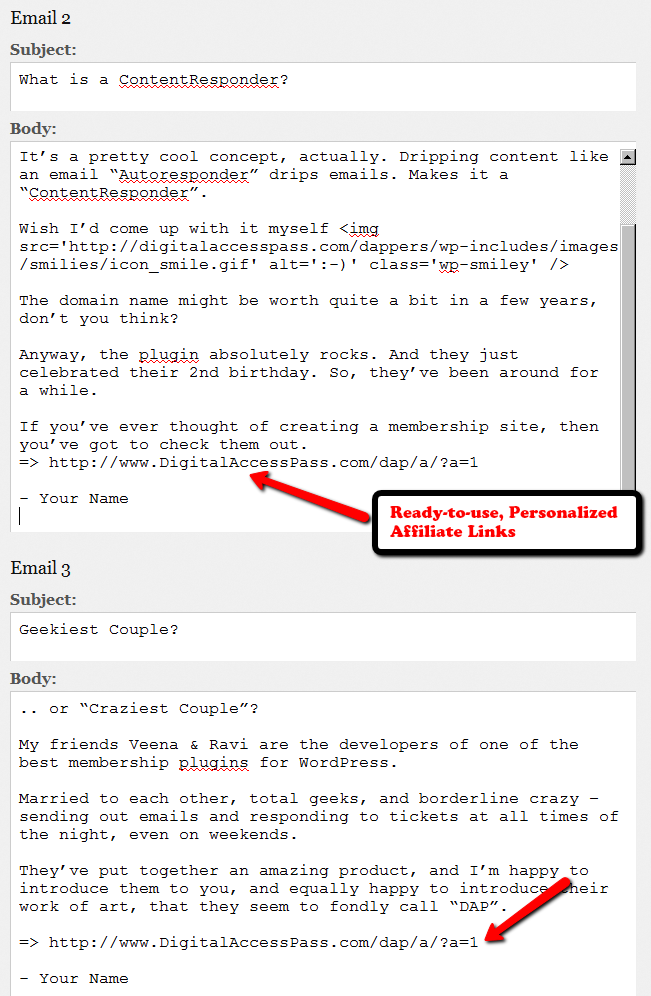
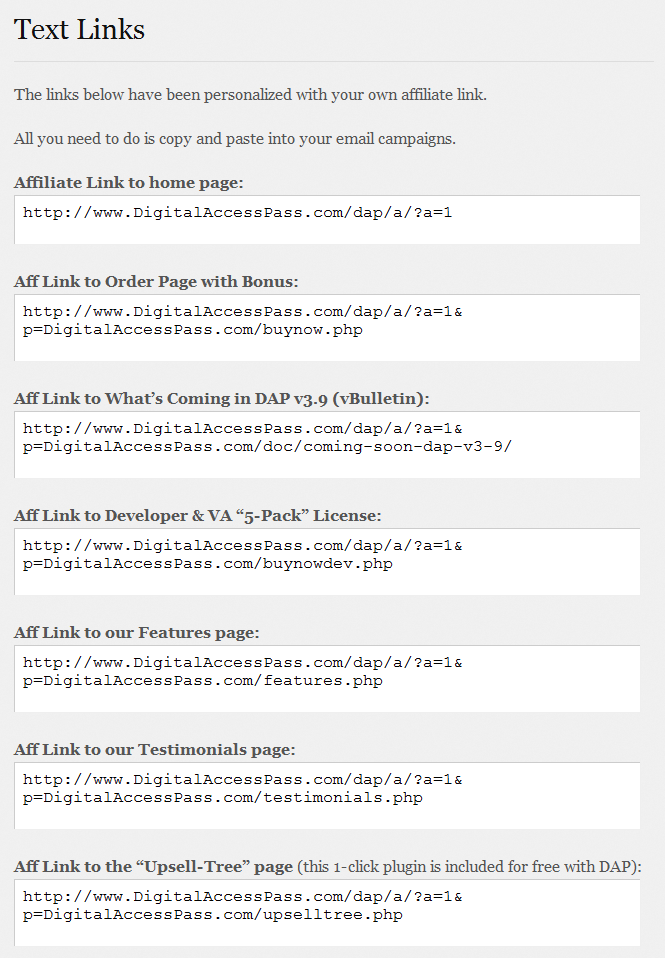
DAP also lets you create an Affiliate Tool Box for your affiliates, with ready-to-use banners, emails, subjects, signatures and text links – all with their own personalized affiliate link embedded into it already.
So all they have to do is copy, paste, and hit send.
See the sample screen-shots below that show what our own affiliate tool box looks for DAP affiliates who wish to promote DigitalAccessPass.com to others.
Banners
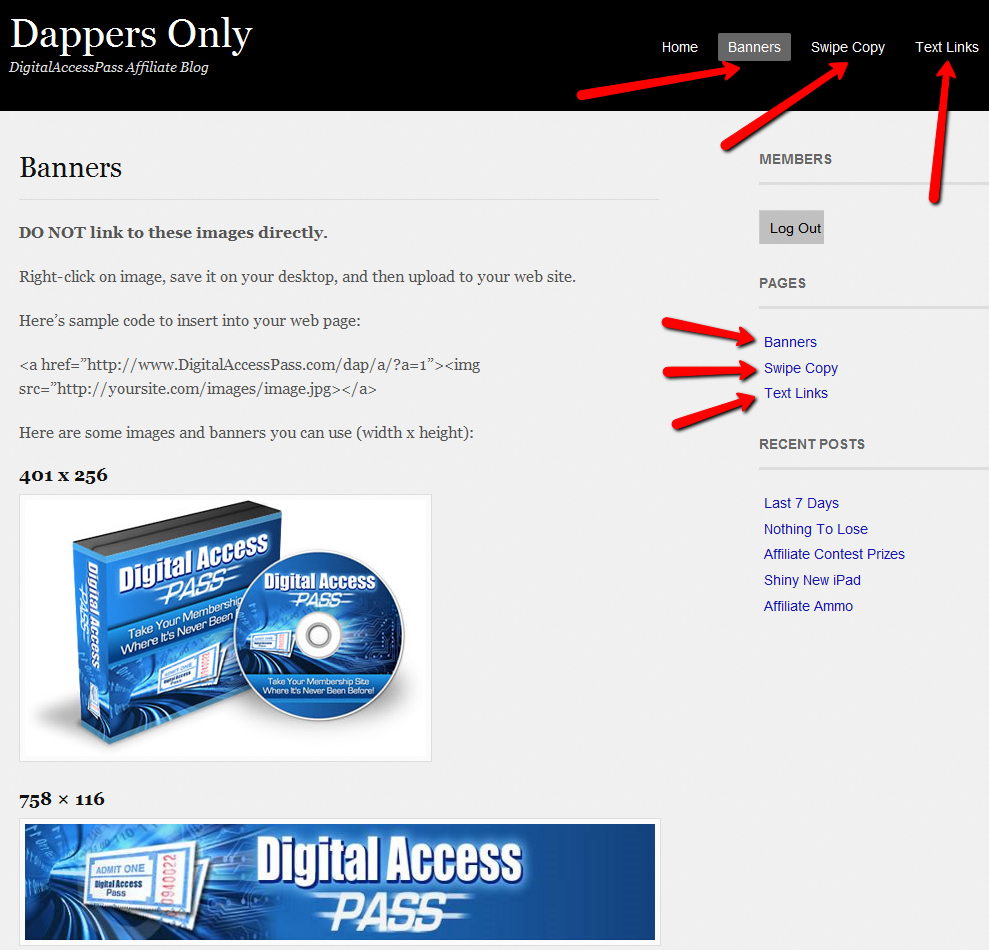
Email Copy
Text Links
How To Create The Affiliate Tool Box
Create as many different pages you want on your blog – like “Banners”, “Email Swipe Copy” or “Text Links”.
Or create just one big page for all of this – like “Affiliate Tool Box”.
Download this text file which has all of the ready-made HTML code that you need to insert into the WordPress pages.
Feel free to modify the text as required, and be careful not to delete any of the special characters that are in there just for the formatting.
=> Download Sample Affiliate ToolBox Code
Troubleshooting Bulk-Add & Bulk-Import Of Users
Issue: You tried to bulk-add users to DAP (i.e., a bulk-import), and it is not working. No users have been added to the system.
Possible Solutions & Troubleshooting Tips
1. CSV File created?
First check if there's a .csv file that has been created in the folder /dap/bulk/ on your server. If there's more than one .csv file in there (from a previous import/bulk-add), then see if there's a file whose timestamp is close to the time when you actually did the "Users > Add > Bulk-add Multiple Users To A Product" action.
If there's no .csv file, then it's possible that the folder doesn't have the right permissions for DAP to be able to create the file. So CHMOD the "bulk" folder (in /dap/ folder) to 755. Then re-try the bulk-add again.
2. Is Cron job running?
You see a .csv file in there sitting for a few hours, but none of the users inside the .csv file have been added to DAP.
It's possible that the hourly cron job has either not been set up at all, or may have been setup incorrectly. Make sure the cron is setup and running correctly.
See both these links:
3. Error in CSV File
Sometimes, it is possible that the .csv file was actually created, but it was actually corrupt. And you won't know this until the cron runs and that specific bulk-add job shows an error.
When you look at the “System > Job Queue” screen, you see one line that shows this error…
Action: BulkAddCSVToProduct
Message: Error in CSV File
You were probably trying to to Bulk-Add Users to DAP. Or do a Broadcast email to a CSV file. In either case, there was an error in processing your request, because one of the following happened:
1) The CSV file could not be created in /dap/bulk/ folder because of a permission issue (try CHMOD 755), so when the cron task ran, it could not find the CSV file (or the file was corrupted for some reason).
2) The list of email addresses within the CSV file were not in the right format – Order should be: Email,FirstName,LastName ( LastName is optional)
How To Fix It
If a job fails, then there’s no way to “fix it and re-run it” right now. So you basically have to delete the job, and then submit a new one. So if a Bulk-Add job errors with the above message, then here’s what you need to do…
A) Click on the “Delete Jobs In Error” link on the “System > Job Queue” page. That will delete all jobs that have failed for whatever reason.
B) You should also clear out the /dap/bulk/ folder to make sure you delete any old, or errored out CSV files from that folder.
DAP As A Global Content + Affiliate Hub
DAP can only protect content on the same domain where it is installed.
So, if you install DAP on SiteA.com, then DAP can only protect content (blog posts/pages and files) on SiteA.com.
If you install DAP on subdomain1.SiteA.com, then DAP can only protect content (blog posts/pages and files) on subdomain1.SiteA.com.
DAP on SiteA.com cannot protect content on SiteB.com.
DAP on SiteA.com cannot protect content on subdomain.SiteA.com.
Similarly, DAP installed on subdomain.SiteA.com cannot protect content on the main domain, SiteA.com
Now, let’s say you own a network of web sites, some sell a product, some sell a membership course, some sell a physical product, and some just exist to build a list.
So let’s say you have 10 sites in all.
And you want someone who’s an affiliate on Site A, to be an affiliate for all ten, and be able to get commissions if the person he referred goes on to purchase a product from any of your 10 web sites.
Yup, DAP can handle that. And here’s how…
Configuration #1
Summary: Parent.com has DAP. Your sales pages are all on different sites, like ChildA.com, ChildB.com and ChildC.com. But all buy buttons point right back to the main DAP site (Parent.com) and that’s where all buyers from all child sites are eventually added to, regardless of where the sale was initiated from. So all members are actually created on Parent.com, and that’s where everyone would log in to access the member content.
1) Install DAP on your main “Parent” site where you have all of your content that needs to be protected/delivered. Make sure all of your content for all of your sites is on this main “Parent” (hub) site.
2) You can then have multiple “Child” sites – completely different domains from your parent site – which are basically just “sales page only” sites. Of course you can have a wordpress blog on each of them and have as much content as you want. Just put the main content to be delivered on the Parent site.
2A) On each of these child sites, you can use any DAP-supported payment processors to sell your products. So for eg., on one “child” site, you can use ClickBank, on another, you can use Paypal, on another you use e-junkie, etc.
3) All buyers end up with an account on your “Parent” site, which is where they get to access their content too. You can set up multiple blogs on one site for different look & feel for all of your various products, and deliver content from the specific blog for the specific product. DAP can support multiple blogs on one site, so that’ll work fine.
4) Since all of your actual products are on one DAP installation, your affiliates can use the same affiliate link for promoting all of your “child” sites. Which means, anyone buying any product across your network, will result in a commission for your affiliate
5) Since all of your users are in one database, email marketing also becomes extremely simple. You can send autoresponders & broadcasts all from within DAP
6) And anyone purchasing any product across your entire network, instantly and automatically becomes a “global” affiliate – which means they can straightaway start promoting any of your web sites. So if your parent site is Parent.com, and you have 3 child sites called childA.com, childB.com and childC.com, then your affiliates’ global affiliate link would be:
http://Parent.com/dap/a/?a=1234
Now if they wanted to promote childA.com, they just use the redirection feature of DAP like this:
http://Parent.com/dap/a/?a=1234&p=www.ChildA.com
Or if they want to point to a specific page on childA, they can do this:
http://Parent.com/dap/a/?a=1234&p=www.ChildA.com/specificpage.php
or
http://Parent.com/dap/a/?a=1234&p=www.ChildA.com/blog/specific-post/
Plus we’re coming up with a “N”-tier affiliate program in 4.0, which will make it even more powerful when you club it with the ‘global’ concept explained above, as every new member becomes a global affiliate, and will also get multi-tiered commissions across ALL purchases across ALL of your child sites.
DAP now supports Coupon codes – which again means your global affiliate will be able to use coupon codes for any product across your network. So the extensions are unlimited, and the possibilities are infinite.
Configuration #2
Summary: There’s only one site – Parent.com. That’s where DAP is installed. All child sites and content for those sites, are created in “sub-folders” on the same Parent.com site.
Parent.com has “dap” in its root folder.
Parent.com/site1/ is a blog for Site 1 which has all of the content for whatever is being sold on Site 1. Sales page can be the root of the “site1” blog itself, or in a separate WordPress Page on that blog.
So you will have one blog per site, each installed as a separate WP installation, in sub-folders of Parent.com.
Parent.com/site1/
Parent.com/site2/
Parent.com/site3/
Parent.com/site4/
Each of the above blogs should have their own copy of the “DAP-WP-Livelinks” plugin.
But only one installation of the “dap” folder itself. DAP is in root.
Parent.com/dap/
The blogs must be in sub-folders of the main domain – they may not be in sub-domains.
So, in a nutshell…
- DAP enables to you have one, large, global “store”.
- This is also your content and affiliate hub, while unifying and standardizing content delivery for all of your products,
- This gives your members a “Single Sign-on” facility, where if they log in to your “Hub Store”, they basically never have to log in again
- All of the content can be made available from one “Content Delivery” site
- Your affiliate program goes “Global” – which means if you’re an affiliate for one site, you can promote all sites and all products in the network using just one affiliate link. Which will help you recruit more affiliates, and help get them excited about promoting your network sites.
| what i wish to do is have a central dap install, that looks after all my sites and affiliate programs, of course i would like different site members to access the down load they bought in they same style of the site they bought i would like different site members to access the affiliate programs that they enrolled in affiliate program , but also let them taste my others, so each product wold have its own tools affiliate links, my current set up is a hep desk in my root folder, as that is generic name which will work for all my products,i wold then like to deliver products within this system so each has its own download pages , in its own styleall im asking is do i need 10 wp blogs to do this or just one or none can blogs and pages be sub-domains or only folders ( you answered this in your last post )thanks for your help |
|||
|
|||
Your Host Does Not Support Cron Jobs
Question: You ask what to do if your host does not support cron jobs?
Short answer: You may want to switch your hosting company.
The basic idea of a cron jobs is that it allows you to run scheduled tasks, that run automatically, frequently, silently, in the background, without requiring manual intervention.
DAP uses cron jobs to do things like…
- Send out autoresponder emails
- Send out broadcast emails
- Manage your outgoing queue of emails so that you can stay within your cheap web host’s strict hourly email sending limits
- Process and manage affiliate data & commissions , and
- Do some clean up jobs
Any membership plugin that offers email broadcasts, autoresponders and other bulk tasks, will likely ask you to set up cron jobs for sending out emails. You couldn’t possibly send out an email blast to even 500 members in real time as your browser will timeout.
DAP requires you to set up a cron job to do all of the tasks above.
If yours doesn’t, seriously you have only 2 choices…
- Stick to your host but lose the ability to use powerful scripts like DAP.
- Or do the smart thing and move to a better host. There are plenty of good ones out there, and there are a few we recommend highly, and they’re very inexpensive.
Attaching Files To Autoresponder & Broadcast Emails
Uploading file to be attached
First upload file(s) to be attached to the emails, to the folder…
/dap/admin/attachments/
Attaching it to Autoresponder Emails
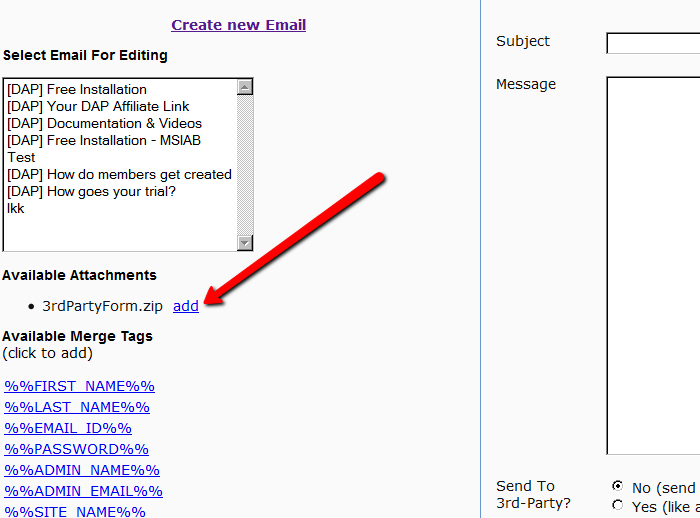
On the Email > Autoresponders page, any file(s) uploaded above, show up as in the image below. When composing a new email, just click on the “add” link next to the file name to be attached to that email.
Attaching it to Broadcast Emails
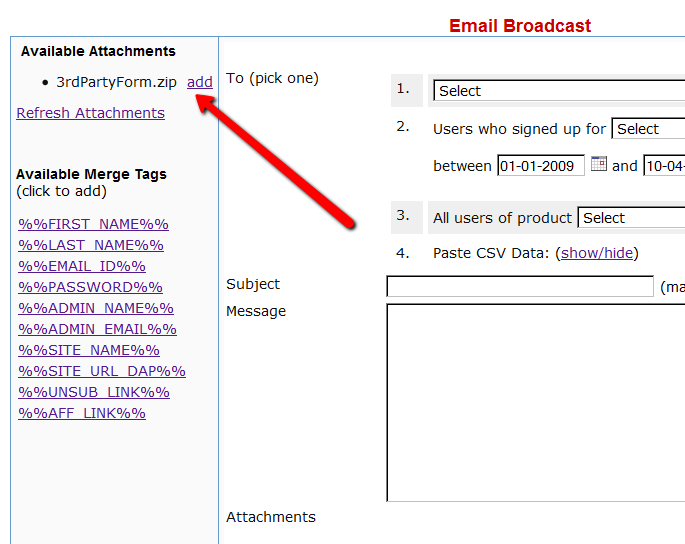
Same deal for broadcast emails. The uploaded file shows up as follows. Click on the “add” link to add to the broadcast email to be sent.
Customizing User-facing CSS
Starting DAP v3.8, there is a file in the folder dap/inc/content/ called userfacing.css
Copy (not rename) it to a file called customuserfacing.css
Basically you are adding the word “custom” at the beginning of the file name.
Feel free to customize the CSS, and then upload it back to the same folder on your site.
This CSS file only impacts certain user-facing sections, like the User Links page, User Profile page and Affiliate Details section.
Creating Ready-made Banners & Copy For Affiliates
DAP lets you create a “Affiliate Promo Materials” page that has ready-made, ready-to-copy-paste banner images, HTML code, and email copy, that includes the affiliate link of the affiliate viewing the page, already readily embedded and customized just for her.
Here’s all you need to know:
Wherever you insert the Affiliate Merge Tag….
%%AFF_LINK%%
…into your blog posts/pages, it will get automatically get replaced by the affiliate’s actual affiliate link, that looks like this…
http://YourSite.com/dap/a/?a=1234
So, that’s all you really need to know to create a custom, affiliate promo page.
Creating Customized Banners
Normally, your banner code for affiliates would look like this:
<img src=”/path/to/banner/image.jpg”>
That would simply display a banner that is not linked to any link.
Then, here’s how you would link it to any link.
<a href=”http://LinkToSomething.com”><img src=”/path/to/banner/image.jpg”></a>
Now, instead of the link above, you would insert your Affiliate Merge Tag in there, like this:
<a href=”%%AFF_LINK%% “><img src=”/path/to/banner/image.jpg”></a>
That would display the image, as well as link it to the affiliate’s own custom affiliate link. The above code is what you would enter into the promo page in the “Visual” tab, because you want the affiliate to see the actual raw HTML code that she can copy/paste and publish on their web site.
So when the affiliate views your promo page, they would not see an actual image that is linked to their affiliate link, but the raw HTML – just like what you see below – which they can copy and publish on their web site.
<a href=”http://YourSite.com/dap/a/?a=1234 “><img src=”/path/to/banner/image.jpg”></a>
Obviously, you don’t want them to directly link to the image on your site. So you just tell them that they need to download the image/banner and upload to their web site.
The same can be done for email copy too.
That’s how simple it is.
WishList Migration Kit
We get many requests from folks wanting to switch their existing membership site from WishList to DAP, or from Amember to DAP, from Magic Member, YourMembers, eMember, Membergate, etc. We’ve honestly lost count of the number of migrations we’ve done over the years. And every single one of those users who switched to DAP, has been thrilled with DAP and has continued to stay with DAP ever since.
In almost all cases, they all wanted to switch their main “bread-and-butter” membership site over to DAP, because of many things that DAP does that the others don’t. Or maybe because their current membership plugin doesn’t let them do what they want to do, or because their developers stopped supporting it (or support is non-existent), or they’ve gone out of business, or simply because the plugins just don’t scale well for a large membership site, like DAP can.
Anyway, we decided to write a blog post about how to do that for those of you considering doing it yourself.
[NOTE] You don’t have to do this yourself – we can do the migration for you for a fee. See this link for details about purchasing our WishList-To-DAP Migration. [/NOTE]
1) Migrating “Free Members”
Moving free members over to DAP is very simple. Export your old members as a CSV (comma-separated) file containing just email, first name and last name(optional) in the following order:
Email,FirstName,LastName
Lastname is optional. No spaces before or after the comma’s.
And then import them on the “Users > Add” screen.
You can read more about importing users into DAP in this post.
2) Migrating “Paying Members” With Current Subscriptions
This is a bit trickier than migrating just free members. You not only have to import existing member information, but you also need to migrate over their existing subscriptions to point to DAP.
How this is done, primarily depends on what payment processor you were already using, and wish to continue to use while making sure all new incoming subscription payments get processed by DAP.
But before you migrate over their existing subscriptions, you have to import all of them first using DAP’s “Users > Add” screen, which allows you to import multiple users into a Product, while also marking them as “Paid”.
Before you do the import, be sure to empty both the “Double Optin” and “Thank-you” email subject and body on the Product page, because you don’t want DAP sending out any double-optin or thank-you emails to the members you are about to import. We can send them a broadcast email at a later point, when we’ve fully set them up correctly in the system.
Then once you’ve imported them all, you can modify each of their records quickly to modify their start and end dates, to sync with wherever they were in your previous WL site.
Then once you have all of their dates set up, all that remains is to integrate DAP with your payment processor, such that both payments from both new members as well existing members, all get processed by DAP, so that DAP continue to manage their subscriptions, and start giving them access to the member’s area, going forward.
Paypal Integration
Your current WishList subscriptions are probably already pointing to a WishList specific “virtual” URL. Unfortunately, Paypal will not allow you to modify the IPN url in existing “stored” subscriptions that are current.
So you will need to put in a new rule into your .htaccess file at the root of your web site, to simply redirect all incoming IPN notifications (that come to your WL virtual URL) to DAP’s Paypal-specific file on your site, which is http://YourSite.com/dap/dap-paypal.php
Here’s the exact line of text to place within your .htaccess file that’s in your root…
RewriteRule ^index.php/register/pgiotv$ /dap/dap-paypal.php [L]
Be sure to replace the text “index.php/register/pgiotv$” by the IPN URL given to you by wishlist.
Once this is done, DAP will start processing all future subscription payments from existing members.
3) IMPORTANT
Before you create any DAP Products and start protecting content within DAP, make sure you have disabled the Wishlist plugin. Also be sure to disable any other “content protection” plugins, like “Maintenance Mode”, and Cache plugins.
Order Of Links On “My Links” page
[Updated 05/20/2012: Drag & Drop Re-ordering of links available since DAP v4.3.1]Ordering Links
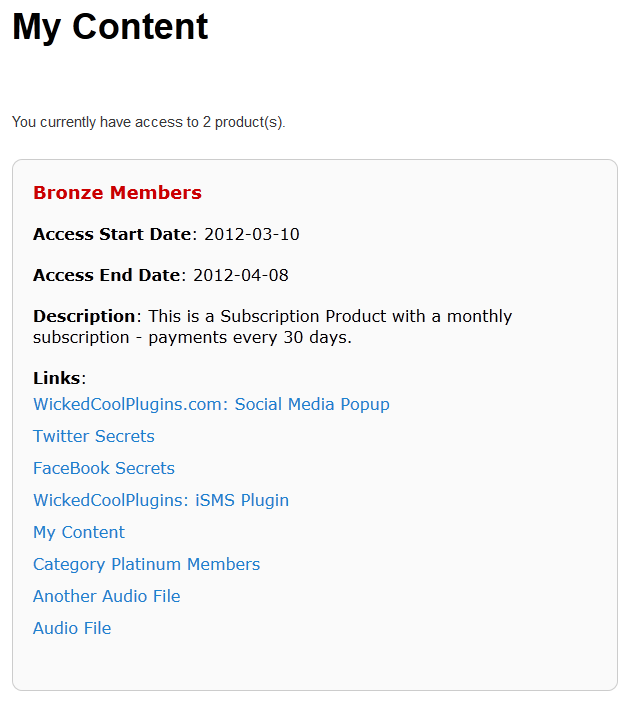
The ordering of links in the ContentResponder tab of a product is required ONLY if you have a “My Content” page (see example below – page uses the merge tag %%USERLINKS%%) and you want control over exactly how those links are displayed in that list:
Fig 1: Example “My Content” page which uses the merge tag %%USERLINKS%%
Ordering by Drip Day
The easiest way to organize links, is to set the dripping “day” for each link.
So if you’re setting up 5 links to be available on Day #1, 2, 3,4 & 5, then in the “My Links” section, DAP will display the links in “Newest On Top” order.
So the newest link (Day #5) will appear first, followed by Day #4, and so on, until Day #1.
Ordering When There Is No Dripping
If you have multiple links that you’re making available all on the same day (like say, all on Day #1), then once you’ve added the links from left to right in the ContentResponder tab of your DAP Product, you can then hold down any row from the Protected Content section, drag and drop and re-order it however you wish to.
Remember that the drag-and-drop re-ordering will only work within different links that are all set to drip on the same day. So for eg., dragging a day 1 link above a day 4 link (see screenshot below) will not work, and it will simply come back to it original position after refreshing the screen. But dragging one Day #1 link above or below another Day #1 link will re-order the links exactly in that order.
Fig 2. Screenshot showing drag-and-drop reordering in action
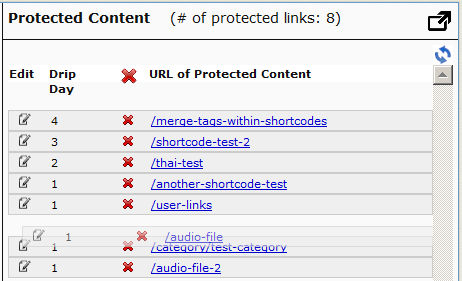
If you see the links order in the above screenshot, that’s the exact same order in which the links will appear when the member views their “My Content” page (or whatever you have called the user links page).
[DAPUserLinks] Shortcode
If you want even more control over how many links are displayed, order of the links, date format etc, then consider our new shortcode shown below:
[DAPUserLinks showProductName=”N” showAccessStartDate=”Y” showAccessEndDate=”Y” showDescription=”Y” showLinks=”Y” orderOfLinks=”NEWESTFIRST” howManyLinks=”10000″ errMsgTemplate=”SHORT” productId=”ALL” dateFormat=”YYYY-MM-DD”]NOTE: orderOfLinks can have one of two values…
NEWESTFIRST will drip newly dripped links at the top. So day 7 link will be above day 1 link.
OLDESTFIRST will drip newly dripped links towards the bottom. So day 1 link will be above day 7 link.
So, here’s another version of the DAPUserLinks shortcode:
[DAPUserLinks showProductName=”N” showAccessStartDate=”Y” showAccessEndDate=”Y” showDescription=”Y” showLinks=”Y” orderOfLinks=”OLDESTFIRST” howManyLinks=”10000″ errMsgTemplate=”SHORT” productId=”ALL” dateFormat=”YYYY-MM-DD”]Related: See more such shortcodes at DAP Shortcodes
Global Login & Password
Creating 1 Single Login & Password For All Users
This is for when you don’t care about assigning unique usernames and passwords to your users, and would rather given all of your members (or site visitors) a single email id and password to log in to your membership site.
Here’s how you can do it:
- Most important: Go to Setup > Config > Advanced > “Max. # of User Logins From Different IP`s” and set it to a very high number – like 99999999. You’ll need to do this because everyone will be logging in using the same email/password, and you don’t want DAP to lock out the public account (you’re about to create below).
- Create a “public” user manually, with an email id like, say, “demo@yoursite.com” . DAP will assign a random password to the user (unless of course you have set the “Default” password in Config).
- Change this password also to something public – like ‘demo’ 🙂
- Then if you don’t care about collecting anyone’s email id, then you could publish this info publicly on your web site
- But if you wish to collect people’s email id’s, and *then* give them this public email/password, then you can still sign them up using the “Direct Signup Form”. And in the welcome email, instead of sending them their own email id and password, send them the public email id and password.


