GetResponse Integration
DAP integrates with GetResponse very easily.
DAP to GetResponse Integration
If you are on DAP 4.1, then DAP can connect with getresponse using the APIs provided by getresponse.
So when someone buys or signs up for that Product, then DAP will automatically notify your GetResponse list, and add the buyer or subscriber (if it’s a free sign-up) to your GetResponse list.
So basically, user gets added to DAP first, and then DAP adds them to GetResponse.
If you want the other flow (subscriber gets added to GR first, and then GR adds them to DAP, then see this GetResponse-to-DAP flow)
1) Retrieve the getresponse API Key from this URL:
http://www.getresponse.com/my_api_key.html
2) Then go to DAP > Products > Manage, select the product, go to “Notifications” tab, then in the Plugin Notification upon User “Add” field, add the following:
getresponse:<API Key>:<campaign name>
For example:
getresponse:89kjhjgjfh1734dap:fbsecrets
That’s it.
Now go to DAP admin -> add users page and add a brand new user / email and see what happens.
The added user should first receive the confirmation email from GetResponse, and upon confirmation, the user should get added to GetResponse.
If it does not work, then…
- Set the dap log level to 5,
- Go to DAP > System > Logs.
- Empty logs, and rerun the test.
- Then send us the log text from DAP > Sytem > Logs.
Making Affiliate Payments
DAP’s affiliate program works the same regardless of which DAP-supported payment processor or shopping cart you’re using.
DAP does not directly make any affiliate payments. Instead, at the beginning of each month (or however often you wish to pay your affiliates), with one click on the Affiliates > Run Reports page, DAP will give you a list of all affiliates to whom payment is due, and the actual amount due to each one of them.
The format of the payment list that DAP provides you with, is already “Paypal Mass-Pay Ready” – which means, you could simply upload the file that DAP gives you, upload it to your Paypal account, and then pay all affiliates in one click (details further below).
Or if you don’t wish to pay by Paypal, and wish to use any other form of offline payment (like sending them a physical “check” in the mail, doing wire-transfers, etc), you’re free to use any external means for paying your affiliates. Once you have paid (by Paypal, or other external means), you just come back to DAP and mark all those affiliates as “Paid” – which is when DAP actually reports to all of those affiliates that a payment has been sent to them. Until the actual payment is made, they only see that they are owed a certain amount.
How To Pay Your Affiliates In DAP
1) Go to “Affiliates > Reports”
2) Click on “Pay Affiliates as of mm-dd-yyyy” on the right/top part of the page (in older versions of DAP, this would be called “View Due Payments as of mm-dd-yyyy“)
3) DAP will bring up a list of affiliates to be paid. Click on “Export affiliates for payment”
4) DAP will create an export of only those affiliates. Only those affiliates can be paid now, as per DAP.
5) You take the exported list that DAP gives you. Pay them via Paypal MassPay (details in the next section below).
6) Once you’ve actually sent them the payment via Paypal, come back to “Affiliates > Reports“, pick the previously exported list from “Mark affiliates from ……. as Paid” drop down (your last un-paid export will be shown in the drop-down list).
7) Mark that export as “Paid”.
That’s it!
Making Payments Via Paypal Mass-Pay
1. Copy all of the text from export field that DAP provides you with, and save it as a text file on your desktop, with a file name like, say, “February 2012 Commissions.txt”
2. Log in to your Paypal account
3. Click on “Send Money”

4. Click on”Make a Mass Payment”
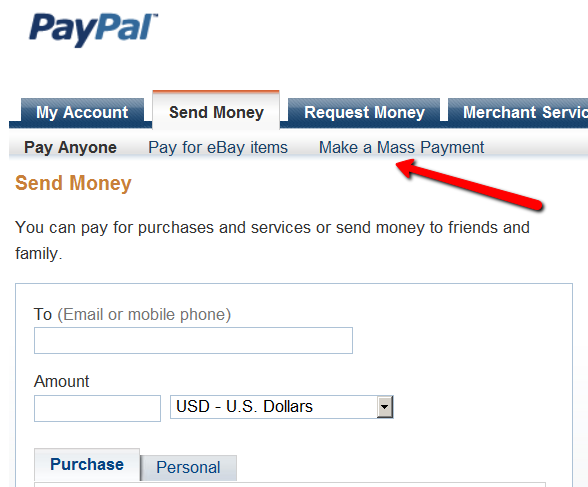
5. Upload previously saved text file on this next screen.
You may also enter a custom subject and body for the email that Paypal will send to all those receiving a payment.
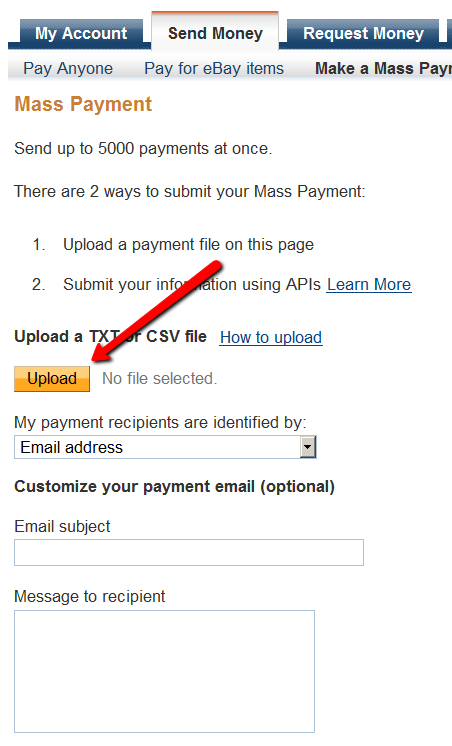
6. Follow the rest of the on-screen instructions and hit “Send”, and you will see a confirmation from Paypal that your payment has been scheduled.
At this point, the money would have already been debited from your Paypal account.
Soon thereafter (usually within 10 minutes), Paypal would’ve actually deposited your payments in to the affiliates’ Paypal accounts.
Recommended Refund Policy
There really is no one-size-fits-all when it comes to refund policies.
There are so many factors involved. The main one being, that Visa/Master/Amex/Paypal all give a buyer up to 60 days to ask for a refund, at least with most merchants.
Unless you’ve already negotiated the refund terms with your merchant account provider, and have both specifically agreed that there would be no refunds (like say, if you were selling an expensive item, like a car, or a boat, or a service), or that it’s only going to be a 30-day refund period, then you really have no control over the refund period. You just have to comply with at least the mandatory 60-day refund period required by the credit card companies.
So that brings us to the question:
How much should you set your refund period to be within DAP?
Now remember, it is this Refund Period setting (under Setup > Config > Advanced) that also makes affiliates eligible for payment.
So it really comes down to the question:
What is the waiting period for an affiliate to get paid for a referral?
Our recommendation: 60 days.
That’s because if you end up paying too soon (say like within 15 or 30 days), and then the buyer comes back and asks for a refund, now you’re out-of-pocket for the affiliate commissions that you have already paid on a purchase that you just refunded.
Now remember that when you do the actual refund within DAP, DAP will roll-back any commissions credited towards this purchase. If you have not yet paid your affiliates, then in the next report, it will ignore the refunded purchase, and will not calculate commissions on that purchase.
But if you have already paid your affiliates (like within 15 or 30 days after purchase), then DAP will include the negative commission in the next pay-period’s report. And any future commissions earned by this affiliate will be accordingly adjusted.
However, if the affiliate doesn’t refer any more members, then you have two choices at this point:
1) Ask the affiliate to pay back the over-paid commissions
2) Just swallow the loss, write it up to the cost of doing business, and move on.
Content Protection, Security and DRM
We frequently get asked questions like…
“Can DAP protect my Videos/PDF’s/Audio files from being copied? Is there some kind of tracking that I can build into my videos that will let me track the video on torrent sites?”
“Can DAP prevent people from downloading my videos/audio/pdf and uploading it to a torrent or third-party site?”
“Can DAP force people to only watch my videos online? I don’t want my members to download any of my content to their hard disk – I want to force them to see/read/hear/watch everything online.”
Short Answer: No.
Long Answer: Keep reading…
The Nitty-Gritty
There are so many ways to steal your content from your web site – no matter what technology you use.
Let us explain what that means…
1) Let’s say you implement a technology where only paying members can even get to your videos. Like you can already do with DAP. So then a paying member can download your video because they are already a paying member, and they actually have access to the videos. And once your video has been downloaded to their hard disk, you have lost all control over it – no matter what anyone tells you, that’s the truth. Because they can upload it to any illegal warez sharing site, and there’s nothing you can do about it.
Of course, you could spend all your time, money and efforts monitoring the thousands of illegal sharing sites whether your video or ebook is found anywhere – assuming you can even find it in the first place, which would be like finding a needle in a hay stack – no, make that “hay factory” – wait, make that “finding a needle in New York City” – and then write to those site owners and ask them to take it down.
Or you could focus on the 99% of legitimate members of your site, and create great content for them, and keep them paying month after month, and sell more products to them, and keep them happy.
2) Let’s say you use a plugin that only allows true-streaming – like one based on Amazon CloudFront technology, that will not allow the users to directly download your videos, but force them to watch online only. Then there’s any number of “screen-capture” tools – even free ones – that your members can use to capture another video of your video, and then share it with their friends, or upload to illegal sharing sites.
The list goes on and on. No matter how hard you make it, there’s always going to be a way around.
So, unless you’re a NASA, NetFlix, or Amazon or Apple who has a real reason to protect their content that is worth real millions of dollars, there is *no technology* available today that will let you track a video or pdf *after* it has been downloaded. If someone is saying they can do this, then they’re outright lying to you, and playing on your fears.
DAP already has a built-in password-sharing prevention security built in. If someone tries to share their account info with others, DAP will lock their account the moment their account gets log-ins from multiple IP’s (you can configure this setting) and deny further access to any of their content, until you investigate the user and “un-lock” their account.
DAP already protects all of your media from illegal access.
DAP also prevents your Amazon S3 videos and audio and other content from being accessed by anyone directly. Using a script like http://S3MediaVault.com , you can make it such that your videos and audio and other media can only be downloaded from approved sites (where the plugin is installed), and then on top of that, there’s DAP already sitting like a monster watch-dog, making sure only authorized users can even get into the site in the first place.
So hope that helps if you’ve gotten too worried about protecting your content – so worried that you’re missing the big picture.
Don’t Forget What Is Important (Hint: It starts with “Mem” and ends with “bers”)
The best membership sites allow people to consume the content they’ve paid for in multiple ways – view the video, download the video, download mp3 audio version of the video, download the presentation as a powerpoint, download the transcripts as a PDF, and so on.
Instead of making it easy for your members to download the content, if you’re going to spend your limited resources trying to figure out how to prevent people from downloading content that they’ve actually paid for, and force people to only view your content online and not be able to view it offline (like in their spare time or when going for a jog in the park), you run the risk of upsetting 99% of your legitimate paying members, in order to secure your content from the 1% of pirates, who will steal and share your content no matter what.
So forget about the 1%, and focus on the 99%. DAP already has enough security in place to stop the 1%. So don’t worry about that. Your content is very secure with DAP.
Anything else is just a total waste of your time. So don’t get distracted by the noise, and just get on with the real important tasks on hand: Building a long-term recurring income stream by building a large community of highly satisfied, loyal fans who are thrilled about what you have to offer, and will continue to pay month after month because whatever it is that you’re selling, is making their life better in some way.
The hardest thing to do online, with a membership site is still this: Creating great content, Attracting buyers, and then getting your members to keep paying month after month.
And that, is the big picture.
Mailchimp Integration
Subscriber Flow
The flow of subscriber is “FROM DAP TO Mailchimp“. User signs up at DAP first, then DAP automatically adds the user to Mailchimp list.. Admin removes the user’s access to a product, and DAP automatically removes the user from Mailchimp list. This feature is available starting DAP v4.1.
How it works
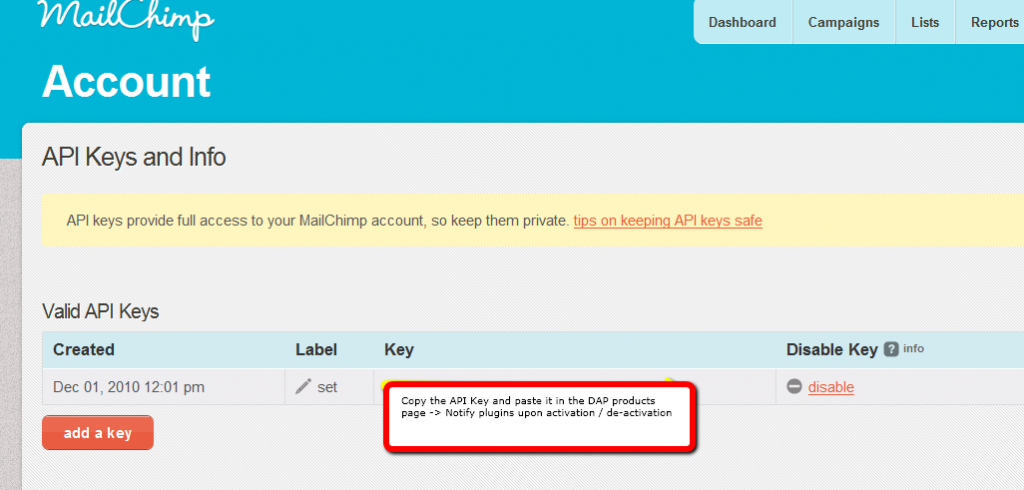
[s3mv]mailchimp.mp4,640,378,false,false[/s3mv]1. Login to your account at http://admin.mailchimp.com/account/api/ and note down the API Key.
Image 1:
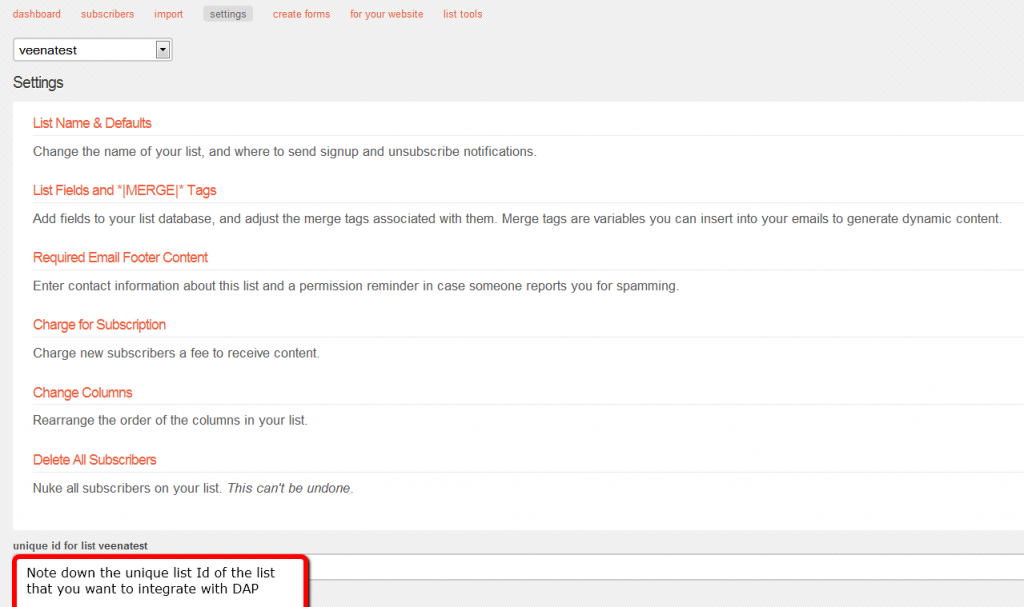
2. Go to http://admin.mailchimp.com/lists/ and grab your List’s Unique Id. Click the “settings” link for the list – the Unique Id is at the bottom of that page.
Image 2:
3. Log in to your DAP Admin Dashboard -> Products Page and select the product (whose members you wish to add automatically to your Mailchimp list.
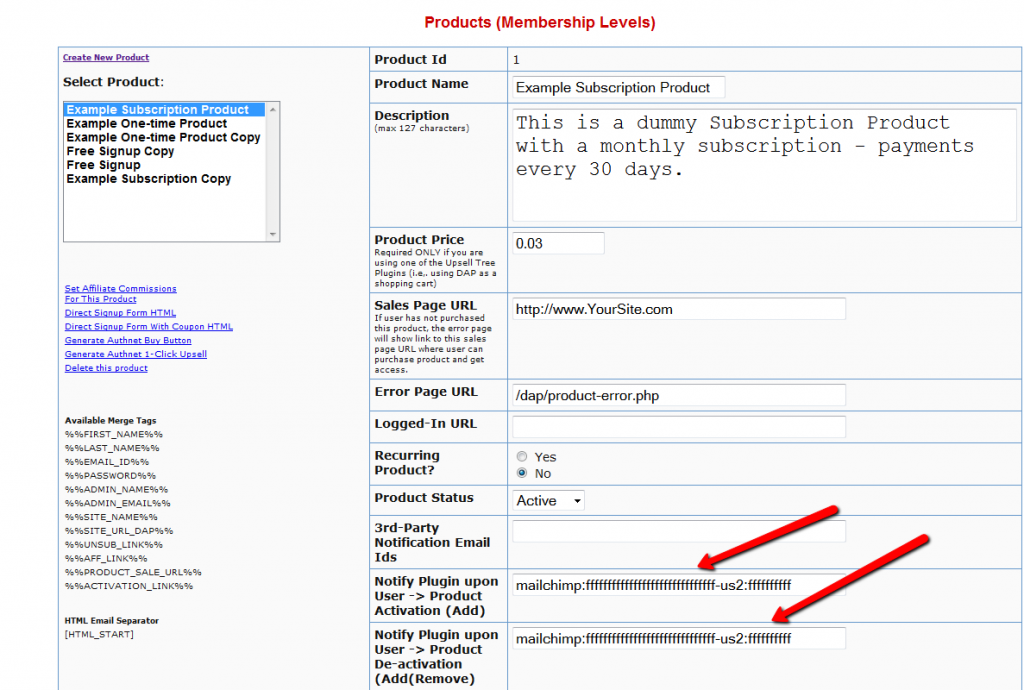
4. If the list Id of the mailchimp list that you want to integrate with a DAP product/membership is say “ffffffffff”, and say your Mailchimp API Key is ‘ffffffffffffffffffffffffffffff-us2’ then add the following to the “Notify Plugin upon User -> Product Activation (Add)” in DAP products page and HIT Save/Update Product.
mailchimp:ffffffffffffffffffffffffffffff-us2:ffffffffff
Image 3:
That’s it!
Save the product and this completes the DAP->Mailchimp integration.
How This Works
So let’s say you picked the list “ffffffffff” in your Mailchimp account, and the DAP Product “Example Subscription Product” (as shown in the screenshots above).
So once you add “mailchimp:ffffffffffffffffffffffffffffff-us2:ffffffffff” to the product’s “Notify plugin upon user->product activation” and “Notify plugin upon user->product de-activation” field and save it, every time someone gets access to the “Example Subscription Product” product (regardless of whether they buy it, or you give them access on the backend), DAP will automatically add them to the list – ffffffffff. And everytime you remove the user’s access to product (click on ‘Remove’ in DAP manage users page), DAP will automatically remove the user from the list.
2-Tier Affiliate Program
DAP supports (up to) a 2-tier affiliate program. So you could pay just one level (“tier”) of commissions (A gets paid when he refers B), or you could also set up DAP to pay 2 “tiers” of commissions (User 1 gets paid when he refers User 2 AND User 1 also gets paid something when User 2 refers User 3).
[NOTE: Paypal has an Acceptable Use Policy – especially for a product or service that could be considered “MLM” or “Pyramid”. Make sure you’re not violating their terms. For eg., requiring your members to keep paying subscription fees in order to remain an affiliate, could be considered a Pyramid scheme. So, in general (nothing to do with using DAP or paying 2 levels of commissions), if you are running an affiliate program and will be paying out commissions via Paypal, make sure you are not violating their terms.]
How The 2-Tier Affiliate Program Works
In a typical “1-Tier” affiliate program, when a buyer makes a purchase, the affiliate who referred the buyer is the only one who gets paid an affiliate commission. Which is why it’s called “1-tier”, because there’s only one level of commissions paid.
However, in a “2-tier” affiliate program, the “Affiliate’s Affiliate” (2nd level above) can also be paid a portion of the sale in commissions.
So consider this this example…
You are selling Product A that costs $100.
You’ve set up your commission structure for Product A as follows:
Tier 1: 50% Per Sale
Tier 2: 10% Per Sale
Joe Customer is referred by Charlie to your web site. Joe went on to purchase Product A for which commissions are set up above.
So Charlie (tier-1 affiliate) gets paid 50% of the sale – which is $50.
Now, normally a 1-tier affiliate program would stop there, and that would be the end of affiliate commissions for that purchase. But you have set up 2 tiers.
So now DAP looks at who referred Charlie, the affiliate. It finds that David originally referred Charlie to your web site (regardless of how Charlie got in to your membership site).
So now David (tier-2 affiliate) gets paid 10% of the sale – which is $10.
So for that one sale of $100, $50 was paid to Charlie, and $10 was paid to David, which totals $60.
So $40 is your earnings, as the site owner.
How To Set It Up
The 2-tier or “n” tier setup is the exact same as the 1-tier setup.
Only difference is, set up a new record on the “Affiliates > Set Commissions” page for each tier – one for Tier 1, one for Tier 2, and so on.

Paypal Integration Summary
DAP supports 3 different types of Paypal Integration.
1) Paypal Hosted Buttons
2) DAP Generated Buttons For Paypal
3) DAP Shopping Cart with Upsells
Let’s get into more details about each one of them.
[s3mv]DAP-Paypal-Integration-Overview.mp4,640,350,false,false[/s3mv]1) Paypal Hosted Buttons
You generate the button within your Paypal account.
Click Here to find instructions to integrate DAP and Paypal Hosted Buttons.
If the integration is not working, Click Here to find troubleshooting instructions.
Note: you only need to set the following config items for Paypal hosted buttons.
a) If you want to use Paypal Sandbox for testing, then set the following to “Y”.
DAP Setup -> Config -> Paypal -> Use Paypal Sandbox: For initial testing only
If you want to connect to your Paypal live account, then set it to “No”.
b) If your site has trouble connecting to Paypal via CURL and you see this error in DAP orders page => Check Product and Price(Reprocessible), then update the config below to FOPEN.
DAP Setup -> Config -> Paypal -> 4) Paypal Communication Protocol: How DAP connects to and communicates with Paypal on the back-end.
That’s it.
The following config items are NOT needed if you use the Paypal hosted buttons.
Paypal API Username – Only needed if you use the DAP upsell tree plugins for Paypal Payments Pro or Paypal Standard.
Paypal API Password – Only needed if you use the DAP upsell tree plugins for Paypal Payments Pro or Paypal Standard.
Paypal API Signature – Only needed if you use the DAP upsell tree plugins for Paypal Payments Pro or Paypal Standard.
Paypal API Endpoint – Only needed if you use the DAP upsell tree plugins for Paypal Payments Pro or Paypal Standard.
Paypal Business Email ID – Only needed if you use the DAP generated button for Paypal (DAP Payments/Coupons -> Generate paypal button)
Merchant Payment Gateway API Login ID: Only needed if you use e-junkie or the DAP upsell tree plugin for Authorize.net
Merchant Payment Gateway Transaction Key: Only needed if you use e-junkie or the DAP upsell tree plugin for Authorize.net
The following fields in the DAP Products page ONLY need to be set if you use DAP upsell tree plugin or the DAP generated button for Paypal.
Recurring Count, Trial Amount and Product Price
If you are using regular paypal button, you can leave these empty. Even if these are not-empty, DAP will not use it for regular paypal hosted buttons.
2) DAP Generated Buttons For Paypal
With DAP 4.0, we have added support for DAP generated buttons for Paypal. You no longer have to generate buttons within Paypal.
You can generate the button for Paypal from within your DAP Admin Panel -> Payment Processing -> Generate Paypal Button page.
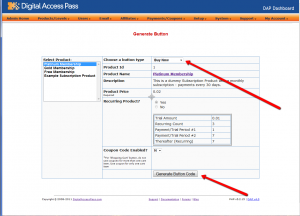
Click Here to find instructions to integrate the DAP generated button with Paypal.
3) DAP Shopping Cart / DAP Upsell Tree Plugins
1) Paypal Standard Upsell Tree Plugin
2) Paypal Payments Pro Upsell Tree Plugin / DAP shopping cart
Click Here for details.
Protect Entire Blog
If you, for some reason, need to protect your ENTIRE blog from “non-logged in users” – meaning, any part of your blog (menus, sidebars, widgets, etc), including the un-protected pages, should be seen only by someone who is already logged in – be it a free user or a paid user, then here’s how you do it…
- Go into your WordPress Admin, click on Appearance > Editor
- Make sure your current theme is selected in the drop-down towards the right/top corner.
- Click on “Header” (header.php) of your theme.
- Enter the following text right towards the very top of that file.
<?php
include_once “./dap/dap-config.php”;if( !Dap_Session::isLoggedIn() ) {
header(“Location: /dap/login.php”);
exit;
}
?>
The only thing you need to make sure is that you have the path to the dap-config.php correct.
If your blog is in the root, then use the code above as is.
If your blog is in a sub-folder, then replace line in red above, with the line in red below…
include_once “../dap/dap-config.php”;
That’s it!
WARNING
Please remember that if you do this, then you must use the default DAP login page /dap/login.php , and you won’t be able to put the login form within WordPress.
The reason for this, is that the protection code is being applied at the theme level, and the protection will also apply to all WordPress pages and posts – and if you put the DAP login form inside a WP page, then that page will also get protected from everyone, and no one will even be able to get to the login form in order to log in. That makes your site impossible to log in to, which of course makes no sense.
Troubleshooting Login Errors
Problem: When you go to http://YourSite.com/dap/ , you get redirected to a "Page Not Found – 404" error page.
Solution: This is happening because in DAP Config, you probably set up an invalid URL to be the default login page. So do this:
- First, log out of DAP by going to http://yoursite.com/dap/logout.php (manually type that in to your browser)
- Now log in to DAP via DAP's special login page – http://YourSite.com/dap/login.php
- Go to "Setup > Config > Advanced" screen
- Then where it says "Location of your login page (eg., if using WordPress). Should start with a forward slash (`/`)" – enter a valid URL there. Before entering any URL there, visit the URL separately in a separate browser tab (or window) and make sure you can actually get to it, and that it has a login form there. Then put that URL in to the above field, and click on "Update".
- Now in a separate browser (totally different browser) where you are not logged in to DAP or WP, try to go to http://YourSite.com/dap/ and see if it redirects to the right page. If not, revisit the steps above, and double check the login URL, that's all.
DAP-1SC Login Xpress
DAP Supports instant auto-login to the member’s area immediately after completing the 1ShoppingCart (or private label) purchase. We call this Login Xpress with 1ShoppingCart (Read more about Login Xpress)
The documentation below will show you how to setup 1ShoppingCart and DAP, so that your buyers can be automatically logged in to your “Member’s Area” upon completion of their purchase.
Note About Processing Recurring Orders via 1SC
If you only sell ONE-TIME products at this time, then the Login Xpress flow below is all you will need to setup as far DAP & 1SC integration is concerned.
If you are selling RECURRING products via 1SC , but DO NOT WANT your users to be automatically logged in to the “Members’ Area” right after their purchase, and you prefer sending them their membership login info (email & password) via email, then you DO NOT need to read this post any further – simply head over to this post: 1ShoppingCart Recurring Payment Processing via Email
But if you sell RECURRING products via 1SC and you DO WANT your users to be automatically logged in to the “Members’ Area” right after their purchase, then continue reading this post for Login Xpress setup.
Login Xpress Setup
1) Set up your sales page as you would normally do when accepting payment through 1ShoppingCart.
Make sure to use the exact same Product Name in 1SC as well as within DAP.
So, if you set up a product called “Platinum Members” within DAP, then use the exact same name “Platinum Members” as your 1SC product name. In fact, just to be sure, copy the product name from DAP and paste it into the product name field within 1SC (or vice-versa). That way, there will be no typos.
2) Log in to your 1ShoppingCart account.
Go to Products > Manage Products. Edit the Product you are setting up.
Go to the “Links” tab of that Product.
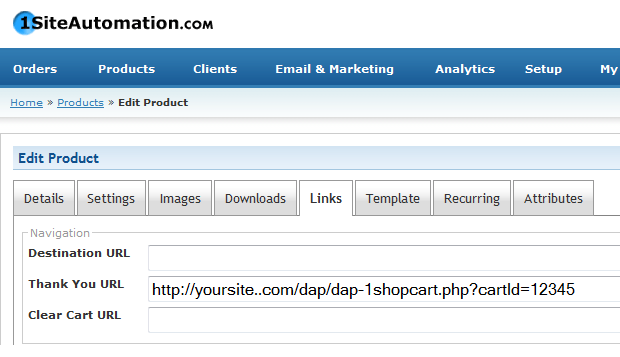
Set up the Thank You URL to point to this DAP script on your site, as shown below:
http://YourSite.com/dap/dap-1shopcart.php?cartId=SecretKey
YourSite.com should be replaced by the name of your site
SecretKey should be set to the same value that you set in DAP Dashboard > Setup > Config > Secret Key For Payment Processing
This secret key can be alphanumeric. No special characters or spaces.
For eg., if you set Secret Key For Payment Processing in DAP to be 12345
Then your 1ShoppingCart Thank You URL would look like this:
http://YourSite.com/dap/dap-1shopcart.php?cartId=12345
DAP Secret Key Setup (under DAP Admin > Setup > Config)
3) Now open a brand new browser session where you are not logged in as DAP admin or WP admin. Complete a test purchase using an email id that is not already in your DAP. If the integration worked correctly, then a new user account will automatically get created in DAP, and you (the buyer) will also be automatically logged in to DAP, and will be redirected to one of the following URL’s:
a) If this buyer has access to just 1 product, then user will be redirected to the Post-Login URL set up under that Product, at DAP Admin > Products > Manage
-OR-
b) If this buyer has previously purchased other products, then for security reasons, buyer will be redirected to the login URL that you have set up under DAP Admin > Setup > Config > Login URL. And at the same time, the buyer will be sent the Welcome Email from the Product’s settings.
Redirecting To A Custom URL After Checkout
The above setup will log new members right into the member’s area immediately after completing their purchase through your 1SiteAutomation.com or 1Shoppingcart check out page.
But if you wanted them to be redirected to a different page of your choice after the purchase, then set up the thank-you URL like this:
http://YourSite.com/dap/dap-1shopcart.php?cartId=SecretKey&redirect=yoursite.com/another-page/
So basically you are just adding the text in red to the end of the standard DAP/1SC thank-you page URL.
Now note that even though user is being redirected to “another-page” in the above example, they have been logged in to your membership site already. So if you publish a link to your member’s area somewhere on “another-page”, then they can go right to that page without having to log in, because they’re already auto-logged in at this point.
NOTE:
If you are setting up a recurring subscription product, then after completing the above Login Xpress set up, next step is to set up DAP to process RECURRING payment notifications from 1SC as described here.

