[DAPUpline]
[DAPUpline]
[DAPUpline] is basically a WordPress shortcode that you can insert into WordPress pages and posts. It allows you (DAP admin) to display the member’s upline affiliate’s data to the member.In simple terms, it shows a user their referring Affiliate’s (a.k.a Sponsor’s) information. It could also be called a downline builder.
And you can display any data from the member’s affiliate profile, on a page.
So when a user visits the page that has this shortcode, it will determine who the visitor/member’s affiliate is, from…
1) Affiliate Cookie (if it exists), or
2) If they’re already a member, and have logged in to DAP, then it will show their current Affiliate’s information. Or,
3) If neither the cookie is set, nor the user has an Affiliate attached to their account already in DAP, then it will show the info of the DAP Admin.
So you can use it to show the user information of the person (affiliate) who referred them to the page.
Think of it as a “Your Sponsor” tag.
Consider this example:
1) John joins your site
2) John fills out his profile with (say) his ClickBank nickname
3) John later refers Adam
4) When Adam logs in, he sees affiliate link to some third-party product, but CB nickname in the affiliate link is replaced with John’s CB nickname. So if Adam goes on to purchase that third-party CB product, then John will get the affiliate commissions for that purchase.
5) Now Adam fills out his profile with his own CB nickname
6) Adam refers Jill
7) When Jill logs in, she sees affiliate link to same third party product, except this time, the CB nickname is replaced with Adam’s CB affiliate nickname.
This can be done with any number of third-party programs, as long as the nickname can be easily replaced with the info provided by the upline affiliate. And it’s not just one field – you can create multiple profile fields for the affiliate to fill out – like ClickBankNick, CommissionJunctionNick, JVZooId, GoogleAnalyticsId, etc.
DAP actually even takes this one step further.
When Jill joins through Adam’s DAP affiliate link, if Adam has not filled out his CB nickname in his profile, then the third-party CB link shows CB Nickname of Site Admin in its place.
So if an affiliate fails to claim his affiliate link, then site admin gets credit for it (and all such links).
Hope this helps.
For eg., to show affiliate’s first name on a page, insert this into page:
[DAPUpline showField="first_name"]
Full list of available fields from sponsor’s or affiliate’s profile:
[DAPUpline showField="first_name"]
[DAPUpline showField="last_name"]
[DAPUpline showField="user_name"]
[DAPUpline showField="email"]
[DAPUpline showField="address1"]
[DAPUpline showField="address2"]
[DAPUpline showField="city"]
[DAPUpline showField="state"]
[DAPUpline showField="zip"]
[DAPUpline showField="country"]
[DAPUpline showField="phone"]
[DAPUpline showField="fax"]
[DAPUpline showField="company"]
[DAPUpline showField="title"]
[DAPUpline showField="paypal_email"]
Showing Custom fields:
[DAPUpline showField="custom_"]
Eg: To show affiliate’s/sponsor’s custom SSN field (say “ssn”):
[DAPUpline showField="custom_ssn"]
NOTE: You should’ve already created the custom field “ssn” before you can do this, of course.
Automated Reminder Emails For Admin
In DAP, you can not only send automated pre-scheduled emails to your members (Autoresponders), but you can also set up similar pre-scheduled “Reminder” emails to be sent to you (the admin) every time a member reaches a day milestone.
Eg: Let’s say you (the admin) want DAP to send you or someone on your team a reminder email to follow up with each member by email once they reach day #7 – meaning, it’s been 7 days since they signed up for a specific product.
This is how you do it in DAP:
- Go to DAP Admin > Emails > Autoresponders
- Click on “Compose New Email“
- For subject, enter (say) “Follow Up with %%FIRST_NAME%%”
- In the body of that email, you may use merge-tags for the member – like “Be sure to email %%FIRST_NAME %%LAST_NAME%% , ask them about their progress, see how they’re doing and upsell Platinum Coaching program. Their email id is: %%EMAIL_ID%%”
- Further below on that page, in the “Send to 3rd Party (instead of member)” field, select “Yes (like admin or staff)” and you will see an additional text box show up below, where you can enter your (or your staff’s) email id where you want the reminder to be sent.
- Save the email.
- Go to the DAP Product where you want this email to be added to the sequence.
- Go to “ContentResponder” tab.
- Add this new email to the product, click on the “Edit” icon, and set it to be dripped on Day #7.
That’s it!
Now for each member that signs up for that product, regardless of when they join, every time they reach day #7, the reminder email will be sent to the 3rd party email id specified for that message (instead of being sent to member).
Reverse Dripping
If you want to be sent this same email say 3 days before member’s access expires to that Product, then set the email to be dripped on day “-3”. (See Expiration Notifications / Renewal Reminders)
Internationalization & Custom Messages
Last Updated: March 9, 2015
The article below applies to both of the following groups…
A) Customizing DAP’s Default Messages
Those who wish to replace DAP’s default error and success messages (like … “Sorry, No User found with the email address…” when someone is trying to use the “Forgot Password” feature, or the message “Sorry, either you have entered an invalid username/password, or you may not have activated your account yet.” which is shown when someone uses the wrong email/password when logging in to your membership site – with English text of their own choice, and
B) Internationalization
Those who wish to replace those messages with text in a completely different non-English, international language (like Spanish, Danish, French, etc).
Non-English Content
All of your content is really going to be within WordPress, which is already international-friendly, and all of your regular site content – including your sales pages, squeeze pages, member content, etc – can all be presented in any language that WordPress already supports.
DAP is also international-friendly.
DAP really has only 4 member-facing pages: Login Form, “My Content“, “My Profile” and “My Affiliate Info (everything else is within WordPress).
And all of these member pages in DAP can be customized in any non-English language of your choice. We tested with many languages like Spanish, Dutch, French, and even Chinese! Others will/should work too as long the character set is UTF-8 based.
So we’re excited to be able to help you create membership sites in multiple languages.
Non-English Emails
And what’s really cool, is that with DAP, you can also send Autoresponder & Broadcast emails in your language.
This is a very powerful feature for those who are often restricted by 3rd-party email services in sending out non-english emails.
In fact, the last time we checked, even the big-boys like Aweber don’t let you do that!
Customizing Language Files
1) Language File Setup for PHP
Open the file…
/dap/inc/language/english.php
and save the file as…
/dap/inc/language/custom.php
in the same folder.
Then you can change the english text within custom.php (last section that is not in caps – like “Sorry, no data found” in the example below) in your language, and upload it back to the same folder ( /dap/inc/content/language ) back on your site. For example…
define(“MSG_SORRY_NO_DATA_FOUND”,”Sorry, no data found.“);
becomes…
define(“MSG_SORRY_NO_DATA_FOUND”,”Désolé, aucune donnée trouvée.“);
(That’s the French translation, according to Google – blame them if it’s not right 🙂
2) Language File Setup for JavaScript
DAP also allows you to customize the JavaScript alerts and messages that pop-up for client-side validations of form fields.
Open the file…
/dap/inc/language/jsenglish.js
and save the file as…
/dap/inc/language/jscustom.js
…on your desktop. Then change the text inside this jscustom.js file and upload it back to /dap/inc/language/ folder on your web site.
That’s it!
Contents of english.php
//———- Added in v4.4 ———//
define(“AFFILIATE_INFO_PERFSUMM_SUBHEADING”,”Affiliate Performance Summary”); //used only in dap/index.php
define(“AFFILIATE_INFO_HEADING”,”Affiliate Details”); //used only in dap/index.php
define(“MSG_NO_COMM”,”Sorry, no commissions earned yet.”);
define(“USER_PROFILE_SUCCESS_MESSAGE_USER”,”SUCCESS! Your profile has been updated.”);
define(“MSG_ERROR_EMAILEXISTSVB”, “Sorry, this email id is already in use in our vBulletin Forum. Please try using a different email id.”);
define(“MSG_SUCCESS_USERUPDATE_NOVB”, “SUCCESS! Your profile has been updated, but could not register this username in our vBulletin Forum. Please contact the site admin for help.”);
define(“AUTOMATED_AUTORESPONDER_EMAIL_SUBJECT”, “New Content Available:\n%%CONTENT_NAME%%”);
define(“MSG_INVALID_PASS”,”Sorry, the password you have chosen contains special characters. Only Alphabets and Numbers allowed. Please go ‘back’ and choose a different password.”);
define(“COLNAME_EARNINGTYPE_TEXT”,”Cash/Credit”);
define(“USER_PROFILE_NEW_PASSWORD_LABEL_DAPUSERPROFILE”,”Password<br/>(only if changing)”);
//———- Added in v4.3 ———//
define(“USER_LINKS_COMINGSOON_TEXT”,”Coming Soon…”);
define(“USER_LINKS_COMINGSOON_PREFIX_TEXT”,”[In XXX day(s)]”); //do not change/remove the text “XXX”
define(“MSG_UNSUBSCRIBE”,”[In XXX days]”); //do not change/remove the text “XXX”
define(“MSG_MANDATORY”,”Sorry, all fields are mandatory. Please go ‘back’ and fill up the missing information.”);
define(“MSG_INVALID_EMAIL”,”Sorry, the email address you entered is invalid. Please go ‘back’ and enter a valid email address.”);
define(“MSG_INVALID_COUPON”,”Sorry, the coupon code you entered is invalid. Please go ‘back’ and enter a valid coupon code.”);
define(“MSG_INVALID_PRODUCT”,”Sorry, the product you are trying to sign up for is either invalid, or not authorized for free signup. Please email the web site owner and let them know about this error.”);
define(“MSG_MISSING_COUPON”,”Sorry, coupon code is a required field. Please go ‘back’ and enter a valid coupon code.”);
define(“MSG_PAYMENT_FAILED”,”Payment failed. Please contact the site admin. “);
define(“MSG_THANKYOU_SIGNUP”,”SUCCESS! Thank you for signing up. Please check your email for further details.”);
define(“BUTTON_UPDATE”,”Update”);
define(“SUCCESS_CREATION”,”SUCCESS! Your account has been successfully created! Please check your inbox for login information…”);
define(“NO_AUTH”,”Sorry, you are either not logged in, or not authorized to perform this operation.”);
define(“MSG_ALREADY_SIGNEDUP”,”It appears that you have already signed up for this. No further action is required at this time.”);//———- Added 03/22/2011 ———//
define(“MSG_ALREADY_LOGGEDIN_1″,”You are already logged in.”);
define(“MSG_ALREADY_LOGGEDIN_2″,”Click here to continue…”);
define(“MSG_PLS_LOGIN”,”Sorry, you must log in before you can view this content.”);
define(“MSG_CLICK_HERE_TO_LOGIN”,”Click here to log in”);
define(“MSG_SORRY_EMAIL_NOT_FOUND”,”Sorry, No User found with the email address “);
define(“MSG_PASSWORD_SENT”,”Please check your email. Your Password has been sent to “);//———- GENERAL TEXT ———//
define (“ACTIVATION_EMAIL_SUBJECT”, “%%FIRST_NAME%%, Welcome to %%SITE_NAME%% (Activation)”);
define (“AFF_PAYMENT_EMAIL_SUBJECT”, “%%FIRST_NAME%%, You’ve Got An Affiliate Payment”);
define (“FORGOT_PASSWORD_EMAIL_SUBJECT”, “Lost Password”);
define (“LOCKED_EMAIL_SUBJECT”, “Your account has been locked”);
define (“UNLOCKED_EMAIL_SUBJECT”, “Your account has been Unlocked”);
define (“INVALID_PASSWORD_MSG”,”Sorry, either you have entered an invalid username/password, or you may not have activated your account yet.”);
define(“SUCCESS_ACTIVATION”,”SUCCESS! Your account has been successfully activated! We have now sent you an email with your login details that you can use to log in below…”);define(“MSG_SORRY_NO_DATA_FOUND”,”Sorry, no data found.”);
define(“COLNAME_AFFID_TEXT”,”Aff Id”);
define(“COLNAME_NAME_TEXT”,”Name”);
define(“COLNAME_FIRSTNAME_TEXT”,”First Name”);
define(“COLNAME_LASTNAME_TEXT”,”Last Name”);
define(“COLNAME_EMAIL_TEXT”,”Email”);
define(“COLNAME_AMTEARNED_TEXT”,”Amount Earned”);
define(“COLNAME_DATETIME_TEXT”,”Date/Time”);
define(“COLNAME_AMTPAID_TEXT”,”Amount Paid”);
define(“COLNAME_HTTPREFERER_TEXT”,”HTTP Referer”);
define(“COLNAME_DESTINATION_TEXT”,”Destination”);//———- USER PROFILE TEXT ———//
define(“USER_PROFILE_HEADING_TEXT”,”Profile Information”);
define(“USER_PROFILE_FIRST_NAME_LABEL”,”First Name”);
define(“USER_PROFILE_LAST_NAME_LABEL”,”Last Name”);
define(“USER_PROFILE_EMAIL_LABEL”,”Email”);
define(“USER_PROFILE_USER_NAME_LABEL”,”Username”);
define(“USER_PROFILE_NEW_PASSWORD_LABEL”,”Password”);
define(“USER_PROFILE_REPEAT_PASSWORD_LABEL”,”Repeat Password”);
define(“USER_PROFILE_PAYPAL_EMAIL_LABEL”,”Paypal Email”);
define(“USER_PROFILE_PAYPAL_EMAIL_EXTRA_LABEL”,”For Affiliates Only”);
define(“USER_PROFILE_COMPANY_LABEL”,”Company”);
define(“USER_PROFILE_TITLE_LABEL”,”Title”);
define(“USER_PROFILE_ADDRESS1_LABEL”,”Address 1″);
define(“USER_PROFILE_ADDRESS2_LABEL”,”Address 2″);
define(“USER_PROFILE_CITY_LABEL”,”City”);
define(“USER_PROFILE_STATE_LABEL”,”State”);
define(“USER_PROFILE_ZIP_LABEL”,”Zip”);
define(“USER_PROFILE_COUNTRY_LABEL”,”Country”);
define(“USER_PROFILE_PHONE_LABEL”,”Phone”);
define(“USER_PROFILE_FAX_LABEL”,”Fax”);
define(“USER_PROFILE_UNSUBSCRIBE_LABEL”,”You are currently receiving product and <br/>account related emails. Uncheck to stop<br/>receiving all emails (not recommended)”);
define(“USER_PROFILE_SUCCESS_MESSAGE”,”SUCCESS! User has been successfully updated.”);//———- AFFILIATE PAGE LABELS ———//
define(“AFFILIATE_INFO_TOTALEARNINGS_SUBHEADING”,”Total Earnings”);
define(“AFFILIATE_INFO_AFFLINK_SUBHEADING”,”Affiliate Link”);
define(“AFFILIATE_INFO_YOURAFFLINKHOME_LABEL”,”Your Affiliate Link – redirects to home page:”);
define(“AFFILIATE_INFO_AFFLINKSPECIFIC_LABEL”,”Affiliate Link To Specific Page:”);
define(“AFFILIATE_INFO_AFFLINKSPECIFIC_EXTRA_TEXT”,”To link to a specific page, just add the text "&p=<insert_url_here>" to the end of your affiliate link, like this: (no "http://" in the 2nd link at the end – should start with "www")”);
define(“AFFILIATE_INFO_TEST_TEXT”,”test”);
define(“AFFILIATE_INFO_PAYMENT_DETAILS_SUBHEADING”,”Payment Details”);
define(“AFFILIATE_INFO_EARNINGS_DETAILS_SUBHEADING”,”Earnings Details”);
define(“AFFILIATE_INFO_TRAFFIC_STATISTICS_SUBHEADING”,”Traffic Statistics”);//———- USER LINKS PAGE TEXT ———//
define(“USER_LINKS_YOUCURRENTLYHAVEACCESSTO_TEXT”,”You currently have access to “);
define(“USER_LINKS_PRODUCTS_TEXT”,” product(s).”);
define(“USER_LINKS_ACCESS_START_DATE_TEXT”,”Access Start Date”);
define(“USER_LINKS_ACCESS_END_DATE_TEXT”,”Access End Date”);
define(“USER_LINKS_DESCRIPTION_TEXT”,”Description”);
define(“USER_LINKS_LINKS_TEXT”,”Links”);
define(“USER_LINKS_NOLINKSFOUND_TEXT”,”No links found.”);
Contents Of jsenglish.php
//New entry MSG_EMAIL_INVALID added on 07/14/2011
var MSG_EMAIL_INVALID = “Sorry, email id must of a valid format, may not be blank or contain any special characters”;var MSG_MISSING_INFO = “Please enter missing information…”;
var MSG_ENTER_EMAIL = “Please enter your email address before we can email you the password”;
var MSG_ENTER_PASSWORD = “Sorry, the password field may not be empty”;
var MSG_PASSWORDS_MISMATCH = “The two Passwords don’t match. Please try again…”;
var MSG_PASSWORD_INVALID = “Sorry, password contains invalid characters. Please choose from numbers and alphabets only.”;
var MSG_UPDATING_PROFILE = “Please wait… Updating User Profile …”;
var MSG_OPTOUT_WARNING = “WARNING: If you uncheck this box, you may not receive emails relevant to the product you have purchased. Are you sure you still want to Unsubscribe?”;
var MSG_NO_SPECIAL = “Sorry, no special characters allowed”;
Other links….
To customize the DAP Stand-alone Login form, click here.
To customize the DAP Login/Logout widget, click here.
To customize the DAP default Error Message with the ‘Lock’ image, click here.
Creating A Ready-Made Affiliate Toolbox
You already know that DAP has a built-in affiliate program, and everyone who joins your site (or gets a free or paid account) is automatically made into an “Instant Affiliate”.
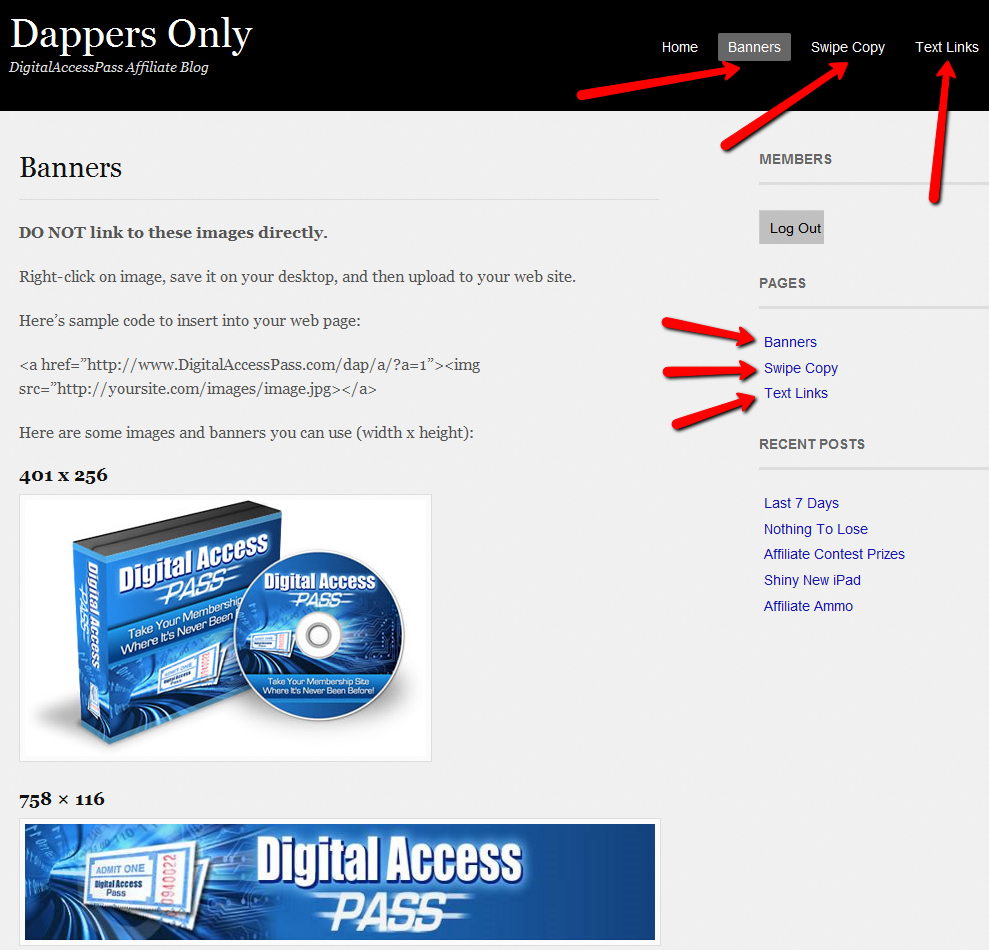
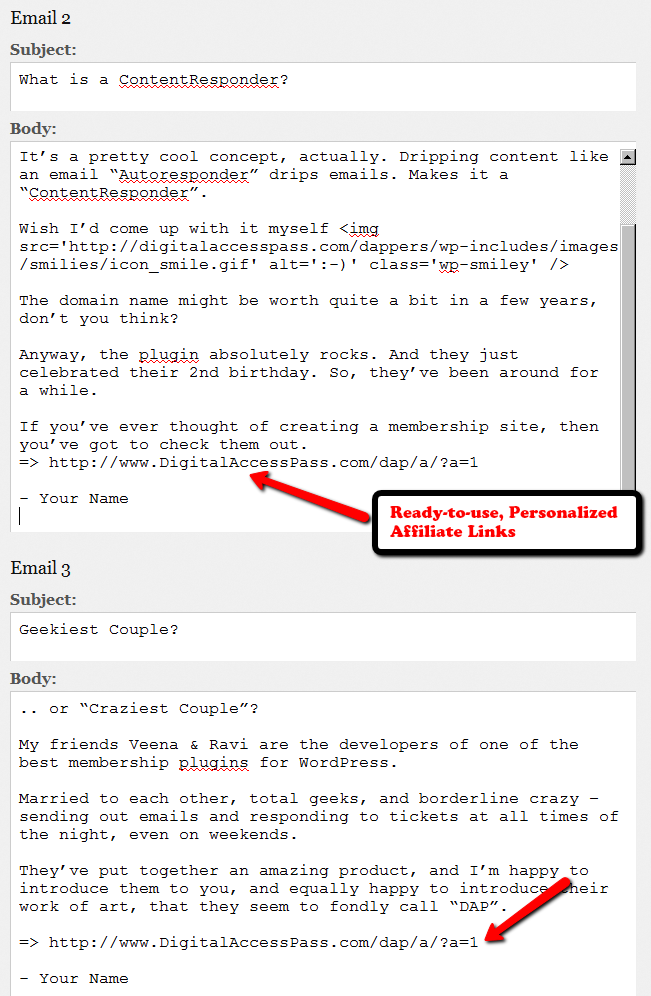
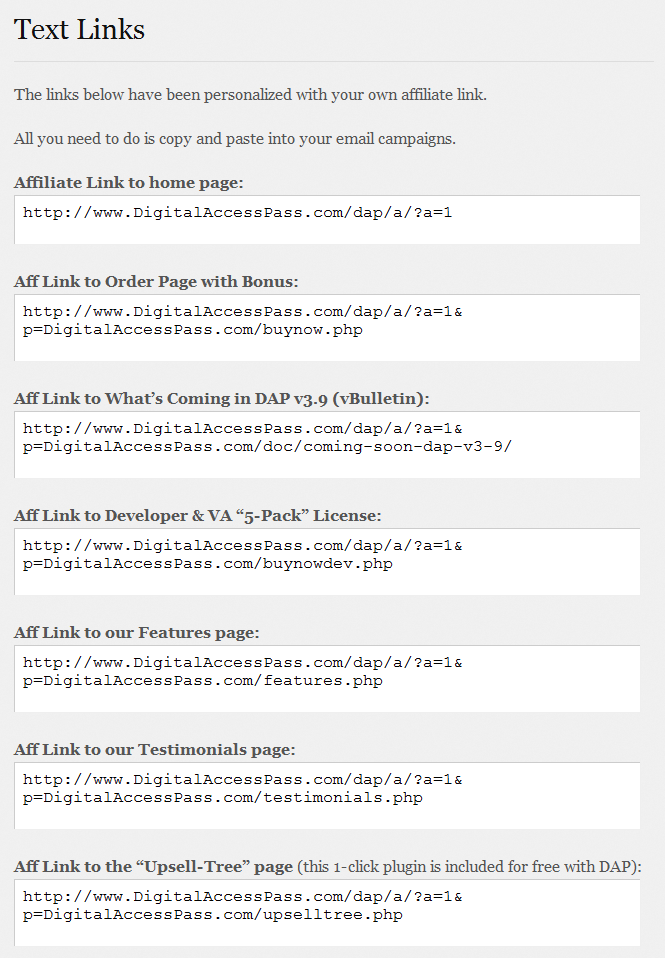
DAP also lets you create an Affiliate Tool Box for your affiliates, with ready-to-use banners, emails, subjects, signatures and text links – all with their own personalized affiliate link embedded into it already.
So all they have to do is copy, paste, and hit send.
See the sample screen-shots below that show what our own affiliate tool box looks for DAP affiliates who wish to promote DigitalAccessPass.com to others.
Banners
Email Copy
Text Links
How To Create The Affiliate Tool Box
Create as many different pages you want on your blog – like “Banners”, “Email Swipe Copy” or “Text Links”.
Or create just one big page for all of this – like “Affiliate Tool Box”.
Download this text file which has all of the ready-made HTML code that you need to insert into the WordPress pages.
Feel free to modify the text as required, and be careful not to delete any of the special characters that are in there just for the formatting.
=> Download Sample Affiliate ToolBox Code
Creating Ready-made Banners & Copy For Affiliates
DAP lets you create a “Affiliate Promo Materials” page that has ready-made, ready-to-copy-paste banner images, HTML code, and email copy, that includes the affiliate link of the affiliate viewing the page, already readily embedded and customized just for her.
Here’s all you need to know:
Wherever you insert the Affiliate Merge Tag….
%%AFF_LINK%%
…into your blog posts/pages, it will get automatically get replaced by the affiliate’s actual affiliate link, that looks like this…
http://YourSite.com/dap/a/?a=1234
So, that’s all you really need to know to create a custom, affiliate promo page.
Creating Customized Banners
Normally, your banner code for affiliates would look like this:
<img src=”/path/to/banner/image.jpg”>
That would simply display a banner that is not linked to any link.
Then, here’s how you would link it to any link.
<a href=”http://LinkToSomething.com”><img src=”/path/to/banner/image.jpg”></a>
Now, instead of the link above, you would insert your Affiliate Merge Tag in there, like this:
<a href=”%%AFF_LINK%% “><img src=”/path/to/banner/image.jpg”></a>
That would display the image, as well as link it to the affiliate’s own custom affiliate link. The above code is what you would enter into the promo page in the “Visual” tab, because you want the affiliate to see the actual raw HTML code that she can copy/paste and publish on their web site.
So when the affiliate views your promo page, they would not see an actual image that is linked to their affiliate link, but the raw HTML – just like what you see below – which they can copy and publish on their web site.
<a href=”http://YourSite.com/dap/a/?a=1234 “><img src=”/path/to/banner/image.jpg”></a>
Obviously, you don’t want them to directly link to the image on your site. So you just tell them that they need to download the image/banner and upload to their web site.
The same can be done for email copy too.
That’s how simple it is.
Order Of Links On “My Links” page
[Updated 05/20/2012: Drag & Drop Re-ordering of links available since DAP v4.3.1]Ordering Links
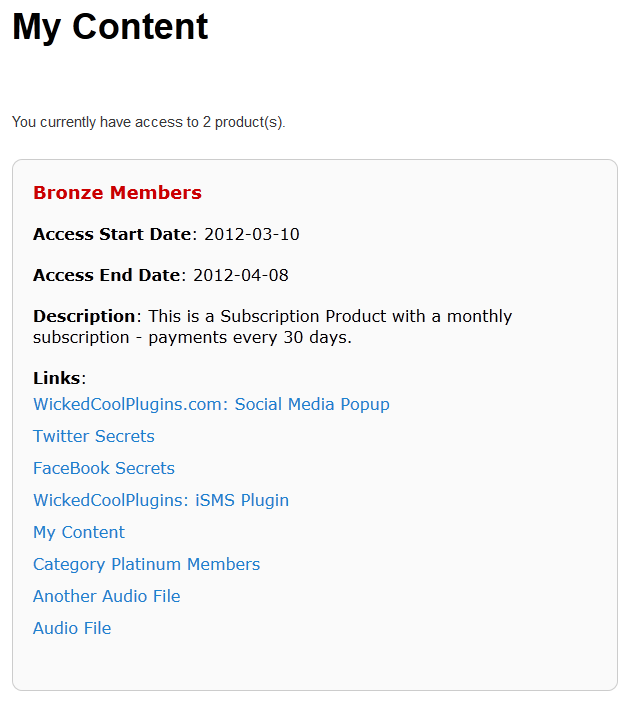
The ordering of links in the ContentResponder tab of a product is required ONLY if you have a “My Content” page (see example below – page uses the merge tag %%USERLINKS%%) and you want control over exactly how those links are displayed in that list:
Fig 1: Example “My Content” page which uses the merge tag %%USERLINKS%%
Ordering by Drip Day
The easiest way to organize links, is to set the dripping “day” for each link.
So if you’re setting up 5 links to be available on Day #1, 2, 3,4 & 5, then in the “My Links” section, DAP will display the links in “Newest On Top” order.
So the newest link (Day #5) will appear first, followed by Day #4, and so on, until Day #1.
Ordering When There Is No Dripping
If you have multiple links that you’re making available all on the same day (like say, all on Day #1), then once you’ve added the links from left to right in the ContentResponder tab of your DAP Product, you can then hold down any row from the Protected Content section, drag and drop and re-order it however you wish to.
Remember that the drag-and-drop re-ordering will only work within different links that are all set to drip on the same day. So for eg., dragging a day 1 link above a day 4 link (see screenshot below) will not work, and it will simply come back to it original position after refreshing the screen. But dragging one Day #1 link above or below another Day #1 link will re-order the links exactly in that order.
Fig 2. Screenshot showing drag-and-drop reordering in action
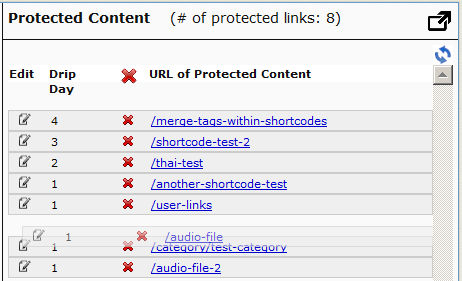
If you see the links order in the above screenshot, that’s the exact same order in which the links will appear when the member views their “My Content” page (or whatever you have called the user links page).
[DAPUserLinks] Shortcode
If you want even more control over how many links are displayed, order of the links, date format etc, then consider our new shortcode shown below:
[DAPUserLinks showProductName=”N” showAccessStartDate=”Y” showAccessEndDate=”Y” showDescription=”Y” showLinks=”Y” orderOfLinks=”NEWESTFIRST” howManyLinks=”10000″ errMsgTemplate=”SHORT” productId=”ALL” dateFormat=”YYYY-MM-DD”]NOTE: orderOfLinks can have one of two values…
NEWESTFIRST will drip newly dripped links at the top. So day 7 link will be above day 1 link.
OLDESTFIRST will drip newly dripped links towards the bottom. So day 1 link will be above day 7 link.
So, here’s another version of the DAPUserLinks shortcode:
[DAPUserLinks showProductName=”N” showAccessStartDate=”Y” showAccessEndDate=”Y” showDescription=”Y” showLinks=”Y” orderOfLinks=”OLDESTFIRST” howManyLinks=”10000″ errMsgTemplate=”SHORT” productId=”ALL” dateFormat=”YYYY-MM-DD”]Related: See more such shortcodes at DAP Shortcodes
How To Use DAP’s Default Password
DAP has a feature where you can ask DAP to always generate a pre-determined, default password of your choice for all new members.
So all new users will be assigned the same default password, which of course, they can change as soon as (or any time after) they login.
This is especially useful if you want a third-party service like Aweber – instead of DAP – to send out the new member’s “Welcome Email” which contains their email and password.
Since DAP is unable to pass the randomly generated password to Aweber, instead, you can setup a default password by going to
Setup > Config > Default Password
This can be found under the Miscellaneous section on that page.
So if you set this password to say, changethis, then DAP will give out the same password to all new users.
Then, in the welcome email you configure at, say, Aweber, you would put the Aweber merge code for email id, and then enter this pre-selected password (because you already know what it is) into your Aweber email, like this:
Hello {!firstname},
Welcome to Example.com. You may log in to your member’s area at:
Email: {!email}
Password: changethisThank you,
– Admin from Example.com
And if you ever change the default password in DAP, don’t forget to also change it in your welcome email at Aweber (or 3rd party email service).
Also, don’t use the default password in any subsequent emails, other than the Welcome email (very first email sent to member through Aweber), because the member may have already changed their password by then.
WARNING: You must have also set up DAP/Aweber integration first before you attempt to do this.
“ProductLinks” Widget: Product-Specific Content
You already know that you can create a “My Content” kind of page within WordPress, that will list all products that a user has access to, and then each product will list the content that they currently have access to (content that has already dripped on them).
But this page is a full-summary of all products, all listed on one page.
Instead, if you wished to create product-specific download pages, where you create a separate page for each product, that lists all the content within just that product alone, then that’s where DAP’s “ProductLinks” Widget comes in handy.
Here’s how you set it up.
- In WordPress admin, go to “Appearance > Widgets” and enable the “DAP ProductLinks” widget by dragging it onto a widgetized section of your theme’s sidebar.
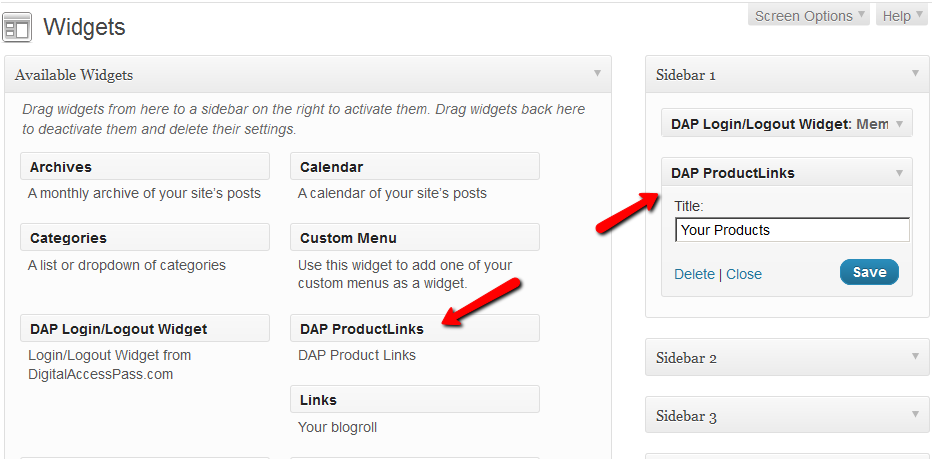
- As soon as you do that, the DAP ProductLinks widget will show up in your blog’s side bar.
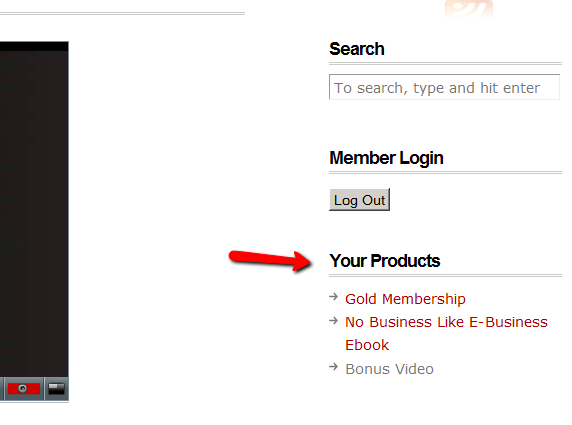
- By default, each of the product names – like “Gold Membership” in the above example – will link to whatever URL you put into the “Post-Login URL” for that particular product (DAP Dashboard > Products > Manage). So the next step is to create a separate page for each product, and then enter the permalink for this new page, into the Post-Login URL of that Product within DAP.
- Create a new page in WordPress – call it, “Gold Membership Content” (for example). In the body of the page, enter the following DAP merge tag:%%PRODUCT_DETAILS_<id>%%
Replace the entire text <id> with the actual Product id from DAP (Products > Manage)
So, if the product’s id is 6 in DAP, then the merge code becomes:
%%PRODUCT_DETAILS_6%%
Save the page. And if you gave the page the title “Gold Membership Content”, then the permalink for this page will be:
http://YourSite.com/gold-membership-content/ - Take the above permalink and enter it into the product “Gold Membership” in the “Post-Login URL” field. That’s it!
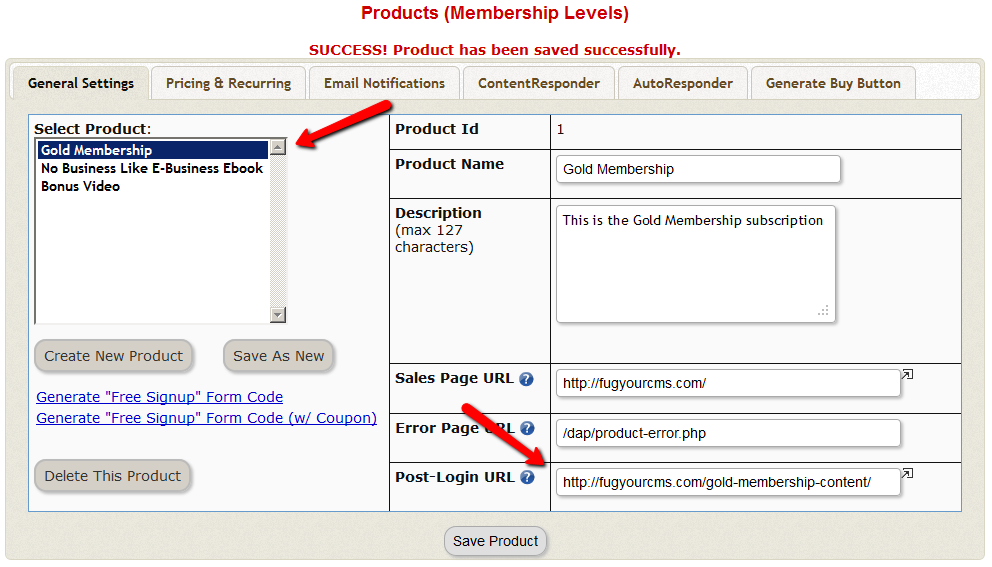
- Do the above for all products and you’re done.
End Result
- For each product that your member buys, the “Your Products” widget will show in the side-bar.
- It will list all of the products that the member has purchased.
- Each of the product names will link to it’s own specific content page
- When member goes to that page, the DAP merge tag you entered for that product will expand into product details and product-specific content links just for that product.
Merge Tags For Email
Here are the merge-tags that you can use in outgoing autoresponder and broadcast emails sent through DAP.
%%FIRST_NAME%%
This will be replaced by the first-name of the user.
%%LAST_NAME%%
This will be replaced by the first-name of the user.
%%EMAIL_ID%%
This will be replaced by the email id of the user.
%%PASSWORD%%
This will be replaced by the password of the user.
%%SITE_NAME%%
This will be replaced by whatever text you have entered in “Setup > Config > Basic > Site Name” in your DAP Dashboard.
%%ADMIN_NAME%%
This will be replaced by whatever text you have entered in “Setup > Config > Basic > Admin Name” in your DAP Dashboard.
%%ADMIN_EMAIL%%
This will be replaced by whatever text you have entered in “Setup > Config > Basic > Admin Email” in your DAP Dashboard.
%%AFF_LINK%%
This will be replaced by the actual affiliate link of the member (Eg., http://yoursite.com/dap/a/?a=1234)
%%SITE_URL_DAP%%
Replaced by your actual web site url (Eg., http://yoursite.com)
%%UNSUB_LINK%%
This is replaced by a 1-click Unsubscribe link that you can add to the bottom of your outgoing broadcast and autoresponder emails.
Using Custom Fields In DAP Emails
You can send custom field values in the DAP emails by using merge tags like this – %%custom_tax_id%%
Add ‘custom_’ in front of the custom field’s database field name.
So if you have defined a custom field called tax_id in your database, to include this field in the autoresponder/broadcast email, just add this – %%custom_tax_id%% to the body of your email.
That’s it. When the user receives the email, dap will automatically replace the merge tag with the user’s tax id value.
So if your email message body contains the following text:
Your Tax Id: %%custom_tax_id%%
When the user receives the message, it will look like this (in this example, the user’s taxId = 9999):
Your Tax Id: 9999
Related Links:
Click here for full documentation about Custom Fields
Click here for merge tags you can use in WordPress posts/pages
This will be replaced by whatever text you have entered in “Setup > Config > Basic > Admin Email” in your DAP Dashboard.
Merge Tags For WordPress Posts & Pages
Here are the merge-tags that you can use in your WP posts, and what they mean. (Click here for merge tags for Autoresponder & Broadcast Emails)
This is better suited for a WP “page”. This text will be replaced by a login form using which your members can log in to your membership site.
%%AFFDETAILS%%
This will be replaced by the entire Affiliate section from the default home page at YourSite.com/dap/ . Better suited for a Page.
This will be replaced by the user profile from the default home page at YourSite.com/dap/. Better suited for a Page.
This will be replaced by the user links section (the list of what products and what links user currently has access to) from the default home page at YourSite.com/dap/. Better suited for a Page.
%%FIRST_NAME%%
This will be replaced by the first-name of the user.
%%EMAIL%%
This will be replaced by the email id of the user.
%%AFF_LINK%%
This will be replaced by the raw affiliate link of the member. If you want it to show up as a link in your blog post, use it like this:
<a href=”%%AFF_LINK%%”>%%AFF_LINK%%</a>
%%USER_NAME%%
This will display the DAP user’s “Username” on the page.
%%USER_ID%%
This will display the DAP user’s ID on the page (ID is a number).
%%FEEDLINK%%
Replaces with user’s personalized RSS feed URL.
%%PRODUCT_DETAILS_<insert-product-id>%%
Replaces merge tag with Product-specific details (including links available to the member as part of that Product) on a specific WordPress page/post.
%%DAPCUSTOMFIELD_<insert-custom-field-name>%%
You can display the value of the user’s own custom fields on your pages, using a merge tag like this:
%%DAPCUSTOMFIELD_tax_id%%
In the above example, tax_id is the custom field that you have created in DAP. So if the name of the custom field in DAP were “ssn”, then the above merge tag would become %%DAPCUSTOMFIELD_ssn%%
Displays data of the user’s “upline” affiliate.
Displays upcoming drip-feed scheduled content.
[DAPRefAffId]
Displays id of affiliate who referred visitor to site. If no affiliate set, displays DAP Admin’s id.
[DAPShowTransactions]
Shows list of all transactions/orders by logged-in user.
[DAPUserSubscriptions]
Shows list of all subscriptions by logged-in user.

