Customizing Logout Button
If you wish to change the default “Logout” button that shows up in the Login/Logout sidebar widget, then here’s what you need to do…
Rename the file
wp-content/plugin/DAP-WP-LiveLinks/DAP-WP-LogoutHTML.html
To…
wp-content/plugin/DAP-WP-LiveLinks/customDAP-WP-LogoutHTML.html
Open this new file customDAP-WP-LogoutHTML.html and inside you’ll see just this one line…
<input type=’button’ name=’dap-logout-button’ value=’Log Out’ onClick=”javascript:location.href=’/dap/logout.php’;” style=”margin-top:5px” />
Change that to…
<input type=’image’ src=”/path/to/button/image.jpg” name=’dap-logout-button’ value=’Log Out’ onClick=”javascript:location.href=’/dap/logout.php’;” style=”margin-top:5px” />
Affiliate Reports
DAP offers a number of affiliate statistics on the “Affiliates > Reports” page.
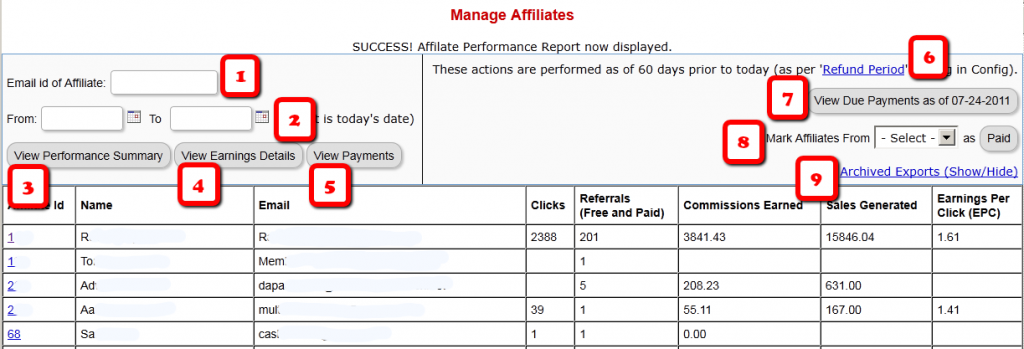
Here’s how it looks as of DAP v4.2.1.
1) Email Id of Affiliate
This is the field where you would enter the email id of an affiliate, if you want to generate a report specifically for an affiliate. If you leave it blank, the report will include all affiliates.
2) “From” & “To” Dates
By default, if you leave these fields blank, then DAP will assume “today’s” date – i.e., the date whenever you’re viewing this page.
3) View Performance Summary
This is the most detailed report available. This is the report being viewed in the above screenshot. For a given time period, for a given number of affiliates (“all” affiliates if (1) is left blank above), it shows…
- Affiliate Id
- Full Name
- Email id
- Clicks generated during selected period
- Referrals generated (includes total of both Free and Paid referrals): If the referred member actually bought something, it constitutes a “Paid” referral. If they simply signed up, say, for your free newsletter or free report or free product, then it is counted as a “Free” referral.
- Commissions Earned: This is the actual amount credited to the affiliate’s account during the selected period
- Sales Generated: This is the amount of the actual sale (purchase) generated for your membership site.
- Earnings Per Click (EPC): This is an indicator of how well your web site is converting clicks into signups/members. So if an affiliate sent you 100 clicks (on their affiliate link), and 5% of them signed up for your “FaceBook Secrets” membership product by paying $10 each, it means a total revenue of $10 x 5 = $50. And if you were paying 30% affiliate commissions for the product, then the affiliate earned $15 in total.Total clicks sent: 100
Total affiliate earnings from those 100 clicks: $15
Earnings Per Click (EPC) = $15/100 = $0.15 – which means, 15 cents per click.The higher the EPC, the easier it will be for you to attract other JV partners and super-affiliates.
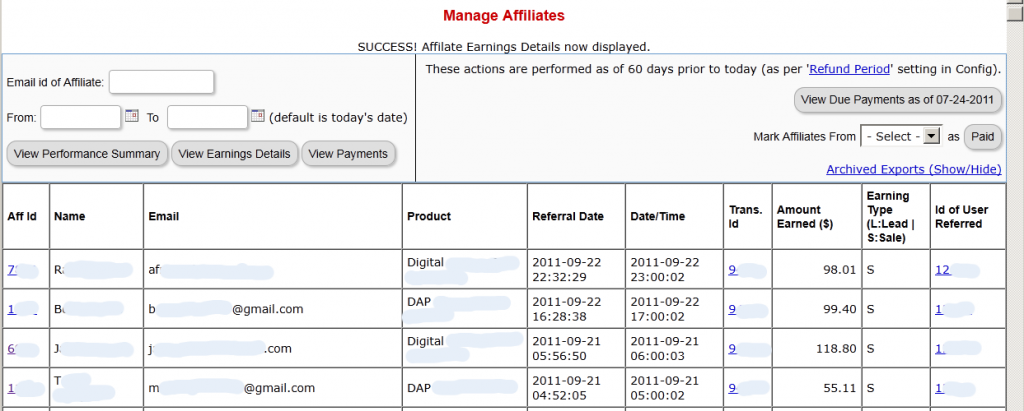
4) View Earnings Details
This shows the breakdown of each purchase referred by each affiliate. It’s a detailed view of the affiliate earnings, that lists each and every transaction (order) in the system that was referred by affiliates, all generated for the selected time period. It displays…
- Affiliate Id
- Full Name
- Email Id
- Product (name) that was purchased by referred buyer
- Referral Date (when affiliate was associated with buyer)
- Date/Time of actual transaction
- Trans Id: This is the transaction (order) id for the actual purchase
- Earning Type (L: Lead, S: Sale): Says what type of a commission credit it was – whether it was a “Pay Per Sale” credit or a “Pay Per Lead” credit.
- Id of User Referred: This tells you the actual user id of the buyer who was referred by the affiliate.
5) View Payments
This shows all payments made to affiliates during the period.
6) Refund Period
This is a config setting that you can change in Setup > Config. This is what drives which orders are picked up for affiliate payment. See this article for more details.
7) View Due Payments as of <date>
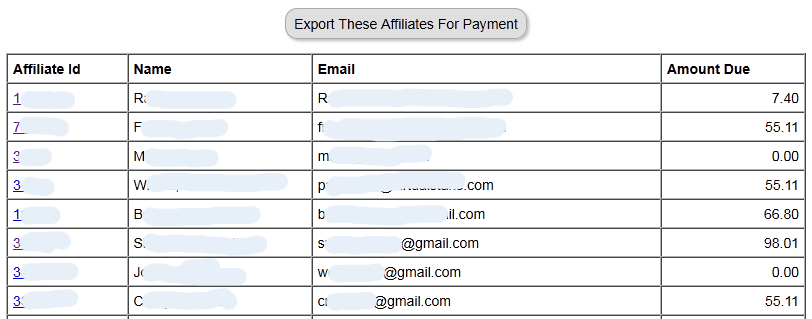
This is the MAIN button you should click to start the process of paying your affiliates each month (or however often it is that you pay affiliates). When you click this button, it will show you a report (see screenshot below) of commissions owed on all orders in the system UNTIL X days ago, where X is your “Refund Period”.
So if today is 10/01/2011, and you have a refund period of 60 days, then DAP will only consider orders prior to 60 days as of today. Which means, orders up to 08/01/2011 (of course, depending on how many days in a month, you may not exactly end up with 08/01/2011, because it goes an actual 60 days back from today – and sometimes, the report will stop at the 2nd or 3rd day of the month – like 08/03/2011. But that’s ok, don’t worry about it). You just focus on paying your affiliates on whatever day you wish to make the payment.
So when you click on this button, DAP will bring you a summary report of all affiliates, and how much they’re owed today, for all transactions referred by them as of 08/01/2011 (as per this example).
And when you click on the “Export These Affiliates For Payment” button shown in the screenshot above, DAP will select and mark those affiliates as being exported for payment.
And DAP will show you Paypal Mass-Pay Ready text report, with the affiliate info and the commission amount info already filled in and ready to go. If you’re paying via Paypal Mass-Pay, then all you need is this file. See this post for details.
NOTE: Being exported for payment doesn’t mean that you’ve actually paid them. Exporting affiliates for payment only means that DAP has now “set aside” those affiliates for payment, and you still need to tell DAP that you’ve actually paid your affiliates.
This is important, because you might export affiliates for payment on the first of the month, but it may take you a day or two (or 10) to actually make the payment – especially if you’re sending out Checks.
So once you’ve made the payment either through Paypal mass-pay, or by mailing your affiliates physical checks, then you need to tell DAP that you’ve actually sent out the payments, which is what you’ll do in the step below.
8 ) Mark Affiliates from <export> as Paid
This is where you will select the most recent export from the drop down (see #8 in first image at the very top), and click the “Paid” button. This is what actually lets DAP know that you’ve actually made the payment, and only after you do this, will the affiliates see the payment show up in the “Payments” section on their “Affiliate Info” page.
9) Archived Reports
This is just a report that shows you past commission payment exports.
Creating Member-specific Content
If you have a coaching program, or have clients for whom you’re doing custom work (like if you were a teacher, CPA, web designer, personal trainer or coach) and wish to publish content that is available to and downloadable by only that specific client/student/customer, then there are THREE ways in which you can do Member-Specific Content in DAP.
1) BEST SOLUTION: Using a combination of a special page for each member PLUS DAP’s “For Your Eyes Only” Shortcode
2) Creating Separate Products for each Member
3) Using DAP’s “For Your Eyes Only” Shortcode
Let’s take a look at each one in detail.
SOLUTION #1: BEST OPTION: Special page for each member PLUS DAP’s “For Your Eyes Only” Shortcode
This is partly manual, partly automated, but is the absolute best solution for multiple reasons, as explained below.
1) For each new member, you would create a separate page. So, for Joe Customer, you would create a new page in WP – http://YourSite.com/joe-customer/
This page would be created after someone has become a member, of course. But creating a WP page for every member will probably take you about what, 30 seconds? So it’s not going to be a big deal (unless you wish to make it one 😉
2) Then, assuming Joe Customer’s “userid” in DAP is 144 (you can find this out on the Users > Manage page). So within the above new page, you would add the following shortcode…
[DAP userId=”144″]protected content[/DAP]
(See DAP’s “Member-Specific Content” Shortcodes )
3) You can start adding any amount of private content between the shortcode start and end tags (where you see protected content above).
4) You can use a simple, free plugin like Exclude Pages to make sure the customer’s page http://YourSite.com/joe-customer/ does not show up in any of your menu’s. Even if it did, it’s not like anyone else can see the contents of the page – only Joe Customer – after he’s logged in to DAP – can see the contents of the page. So it’s secure from everyone else.
Solution #2: Separate Products for each Member
Here, you would create separate products, one per member – and only give that member access to that product. The advantage here, is that you can protect the entire page (not just the content section) and make it available just to that one client, so you can be a lot more creative with this page, use special templates, add sidebar widgets that show content just for that client, use the commenting system to communicate back and forth with the client.
So if you had a client named John Customer, then you would create a DAP Product by name “John Customer”, then take John’s email id and give John access to his product.
And within this DAP Product, you would’ve protected files, pages and posts that only John should get access to. So since only John has access to the product, only he can get access to the content protected as part of this product.
Obviously, it takes a few minutes of additional setup per customer to create a DAP Product specifically for him, but then the few extra minutes of creating a DAP Product would be nothing compared to the few hours (or tens of hours) that you’re actually going to be taking to create the actual custom content for John. So it’s a very small overhead compared to the whole process, where you are actually creating custom content for each member.
Solution #3: No special pages, just DAP’s “Member-Specific Content” Shortcode
If you wish to automated this a bit more than Option #2, then one way is to implement this is using DAP’s “Member-Specific Content” Shortcodes, which look like this:
Using the “userId” parameter in the DAP shortcode, you can now protect a piece of content so that only John Customer (who has the user id “144” in your membership site) user can see it.
[DAP userId=”144″]protected content[/DAP]
So on a single page, you may publish a number of these shortcodes, with content meant only for specific members protected within those shortcodes.
And doesn’t matter which one of your members visits the above page, they will all only see content intended only for them, and will be unable to see content intended for others.
So those are the three ways in which you can create Member-Specific Content.
Member-specific Chat Room
Using our WPChatR Chatroom plugin for WordPress, you can also create a separate page per user, then put a chat room on that page specific to that user, so you can have unlimited back-and-forth real-time or off-line chats with one specific member.
Merging User Accounts
User ID 111 has been created with email id ABC123@somewhere.com
Same user buys a different product using a completely new (Paypal) email id. and DAP creates User ID 999 with PayPal email XYZ789@anothersite.com
User now has 2 accounts and wants only ABC123@somewhere.com (user ID 111) to be active.
So here’s what you should do:
- Place XYZ789@anothersite.com in the PayPal email field of User ID 111 and save.
- Give User ID 111 access to all products that User ID 999 currently has active, with matching start and end dates.
- Delete User ID 999 fully from the system.
If User ID 111 purchases additional products through Paypal, and her primary Paypal email id is still XYZ789@anothersite.com, then that Paypal email id will be recognized by DAP, and all purchased products will be activated under User ID 111 and no additional User IDs will be created.
However, if User ID 111 has changed their primary Paypal email id to be something else like XYZ123@yetanother.com, then the next time they make a purchase, DAP will not know it’s the same person, and will end up creating a completely new user id for the buyer. Which means, you will have to do the merge again, and replace the old Paypal email id in DAP with the new Paypal email id of the buyer.
The “Smart Login” Process
DAP has a very powerful, flexible and easy-to-use log in flow for your users and members.
- Log in from a dedicated log in page, or
- Log in from the login form on the side-bar (login/logout widget), or
- Log in through the log in form shown on “Sorry, you don’t have access to this content. Please log in first…” kind of error messages.
And we call it the Smart Login, because the login process will work differently under different conditions, all designed to make the user-experience for your member more smooth and consistent with general login standards around the web.
So let’s see the various possible login locations in DAP.
But first, it is important to note that DAP has two main types of logins.
Primary Login
This is where it is considered a “generic” login by your member. For eg., a member came to your web site, and then just generally wants to log in to the member’s area – so they have no “context” – it’s NOT as if they were trying to view a specific page or post, got challenged with a login form, and then logged-in from there. That makes this a “Primary Login“.
Examples of this are…
a) Dedicated Login Page: You have a dedicated login page, like http://YourSite.com/login/ – which is what you’ve entered in to “Setup > Config > Login URL“. The body of this page has the DAP merge tag for the login form, which is %%LOGIN_FORM%%
b) Login/Logout Widget on any page of your web site. This is also considered a primary login. The reasoning here is that if they’re logging in through a sidebar widget, it means that they just want to log in to the member’s area, so it is considered primary login.
Secondary Login
This is a login action that HAS “context”. Say, a member landed deep into your site (not the home page, not the dedicated login page) and were challenged by the “In Page Error Message” that says something like “Sorry, you must log in before you can view this content” and are presented with a login form right on that very same page. They were trying to read something before they were asked to log in first – which means, they must be returned to the same page they were trying to view BEFORE they were asked to login. So that makes this a “Secondary Login“.
Examples of this are…
a) Any custom “Error Page”, where you have inserted the DAP merge tag for the login form, %%LOGIN_FORM%%.
b) DAP’s “In-Page Error Message” which says “Sorry, this is private content – you must log in first before you can view this”.
c) Log in form showing up on a page when “Sneak-Peek” is enabled.
Redirection Rules
Based on whether it’s a Primary Login or a Secondary Login, your member will be redirected to a different location.
1) If it is a Primary Login action, then…
a) They’re taken to the “Post-Login URL” if set at a Product-level AND they have access to just one Product.
b) They’re taken to the GLOBAL “Post Login URL” (under Setup > Config) if you have NOT set anything at a Product-level, OR if they have access to more than one Product.
This scenario is the only one where the Post-Login URL is ever used (whether it’s the Product-level or Global-level).
1) If it is a Secondary Login action, then…
They’re always redirected back to the same page they were on (or were trying to access) before they were challenged to log in first to view the content.
Bottom-line:
Primary Login is predictable, and you (the DAP Admin) control where they go right after they login.
Secondary Login depends on “context”, and they’re taken back to whatever page they were on, before they logged in.
Secure RSS Feeds
Once you protect a post in DAP, you can …
a) Make it completely disappear from your feed except for authorized users who have valid access to the post and are using a member-specific RSS feed URL
-OR-
b) You can show a “Summary” of every post, by turning on sneak-peek and making sure you have inserted the “<!–more–>” tag entered into each of your posts.
Troubleshooting RSS Feeds
If your blog post is showing in its entirety in your feed, then….
1) You may not have protected the post in DAP at all, so it’s an unprotected post, which will (and should) show up in your feed
-OR-
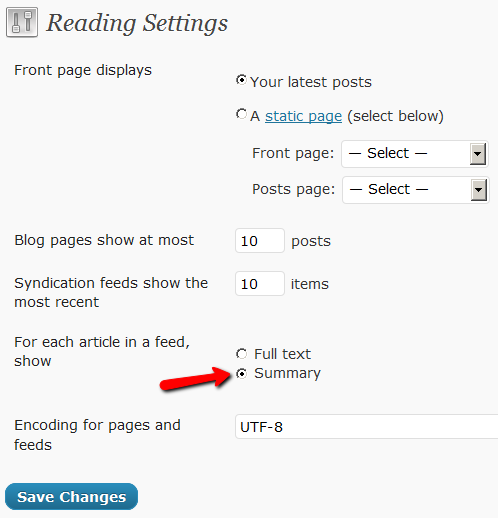
2) You have turned on Sneak-Peek and haven’t inserted the WordPress “more” tag (<!–more–>) into each of your posts. If you turn on Sneak-peek, then you must insert more tags into all posts. Also, if you have turned on Sneak-Peek, then you must also do this…
Go to “Settings > Reading” in WP admin, then set “For each article in a feed, show” to “Summary“.
If it is set to “Full text”, then it will show the full text in the feed, which is not what you want.
Custom RSS Feed Links For Members
Starting DAP v4.2, each of your members can now get their own unique RSS feed link that they can use with a feed reader (like Google Reader, FeedBlitz, iTunes, etc) to get a custom RSS feed with content that they’re eligible to view.
To give each of your members their own unique RSS Feed URL, just insert the following line of code into the top of the “Member Links” or “My Content” type page, or wherever you want your users to see their personalized RSS feed link…
If your blog is in the root…
http://YourSite.com/feed/?key=%%ACTIVATION_KEY%%
If your blog is in a sub-folder (say “/blog”)…
http://YourSite.com/blog/feed/?key=%%ACTIVATION_KEY%%
The text %%ACTIVATION_KEY%% in the above URL will be replaced with their own custom key, like…
http://YourSite.comcom/feed/?key=123456789
They can then copy that link, enter that into any feed reader, and it will show content specific to their account.
Custom Feed Link Security
Another useful feature we’ve added, is that the custom feed link also does IP count validation. So if they share the feed link with others, then after “X” unique IP login attempts (where “X” is configurable by you, the DAP Admin, in Setup > Config), their account will automatically get locked out.
DAP’s “Pause Membership” Feature
How It Works
Joe Member joins your site on 01/01/2011.
He stays a member for about 3 months. Let’s say it’s now mid March. He wants to take a couple of months break. So he goes on a 2 month break. Comes back end of May and wants to resume his membership.
DAP allows him to pick up right where he left off – which is continuing to receive content as of April (04/01/2011), even though today’s date is May 25th, 2011.
So while he took a break, other members who did not take a break in membership, continued to pay for those 2 months, and continued to receive content dripped through those months. So it is only fair that when he does come back end of May and resumes his subscription, he does not resume from June’s content, but from April’s content (when he last put his membership on “Pause”).
It’s ok if you’re not dripping content on a monthly-basis, but rather on a “day” basis. So to put it in terms of “days”, when Joe resumes his subscription, since he was already 90 days old in the system when he put his subscription “On Hold”, and comes back another 60 days later (roughly about 2 months), then DAP will start dripping Day #91 content onwards for him, and NOT Day #151 onwards (he didn’t pay for 2 months in between).
This is how DAP works right out of the box. Nothing special to configure. And DAP automatically takes care of pausing the dripping when he is not paying.
WARNING: Just remember that in order for you to put his actual payments on hold, you will need to have a payment gateway like Authorize.net or Paypal Website Payments Pro. Or you must be using a shopping cart like http://1SiteAutomation.com . Using something like Paypal Standard or ClickBank will not allow you to put the actual charging of his credit card on hold.
NOTE: If you actually did want him to start receiving current content even though he left for 2 months, then all you have to do is, once he comes back and starts paying again, just extend his access end date on his account (which will initially be showing 03/31/2011 – end of March, when he left) and modify it and make it 05/31/2011. So when his next payment comes in after he resumes, DAP will extend his access end date to 06/30/2011 – which means, he can now access all of the current content.
Manually Crediting Affiliates
Please note that an affiliate will get their commissions credited only if there’s an actual payment (transaction) in the system for that purchase.
So if you have marked someone as “PAID”, for whatever reason, then even if there is an affiliate associated with that user, then the affiliate is not going to get credited any actual commissions because there is no payment in the system.
Here’s how to manually credit affiliates for a sign-up or purchase…
1) Add Transaction If None Exists
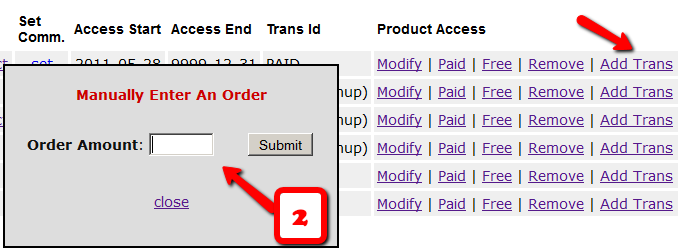
If there is no payment associated with the purchase, and you’ve marked the user as “FREE” or “PAID”, then you must first enter an order (transaction) into the system. So search for the user by email id on the Users > Manage page, and on their row for that Product, click on “Add Trans” (which stands for “Add Transaction”).

2) Add Transaction Amount – If None Exists
When you click on the “Add Trans” link, you will see a small popup appear (see image below) that allows you to manually enter an order. So if the purchase was for say $97, then you would enter “97” or “97.00” in the “Order Amount” field and click on “Submit”.
3) Verifying Order Id
Once you’ve entered a manual order, the “Trans Id” column will change from “PAID” to an actual transaction (or order) id – in the example below, it turns to Transaction Id “3”.
4) Give Manual Credit To Affiliate
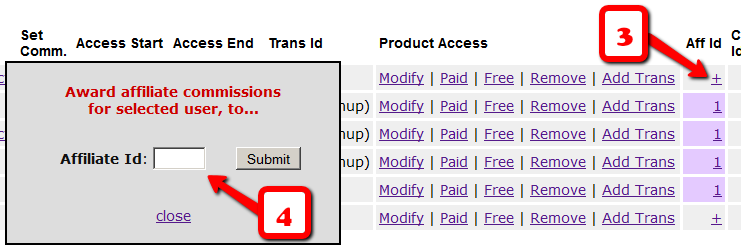
Now that there’s an order in the system, it’s time to manually give credit to the affiliate. Now on the same User row, scroll all the way to the end, and under the “Aff Id” column, if you already see a number, then it means some other affiliate is already associated with this purchase. You cannot change that affiliate id at this time.
But if you see a “+” (plus sign) there instead of a number, it means that no affiliate is associated with that purchase yet, and you will be able to give credit for that purchase or sign up to any affiliate in the system.
So when you click on the “+” sign, you will see a small popup come up, which allows you to enter the affiliate id (must be a number) of any user in the system. Please note that ever user has a unique number (“User Id”) associated with their account. That’s the number you should enter here.
5) Verifying Manual Credit
Let’s say you gave credit to Affiliate Id 5 for this purchase. So now you should see the “+” sign at the end of the row change to “5”. That means, user #5 has been given affiliate credit for this purchase. So assuming you have already set up affiliate commissions for this product (under Affiliates > Set Commissions ), then at the top of the next hour, when the hourly cron job runs, the affiliate commission will be “credited” the affiliate’s account depending on the commissions set up for the product.

WARNING
Sometimes you may enter a manual transaction for a purchase at the same time DAP is processing an automated transaction for that same purchase.
That means, there are now two transactions in DAP for the same purchase – which can cause problems in accounting.
At the very least, you may end up paying double commissions to the affiliate who referred the user, because all affiliate commissions are calculated from sales, and if you have two entries for the same purchase, then the affiliate will get paid twice.
So if you see two credits for the affiliate, you must note that it will not be for the same transaction, but for different transactions.
So be careful when you’re entering Manual transactions. That is only for when there is no way to automate it in DAP, and you’re unable to bring the transaction into DAP automatically.
If you see two affiliate commission credits (one for the automated transaction that DAP picked up, and one for the Manual transaction that you entered), then just refund the manual transaction in DAP. There will probably be a change to the user’s access because of the refund. So make a note of the current access of the user BEFORE you do the refund, and then AFTER you’ve processed the refund, go back to the User’s details on the Users > Manage page, and manually adjust their access to make sure it’s accurate.
Troubleshooting: Paypal Coupon Error Emails
Problem: You see emails sent to your DAP Admin email account that look like this:
paypalCoupon.php: missing item_name
-or-
paypalCoupon.php: No such Product found – SomeProductNameHere
This could be happening because….
a) Some robot software somewhere is auto-posting to that URL.
b) It’s possible that a search engine spider or spambot is hopping from link to link, submitting the form repeatedly from the backend, and because the form is being submitted in an illegal/invalid fashion, DAP is complaining about a missing coupon code.
So for now, if everything else is working ok, and the annoying email is the the only issue, then you can just ignore those emails. Or better yet, simply put a filter on that email subject and have it directly sent to the trash folder in your email client.
Strange Characters In Emails
If you or your members are noticing strange characters in emails – especially where there should normally be a single or double quote, then these are due to what are known as “Smart Quotes”.
These special characters always show up when you copy text from a WordPress blog (some themes use these characters) or a Microsoft Word document.
Single quote:
'(correct)
`(incorrect)Double quote:
"(correct)
``(incorrect)
The single quote that works correctly is located next to the “Enter” key.
The incorrect one is located next to the “1” number key.
So copy your email text to a text editor, like notepad. Then change all single quotes to be ‘ and all double-quotes to be “ in your emails. Then put them back into DAP, and then test.
The “strange characters” issue should then be resolved.
NOTE: In a future version, we will implement an enhancement in DAP so that DAP can handle this automatically, but for now, the above solution is your only option.

