Creating Ready-made Banners & Copy For Affiliates
DAP lets you create a “Affiliate Promo Materials” page that has ready-made, ready-to-copy-paste banner images, HTML code, and email copy, that includes the affiliate link of the affiliate viewing the page, already readily embedded and customized just for her.
Here’s all you need to know:
Wherever you insert the Affiliate Merge Tag….
%%AFF_LINK%%
…into your blog posts/pages, it will get automatically get replaced by the affiliate’s actual affiliate link, that looks like this…
http://YourSite.com/dap/a/?a=1234
So, that’s all you really need to know to create a custom, affiliate promo page.
Creating Customized Banners
Normally, your banner code for affiliates would look like this:
<img src=”/path/to/banner/image.jpg”>
That would simply display a banner that is not linked to any link.
Then, here’s how you would link it to any link.
<a href=”http://LinkToSomething.com”><img src=”/path/to/banner/image.jpg”></a>
Now, instead of the link above, you would insert your Affiliate Merge Tag in there, like this:
<a href=”%%AFF_LINK%% “><img src=”/path/to/banner/image.jpg”></a>
That would display the image, as well as link it to the affiliate’s own custom affiliate link. The above code is what you would enter into the promo page in the “Visual” tab, because you want the affiliate to see the actual raw HTML code that she can copy/paste and publish on their web site.
So when the affiliate views your promo page, they would not see an actual image that is linked to their affiliate link, but the raw HTML – just like what you see below – which they can copy and publish on their web site.
<a href=”http://YourSite.com/dap/a/?a=1234 “><img src=”/path/to/banner/image.jpg”></a>
Obviously, you don’t want them to directly link to the image on your site. So you just tell them that they need to download the image/banner and upload to their web site.
The same can be done for email copy too.
That’s how simple it is.
Order Of Links On “My Links” page
[Updated 05/20/2012: Drag & Drop Re-ordering of links available since DAP v4.3.1]Ordering Links
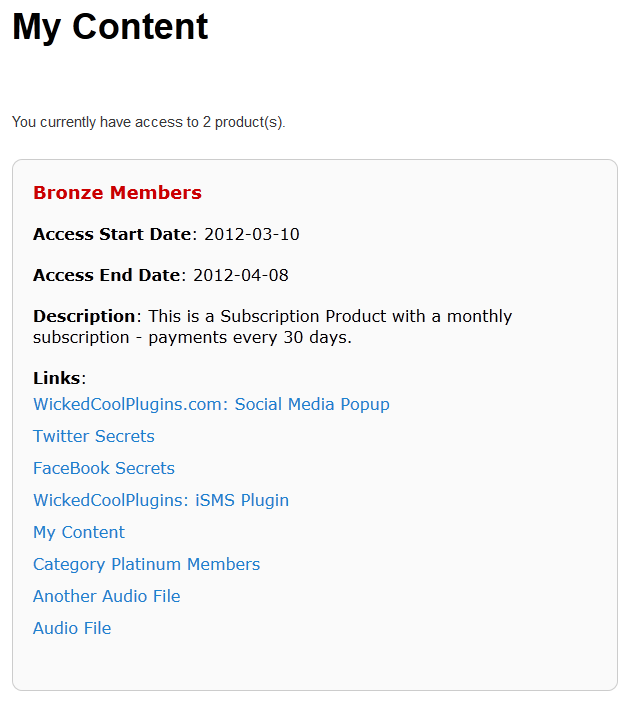
The ordering of links in the ContentResponder tab of a product is required ONLY if you have a “My Content” page (see example below – page uses the merge tag %%USERLINKS%%) and you want control over exactly how those links are displayed in that list:
Fig 1: Example “My Content” page which uses the merge tag %%USERLINKS%%
Ordering by Drip Day
The easiest way to organize links, is to set the dripping “day” for each link.
So if you’re setting up 5 links to be available on Day #1, 2, 3,4 & 5, then in the “My Links” section, DAP will display the links in “Newest On Top” order.
So the newest link (Day #5) will appear first, followed by Day #4, and so on, until Day #1.
Ordering When There Is No Dripping
If you have multiple links that you’re making available all on the same day (like say, all on Day #1), then once you’ve added the links from left to right in the ContentResponder tab of your DAP Product, you can then hold down any row from the Protected Content section, drag and drop and re-order it however you wish to.
Remember that the drag-and-drop re-ordering will only work within different links that are all set to drip on the same day. So for eg., dragging a day 1 link above a day 4 link (see screenshot below) will not work, and it will simply come back to it original position after refreshing the screen. But dragging one Day #1 link above or below another Day #1 link will re-order the links exactly in that order.
Fig 2. Screenshot showing drag-and-drop reordering in action
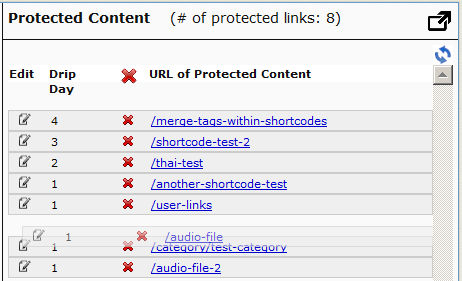
If you see the links order in the above screenshot, that’s the exact same order in which the links will appear when the member views their “My Content” page (or whatever you have called the user links page).
[DAPUserLinks] Shortcode
If you want even more control over how many links are displayed, order of the links, date format etc, then consider our new shortcode shown below:
[DAPUserLinks showProductName=”N” showAccessStartDate=”Y” showAccessEndDate=”Y” showDescription=”Y” showLinks=”Y” orderOfLinks=”NEWESTFIRST” howManyLinks=”10000″ errMsgTemplate=”SHORT” productId=”ALL” dateFormat=”YYYY-MM-DD”]NOTE: orderOfLinks can have one of two values…
NEWESTFIRST will drip newly dripped links at the top. So day 7 link will be above day 1 link.
OLDESTFIRST will drip newly dripped links towards the bottom. So day 1 link will be above day 7 link.
So, here’s another version of the DAPUserLinks shortcode:
[DAPUserLinks showProductName=”N” showAccessStartDate=”Y” showAccessEndDate=”Y” showDescription=”Y” showLinks=”Y” orderOfLinks=”OLDESTFIRST” howManyLinks=”10000″ errMsgTemplate=”SHORT” productId=”ALL” dateFormat=”YYYY-MM-DD”]Related: See more such shortcodes at DAP Shortcodes
Partial Content Protection Using Sneak-Peek
DAP has a feature called “Sneak-Peek” where you can show a part of your blog post or page to casual visitors (as well as to search engines like Google) and then when they click on the “Read more…” link, the protection will kick in for the rest of the post, and DAP will say something to the effect of “Sorry, you must be logged in to access this content. Please login below or click here to get access”.
And that error page will contain both the login form, as well as a link to your sales page. Of course, you can customize this error page to say whatever you want, but that’s another topic altogether.
Advantages of Sneak-Peek
Sneak-Peek allows you to show “teaser” content to potential members, instead of fully locking it up and showing just an error page. Using Sneak-Peek allows you to show some content to casual visitors in order to get them to subscribe to see the rest of the content, as well as keep some content open so that search engines like Google will have some content to index in their search databases, so that the open part of the content can show up in search results for potentially matching keywords, and bring you some free organic search traffic to your site.
How this works
WordPress has a feature called the “more” tag. Basically it is a bunch of text (<!–more–>) that you insert into your posts or pages. And WP will then break up your post right at the point where you inserted the more tag, and replace that tag (and everything that follows) with a “Read more…” link
Fig A: “More” icon in WP. Click to enlarge.

You can also insert the more tag in to your post or page, by clicking on the icon shown in the image above – that looks like two rectangles separated by a dotted line – on the WordPress page/post edit screen.
Of course, exactly what that “Read more” link will say (it could say, for eg., “Click here to read the rest of this post”) is determined by your actual WP theme.
Regardless of what it says, when you have a protected post, by default (when sneak peek is off) that post will completely disappear from your blog for non-members and those who are logged in, but don’t have access to it yet. And even to Google.
But if you insert the “More” tag in to all of your pages and posts, then on your blog’s summary page (which lists all of your posts), all posts with the more tag (protected and un-protected will show up to the more tag, and when someone clicks on the “Read more’ link, that’s when DAP’s security kicks in and if the user has access to that content, it will show her the rest of the post. But if the user is either not logged in, or is logged in and does not have access to that content (either access is yet to come because of the drip, or content has already expired), then it will show the appropriate error message.
Enabling Sneak-Peek
In your DAP Admin Dashboard, go to…
“DAP Admin > Setup > Config > WordPress Sneak Peek: Show snippets of post (upto the `More` break) even for protected posts?“
… and set the above setting to “Y” (for ‘yes’),
Update on 09/07/2014
To protect your content, if you turn on “Sneak-Peek” in DAP, and you inadvertently (or intentionally) don’t insert the “more” tag into a post, then the entire post will get hidden and protected by default, and nothing will be shown except the error message.
Troubleshooting Product Settings
Summary
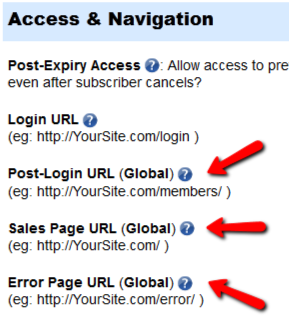
DAP has 3 fields which are applicable at a Product-level.
If a content (page/post) is part of just one single product, then the Product-level settings will apply.
But if a content (page/post) is part of multiple products, then DAP can’t figure out which product’s settings to use – so it falls back to the “GLOBAL” equivalent of that same setting under Setup > Config.
The 3 fields are…
- Post-Login URL
- Sales Page URL
- Error Page URL
All 3 of these have both a Product-level setting, plus a fall-back Global setting under Setup > Config.
1) Post-Login URL not redirecting to the right page
If the user has access to more than 1 DAP Product, then DAP cannot decide which Product’s Post-Login URL to redirect the user to. So it simply redirects the user to the global equivalent of that URL at Setup > Config > Post-Login URL (Global)
So if you’re testing the “Post-Login URL” field, make sure you create a test user with access to just that one product, and then log in as her and test.
2) Error Page URL not redirecting to the right page
If the content that user is trying to access, but is not eligible to access, is part of just one DAP product, then that product’s “Error Page URL” will apply. And this field is set to “/dap/product-error.php” by default. Even if you set this to blank, it will assume that to be the same as teh default value, and the default “In-page Error Message” will apply.
If the content that user is trying to access, but is not eligible to access, is part of more than 1 DAP Product, then DAP cannot decide which Product’s “Error Page URL” to use. So it simply uses the global equivalent under Setup > Config > Error Page URL (Global)
If you want to redirect the error page URL to a custom error page, then you have to enter that into each product, as well as one for the global one.
3) “Sales Page URL” on error page not pointing to right URL
(OR)
Lock message says “Sorry, this content is for members only. Click here to get access” but “Click here” points to my incorrect URL
If the content that user is trying to access, but is not eligible to access, is part of more than 1 DAP Product, then DAP cannot decide which Product’s “Sales Page URL” to show on the “In-Page Error Message” shown to the viewer. So it simply uses the global equivalent under Setup > Config > Sales Page URL (Global)
So make sure you have set up a URL in that field.
4) Clicking on a protected Category is not taking user to the correct “Error Page URL”
When you click on a category (instead of a single post), then because the category could contain many posts, each of which could be part of multiple Products. So DAP is unable to choose just 1 single Product from which to pick the “Error Page URL” and redirect the visitor to. So it just shows the error message with the padlock image, which can be customized. Click here for details.
| 3. The Lock, being generic, says “Sorry, this content is for members only.” but does not specify, as I (will) have several different types of members. It should say something like “Sorry, this content is for %%PRODUCT%% subscribers only.” Can this actually work? I am just guessing. | |||
|
|||
Disabling The Built-In Affiliate Program
There are many reasons for wanting to have more control over the affiliate program – or even completely disable it for the entire web site.
1) You simply don’t wish to let people know that you have an affiliate program – maybe it is because you don’t want to confuse the mom-and-pop niche that you are in with crazy words like “Affiliate” and “Commission” :-). Or you just don’t need affiliates and don’t wish to pay commissions
2) You want to allow only certain users to be affiliates. You don’t want every member to automatically become affiliates.
3) You are using a 3rd party affiliate service – like ClickBank – and don’t wish to use DAP’s built-in affiliate program.
Completely Disabling The Affiliate Program
This is easy to do. Don’t announce any affiliate program. Don’t say anywhere that you have one, or that you’re offering commissions. Do not setup commissions for your products. Do not create an “Affiliate Info” page, so no one will know what their affiliate link is, and since no commissions are set, no one will get paid anything.
Basically, don’t do anything to set up any of the the affiliate stuff, and that’s as good as having no affiliate program.
Signing Up Affiliates
Allowing Only Hand-Picked Affiliates
If you do not want all members to become affiliates, and only want people you want – like your business associates and JV partners – to be the only affiliates, then…
a) Create a separate product called Affiliates. But do not publish a public sign-up form for that product. So no one can sign-up for that, and the only way to get access to it is if you manually added them in from the DAP Admin Users > Add screen.
b) Create the Affiliate Info page that displays all of the affiliate information and stats. But add that page only to this Affiliates product, and not to any other product. So only those with access to the Affiliates product can even get to the Affiliate Info page.
Hide Affiliate Info On dap/index.php (Non WP)
If you are using DAP with a non-WordPress site, or simply using the the default http://YourSite.com/dap/index.php page as your members’ area, then all you have to do is go to…
DAP Admin > Setup > Config > Display Affiliate Details
… and set it to “N”.
That will essentially “hide” the affiliate section from showing up on the default DAP home page (at http://YourSite.com/dap/index.php)
—
NOTE: In a future version of DAP, we will have the ability to selectively turn off an individual’s ability to use their affiliate link, so DAP will completely ignore all referrals from the affiliate, and won’t track anything from them.
Aweber To DAP (<=4.3.1)
Follow this documentation page for Aweber-to-DAP integration only if you’re using DAP 4.3.1 or older.
(For DAP version 4.4 and newer, click here)
Subscriber Flow
The flow of subscriber in this model, is “FROM Aweber TO DAP“. User gets added to Aweber first, then arrives at DAP via Aweber “thank you page”, at which point she gets added to DAP.
Now, if the flow is from DAP-to-Aweber, and are using email parsing to integrate DAP and Aweber, then your Aweber list will always be double-opt-in (as per Aweber policy, nothing to do with DAP).
But if you want your Aweber list to be single-opt-in, then you can use an Aweber signup form on your squeeze page (instead of the DAP sign-up form) and then have Aweber add users to DAP.
Please note that you cannot use this flow for Paid members – because paid members will need to have paid first, which means DAP needs to process their payment first, and if successful, it can add them to Aweber. So for paid members and paid content, always use the other DAP-to-Aweber flow.
But for free signups (say, like when you’re trying to build a list), you can add them to Aweber first using the flow explained below, just so you can take advantage of making your Aweber list single-optin, and then have Aweber add the subscriber to DAP on the other end. So this way, DAP can then create a free account for them, email them their login/password, and give them access to the “Free” content (that is, content available only to “Registered” users, so to speak), etc.
So here are the steps…
Aweber To DAP Integration
1. Go to DAP Dashboard > Products > Manage page.
2. Note down the Product Id of the product to which you want to sign-up the users (after adding them Aweber first, of course)
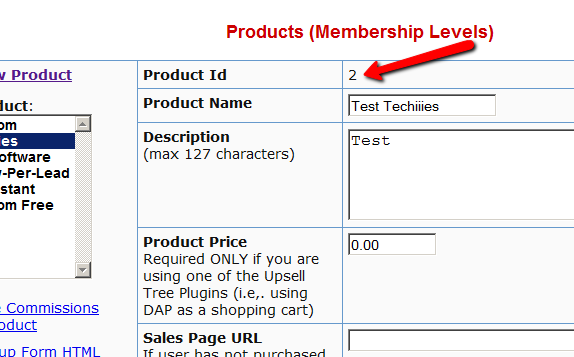
3. There is a file called dap-aweber.php in the dap folder. Make a copy of that file and call it dap-aweber-PRODUCTID.php.
Replace with the text PRODUCTID with the actual Product Id you noted in the previous step.
So in the example above, Product Id is 2. So the name of the file copy should be dap-aweber-2.php.
4. Open this file (dap-aweber-2.php).
The first line of code in this file looks like this:
$default_product_id = 1; //Change this to any product id from DAP
Change the part shown in bold below:
$default_product_id = 2; //Change this to any product id from DAP
Upload this file back to /dap folder on your site.
Aweber List Is Single Optin
If your Aweber list is single-optin, then follow the steps below. If not, skip to “Aweber List Is Double-Optin” flow further below.
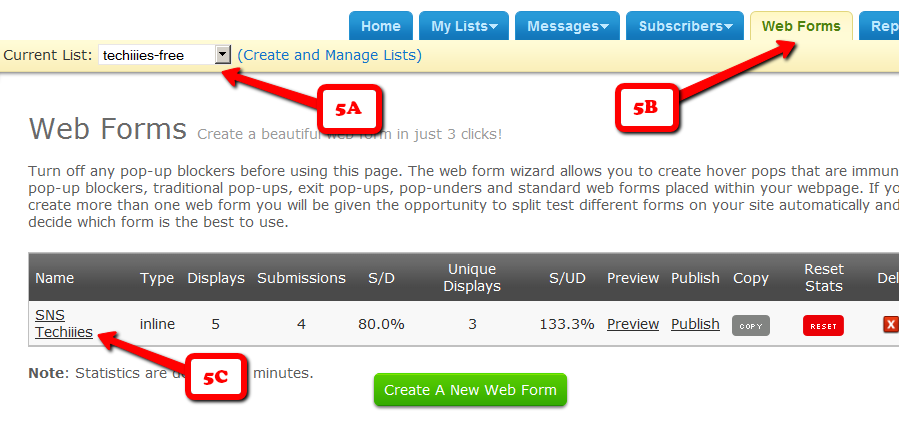
5. Now login to your AWeber account.
5A) From the “Current List” drop-down, select the list that you wish to sign up users to.
5B) Click on “Web Forms” in the menu at the top.
5C) Edit existing form by clicking on the name of the list.
6. On the next page – the list form generator page – click on ‘Go to Step 2’ towards the bottom of the page.
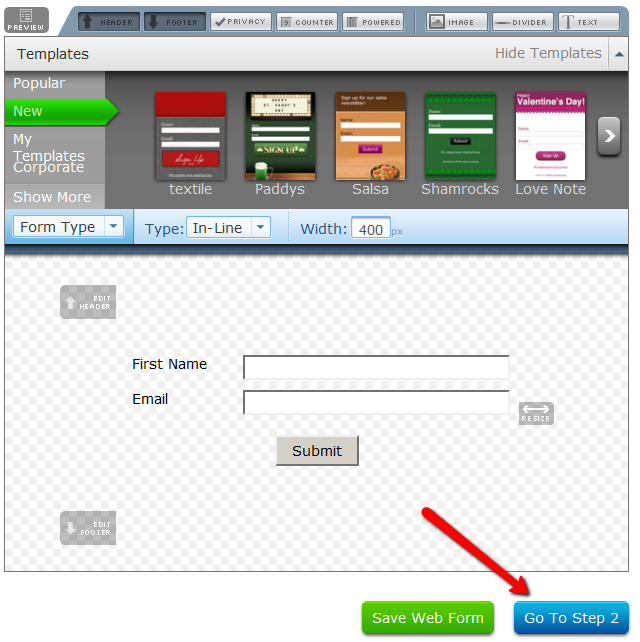
7. On the next, page….
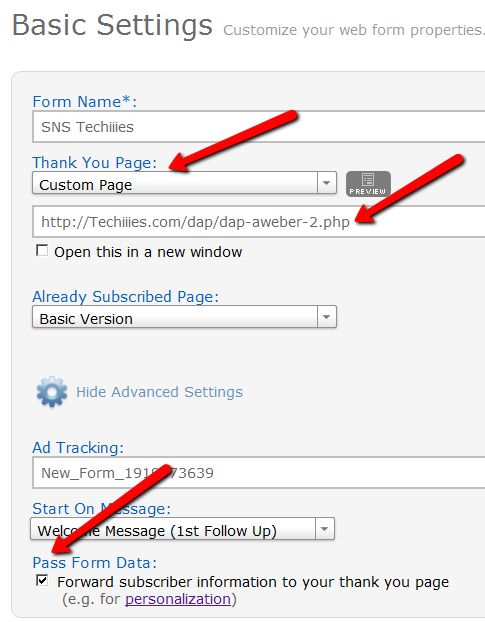
7A) Click on the thankyou page dropdown and select ‘Custom’.
7B) Set the thank you Page URL to http://YourSite.com/dap/dap-aweber-PRODUCTID.php
Replace YourSite.com with the name of your site.
Replace PRODUCTID with the ProductId of the product you noted in step 2.
So, if the productId of the product in DAP is 2, then the thankyou page URL will be – http://yoursite.com/dap/dap-aweber-2.php
7C) Where it says “Pass Form Data”, check the check box so that Aweber can “Forward subscriber information to your thank you page” – which essentially is DAP, so that DAP can add the subscriber to your membership site.
That’s it!
Aweber List Is Double-Optin
In this flow, set up your Web Form as usual, with no DAP-specific settings required.
Only change required is in the Aweber list’s main “List Settings” page.
5. Now login to your AWeber account.
6. From the “Current List” drop-down, select the list that you wish to sign up users to.
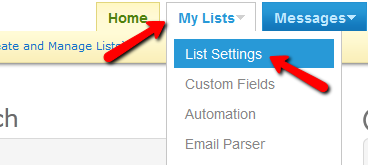
7. Go to My Lists > List Settings
8. Go to “Confirmed Opt-In” tab

9. Scroll down to “3: Success Page“, and enter the URL of the special dap-aweber-2.php script (or whatever the file name is) you created back in Step #4 above.
Check the check-box that says “Pass subscriber info for personalizing this page”.
Ignore the comment that says “Not recommended for WordPress users”, because this is going to point to a DAP script, and not a WordPress page.
Click on “Save Settings”.
That’s it!
ADDITIONAL NOTES
Now that you’ve set up DAP to integrate with your Aweber list (single- or double-optin), you may use the Aweber web form directly on your squeeze page for signing up subscribers (instead of DAP’s “Direct Signup Form”).
Now, every time a subscriber signs up via the Aweber form, they will automatically be added to DAP.
If your list is single-optin, then the subscriber will be added to DAP instantly after sign-up.
If your list is double-optin, then the subscriber will be added to DAP only AFTER they’ve clicked on the Aweber double-optin confirmation link.
In both cases, they will be redirected to the DAP Login Form.
You may also configure the DAP Product’s “Welcome Email” to send out the DAP email and password via DAP itself.
-OR-
You can leave the Welcome Email in DAP Product page as blank. And then configure DAP to generate a default password (DAP Admin > Setup > Config > Default Password) as shown below, and then enter that same pre-chosen password in to your very first Aweber follow up email that goes out to your subscribers, so that they can receive their dap id/password details directly from your Aweber list.
For more details about this default password, please see this post.
NOTE: If you want to send the subscriber to a different page (instead of the DAP login page) upon sign-up, then do this:
- Open dap-aweber-2.php (or whatever the script name is)
- Look for this line :
$redirect = Dap_Config::get(“LOGIN_URL”); - Update it to point to any URL of your choice. For eg.,
$redirect = “http://yoursite.com/thankyou”;
This way you can redirect users after they complete the Aweber signup, to a landing page of your choice.
Customizing Login Form
When you use the merge tag %%LOGIN_FORM%% in a WordPress page, the tag is replaced by a login form that your member can use to log in to your membership site.
If you wish to customize the look & feel or text of the form, then rename the file…
wp-content/plugins/DAP-WP-LiveLinks/DAP-WP-LoginForm.html
To…
wp-content/plugins/DAP-WP-LiveLinks/customDAP-WP-LoginForm.html
Basically you are adding the text “custom” to the beginning of the file name, that’s it.
And this new file will also reside in the same directory.
Once you have this new file in the directory, DAP will ignore the old, default file, and will only use your new custom version.
“ProductLinks” Widget: Product-Specific Content
You already know that you can create a “My Content” kind of page within WordPress, that will list all products that a user has access to, and then each product will list the content that they currently have access to (content that has already dripped on them).
But this page is a full-summary of all products, all listed on one page.
Instead, if you wished to create product-specific download pages, where you create a separate page for each product, that lists all the content within just that product alone, then that’s where DAP’s “ProductLinks” Widget comes in handy.
Here’s how you set it up.
- In WordPress admin, go to “Appearance > Widgets” and enable the “DAP ProductLinks” widget by dragging it onto a widgetized section of your theme’s sidebar.
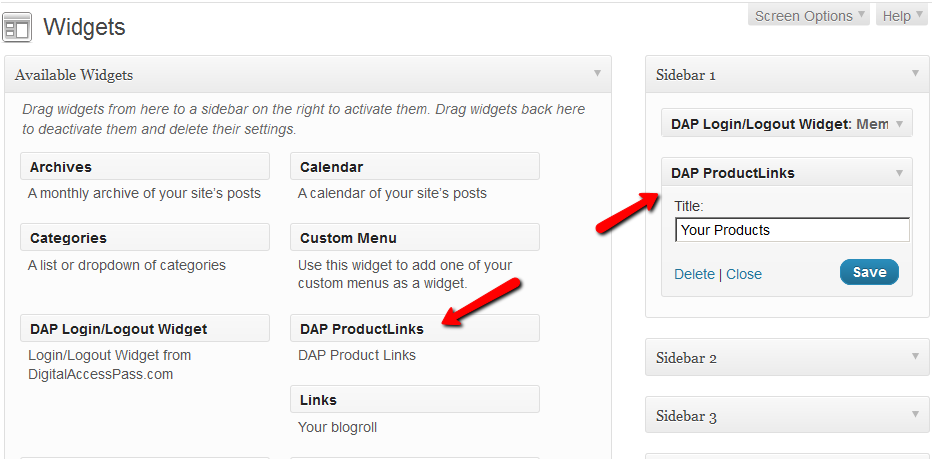
- As soon as you do that, the DAP ProductLinks widget will show up in your blog’s side bar.
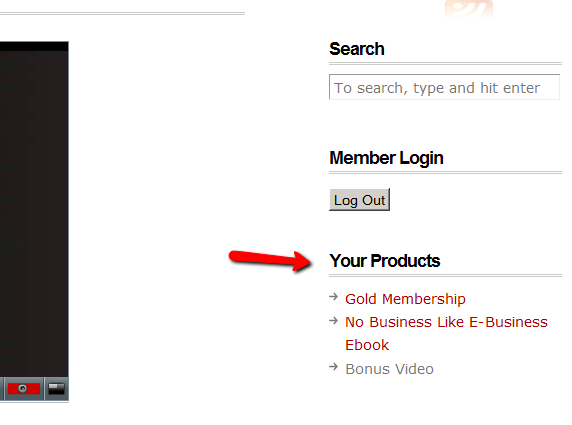
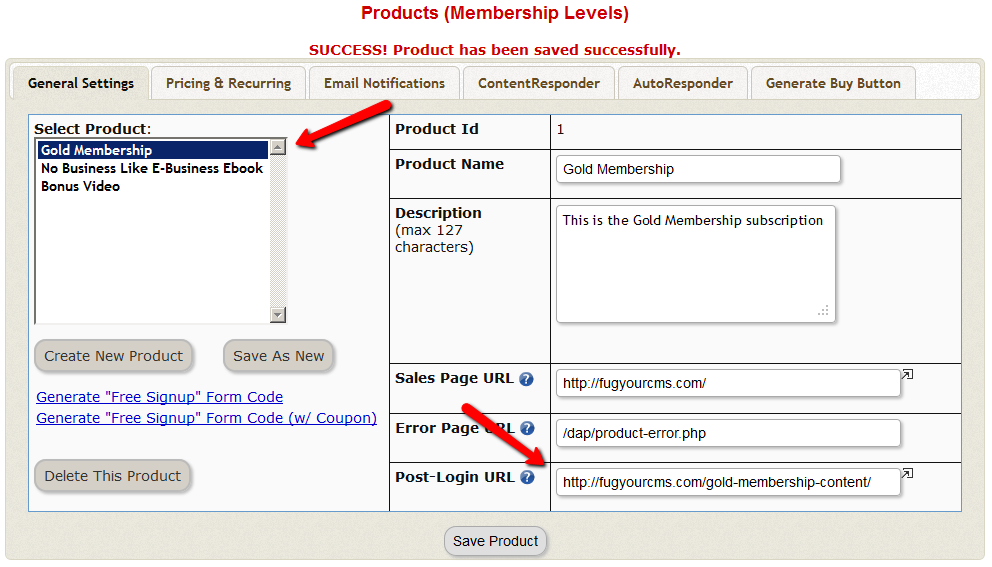
- By default, each of the product names – like “Gold Membership” in the above example – will link to whatever URL you put into the “Post-Login URL” for that particular product (DAP Dashboard > Products > Manage). So the next step is to create a separate page for each product, and then enter the permalink for this new page, into the Post-Login URL of that Product within DAP.
- Create a new page in WordPress – call it, “Gold Membership Content” (for example). In the body of the page, enter the following DAP merge tag:%%PRODUCT_DETAILS_<id>%%
Replace the entire text <id> with the actual Product id from DAP (Products > Manage)
So, if the product’s id is 6 in DAP, then the merge code becomes:
%%PRODUCT_DETAILS_6%%
Save the page. And if you gave the page the title “Gold Membership Content”, then the permalink for this page will be:
http://YourSite.com/gold-membership-content/ - Take the above permalink and enter it into the product “Gold Membership” in the “Post-Login URL” field. That’s it!
- Do the above for all products and you’re done.
End Result
- For each product that your member buys, the “Your Products” widget will show in the side-bar.
- It will list all of the products that the member has purchased.
- Each of the product names will link to it’s own specific content page
- When member goes to that page, the DAP merge tag you entered for that product will expand into product details and product-specific content links just for that product.
Troubleshooting Email Delivery
Sending Email Through Your Web Site: The Basics
DAP is not an email service (like, say, Aweber).
DAP is just a script – a tool – like Microsoft Outlook or Thunderbird – that simply sends out email using your web host’s email server.
It is your web host’s mail server that actually sends out the email to the recipient. So once DAP notifies your mail server about a email that is to be sent, it has absolutely no control over what happens next.
It’s like when you put an envelope with a letter (regular mail) into the mailbox (post box). It is up to the Postal Service to actually pick up your letter, and deliver to the destination address. Your web host is like the Postal Service. If it doesn’t pick up and deliver the (e)mail, then DAP doesn’t have any say in it.
So if the emails that DAP sends out are not getting delivered to your recipients (or landing in the spam/junk folder of the recipient), there could be more than one reason for that.
Improving Email Delivery
DAP uses your web host’s email servers to send out emails.
Here are some ways to improve email deliverability and also avoid your email landing in the recipient’s junk/spam folder.
- Check with your web host to make sure they have “Reverse DNS” setup and configured correctly for your domain. If not, then this is most likely the cause of emails not getting delivered.
- Do not use a Gmail or Yahoo or some other web based email as the “From” email id (under DAP Admin > Setup > Config).
- Instead, use a domain-based email id – like You@Yoursite.com or Support@Yoursite.com – as the “From” email id
If you are on a shared host, you may even consider totally by-passing sending emails through your web host, and instead use DAP’s “SMTP” feature to send emails out through an external email system – like Amazon’s SES (Simple Email Service) , Gmail or AuthSMTP.com.
Welcome Emails Not Going Out
If Admin notifications are going out ok, but the welcome email to the buyer/member is not being delivered, then see Troubleshooting Welcome-Email Delivery
Autoresponder Emails Not Going Out
If yours is a new site setup, then this is usually because the hourly cron-job has not been setup.
However, if the emails were going out fine previously, and suddenly stopped going out, then it usually is because…
- Something changed on your host that caused the cron to stop working.
- There is an error in the job queue, because of which DAP is unable to proceed with the remaining non-error emails. This could have happened if you tried to send out a broadcast to a CSV list, and there was an error in one of the emails from the CSV list.
- You’re trying to use a third party “SMTP” server to send out the emails, and your server is unable to connect to that server because the authentication settings you’ve configured on “Email > SMTP” are incorrect.
Steps to troubleshoot
- Make sure that the hourly cron (dap-cron.php) is still running – you need to look at your web hosting control panel for that.
- Go to “System > Job Queue” and scroll through any items there, and see if there are any scheduled messages there with the status “Error”. If yes, then click on the “Delete Jobs In Error” link. That will delete any jobs that can’t be processed because of an error in the email id or in the import process. Also be sure to click on “Delete Successful Jobs (till yesterday)” just to clear up old, sent emails.
- Also go to “System > Logs” and empty the logs.
- Go to “System > Config” and set “DAP Log Level” to “5”. That will start logging all the details you/we may need for troubleshooting.
- Wait for the top of the next hour and then re-visit the queue and see if emails are going out.
- If they still aren’t going out, go back to “System > Logs”, copy paste all text there, and open a new ticket with that info, of course, also giving us more details about the problem, what you have tried, etc, along with your login info for: FTP, WP Admin, DAP Admin, and Web Host Control Panel.
Server Blacklisting
If your inexpensive (read as cheap 🙂 shared web host is hosting a large number of sites on one server, and one of them knowingly sends out spam (or mistakenly gets flagged for spam), that will put the email deliverability of every web site on that server in jeopardy, because your site now shares the same IP address as that of an “alleged” spammer.
So your emails get sent to junk/spam folder by Gmail and Yahoo. Or worse, they just totally disappear into the ether.
Hourly Email-Sending Limits
Almost all shared hosts have hourly email sending limits. For example, DreamHost has an outgoing limit of 300 emails per hour. Which means, a total of only 300 emails can be sent out per hour through any web site hosted on DreamHost. All of the following count towards the 300 limit:
- Emails sent by any scripts on your site – like DAP
- Your WordPress blog notification emails
- Your WordPress admin emails,
- WP forgot password emails,
- WP comment notification emails,
- Forum notification emails,
- Forum emails sent to each other by your users,
- Forum-software Admin notification emails,
- Support software user and admin notification emails
- Tell-a-friend emails
- Viral-inviter type emails
- Emails sent through Outlook or Thunderbird where you have set the outgoing SMTP server to be your web site’s SMTP server
- Emails sent by others using the same SMTP server to send out emails- like your business partners, employees, etc
- DAP User welcome emails, Payment notification emails, Forgot password emails, Autoresponder emails, Broadcast emails, etc
So do you see how quickly you can go over that hourly limit of 300 emails per hour?
But here comes the worst part…
Once you go over that limit, any emails that are actually sent by you or the scripts running on your site, will not actually result in any kind of error. The mail server will respond by saying that the email(s) has been sent successfully, but in reality, on the backend, it quietly “snuffs out” the email. Which means, it doesn’t go anywhere – just gets sent to a “blackhole”. So you keep thinking that you sent out the email. DAP keeps thinking it has sent out the email. But in reality, the emails never actually get sent.
This is the same as you actually putting your letter into the mailbox at the Post Office. But then, imagine this: The postal worker who comes to pick up your mail, quietly goes to the back of the post office and dumps it all into one giant trash can, and destroys all of the mail. So you’re thinking you actually mailed out that important check to pay your utility bill. But the utility company never gets your check, and they slam you with a late fee.
Possible Solutions
1) BEST OPTION: DAP + 3rd party SMTP service provider like Amazon SES, AuthSMTP.com or SMTP.com. (much less expensive than Aweber, and very reliable too)
2) DAP + Aweber (more expensive, very reliable)
3) DAP + Good web host (cheapest option, but can lead to mixed results – depends on your host).
You could always use DAP and external SMTP service provider like Amazon SES, AuthSMTP.com or SMTP.com to send out bulk mail through DAP while totally bypassing your web host’s email system. This is probably the first best option where DAP controls the composition and sending of the email, the 3rd party service controls the deliverability.
Next best option is using a service like Aweber or GetResponse.
And if you can’t afford even that, then simply use DAP on a good web host. We ourselves use just DAP and LiquidWeb’s email servers to send out emails to all of our users.
And DAP also has built-in job queues to schedule outgoing emails while also making sure that you don’t exceed your web host’s hourly email sending limits (dreamhost’s limit is 300 emails/hour, I think). We use multiple SMTP servers from our own other web sites, all combined to be able to send a few thousand emails per hour.
But even with a lot of planning, it is easy to go over the hourly limit.
So the next time you see in your Job Queue that emails were sent out successfully, but the recipient never received it, here are some things to check:
1) It landed in your recipient’s junk/spam folder. Ask them to whitelist or add your email address to their contacts list.
2) You have overshot the limit, so you would have to actually send out the email again.
3) Try to send out broadcasts during a low-traffic time – say like later in the night – when you’re not actively sending out emails, and using up precious email counts from that hourly quota.
http://DigitalAccessPass.com/documentation/?page=/doc/troubleshooting-email-delivery/
Static WordPress Home Page With Different Blog Page
So you want your blog’s home page to be a “static” page – could be your “Sales page”.
And then you want your actual blog content (where all of your posts show in reverse order), on a different page – like “Members” or “Lessons” or “Blog”.
Here’s how you do it.
1. Create Static WordPress “Page”
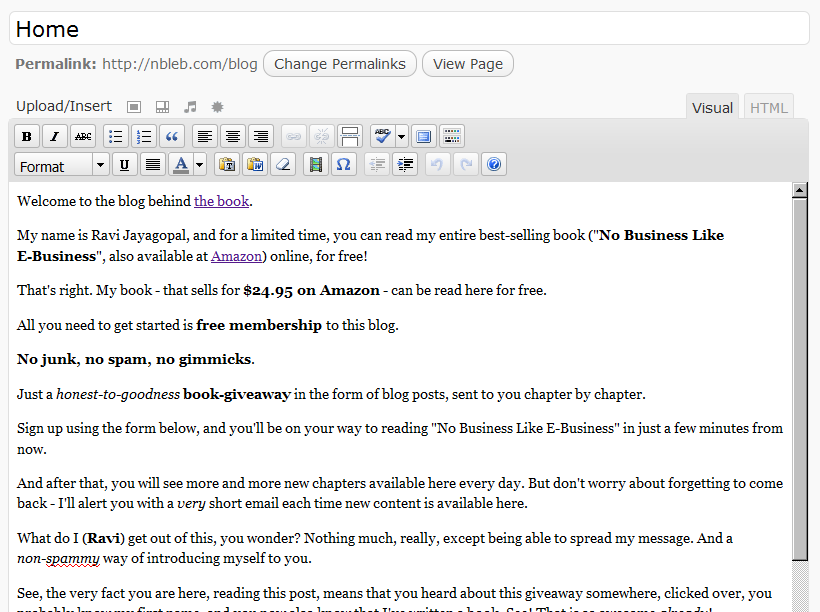
Create a WordPress “page” that will become your blog’s new “static” home page. Let’s give it the title, “Home”. Publish your content within this WP page, and it could even have a sign-up form, or your “Buy” button(s). Publish it.
2. Create “Placeholder” WordPress page for your blog posts
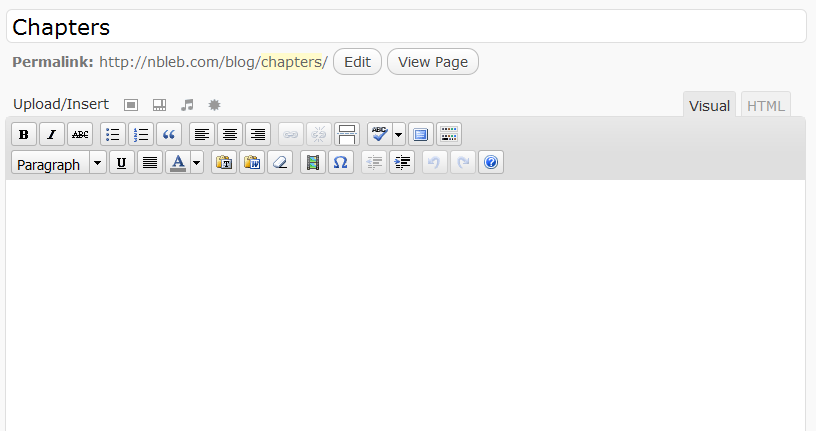
Next, you create a new page which will not have any content, but will serve as a “placeholder” for all of your blog posts to be displayed in reverse chronological order, just like it would show up on any regular blog. In the example below, the page title is “Chapters”. You could call it “Lessons”, “Blog”, “Blog Posts”, “Member Blog”, etc.
3. Change WordPress Settings
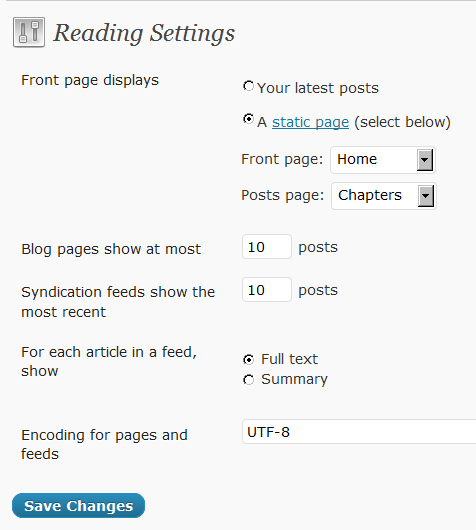
In your WP Admin dashboard, go to “Settings > Reading”
a) Change “Front page displays” to “A static page“, as shown below.
b) In the drop down below…
For “Front Page“, pick the page you created in Step 1 above (your static “Home” page).
For “Posts Page“, pick the page you created in Step 2 above (your “Chapters” page).
That’s it.
To see a working example of a “static” home page in wordpress, which can be used as your Sales page or as a Squeeze page, see http://NBLEB.com/blog/
Oh, and none of this has anything to do with DAP, by the way. This is all WordPress.

