Downline Builder
Or also called as network builder. And we introduced this feature in DAP v4.4.
We call it DAP “Upline” – basically a shortcode called [DAPUpline] that allows you (site admin) to display the person’s upline’s affiliate code to the person. So in effect, it is a downline builder.
1) John joins your site
2) John fills out profile with (say) his ClickBank nickname
3) John refers Adam
4) When Adam logs in, he sees affiliate link to some xyz third party product, but CB nick in the affiliate link is replaced with John’s CB nickname.
5) Adam fills out his profile with his own CB nickname
6) Adam refers Jill
7) When Jill logs in, she sees affiliate link to same third party product, but cbnickname is replaced with Adam’s CB nickname.
This can be done with any number of third-party programs, as long as the nickname can be easily replaced with the info provided by the upline affiliate.
DAP even takes this one step further.
When Jill joins through Adam’s DAP affiliate link, if Adam has not filled out his CB nickname in his profile, then the third-party CB link shows CB Nickname of Site Admin in its place.
So if an affiliate fails to claim his affiliate link, then site admin gets credit for it (and all such links).
Here’s the documentation for [DAPUpline]
[DAPUpline]
[DAPUpline]
[DAPUpline] is basically a WordPress shortcode that you can insert into WordPress pages and posts. It allows you (DAP admin) to display the member’s upline affiliate’s data to the member.In simple terms, it shows a user their referring Affiliate’s (a.k.a Sponsor’s) information. It could also be called a downline builder.
And you can display any data from the member’s affiliate profile, on a page.
So when a user visits the page that has this shortcode, it will determine who the visitor/member’s affiliate is, from…
1) Affiliate Cookie (if it exists), or
2) If they’re already a member, and have logged in to DAP, then it will show their current Affiliate’s information. Or,
3) If neither the cookie is set, nor the user has an Affiliate attached to their account already in DAP, then it will show the info of the DAP Admin.
So you can use it to show the user information of the person (affiliate) who referred them to the page.
Think of it as a “Your Sponsor” tag.
Consider this example:
1) John joins your site
2) John fills out his profile with (say) his ClickBank nickname
3) John later refers Adam
4) When Adam logs in, he sees affiliate link to some third-party product, but CB nickname in the affiliate link is replaced with John’s CB nickname. So if Adam goes on to purchase that third-party CB product, then John will get the affiliate commissions for that purchase.
5) Now Adam fills out his profile with his own CB nickname
6) Adam refers Jill
7) When Jill logs in, she sees affiliate link to same third party product, except this time, the CB nickname is replaced with Adam’s CB affiliate nickname.
This can be done with any number of third-party programs, as long as the nickname can be easily replaced with the info provided by the upline affiliate. And it’s not just one field – you can create multiple profile fields for the affiliate to fill out – like ClickBankNick, CommissionJunctionNick, JVZooId, GoogleAnalyticsId, etc.
DAP actually even takes this one step further.
When Jill joins through Adam’s DAP affiliate link, if Adam has not filled out his CB nickname in his profile, then the third-party CB link shows CB Nickname of Site Admin in its place.
So if an affiliate fails to claim his affiliate link, then site admin gets credit for it (and all such links).
Hope this helps.
For eg., to show affiliate’s first name on a page, insert this into page:
[DAPUpline showField="first_name"]
Full list of available fields from sponsor’s or affiliate’s profile:
[DAPUpline showField="first_name"]
[DAPUpline showField="last_name"]
[DAPUpline showField="user_name"]
[DAPUpline showField="email"]
[DAPUpline showField="address1"]
[DAPUpline showField="address2"]
[DAPUpline showField="city"]
[DAPUpline showField="state"]
[DAPUpline showField="zip"]
[DAPUpline showField="country"]
[DAPUpline showField="phone"]
[DAPUpline showField="fax"]
[DAPUpline showField="company"]
[DAPUpline showField="title"]
[DAPUpline showField="paypal_email"]
Showing Custom fields:
[DAPUpline showField="custom_"]
Eg: To show affiliate’s/sponsor’s custom SSN field (say “ssn”):
[DAPUpline showField="custom_ssn"]
NOTE: You should’ve already created the custom field “ssn” before you can do this, of course.
Affiliate Notification On Leads And Sales
Starting DAP v4.4, you can notify your affiliates with an automated instant email when they earn a commission for a lead and a sale.
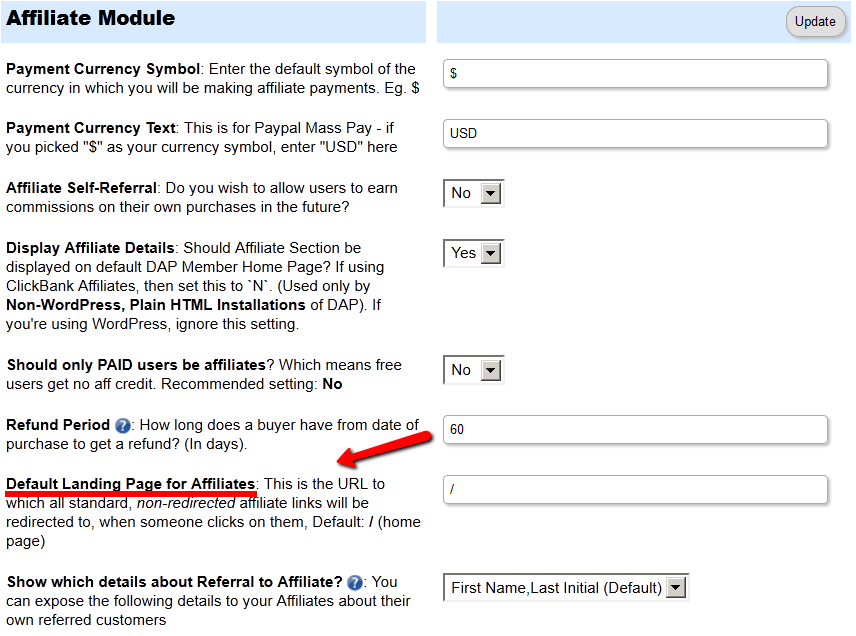
In DAP > Setup > Config > (Affiliate Module) you can separately configure which emails to send (Lead, Sale):
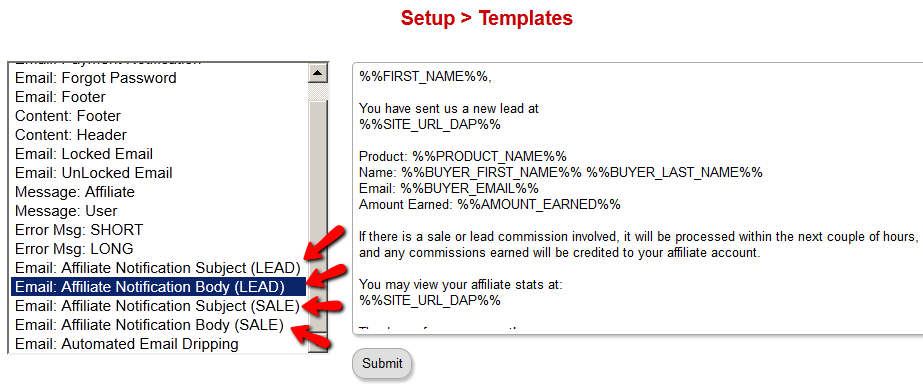
And then on DAP > Setup > Templates page, you can configure the Subject and Body for both emails.
Processing Offline Payments
DAP supports offline payments.
Your buyer does not have to necessarily pay using one of our supported payment processors. You can also use un-supported processors, like say a physical Check/Cheque, Western Union, Wire Transfer, Bank Deposit, etc.
So when someone pays you offline, if you just want to give them access to a product or membership level, then see:
If you also want to record (or book) the payment in DAP, so that DAP can include the payment in the Admin reports, then keep reading.
And normally, when the user logs in after they’ve received the login information from DAP, when they log in, if they had an affiliate cookie on their system, the affiliate will get credit for their purchase, and will get credited the commission within an hour of their logging in (when the hourly DAP cron runs).
But if you want to override this and manually give some other affiliate credit for the purchase, then see:
Affiliate Link Landing Page
Your DAP affiliate link (for DAP on your site, for your affiliates) by default will take the visitor to your home page.
If you wish to point this default landing page to some other URL – like, say, your squeeze page at http://YourSite.com/squeeze-page/ – then you can change this default landing page URL setting at:
DAP Admin > Setup > Config > Default Landing Page for Affiliates
Please note that this will change the landing page for ALL “default” affiliate links – except those using special redirection.
So it will affect all default affiliate links that look like this:
http://YourSite.com/dap/a/?a=1234
But it will not affect affiliate links where they’re already setting a special landing page, like:
http://YourSite.com/dap/a/?a=1234&p=yoursite.com/some-cool-blog-post/
Affiliate Commissions For Offline Payments
DAP is one of the very few membership platforms that will let affiliates earn commissions on offline payments too.
And in fact, DAP will credit affiliates for not just offline payments, but for any payments that you accepted outside of the payment options listed on your web site.
So, for example, you’re using Paypal and Authorize.net buttons on your site. And someone wants to send you a check (cheque) in the mail, or they want to send you money via Western Union, or wire transfer, or they call you and you accept their credit card information by phone, or any other such offline methods.
In this case, DAP can still give credit to the right affiliate for the sale. Here’s how…
1) Add Manual Transaction
- First you add the user manually, by going to DAP Admin > Users > Add.
- Once you’ve added them to the product, come back to DAP Admin > Users > Manage.
- Search for the user by email
- On the user data row for that Product, initially, under Trans Id column, it will show PAID (see image below)
- Step 1: Enter a manual transaction by clicking on Add Trans (which stands for “Add Transaction”). That will record your offline payment in DAP. So now there’s an actual payment associated with that user’s sign up.

- When you click on the “Add Trans” link, you will see a small popup appear (see image below) that allows you to manually enter an order. So if the offline payment was for say $97, then you would enter “97” or “97.00” in the “Order Amount” field and click on “Submit”.
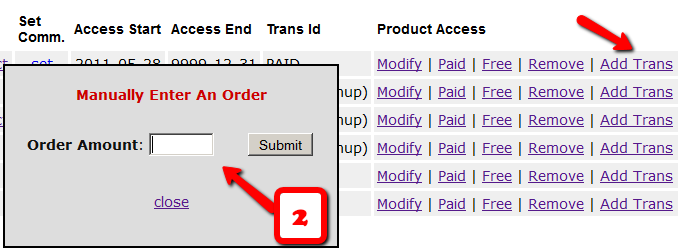
- Once you’ve entered a manual order, the “Trans Id” column will change from “PAID” to an actual transaction id.
That’s it.
By this time, the user would’ve received their “Welcome Email” from DAP, which will have their login info to log in to your site.
And when they log in, if they have an affiliate cookie set in their browser (which they would, if they had clicked on an affiliate link at some point before they contacted you and asked you about a non-standard, offline payment method), then when they first log in to your member’s area, DAP will pick up the referring affiliate’s id from the affiliate cookie, and give credit to them for the sale.
And when the DAP hourly cron runs at the top of the next hour, that affiliate will be credited with any commissions that you’ve set up for that product.
Affiliate Reports
DAP offers a number of affiliate statistics on the “Affiliates > Reports” page.
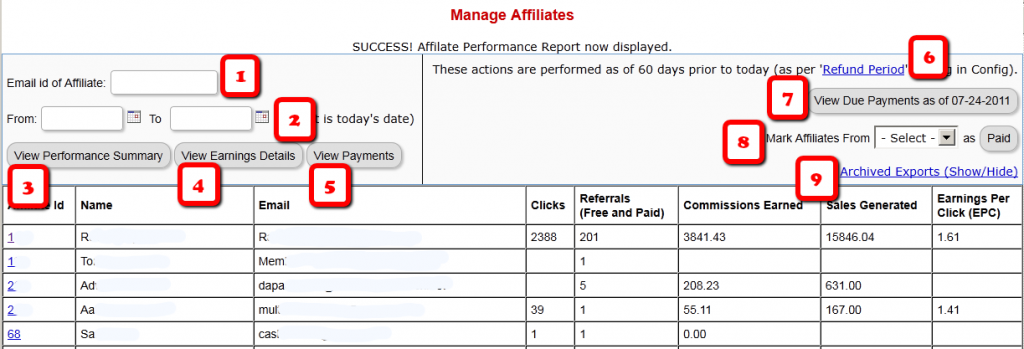
Here’s how it looks as of DAP v4.2.1.
1) Email Id of Affiliate
This is the field where you would enter the email id of an affiliate, if you want to generate a report specifically for an affiliate. If you leave it blank, the report will include all affiliates.
2) “From” & “To” Dates
By default, if you leave these fields blank, then DAP will assume “today’s” date – i.e., the date whenever you’re viewing this page.
3) View Performance Summary
This is the most detailed report available. This is the report being viewed in the above screenshot. For a given time period, for a given number of affiliates (“all” affiliates if (1) is left blank above), it shows…
- Affiliate Id
- Full Name
- Email id
- Clicks generated during selected period
- Referrals generated (includes total of both Free and Paid referrals): If the referred member actually bought something, it constitutes a “Paid” referral. If they simply signed up, say, for your free newsletter or free report or free product, then it is counted as a “Free” referral.
- Commissions Earned: This is the actual amount credited to the affiliate’s account during the selected period
- Sales Generated: This is the amount of the actual sale (purchase) generated for your membership site.
- Earnings Per Click (EPC): This is an indicator of how well your web site is converting clicks into signups/members. So if an affiliate sent you 100 clicks (on their affiliate link), and 5% of them signed up for your “FaceBook Secrets” membership product by paying $10 each, it means a total revenue of $10 x 5 = $50. And if you were paying 30% affiliate commissions for the product, then the affiliate earned $15 in total.Total clicks sent: 100
Total affiliate earnings from those 100 clicks: $15
Earnings Per Click (EPC) = $15/100 = $0.15 – which means, 15 cents per click.The higher the EPC, the easier it will be for you to attract other JV partners and super-affiliates.
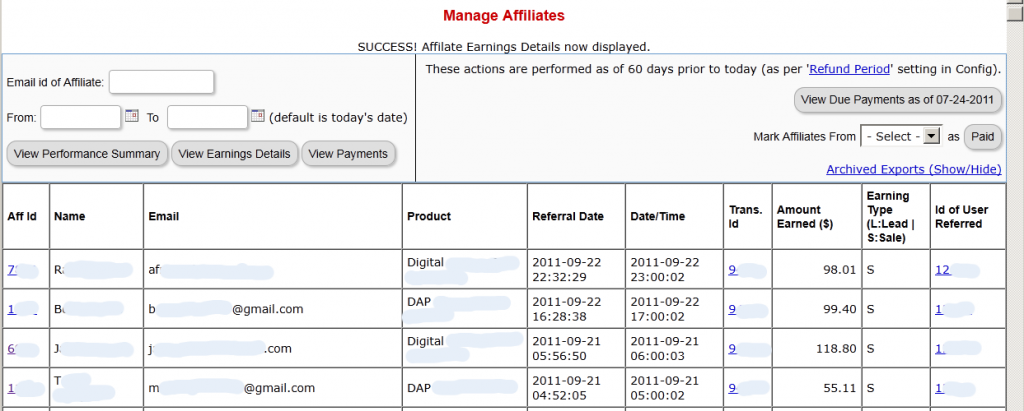
4) View Earnings Details
This shows the breakdown of each purchase referred by each affiliate. It’s a detailed view of the affiliate earnings, that lists each and every transaction (order) in the system that was referred by affiliates, all generated for the selected time period. It displays…
- Affiliate Id
- Full Name
- Email Id
- Product (name) that was purchased by referred buyer
- Referral Date (when affiliate was associated with buyer)
- Date/Time of actual transaction
- Trans Id: This is the transaction (order) id for the actual purchase
- Earning Type (L: Lead, S: Sale): Says what type of a commission credit it was – whether it was a “Pay Per Sale” credit or a “Pay Per Lead” credit.
- Id of User Referred: This tells you the actual user id of the buyer who was referred by the affiliate.
5) View Payments
This shows all payments made to affiliates during the period.
6) Refund Period
This is a config setting that you can change in Setup > Config. This is what drives which orders are picked up for affiliate payment. See this article for more details.
7) View Due Payments as of <date>
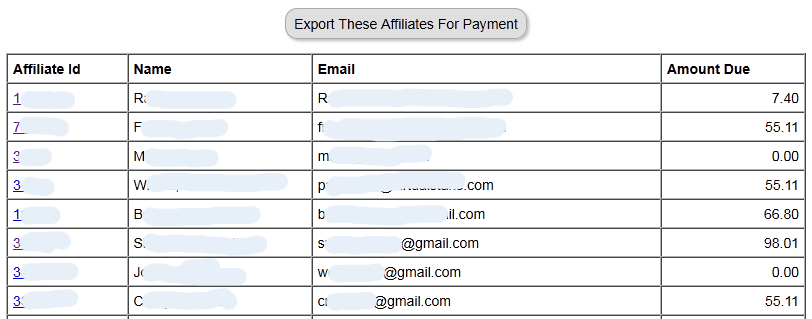
This is the MAIN button you should click to start the process of paying your affiliates each month (or however often it is that you pay affiliates). When you click this button, it will show you a report (see screenshot below) of commissions owed on all orders in the system UNTIL X days ago, where X is your “Refund Period”.
So if today is 10/01/2011, and you have a refund period of 60 days, then DAP will only consider orders prior to 60 days as of today. Which means, orders up to 08/01/2011 (of course, depending on how many days in a month, you may not exactly end up with 08/01/2011, because it goes an actual 60 days back from today – and sometimes, the report will stop at the 2nd or 3rd day of the month – like 08/03/2011. But that’s ok, don’t worry about it). You just focus on paying your affiliates on whatever day you wish to make the payment.
So when you click on this button, DAP will bring you a summary report of all affiliates, and how much they’re owed today, for all transactions referred by them as of 08/01/2011 (as per this example).
And when you click on the “Export These Affiliates For Payment” button shown in the screenshot above, DAP will select and mark those affiliates as being exported for payment.
And DAP will show you Paypal Mass-Pay Ready text report, with the affiliate info and the commission amount info already filled in and ready to go. If you’re paying via Paypal Mass-Pay, then all you need is this file. See this post for details.
NOTE: Being exported for payment doesn’t mean that you’ve actually paid them. Exporting affiliates for payment only means that DAP has now “set aside” those affiliates for payment, and you still need to tell DAP that you’ve actually paid your affiliates.
This is important, because you might export affiliates for payment on the first of the month, but it may take you a day or two (or 10) to actually make the payment – especially if you’re sending out Checks.
So once you’ve made the payment either through Paypal mass-pay, or by mailing your affiliates physical checks, then you need to tell DAP that you’ve actually sent out the payments, which is what you’ll do in the step below.
8 ) Mark Affiliates from <export> as Paid
This is where you will select the most recent export from the drop down (see #8 in first image at the very top), and click the “Paid” button. This is what actually lets DAP know that you’ve actually made the payment, and only after you do this, will the affiliates see the payment show up in the “Payments” section on their “Affiliate Info” page.
9) Archived Reports
This is just a report that shows you past commission payment exports.
Manually Crediting Affiliates
Please note that an affiliate will get their commissions credited only if there’s an actual payment (transaction) in the system for that purchase.
So if you have marked someone as “PAID”, for whatever reason, then even if there is an affiliate associated with that user, then the affiliate is not going to get credited any actual commissions because there is no payment in the system.
Here’s how to manually credit affiliates for a sign-up or purchase…
1) Add Transaction If None Exists
If there is no payment associated with the purchase, and you’ve marked the user as “FREE” or “PAID”, then you must first enter an order (transaction) into the system. So search for the user by email id on the Users > Manage page, and on their row for that Product, click on “Add Trans” (which stands for “Add Transaction”).

2) Add Transaction Amount – If None Exists
When you click on the “Add Trans” link, you will see a small popup appear (see image below) that allows you to manually enter an order. So if the purchase was for say $97, then you would enter “97” or “97.00” in the “Order Amount” field and click on “Submit”.

3) Verifying Order Id
Once you’ve entered a manual order, the “Trans Id” column will change from “PAID” to an actual transaction (or order) id – in the example below, it turns to Transaction Id “3”.
4) Give Manual Credit To Affiliate
Now that there’s an order in the system, it’s time to manually give credit to the affiliate. Now on the same User row, scroll all the way to the end, and under the “Aff Id” column, if you already see a number, then it means some other affiliate is already associated with this purchase. You cannot change that affiliate id at this time.
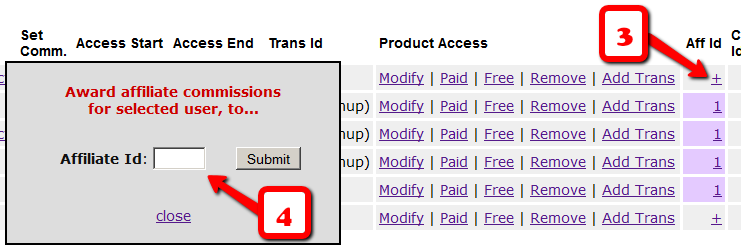
But if you see a “+” (plus sign) there instead of a number, it means that no affiliate is associated with that purchase yet, and you will be able to give credit for that purchase or sign up to any affiliate in the system.
So when you click on the “+” sign, you will see a small popup come up, which allows you to enter the affiliate id (must be a number) of any user in the system. Please note that ever user has a unique number (“User Id”) associated with their account. That’s the number you should enter here.
5) Verifying Manual Credit
Let’s say you gave credit to Affiliate Id 5 for this purchase. So now you should see the “+” sign at the end of the row change to “5”. That means, user #5 has been given affiliate credit for this purchase. So assuming you have already set up affiliate commissions for this product (under Affiliates > Set Commissions ), then at the top of the next hour, when the hourly cron job runs, the affiliate commission will be “credited” the affiliate’s account depending on the commissions set up for the product.

WARNING
Sometimes you may enter a manual transaction for a purchase at the same time DAP is processing an automated transaction for that same purchase.
That means, there are now two transactions in DAP for the same purchase – which can cause problems in accounting.
At the very least, you may end up paying double commissions to the affiliate who referred the user, because all affiliate commissions are calculated from sales, and if you have two entries for the same purchase, then the affiliate will get paid twice.
So if you see two credits for the affiliate, you must note that it will not be for the same transaction, but for different transactions.
So be careful when you’re entering Manual transactions. That is only for when there is no way to automate it in DAP, and you’re unable to bring the transaction into DAP automatically.
If you see two affiliate commission credits (one for the automated transaction that DAP picked up, and one for the Manual transaction that you entered), then just refund the manual transaction in DAP. There will probably be a change to the user’s access because of the refund. So make a note of the current access of the user BEFORE you do the refund, and then AFTER you’ve processed the refund, go back to the User’s details on the Users > Manage page, and manually adjust their access to make sure it’s accurate.
Making Affiliate Payments
DAP’s affiliate program works the same regardless of which DAP-supported payment processor or shopping cart you’re using.
DAP does not directly make any affiliate payments. Instead, at the beginning of each month (or however often you wish to pay your affiliates), with one click on the Affiliates > Run Reports page, DAP will give you a list of all affiliates to whom payment is due, and the actual amount due to each one of them.
The format of the payment list that DAP provides you with, is already “Paypal Mass-Pay Ready” – which means, you could simply upload the file that DAP gives you, upload it to your Paypal account, and then pay all affiliates in one click (details further below).
Or if you don’t wish to pay by Paypal, and wish to use any other form of offline payment (like sending them a physical “check” in the mail, doing wire-transfers, etc), you’re free to use any external means for paying your affiliates. Once you have paid (by Paypal, or other external means), you just come back to DAP and mark all those affiliates as “Paid” – which is when DAP actually reports to all of those affiliates that a payment has been sent to them. Until the actual payment is made, they only see that they are owed a certain amount.
How To Pay Your Affiliates In DAP
1) Go to “Affiliates > Reports”
2) Click on “Pay Affiliates as of mm-dd-yyyy” on the right/top part of the page (in older versions of DAP, this would be called “View Due Payments as of mm-dd-yyyy“)
3) DAP will bring up a list of affiliates to be paid. Click on “Export affiliates for payment”
4) DAP will create an export of only those affiliates. Only those affiliates can be paid now, as per DAP.
5) You take the exported list that DAP gives you. Pay them via Paypal MassPay (details in the next section below).
6) Once you’ve actually sent them the payment via Paypal, come back to “Affiliates > Reports“, pick the previously exported list from “Mark affiliates from ……. as Paid” drop down (your last un-paid export will be shown in the drop-down list).
7) Mark that export as “Paid”.
That’s it!
Making Payments Via Paypal Mass-Pay
1. Copy all of the text from export field that DAP provides you with, and save it as a text file on your desktop, with a file name like, say, “February 2012 Commissions.txt”
2. Log in to your Paypal account
3. Click on “Send Money”

4. Click on”Make a Mass Payment”
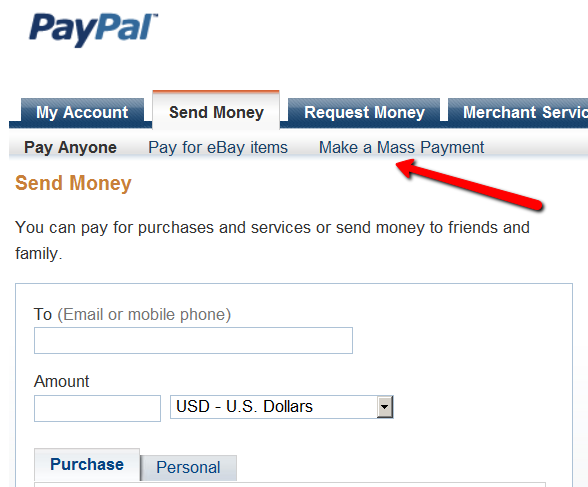
5. Upload previously saved text file on this next screen.
You may also enter a custom subject and body for the email that Paypal will send to all those receiving a payment.
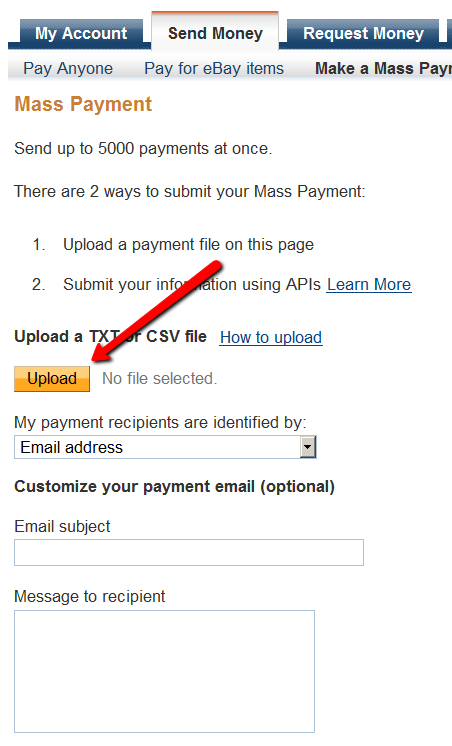
6. Follow the rest of the on-screen instructions and hit “Send”, and you will see a confirmation from Paypal that your payment has been scheduled.
At this point, the money would have already been debited from your Paypal account.
Soon thereafter (usually within 10 minutes), Paypal would’ve actually deposited your payments in to the affiliates’ Paypal accounts.
2-Tier Affiliate Program
DAP supports (up to) a 2-tier affiliate program. So you could pay just one level (“tier”) of commissions (A gets paid when he refers B), or you could also set up DAP to pay 2 “tiers” of commissions (User 1 gets paid when he refers User 2 AND User 1 also gets paid something when User 2 refers User 3).
[NOTE: Paypal has an Acceptable Use Policy – especially for a product or service that could be considered “MLM” or “Pyramid”. Make sure you’re not violating their terms. For eg., requiring your members to keep paying subscription fees in order to remain an affiliate, could be considered a Pyramid scheme. So, in general (nothing to do with using DAP or paying 2 levels of commissions), if you are running an affiliate program and will be paying out commissions via Paypal, make sure you are not violating their terms.]
How The 2-Tier Affiliate Program Works
In a typical “1-Tier” affiliate program, when a buyer makes a purchase, the affiliate who referred the buyer is the only one who gets paid an affiliate commission. Which is why it’s called “1-tier”, because there’s only one level of commissions paid.
However, in a “2-tier” affiliate program, the “Affiliate’s Affiliate” (2nd level above) can also be paid a portion of the sale in commissions.
So consider this this example…
You are selling Product A that costs $100.
You’ve set up your commission structure for Product A as follows:
Tier 1: 50% Per Sale
Tier 2: 10% Per Sale
Joe Customer is referred by Charlie to your web site. Joe went on to purchase Product A for which commissions are set up above.
So Charlie (tier-1 affiliate) gets paid 50% of the sale – which is $50.
Now, normally a 1-tier affiliate program would stop there, and that would be the end of affiliate commissions for that purchase. But you have set up 2 tiers.
So now DAP looks at who referred Charlie, the affiliate. It finds that David originally referred Charlie to your web site (regardless of how Charlie got in to your membership site).
So now David (tier-2 affiliate) gets paid 10% of the sale – which is $10.
So for that one sale of $100, $50 was paid to Charlie, and $10 was paid to David, which totals $60.
So $40 is your earnings, as the site owner.
How To Set It Up
The 2-tier or “n” tier setup is the exact same as the 1-tier setup.
Only difference is, set up a new record on the “Affiliates > Set Commissions” page for each tier – one for Tier 1, one for Tier 2, and so on.


