8
Testing Autoresponder And Broadcast Emails
Here’s how you test emails in the system before making them live.
Testing Autoresponder Emails
- Create a test DAP Product called “Test Product”
- Set up the email drip for this product
- Give yourself (or a new test user, but with a real email id that belongs to you) access to this DAP Product on the Users > Manage page (for existing users) or Users > Add page for new users
- Run the hourly-cron manually, by going to http://YourSite.com/dap/dap-cron.php . That should send out the day 1 drip for that test user.
- Go to Users > Manage page, and back-date the Access Start Date for this test user for the test product, back by one day. So DAP now thinks he bought the product “Yesterday”.
- Now run the cron manually again. This time, DAP will send out the day #2 drip for this user.
- So every time, move the user’s access start date back by as many days as you want, to trigger that day’s autoresponder email. And each time run the cron manually.
Testing Broadcast Emails
- Create a test DAP Product called “Test Product” (or if you have previously created one above, then use the same one)
- Add 3-4 test users to this product
- On the Emails > Broadcast page, schedule a broadcast email to be sent to “All Users of Product <<Test Product>>”
- Run the hourly-cron manually, by going to http://YourSite.com/dap/dap-cron.php . That should send out the broadcast to that test product.
- Log in to the email id’s of all the test users that you added to this product, and make sure the email arrived in the inbox.
7
Hiding Protected Links On Member Home Page
When you have hundreds of posts or pages protected as part of a DAP Product, the list of links on the DAP Member Home Page (that is the result of using the merge tag %%USERLINKS%%) can get quite long and unwieldy.
So you can choose to hide some of those links from being displayed on the member’s home page.
Here’s how you hide a link from being shown on the member’s home page…

1) Go to the DAP Product in question, scroll down to the ContentResponder section
2) Click on the edit link next to the content in question on the right. The “Edit Files” popup will then show up on the left.
3) Set “Display On User’s Home Page” to “N”.
That’s it.
The content is still part of that product, it is still being protected, but the link simply won’t be displayed on the member home page.
6
Manually Crediting Affiliates
Please note that an affiliate will get their commissions credited only if there’s an actual payment (transaction) in the system for that purchase.
So if you have marked someone as “PAID”, for whatever reason, then even if there is an affiliate associated with that user, then the affiliate is not going to get credited any actual commissions because there is no payment in the system.
Here’s how to manually credit affiliates for a sign-up or purchase…
1) Add Transaction If None Exists
If there is no payment associated with the purchase, and you’ve marked the user as “FREE” or “PAID”, then you must first enter an order (transaction) into the system. So search for the user by email id on the Users > Manage page, and on their row for that Product, click on “Add Trans” (which stands for “Add Transaction”).
![]()
2) Add Transaction Amount – If None Exists
When you click on the “Add Trans” link, you will see a small popup appear (see image below) that allows you to manually enter an order. So if the purchase was for say $97, then you would enter “97” or “97.00” in the “Order Amount” field and click on “Submit”.
![]()
3) Verifying Order Id
Once you’ve entered a manual order, the “Trans Id” column will change from “PAID” to an actual transaction (or order) id – in the example below, it turns to Transaction Id “3”.![]()
4) Give Manual Credit To Affiliate
Now that there’s an order in the system, it’s time to manually give credit to the affiliate. Now on the same User row, scroll all the way to the end, and under the “Aff Id” column, if you already see a number, then it means some other affiliate is already associated with this purchase. You cannot change that affiliate id at this time.
But if you see a “+” (plus sign) there instead of a number, it means that no affiliate is associated with that purchase yet, and you will be able to give credit for that purchase or sign up to any affiliate in the system.
So when you click on the “+” sign, you will see a small popup come up, which allows you to enter the affiliate id (must be a number) of any user in the system. Please note that ever user has a unique number (“User Id”) associated with their account. That’s the number you should enter here.
![]()
5) Verifying Manual Credit
Let’s say you gave credit to Affiliate Id 5 for this purchase. So now you should see the “+” sign at the end of the row change to “5”. That means, user #5 has been given affiliate credit for this purchase. So assuming you have already set up affiliate commissions for this product (under Affiliates > Set Commissions ), then at the top of the next hour, when the hourly cron job runs, the affiliate commission will be “credited” the affiliate’s account depending on the commissions set up for the product.
![]()
WARNING
Sometimes you may enter a manual transaction for a purchase at the same time DAP is processing an automated transaction for that same purchase.
That means, there are now two transactions in DAP for the same purchase – which can cause problems in accounting.
At the very least, you may end up paying double commissions to the affiliate who referred the user, because all affiliate commissions are calculated from sales, and if you have two entries for the same purchase, then the affiliate will get paid twice.
So if you see two credits for the affiliate, you must note that it will not be for the same transaction, but for different transactions.
So be careful when you’re entering Manual transactions. That is only for when there is no way to automate it in DAP, and you’re unable to bring the transaction into DAP automatically.
If you see two affiliate commission credits (one for the automated transaction that DAP picked up, and one for the Manual transaction that you entered), then just refund the manual transaction in DAP. There will probably be a change to the user’s access because of the refund. So make a note of the current access of the user BEFORE you do the refund, and then AFTER you’ve processed the refund, go back to the User’s details on the Users > Manage page, and manually adjust their access to make sure it’s accurate.
1
Exporting Users
You can export DAP user/member data in CSV format, from the Users > Manage screen, as shown below.
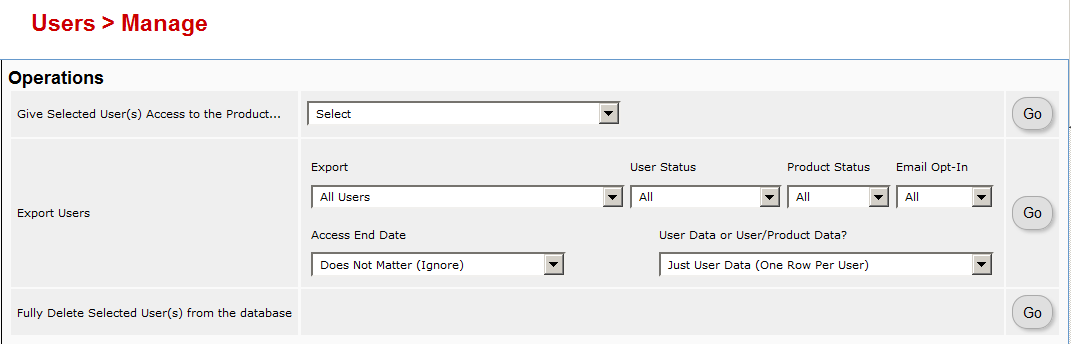
When you click on the “Go” button, you will see a pop-up appear that contains the exported data.
You may then copy it and save it to your desktop.
If you wish to bring that data into, say, an MS Excel spreadsheet, then save the file as a .csv file on your desktop, and then you will be able to import it into Excel.
4
Give Existing Users Access To A Product
This flow is only for giving access to an existing User to a Product. If you wish to add a new user manually to the system, then see this post.
- Go to the Users > Manage screen.
- Search for the user by email id (or last name, user id, etc)
- Once you have found their information, check the check box in the first column next to their user id
- Then using the drop-downs in the top-right section, give them access to the new Product
- They’re initially added as a “Free” user by default. You may mark them as “PAID” if you want to have access to the product just like an actual paying member would.

20
Making Affiliate Payments
DAP’s affiliate program works the same regardless of which DAP-supported payment processor or shopping cart you’re using.
DAP does not directly make any affiliate payments. Instead, at the beginning of each month (or however often you wish to pay your affiliates), with one click on the Affiliates > Run Reports page, DAP will give you a list of all affiliates to whom payment is due, and the actual amount due to each one of them.
The format of the payment list that DAP provides you with, is already “Paypal Mass-Pay Ready” – which means, you could simply upload the file that DAP gives you, upload it to your Paypal account, and then pay all affiliates in one click (details further below).
Or if you don’t wish to pay by Paypal, and wish to use any other form of offline payment (like sending them a physical “check” in the mail, doing wire-transfers, etc), you’re free to use any external means for paying your affiliates. Once you have paid (by Paypal, or other external means), you just come back to DAP and mark all those affiliates as “Paid” – which is when DAP actually reports to all of those affiliates that a payment has been sent to them. Until the actual payment is made, they only see that they are owed a certain amount.
How To Pay Your Affiliates In DAP
1) Go to “Affiliates > Reports”
2) Click on “Pay Affiliates as of mm-dd-yyyy” on the right/top part of the page (in older versions of DAP, this would be called “View Due Payments as of mm-dd-yyyy“)
3) DAP will bring up a list of affiliates to be paid. Click on “Export affiliates for payment”
4) DAP will create an export of only those affiliates. Only those affiliates can be paid now, as per DAP.
5) You take the exported list that DAP gives you. Pay them via Paypal MassPay (details in the next section below).
6) Once you’ve actually sent them the payment via Paypal, come back to “Affiliates > Reports“, pick the previously exported list from “Mark affiliates from ……. as Paid” drop down (your last un-paid export will be shown in the drop-down list).
7) Mark that export as “Paid”.
That’s it!
Making Payments Via Paypal Mass-Pay
1. Copy all of the text from export field that DAP provides you with, and save it as a text file on your desktop, with a file name like, say, “February 2012 Commissions.txt”
2. Log in to your Paypal account
3. Click on “Send Money”

4. Click on”Make a Mass Payment”

5. Upload previously saved text file on this next screen.
You may also enter a custom subject and body for the email that Paypal will send to all those receiving a payment.

6. Follow the rest of the on-screen instructions and hit “Send”, and you will see a confirmation from Paypal that your payment has been scheduled.
At this point, the money would have already been debited from your Paypal account.
Soon thereafter (usually within 10 minutes), Paypal would’ve actually deposited your payments in to the affiliates’ Paypal accounts.
Un-Protecting Content
Once a post or page is added to ANY DAP product, then it becomes protected, and will be available to only those who have authorized access to that Product.
So to completely Un-protect a page or post that you have protected previously, and make it “public” (a.k.a “open”) again, so that any casual visitor to your blog or web site can see it, you just scroll to the right in the “Protected Content” section, and click on the “X” image next to the content that you wish to Un-protect.
Of course, also make sure that you do the same for all products – because if you forget to delete it from even one Product, then it will continue to remain protected.

4
User & Product Statuses
DAP assigns a status for the User itself (at a global, account level), as well as a User/Product level (specific to the user's access to that product).
So there's the User Status and then the User/Product Status
For eg., the User Status may be "Active", but a specific User/Product status may be "Inactive" – which means user can log in to their account, receive emails, etc, but cannot access any content that is part of this specific product (though they can access all other products they may have, that are "Active").
The bottom-line is this: In order for a user to access his/her account, and all the content in the Products that he/she's purchased, all the statuses have to be Active.
So here are the possible statuses, and what they mean.
User Status
These statuses apply to the User's account itself.
Inactive
If the user's status is inactive, then that means the user's entire account is inactive. User will not be able to even log in to their account. All outgoing broadcast and autoresponder emails will "exclude" them from the list, and they will not receive any emails from the system.
Active
Account is accessible, all emails are being sent.
Unconfirmed
They've just signed up for a product that requires "Double Optin". Which means, unless they "confirm" by clicking on the double-optin link, their account will not become active. Please note that once a user has already confirmed the double-optin link for one product, then their "User" status automatically becomes "Active". So even if they go on to sign up for another double-optin product, then their User status will never again change to "Unconfirmed" (unless specifically set so by the DAP Admin). For all future double-optin products, it is this user's "User/Product" status that will be "Unconfirmed", while the main "User" status remains "Active".
Locked
When an account receives login attempts from more than the number of IP addresses set in the "Setup > Config > Advanced > Max. # of User Logins From Different IP`s" field, then that user's main User status is changed to be "Locked". This is very similar to the "Inactive" status, except named different just so admin can distinguish between "Locked" and other users.
User/Product Status
These statuses specifically apply to a User's access with relation to a specific Product.
Inactive
User cannot access any content that is part of this product. However, User may access other products whose user/product status is "Active".
Active
There are no restrictions for this User to access content that is part of this product (of course, only whatever the user is eligible to see, based on the drip setup).
4
Creating A Ready-Made Affiliate Toolbox
You already know that DAP has a built-in affiliate program, and everyone who joins your site (or gets a free or paid account) is automatically made into an “Instant Affiliate”.
DAP also lets you create an Affiliate Tool Box for your affiliates, with ready-to-use banners, emails, subjects, signatures and text links – all with their own personalized affiliate link embedded into it already.
So all they have to do is copy, paste, and hit send.
See the sample screen-shots below that show what our own affiliate tool box looks for DAP affiliates who wish to promote DigitalAccessPass.com to others.
Banners

Email Copy

Text Links

How To Create The Affiliate Tool Box
Create as many different pages you want on your blog – like “Banners”, “Email Swipe Copy” or “Text Links”.
Or create just one big page for all of this – like “Affiliate Tool Box”.
Download this text file which has all of the ready-made HTML code that you need to insert into the WordPress pages.
Feel free to modify the text as required, and be careful not to delete any of the special characters that are in there just for the formatting.
=> Download Sample Affiliate ToolBox Code
CSV File Error During Bulk-Add Users
When you look at the “System > Job Queue” screen, you see one line that shows this error…
Action: BulkAddCSVToProduct
Message: Error in CSV File
You were probably trying to to Bulk-Add Users to DAP. Or do a Broadcast email to a CSV file. In either case, there was an error in processing your request, because one of the following happened:
1) The CSV file could not be created in /dap/bulk/ folder because of a permission issue (try CHMOD 755), so when the cron task ran, it could not find the CSV file (or the file was corrupted for some reason).
2) The list of email addresses within the CSV file were not in the right format – Order should be: Email,FirstName,LastName ( LastName is optional)
How To Fix It
If a job fails, then there’s no way to “fix it and re-run it” right now. So you basically have to delete the job, and then submit a new one. So if a Bulk-Add job erros with the above message, then here’s what you need to do…
A) Click on the “Delete Jobs In Error” link on the “System > Job Queue” page. That will delete all jobs that have failed for whatever reason.
B) You should also clear out the /dap/bulk/ folder to make sure you delete any old, or errored out CSV files from that folder.