Troubleshooting DAP/WordPress Sync
The problem: DAP users are not being “sync”ed to WordPress.
Here’s how to troubleshoot.
What are your sync options in DAP Admin -> Setup -> Config -> WordPress Related Section?
Do you allow all users to be sync’d or just paid users?
Do you allow users to be synced only when they pick a username?
If you allow all users to be sync’d and do not want to force your users to pick a username before dap syncs to WP, then use these settings:
Sync DAP User Data to WordPress “Y”
Sync Paid Users Only “N”
Sync Only if Username Exists in DAP “N”
To test:
1) Add a user manually to DAP via dap admin panel
2) Note down the user’s dap login id/password
3) Open a new browser where you are not logged in to DAP as admin
4) Now login to DAP again but this time as the user you created in step 1.
5) Now visit any part of your blog. DAP will now sync user to WP.
6) Login to WP admin panel. Click on Users in the left sidebar and see if the new user was created.
Content Protection, Security and DRM
We frequently get asked questions like…
“Can DAP protect my Videos/PDF’s/Audio files from being copied? Is there some kind of tracking that I can build into my videos that will let me track the video on torrent sites?”
“Can DAP prevent people from downloading my videos/audio/pdf and uploading it to a torrent or third-party site?”
“Can DAP force people to only watch my videos online? I don’t want my members to download any of my content to their hard disk – I want to force them to see/read/hear/watch everything online.”
Short Answer: No.
Long Answer: Keep reading…
The Nitty-Gritty
There are so many ways to steal your content from your web site – no matter what technology you use.
Let us explain what that means…
1) Let’s say you implement a technology where only paying members can even get to your videos. Like you can already do with DAP. So then a paying member can download your video because they are already a paying member, and they actually have access to the videos. And once your video has been downloaded to their hard disk, you have lost all control over it – no matter what anyone tells you, that’s the truth. Because they can upload it to any illegal warez sharing site, and there’s nothing you can do about it.
Of course, you could spend all your time, money and efforts monitoring the thousands of illegal sharing sites whether your video or ebook is found anywhere – assuming you can even find it in the first place, which would be like finding a needle in a hay stack – no, make that “hay factory” – wait, make that “finding a needle in New York City” – and then write to those site owners and ask them to take it down.
Or you could focus on the 99% of legitimate members of your site, and create great content for them, and keep them paying month after month, and sell more products to them, and keep them happy.
2) Let’s say you use a plugin that only allows true-streaming – like one based on Amazon CloudFront technology, that will not allow the users to directly download your videos, but force them to watch online only. Then there’s any number of “screen-capture” tools – even free ones – that your members can use to capture another video of your video, and then share it with their friends, or upload to illegal sharing sites.
The list goes on and on. No matter how hard you make it, there’s always going to be a way around.
So, unless you’re a NASA, NetFlix, or Amazon or Apple who has a real reason to protect their content that is worth real millions of dollars, there is *no technology* available today that will let you track a video or pdf *after* it has been downloaded. If someone is saying they can do this, then they’re outright lying to you, and playing on your fears.
DAP already has a built-in password-sharing prevention security built in. If someone tries to share their account info with others, DAP will lock their account the moment their account gets log-ins from multiple IP’s (you can configure this setting) and deny further access to any of their content, until you investigate the user and “un-lock” their account.
DAP already protects all of your media from illegal access.
DAP also prevents your Amazon S3 videos and audio and other content from being accessed by anyone directly. Using a script like http://S3MediaVault.com , you can make it such that your videos and audio and other media can only be downloaded from approved sites (where the plugin is installed), and then on top of that, there’s DAP already sitting like a monster watch-dog, making sure only authorized users can even get into the site in the first place.
So hope that helps if you’ve gotten too worried about protecting your content – so worried that you’re missing the big picture.
Don’t Forget What Is Important (Hint: It starts with “Mem” and ends with “bers”)
The best membership sites allow people to consume the content they’ve paid for in multiple ways – view the video, download the video, download mp3 audio version of the video, download the presentation as a powerpoint, download the transcripts as a PDF, and so on.
Instead of making it easy for your members to download the content, if you’re going to spend your limited resources trying to figure out how to prevent people from downloading content that they’ve actually paid for, and force people to only view your content online and not be able to view it offline (like in their spare time or when going for a jog in the park), you run the risk of upsetting 99% of your legitimate paying members, in order to secure your content from the 1% of pirates, who will steal and share your content no matter what.
So forget about the 1%, and focus on the 99%. DAP already has enough security in place to stop the 1%. So don’t worry about that. Your content is very secure with DAP.
Anything else is just a total waste of your time. So don’t get distracted by the noise, and just get on with the real important tasks on hand: Building a long-term recurring income stream by building a large community of highly satisfied, loyal fans who are thrilled about what you have to offer, and will continue to pay month after month because whatever it is that you’re selling, is making their life better in some way.
The hardest thing to do online, with a membership site is still this: Creating great content, Attracting buyers, and then getting your members to keep paying month after month.
And that, is the big picture.
Un-Protecting Content
Once a post or page is added to ANY DAP product, then it becomes protected, and will be available to only those who have authorized access to that Product.
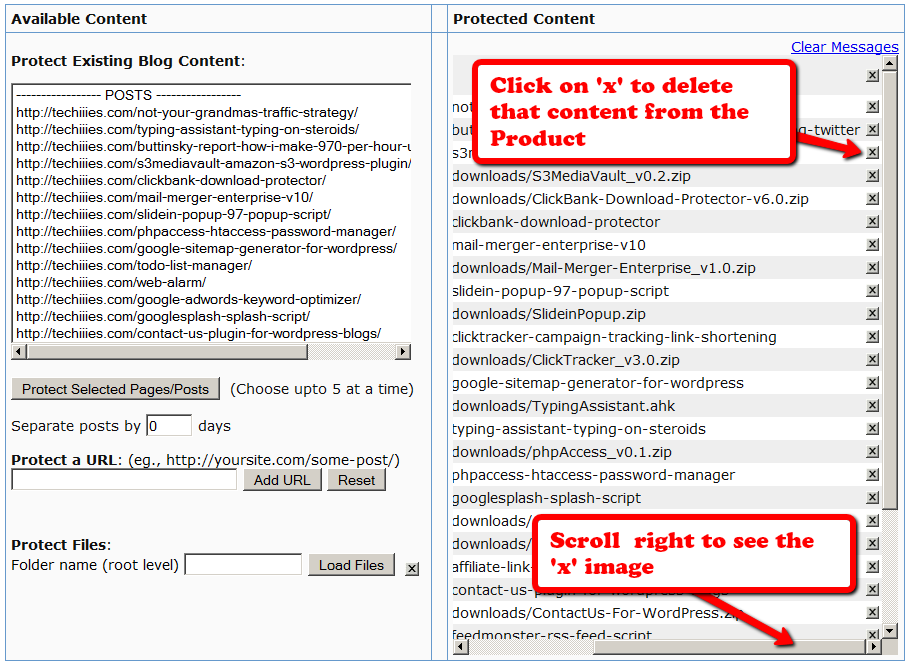
So to completely Un-protect a page or post that you have protected previously, and make it “public” (a.k.a “open”) again, so that any casual visitor to your blog or web site can see it, you just scroll to the right in the “Protected Content” section, and click on the “X” image next to the content that you wish to Un-protect.
Of course, also make sure that you do the same for all products – because if you forget to delete it from even one Product, then it will continue to remain protected.
Protect Entire Blog
If you, for some reason, need to protect your ENTIRE blog from “non-logged in users” – meaning, any part of your blog (menus, sidebars, widgets, etc), including the un-protected pages, should be seen only by someone who is already logged in – be it a free user or a paid user, then here’s how you do it…
- Go into your WordPress Admin, click on Appearance > Editor
- Make sure your current theme is selected in the drop-down towards the right/top corner.
- Click on “Header” (header.php) of your theme.
- Enter the following text right towards the very top of that file.
<?php
include_once “./dap/dap-config.php”;if( !Dap_Session::isLoggedIn() ) {
header(“Location: /dap/login.php”);
exit;
}
?>
The only thing you need to make sure is that you have the path to the dap-config.php correct.
If your blog is in the root, then use the code above as is.
If your blog is in a sub-folder, then replace line in red above, with the line in red below…
include_once “../dap/dap-config.php”;
That’s it!
WARNING
Please remember that if you do this, then you must use the default DAP login page /dap/login.php , and you won’t be able to put the login form within WordPress.
The reason for this, is that the protection code is being applied at the theme level, and the protection will also apply to all WordPress pages and posts – and if you put the DAP login form inside a WP page, then that page will also get protected from everyone, and no one will even be able to get to the login form in order to log in. That makes your site impossible to log in to, which of course makes no sense.
DAP Shortcodes
DAP has a feature called “DAP Shortcodes” that allows you to do partial or in-page content protection.
(RELATED: If you are looking for merge tags to place into WordPress posts, then see Merge Tags for WordPress. For email-related merge tags, see Merge Tags for Email).
So if you had a blog post or page with 3 paragraphs of text and a video, you can protect just the video from certain groups of viewers, and leave the text portions open for anyone to read.
And you can…
a) Replace the text that is enclosed by the short codes with an error message.
So entering this in to your page/post’s body…
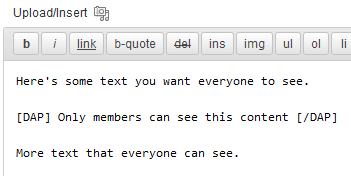
… then becomes this…
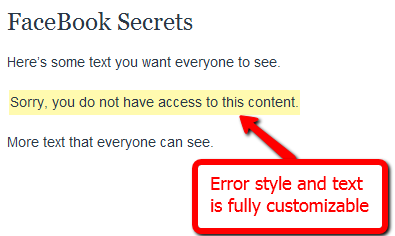
You can fully customize the style and text of the error message.
Or…
b) You can make the private text completely disappear from the page
By adding an additional parameter to the shortcode, you can make the error message completely disappear.
So this…
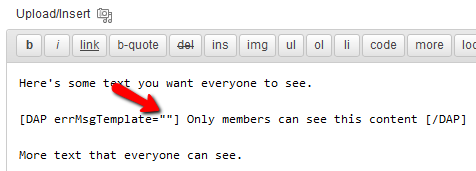
…is seen like this by the visitor…
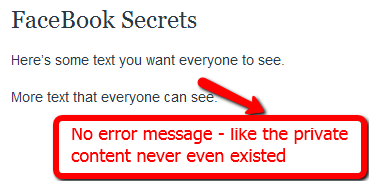
No error message at all – like that section of content never even existed, and no errors or warnings shown either.
Teaser On Steroids
The DAP Shortcodes may be used to quickly protect content that you don’t necessarily wish to create a DAP Product for.
So if you don’t care about dripping some content, but just wish to protect it from say, non-members, or make it available only to certain “levels”, then you can do it by using the DAP Shortcode, and not have to worry about adding it to any particular level first.
These Shortcodes may or may not be used within content that is already protected as part of a DAP Product. Totally up to you.
Shortcode Summary
This section just lists all of the available shortcodes so you can quickly see everything in one glance. Details about each shortcode is available in the next section below.
Basic DAP Shortcode
[DAP]...private content...[/DAP]
Expanded DAP Shortcode Options
[DAP]...private...[/DAP]
[DAP hasAccessTo="1" errMsgTemplate=""]...private...[/DAP]
[DAP hasAccessTo="1,2,3" errMsgTemplate="SHORT"]...private...[/DAP]
[DAP hasAccessTo="1" errMsgTemplate="SHORT"]...private...[/DAP]
[DAP hasAccessTo="1,2,3" errMsgTemplate="LONG"]...private...[/DAP]
Member-Specific Content
[DAP userId="144"]protected content[/DAP]
In-Page Dripping
[DAP startday="1" endday="9999" hasAccessTo="1"]Video 1 Embed Code[/DAP]
[DAP startday="2" endday="9999" hasAccessTo="1"]Video 2 Embed Code[/DAP]
[DAP startday="3" endday="9999" hasAccessTo="1"]Video 3 Embed Code[/DAP]
If you don’t include endday in your shortcode, then the default value for endday is taken as 9999 – which means forever access.
Hiding Content From Logged-In Members
(a.k.a showing content only to visitors)
[DAP isLoggedIn="N"]....content to show only to NON-members... [/DAP]
Showing Different Content To Visitors -vs- Members
Use both codes as shown below (one following the other):
[DAP isLoggedIn="N"]....sales page content shown only to visitors (and members who have not yet logged in)...[/DAP][DAP isLoggedIn="Y"]...member content that will replace sales content shown only to logged-in members...[/DAP]
publicUntil
[DAP publicUntil="2012-12-31" hasAccessTo="1"]This message will be completely public UNTIL (and including) December 31st, 2012 after which it will be protected as part of product 1[/DAP]
publicAfter
[DAP publicAfter="2012-01-01" hasAccessTo="1"]This message will be completely public AFTER (and including) January 1st, 2012 until which time it will be protected as part of product 1[/DAP]
hasNoAccessTo
[DAP hasAccessTo="2" hasNoAccessTo="1,3" ]This message will appear only to active users of product 2 but only for those who DO NOT also have access to products 1 or 3[/DAP]
startday / endday
[DAP hasAccessTo="2" startday="1" endday="1"]This message will appear to you only to users of Product 2, on Day 1 and no further[/DAP]
startdate / enddate
[DAP hasAccessTo="2" startdate="2012-01-01" enddate="2012-01-31"]This message will appear to you only to users of Product 2, between the dates of Jan 1st, 2012 and Jan 31st, 2012 - and no further[/DAP]
Negative Days
[DAP hasAccessTo="2" startDay="-6" endDay="-3"]Howdy[/DAP]
Error Message From File
[DAP hasAccessTo="2" startday="1" endday="1" errMsgTemplate="file:http://YourSite.com/customMessage.html"]This message will appear to you only today[/DAP]
[DAPUserLinks]
[DAPUserLinks showProductName="Y" showAccessStartDate="Y" showAccessEndDate="Y" showDescription="Y" showLinks="Y" orderOfLinks="NEWESTFIRST" howManyLinks="10000" errMsgTemplate="SHORT" productId="ALL" dateFormat="YYYY-MM-DD" showproductcount="Y"]
orderOfLinks
orderOfLinks can have one of two values…
NEWESTFIRST will drip newly dripped links at the top. So day 7 link will be above day 1 link.
OLDESTFIRST will drip newly dripped links towards the bottom. So day 1 link will be above day 7 link.
showproductcount=”N” will disable the heading “You have access to X products” at the top of the “My Content” section.
So, here’s another version of the DAPUserLinks shortcode:
[DAPUserLinks showProductName="Y" showAccessStartDate="Y" showAccessEndDate="Y" showDescription="Y" showLinks="Y" orderOfLinks="OLDESTFIRST" howManyLinks="10000" errMsgTemplate="SHORT" productId="ALL" dateFormat="YYYY-MM-DD" showproductcount="N"]
[DAPComingSoon]
[DAPComingSoon showProductName="Y" showAccessStartDate="Y" showAccessEndDate="Y" showDescription="Y" showLinks="Y" orderOfLinks="NEWESTFIRST" howManyLinks="10000" errMsgTemplate="SHORT" productId="ALL" makelinksclickable="N" dateFormat="YYYY-MM-DD"]
[DAPUserProfile]
[DAPUserProfile showFirstName="Y" showLastName="Y" showUserName="Y" showEmail="Y" showPassword="Y" showAddress1="Y" showAddress2="Y" showCity="Y" showState="Y" showZip="Y" showCountry="Y" showPhone="Y" showFax="Y" showCompany="Y" showTitle="Y" showPaypalEmail="Y" showOptedOut="Y" showCustomFields="Y"]
[DAPUpline]
To show affiliate’s/sponsor’s first name:
[DAPUpline showField="first_name"]
To show affiliate’s/sponsor’s last name:
[DAPUpline showField="last_name"]
To show affiliate’s/sponsor’s custom field (say “ssn”):
[DAPUpline showField="custom_ssn"]
More examples and details in the “Shortcode Details” section below.
—————————————————————————————————————-
Shortcode Details
All of the shortcodes listed in the above “Shortcode Summary” section, are explained here.
Basic DAP Shortcode
[DAP]…private content…[/DAP]
This is the shortest version of the DAP Shortcode. In this version, anything you put between the [DAP] and [/DAP] tags, will be viewable only by a logged-in user.
No other restrictions for the content to be viewed, except that the viewer has to be logged in to your membership site (via DAP). So basically all free and paid members, regardless of which product they have access to, regardless of whether their product access is active or expired, can view the private content.
Full DAP Shortcode
[DAP hasAccessTo=”1,2,3″ errMsgTemplate=”SHORT”]…private…[/DAP]
This is the full version of the DAP Shortcode. All inner tags – hasAccessTo and errMsgTemplate – are all OPTIONAL.
hasAccessTo: Comma-separated list of one or more Product Id’s that you want the user to have access to before they can view the content. So if you enter 3 different product id’s (like hasAccessTo=”2,7,14″) it means “Anyone with access to AT LEAST ONE of those products with the product Id’s 2, 17 or 14. It does NOT mean they have to have access to all of them at once. Access to any one is fine.
errMsgTemplate: This determines the HTML/text of the error message displayed, if user DOES NOT have access to the content being protected.
Values may be Can be SHORT, LONG or “” (empty). NOT mandatory. If omitted entirely from the tag, then the default template used is SHORT.
If you want no error message to be displayed, and want the protected content to silently disappear completely if user does not have access to it, then include the tag, but set it to “” (blank/empty), like this…
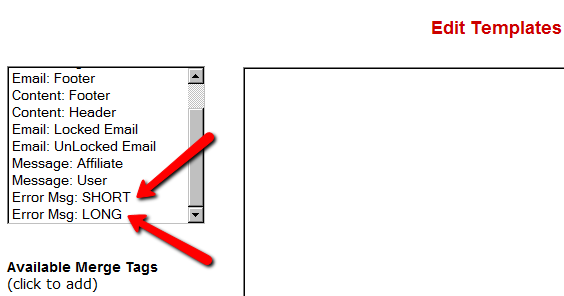
[DAP errMsgTemplate=””]…private…[/DAP]The HTML/text displayed by the SHORT and LONG templates can be configured via the Setup > Templates screen, as shown below.
Examples
[DAP]...private content...[/DAP]
Viewable by Any Logged-in User
[DAP hasAccessTo="1" errMsgTemplate="SHORT"]...private...[/DAP]
Viewable by ANY logged in user (FREE or PAID – doesn’t matter) who is a user of the product with the ID “1” (you can get the Product id from the “Products > Manage” screen). Display HTML/text from the SHORT template if user does not have access to the private content.
[DAP hasAccessTo="1,2,3" errMsgTemplate="LONG"]...private...[/DAP]
Viewable by ANY logged in user (FREE or PAID – doesn’t matter) who has access to EITHER of the Products – 1, 2 or 3. Display HTML/text from the LONG template if user does not have access to the private content.
Member-Specific Content
“For Your Eyes Only”
Let’s say you run a coaching program. You have 10 clients. You want Joe Customer to see a tailor-made custom video meant only for Joe, and Jill Member to see a specific PDF report written specifically for Jill’s business. Now using the new “userId” parameter in the DAP shortcode, you can now protect a piece of content so that only a specific DAP user can see it.
[DAP userId="144"]protected content[/DAP]
In-Page Dripping
DAP Shortcodes now include the ability to specify a “Day” right within the shortcode itself. So you can now publish, say, 10 videos on one page, and you can enclose each video’s embed code with a separate DAP Shortcode that has a different “Day” setting, so the very same page will show 1 video on Day 1, 2 videos on Day 2, 3 videos on Day 3, and so on.
Like this…
[DAP day="1" hasAccessTo="1"]Video 1 Embed Code[/DAP]
[DAP day="2" hasAccessTo="1"]Video 2 Embed Code[/DAP]
[DAP day="3" hasAccessTo="1"]Video 3 Embed Code[/DAP]
NOTE: Please remember that you may not omit the hasAccessTo field – you must use the hasAccessTo field to specify a product id, because all start “days” for a user are associated with a product.
Hiding Content From Logged-In Members
Starting DAP v4.1, you can now mark content such that it will NOT be displayed to members who ARE logged in. To put it another way, it will HIDE content from members, and show it ONLY to NON-Members.
For example, this could be your sales copy or your buy-button, that you don’t want your logged in members (who may have already purchased the product) to see.
Here’s the shortcode for that.
[DAP isLoggedIn="N"]....content to show only to NON-members... [/DAP]
publicUntil
You can set a date UNTIL which a blog post is public (no protection or rules will be applied from any other shortcode parameters.
[DAP publicUntil="2012-12-31" hasAccessTo="1"]This message will be completely public UNTIL (and including) December 31st, 2012[/DAP]
publicAfter
You can set a date AFTER which a blog post will become public (no protection or rules will be applied from any other shortcode parameters.
[DAP publicAfter="2012-01-01" hasAccessTo="1"]This message will be completely public AFTER (and including) January 1st, 2012[/DAP]
hasNoAccessTo
A much requested feature. You can now specify a list of products that a user does NOT have access to, like this:
[DAP hasAccessTo="2" hasNoAccessTo="1,3" ]This message will appear only to active (current) users of product 2 but don't have access to 1 or 3[/DAP]
startday / endday
Now you can specify “startday” and “endday” in the shortcodes to make the contents stop being shown after a certain end “day”. Previously available “day” variable has been deprecated and replaced by “startday” instead. However, if you already are using it somewhere, it will continue to work as is. However, if you wish to use the “endday” variable, you must now also use “startday” instead of “day”. Very useful for, say, displaying a message on the Welcome page only on the first day.
[DAP hasAccessTo="2" startday="1" endday="1"]This message will appear to you only to users of Product 2, on Day 1 and no further[/DAP]
startdate / enddate
You can also specify actual dripping “dates” (instead of “days”) by using “startdate” and “enddate” in the shortcodes to make the contents stop being shown after a certain end “date”.
[DAP hasAccessTo="2" startdate="2012-01-01" enddate="2012-01-31"]This message will appear to you only to users of Product 2, on between the dates of Jan 1st, 2012 and Jan 31st, 2012 - and no further[/DAP]
Negative Days
“startday” and “endday” can also be a negative number.
For eg., [DAP hasAccessTo="2" startDay="-6" endDay="-3"]Howdy[/DAP]
This basically means, the message “Howdy” will be shown starting 6 days before the “Access End Date” of the user’s access to the product with Id “2” (specified in hasAccessTo). So you can use this to display a special message – or specially priced offer (buy button) – for those whose access has not yet expired. Last day (same day of access end date) is day 0. Day before that is -1.
Error Message From File
You can now specify a file name whose contents are to be used as error message. Use the existing errMsgTemplate field, but add a “file:…” to the beginning, and make sure the file name is a fully qualified URL starting with http:// and your domain name. So you can say…
[DAP hasAccessTo="2" startday="1" endday="1" errMsgTemplate="file:http://YourSite.com/customMessage.html"]This message will appear to you only today[/DAP]
[DAPUserLinks]
Allows you to heavily customize how the links are displayed when you use the merge tag %%USERLINKS%%…
[DAPUserLinks showProductName="N" showAccessStartDate="Y" showAccessEndDate="Y" showDescription="Y" showLinks="Y" orderOfLinks="NEWESTFIRST" howManyLinks="10000" errMsgTemplate="SHORT" productId="ALL" dateFormat="YYYY-MM-DD"]
[DAPComingSoon]
Allows you to display links that are coming soon.
[DAPComingSoon showProductName="Y" showAccessStartDate="Y" showAccessEndDate="Y" showDescription="Y" showLinks="Y" orderOfLinks="NEWESTFIRST" howManyLinks="10000" errMsgTemplate="SHORT" productId="ALL" makelinksclickable="N" dateFormat="YYYY-MM-DD"]
[DAPUserProfile]
Allows you to selectively display profile fields on a page. Just set the profile field that you don’t want shown to “N” in the tag below.
Default is “Y”. So Leaving out the text showLastName=”Y” entirely from the shortcode, is the same as setting it “Y”, which means it will be displayed.
So just entering the text [DAPUserProfile] into a page, will show ALL fields.
And to not show say, Phone and Fax, you would do something like this:
[DAPUserProfile showPhone="N" showFax="N"]
So all other fields will be displayed, except those two.
[DAPUpline]
This shortcode shows a user their referring Affiliate’s (a.k.a Sponsor’s) information. So when a user visits the page that has this shortcode, it will display information of that user’s referring Affiliate – either from cookie (if exists), or if they’re already a member, then their current Affiliate’s information. And if neither the cookie is set, nor the user has an Affiliate attached to their account already, then it will show the info of the DAP Admin). So you can use it to show the user information of the person (affiliate) who referred them to the page. Think of it as a “Your Sponsor” tag.
To show affiliate’s first name, use this:
[DAPUpline showField="first_name"]
To show affiliate’s last name, use this
[DAPUpline showField="last_name"]
[DAPUpline showField="user_name"]
[DAPUpline showField="email"]
[DAPUpline showField="address1"]
[DAPUpline showField="address2"]
[DAPUpline showField="city"]
[DAPUpline showField="state"]
[DAPUpline showField="zip"]
[DAPUpline showField="country"]
[DAPUpline showField="phone"]
[DAPUpline showField="fax"]
[DAPUpline showField="company"]
[DAPUpline showField="title"]
[DAPUpline showField="paypal_email"]
For Custom fields…
[DAPUpline showField="custom_customfieldname"]
User & Product Statuses
DAP assigns a status for the User itself (at a global, account level), as well as a User/Product level (specific to the user's access to that product).
So there's the User Status and then the User/Product Status
For eg., the User Status may be "Active", but a specific User/Product status may be "Inactive" – which means user can log in to their account, receive emails, etc, but cannot access any content that is part of this specific product (though they can access all other products they may have, that are "Active").
The bottom-line is this: In order for a user to access his/her account, and all the content in the Products that he/she's purchased, all the statuses have to be Active.
So here are the possible statuses, and what they mean.
User Status
These statuses apply to the User's account itself.
Inactive
If the user's status is inactive, then that means the user's entire account is inactive. User will not be able to even log in to their account. All outgoing broadcast and autoresponder emails will "exclude" them from the list, and they will not receive any emails from the system.
Active
Account is accessible, all emails are being sent.
Unconfirmed
They've just signed up for a product that requires "Double Optin". Which means, unless they "confirm" by clicking on the double-optin link, their account will not become active. Please note that once a user has already confirmed the double-optin link for one product, then their "User" status automatically becomes "Active". So even if they go on to sign up for another double-optin product, then their User status will never again change to "Unconfirmed" (unless specifically set so by the DAP Admin). For all future double-optin products, it is this user's "User/Product" status that will be "Unconfirmed", while the main "User" status remains "Active".
Locked
When an account receives login attempts from more than the number of IP addresses set in the "Setup > Config > Advanced > Max. # of User Logins From Different IP`s" field, then that user's main User status is changed to be "Locked". This is very similar to the "Inactive" status, except named different just so admin can distinguish between "Locked" and other users.
User/Product Status
These statuses specifically apply to a User's access with relation to a specific Product.
Inactive
User cannot access any content that is part of this product. However, User may access other products whose user/product status is "Active".
Active
There are no restrictions for this User to access content that is part of this product (of course, only whatever the user is eligible to see, based on the drip setup).
vBulletin Integration
Click Here for detailed vBulletin -> DAP setup instructions.
Click Here for DAP->vBulletin integration FAQ/Usecases
Video 1: DAP/vBulletin Integration
[s3mv]vbintro.mp4,800,600,false,false[/s3mv]Video 2: Demo of vBulletin Integration
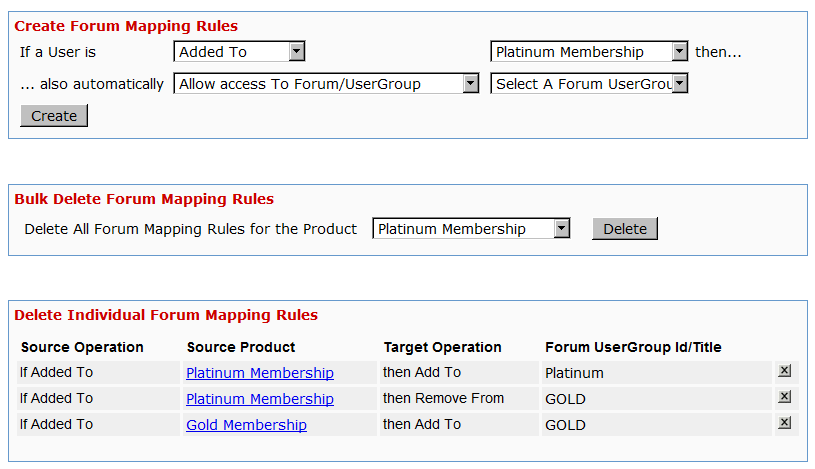
[s3mv]vbintro2.mp4,800,600,false,false[/s3mv]Product/Forum Chaining
This is by far the most exciting feature in 3.9. I don’t think even we, the developers of DAP, have been this excited about a new feature.
Now, with just a few clicks of the mouse, you can completely automate your Forum management, and do some really slick stuff like…
* “Silver” Members get posting access only to the following vB forums…
– Introductions
– General Discussions
* “Gold” members get access to all above, plus the forum “Puppy Potty Training Tips”. So they get access to the following vB forums…
– Introductions
– General Discussions
– Puppy Potty Training Tips
* “Platinum” members get access to ALL of the forums above, PLUS some premium forums, like “Joint Ventures”, “Starting Your Own Dog Business”, “Premium Support”, and more. So they get access to…
– Introductions
– General Discussions
– Puppy Potty Training Tips
– Joint Ventures
– Platinum Mastermind
– Starting Your Own Dog Business
– Premium Support
And then you can add some more rules like…
Both Gold & Silver can just VIEW the “Premium Support” forums, but cannot POST anything.
And Gold & Silver CANNOT even VIEW the “Joint Ventures”, “Platinum Mastermind”, “Starting Your Own Dog Business”.
See how insanely powerful this can get?
Sure, you could have a forum with WP-based forum plugins like bbPress and Simple:Press too.
But comparing those WP forums to vBulletin? That’s like putting a kid who’s just completed one month of boxing lessons, in a ring with Mike Tyson right after someone said something mean about his mother!
And can you imagine what it would do to your “retention rate”, when you tell your members that if they cancel their subscription, they will lose access to the entire community of like minded people?
And to think that we’re just scratching the surface of monetizing forums here.
The vBulletin forum software is so rich in rules and user roles, and the DAP integration with vB is so tight that you could start just a “Forums Only” membership site and charge just for access to your forums!
Imagine creating a one-time product where for $10, they get to post in a “Special Offers” forum where they can advertise their product or service?
Or how about charging $10 to post in a forum called “Outsourcing”, where they can advertise their need to hire someone either for both long-term and short-term projects? It would be free to view for everyone, but you have to pay-to-post]
– Veena Prashanth
Co-Founder & Co-Developer, DAP
Order Of Links On “My Links” page
[Updated 05/20/2012: Drag & Drop Re-ordering of links available since DAP v4.3.1]Ordering Links
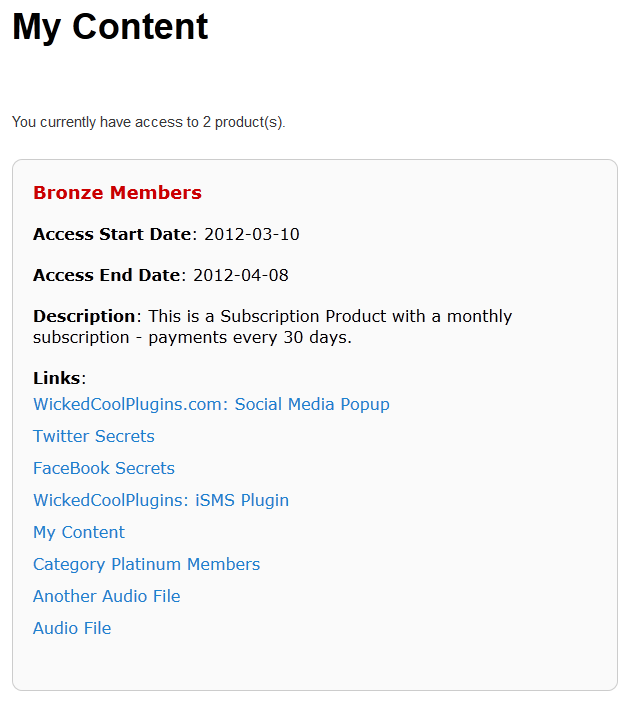
The ordering of links in the ContentResponder tab of a product is required ONLY if you have a “My Content” page (see example below – page uses the merge tag %%USERLINKS%%) and you want control over exactly how those links are displayed in that list:
Fig 1: Example “My Content” page which uses the merge tag %%USERLINKS%%
Ordering by Drip Day
The easiest way to organize links, is to set the dripping “day” for each link.
So if you’re setting up 5 links to be available on Day #1, 2, 3,4 & 5, then in the “My Links” section, DAP will display the links in “Newest On Top” order.
So the newest link (Day #5) will appear first, followed by Day #4, and so on, until Day #1.
Ordering When There Is No Dripping
If you have multiple links that you’re making available all on the same day (like say, all on Day #1), then once you’ve added the links from left to right in the ContentResponder tab of your DAP Product, you can then hold down any row from the Protected Content section, drag and drop and re-order it however you wish to.
Remember that the drag-and-drop re-ordering will only work within different links that are all set to drip on the same day. So for eg., dragging a day 1 link above a day 4 link (see screenshot below) will not work, and it will simply come back to it original position after refreshing the screen. But dragging one Day #1 link above or below another Day #1 link will re-order the links exactly in that order.
Fig 2. Screenshot showing drag-and-drop reordering in action
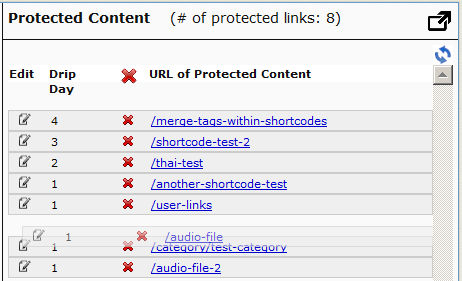
If you see the links order in the above screenshot, that’s the exact same order in which the links will appear when the member views their “My Content” page (or whatever you have called the user links page).
[DAPUserLinks] Shortcode
If you want even more control over how many links are displayed, order of the links, date format etc, then consider our new shortcode shown below:
[DAPUserLinks showProductName=”N” showAccessStartDate=”Y” showAccessEndDate=”Y” showDescription=”Y” showLinks=”Y” orderOfLinks=”NEWESTFIRST” howManyLinks=”10000″ errMsgTemplate=”SHORT” productId=”ALL” dateFormat=”YYYY-MM-DD”]NOTE: orderOfLinks can have one of two values…
NEWESTFIRST will drip newly dripped links at the top. So day 7 link will be above day 1 link.
OLDESTFIRST will drip newly dripped links towards the bottom. So day 1 link will be above day 7 link.
So, here’s another version of the DAPUserLinks shortcode:
[DAPUserLinks showProductName=”N” showAccessStartDate=”Y” showAccessEndDate=”Y” showDescription=”Y” showLinks=”Y” orderOfLinks=”OLDESTFIRST” howManyLinks=”10000″ errMsgTemplate=”SHORT” productId=”ALL” dateFormat=”YYYY-MM-DD”]Related: See more such shortcodes at DAP Shortcodes
Global Login & Password
Creating 1 Single Login & Password For All Users
This is for when you don’t care about assigning unique usernames and passwords to your users, and would rather given all of your members (or site visitors) a single email id and password to log in to your membership site.
Here’s how you can do it:
- Most important: Go to Setup > Config > Advanced > “Max. # of User Logins From Different IP`s” and set it to a very high number – like 99999999. You’ll need to do this because everyone will be logging in using the same email/password, and you don’t want DAP to lock out the public account (you’re about to create below).
- Create a “public” user manually, with an email id like, say, “demo@yoursite.com” . DAP will assign a random password to the user (unless of course you have set the “Default” password in Config).
- Change this password also to something public – like ‘demo’ 🙂
- Then if you don’t care about collecting anyone’s email id, then you could publish this info publicly on your web site
- But if you wish to collect people’s email id’s, and *then* give them this public email/password, then you can still sign them up using the “Direct Signup Form”. And in the welcome email, instead of sending them their own email id and password, send them the public email id and password.
Partial Content Protection Using Sneak-Peek
DAP has a feature called “Sneak-Peek” where you can show a part of your blog post or page to casual visitors (as well as to search engines like Google) and then when they click on the “Read more…” link, the protection will kick in for the rest of the post, and DAP will say something to the effect of “Sorry, you must be logged in to access this content. Please login below or click here to get access”.
And that error page will contain both the login form, as well as a link to your sales page. Of course, you can customize this error page to say whatever you want, but that’s another topic altogether.
Advantages of Sneak-Peek
Sneak-Peek allows you to show “teaser” content to potential members, instead of fully locking it up and showing just an error page. Using Sneak-Peek allows you to show some content to casual visitors in order to get them to subscribe to see the rest of the content, as well as keep some content open so that search engines like Google will have some content to index in their search databases, so that the open part of the content can show up in search results for potentially matching keywords, and bring you some free organic search traffic to your site.
How this works
WordPress has a feature called the “more” tag. Basically it is a bunch of text (<!–more–>) that you insert into your posts or pages. And WP will then break up your post right at the point where you inserted the more tag, and replace that tag (and everything that follows) with a “Read more…” link
Fig A: “More” icon in WP. Click to enlarge.

You can also insert the more tag in to your post or page, by clicking on the icon shown in the image above – that looks like two rectangles separated by a dotted line – on the WordPress page/post edit screen.
Of course, exactly what that “Read more” link will say (it could say, for eg., “Click here to read the rest of this post”) is determined by your actual WP theme.
Regardless of what it says, when you have a protected post, by default (when sneak peek is off) that post will completely disappear from your blog for non-members and those who are logged in, but don’t have access to it yet. And even to Google.
But if you insert the “More” tag in to all of your pages and posts, then on your blog’s summary page (which lists all of your posts), all posts with the more tag (protected and un-protected will show up to the more tag, and when someone clicks on the “Read more’ link, that’s when DAP’s security kicks in and if the user has access to that content, it will show her the rest of the post. But if the user is either not logged in, or is logged in and does not have access to that content (either access is yet to come because of the drip, or content has already expired), then it will show the appropriate error message.
Enabling Sneak-Peek
In your DAP Admin Dashboard, go to…
“DAP Admin > Setup > Config > WordPress Sneak Peek: Show snippets of post (upto the `More` break) even for protected posts?“
… and set the above setting to “Y” (for ‘yes’),
Update on 09/07/2014
To protect your content, if you turn on “Sneak-Peek” in DAP, and you inadvertently (or intentionally) don’t insert the “more” tag into a post, then the entire post will get hidden and protected by default, and nothing will be shown except the error message.

