13
1-Click Upsells With Paypal Standard
1-Click Upsells, Downsells and OTO’s are now extremely simple to implement using the new “Upsell Tree” plugin for DAP.
And this particular plugin works with Paypal Standard! Which means you don’t need a merchant account any more.
All you need is a regular Paypal Business Account.
Please note that this is not “True 1-Click”, like you can do with a real merchant account – because of the very fact that Paypal expects your buyers to log in at least once into their paypal account through Paypal.com, and then at the end of the Upsell-flow, there is one final confirmation page. So it’s more like “2-Click Upsells” really.
If you want true 1-Click Upsells, then you need to have a merchant account through Paypal Website Payments Pro or Authorize.net.
IMPORTANT: What you need before you can use this plugin
- You need a Paypal (Standard) Business or Premier account
- You must have SSL (secure server) enabled on your web site. Ask your web host to enable SSL for your site.
- You must have a working version of DAP 3.7+
- You cannot sell a “Recurring” product as an Upsell – recurring products have to be the first product in the flow.
- Here’s what you CAN do: You can have a recurring product as the very FIRST product that they purchase (when they first click on the “Buy” button on your main sales page, and then you can offer any number of “One-Time” Products as upsells or downsells.
- Here’s what you CANNOT do: Offer a “One-Time” product as your first product that they buy, and then try to upsell them to a “Recurring” Product. Unfortunately, this is a Paypal problem at this time.
Installation & Setup of UpsellTree For Paypal Standard
- You need to be running at least DAP v3.7 for this plugin to work
- Purchase the UpsellTree plugin if you haven’t already done so, login to your DAP account and download the plugin zip file, PaypalStandardUpsellTree.zip .
- Unzip the file to your desktop. That will create a new folder on your desktop, called “PaypalStandardUpsellTree” which will have all of the files inside.
- Upload all the files inside, directly to your “dap” folder on your web site.
- DO NOT upload the folder itself. Just the files inside.
- Installation of Paypal Upsell-Tree Plugin is complete.
- Next, log in to your Paypal account.
- Click on “Profile”
- Click on “Request API Credentials” (under ‘Account Information’ section). It will bring you to the API access page.
- Under Option 2, click on “Request API credentials” to create your own API username and password.
- Click on “Request API signature”
- Click on “Agree & Submit”
- Note down the following pieces of information:
* API Username
* API Password
* API Signature - That’s it as far as your Paypal account is concerned. Now back to DAP on your site.
- Log in to your DAP Dashboard
- Go to “Setup > Config“. On that page, click on the “Paypal” link in the links towards the very top of that page (or scroll down to the “Payment Processing: Paypal” section).
- Enter the 3 pieces of information (from Step #13 above) into the Config fields 7, 8 & 9 on that screen: Paypal API Username, Paypal API Password, and Paypal API Signature. Cick “Update” and save the changes.
- Generating the Paypal Upsell Buy Buttons:
In the DAP Dashboard menu, go to Payment Processing > Generate Buy Button
You will now see that you’re on the default tab “Paypal Standard”. - So now select the DAP Product for which you’re trying to generate the buy button, from the Product list.
- Now, once the page has refreshed, scroll down to the bottom of this page, and you’ll see an expandable section with the heading “Paypal Standard 1-Click Upsells”
Expand that section by clicking on the “+” image. - You will see the following two links in that section…Generate Paypal Standard 1-Click Primary Button
Generate Paypal Standard 1-Click Upsell ButtonThe first one is for generating the buy-button code for your primary product (the very first product in the flow). The second one is for all upsells.So if this is the first time you’re doing this, and for your main product, click on the first link. - If all of your Product’s settings are correct, then you’ll see a small popup that contains the buy-button HTML code. Paste this code into a blank notepad (or text editor) window.
So let’s say this is what the code you got looks like…<form name=”generate_paypal” method=”post” action=”/dap/PaypalSetExpressCheckout.php”>
<input type=”hidden” name=”item_name” value=”Facebook Secrets Subscription”/>
<input type=”hidden” name=”description” value=”This is a Subscription Product with a monthly subscription – payments every 30 days.” />
<input type=”hidden” name=”amount” value=”10.00″ />
<input type=”hidden” name=”trial_amount” value=”0.00″ />
<input type=”hidden” name=”total_occurrences” value=”9999″ />
<input type=”hidden” name=”is_recurring” value=”Y” />
<input type=”hidden” name=”recurring_cycle_1″ value=”365″ />
<input type=”hidden” name=”recurring_cycle_2″ value=”365″ />
<input type=”hidden” name=”recurring_cycle_3″ value=”365″ />
<input type=”hidden” name=”payment_succ_page” value=”https://YourSite.com/dap/continue.php?url=/dap/upsell1-paypalstandard-sample.html” />
<input type=”hidden” name=”payment_err_page” value=”https://YourSite.com/dap/paymentError.php” />
<input type=”hidden” name=”payment_cancel_page” value=”https://YourSite.com/dap/cancel.php” />
<input type=”hidden” name=”payment_gateway” value=”paypal” />
<input type=”hidden” name=”is_submitted” value=”Y” />
<input type=”image” src=”/dap/images/btn_xpressCheckout.gif” align=”left” width=”200″ height=”50″ style=”margin-right:7px;” value=”Submit” alt=”Submit”> - Look at the payment_succ_pagetag in the generated button code and have it point to your sales page for your upsell.In the above example, the upsell page is called upsell1-paypalstandard-sample.htmland it’s under the dap folder.Put this HTML code on the primary product’s sales page. This is the first product in the flow.
- Now, you need to generate a button for your upsell product. So go back to Payment Processing > Generate Buy Button . This time, pick the Upsell product from the list.
- Now scroll down to the bottom of this page, expand the section “Paypal Standard 1-Click Upsells” , and this time, click on the second link there, because you’re now generating a buy-button for the Upsell product.Generate Paypal Standard 1-Click Primary Button
Generate Paypal Standard 1-Click Upsell Button - Say this is the button code you get this time…<form name=”generate_paypal” method=”post” action=”/dap/PaypalAddToCart.php”>
<input type=”hidden” name=”item_name” value=”Upsell 1″/>
<input type=”hidden” name=”description” value=”This is a dummy Subscription Product with a monthly subscription – payments every 30 days.” />
<input type=”hidden” name=”amount” value=”10.00″ />
<input type=”hidden” name=”trial_amount” value=”0.00″ />
<input type=”hidden” name=”total_occurrences” value=”9999″ />
<input type=”hidden” name=”is_recurring” value=”Y” />
<input type=”hidden” name=”recurring_cycle_1″ value=”365″ />
<input type=”hidden” name=”recurring_cycle_2″ value=”365″ />
<input type=”hidden” name=”recurring_cycle_3″ value=”365″ />
<input type=”hidden” name=”payment_succ_page” value=”/dap/PaypalCheckoutConfirm.php” />
<input type=”hidden” name=”payment_gateway” value=”paypal” />
<input type=”hidden” name=”is_submitted” value=”Y” />
<input type=”submit” value=”AddToCart” />
</form> - Now again, notice the payment_succ_page in the generated button code. You will see its pointing to /dap/PaypalCheckoutConfirm.php.
a) If this is the last upsell, then leave it pointed to /dap/PaypalCheckoutConfirm.php.
b) If this is NOT the last upsell, then update it to point to the url of the 2nd Upsell page (like we did for the primary product to point to the first Upsell sales page) and repeat the process above for the next upsell page.Bottom-line: Make sure that both the buy-button code as well as “No Thank You” link on the last upsell or downsell page, points to /dap/PaypalCheckoutConfirm.php - When your buyer reaches the final checkout confirmation page (PaypalCheckoutConfirm.php) then they can review all of the products in their “Upsell Cart”, and buy them all instantly and all together, without having to go back to Paypal ever again.
- Things To Note:
a) If you’re doing upsells, the only thing you need to do is, look for the “payment_succ_page” field in the above form. By default it will point to:
https://www.example.com/dap/continue.php?url=/dap/upsell1.html
b) Modify the file upsell1.html within your dapfolder, to create your 1-Click Upsell offer. Or if you don’t wish to use 1-Click upsells, you can make just about any kind of upsell offer on that page. The upsell1.html that comes with the plugin has a sample upsell page already created for you, just so you get an idea of what that will look like.b) On the upsell page, if you want to upsell say, Product B, then make sure you set up “Product B” ahead of time in DAP, and set up the price and recurring options.
c) Then for upsell products only, click on the “Generate Authnet 1-Click Upsell” link to generate the 1-Click Upsell Buy button code, as the upsell buy button is slightly different than the ‘regular’ buy button code. Now take the upsell buy button code like you did before, and paste it in upsell1.html.Repeat this process for unlimited upsells, downsells and one-time offers. No limits.
“No, Thank You” Buttons & Links
On every upsell page, you must also include a “No, Thank You” button or link that will allow your buyer to skip your upsell or downsell, and go to the next part of the sale.
For all upsells that are not the last upsell, you can link this button or link to the next upsell in the chain. So basically, on Upsell 1, they can either take the upsell1 (whatever your offer is) by clicking on the buy button, or click on the “No, Thank You” button/link, and you could then either taken them to the URL of Upsell2, or Downsell 1, or if this is the last upsell in the flow, then you could send them directly to the Paypal Upsell Summary Page /dap/PaypalCheckoutConfirm.php
Creating a “No, Thank You” button
Button to take them to next Upsell/Downsell:
<form name=”nothankyou”>
<input type=”button” name=”nothankyoubutton” value=”No, thank you, I wish to skip this incredible offer” onClick=”location.href=’https://YourSite.com/dap/continue.php?url=/dap/upsell2.html‘;”>
</form>
Feel free to copy the above HTML button code for the no-thankyou button. However, paste it into a text editor and be careful and don’t delete any of the HTML code, and only change actual URL’s or the button’s value (which is the text your buyer will see on the button).
Button to take them to final Checkout Summary page:
<form name=”nothankyou”>
<input type=”button” name=”nothankyoubutton” value=”No, thank you, please complete my order” onClick=”location.href=’/dap/PaypalCheckoutConfirm.php‘;”>
</form>
Creating a “No, Thank You” link
Link to take them to next Upsell/Downsell:
<a href=”https://YourSite.com/dap/continue.php?url=/dap/upsell2.html“>No, thank you, I wish to skip this incredible offer</a>
Link to take them to final Checkout Summary page:
<a href=”/dap/PaypalCheckoutConfirm.php“>No, thank you, please complete my order</a>
That’s it.
While it looks like a LOT of steps, that is only because we have to explain the steps in detail so they are clear. In reality, it is very simple to set up, and starting from scratch, if you have DAP & SSL already installed, it shouldn’t take you more than 1/2 hour to set up your 1-Click Upsells/Downsells/OTO’s. And if you’re not using Upsells/Downsells, then it can be done even faster.
If you have any further questions, feel free to open a support ticket, and we will assist you in getting this going.
Click here to buy our Paypal Upsell-Tree Plugin
10
Paypal Website Payments Pro Integration
IMPORTANT: PLEASE NOTE
The latest version of Paypal Payments Pro (called PAYFLOW) is not compatible with DAP and Recurring Billing Cycles, You will have to open a Paypal account with the older version of their Payments Pro Merchant service that is compatible with DAP. Please make sure to use the older version of PPP which has to be specially requested through their support team. In a future DAP release, we will make it compatible with the new version of PPP.
Please read this for more on Payflow and Paypal Payments PRO :
http://www.digitalaccesspass.com/forums/threads/1044-Recurring-transaction-failed-in-paypal?highlight=payflow
This post includes information about generating buy buttons for Paypal Website Payments Pro. It also has information about setting up 1-Click Upsells.
Even if you don’t wish to do upsells, you should follow the setup instructions in this page, for integrating your site with Paypal Website Payments Pro .
What you need before you can use this plugin
- You need a Paypal Website Payments Pro merchant account with Recurring Billing enabled.
- You must have SSL (secure server) enabled on your web site. Ask your web host to enable SSL for your site.
- You must have a working version of DAP 4.2+.
- Login to the DigitalAccessPass.com member’s area and download the file, DAPShoppingCart.zip .
- Unzip it to your desktop. It will unzip the files to a new folder on your desktop, called “DAPShoppingCart”.
- Upload all the files inside, directly to your “dap” folder on your web site. DO NOT upload the folder itself.
- After the files are uploaded, check to make sure that you find the files checkout.php and checkout-submit.php (just to name 2) directly under the dap folder. If you don’t, then you haven’t uploaded the files to the right directory.
Installation & Setup
-
Enabling Instant Payment Notification (IPN) within your Paypal account.
a) Log in to your Paypal account and click on the “Profile” link.
b) Go to Instant Payment Notification
c) If IPN is already enabled, and you already have a URL in that field, then skip ahead to Step 2.
Else, if IPN is not already enabled, then click on “Choose IPN Settings”
d) On the next screen, in the Notification URL field, enter…
http://YourSite.com/dap/dap-paypal.phpDon’t forget to replace “YourSite.com” with your actual web site’s domain name.
e) Make sure “Receive IPN Messages” is selected.
f) Click on “Save”.
-
Enable “Auto-Return” and “Payment Data Transfer”
Log in to your Paypal account.
Go to Profile.
Click on Website Payment Preferences
Turn Auto Return to On (see image below)
Set Return URL to http://YourSite.com/dap/dap-thankyou.php
Scroll down further to the Payment Data Transfer (optional) section
Set Payment Data Transfer to On
Scroll all the way to the bottom of the page, and then Save the changes.
You will now see a green check mark image, with a long string of characters on line 2. That is your Paypal Identity Token. Copy that string.
Go back to DAP Dashboard > Setup > Config > Payment Processing > Paypal Identity Token field, and enter this string there, and save it.

- Log in to your Paypal account and retrieve the following 3 pieces of information:
Paypal API Username
Paypal API Password
Paypal API Signature - Now log in to your DAP Dashboard and go to “Setup > Config“. Click on the “Paypal” link in the sub-menu at the top. The current page will then skip to the “Payment Processing: Paypal” section about half-way down the page.
 The current page will then skip to the “Payment Processing: Paypal” section about half-way down the page.

- Fill out items (1) through (10).
- Into fields 7, 8 and 9, enter the Paypal API Username, Paypal API Password, and Paypal API Signature that you noted down earlier.
- This step applies to you only if you are already using 1ShoppingCart with DAP (if not, skip to next step):
Be sure to disable the “Email Order” cron job from your web hosting control panel (“Cron Jobs” screen), because you don’t want your orders to be double-processed. - We’re going to assume that you’ve already setup the pricing and recurring options on the Products/Levels > Manage page, on the Pricing & Recurring tab.
- Now click on Payment Processing > Generate Buy Button on the DAP Admin Main Menu.
- Switch to Auth.net & Paypal Pro tab.
- Select the product name for which you wish to generate the buy button. Sections 1 and 2 are self-explanatory.

- If you want to put the shopping cart page right within a WordPress page, then do this…
a) Set the Payment Success Page to point to the page where you want users to be redirected upon purchase. It can be your login page, or a static thank-you page that informs the buyer to check their email id
b) Create a WP Page with the title Checkout containing the tag %%DAPCART%% tag and publish it. The permalink of this page would now become https://yoursite.com/checkout. Remember to add the “s” to “http” to make it “https://”. This page is not something you should access directly, but only through clicking a buy-button.
c) In the above screenshot, where it asks for “Checkout Page in WordPress”, enter the URL of your new checkout page from Step (b) above. Replace yoursite.com with the name of your site.
NOTE: The checkout page URL should start with https (SSL-enabled) and not http. - When done with sections 1 & 2, at the bottom of section 2, click on the Generate DAP Shopping Cart Button Code
This generates the buy button HTML code for your product, which you can then directly paste into your sales page. When you click on this link, you will get a pop-up that shows the actual HTML code for your button. The price, trial price, and recurring options are all taken from your Product settings. So make sure you have saved your Product changes before you click on this link. - Here’s what the HTML code looks like:
<form name="DAPCartPaymentForm" method="post" action="https://yoursite.com/dap/checkout.php">

<input type="hidden" name="payment_succ_page" value="http://yoursite.com/members/"/>

<input type="hidden" name="item_name" value="Bronze Members" />

<input type="hidden" name="is_submitted" value="Y" />

<input type="hidden" name="btntype" value="buynow" />

<input type="hidden" name="is_last_upsell" value="N" />

<input type="hidden" name="payment_gateway" value="paypal" />

<div align="center"><input type="image" src="https://yoursite.com/dap/images/addtoorder1click.jpg" width="200" height="100" border="0" name="submit" /></div>

</form> - Put the button code on your sales page. Now click on the button, it will take you to the checkout page (if you customized the checkout page as per step 12 above, then you’ll be taken to https://yoursite.com/checkout).
- Enter the CC details and other info and hit submit.
- The purchase will complete and DAP will redirect you to whatever you set in the Payment Success Page in the button.
That’s it for Paypal Pro button generation.
1-Click Upsells
- If you’re doing upsells, the only thing you need to do is, look for the “payment_succ_page” field in the above form.
- Point it to the URL of your Upsell offer. This can be either a static HTML page, or a WordPress Page.
- On the upsell page, if you want to upsell say, Product B, then make sure you set up Product B ahead of time in DAP, and set up the price and recurring options. Then generate the buy button code for Product B and have it already published on that page.
- You can repeat this process for unlimited upsells, downsells and one-time offers. No limits.
Creating Custom Header & Footer for Checkout Page
You can either use the standalone cart page, and then customize the header and footer.php file.
Or you can put the cart right within a WordPress page on your site, so the cart will then take on your theme’s look and feel, and look like it were completely a part of your wordpress site.
Header & Footer for Stand-alone Cart page
To create custom header and footer, create two files by name cartheader.php & cartfooter.php
Upload them to the dap/inc/ folder.
Whatever HTML snippet you put in the above two files will show up as header & footer on the check out page.
Shopping Cart Overview
See http://www.digitalaccesspass.com/doc/dap-shopping-cart-overview/
Summary
While it looks like a LOT of steps, that is only because we have to explain the steps in detail so they are clear. In reality, it is very simple to set up, and starting from scratch, if you have DAP & SSL already installed, it shouldn’t take you more than 1/2 hour to set up your 1-Click Upsells/Downsells/OTO’s. And if you’re not using Upsells/Downsells, then it can be done even faster.
If you have any further questions, feel free to open a support ticket, and we will assist you in getting this going.
17
Buy Buttons, 1-Click Upsells, Downsells & OTO’s using Authorize.net
Selling through Authorize.net, 1-Click Upsells, Downsells and One-Time Offers (OTO’s) are all now extremely simple to implement using the new Shopping Cart Plugin for DAP.
This post explains how to create buy buttons for selling through Authorize.net.
Your site visitors never have to leave your site in order to make a purchase, if you are selling through Authorize.net. DAP itself will act as your shopping cart, and buyers can checkout and make purchases by staying right on your web site.
The DAP Shopping Cart itself is your actual shopping cart that connects to Authorize.net. You need to install this plugin whether you wish to accept one-time or subscription payments via Authorize.net, or whether you wish to do Upsells, and Downsells.
What you need before you can use this plugin
- You need an Authorize.net merchant account
- If you want to sell subscription-based products, then you also need Automated Recurring Billing (ARB) enabled in your Authorize.net account.
- You must have SSL (secure server) enabled on your web site. Ask your web host to enable SSL for your site.
- You must have a working version of DAP 3.5+.
Installation & Setup of UpsellTree
- You need be using at least DAP v3.5 for this.
- If you haven’t installed DAP already, then install DAP first.
- Log in to our member’s area and download the plugin file, DAPShoppingCart.zip .
- Unzip DAPShoppingCart.zip to your desktop. It will unzip the files to a new folder on your desktop, called DAPShoppingCart.
- Upload ALL of the files inside, DIRECTLY to your “dap” folder on your web site. DO NOT upload the folder itself – just the files inside.
- Log in to your Authorize.net account, and go to the “Settings” page.
- Click on Silent Post URL.

- On the next page, set the URL field, to http://YourSite.com/dap/dap-silentpost.php . Be sure to change the text “YourSite.com” to your actual domain name. Click “Submit”. It will take you back to the Settings page.

- On the Settings page, now click on the “API Login ID and Transaction Key” link towards the bottom.

- On the next page, make a note of your “API Login ID” and “Transaction Key” on a piece of paper (or copy/paste it into a text file). That page also lets you create a new Transaction key or modify your existing one.
- That’s it for Authnet.
- Now, log in to your DAP Dashboard on your side, and go to “DAP Admin > Setup > Config > Payment Processing“.
- Enter the “API Login ID” and “Transaction Key” that you noted down earlier (Step #9 above) into the respective fields, and click “Update” next to the fields to save the changes.

- This step applies to you only if you are already using 1ShoppingCart with DAP (if not, skip to next step):
Be sure to remove the “Email Order” cron job from your web hosting control panel (“Cron Jobs” screen), because you don’t want your orders to be double-processed. - Go to the Products > Manage.

A) Product Price: For a 1-time purchase product, this is the product’s purchase price. For a recurring product, this is the “recurring” price (what the customer gets charged month after month).
B) Trial Amount: This is only if there’s a trial amount. If no trial, leave this empty.
C) Recurring Count: How long is your subscription? If you said “Forever”, then enter the number 9999 here. If it ends after 6 months, then enter 6 here. - Set these fields to valid values.
- NOTE: The DAP Authorize.net allows 1 trial. So in the recurring cycle fields, make sure “Payment/Trial Period #2” and “Payment/Trial Period #3” are both the same (set to same number of days: like 30). Example below shows the setting for a “7 day” trial period, followed by recurring payments every “30 days”.

- If you are not offering a trial, then just set the Trial Amount to $0.00. But if you really wanted to offer a FREE TRIAL, then you must set the Trial Amount to at least $0.01 (1 penny).
- Once you’ve saved the product, you can now click on any of the two new “Generate… Button Code” links that are located right below the product list combo box.

- “Generate Authnet Buy Button” link:
This generates the buy button HTML code for your product, which you can then directly paste into your sales page. When you click on this link, you will get a pop-up that shows the actual HTML code for your button. The price, trial price, and recurring options are all taken from your Product settings. So make sure you have saved your Product changes before you click on this link.

- Here’s what the HTML code looks like:
<form name="generate_authnet" method="post" action="https://www.contentresponder.com/dap/buy.php">

<input type="hidden" name="item_name" value="Example Subscription Product"/>

<input type="hidden" name="description" value="This is a dummy Subscription Product with a monthly subscription - payments every 30 days." />

<input type="hidden" name="amount" value="1.00" />

<input type="hidden" name="trial_amount" value="0.01" />

<input type="hidden" name="total_occurrences" value="9999" />

<input type="hidden" name="is_recurring" value="Y" />

<input type="hidden" name="recurring_cycle_1" value="30" />

<input type="hidden" name="recurring_cycle_2" value="30" />

<input type="hidden" name="recurring_cycle_3" value="30" />

<input type="hidden" name="payment_succ_page" value="https://www.contentresponder.com/dap/continue.php?url=/dap/upsell1.html" />

<input type="hidden" name="payment_gateway" value="authnet" />

<input type="hidden" name="is_submitted" value="Y" />

<input type="submit" value="Buy Now" />

</form> - If you’re doing upsells, the only thing you need to do is, look for the “payment_succ_page” field in the above form. By default it is pointing to:
https://www.contentresponder.com/dap/continue.php?url=/dap/upsell1.html - Modify the “upsell1.html” file within your dap folder, to make your 1-Click Upsell offer. Or if you don’t wish to use 1-Click upsells, you can make just about any kind of upsell offer on that page. The upsell1.html that comes with the plugin has a sample upsell page already created for you, just so you get an idea of what that will look like.
- On the upsell page, if you want to upsell say, Product B, then make sure you set up “Product B” ahead of time in DAP, and set up the price and recurring options. Then for upsell products only, click on the “Generate Authnet 1-Click Upsell” link to generate the 1-Click Upsell Buy button code, as the upsell buy button is slightly different than the ‘regular’ buy button code. Now take the upsell buy button code like you did before, and paste it in upsell1.html. That’s it.
- You can repeat this process for unlimited upsells, downsells and one-time offers. No limits.
That’s it.
While it looks like a LOT of steps, that is only because we have to explain the steps in detail so they are clear. In reality, it is very simple to set up, and starting from scratch, if you have DAP & SSL already installed, it shouldn’t take you more than 1/2 hour to set up your 1-Click Upsells/Downsells/OTO’s. And if you’re not using Upsells/Downsells, then it can be done even faster.
If you have any further questions, feel free to open a support ticket, and we will assist you in getting this going.
41
Cancellations and Refunds
Cancellation Of Ongoing Subscription
DAP employs a very unique “Pay As You Go” model.
It’s very similar to the “Pay As You Go” model used by cell phone companies.
You pay first, then new content (or “cell phone minutes” in the mobile world) gets released to you. You stop paying, you don’t get new content (minutes).
So let’s say a member (Joe Customer) joined your membership site this month, and this is January. So he’s on Month #1 in January.
When he first signs up (free or paid trial, or actual 1st month’s subscription), then his start and end dates in DAP on your site look like this:
Start date: Jan 1, 2009
End date: Jan 31, 2009
(Of course, DAP uses actual dates like “01/01/2009”, but “Jan 1, 2009” is easier to read for most people, especially an international audience – so using the above date format just for the purposes of this post).
Then, let’s say, his February subscription payment comes in. Now DAP “extends” his access to your content by a month. So now the dates look like this:
Start date: Jan 1, 2009
End date: Feb 28, 2009
Now your member Joe has access to all content from Jan 1 to Feb 28 (meaning, about 60 days worth of “dripped content”).
Then end of February, he decides to cancel his membership for whatever reason (or his credit card gets declined or rejected while processing payment for Feb). So no payment comes in for March.
Now because no payment came in, DAP doesn’t really do anything about his access dates. So they continue to stay at:
Start date: Jan 1, 2009
End date: Feb 28, 2009
So any content that you have configured to be dripped on, say, Day #61 (which is Month #3), won’t be available to Joe, even though he continues to remain an “Active” member within DAP, and continues to get your autoresponder and br0adcast emails, and even continues to have access to your affiliate program and continues to earn commissions.
Actually, it gets even better – just because Joe’s end date expired, he basically now has NO access to ANY content on your web site (even Month #1’s content).
[Note: Just so you know, DAP does have a feature to enable “Access to Previously Paid-for Content”. Keep reading for details.]Now all Joe has lost is just the “access to the content”.
So let’s say you exchange emails with him, ask him why he wanted to cancel, and try to convince him to come back (or get him to use a new, valid credit card).
Now remember that Joe is still at the end of February’s content (Month #2). So whenever the next payment comes in (be it in March, April, or 1 year later), Joe now gets access only to the 3rd month’s content, and not, say, the 10th month content.
So even though it is now say, May, because Joe’s next payment came in just now, his access dates now look like this:
Start date: Jan 1, 2009
End date: March 31, 2009
So that’s how DAP takes care of your content and makes sure that when members cancel or their payment doesn’t come in for whatever reason, your content cannot be accessed by unauthorized users.
But let’s say you want to be really fair and look like a “generous, honest” guy to your members. In that case, you want to make sure that if someone cancels their subscription 6 months after being with you, you don’t want to ‘screw’ them just because they stopped paying you. Who knows, they’ll probably come back if you keep showing to them what kind of content you’re building. Or they may buy your other products.
So now you want to make sure that they get access to the last 6 months worth of content, for which they have actually paid for.
There is a Configuration element in DAP where you can just turn this feature on, and members can instantly start access all “Previously Paid-for Content”.
So that’s how DAP puts a unique twist on cancellations.
Cancellation Of Trial
There is a small twist to the cancellation of a free or paid “Trial”. Consider the following example:
- User made the purchase on 2011-09-16.
- Because you have set it up as a 14-day trial, User gets 14 days of access.
So at this time the user’s access start date = 2011-09-16 and user’s access end date = 2011-09-29 (14 days access). - He then asks you to cancel his trial. So you go into your payment processor back-office, and cancel his future payments.
- In this case, because it’s a “trial”, if he ever decides to come back down the road and sign up for a trial again, you need him to start all the way AT THE BEGINNING.
- Which means, you must completely remove this person’s access to the product in DAP.
- If you don’t do it, then if he does come back later, then DAP will think he’s an existing user who wants to RESUME his subscription, and will move him past the trial into the next payment period meant only for people who actually stayed past the trial.
Refunds
“Refunds” are a slightly different animal than “Cancellations”. While a subscription “Cancellation” means you only have to stop access going forward, a “Refund” means you have to actually roll-back existing access.
So, doing a refund takes a few steps.
- Go into your payment processor (like Paypal.com, Authorize.net, etc) and refund the actual payment
- Now log into the DAP Dashboard on your site
- Go to the “Orders” page, search for all of the user’s transactions by her email id
- Click on the “Id” link for the transaction that you wish to refund
- On the transaction details page, you will see a “Refund” button. Click on that.
- That will mark that transaction as a refund, and also create a new transaction with a negative value (same as value of original transaction, except negative in value)
- DAP then rolls-back access for that user by one payment period (or “Recurring Cycle #3” from the Product page). So if member is still in month 1, then user will lose complete access to the product. But if member is on month 3, then since only one payment is being refunded, only the last month’s access (month #3’s access) will be rolled back – so now they only have access till month 2.
- Go back to “Manage > Users” screen, search for user by email, and make sure access is either rolled back, or access has been completely removed for that member.
- All Affiliate commissions credited to affiliates for this particular purchase will be automatically and completely rolled back. So the affiliate who referred this purchase, will see a negative commission credited to their account, that cancels out the positive commission credited earlier. So that in effect zeroes out their commissions.
33
How Do Members Get Added To Your Membership Site
(OR) How do members get access to the content
(OR) How does someone become a member?
With DAP, you can add users to your membership site in 3 different ways.
1. PURCHASE: Someone buys your product or subscribes (“Paid” member with access to both free and paid content)
2. FORM SIGNUP: Someone signs up through a signup form (“Free” members with access to only free content)
3. ADMIN ADDED: You add them as a member directly through the DAP Admin Control Panel (you can mark them as either “free” or “paid”)
All three are explained in detail below.
1. PURCHASE
*You first create a “Sales Page”.
On your sales page, depending on which payment processor you use, you go to Paypal/1ShoppingCart/ClickBank and create a new product with the EXACT same name as the product you created within DAP, and get the ‘Buy Button’ link from your Payment Processor. Publish this “Buy Button” on your sales page.
* Your visitor goes to your sales page
* They purchase your product
* Your payment process (Paypal/1ShoppingCart/ClickBank) notifies DAP that you have a new purchase.
* If the product names match, DAP automatically creates an account for them, generates a random password, and sends them an email with their email/password. You can customize the contents of this email on the “Templates” screen in your DAP Admin Control Panel. Integration with your shopping cart explained elsewhere (see documentation for setup).
That’s it!
That’s how “buyers” get added to your membership site and get access to the product they just purchased.
2. FORM SIGNUP:
You wish to give someone a “Free” membership.
NOTE: “Free” members who do not have a payment associated in DAP (which means they have not purchased anything) will have access only to content that you have marked as “Free”.
Once you have created a Product in DAP, and have added content (blog post/page links, links to files, etc), and have saved it, on the Product page, below the Product name list, you will see a link called “Direct Signup HTML”. (See image below). You must first select a Product before you can copy the correct form HTML.
Fig 1. Direct Signup Link on Products page

Fig 2. Form HTML that you get on clicking the Direct Signup Link

This HTML gives you the full HTML form code that you can publish on any page of your web site. This form only collects an email address and a first name.
Take this HTML code and publish it on page of your web site where you want sign up users. This could be a WP page or post too.
Note: When you see the above HTML code, there’s a field in there that looks like this:
<input type=”hidden” name=”redirect” value=”http://YourSite/Your-login-page-link/?msg=Success!%20Your%20membership account%20has%20been%20created.%20%20Check%20your%20email%20address%20in%20a%20few%20minutes%20for%20your%20password“>
Don’t forget to change the text above, where it says “http://YourSite/Your-login-page-link/?…” to point to your actual domain name and to your actual login page (if you have customized it).
Then, when someone enters their email address and first name and signs up through the signup form, DAP creates an account for them using that email address, creates a random password, and sends them an email with their email/password.
After that, you can drip any content or emails on them that are marked as “Free” (when adding content or emails).
At some later point, if they purchase any of your “Paid” products (see the “1. Purchase” section above), then as long as they use the same email id during purchase, DAP will automatically give them access to all of the “Paid” content in the Product that they just purchased.
3. ADMIN ADDED:
If you wish to directly give someone access to a Product and all its content and emails, you can add them directly from the DAP Admin screen (Users > Add/Edit).
You just need their email id and their first name (both of which they can change subsequently) to add them to a Product.
While adding them, you have the option of marking them as a “Paid” user by checking the “Mark as Paid” checkbox.
If you don’t check this check box, then they will be added as a “Free” user and get access only to “Free” resources (content/emails).
But if you check the “Mark as Paid” checkbox, then they will get access to all “Paid” content and emails, just like someone who is actually a “Paid” member.
32
Payment: Setup and Integration – FAQs
Q: I just made a test purchase. But DAP did not process the payment (or) did not add me as a member (or) is not creating a new member.
Make sure that the product name within DAP and the product name in your “buy” button (i.e., your shopping cart) are EXACTLY the same. Don’t just look at the two and say, “oh yeah, they’re the same”.We recommend “copying” the product name that you set up in DAP, and then “pasting” it when creating your “buy” button. If you are using Paypal, then this is the “Item Name” when you are creating your Paypal “buy” button. If you are using 1ShoppingCart, then this is the “Product Name” when creating a new product.
(Paypal users, skip ahead)
1ShoppingCart/ClickBank:
1) Make sure you have set up the “Email Order Processing” correctly.
2) Is your Cron Job dap-emailorder.php set up and running correctly?
3) Make sure you have not “removed” the 1Shoppingcart or ClickBank payment notification email from your server. Log in to your email server, and make sure that the email is still there, and also it needs to be “Unread”. If your email client (like Outlook or Thunderbird, or Gmail) already accessed it and marked it as read, then simply mark it unread, and the next time DAP runs (which should be in 10 minutes) it will pick up the email and process it.
Paypal Users:
1. If you are using Paypal IPN, then make sure you have enabled IPN within your Paypal account.
2. Make sure you put the correct IPN “notify_url” text in your button.
3. Make sure the Paypal button you set up is a “Buy Now” or “Subscribe” or “Add to Cart” button.
Also see these troubleshooting guides:
Troubleshooting Paypal Integration
Troubleshooting 1ShoppingCart & ClickBank
http://www.digitalaccesspass.com/doc/troubleshooting-paypal-integration/
55
Paypal Hosted Buy Buttons
DAP can process Paypal payments using Paypal IPN (Instant Payment Notification). All you need to basically do is to enable IPN within your Paypal account and create your Buy button with a few extra parameters. It’s all explained below.
So here’s what you need to do to process orders through Paypal using IPN, and have your buyers automatically added to DAP on your site.
1. Enable IPN within your Paypal account.
Follow this post to enable IPN first, and then come back here to this post.
2. Create your “Buy Now” or “Subscribe” or “Add to Cart” button
- Log in to your Paypal account.
- Click on Profile => Profile and Settings => My selling tools => Paypal Buttons => Update

- Click on the “Create New Button”

On the Create New Button Page:
Step 1: Choose a button type and enter your payment details
1: Choose any one of the following button types based on the type of product you wish to sell.
* Shopping Cart (for multiple-item purchases)
* Buy Now (for one-time products)
* Subscriptions (for subscription-based recurring products)
2: After selecting the button type, enter item name and price.

- “Item Name”
Make sure the Paypal “Item Name” EXACTLY matches the “Product Name” that you created within DAP. In fact, login as DAP admin, edit the product, copy the text from the “Product Name” field, then paste this into your Paypal “Item Name” field, so that there are no typos. If the product names don’t match, DAP will ignore any IPN posts coming in from Paypal, which means no account will be created for your new member.
Step 3: Customize advanced features (optional)
- just add a custom variable to the button as follows:
Under “Step 3: Customize advanced features (optional)” tab, within the “Advanced Variables” text box, enter the following (change the text YourSite.com below to your domain name).
notify_url=http://YourSite.com/dap/dap-paypal.php
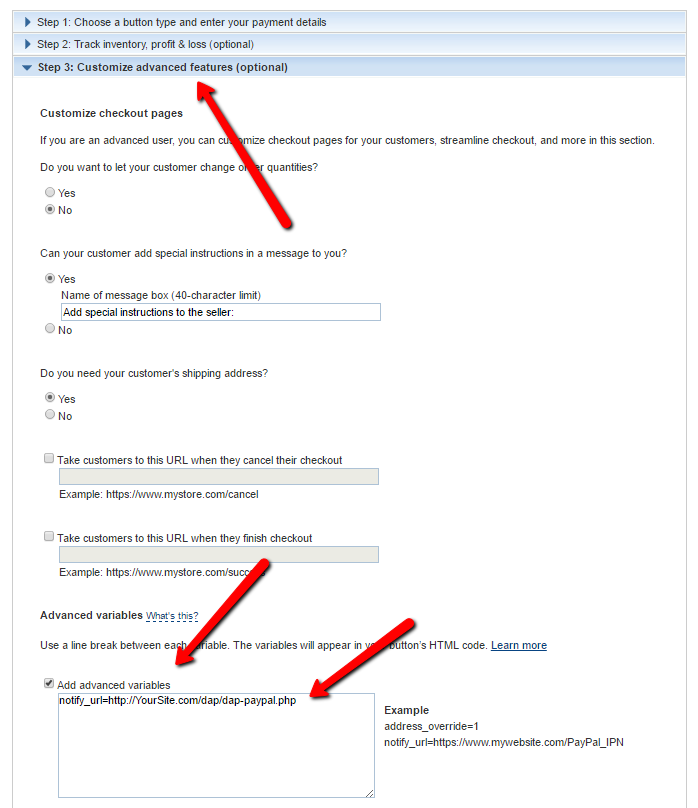
(change the text YourSite.com to your domain name).
Save the button.
4. Copy the HTML code for this button
5. Publish the code on your web site’s sales page
..or WP page or post.
That’s it!
So when someone subscribes to, or purchases your product using this button, Paypal will send an IPN notification to your web site to the above link. DAP will then verify the product and payment status, and then will automatically add give the buyer/subscriber access to that product.
If the email id used in this purchase is not already associated with an account on your site, then DAP automatically creates a new account, and sends the buyer an “activation” email that requires them to click on a link to confirm and activate their account.
But If this email id belongs to someone who already has an account in DAP (existing buyer, purchased a different product this time), then DAP doesn’t create a new account for this user. It simply gives the existing account access to this new product.
So when the user logs in, they will see that they now have access to TWO products, with each product and the available URL’s listed separately.
Note: If you’re going to be using Paypal to process payments, then you don’t need to set up the Email Processing info in your DAP Admin > Config > Payment Processing screen. You don’t need to set up the DAP Email Order cron job either.