Paypal Website Payments Pro Integration
IMPORTANT: PLEASE NOTE
The latest version of Paypal Payments Pro (called PAYFLOW) is not compatible with DAP and Recurring Billing Cycles, You will have to open a Paypal account with the older version of their Payments Pro Merchant service that is compatible with DAP. Please make sure to use the older version of PPP which has to be specially requested through their support team. In a future DAP release, we will make it compatible with the new version of PPP.
Please read this for more on Payflow and Paypal Payments PRO :
http://www.digitalaccesspass.com/forums/threads/1044-Recurring-transaction-failed-in-paypal?highlight=payflow
This post includes information about generating buy buttons for Paypal Website Payments Pro. It also has information about setting up 1-Click Upsells.
Even if you don’t wish to do upsells, you should follow the setup instructions in this page, for integrating your site with Paypal Website Payments Pro .
What you need before you can use this plugin
- You need a Paypal Website Payments Pro merchant account with Recurring Billing enabled.
- You must have SSL (secure server) enabled on your web site. Ask your web host to enable SSL for your site.
- You must have a working version of DAP 4.2+.
- Login to the DigitalAccessPass.com member’s area and download the file, DAPShoppingCart.zip .
- Unzip it to your desktop. It will unzip the files to a new folder on your desktop, called “DAPShoppingCart”.
- Upload all the files inside, directly to your “dap” folder on your web site. DO NOT upload the folder itself.
- After the files are uploaded, check to make sure that you find the files checkout.php and checkout-submit.php (just to name 2) directly under the dap folder. If you don’t, then you haven’t uploaded the files to the right directory.
Installation & Setup
-
Enabling Instant Payment Notification (IPN) within your Paypal account.
a) Log in to your Paypal account and click on the “Profile” link.
b) Go to Instant Payment Notification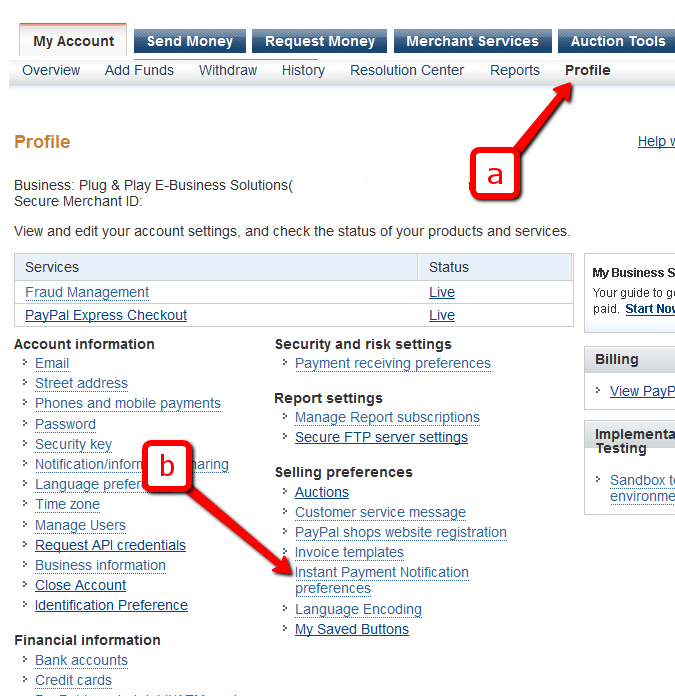
c) If IPN is already enabled, and you already have a URL in that field, then skip ahead to Step 2.
Else, if IPN is not already enabled, then click on “Choose IPN Settings”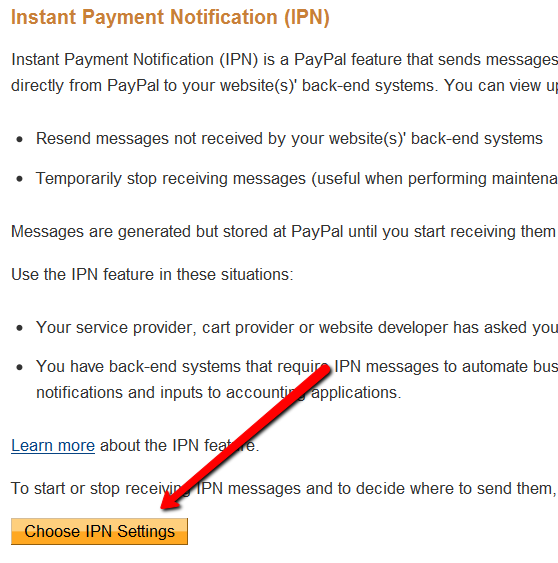
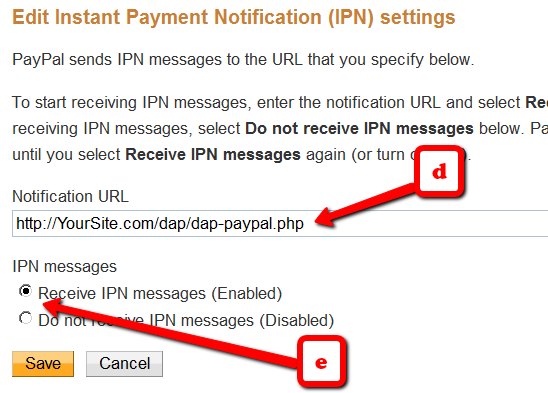
d) On the next screen, in the Notification URL field, enter…
http://YourSite.com/dap/dap-paypal.phpDon’t forget to replace “YourSite.com” with your actual web site’s domain name.
e) Make sure “Receive IPN Messages” is selected.f) Click on “Save”.
-
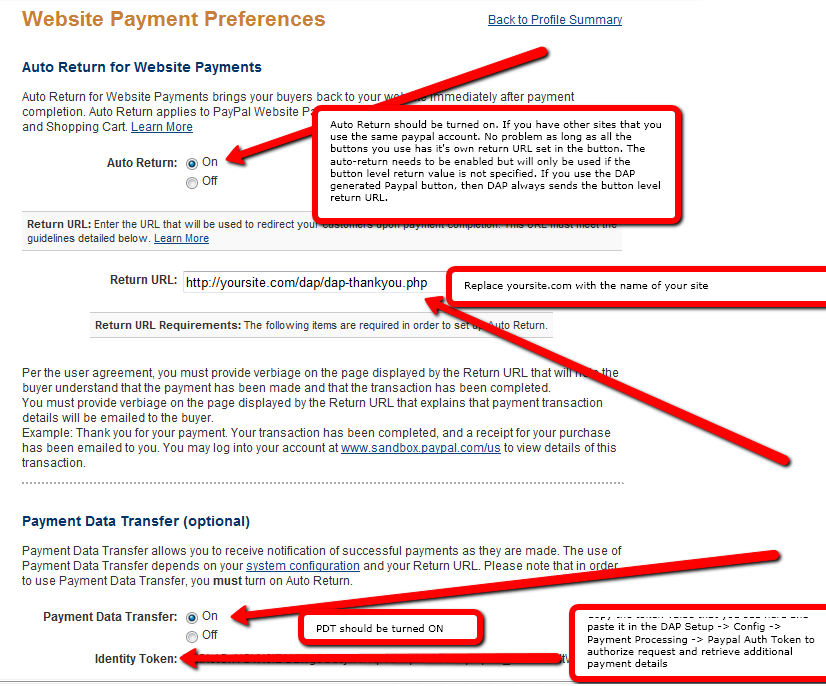
Enable “Auto-Return” and “Payment Data Transfer”
Log in to your Paypal account.
Go to Profile.
Click on Website Payment Preferences
Turn Auto Return to On (see image below)
Set Return URL to http://YourSite.com/dap/dap-thankyou.php
Scroll down further to the Payment Data Transfer (optional) section
Set Payment Data Transfer to On
Scroll all the way to the bottom of the page, and then Save the changes.
You will now see a green check mark image, with a long string of characters on line 2. That is your Paypal Identity Token. Copy that string.
Go back to DAP Dashboard > Setup > Config > Payment Processing > Paypal Identity Token field, and enter this string there, and save it.
- Log in to your Paypal account and retrieve the following 3 pieces of information:
Paypal API Username
Paypal API Password
Paypal API Signature - Now log in to your DAP Dashboard and go to “Setup > Config“. Click on the “Paypal” link in the sub-menu at the top. The current page will then skip to the “Payment Processing: Paypal” section about half-way down the page.
 The current page will then skip to the “Payment Processing: Paypal” section about half-way down the page.
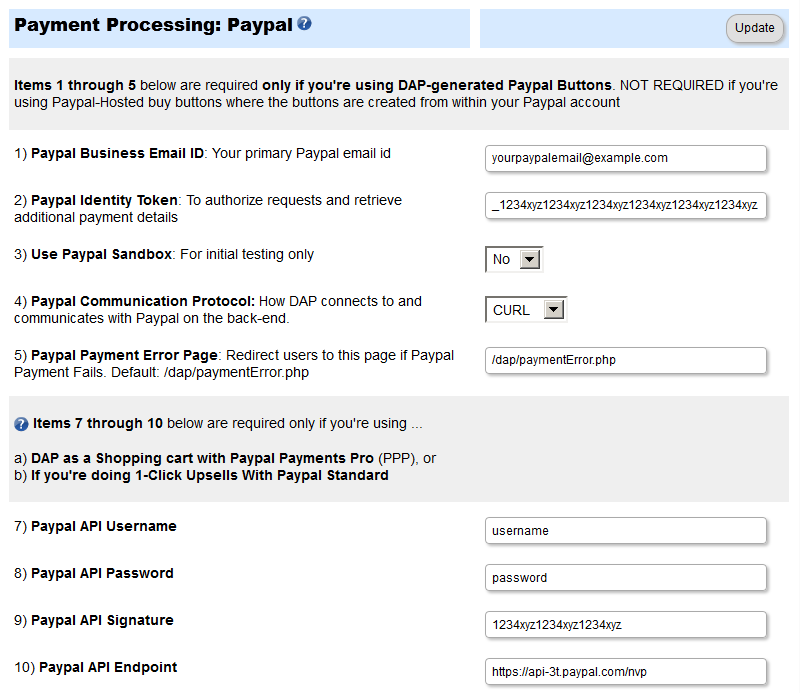
- Fill out items (1) through (10).
- Into fields 7, 8 and 9, enter the Paypal API Username, Paypal API Password, and Paypal API Signature that you noted down earlier.
- This step applies to you only if you are already using 1ShoppingCart with DAP (if not, skip to next step):
Be sure to disable the “Email Order” cron job from your web hosting control panel (“Cron Jobs” screen), because you don’t want your orders to be double-processed. - We’re going to assume that you’ve already setup the pricing and recurring options on the Products/Levels > Manage page, on the Pricing & Recurring tab.
- Now click on Payment Processing > Generate Buy Button on the DAP Admin Main Menu.
- Switch to Auth.net & Paypal Pro tab.
- Select the product name for which you wish to generate the buy button. Sections 1 and 2 are self-explanatory.
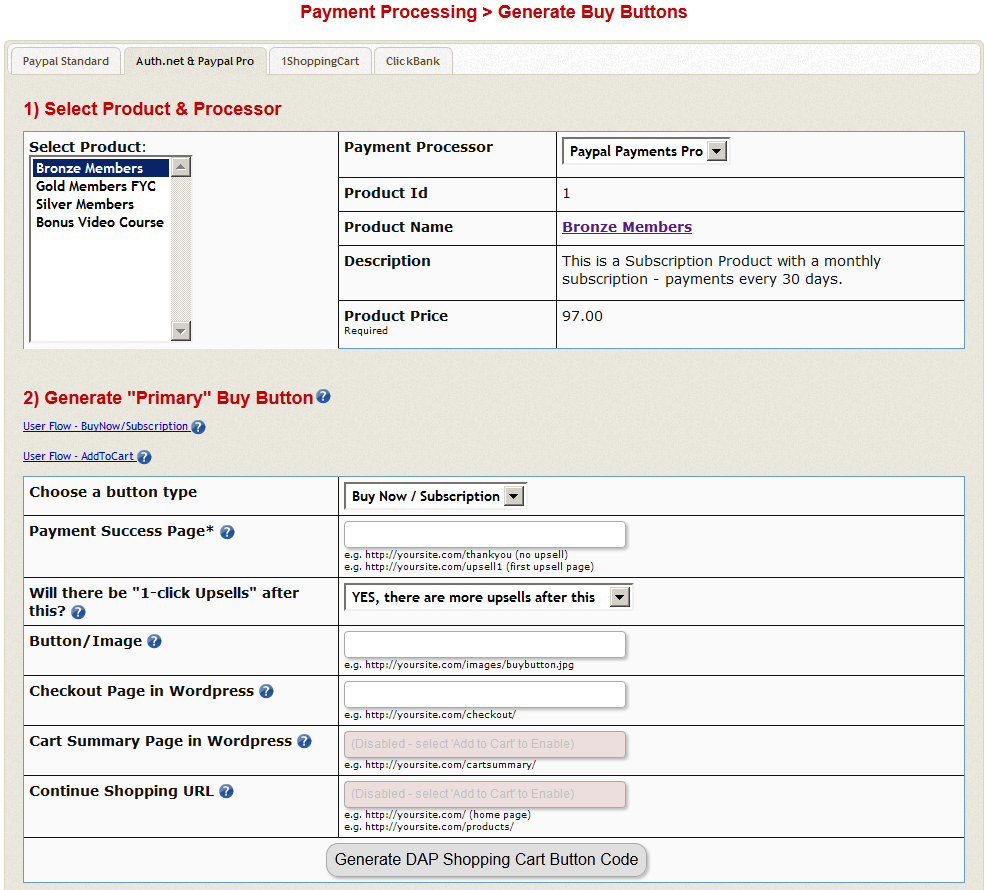
- If you want to put the shopping cart page right within a WordPress page, then do this…
a) Set the Payment Success Page to point to the page where you want users to be redirected upon purchase. It can be your login page, or a static thank-you page that informs the buyer to check their email id
b) Create a WP Page with the title Checkout containing the tag %%DAPCART%% tag and publish it. The permalink of this page would now become https://yoursite.com/checkout. Remember to add the “s” to “http” to make it “https://”. This page is not something you should access directly, but only through clicking a buy-button.
c) In the above screenshot, where it asks for “Checkout Page in WordPress”, enter the URL of your new checkout page from Step (b) above. Replace yoursite.com with the name of your site.
NOTE: The checkout page URL should start with https (SSL-enabled) and not http. - When done with sections 1 & 2, at the bottom of section 2, click on the Generate DAP Shopping Cart Button Code
This generates the buy button HTML code for your product, which you can then directly paste into your sales page. When you click on this link, you will get a pop-up that shows the actual HTML code for your button. The price, trial price, and recurring options are all taken from your Product settings. So make sure you have saved your Product changes before you click on this link. - Here’s what the HTML code looks like:
<form name="DAPCartPaymentForm" method="post" action="https://yoursite.com/dap/checkout.php">

<input type="hidden" name="payment_succ_page" value="http://yoursite.com/members/"/>

<input type="hidden" name="item_name" value="Bronze Members" />

<input type="hidden" name="is_submitted" value="Y" />

<input type="hidden" name="btntype" value="buynow" />

<input type="hidden" name="is_last_upsell" value="N" />

<input type="hidden" name="payment_gateway" value="paypal" />

<div align="center"><input type="image" src="https://yoursite.com/dap/images/addtoorder1click.jpg" width="200" height="100" border="0" name="submit" /></div>

</form> - Put the button code on your sales page. Now click on the button, it will take you to the checkout page (if you customized the checkout page as per step 12 above, then you’ll be taken to https://yoursite.com/checkout).
- Enter the CC details and other info and hit submit.
- The purchase will complete and DAP will redirect you to whatever you set in the Payment Success Page in the button.
That’s it for Paypal Pro button generation.
1-Click Upsells
- If you’re doing upsells, the only thing you need to do is, look for the “payment_succ_page” field in the above form.
- Point it to the URL of your Upsell offer. This can be either a static HTML page, or a WordPress Page.
- On the upsell page, if you want to upsell say, Product B, then make sure you set up Product B ahead of time in DAP, and set up the price and recurring options. Then generate the buy button code for Product B and have it already published on that page.
- You can repeat this process for unlimited upsells, downsells and one-time offers. No limits.
Creating Custom Header & Footer for Checkout Page
You can either use the standalone cart page, and then customize the header and footer.php file.
Or you can put the cart right within a WordPress page on your site, so the cart will then take on your theme’s look and feel, and look like it were completely a part of your wordpress site.
Header & Footer for Stand-alone Cart page
To create custom header and footer, create two files by name cartheader.php & cartfooter.php
Upload them to the dap/inc/ folder.
Whatever HTML snippet you put in the above two files will show up as header & footer on the check out page.
Shopping Cart Overview
See http://www.digitalaccesspass.com/doc/dap-shopping-cart-overview/
Summary
While it looks like a LOT of steps, that is only because we have to explain the steps in detail so they are clear. In reality, it is very simple to set up, and starting from scratch, if you have DAP & SSL already installed, it shouldn’t take you more than 1/2 hour to set up your 1-Click Upsells/Downsells/OTO’s. And if you’re not using Upsells/Downsells, then it can be done even faster.
If you have any further questions, feel free to open a support ticket, and we will assist you in getting this going.

