2

WordPress versus HTML

Last updated: Dec 6, 2014

[NOTE: Read this only if you have a Non-WordPress, plain HTML web site that you wish to protect using DAP]

Ok, so you’re not using (or thinking of not using) WordPress to power your web site. For what it’s worth, you are way better off using WordPress, but if you can’t switch for whatever reason, then keep reading.

DAP is deeply integrated with WordPress, and has a lot of very powerful features that work with WordPress like a dream. DAP is truly “Made For WordPress”.

While you’re really missing out on a *lot* of really cool things that you can do with DAP and WordPress, it’s fine as far as DAP is concerned that you wish to use DAP with a non-WordPress plain HTML web sites – because DAP can protect plain HTML web sites too.

But you also need to understand that because you’re not using WordPress, that makes “customizing” your DAP-powered site a bit more difficult, not because of a DAP shortcoming, but just because of the sheer fact that you have to hand-code a lot of things when it comes to a regular non-WordPress, HTML-based site.

So if you’re going to go down this route, there are a few things to consider:

  • There are some DAP features which are WordPress-only, that won’t work on a plain HTML web site. For eg., Sneak-Peek, Short Codes for Partial Content Protection, Disabling Comments for non-members, ability to use free WordPress forum plugins, creating customizable member’s areas etc.
  • You won’t be able to use our DAP Shopping Cart Plugin because it’s a WordPress plugin.
  • You won’t be able to use any of our cool WickedCoolPlugins.com plugins.
  • You won’t be able to use our built-in “Login/Logout Widget“, which shows the login form on the sidebar if users are not logged in, and automatically turns into a “Logout” button once they log in to your membership site.
  • You won’t be able to “power customize” or “power tweak” every aspect of your membership area. For example, you must use the out-of-the-box log in page that comes with DAP – you cannot customize it much other than choosing a header and footer, unless you know how to work with a bit of PHP & HTML.
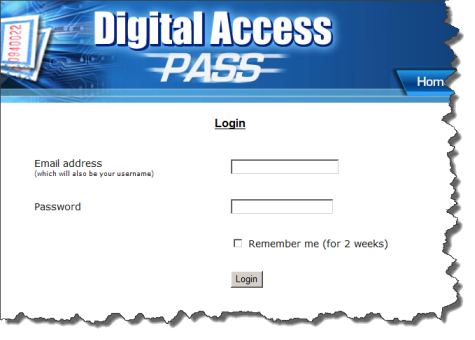
  • You will have to use the default login page that comes with dap – that looks like this: http://DigitalAccessPass.com/dap/ . Of course, you don’t have to use our header image – you can replace it with your web site header and footer. For which, you have to at least know how to extract the HTML for the header & footer areas from your current web site. Or at least have someone who can help you with that.
  • WordPress users have tons of customization options, which you won’t have when using a HTML/PHP only web site. Like the ability to switch themes, split the member area into multiple pieces – like “User Profile”, “My Content”, and “Affiliate Links” – and put them on 3 different pages on their WordPress blog. You won’t be able to do that. For you, it will all be on one, default member home page.

So, if you are a “power tweaker” and want more control on the little things in your membership site, then DAP on a HTML site may not work for you.

But if moving your entire web site over to WordPress is such a big task and pain that you don’t wish to (or can’t) deal with, or you are not too particular about power customizations, and just want your membership site to “just work” right out of the box, then DAP is perfect for you, because it can work with WordPress- and non-WordPress web sites.

What You CAN and CANNOT Do If You Have A Plain HTML Web Site (and don’t use WordPress)

  • NO: Sneak-Peek
  • NO: DAP Shortcodes
  • NO: DAP Shopping Cart Plugin
  • NO: WickedCoolPlugins.com Plugins
  • NO: Comment-Protection for visitors
  • NO: Login/Logout widget
  • NO: Must use DAP’s default login page, that is only customizable with a header and footer – will take more work (and you must know HTML) if you want to make the login page look exactly like the rest of your web site
  • NO: Must use DAP’s default member page, which contains the “My Content” page, “My Profile” and “My Affiliate Info” sections all rolled into one single page – you won’t be able to split them up into multiple pages like you can do with WordPress
  • NO: Our Amazon S3 plugin S3MediaVault.com will not work on plain HTML sites
  • NO: “In-Page” dripping won’t work

Instant Membership Site

One of the biggest advantages of using the HTML/PHP version of DAP (without WordPress) is that you can get started instantly with the pages that come right out of the box with DAP.

DAP has a ready-made login page which will be available at http://YourSite.com/dap/login.php

Once your members/buyers log in through that default log in page (can be customized as shown further below), they are taken to the default one-page member page, that lists all of the products or membership levels they’ve purchased, lists all of the content that is part of each of those products/levels, and that page also has the affiliate section and the member profile.

Bottom-line: Everything your members will need – the entire member dashboard – is available in one single page.

If you don’t need the affiliate section, that can be easily turned off via DAP Admin > Setup > Config.

See http://DigitalAccessPass.com/documentation/?page=/doc/creating-member-affiliate-sections-within-wordpress/ – all of those pages that you would have to create within WordPress, are readily available out of the box on this one default member home page.

So all you have to do, is create the buy buttons from within the DAP Admin pages, put that button on your sales page, and once your member signs up, they log in via http://YourSite.com/dap/login.php and they’re in. And they can get everything that they need on that one member dashboard page which is all readily setup and configured for you.

Screenshot Of Sample Login Page

You can customize header and footer HTML. Click image to enlarge.

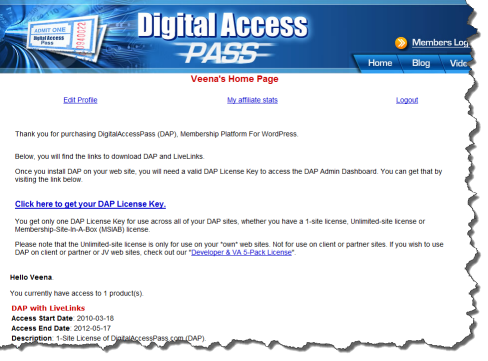
Screenshot of Sample Members’ Area

You can customize header and footer HTML. Click image to enlarge.

How To Customize Content On dap/index.php

You can modify only a few sections on the default dap/index.php page.

Go to DAP Admin > Setup > Templates , and the following 4 items are related to content on the dap/index.php page.

  • Content:Header
  • Content:Footer
  • Message:Affiliate
  • Message:User

Those are the only 4 things you can modify, and nothing else.

If you wish to customize it more, then consider putting those sections within WordPress.
See http://DigitalAccessPass.com/documentation/?page=/doc/creating-member-affiliate-sections-within-wordpress/

 

2

Attaching Files To Autoresponder & Broadcast Emails

Uploading file to be attached

First upload file(s) to be attached to the emails, to the folder…

/dap/admin/attachments/


Attaching it to Autoresponder Emails

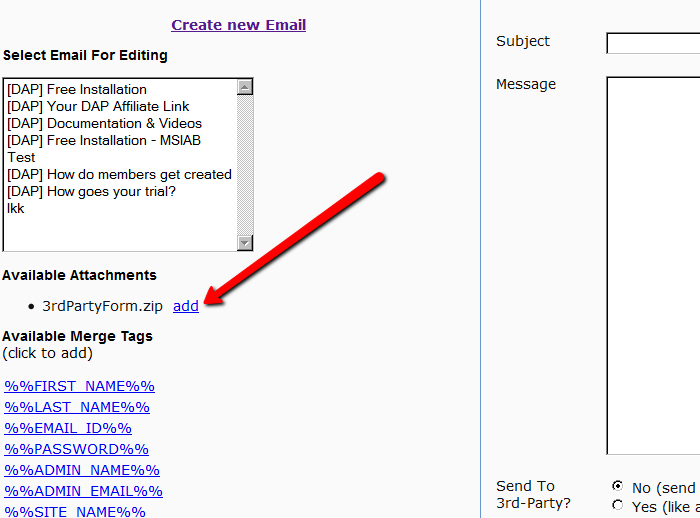
On the Email > Autoresponders page, any file(s) uploaded above, show up as in the image below. When composing a new email, just click on the “add” link next to the file name to be attached to that email.


Attaching it to Broadcast Emails

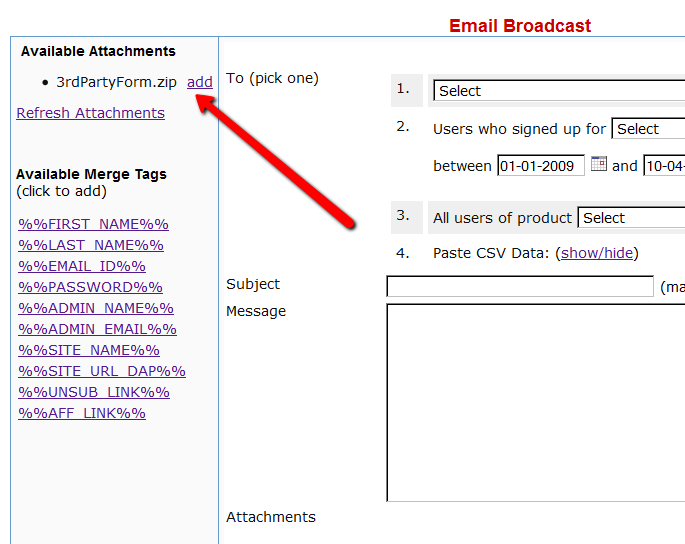
Same deal for broadcast emails. The uploaded file shows up as follows. Click on the “add” link to add to the broadcast email to be sent.

29

Coming Soon: DAP v3.9

[Updated: 09/27/2010]

Video 1: DAP/vBulletin Integration

[s3mv]vbintro.mp4,800,600,false,false[/s3mv]

Video 2: Demo of vBulletin Integration

[s3mv]vbintro2.mp4,800,600,false,false[/s3mv]

We’re about to launch DAP v3.9 which has some really cool new features packed into it! Here’s what is coming in 3.9…

vBulletin integration

This is by far the most exciting feature in 3.9. I don’t think even we, the developers of DAP, have been this excited about a new feature in the longest time! 🙂

This is going to completely ROCK your membership world.

Now, with just a few clicks of the mouse, you can completely automate your Forum management, and do some really slick stuff like…

* “Silver” Members get posting access only to the following vB forums…
– Introductions
– General Discussions

* “Gold” members get access to all above, plus the forum “Puppy Potty Training Tips”. So they get access to the following vB forums…
– Introductions
– General Discussions
– Puppy Potty Training Tips

* “Platinum” members get access to ALL of the forums above, PLUS some premium forums, like “Joint Ventures”, “Starting Your Own Dog Business”, “Premium Support”, and more. So they get access to…
– Introductions
– General Discussions
– Puppy Potty Training Tips
– Joint Ventures
– Platinum Mastermind
– Starting Your Own Dog Business
– Premium Support

And then you can add some more rules like…

Both Gold & Silver can just VIEW the “Premium Support” forums, but cannot POST anything.

And Gold & Silver CANNOT even VIEW the “Joint Ventures”, “Platinum Mastermind”, “Starting Your Own Dog Business”.

See how insanely powerful this can get?

Sure, you could have a forum with WP-based forum plugins like bbPress and Simple:Press too.

But comparing those WP forums to vBulletin? That’s like putting a kid who’s just completed one month of boxing lessons, in a ring with Mike Tyson right after someone said something mean about his mother!

And can you imagine what it would do to your “retention rate”, when you tell your members that if they cancel their subscription, they will lose access to the entire community of like minded people?

And to think that we’re just scratching the surface of monetizing forums here.

The vBulletin forum software is so rich in rules and user roles, and the DAP integration with vB is so tight that you could start just a “Forums Only” membership site and charge just for access to your forums!

Imagine creating a one-time product where for $10, they get to post in a “Special Offers” forum where they can advertise their product or service?

Or how about charging $10 to post in a forum called “Outsourcing”, where they can advertise their need to hire someone either for both long-term and short-term projects? It would be free to view for everyone, but you have to pay-to-post]

HTML Email

Now you can send out HTML email in your welcome emails, double-optin emails, autoresponder emails and broadcast emails. Of course, you still get to send out a “text” version of that same email, so that those email clients which cannot handle HTML (we really can’t think of any, though) can still show your member the “text” version. Pretty cool stuff.

Manual Transactions

Now if someone sends you a check in the mail, there is a way to directly enter the “payment amount” into the sytem. This is awesome on many levels:

1) Your DAP Dashboard reports now show you your earnings more accurately (previously, it didn’t know about the “offline” payments)

2) Because now there is a “manual” order in the system, DAP knows how much to pay the affiliate who referred the member. So Joe Customer clicks on Jill Affiliate‘s affiliate link, arrives at your web site, calls you up and says he doesn’t have a credit card or Paypal account, and would like to send you a check. Then you get a check in the mail. You add Joe manually through the DAP Dashboard (this is already possible). Then you now add a new transaction into the system manually, that Joe Customer paid you $100. Then when Joe Customer logs into your system, Jill’s affiliate link kicks in, DAP knows now that Joe paid $100, and Jill’s commission is 20% (what you have set as the admin).

So Jill now gets paid $20, which wouldn’t have been possible before!

And what’s EVEN more cool, is that if you really want to be super awesome to your affiliates (which we highly recommend you do :-), then you can even enter transactions retroactively – even from 2 years ago – and all of your affiliates will now suddenly start seeing commissions for customers they referred a long time ago, but never really got paid because you had no way of entering the offline transactions into the system.

Is that awesome? Or is that AWESOME? 🙂

Manual Affiliate Credits

Joe Customer purchased a product. He doesn’t seem to have been referred by any affiliate. Then you get an email from Jill – “Hey guys, I just referred my cousin Joe to your product using my affiliate link. He says he purchased it, but I never got any commissions. Can you please look into this?”

Previously, the only way to make sure Jill got the credit for Joe, was a slightly long-winded (and boring) manual process (which we won’t go into here), which really wasn’t hard to do, but still took you about 5 minutes.

Starting 3.9, it’s going to take you 5 seconds!

And Lots More To Come…

We have features that are even more exciting (something that’s not going to be easy to do, after the vBulletin launch!) planned for DAP 4.0!

* “N” tier affiliate program (psst… you read that right, not “2-tier”, not “3-tier” – but “N” tier- which means as many levels as you want, and each new tier with a different commission percentage!)

* Coupon Codes

And lots more…. (we can’t tell you just yet, because otherwise our competitors may steal our ideas 😉

Ok, now you know why we’re so excited about DAP 3.9.

So do let us know what you think in the comments section below.

And be sure to also subscribe to this post – because we’re going to shortly publish a video right here showing you some of the new features, as well as announce a pre-launch call that you’re not going to want to miss.

Cheers!

Veena Prashanth & Ravi Jayagopal

9

Customizing User-facing CSS

Starting DAP v3.8, there is a file in the folder dap/inc/content/ called userfacing.css

Copy (not rename) it to a file called customuserfacing.css

Basically you are adding the word “custom” at the beginning of the file name.

Feel free to customize the CSS, and then upload it back to the same folder on your site.

This CSS file only impacts certain user-facing sections, like the User Links page, User Profile page and Affiliate Details section.

4

Creating Ready-made Banners & Copy For Affiliates

DAP lets you create a “Affiliate Promo Materials” page that has ready-made, ready-to-copy-paste banner images, HTML code, and email copy, that includes the affiliate link of the affiliate viewing the page, already readily embedded and customized just for her.

Here’s all you need to know:

Wherever you insert the Affiliate Merge Tag….

%%AFF_LINK%%

…into your blog posts/pages, it will get automatically get replaced by the affiliate’s actual affiliate link, that looks like this…

http://YourSite.com/dap/a/?a=1234

So, that’s all you really need to know to create a custom, affiliate promo page.

Creating Customized Banners

Normally, your banner code for affiliates would look like this:

<img src=”/path/to/banner/image.jpg”>

That would simply display a banner that is not linked to any link.

Then, here’s how you would link it to any link.

<a href=”http://LinkToSomething.com”><img src=”/path/to/banner/image.jpg”></a>

Now, instead of the link above, you would insert your Affiliate Merge Tag in there, like this:

<a href=”%%AFF_LINK%% “><img src=”/path/to/banner/image.jpg”></a>

That would display the image, as well as link it to the affiliate’s own custom affiliate link. The above code is what you would enter into the promo page in the “Visual” tab, because you want the affiliate to see the actual raw HTML code that she can copy/paste and publish on their web site.

So when the affiliate views your promo page, they would not see an actual image that is linked to their affiliate link, but the raw HTML – just like what you see below – which they can copy and publish on their web site.

<a href=”http://YourSite.com/dap/a/?a=1234 “><img src=”/path/to/banner/image.jpg”></a>

Obviously, you don’t want them to directly link to the image on your site. So you just tell them that they need to download the image/banner and upload to their web site.

The same can be done for email copy too.

That’s how simple it is.

%%AFF_LINK%%
5

WishList Migration Kit

We get many requests from folks wanting to switch their existing membership site from WishList to DAP, or from Amember to DAP, from Magic Member, YourMembers, eMember, Membergate, etc. We’ve honestly lost count of the number of migrations we’ve done over the years. And every single one of those users who switched to DAP, has been thrilled with DAP and has continued to stay with DAP ever since.

In almost all cases, they all wanted to switch their main “bread-and-butter” membership site over to DAP, because of many things that DAP does that the others don’t. Or maybe because their current membership plugin doesn’t let them do what they want to do, or because their developers stopped supporting it (or support is non-existent), or they’ve gone out of business, or simply because the plugins just don’t scale well for a large membership site, like DAP can.

Anyway, we decided to write a blog post about how to do that for those of you considering doing it yourself.

[NOTE] You don’t have to do this yourself – we can do the migration for you for a fee. See this link for details about purchasing our WishList-To-DAP Migration. [/NOTE]

1) Migrating “Free Members”

Moving free members over to DAP is very simple. Export your old members as a CSV (comma-separated) file containing just email, first name and last name(optional) in the following order:

Email,FirstName,LastName

Lastname is optional. No spaces before or after the comma’s.

And then import them on the “Users > Add” screen.

You can read more about importing users into DAP in this post.

2) Migrating “Paying Members” With Current Subscriptions

This is a bit trickier than migrating just free members. You not only have to import existing member information, but you also need to migrate over their existing subscriptions to point to DAP.

How this is done, primarily depends on what payment processor you were already using, and wish to continue to use while making sure all new incoming subscription payments get processed by DAP.

But before you migrate over their existing subscriptions, you have to import all of them first using DAP’s “Users > Add” screen, which allows you to import multiple users into a Product, while also marking them as “Paid”.

Before you do the import, be sure to empty both the “Double Optin” and “Thank-you” email subject and body on the Product page, because you don’t want DAP sending out any double-optin or thank-you emails to the members you are about to import. We can send them a broadcast email at a later point, when we’ve fully set them up correctly in the system.

Then once you’ve imported them all, you can modify each of their records quickly to modify their start and end dates, to sync with wherever they were in your previous WL site.

Then once you have all of their dates set up, all that remains is to integrate DAP with your payment processor, such that both payments from both new members as well existing members, all get processed by DAP, so that DAP continue to manage their subscriptions, and start giving them access to the member’s area, going forward.

Paypal Integration

Your current WishList subscriptions are probably already pointing to a WishList specific “virtual” URL. Unfortunately, Paypal will not allow you to modify the IPN url in existing “stored” subscriptions that are current.

So you will need to put in a new rule into your .htaccess file at the root of your web site, to simply redirect all incoming IPN notifications (that come to your WL virtual URL) to DAP’s Paypal-specific file on your site, which is http://YourSite.com/dap/dap-paypal.php

Here’s the exact line of text to place within your .htaccess file that’s in your root…

RewriteRule ^index.php/register/pgiotv$ /dap/dap-paypal.php [L]

Be sure to replace the text “index.php/register/pgiotv$” by the IPN URL given to you by wishlist.

Once this is done, DAP will start processing all future subscription payments from existing members.

3) IMPORTANT

Before you create any DAP Products and start protecting content within DAP, make sure you have disabled the Wishlist plugin. Also be sure to disable any other “content protection” plugins, like “Maintenance Mode”, and Cache plugins.

10

Order Of Links On “My Links” page

[Updated 05/20/2012: Drag & Drop Re-ordering of links available since DAP v4.3.1]

Ordering Links

The ordering of links in the ContentResponder tab of a product is required ONLY if you have a “My Content” page (see example below – page uses the merge tag %%USERLINKS%%) and you want control over exactly how those links are displayed in that list:

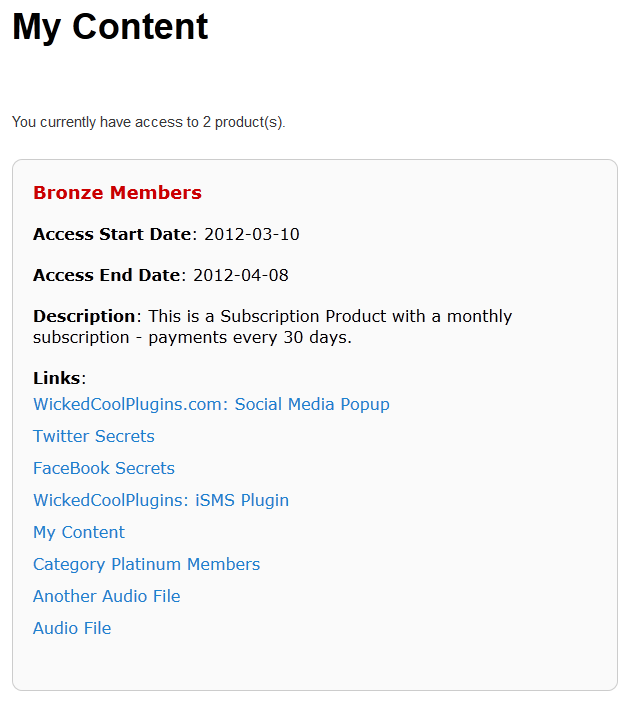
Fig 1: Example “My Content” page which uses the merge tag %%USERLINKS%%

Ordering by Drip Day

The easiest way to organize links, is to set the dripping “day” for each link.

So if you’re setting up 5 links to be available on Day #1, 2, 3,4 & 5, then in the “My Links” section, DAP will display the links in “Newest On Top” order.

So the newest link (Day #5) will appear first, followed by Day #4, and so on, until Day #1.

Ordering When There Is No Dripping

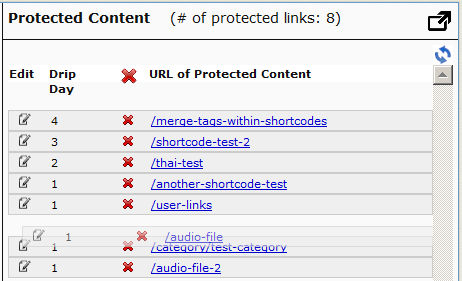
If you have multiple links that you’re making available all on the same day (like say, all on Day #1), then once you’ve added the links from left to right in the ContentResponder tab of your DAP Product, you can then hold down any row from the Protected Content section, drag and drop and re-order it however you wish to.

Remember that the drag-and-drop re-ordering will only work within different links that are all set to drip on the same day. So for eg., dragging a day 1 link above a day 4 link (see screenshot below) will not work, and it will simply come back to it original position after refreshing the screen. But dragging one Day #1 link above or below another Day #1 link will re-order the links exactly in that order.

Fig 2. Screenshot showing drag-and-drop reordering in action

If you see the links order in the above screenshot, that’s the exact same order in which the links will appear when the member views their “My Content” page (or whatever you have called the user links page).

[DAPUserLinks] Shortcode

If you want even more control over how many links are displayed, order of the links, date format etc, then consider our new shortcode shown below:

[DAPUserLinks showProductName=”N” showAccessStartDate=”Y” showAccessEndDate=”Y” showDescription=”Y” showLinks=”Y” orderOfLinks=”NEWESTFIRST” howManyLinks=”10000″ errMsgTemplate=”SHORT” productId=”ALL” dateFormat=”YYYY-MM-DD”]

NOTE: orderOfLinks can have one of two values…

NEWESTFIRST will drip newly dripped links at the top. So day 7 link will be above day 1 link.

OLDESTFIRST will drip newly dripped links towards the bottom. So day 1 link will be above day 7 link.

So, here’s another version of the DAPUserLinks shortcode:

[DAPUserLinks showProductName=”N” showAccessStartDate=”Y” showAccessEndDate=”Y” showDescription=”Y” showLinks=”Y” orderOfLinks=”OLDESTFIRST” howManyLinks=”10000″ errMsgTemplate=”SHORT” productId=”ALL” dateFormat=”YYYY-MM-DD”]
 

Related: See more such shortcodes at DAP Shortcodes

Global Login & Password

Creating 1 Single Login & Password For All Users

This is for when you don’t care about assigning unique usernames and passwords to your users, and would rather given all of your members (or site visitors) a single email id and password to log in to your membership site.

Here’s how you can do it:

  1. Most important: Go to Setup > Config > Advanced > “Max. # of User Logins From Different IP`s” and set it to a very high number – like 99999999. You’ll need to do this because everyone will be logging in using the same email/password, and you don’t want DAP to lock out the public account (you’re about to create below).
  2. Create a “public” user manually, with an email id like, say, “demo@yoursite.com” . DAP will assign a random password to the user (unless of course you have set the “Default” password in Config).
  3. Change this password also to something public – like ‘demo’ 🙂
  4. Then if you don’t care about collecting anyone’s email id, then you could publish this info publicly on your web site
  5. But if you wish to collect people’s email id’s, and *then* give them this public email/password, then you can still sign them up using the “Direct Signup Form”. And in the welcome email, instead of sending them their own email id and password, send them the public email id and password.
6

Data Loading Errors

Progress Bar Never Stops

You’re seeing the green “Loading… Please Wait” progress bar continuosly running – it never stops and comes back with any data.

If this is a new setup, then it’s possible that your web host does not have a library called “JSON” enabled. Just ask them to enable it for your server. It’s rather simple to do, and we’ve never seen a host that won’t do this for their customers.

If it’s an old setup, and it was working previously, then your host made some changes that caused the library to stop working. So you still need their help in resolving the issue.

Error Message: “There was an error returning data'”.

One possibility is that your database or web site is temporarily down, slow, or plain not responding for some reason. So DAP cannot connect to your database, and comes back with this error.

Or it could also be the “Progress Bar Never Stops” issue from above.

9

Troubleshooting Welcome Email Delivery

Problem: Someone buys a product from your site, and you can see in the DAP  “Manage Users”  page that they have been added as a user, but that user never gets an email with their login/password. All they get is the confirmation email from the payment processor.

You want to know: “How can I get my users to automatically receive a “welcome” email with their Id/password” from DAP?”

If the users got added and the user status is “A” in the DAP manage users page, but the user did not receive welcome email with their ID/Password, it could because:

No Thank-You Email Setup

[NOTE: In newer versions of DAP, “Thank-You Email” is now being called as “Welcome Email”. So wherever you see “Thank-You” below, please note that it’s the same as “Welcome”]

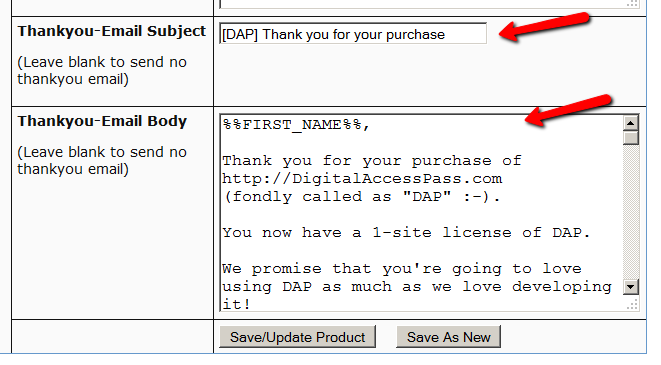
For that product, you did not set the ‘thank-you’ email subject/body in the DAP Products Page.

Select the product in DAP products page and set the thank-you message content as shown below.

Thank-You Email Setup, But Still No Email

You have set up the thank-you email message, but the email still did not get delivered.

Solution 1

The only time the Welcome Email is sent, is when a user is given access to a Product for the very first time. If you are trying to add a user to a product, and the user already has been given access to the product, then it won’t send out the welcome email the second (or subsequent) time(s). So make sure the user you’re testing with does not already have access to that Product. If she does, then remove access to the product before testing again.

Solution 2

Go to DAP Setup > Config > Basic and make sure the “Admin Email” is set to an ’email address that resides on your domain/hosting account where DAP is installed’ instead of say a gmail or hotmail or yahoo email address. Now, if you have done everything in terms of making sure there’s no reverse DNS lookup issues with your host but if there are still users who do not receive emails (and the email is not in their spam folder) :

Here’s what you can do:
1) Setup dap to generate default password (dap setup -> config -> advanced) and instruct users to change their password right after they log in.
OR
2) Set up an autoresponder email in DAP to drip day 1 with the merge tag for login id/password. So even if the thank-you email is not delivered right after purchase, when the cron runs at the top of the hour, it will send out the id/password again.. in case they did not receive it the first time.

You can have dap connect to 3rd party smtp service like AuthSMTP.com to send out all autoresponder/broadcast emails for better email deliverability.

BTW, if you have tried everything and still the emails are not getting delivered or is landing in the SPAM folder, then please checkout our documentation on troubleshooting email delivery here:

http://www.digitalaccesspass.com/doc/troubleshooting-email-delivery


1 24 25 26 27 28 35