11
Premium Web Cart Integration
Starting v4.2.1, DAP now integrates with Premium Web Cart (PWC)
PWC=>DAP integration is very simple to set up.
NOTE:
- If your DAP version is 4.2 or earlier, you must upgrade to DAP v4.2.1 & LiveLinks v1.7.
- If you are already using DAP v4.2.1, then download the very latest dap_v4.2.1 zip from the member’s area, unzip the contents to your desktop, and upload just the dap-pwc.php (within the main dap folder on your desktop) to the dap folder on your site.
Integration Steps
- Login to your PWC account.
- Go to Cart Settings > Advance Integration.
- Select PWC IPN tab.
- Set the PWC IPN URL to http://yoursite.com/dap/dap-pwc.php (Note: replace yoursite.com with the name of your site)
- Make sure the product name in PWC eXactly matches the Product Name in DAP.
User Flow
- Buyer clicks on the buy button (button created within your PWC account and published on your sales page).
- Buyer completes the payment successfully and is transferred to the thankyou page.
- PWC notifies DAP via IPN about the purchase.
- DAP automatically creates the member account, and sends thank-you email (configured in your dap products page) with login info to the buyer. NOTE: Make sure to setup the thankyou email in the DAP products page for all the products you sell via DAP.
- When the user logs in to their membership area, they will be redirected to either product-level logged-in URL or global logged-in url based on whether they have access to just 1 product or multiple products. The product level logged-in url is used if the user has access to just 1 product. The global logged-in url (under dap setup -> config -> advanced -> url to which user is redirected upon login) is used when user has access to multiple products.
Note: You can create a member’s area and redirect users to that page upon purchase.
5
Affiliate Reports
DAP offers a number of affiliate statistics on the “Affiliates > Reports” page.
Here’s how it looks as of DAP v4.2.1.

1) Email Id of Affiliate
This is the field where you would enter the email id of an affiliate, if you want to generate a report specifically for an affiliate. If you leave it blank, the report will include all affiliates.
2) “From” & “To” Dates
By default, if you leave these fields blank, then DAP will assume “today’s” date – i.e., the date whenever you’re viewing this page.
3) View Performance Summary
This is the most detailed report available. This is the report being viewed in the above screenshot. For a given time period, for a given number of affiliates (“all” affiliates if (1) is left blank above), it shows…
- Affiliate Id
- Full Name
- Email id
- Clicks generated during selected period
- Referrals generated (includes total of both Free and Paid referrals): If the referred member actually bought something, it constitutes a “Paid” referral. If they simply signed up, say, for your free newsletter or free report or free product, then it is counted as a “Free” referral.
- Commissions Earned: This is the actual amount credited to the affiliate’s account during the selected period
- Sales Generated: This is the amount of the actual sale (purchase) generated for your membership site.
- Earnings Per Click (EPC): This is an indicator of how well your web site is converting clicks into signups/members. So if an affiliate sent you 100 clicks (on their affiliate link), and 5% of them signed up for your “FaceBook Secrets” membership product by paying $10 each, it means a total revenue of $10 x 5 = $50. And if you were paying 30% affiliate commissions for the product, then the affiliate earned $15 in total.Total clicks sent: 100
Total affiliate earnings from those 100 clicks: $15
Earnings Per Click (EPC) = $15/100 = $0.15 – which means, 15 cents per click.The higher the EPC, the easier it will be for you to attract other JV partners and super-affiliates.
4) View Earnings Details

This shows the breakdown of each purchase referred by each affiliate. It’s a detailed view of the affiliate earnings, that lists each and every transaction (order) in the system that was referred by affiliates, all generated for the selected time period. It displays…
- Affiliate Id
- Full Name
- Email Id
- Product (name) that was purchased by referred buyer
- Referral Date (when affiliate was associated with buyer)
- Date/Time of actual transaction
- Trans Id: This is the transaction (order) id for the actual purchase
- Earning Type (L: Lead, S: Sale): Says what type of a commission credit it was – whether it was a “Pay Per Sale” credit or a “Pay Per Lead” credit.
- Id of User Referred: This tells you the actual user id of the buyer who was referred by the affiliate.
5) View Payments
This shows all payments made to affiliates during the period.
6) Refund Period
This is a config setting that you can change in Setup > Config. This is what drives which orders are picked up for affiliate payment. See this article for more details.
7) View Due Payments as of <date>
This is the MAIN button you should click to start the process of paying your affiliates each month (or however often it is that you pay affiliates). When you click this button, it will show you a report (see screenshot below) of commissions owed on all orders in the system UNTIL X days ago, where X is your “Refund Period”.
So if today is 10/01/2011, and you have a refund period of 60 days, then DAP will only consider orders prior to 60 days as of today. Which means, orders up to 08/01/2011 (of course, depending on how many days in a month, you may not exactly end up with 08/01/2011, because it goes an actual 60 days back from today – and sometimes, the report will stop at the 2nd or 3rd day of the month – like 08/03/2011. But that’s ok, don’t worry about it). You just focus on paying your affiliates on whatever day you wish to make the payment.
So when you click on this button, DAP will bring you a summary report of all affiliates, and how much they’re owed today, for all transactions referred by them as of 08/01/2011 (as per this example).

And when you click on the “Export These Affiliates For Payment” button shown in the screenshot above, DAP will select and mark those affiliates as being exported for payment.
And DAP will show you Paypal Mass-Pay Ready text report, with the affiliate info and the commission amount info already filled in and ready to go. If you’re paying via Paypal Mass-Pay, then all you need is this file. See this post for details.
NOTE: Being exported for payment doesn’t mean that you’ve actually paid them. Exporting affiliates for payment only means that DAP has now “set aside” those affiliates for payment, and you still need to tell DAP that you’ve actually paid your affiliates.
This is important, because you might export affiliates for payment on the first of the month, but it may take you a day or two (or 10) to actually make the payment – especially if you’re sending out Checks.
So once you’ve made the payment either through Paypal mass-pay, or by mailing your affiliates physical checks, then you need to tell DAP that you’ve actually sent out the payments, which is what you’ll do in the step below.
8 ) Mark Affiliates from <export> as Paid
This is where you will select the most recent export from the drop down (see #8 in first image at the very top), and click the “Paid” button. This is what actually lets DAP know that you’ve actually made the payment, and only after you do this, will the affiliates see the payment show up in the “Payments” section on their “Affiliate Info” page.
9) Archived Reports
This is just a report that shows you past commission payment exports.
Login Redirect
Admin users will always be redirected to the dap admin dashboard upon login.
Regular users (non-admin) will be redirected either to the ‘product-level logged-in‘ url or the Global logged-in URL (set in dap setup->config->Post-Login URL ).
If the user has access to 1 product, the user will be redirected to the ‘product-level’ logged-in url. This is set in the DAP products page as shown below:

If the user has access to multiple products OR if the product-level logged-in url is not set, the user will be redirected to global logged-in url set in DAP setup- > config as shown below:

Test Email Delivery Issues on Your Host
If thank-you email or double-opt-in email or forgot password email is NOT getting delivered even after you configure it in dap, it likely has something to do with your host settings and does not have anything to do with DAP.
NOTE: WordPress replaces double quotes with backticks (“). Pls make sure to replace all backticks (“) below with double quote otherwise the php code will break.
To test:
Upload the following php code to a file called testmail.php file to the root of your site.
<?php
$to = “yourname@yourdomain.com”; // put in your email address here to send an email to yourself
$subject = “Test mail”;
$message = “Hello! This is a test email message.”;
$from = “you@yourdomain.com”; // SET this to point to a valid sender email address
$headers = “From:” . $from;
mail($to,$subject,$message,$headers);
echo “Mail Sent.”;
?>
NOTE:
Update the “from tag” above to point to a valid email address.
Then run the following script on your browser and see if it goes through.
http://yoursite.com/testmail.php (replace yoursite.com with the name of your site).
4
Integrate Worldpay
Integration between DAP and Worldpay is IPN (instant payment notification) based and pretty straightforward.
a) Login to your Worldpay account, go to your Production/Test Installation, set the Payment Response URL to point to the DAP script on your site — http://YOURSITE.COM/dap/dap-worldpay.php (replace YOURSITE.COM with the name of your site)
b) Make sure the ‘Description‘ in Worldpay eXactly matches Product Name in DAP.
That’s it.
2
Troubleshooting CB issues
1) If you have integrated DAP and CB using INS and receive this error message or email : [DAP] http://yoursite.com: dap-clickbank.php: Check your ClickBank secret key in DAP Config
Pls do this to resolve this error:
– Pls make sure the Secret Key is the same in both Clickbank and in DAP config area. It should be all uppercase and do not use any special characters.
– Pls set the CB INS to version 1.0. Do NOT use version 2.0.
– Make sure the product name in dap and the Product Titles in Clickbank exactly match.
2) If you receive this error message : DAP Clickbank INS Error (Rejected): INS Product Name = ‘your product name’ does not match any DAP Product Name. But REJECTING MISMATCH it because of your Config settings (Product Mismatch)
You can ignore this error if it’s not a dap product. It does not affect the CB affiliate commissions.
If you set the INS URL in CB to point to DAP, then all purchase notifications will get sent to dap.
DAP will only process the ones that are relevant to it and throw away the rest. But before it throws away unrelated purchases for non-dap products, it sends out this email to the admin as FYI that can be ignored.
Troubleshooting Merge Tag Issues
If you put in the DAP merge tags like %%LOGIN_FORM%%, %%USERLINKS%%, %%USERPROFILE%% in a WordPress page but if it does not render correctly, pls do this:
1) Make sure DAP Live Links plugin is active
(check WP admin => Plugins).
2) If it is active, then create a new WP Page with ONLY this tag – %%LOGIN_FORM%%
3) Now open the WP page and see if you still see it as %%LOGIN_FORM%% or if it renders correctly.
4) If you still see it as %%LOGIN_FORM%%, then go back to WP Admin -> Plugins and temporarily de-activate all Plugins EXCEPT DAP Live Link to check if there is a plugin conflict.
5) Go back and open the WP page you created in step 3 above and see if it renders correctly
6) If it still does not work, send us your FTP info, dap and WordPress admin panel url, id/password info for troubleshooting. If it works, then re-activate Plugins one-at-a-time to see which one caused conflict.
2
Merging User Accounts
User ID 111 has been created with email id ABC123@somewhere.com
Same user buys a different product using a completely new (Paypal) email id. and DAP creates User ID 999 with PayPal email XYZ789@anothersite.com
User now has 2 accounts and wants only ABC123@somewhere.com (user ID 111) to be active.
So here’s what you should do:
- Place XYZ789@anothersite.com in the PayPal email field of User ID 111 and save.
- Give User ID 111 access to all products that User ID 999 currently has active, with matching start and end dates.
- Delete User ID 999 fully from the system.
If User ID 111 purchases additional products through Paypal, and her primary Paypal email id is still XYZ789@anothersite.com, then that Paypal email id will be recognized by DAP, and all purchased products will be activated under User ID 111 and no additional User IDs will be created.
However, if User ID 111 has changed their primary Paypal email id to be something else like XYZ123@yetanother.com, then the next time they make a purchase, DAP will not know it’s the same person, and will end up creating a completely new user id for the buyer. Which means, you will have to do the merge again, and replace the old Paypal email id in DAP with the new Paypal email id of the buyer.
4
The “Smart Login” Process
DAP has a very powerful, flexible and easy-to-use log in flow for your users and members.
- Log in from a dedicated log in page, or
- Log in from the login form on the side-bar (login/logout widget), or
- Log in through the log in form shown on “Sorry, you don’t have access to this content. Please log in first…” kind of error messages.
And we call it the Smart Login, because the login process will work differently under different conditions, all designed to make the user-experience for your member more smooth and consistent with general login standards around the web.
So let’s see the various possible login locations in DAP.
But first, it is important to note that DAP has two main types of logins.
Primary Login
This is where it is considered a “generic” login by your member. For eg., a member came to your web site, and then just generally wants to log in to the member’s area – so they have no “context” – it’s NOT as if they were trying to view a specific page or post, got challenged with a login form, and then logged-in from there. That makes this a “Primary Login“.
Examples of this are…
a) Dedicated Login Page: You have a dedicated login page, like http://YourSite.com/login/ – which is what you’ve entered in to “Setup > Config > Login URL“. The body of this page has the DAP merge tag for the login form, which is %%LOGIN_FORM%%
b) Login/Logout Widget on any page of your web site. This is also considered a primary login. The reasoning here is that if they’re logging in through a sidebar widget, it means that they just want to log in to the member’s area, so it is considered primary login.
Secondary Login
This is a login action that HAS “context”. Say, a member landed deep into your site (not the home page, not the dedicated login page) and were challenged by the “In Page Error Message” that says something like “Sorry, you must log in before you can view this content” and are presented with a login form right on that very same page. They were trying to read something before they were asked to log in first – which means, they must be returned to the same page they were trying to view BEFORE they were asked to login. So that makes this a “Secondary Login“.
Examples of this are…
a) Any custom “Error Page”, where you have inserted the DAP merge tag for the login form, %%LOGIN_FORM%%.
b) DAP’s “In-Page Error Message” which says “Sorry, this is private content – you must log in first before you can view this”.
c) Log in form showing up on a page when “Sneak-Peek” is enabled.
Redirection Rules
Based on whether it’s a Primary Login or a Secondary Login, your member will be redirected to a different location.
1) If it is a Primary Login action, then…
a) They’re taken to the “Post-Login URL” if set at a Product-level AND they have access to just one Product.
b) They’re taken to the GLOBAL “Post Login URL” (under Setup > Config) if you have NOT set anything at a Product-level, OR if they have access to more than one Product.
This scenario is the only one where the Post-Login URL is ever used (whether it’s the Product-level or Global-level).
1) If it is a Secondary Login action, then…
They’re always redirected back to the same page they were on (or were trying to access) before they were challenged to log in first to view the content.
Bottom-line:
Primary Login is predictable, and you (the DAP Admin) control where they go right after they login.
Secondary Login depends on “context”, and they’re taken back to whatever page they were on, before they logged in.
26
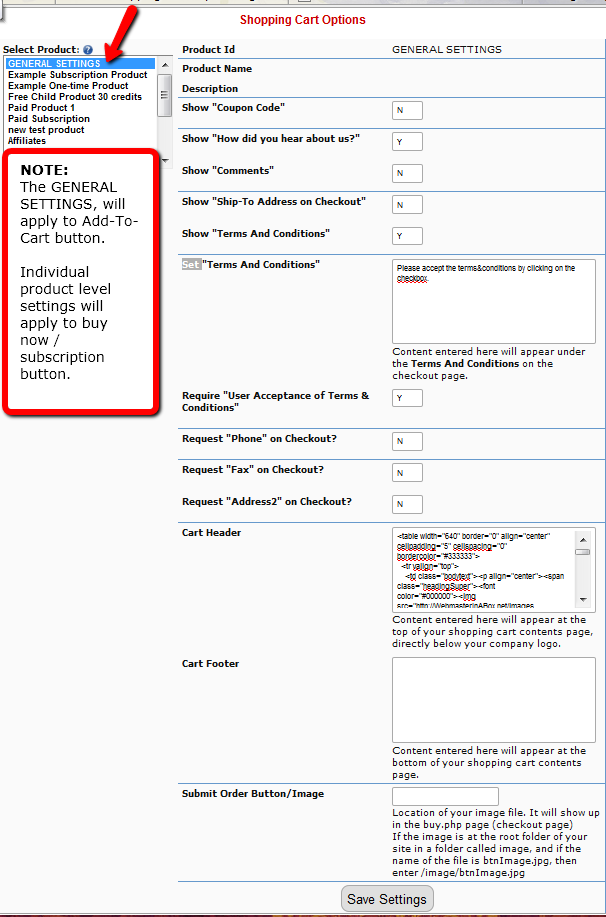
What does the shopping cart offer?
Setting Up The Cart
DAP Shopping Cart Overview
The DAP built-in shopping cart has a lot of great updates in DAP 4.2.
What does the shopping cart offer?
=> Coupon support
=> Add Custom Fields to Your Order/checkout Form
=> Support for Order/Checkout Form customization at product level. For ex – Show “Coupon Code”, Show “How did you hear about us?”, Show “Comments”, CART header/footer html, Show “Ship-To Address on Checkout”, Show “Terms And Conditions”, Request “Phone” on Checkout?, Request “Address2” on Checkout? etc
=> FULLY integrated with WordPress so your order/checkout page will carry the look&feel of your wordpress theme.
=> Multiple cart items support – (you can now use ADD-TO-CART button to allow buyers the option to add multiple items before they finalize purchase)
=> Unlimited Upsells
What you need in order to use the DAP Shopping Cart:
1. You need an Authorize.net merchant account or Paypal Payments PRO account
2. If you want to sell subscription-based products, then you also need Automated Recurring Billing (ARB) enabled in your Authorize.net account.
3. You must have SSL (secure server) enabled on your web site. Ask your web host to enable SSL/HTTPs for your site.
What it looks like when its implemented on your site:
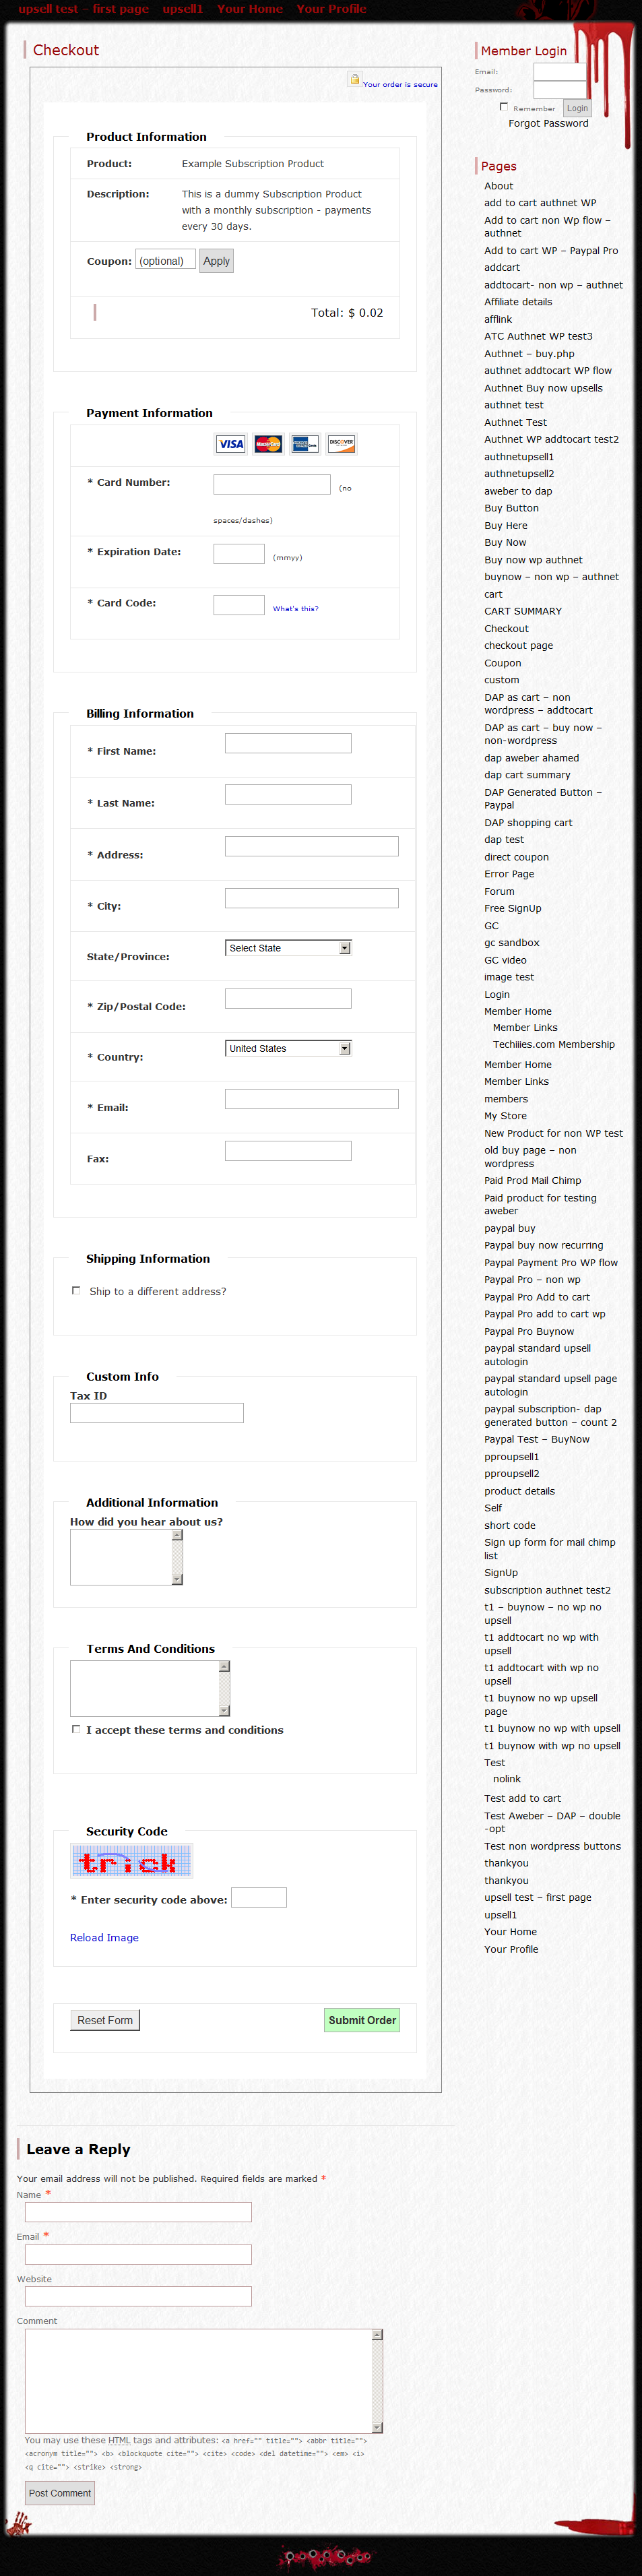
WordPress version (cart appears within your WP page)
1) Buy Now
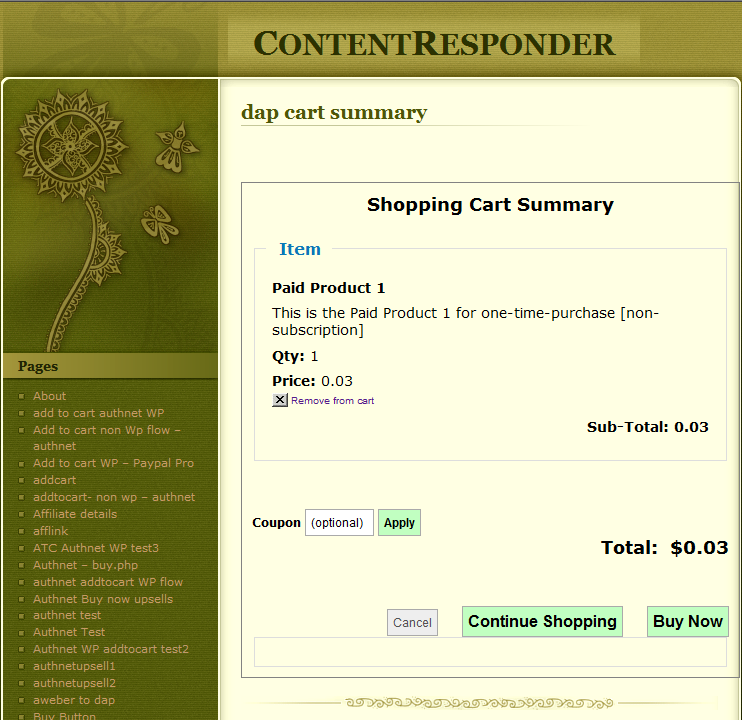
2) Add-to-cart
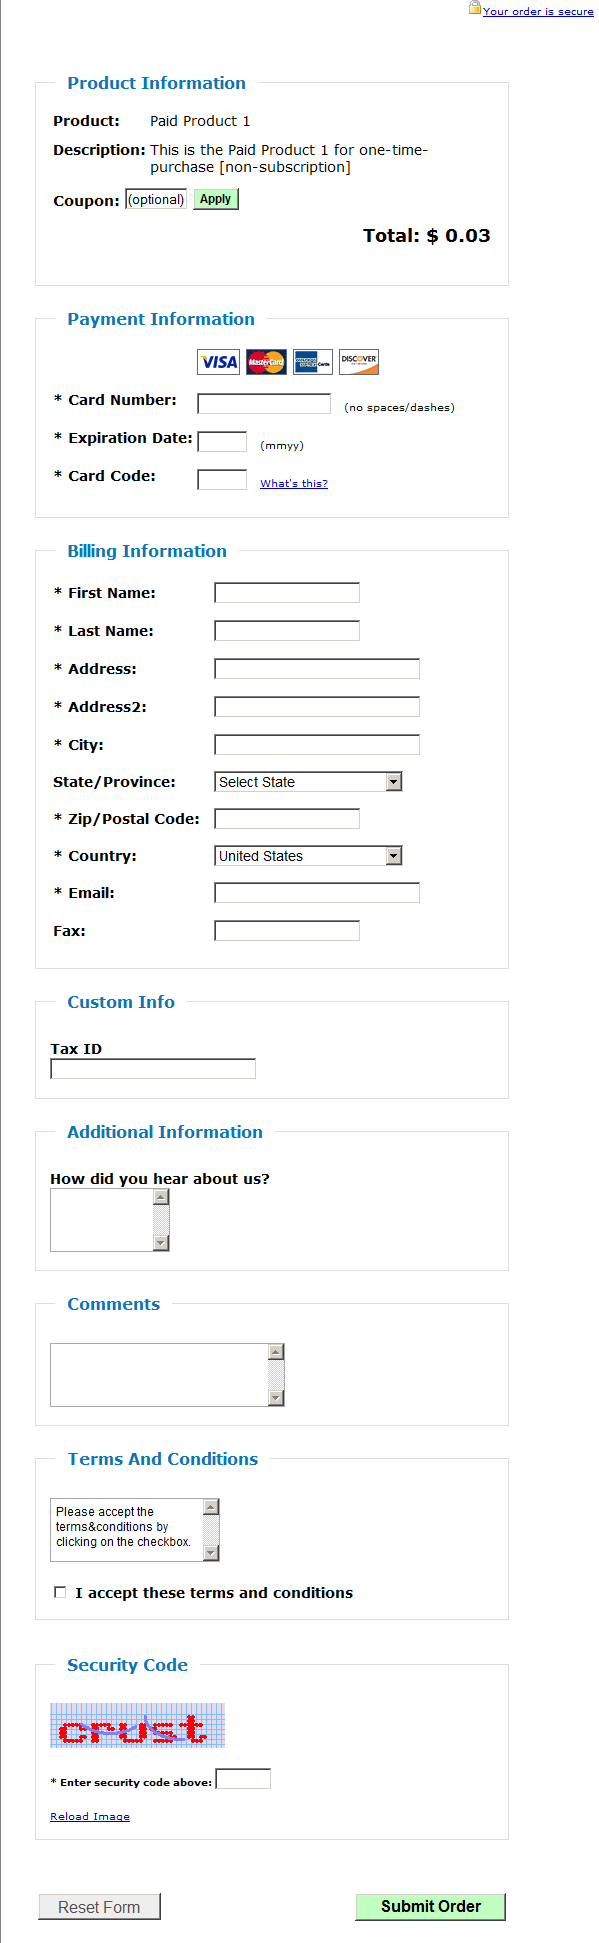
NON-WordPress version (stand-alone cart page)
1) Buy Now
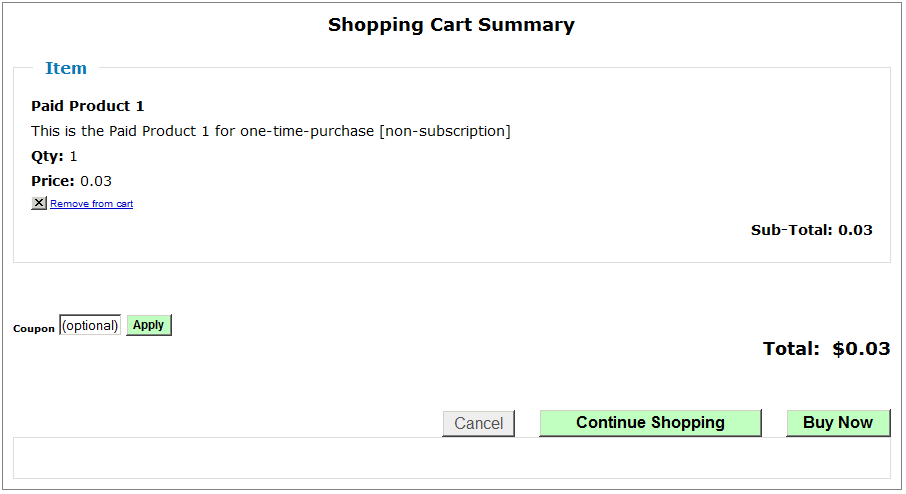
2) Add-to-cart
Setting Up The Cart
=> Create the product that you want to sell in DAP Admin => Products / Levels => Manage Products Page
=> Customize the cart/order page in DAP Admin => Payment Processing => Cart Options Page
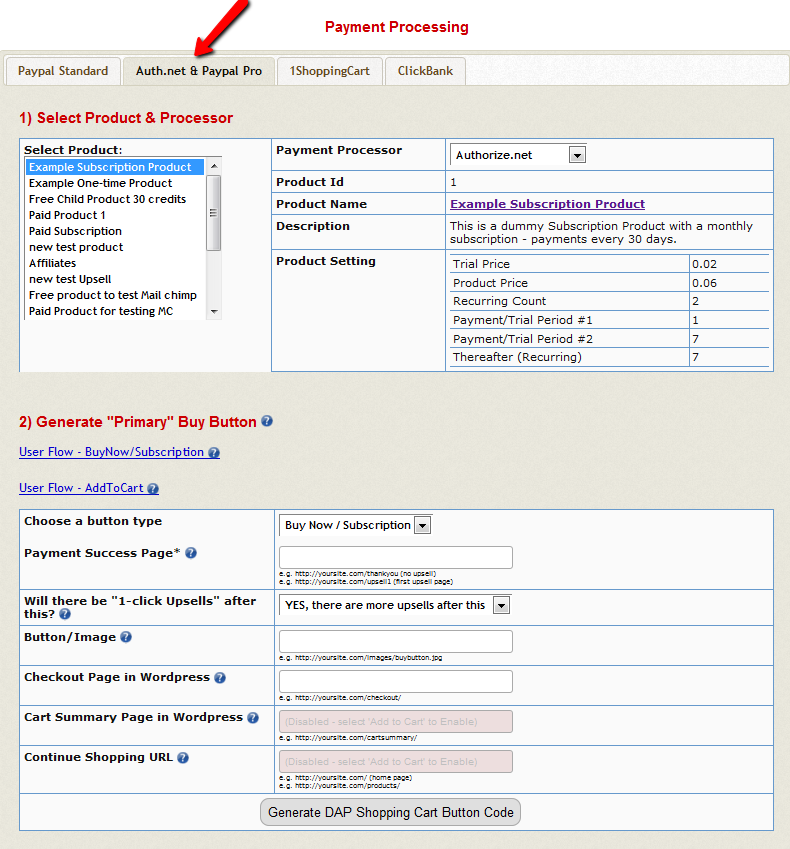
=> Generate the Primary Buy Button in DAP Admin => Payment Processing => Generate Buy Button Page
NOTE: If you do not want to offer upsells, just set the ‘Payment Success Page’ to point to the final landing page. Otherwise point it to the next upsell page in the flow.
=> If you want the checkout and checkout confirmation pages to have the look&feel of your wordpress theme, then create the following wordpress pages and use the URL of these pages in the button generation page above:
– A WordPress page with the merge tag %%DAPCART%% (this is the page where Credit Card and other info is collected from the user).
– A WordPress page with the merge tag %%DAPCARTSUMMARY%% (this is the page where users can see the items added to their cart.. just applies to add-to-cart button).
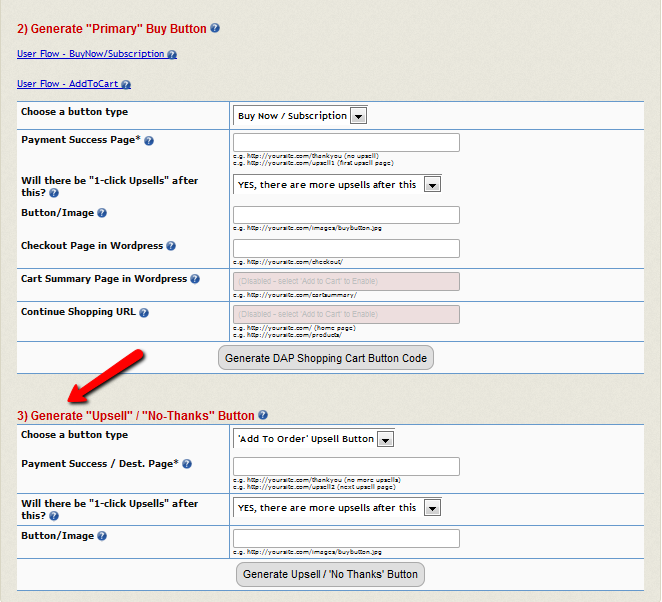
=> Generate the Upsell/No Thanks Button in DAP Admin => Payment Processing => Generate Buy Button Page
If you want to offer more upsells, just point the ‘Payment Success Page’ to the next upsell page in the flow.