DAP Shopping Cart – BuyNow – Setup
If you are on DAP v4.5 / DAPLiveLinks 1.9 or above, you can use the New DAP Shopping Cart Plugin! The document below explains how to setup the DAP Shopping Cart.
Setting up Buy Now / Subscription Payment Button
STEP 1: Install DAP Shopping Cart
See this document on how to install the DAP Shopping Cart. See this document on the minimum requirements to use the DAP Cart.
STEP 2: Create buynow/checkout page.
See this document on how-to-create-checkout-page-in-Wordpress.
STEP 2: Create Payment Button
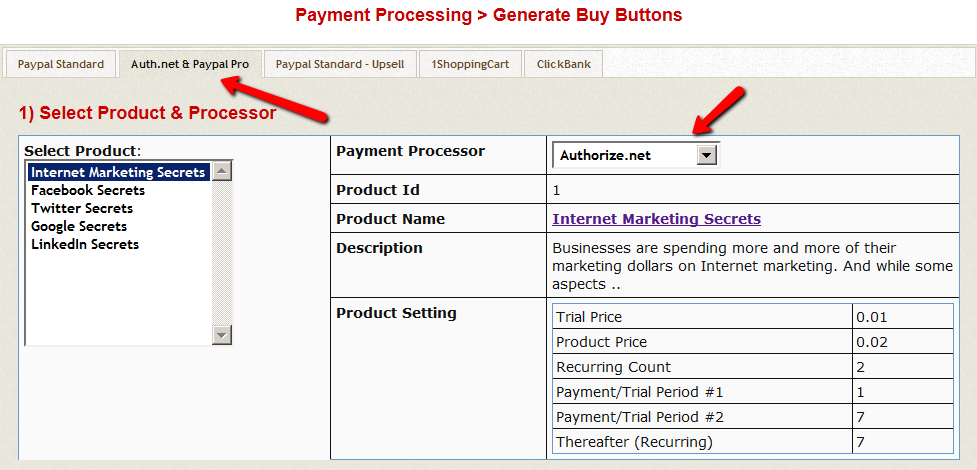
- Go to DAP admin -> Payment Processing > Generate Buy Buttons -> Authnet & Paypal PRO tab -> do the following on this page
1. Select Product.
2. Select Payment Processor.
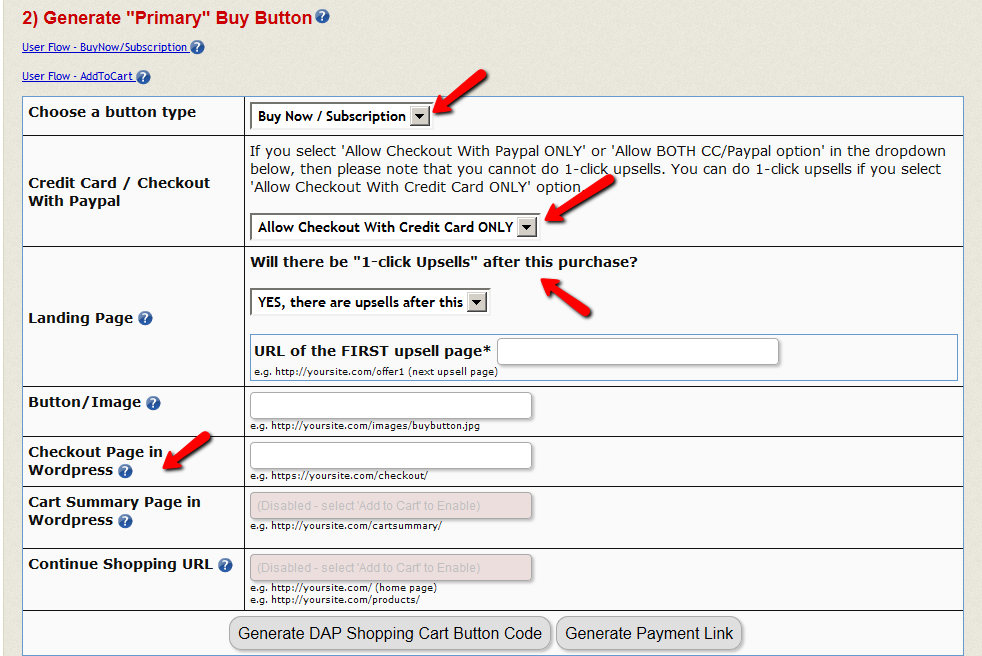
3. Choose a button type (BuyNow/Subscription, AddToCart).
4. Configure payment method. 5. Set the . If you are going to send the users to an upsell page after they click on checkout/buynow, then set the landing page URL to point to your upsell page. Say the upsell page is called http://YOURSITE.com/upsell1. You can set the landing page url to /upsell1. If no upsells, then you can set this to point to a thank you page.
Set the Checkout page in WordPress to http://YOURSITE.com/buynow (check STEP 1 above on how to create buynow page). If you do not have a WP based Checkout page, you can set it to : http://YOURSITE.com/wp-content/plugins/dapshoppingcart/buynow.php.
6. Now you can generate a Payment Button or a Payment Link.
PLEASE NOTE : The buynow/checkout page must be on HTTPs/SSL. Your entire site does not need to be SSL enabled but the checkout/buy now page where Credit Card is collected MUST BE on https for SECURITY reasons. If you ONLY configure ‘Checkout With Paypal’ to show up on Checkout Page, then you DO NOT need https. You only need to have HTTPs enabled checkout page if you offer Credit Card checkout option. Your web host can enable HTTPs for your site. The exact cost of SSL is web host dependent. Please check the pricing details with your web host.
TESTING: If you are waiting on your web host to enable SSL but want to start testing the CART, you can look for ‘https’ in the button code and update all occurrences of https with http for testing. Please remember to change back to https before you go LIVE with the button.
STEP 3: Upsells – Create Upsell Button
* If you want to offer upsells, please ONLY use the Credit Card payment option on the checkout page. Do not offer ‘Checkout with Paypal’. Upsells will not work with Paypal Standard checkout.
* Say your first upsell page URL is http://YOURSITE.com/firstupsell. Use the URL of the FIRST upsell page (/firstupsell) as the ‘LANDING PAGE URL’ when you generate your MAIN/INITIAL button for the sales page. This way, when the users click on the main payment button, the user’s payment will be processed, and instead of users getting redirected to the thank you page, they will land on the FIRST upsell page.
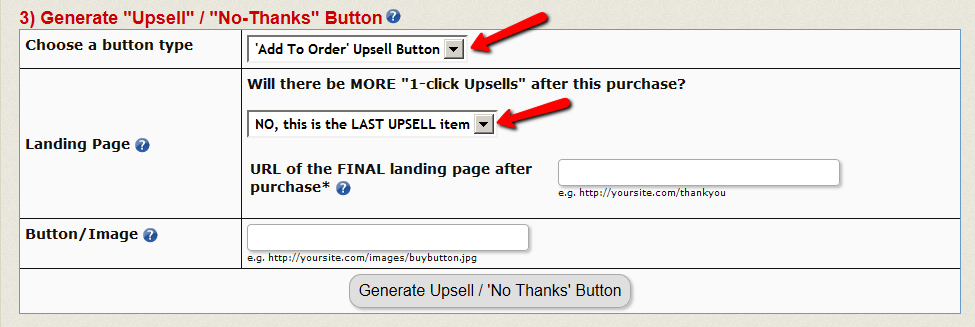
* You need to have 2 buttons on the upsell page:
Add To Order (Yes, I want to add this to my purchase) / No, Thanks (No, I will skip this wonderful offer)
* You can generate the UPSELL / DOWNSELL buttons for all your upsell / downsell offers in the DAP admin -> Payment Processing > Generate Buy Buttons -> Authnet & Paypal PRO tab. Make SURE to select the RIGHT product in the button generation page BEFORE you generate button.
STEP 4: CART OPTIONS
Last STEP in your checkout page configuration process.
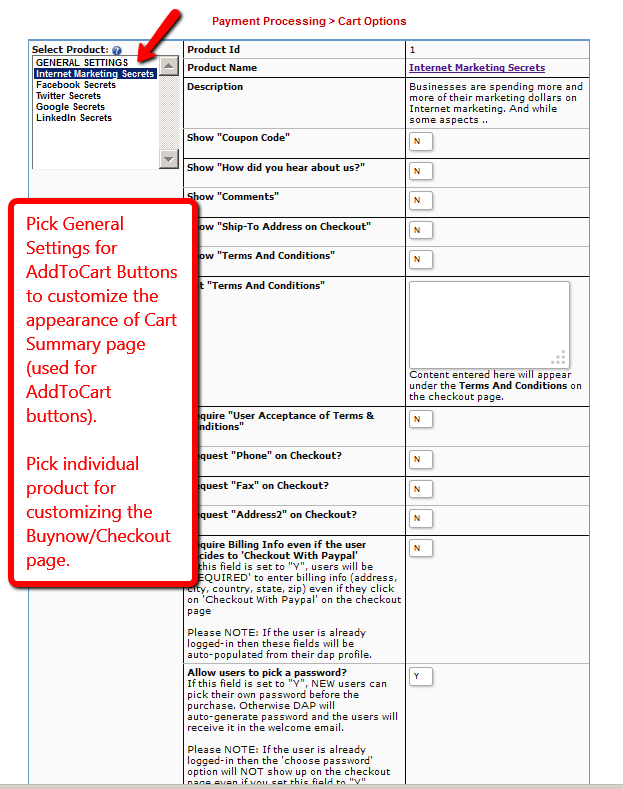
– Go to DAP admin -> Payment Processing > Cart Options page.
You will find several checkout page customization options on this page including options for ‘Choose a Password (pre-registration)’, ‘Require Billing Info for Paypal’, ‘Custom fields’ etc. You can enable options as needed for your site for the product you are trying to sell. Remember to first select the product in the select box on the left before picking options.
That’s it for BuyNow or Subscription buttons. Instructions for AddToCart button will be covered later in this document.
Cache Plugin Setup
DAP works great with the WP Super Cache plugin. Probably works with others too – but we have officially tested it with just Super Cache at this time.
And this page below walks you through the full set up of the WP Super Cache plugin.
___________________________________________________________
Go to Settings > WP Super Cache
You are now on the “Easy” tab. Don’t do anything here just yet.
Go to Advanced tab.
Be sure to put a “Check” (or “Select” the radio button) next to each of the following items
Caching
Cache hits to this website for quick access. (Recommended)
Use mod_rewrite to serve cache files. (Recommended)
Miscellaneous
Compress pages so they’re served more quickly to visitors. (Recommended)
Don’t cache pages for known users. (Recommended)
Don’t cache pages with GET parameters. (?x=y at the end of a url)
Cache rebuild. Serve a supercache file to anonymous users while a new file is being generated. (Recommended)
Advanced
Clear all cache files when a post or page is published or updated.
Extra homepage checks. (Very occasionally stops homepage caching) (Recommended)
Only refresh current page when comments made.
List the newest cached pages on this page.
Click on Update Status button.
Keep scrolling down until you see the Accepted Filenames & Rejected URIs section.
You’ll see a big text area under the text “Add here strings (not a filename) that forces a page not to be cached”. +
There, add the following, one per line.
/dap/
/dap/.*\.php
/dap/admin/
/dap/admin/.*\.php
/login/
/members/
/my-profile/
/my-content/
Obviously, your member content page URL’s may be slightly different. So make sure you customize it to suit your own URL’s.
Next to back to Easy tab at the top.
Now you select the “Caching On” option and save.
That’s it for the setup.
Now, on to testing.
Content Organization Tips
If you organize all of your member content under a main parent page, say “members”, then all you need to exclude from caching, is /members/
For example, if your URLs include year and you don’t wish to cache last year posts, it’s enough to specify the year, i.e. /2004/. WP-Cache will search if that string is part of the URI and if so, it will not cache that page.
So basically, excluding just one single URL – /members/ – from caching, will make sure all of the following as well remain UN-CACHED.
/members/login/
/members/home/
/members/my-content/
/members/my-profile/
/members/my-affiliate-info/
/members/course-1/
/members/course-1/module-1/
/members/course-1/module2/
/members/course-2/module-1/
/members/course-2/module2/
You get the idea. When you exclude “/members/”, any URL that starts with that same text, will be excluded.
So here’s how you set up the “hierarchy” of the pages.
First, create the page “members“.
Then, when you create the “login” page, make sure you select the “parent” of the page, to be the “members” page.
So, instead of the login page URL looking like… http://YourSite.com/login/
… because the parent page is “members”, that also gets added to the URL, and the login page URL becomes like this:
http://YourSite.com/members/login/
If you created a page called “example” and made the “login” page as its parent, then the URL for this new page becomes:
http://YourSite.com/members/login/example/
So you see how that hierarchy works. Use that to arrange all of your member content under the main “ancestor”, which is “members”, here in our example.
But if you have already completed creation of all of your content, then you’re just going to have to do a little extra work to identify all of your pages and posts and exclude the member content from the list. DAP makes this a little bit easier as well.
Getting A Full List Of Pages & Posts
If you log in via FTP and go to the “dap” folder, inside, you will see a file called “dap_permalink_dump.php”. If you download that file to your desktop, and open it with any text editor (Notepad, Dreamweaver, etc), inside you will see a full list of URL’s of all posts and pages from your WordPress site. You can just take that list, remove separator text like “Posts” and “Pages”, and trim the list of URL’s down to just your member content, you can take that and paste it right into the WP Super Cache > Advanced tab > Accepted Filenames & Rejected URIs section.
Testing Caching Impact
Now open multiple browsers – like Firefox, Chrome and Internet Explorer (or Safari). Use at least 3 separate browsers.
Next, go to your login page in one of them, and then log in. Then go to same login page in another browser – make sure it doesn’t say “You are already logged in”. It should show you the DAP login form. Same on third browser.
Next go to the profile page while logged in as member. Do the same in other two browsers, while logging in as three different people. Each profile page should you show you different information.
If you crated 3 separate products, with 3 different users, then logging in as those 3 different users on the 3 different browsers, should show you 3 different sets of pages.
All this is just to make sure there’s no caching going on of your membership content, that’s all.
If all of this works, then you’re all set with caching for your non-membership content, and no caching for your dynamic member content.
Paypal Standard Upsell – Guide
Upsells and Downsells are now extremely simple to implement using OUR NEW “Paypal Standard Upsell Tree” plugin for DAP.
Which means you do not need a merchant account any more. All you need is a regular Paypal (Standard) Business/Premier Account.
-
IMPORTANT: What you need before you can use this plugin
- You need a Paypal (Standard) Business or Premier account
- You must have SSL (secure server) enabled on your web site. Ask your web host to enable SSL for your site.
- You must have a working version of DAP 4.4.3+
- You cannot sell a “Recurring” product as an Upsell. Recurring products have to be the first product in the flow.
- Here’s what you CAN do: You can have a recurring product as the very FIRST product that they purchase (when they first click on the “Buy” button on your main sales page), and then you can offer any number of “One-Time” Products as upsells or downsells.
- Here’s what you CANNOT do: Offer a “One-Time” product as your first product that they buy, and then try to upsell them to a “Recurring” Product. Unfortunately, this is a Paypal problem at this time.
-
Install Paypal Upsell Tree plugin
- Login to your WickedCoolPlugins.com account and download the PaypalStandardUpsell.zip file, dapcompanionfilesforPUT.zip file from http://wickedcoolplugins.com/my-account/downloads/ page. If you do not have access to this plugin, please contact us via a support ticket and we will send you the right link to purchase the plugin.
- Go to WP admin -> plugins -> add new -> Upload tab -> select the PaypalStandardUpsell.zip file, click on Install, and after the plugin is installed, click on activate to activate the PaypalStandardUpsell plugin in WordPress.
- Download the WCP License plugin from your WickedCoolPlugins.com downloads area (http://wickedcoolplugins.com/my-account/downloads/ )
- Install and activate the WCP License plugin in WordPress (just like any other WP plugin).
- Make a note of your WCP license key (you will find it in your WickedCoolPlugins.com downloads area).
- Go to WP admin – > settings -> WCP license and enter the WCP license key (that you noted in step# 6 above).
- Also, unzip the dapcompanionfilesforPUT.zip file to your desktop (the one you downloaded in step #2), you will find a dap subfolder under it.
- FTP to you site, find the root folder of your site, and upload the entire dap folder to the ROOT FOLDER of your WEBSITE. When you do this, it will automatically overwrite the files in your DAP folder with the right version needed by PUT.
- Installation of Paypal Upsell-Tree Plugin is now complete.
-
Find the API info from Paypal.
- log in to your Paypal account.
- Click on “Profile”
- Click on “Request API Credentials” (under ‘Account Information’ section). It will bring you to the API access page.
- Under Option 2, click on “Request API credentials” to create your own API username and password.
- Click on “Request API signature”
- Click on “Agree & Submit”
- Note down the following pieces of information:
* API Username
* API Password
* API Signature
-
Enter the Paypal API info in DAP Seup -> Config.
- Login to DAP Admin Dashboard.
- Go to “Setup > Config“.
- On that page, click on the “Paypal” link in the links towards the very top of that page (or scroll down to the “Payment Processing: Paypal” section).
- Enter the 3 pieces of API info that you got from Paypal in the previous step into the Config fields 7, 8 & 9 on that screen:
Paypal API Username, Paypal API Password, and Paypal API Signature. Cick “Update” and save the changes.
-
Generate a WP based FINAL CONFIRMATION page.
- This is the page the users will land on when they have added all the items (main item, upsell items) to the cart and are ready to complete the final checkout.
- WordPress Based FINAL Confirmation Page for Paypal upsell:
-
- Create a NEW WP page.
- Click on the PUT Editor button in the WP admin – > Add New page -> Visual Tab. pick the options and complete the creation of this WP page.
- Lets say you call this page – confirmation.
- Publish this page.
- When your buyer reaches the final checkout confirmation page (/confirmation) then they can review all of the products in their “Upsell Cart”, and buy them all instantly and all together, without having to go back to Paypal ever again.
-
-
Steps to generate the MAIN buy button
- In the DAP Dashboard menu, go to Payment Processing > Generate Buy Button
Please click on the ‘Paypal Standard Upsell’ tab. - STEP 1 – Select the DAP Product for which you’re trying to generate the buy button, from the Product list. NOTE: The very first product that you sell in the flow can be a recurring product or a one-time product.
- STEP 2 – Generate “Primary” Buy Button (initial/first payment button that triggers upsell). This will be the button that kicks off the full sales funnel. So this is your PRIMARY buy button. Fill in the text boxes for button generation and copy the generated button code to the MAIN SALES PAGE on your site.
- In the DAP Dashboard menu, go to Payment Processing > Generate Buy Button
-
Generate the Upsell and No, Thanks button.
- PLEASE NOTE: you cannot upsell / downsell a recurring/subscription product because of Paypal API Restriction.
- YOU can do unlimited upsells and downsells BUT THE upsell/downsell products can only be non-subscription products.
- In the DAP Dashboard menu, go to Payment Processing > Generate Buy Button
Please click on the ‘Paypal Standard Upsell’ tab. - STEP 1 – Select the product that you want to UPSELL or DOWNSELL.
- STEP 3 – Please SKIP the STEP 2 (as step 2 is for MAIN/PRIMARY button) and go straight to STEP 3. Follow the easy-to-use instructions on the button generation page, fill in the text boxes for upsell button generation and copy the generated button code on to the upsell or downsell page.
- NOTE: On every upsell page, make sure to provide both AN UPSELL BUTTON as well as a ‘NO, THANKS’ button. WITHOUT a NO, THANKS button, the users cannot SKIP any UPSELLS and they will be stuck.
- To generate a No, Thanks. button, select the button type (STEP – 3) as No, Thanks.
- You can repeat step #3 through step #7 for all of your upsell/downsell pages.
- When it’s the last upsell button or if it’s a No, Thanks button that does not lead to any more upsells, then please set the
- Now when you set to “NO”, the button generation process will ask you to fill the URL of the FINAL CONFIRMATION PAGE. You can set it to http://YOURSITE.com/confirmation (replace YOURSITE.com with the name of your site). The URL needs to match the url of the confirmation page you created when you followed the instructions for Generate a WP based FINAL CONFIRMATION page.
- VERY IMPORANT: Please sure that both the upsell button code as well as “No Thank You” link on the last upsell or downsell page, should point to /confirmation or whatever is your FINAL CONFIRMATION PAGE URL. Please set this correctly during the button generation.
-
Test the User Experience
Make sure to test the entire purchase flow, and every upsell/ downsell / no, thanks button before you go LIVE.
To test, you can either create a new Paypal account that is different from your SELLER account OR you can create a Paypal Sandbox account.
If you want to use Paypal Sandbox account for testing, please remember to switch back to your LIVE account before you go LIVE.
For Paypal Sandbox testing, please make the following changes to DAP Config.
DAP Setup => Config => Payment Processing: Paypal => Use Paypal Sandbox => “YES”
DAP Setup => Config => Payment Processing: Paypal => Paypal API Endpoint -> https://api-3t.sandbox.paypal.com/nvp
NOTE: Remember to change back to original settings before you GO LIVE.
While all of this looks like a LOT of steps, that is only because we have tried to explain the steps in detail so they are clear. In reality, it is very simple to set up, and starting from scratch, if you have DAP & SSL already installed, it shouldn’t take you more than 1/2 hour to set up your 1-Click Upsells/Downsells/OTO’s. If you have any further questions, feel free to open a support ticket, and we will assist you in getting this going.
You are NOW ready to launch your UPSELL-Powered Sales Funnel!
DAP User Subscription
In DAP 4.6.2, we added a user-facing ‘subscription cancellation’ feature for transactions processed by Paypal/Authorize.net.In DAP 4.7, we have added a user-facing ‘subscription cancellation’ feature for transactions processed by Stripe. You can configure the following shortcode to allow your users to ‘Cancel their Subscription‘. Please NOTE: You can also use this shortcode to allow your members to see a list of their latest payment transactions (the latest transaction per product). [DAPUserSubscriptions showalltransactions=”Y” showcancel=”Y” cancelimage=”http://YOURSITE.com/wp-content/plugins/DAP-WP-LiveLinks/includes/images/CancelButtonUp.gif” template=”template1″ productId=”ALL”][/DAPUserSubscriptions]
 If the user clicks on ‘Cancel‘ Link/Image, DAP will automatically cancel their current subscription with Paypal Standard or Authorize.net.
The ‘Cancel’ feature will ONLY work with :
1) dap-generated-button-for-paypal-standard AND
2) dap-shopping-cart that integrates with Authorize.net or Paypal Payments PRO or Stripe.com.
It will not work with any other payment processors or shopping carts.
 Attributes:
a) showalltransactions=”N”
If set to “Y”, the DAPUserSubscriptions shortcode will show the latest transactions (one transaction per product) and not just the Paypal / Authnet / Stripe ones.
If set to “N”, the DAPUserSubscriptions shortcode will show the latest ‘Paypal / Authnet / Stripe subscription’ transactions only.
b) showcancel=”Y”
If set to “Y”, a user-facing-cancel link will show up next to cancel-able transactions (authnet / paypal / stripe subscription).
This will allow users to cancel their own subscription. Only authnet / paypal / stripe transactions can be cancelled by users using this feature.
The cancel link/button will ONLY show up for Paypal / Authnet “Subscription/Recurring” transactions.
c) template=”template1″ OR template=”template2″
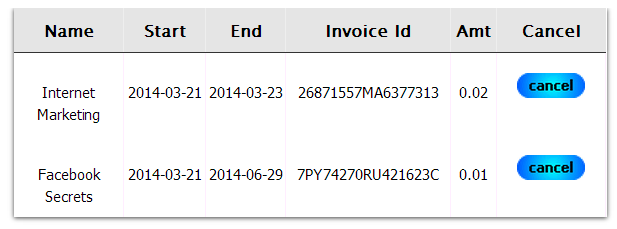
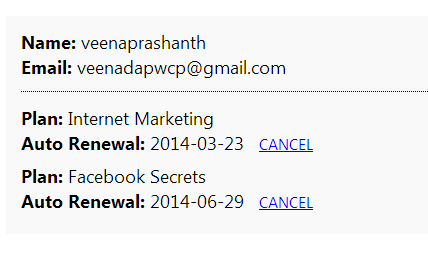
You can use template1 or template2 depending on your preferred display style. The template1 uses a horizontal layout. The template2 uses vertical layout.
Template1 layout:
 Template2 layout:
 d) bgcolor=”#f9f9f9″ (Only applicable to template 2)
e) productId=”ALL” If you want to display all the latest transactions of all the products the logged-in user has, then user ALL. Otherwise, it can be the actual product Id of the product (for ex – productId=1) or a comma separated list of product Ids (for ex – productId=1,3 ) f) cancelimage=“http://yoursite.com/wp-content/plugins/DAP-WP-LiveLinks/includes/images/CancelButtonUp.gif” If you want to use an image for cancel button instead of cancel link, then cancelimage attribute to point to the url of the cancel button image. Please note: replace yoursite.com in the cancelimage url with the name of your site. USECASES 1) Show All latest transactions on file to the logged-in user along with cancel link for cancel-able subscriptions.
[DAPUserSubscriptions showalltransactions=”Y” showcancel=”Y” template=”template1″ productId=”ALL” ][/DAPUserSubscriptions] If you use the above shortcode in a WP page, it will show all active transactions and if it’s a paypal or authnet or stripe subscription, it will show cancel button. Your customers can cancel their authnet / paypal / stripe processed active subscriptions by clicking on the cancel button.
 Cancel button will only show for :
– Transactions that are cancellation eligble (for ex – it will show for active subscriptions but not for one-time-purchases)
– And only if the cancel-eligible transactions are from Paypal or Authnet or Stripe. It will NOT show for other payment processors like Clickbank, Infusionsoft etc.
You can customize the table header names and the cancel button image. The template1 files are under /wp-content/plugins/DAP-WP-LiveLinks/includes/cancel/template1 folder.
Cancel button will only show for :
– Transactions that are cancellation eligble (for ex – it will show for active subscriptions but not for one-time-purchases)
– And only if the cancel-eligible transactions are from Paypal or Authnet or Stripe. It will NOT show for other payment processors like Clickbank, Infusionsoft etc.
You can customize the table header names and the cancel button image. The template1 files are under /wp-content/plugins/DAP-WP-LiveLinks/includes/cancel/template1 folder.The template2 files are under /wp-content/plugins/DAP-WP-LiveLinks/includes/cancel/template2 folder.
If you want to customize the table layout, copy autocanceltemplate.html to customautocanceltemplate.html and make the updates to customautocanceltemplate.html. If you want to customize the template1 css, copy /wp-content/plugins/DAP-WP-LiveLinks/includes/cancel/template1/css/autocanceltemplate.css to /wp-content/plugins/DAP-WP-LiveLinks/includes/cancel/template1/css/customautocanceltemplate.css and make updates to customautocanceltemplate.css. If you want to customize the template2 css, copy /wp-content/plugins/DAP-WP-LiveLinks/includes/cancel/template2/css/autocanceltemplate.css to /wp-content/plugins/DAP-WP-LiveLinks/includes/cancel/template2/css/customautocanceltemplate.css and make updates to customautocanceltemplate.css. Here’s how it works: DAP picks up all the active products the user has. For each active product, it checks if there is a purchase transaction (transaction Id > 0) associated with that user->product row in Manage Users page. – if yes, the row is displayed with a cancel option. – if no, the script will move on to the next product 2) Show just cancel-able transactions on file to the logged-in user along with cancel link for cancel-able subscriptions [DAPUserSubscriptions showalltransactions=”N” showcancel=”Y” template=”template1″ bgcolor=”#f9f9f9″ productId=”ALL” ][/DAPUserSubscriptions]
If you use the above shortcode in a WP page, it will show only cancel eligible transactions (paypal / authnet / stripe subscriptions). Your customers can cancel their authnet / paypal / stripe active subscriptions by clicking on the cancel button/link.
Here’s how it works:
Pick all the active products the user has. For each active product, check if there is a purchase transaction (transaction Id > 0) associated with that user->product row in Manage Users page. – if yes, check if it’s a subscription purchase (IPN received by dap from the payment processor contains recurring_payment_id, or sub_id or subscr_id) and if yes, show it with a cancel button. Note: – The cancel button will only show for authnet / paypal /stripe subscription purchases. Auto-cancel not supported for other payment processors like Clickbank or Infusionsoft.
– Only cancel eligible (or already cancelled) transactions will show (i.e. one-time purchases will not show)
=====================================================================================
You can customize the ‘cancel success msg’, ‘cancel failure message’ and the ‘cancel image’ as shown below:
[DAPUserSubscriptions showalltransactions=”Y” showcancel=”Y” cancelsuccess=”Subscription Cancellation Completed Successfully!” cancelfailed=”Sorry, could not cancel the subscription!” cancelimage=”http://yoursite.com/wp-content/plugins/DAP-WP-LiveLinks/includes/images/CancelButtonUp.gif” template=”template1″][/DAPUserSubscriptions]
Please NOTE:
If showalltransactions=”Y”, then DapUserSubscriptions shortcode will show list of all products the users has from dap->manage users page.
If a product does not show up even though the user has access, it could be because:
– No transactionId ( number > 0) exists in dap users manage for this user->product (check Trans Id) field. Only paid products end up on this page where you have the shortcode.
– If the trans Id field says ‘FREE’ or ‘PAID’ (admin added), then these products will not be displayed in the DAPUSersSubscritpions page. This page will only show products that have a transaction associated with it (paid purchase).
– The product status is inactive.
– Manually added transaction
[DAPShowTransactions]
[DAPShowTransactions][/DAPShowTransactions]
1) You can use this shortcode to show ALL transactions (it’s just a dump of user’s transaction history. Shows every single transaction for the logged-in user). Currently only one transaction template is available (template1).
[DAPShowTransactions template=”template1″ showinvoice=’N’][/DAPShowTransactions]2) You can also use this shortcode to show an ‘invoice’ link per user order / transaction. When the users click on the invoice link, a new window will open where the invoice will be displayed in pdf format. You can set the DAPShowTransactions shortcode to use invoice template1 or template2.
The invoice pdf that opens up when the users click on the invoice hyperlink (View PDF) depends on whether the shortcode is set to invoicetemplate=template1 or invoicetemplate=template2.
PDF Example:
Shortcode with Invoice template 1:
[DAPShowTransactions template=”template1″ invoicetemplate=’template1′ adminemail=’joe@example.com’ companyname=’DigitalAccessPass.com’ showinvoice=’Y’ logo=’/home/mysite/mysite.com/wp-content/plugins/DAP-WP-LiveLinks/includes/transactions/invoices/template1/images/logo.png’ showinvoice=’Y’][/DAPShowTransactions]
IMPORTANT NOTE:
Make sure the “logo” field is set correctly in the shortcode. It should contain the FULL path to the logo image.
If you add logo image to a folder called images at the root of your site. Then the logo image should be set to point to the FULL path of this image.
For ex- /home/mysite/mysite.com/images/logo.png
If you do not know how to get the full path to a folder on your site, your webhost can help with it.
Shortcode with Invoice template 2:
[DAPShowTransactions template=”template1″ invoicetemplate=’template2′ adminemail=’joe@example.com’ companyname=’DigitalAccessPass.com’ showinvoice=’Y’ logo=’/home/mysite/mysite.com/wp-content/plugins/DAP-WP-LiveLinks/includes/transactions/invoices/template1/images/logo.png’ showinvoice=’Y’][/DAPShowTransactions]
Here’s the list of all shortcode options:
‘template’ => ‘template1’
– only valid value is ‘template1’
‘invoicetemplate’ => ‘template1’
– valid values are ‘template1′,’template2’
‘adminemail’=> => ‘joe@example.com’
– Admin Email displayed in the invoice pdf report
‘companyname’=> ‘Your Site Name’
– Company name displayed in the invoice pdf report
‘companyurl’=> ‘http://YOURSITE.com’
– Company website link displayed in the invoice pdf report
‘logo’=>’/home/mysite/mysite.com/wp-content/plugins/DAP-WP-LiveLinks/includes/transactions/invoices/template1/images/logo.png’
– Company logo
‘notranmsg’=> ‘Sorry, no transactions found’
– If there are no orders / payment transactions for the user, this message will be displayed
‘showinvoice’ =>’Y’
– if set to “N”, invoice column with hyperlink to the pdf report will not be displayed
Emailing Expired Users
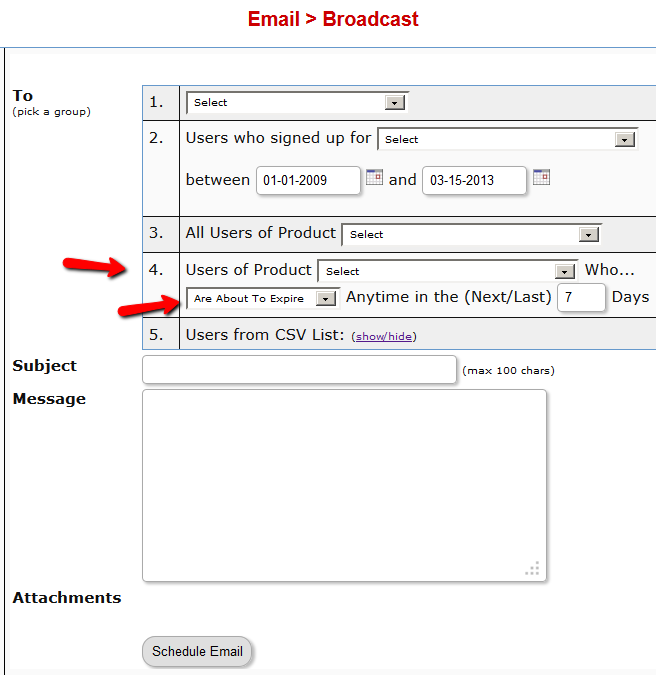
You can send an email broadcast to expired users of a product/level, on the DAP Admin > Email > Broadcasts page, by selecting Group #4.
The same feature works for sending emails to those who have “Cancelled” their subscription or trial.
Go to DAP Admin > Email > Broadcasts
Select Group #4.
1st drop-down: Select Product Name
2nd drop-down: Select “Have Already Expired”
3rd text field: Enter within how many days the users should’ve expired – as in, expired in the “Last X Days”
Once you’ve scheduled the broadcast, the emails will be sent out at the top of the hour when the DAP hourly cron runs.
Paypal Standard Upsell Plugin
Upsells, Downsells and OTO’s are now extremely simple to implement using the “Upsell Tree” plugin for DAP.
And this particular plugin works with Paypal Standard! Which means you don’t need a merchant account any more. All you need is a regular Paypal Standard / Business Account.
IMPORTANT: What you need before you can use this plugin
- You need a Paypal (Standard) Business or Premier account
- You must have SSL (secure server) enabled on your web site. Ask your web host to enable SSL for your site.
- You must have a working version of DAP 4.4.3+
- You cannot sell a “Recurring” product as an Upsell. Recurring products have to be the first product in the flow.
- Here’s what you CAN do: You can have a recurring product as the very FIRST product that they purchase (when they first click on the “Buy” button on your main sales page), and then you can offer any number of “One-Time” Products as upsells or downsells.
- Here’s what you CANNOT do: Offer a “One-Time” product as your first product that they buy, and then try to upsell them to a “Recurring” Product. Unfortunately, this is a Paypal problem at this time.
Installation & Setup of UpsellTree For Paypal Standard
- Here’s the steps to Install Paypal Upsell Tree plugin and the dap companion files.
- You need to be running at least DAP v4.4.3 for this plugin to work
- Login to your WickedCoolPlugins account and download the PaypalStandardUpsell.zip file, dapcompanionfilesforPUT.zip file from http://wickedcoolplugins.com/my-account/downloads/ page. If you do not have access to this plugin, please contact us via a support ticket and we will send you the right link to purchase the plugin.
- Go to WP admin -> plugins -> add new -> Upload tab -> select the PaypalStandardUpsell.zip file, click on Install, and after the plugin is installed, click on activate to activate the PaypalStandardUpsell plugin in WordPress.
- Download the WCP License plugin from your WickedCoolPlugins.com downloads area (http://wickedcoolplugins.com/my-account/downloads/ )
- Install and activate the WCP License plugin in WordPress (just like any other WP plugin).
- Make a note of your WCP license key (you will find it in your WickedCoolPlugins.com downloads area).
- Go to WP admin – > settings -> WCP license and enter the WCP license key (that you noted in step# 6 above).
- Also, unzip the dapcompanionfilesforPUT.zip file to your desktop (the one you downloaded in step #2), you will find a dap subfolder under it.
- FTP to you site, find the root folder of your site, and upload the entire dap folder to the ROOT FOLDER of your WEBSITE. When you do this, it will automatically overwrite the files in your DAP folder with the right version needed by PUT.
- Installation of Paypal Upsell-Tree Plugin is now complete.
- Here’s the steps to find the API info from Paypal.
- Next, log in to your Paypal account.
- Click on “Profile”
- Click on “Request API Credentials” (under ‘Account Information’ section). It will bring you to the API access page.
- Under Option 2, click on “Request API credentials” to create your own API username and password.
- Click on “Request API signature”
- Click on “Agree & Submit”
- Note down the following pieces of information:
* API Username
* API Password
* API Signature - That’s it as far as your Paypal account is concerned. Now back to DAP on your site.
- Here’s the steps to enter the Paypal API info in DAP config.
- Log in to your DAP Dashboard
- Go to “Setup > Config“. On that page, click on the “Paypal” link in the links towards the very top of that page (or scroll down to the “Payment Processing: Paypal” section).
- Enter the 3 pieces of information (from Step #13 above) into the Config fields 7, 8 & 9 on that screen: Paypal API Username, Paypal API Password, and Paypal API Signature. Cick “Update” and save the changes.
- This concludes the config changes in DAP.
- Here’s the steps to generate a WP based FINAL CONFIRMATION page. This is the page the users will land on when they have added all the items (main item, upsell items) to the cart and are ready to complete the final checkout.
- WordPress Based FINAL Confirmation Page for Paypal upsell:
-
- Create a NEW WP page.
- Click on the PUT Editor button in the WP admin – > Add New page -> Visual Tab. pick the options and complete the creation of this WP page.
- Lets say you call this page – confirmation.
- Publish this page.
- When your buyer reaches the final checkout confirmation page (/confirmation) then they can review all of the products in their “Upsell Cart”, and buy them all instantly and all together, without having to go back to Paypal ever again.
-
- Here’s the steps to generate the MAIN buy button:
In the DAP Dashboard menu, go to Payment Processing > Generate Buy Button
Please click on the ‘Paypal Standard Upsell’ tab. - STEP 1 – Select the DAP Product for which you’re trying to generate the buy button, from the Product list. NOTE: The very first product that you sell in the flow can be a recurring product or a one-time product.
- STEP 2 – Generate “Primary” Buy Button (initial/first payment button that triggers upsell). This will be the button that kicks off the full sales funnel. So this is your PRIMARY buy button. Fill in the text boxes for button generation and copy the generated button code to the MAIN SALES PAGE on your site.
- This concludes the MAIN PAYMENT BUTTON GENERATION.
- Here’s the steps to generate the Paypal Standard Upsell Buttons and No, Thanks button.
- PLEASE NOTE: YOU NEED TO FIRST SELECT THE PRODUCT THAT YOU WANT TO UPSELL. YOU CANNOT UPSELL A RECURRING PRODUCT BECAUSE OF PAYPAL API LIMITATION. YOU CAN DO UNLIMITED UPSELLS/DOWNSELLS. BUT THE PRODUCTS CAN ONLY BE NON-SUBSCRIPTION PRODUCTS.
- STEP 1 – in the button generation page… select the product that you want to UPSELL.
- STEP 3 – Please SKIP the STEP 2 (as step 2 is for PRIMARY button) and go to STEP 3. Follow the instructions on the button generation page, fill in the text boxes for upsell button generation and copy the generated button code on to the upsell page.
- To generate a No, Thanks. button, select the button type (STEP – 3) as No, Thanks.
- NOTE: On every upsell page, make sure to provide both AN UPSELL BUTTON as well as a ‘NO, THANKS’ button. WITHOUT a NO, THANKS button, the users cannot SKIP any UPSELLS.
- You can repeat step #35 through step #38 for all of your upsell pages. When it’s the last upsell button or if it’s a No, Thanks button that does not lead to any more upsells, then please set the
- Now when you set to NO, the button generation process will ask you to fill the URL of the FINAL CONFIRMATION PAGE. You can set it to http://YOURSITE.com/confirmation (replace YOURSITE.com with the name of your site). The URL needs to match the url of the confirmation page you created in step 28.
- VERY IMPORANT: Please sure that both the upsell button code as well as “No Thank You” link on the last upsell or downsell page, should point to /confirmation. Please set this during the upsell button generation.
On every upsell page, you must also include a “No, Thank You” button or link that will allow your buyer to skip your upsell or downsell, and go to the next part of the sale.
For all upsells that are not the last upsell, you can link this button or link to the next upsell in the chain. So basically, on Upsell 1, they can either take the upsell1 (whatever your offer is) by clicking on the buy button, or click on the “No, Thank You” button/link, and you could then either taken them to the URL of Upsell2, or Downsell 1, or if this is the last upsell in the flow, then you could send them directly to the Paypal Upsell Summary Page /Confirmation Page (WP-based confirmation page created in step 28).
That’s it.
While it looks like a LOT of steps, that is only because we have to explain the steps in detail so they are clear. In reality, it is very simple to set up, and starting from scratch, if you have DAP & SSL already installed, it shouldn’t take you more than 1/2 hour to set up your 1-Click Upsells/Downsells/OTO’s. And if you’re not using Upsells/Downsells, then it can be done even faster.
If you have any further questions, feel free to open a support ticket, and we will assist you in getting this going.
Clickbank Auto-Login
CB=>DAP Integration
When you integrate CB with DAP using this feature, the user will get auto-logged-in to dap upon purchase, and you can redirect users wherever you want after they are auto-logged-in. The users will get auto-logged when they hit the ‘Complete My Purchase’ button on the CB page after they complete purchase. But even if the users decide to abort and do not hit the ‘Complete My Purchase’ button, the great thing about this new feature is… DAP has a backdoor to make sure the user account gets created automatically (for successful purchase) and you do NOT have to handle the user creation manually.
So you are fully covered regardless of what the user/buyer does after the purchase as far as membership account creation is concerned.
Pls NOTE: DAP does not have this feature currently but we will make this feature available in DAP 4.5 (upcoming release of dap).
======================================
Users will get auto-logged-in to membership upon CB purchase.
1. Login to your ClickBank account
2. Go to the “Account Settings” tab at the top
3. Click on “My Site” from the sub-menu at the top.

4. Under Advanced Tools, update the Instant Notification Service URL (accept the terms of service etc), and make sure the URL points to:
http://YourSite.com/dap/dap-clickbank-6.0.php (Version 6.0)
Replace YourSite.com above with your actual domain name.
5. Whatever value you put in the Secret Key field in ClickBank (see image above), put the same value (must be ALL UPPERCASE) in to your DAP Admin Dashboard on your web site, at:
DAP Admin -> Setup > Config > Payment Processing > Secret Authorization Key used when interfacing with external systems
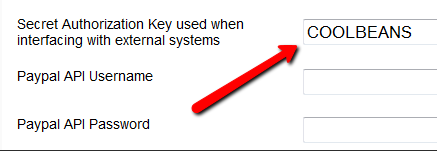
6. Create product in your CB account. Say the product name is ‘facebook secrets’. Say the product price is $47 (one-time).
7. Create same name (facebook secrets) product in DAP.
IMPORTANT: The Product Title in CB must match the Product Name in DAP.
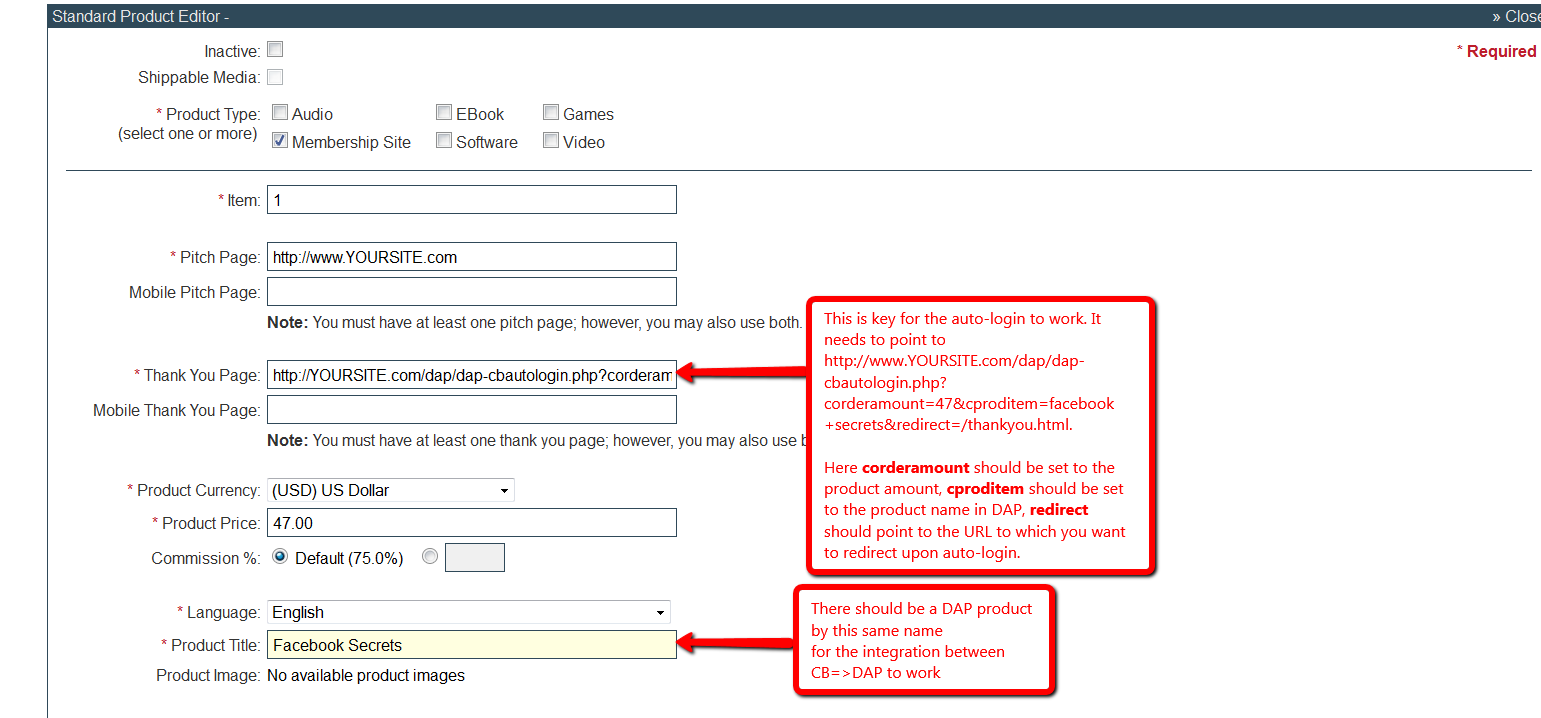
8. Set the CB Product => ‘Thankyou URL‘ to :
http://www.YOURSITE.com/dap/dap-CB-autologin.php?corderamount=47&cprodid=2&cproditem=facebook+secrets&redirect=/thankyou.html
The corderamount should be set to your product price in the thankyou url querystring.
The cproditem needs to be set to your CB product name (replace space with “+” in the name, for ex- “facebook secrets” will be “facebook+secrets”).
The cprodid needs to be set to your CB product ID.
Set the redirect tag to tell dap where to send the user after they are logged-in automatically. If you want to redirect to http://YOURSITE.com/thankyou.html, then set the CB thankyou URL to:
http://www.YOURSITE.com/dap/dap-CB-autologin.php?corderamount=47&cprodid=2&cproditem=facebook+secrets&redirect=/thankyou.html
9. Go to Clickbank -> Account Settings -> ‘My Site’ tab (https://CLICKBANKUSER.accounts.clickbank.com/account/site.htm)
Here you can generate test CC for test the auto-login.
11. For testing, visit the CB payment page (for ex : 1.pay.clickbank.net if your CB productID=1) and test using the test CC generated in step #10 above.
That’s it.
CreditStore FAQ
Question: Is there any way to adjust the image size of the items within the credits store? 60×90 is quite small.
Answer:
You can update it directly in the /wp-content/plugins/dapcreditstorefront/categories/html/1column/template.html.
Look for :
<input type=”image” src=”[REDEEMSRC]” align=”right” name=”[CHILDIDCREDITS]” id=”[CHILDIDCREDITS]” onClick=”purchaseChildProduct([FORMNAME], ‘[CHILDID]’, ‘[CREDITS]’);” value=”Redeem”>
You can try and add “width” and “height” attribute to it and see if it takes affect.
Paypal Standard Upsell Plugin
Upsells With Paypal Standard
Upsells, Downsells and OTO’s are now extremely simple to implement using the “Upsell Tree” plugin for DAP.
And this particular plugin works with Paypal Standard! Which means you don’t need a merchant account any more. All you need is a regular Paypal Standard / Business Account.
IMPORTANT: What you need before you can use this plugin
- You need a Paypal (Standard) Business or Premier account
- You must have SSL (secure server) enabled on your web site. Ask your web host to enable SSL for your site.
- You must have a working version of DAP 4.4.3+
- You cannot sell a “Recurring” product as an Upsell – recurring products have to be the first product in the flow.
- Here’s what you CAN do: You can have a recurring product as the very FIRST product that they purchase (when they first click on the “Buy” button on your main sales page, and then you can offer any number of “One-Time” Products as upsells or downsells.
- Here’s what you CANNOT do: Offer a “One-Time” product as your first product that they buy, and then try to upsell them to a “Recurring” Product. Unfortunately, this is a Paypal problem at this time.
Installation & Setup of UpsellTree For Paypal Standard
- You need to be running at least DAP v4.4.3 for this plugin to work
- Purchase the UpsellTree plugin if you haven’t already done so, login to your WickedCoolPlugins account and download the PaypalStandardUpsellzip file, PaypalStandardUpsell.zip .
- Unzip the file to your desktop. That will create a new folder on your desktop, called “PaypalStandardUpsellTree” which will have all of the files inside.
- Upload all the files inside, directly to your “dap” folder on your web site.
- DO NOT upload the folder itself. Just the files inside.
- Installation of Paypal Upsell-Tree Plugin is complete.
- Next, log in to your Paypal account.
- Click on “Profile”
- Click on “Request API Credentials” (under ‘Account Information’ section). It will bring you to the API access page.
- Under Option 2, click on “Request API credentials” to create your own API username and password.
- Click on “Request API signature”
- Click on “Agree & Submit”
- Note down the following pieces of information:
* API Username
* API Password
* API Signature - That’s it as far as your Paypal account is concerned. Now back to DAP on your site.
- Log in to your DAP Dashboard
- Go to “Setup > Config“. On that page, click on the “Paypal” link in the links towards the very top of that page (or scroll down to the “Payment Processing: Paypal” section).
- Enter the 3 pieces of information (from Step #13 above) into the Config fields 7, 8 & 9 on that screen: Paypal API Username, Paypal API Password, and Paypal API Signature. Cick “Update” and save the changes.
- Generating the Paypal Upsell Buy Buttons:
In the DAP Dashboard menu, go to Payment Processing > Generate Buy Button
You will now see that you’re on the default tab “Paypal Standard”. - So now select the DAP Product for which you’re trying to generate the buy button, from the Product list.
- Now, once the page has refreshed, scroll down to the bottom of this page, and you’ll see an expandable section with the heading “Paypal Standard 1-Click Upsells”
Expand that section by clicking on the “+” image. - You will see the following two links in that section…Generate Paypal Standard 1-Click Primary Button
Generate Paypal Standard 1-Click Upsell ButtonThe first one is for generating the buy-button code for your primary product (the very first product in the flow). The second one is for all upsells.So if this is the first time you’re doing this, and for your main product, click on the first link. - If all of your Product’s settings are correct, then you’ll see a small popup that contains the buy-button HTML code. Paste this code into a blank notepad (or text editor) window.
So let’s say this is what the code you got looks like…<form name=”generate_paypal” method=”post” action=”/dap/PaypalSetExpressCheckout.php”>
<input type=”hidden” name=”item_name” value=”Facebook Secrets Subscription”/>
<input type=”hidden” name=”description” value=”This is a Subscription Product with a monthly subscription – payments every 30 days.” />
<input type=”hidden” name=”amount” value=”10.00″ />
<input type=”hidden” name=”trial_amount” value=”0.00″ />
<input type=”hidden” name=”total_occurrences” value=”9999″ />
<input type=”hidden” name=”is_recurring” value=”Y” />
<input type=”hidden” name=”recurring_cycle_1″ value=”365″ />
<input type=”hidden” name=”recurring_cycle_2″ value=”365″ />
<input type=”hidden” name=”recurring_cycle_3″ value=”365″ />
<input type=”hidden” name=”payment_succ_page” value=”https://YourSite.com/dap/continue.php?url=/dap/upsell1-paypalstandard-sample.html” />
<input type=”hidden” name=”payment_err_page” value=”https://YourSite.com/dap/paymentError.php” />
<input type=”hidden” name=”payment_cancel_page” value=”https://YourSite.com/dap/cancel.php” />
<input type=”hidden” name=”payment_gateway” value=”paypal” />
<input type=”hidden” name=”is_submitted” value=”Y” />
<input type=”image” src=”/dap/images/btn_xpressCheckout.gif” align=”left” width=”200″ height=”50″ style=”margin-right:7px;” value=”Submit” alt=”Submit”> - Look at the payment_succ_page tag in the generated button code and have it point to your sales page for your upsell.In the above example, the upsell page is called upsell1-paypalstandard-sample.html and it’s under the dap folder. Put this HTML code on the primary product’s sales page. This is the first product in the flow.
- Say your upsell page is a static html page called upsell1-paypalstandard-sample.html and it’s under the dap folder.
Then set the payment_succ_page tag as shown below:
<input type=”hidden” name=”payment_succ_page” value=”https://YOURSITE.com/dap/continue.php?url=/dap/upsell1-paypalstandard-sample.html” />If you want to use a WP page/post as your upsell page and the URL of the page is say /upsell1-paypalstandard, then use this in the payment_succ_page tag:
<input type=”hidden” name=”payment_succ_page” value=”https://YOURSITE.com/upsell1-paypalstandard” /> - Now, you need to generate a button for your upsell product. So go back to Payment Processing > Generate Buy Button . This time, pick the Upsell product from the list.
- Now scroll down to the bottom of this page, expand the section “Paypal Standard 1-Click Upsells” , and this time, click on the second link there, because you’re now generating a buy-button for the Upsell product.Generate Paypal Standard 1-Click Primary Button
Generate Paypal Standard 1-Click Upsell Button - Say this is the button code you get this time…<form name=”generate_paypal” method=”post” action=”/dap/PaypalAddToCart.php”>
<input type=”hidden” name=”item_name” value=”Upsell 1″/>
<input type=”hidden” name=”description” value=”This is a dummy Subscription Product with a monthly subscription – payments every 30 days.” />
<input type=”hidden” name=”amount” value=”10.00″ />
<input type=”hidden” name=”trial_amount” value=”0.00″ />
<input type=”hidden” name=”total_occurrences” value=”9999″ />
<input type=”hidden” name=”is_recurring” value=”Y” />
<input type=”hidden” name=”recurring_cycle_1″ value=”365″ />
<input type=”hidden” name=”recurring_cycle_2″ value=”365″ />
<input type=”hidden” name=”recurring_cycle_3″ value=”365″ />
<input type=”hidden” name=”payment_succ_page” value=”/dap/PaypalCheckoutConfirm.php” />
<input type=”hidden” name=”payment_gateway” value=”paypal” />
<input type=”hidden” name=”is_submitted” value=”Y” />
<input type=”submit” value=”AddToCart” />
</form> - Now again, notice the payment_succ_page in the generated button code. You will see its pointing to /dap/PaypalCheckoutConfirm.php.
a) If this is NOT the last upsell, then update it to point to the url of the 2nd Upsell page (like we did for the primary product to point to the first Upsell sales page) and repeat the process above for the next upsell page.Bottom-line: Make sure that both the buy-button code as well as “No Thank You” link on the last upsell or downsell page, points to /dap/PaypalCheckoutConfirm.php
b) If this is the last upsell, then for the default / static FINAL confirmation page, leave it pointed to /dap/PaypalCheckoutConfirm.php. But if you want the confirmation page to be a WP based page (so it has the look&feel of your WP theme), then do step 29. If you want to use the default, go to step 30. - WordPress Based FINAL Confirmation Page for Paypal upsell:
- Create a NEW WP page. Lets say its called ConfirmationPage.
- Click on the PU Editor button as shown below, pick the options and complete the creation of this WP page.
- Publish this page.
- Instead of using the default /dap/PaypalCheckoutConfirm.php in the payment_succ_page tag, use /ConfirmationPage.
- When your buyer reaches the final checkout confirmation page (/ConfirmationPage. or./dap/PaypalCheckoutConfirm.php) then they can review all of the products in their “Upsell Cart”, and buy them all instantly and all together, without having to go back to Paypal ever again.
- Make sure that both the buy-button code as well as “No Thank You” link on the last upsell or downsell page, points to /ConfirmationPage (for WP based confirmation page) OR points to the default /dap/PaypalCheckoutConfirm.php
“No, Thank You” Buttons & Links
On every upsell page, you must also include a “No, Thank You” button or link that will allow your buyer to skip your upsell or downsell, and go to the next part of the sale.
For all upsells that are not the last upsell, you can link this button or link to the next upsell in the chain. So basically, on Upsell 1, they can either take the upsell1 (whatever your offer is) by clicking on the buy button, or click on the “No, Thank You” button/link, and you could then either taken them to the URL of Upsell2, or Downsell 1, or if this is the last upsell in the flow, then you could send them directly to the Paypal Upsell Summary Page /ConfirmationPage (WP-based confirmation page created in step 29) OR /dap/PaypalCheckoutConfirm.php
Creating a “No, Thank You” button
Button to take them to next Upsell/Downsell:
<form name=”nothankyou”>
<input type=”button” name=”nothankyoubutton” value=”No, thank you, I wish to skip this incredible offer” onClick=”location.href=’https://YourSite.com/dap/continue.php?url=/dap/upsell2.html‘;”>
</form>
Feel free to copy the above HTML button code for the no-thankyou button. However, paste it into a text editor and be careful and don’t delete any of the HTML code, and only change actual URL’s or the button’s value (which is the text your buyer will see on the button).
Button to take them to final Checkout Summary page (Default confirmation page)
<form name=”nothankyou”>
<input type=”button” name=”nothankyoubutton” value=”No, thank you, please complete my order” onClick=”location.href=’/dap/PaypalCheckoutConfirm.php‘;”>
</form>
Button to take them to final Checkout Summary page (WP based confirmation page)
<form name=”nothankyou”>
<input type=”button” name=”nothankyoubutton” value=”No, thank you, please complete my order” onClick=”location.href=‘/confirmationpage‘;”>
</form>
Creating a “No, Thank You” link
Link to take them to next Upsell/Downsell:
<a href=”https://YourSite.com/dap/continue.php?url=/dap/upsell2.html“>No, thank you, I wish to skip this incredible offer</a>
Link to take them to final Checkout Summary page:
<a href=”/dap/PaypalCheckoutConfirm.php“>No, thank you, please complete my order</a>
Link to take them to final WP based Checkout Summary page:
<a href=”/ConfirmationPage“>No, thank you, please complete my order</a>
That’s it.
While it looks like a LOT of steps, that is only because we have to explain the steps in detail so they are clear. In reality, it is very simple to set up, and starting from scratch, if you have DAP & SSL already installed, it shouldn’t take you more than 1/2 hour to set up your 1-Click Upsells/Downsells/OTO’s. And if you’re not using Upsells/Downsells, then it can be done even faster.
If you have any further questions, feel free to open a support ticket, and we will assist you in getting this going.

