Bounces and Invalid Emails
There are many reasons why an email is not delivered to the recipient.
- Auto-responses and Vacation Replies
- Email delivered to “Junk” or “Spam” folder of recipient
- General undeliverable emails with no error specified by recipient’s server
- Recipient email server is down or unreachable
- “Connection timed out”
- Recipient mail box full
- Recipient email address not found
- Temporary non-delivery (server will keep trying for a few more days)
- Your server IP is blocked by recipient’s ISP (“Relaying Denied”)
- Your server IP is blacklisted for suspected spam
And the list goes on!
That should give you an idea why email delivery is so tricky and complicated, which is what created a niche for the email delivery industry, and which is why companies like Aweber, MailChimp and GetResponse even came into existence and have thrived while charging a hefty fee for what you would think is the simple act of delivering email over the interwebs.
When you use DAP for sending out emails (whether autoresponder or broadcast emails), the “From Name” and “From Email” you set up in the DAP Config are used to send out the emails.
If you use your own web host as the “carrier”, then your web host’s email server is the one that carries the email and tries to deliver to the inbox of the recipient. And web hosts are generally not very good at the intricate science of email delivery, which is why if you’re going to use DAP, we recommend that you bypass your web host and have a third-party email system like Amazon SES deliver your emails.
Regardless of the carrier (web host, Amazon SES, AuthSMTP.com, etc), all bounced and undeliverable emails come back to the “From Email” that you have used under DAP Config.
DAP by itself does not do anything with those emails, as those emails don’t come back to DAP, but they go straight to the inbox of whatever “From Email” you have specified.
We will surely address this in the future. But for now, you will have to manually review those email bounces, see which one of them sound more serious (like, say, recipient email id not found, or domain no longer in use, etc), and then de-activate those email id’s from your DAP database.
When you use Amazon SES, Amazon by itself also monitors email id’s that have a consistent history of bouncing back, and will automatically suppress those email id’s and won’t even deliver email to those email id’s even if DAP did send the actual email to those id’s.
Custom Error Page-1
Problem
You try to visit a protected page that you’re not eligible to view, and don’t see the proper error message you are supposed to see.
Solution
- Create a custom error page in WP – like http://YourSite.com/error/
- In the body of that error page, enter something like this:
Sorry, you do not have access to this content.
If you are already a member, click here to login.
If you are not a member yet, then click here to get access. - In the above example, link the text “click here to login” to your DAP login page (eg., http://YourSite.com/login/). And link the “get access” text to your sales page.
- Then take this error page’s URL – which is http://YourSite.com/error/ – and enter it into the “Error Page URL” field of all DAP Products.
- Also enter this same URL into DAP Admin > Setup > Config > “Error Page URL (Global)”.
Save the changes.
Now, in a different browser, first visit your logout link – http://YourSite.com/dap/logout.php – so that the config changes can be reloaded. Now go back to that original protected page, and you should now be redirected to the above custom error page you created above.
Troubleshooting Hello World Post
Problem:
When you protect a page or post in DAP, and try to test whether the page or post is actually protected…
a) Instead of showing you a “Sorry…” message with the DAP padlock image, you instead see a “Hello World” post – or the content of some post completely irrelevant.
b) The formatting of the page appears messed up with missing menu items or post content.
Solution:
This has something to do with some special feature of either your theme or one of the plugins you are using, which is causing a conflict with the way DAP “replaces” protected content with an in-page error message that says “Sorry, you don’t have access to this content”.
The workaround for this is very simple.
- Create a new error page in WP – like http://YourSite.com/error/
- In the body of that error page, enter something like this:
Sorry, you do not have access to this content.
If you are already a member, click here to login.
If you are not a member yet, then click here to get access. - In the above example, link the text “click here to login” to your stand-alone DAP login page (eg., http://YourSite.com/login/). And link the text “click here to get access” text to your sales page, or wherever they can purchase your product.
- Then take this new page’s URL – which is http://YourSite.com/error/ – and enter it into the “Error Page URL” field of all DAP Products. And save all of the products as you make that change.
- Also enter this same URL into DAP Admin > Setup > Config > “Error Page URL (Global)”. Save changes to Config.
Now, in a new browser where you are not logged in as DAP admin or WordPress Admin, first visit the following logout URL:
http://YourSite.com/dap/logout.php
This is so that any cached URL’s will be flushed, and the DAP config will be reloaded.
Now, in that same browser window, go to any protected page, and you should now be automatically redirected to the above custom error page that you created above.
Redirect After Double-Optin Confirmation
If you are using double-optin for your DAP product, then you would normally have entered the text %%ACTIVATION_LINK%% in your email body, which is replaced by a unique confirmation link specific to that user.
Normally, when that activation link is clicked, the user is redirected to your login page configured under Setup > Config > Login URL.
But if you wanted them to be redirected elsewhere to a page of your choice, then in your double-optin email body, where you normally enter %%ACTIVATION_LINK%% , enter this instead:
%%ACTIVATION_LINK%%&redirect=http://link/to/landing/page/
Where “http://link/to/landing/page/” is the URL where you want them to be redirected to after they click on the double-optin activation link.
Affiliate Notification On Leads And Sales
Starting DAP v4.4, you can notify your affiliates with an automated instant email when they earn a commission for a lead and a sale.
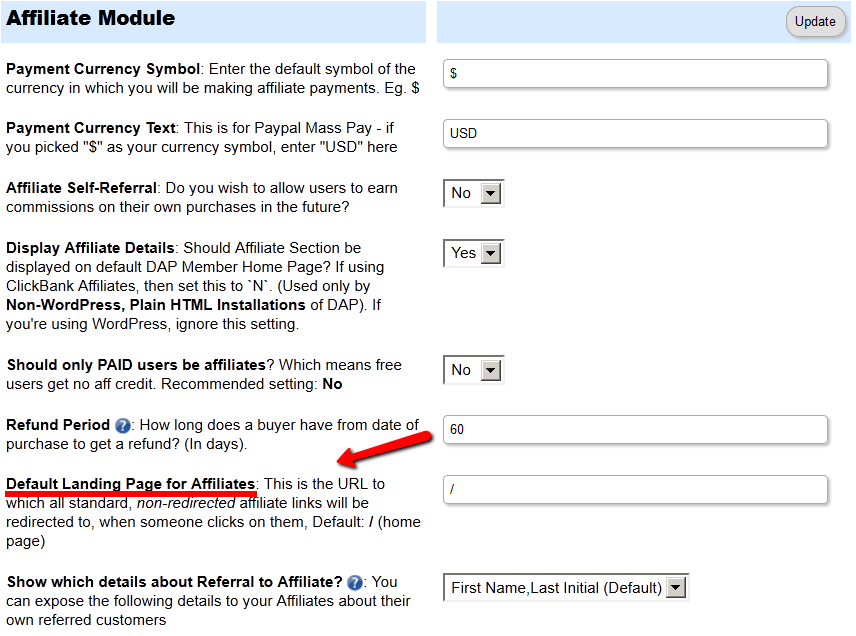
In DAP > Setup > Config > (Affiliate Module) you can separately configure which emails to send (Lead, Sale):
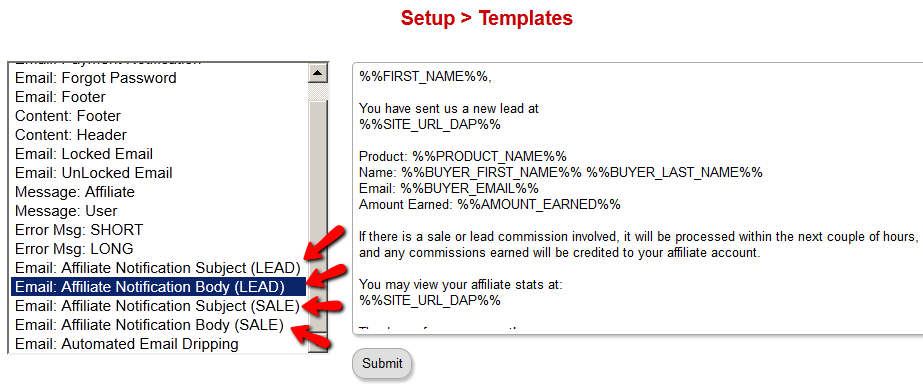
And then on DAP > Setup > Templates page, you can configure the Subject and Body for both emails.
Affiliate Link Landing Page
Your DAP affiliate link (for DAP on your site, for your affiliates) by default will take the visitor to your home page.
If you wish to point this default landing page to some other URL – like, say, your squeeze page at http://YourSite.com/squeeze-page/ – then you can change this default landing page URL setting at:
DAP Admin > Setup > Config > Default Landing Page for Affiliates
Please note that this will change the landing page for ALL “default” affiliate links – except those using special redirection.
So it will affect all default affiliate links that look like this:
http://YourSite.com/dap/a/?a=1234
But it will not affect affiliate links where they’re already setting a special landing page, like:
http://YourSite.com/dap/a/?a=1234&p=yoursite.com/some-cool-blog-post/
Affiliate Reports
DAP offers a number of affiliate statistics on the “Affiliates > Reports” page.
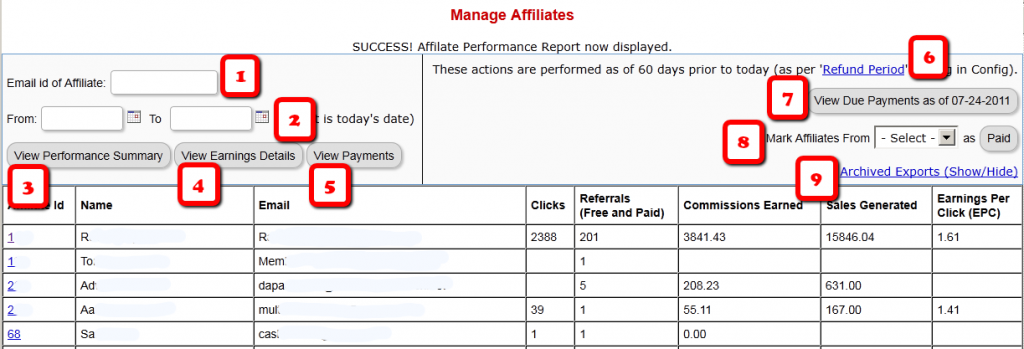
Here’s how it looks as of DAP v4.2.1.
1) Email Id of Affiliate
This is the field where you would enter the email id of an affiliate, if you want to generate a report specifically for an affiliate. If you leave it blank, the report will include all affiliates.
2) “From” & “To” Dates
By default, if you leave these fields blank, then DAP will assume “today’s” date – i.e., the date whenever you’re viewing this page.
3) View Performance Summary
This is the most detailed report available. This is the report being viewed in the above screenshot. For a given time period, for a given number of affiliates (“all” affiliates if (1) is left blank above), it shows…
- Affiliate Id
- Full Name
- Email id
- Clicks generated during selected period
- Referrals generated (includes total of both Free and Paid referrals): If the referred member actually bought something, it constitutes a “Paid” referral. If they simply signed up, say, for your free newsletter or free report or free product, then it is counted as a “Free” referral.
- Commissions Earned: This is the actual amount credited to the affiliate’s account during the selected period
- Sales Generated: This is the amount of the actual sale (purchase) generated for your membership site.
- Earnings Per Click (EPC): This is an indicator of how well your web site is converting clicks into signups/members. So if an affiliate sent you 100 clicks (on their affiliate link), and 5% of them signed up for your “FaceBook Secrets” membership product by paying $10 each, it means a total revenue of $10 x 5 = $50. And if you were paying 30% affiliate commissions for the product, then the affiliate earned $15 in total.Total clicks sent: 100
Total affiliate earnings from those 100 clicks: $15
Earnings Per Click (EPC) = $15/100 = $0.15 – which means, 15 cents per click.The higher the EPC, the easier it will be for you to attract other JV partners and super-affiliates.
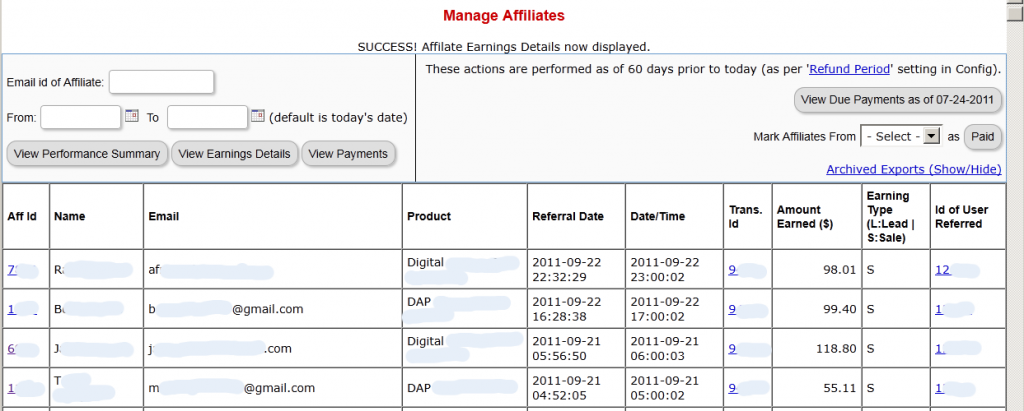
4) View Earnings Details
This shows the breakdown of each purchase referred by each affiliate. It’s a detailed view of the affiliate earnings, that lists each and every transaction (order) in the system that was referred by affiliates, all generated for the selected time period. It displays…
- Affiliate Id
- Full Name
- Email Id
- Product (name) that was purchased by referred buyer
- Referral Date (when affiliate was associated with buyer)
- Date/Time of actual transaction
- Trans Id: This is the transaction (order) id for the actual purchase
- Earning Type (L: Lead, S: Sale): Says what type of a commission credit it was – whether it was a “Pay Per Sale” credit or a “Pay Per Lead” credit.
- Id of User Referred: This tells you the actual user id of the buyer who was referred by the affiliate.
5) View Payments
This shows all payments made to affiliates during the period.
6) Refund Period
This is a config setting that you can change in Setup > Config. This is what drives which orders are picked up for affiliate payment. See this article for more details.
7) View Due Payments as of <date>
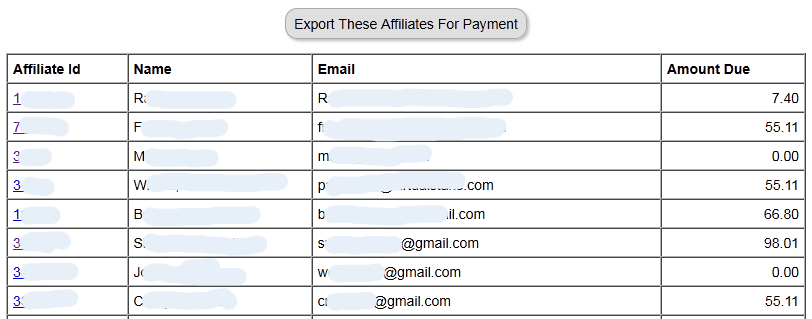
This is the MAIN button you should click to start the process of paying your affiliates each month (or however often it is that you pay affiliates). When you click this button, it will show you a report (see screenshot below) of commissions owed on all orders in the system UNTIL X days ago, where X is your “Refund Period”.
So if today is 10/01/2011, and you have a refund period of 60 days, then DAP will only consider orders prior to 60 days as of today. Which means, orders up to 08/01/2011 (of course, depending on how many days in a month, you may not exactly end up with 08/01/2011, because it goes an actual 60 days back from today – and sometimes, the report will stop at the 2nd or 3rd day of the month – like 08/03/2011. But that’s ok, don’t worry about it). You just focus on paying your affiliates on whatever day you wish to make the payment.
So when you click on this button, DAP will bring you a summary report of all affiliates, and how much they’re owed today, for all transactions referred by them as of 08/01/2011 (as per this example).
And when you click on the “Export These Affiliates For Payment” button shown in the screenshot above, DAP will select and mark those affiliates as being exported for payment.
And DAP will show you Paypal Mass-Pay Ready text report, with the affiliate info and the commission amount info already filled in and ready to go. If you’re paying via Paypal Mass-Pay, then all you need is this file. See this post for details.
NOTE: Being exported for payment doesn’t mean that you’ve actually paid them. Exporting affiliates for payment only means that DAP has now “set aside” those affiliates for payment, and you still need to tell DAP that you’ve actually paid your affiliates.
This is important, because you might export affiliates for payment on the first of the month, but it may take you a day or two (or 10) to actually make the payment – especially if you’re sending out Checks.
So once you’ve made the payment either through Paypal mass-pay, or by mailing your affiliates physical checks, then you need to tell DAP that you’ve actually sent out the payments, which is what you’ll do in the step below.
8 ) Mark Affiliates from <export> as Paid
This is where you will select the most recent export from the drop down (see #8 in first image at the very top), and click the “Paid” button. This is what actually lets DAP know that you’ve actually made the payment, and only after you do this, will the affiliates see the payment show up in the “Payments” section on their “Affiliate Info” page.
9) Archived Reports
This is just a report that shows you past commission payment exports.
The “Smart Login” Process
DAP has a very powerful, flexible and easy-to-use log in flow for your users and members.
- Log in from a dedicated log in page, or
- Log in from the login form on the side-bar (login/logout widget), or
- Log in through the log in form shown on “Sorry, you don’t have access to this content. Please log in first…” kind of error messages.
And we call it the Smart Login, because the login process will work differently under different conditions, all designed to make the user-experience for your member more smooth and consistent with general login standards around the web.
So let’s see the various possible login locations in DAP.
But first, it is important to note that DAP has two main types of logins.
Primary Login
This is where it is considered a “generic” login by your member. For eg., a member came to your web site, and then just generally wants to log in to the member’s area – so they have no “context” – it’s NOT as if they were trying to view a specific page or post, got challenged with a login form, and then logged-in from there. That makes this a “Primary Login“.
Examples of this are…
a) Dedicated Login Page: You have a dedicated login page, like http://YourSite.com/login/ – which is what you’ve entered in to “Setup > Config > Login URL“. The body of this page has the DAP merge tag for the login form, which is %%LOGIN_FORM%%
b) Login/Logout Widget on any page of your web site. This is also considered a primary login. The reasoning here is that if they’re logging in through a sidebar widget, it means that they just want to log in to the member’s area, so it is considered primary login.
Secondary Login
This is a login action that HAS “context”. Say, a member landed deep into your site (not the home page, not the dedicated login page) and were challenged by the “In Page Error Message” that says something like “Sorry, you must log in before you can view this content” and are presented with a login form right on that very same page. They were trying to read something before they were asked to log in first – which means, they must be returned to the same page they were trying to view BEFORE they were asked to login. So that makes this a “Secondary Login“.
Examples of this are…
a) Any custom “Error Page”, where you have inserted the DAP merge tag for the login form, %%LOGIN_FORM%%.
b) DAP’s “In-Page Error Message” which says “Sorry, this is private content – you must log in first before you can view this”.
c) Log in form showing up on a page when “Sneak-Peek” is enabled.
Redirection Rules
Based on whether it’s a Primary Login or a Secondary Login, your member will be redirected to a different location.
1) If it is a Primary Login action, then…
a) They’re taken to the “Post-Login URL” if set at a Product-level AND they have access to just one Product.
b) They’re taken to the GLOBAL “Post Login URL” (under Setup > Config) if you have NOT set anything at a Product-level, OR if they have access to more than one Product.
This scenario is the only one where the Post-Login URL is ever used (whether it’s the Product-level or Global-level).
1) If it is a Secondary Login action, then…
They’re always redirected back to the same page they were on (or were trying to access) before they were challenged to log in first to view the content.
Bottom-line:
Primary Login is predictable, and you (the DAP Admin) control where they go right after they login.
Secondary Login depends on “context”, and they’re taken back to whatever page they were on, before they logged in.
Secure RSS Feeds
Once you protect a post in DAP, you can …
a) Make it completely disappear from your feed except for authorized users who have valid access to the post and are using a member-specific RSS feed URL
-OR-
b) You can show a “Summary” of every post, by turning on sneak-peek and making sure you have inserted the “<!–more–>” tag entered into each of your posts.
Troubleshooting RSS Feeds
If your blog post is showing in its entirety in your feed, then….
1) You may not have protected the post in DAP at all, so it’s an unprotected post, which will (and should) show up in your feed
-OR-
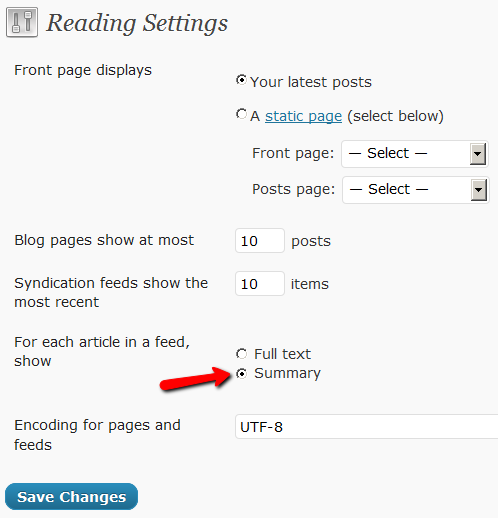
2) You have turned on Sneak-Peek and haven’t inserted the WordPress “more” tag (<!–more–>) into each of your posts. If you turn on Sneak-peek, then you must insert more tags into all posts. Also, if you have turned on Sneak-Peek, then you must also do this…
Go to “Settings > Reading” in WP admin, then set “For each article in a feed, show” to “Summary“.
If it is set to “Full text”, then it will show the full text in the feed, which is not what you want.
Custom RSS Feed Links For Members
Starting DAP v4.2, each of your members can now get their own unique RSS feed link that they can use with a feed reader (like Google Reader, FeedBlitz, iTunes, etc) to get a custom RSS feed with content that they’re eligible to view.
To give each of your members their own unique RSS Feed URL, just insert the following line of code into the top of the “Member Links” or “My Content” type page, or wherever you want your users to see their personalized RSS feed link…
If your blog is in the root…
http://YourSite.com/feed/?key=%%ACTIVATION_KEY%%
If your blog is in a sub-folder (say “/blog”)…
http://YourSite.com/blog/feed/?key=%%ACTIVATION_KEY%%
The text %%ACTIVATION_KEY%% in the above URL will be replaced with their own custom key, like…
http://YourSite.comcom/feed/?key=123456789
They can then copy that link, enter that into any feed reader, and it will show content specific to their account.
Custom Feed Link Security
Another useful feature we’ve added, is that the custom feed link also does IP count validation. So if they share the feed link with others, then after “X” unique IP login attempts (where “X” is configurable by you, the DAP Admin, in Setup > Config), their account will automatically get locked out.
Recommended Refund Policy
There really is no one-size-fits-all when it comes to refund policies.
There are so many factors involved. The main one being, that Visa/Master/Amex/Paypal all give a buyer up to 60 days to ask for a refund, at least with most merchants.
Unless you’ve already negotiated the refund terms with your merchant account provider, and have both specifically agreed that there would be no refunds (like say, if you were selling an expensive item, like a car, or a boat, or a service), or that it’s only going to be a 30-day refund period, then you really have no control over the refund period. You just have to comply with at least the mandatory 60-day refund period required by the credit card companies.
So that brings us to the question:
How much should you set your refund period to be within DAP?
Now remember, it is this Refund Period setting (under Setup > Config > Advanced) that also makes affiliates eligible for payment.
So it really comes down to the question:
What is the waiting period for an affiliate to get paid for a referral?
Our recommendation: 60 days.
That’s because if you end up paying too soon (say like within 15 or 30 days), and then the buyer comes back and asks for a refund, now you’re out-of-pocket for the affiliate commissions that you have already paid on a purchase that you just refunded.
Now remember that when you do the actual refund within DAP, DAP will roll-back any commissions credited towards this purchase. If you have not yet paid your affiliates, then in the next report, it will ignore the refunded purchase, and will not calculate commissions on that purchase.
But if you have already paid your affiliates (like within 15 or 30 days after purchase), then DAP will include the negative commission in the next pay-period’s report. And any future commissions earned by this affiliate will be accordingly adjusted.
However, if the affiliate doesn’t refer any more members, then you have two choices at this point:
1) Ask the affiliate to pay back the over-paid commissions
2) Just swallow the loss, write it up to the cost of doing business, and move on.


