Author Archives: DAP Admin
Author Archives: DAP Admin
Go to “DAP Admin > Templates”.
The header/footer (for the member’s home page), and almost all the emails that are sent to the user, are customizable using this screen.
Just select the template you wish to modify from the menu on the left, make the changes, and save it.
That’s it!
The following is relevant to you only if you are “Upgrading” DAP from an earlier version. (What’s new in 2.0? )
Here’s how to upgrade to the new version:
1. Download the zip file (from your member home page) and unzip to desktop. You should now see a folder by name “dap” on your desktop.
2. OVERWRITE the contents of your current “dap” folder on your site with the contents of the new “dap” folder on your desktop.
3. Visit the following link and login as admin:
http://YourSite.com/dap/ and follow the instructions on your screen.
NOTE: Replace YourSite.com with your actual domain name.
That’s it!
By default, none of the posts or pages you have protected in DAP will be visible in any of the WP menus (not even in custom menus).
Which means, as far as your visitors (or search engines) are concerned, those posts/pages don’t even exist in your blog – until the content “drips” on them.
Some DAP users want it that way, and some don’t.
Also, from an SEO perspective, if your visitor (who is not a member, and one who is not logged in) can’t even see the post, then neither can Google. This means, if you do a blog-and-ping, when Google arrives at the permalink of your new post, because the post is protected, DAP will redirect Google to your login page. This means, you don’ get the benefit of SEO for your new post.
Also, from a “Curiosity” standpoint, if you protect all of the posts, then your visitor will only see a handful of non-protected blog posts, and logged-in members will see only content that has already dripped on them (accessible to them).
Giving them a “sneak-peek” of the protected content is a great way to get them excited about your content.
So for example, you could have a blog post that talks about a video, and goes into detail about everything that they can learn from watching the video – but the content ends just before the video, and where the video would’ve normally appeared, there appears a “Login Form” that asks them to login first before they can view the content, or purchase access if they wanted to see the video.
How to turn on Sneak-Peek
Go to DAP Dashboard > Config > WordPress Sneak-Peek
It is set to “N” (no) by default. Change this to “Y” and click on the “Update” button to save the change.
And then when they click on the “more” button to read the rest of the post, the full post is protected anyway, and they are presented with a login screen.
As soon as you turn on Sneak-Peek, DAP will show all content from your blog posts, but only up to the “More” tag. This means, if you don’t have a “More” tag in any of your content, then all of your blog posts will show to all users, regardless of whether they have access or not.
So, the most important thing here is this:
SNEAK-PEEK and MORE are INSEPARABLE.
If you do sneak-peek, you MUST include a “More” tag.
So when you create a WordPress blog post, split the post into two parts using the “More” tag. This creates a “public preview” portion of the actual post, that shows up on your blog’s home page and in the permalink when that post is displayed. To read the rest of the post, your visitor has to click on the “More” link, and that’s when depending on whether the user has access, the rest of the post will be displayed.
Once you install this plugin, when someone visits your blog, they will ONLY see posts that they are “eligible” to view. This applies to your blogs main page as well.
So, if a casual visitor arrives at your blog, they only see titles and their summaries for posts that have NOT been protected (not added to DAP at all).
For instance, if you have 100 posts, and have protected 95 of them, then on your blogs home page, this visitor will see only 5 blog posts – titles and summaries – in TOTAL.
They wont even see the titles or bodies of the protected posts. And if they somehow get the link to it (from someone else, by email, say) and try to visit it, then the existing DAP protection kicks in, and theyre asked to login first to determine if they have access to that post “as of now.
But once this same visitor logs in, all blog posts that were HIDDEN earlier MAGICALLY re-appear ![]() And they see all posts that they are CURRENTLY eligible to access (this excludes posts to which access already expired, and posts to which they dont have access YET – i.e., future availability).
And they see all posts that they are CURRENTLY eligible to access (this excludes posts to which access already expired, and posts to which they dont have access YET – i.e., future availability).
If you want a certain portion of even your protected posts to always show up, even if the user is not eligible to see the post, see DAP “Sneak-Peek”.
This plugin lets you do two other things:
1) You can PERSONALIZE blog post titles and content with MERGE variables.
So, if you create a blog post with the title “Welcome %%FIRST_NAME%%“, then when your member logs in, they will see “Welcome John“.
Available merge variables;
%%FIRST_NAME%% – Gets replaced with their first name
%%EMAIL%% – Gets replaced with their email
%%MEMBER_HOME_PAGE%% – Gets replaced with the ‘login’ page
2) You can also put the Login Form on any WP “Page”.
Q: I just made a test purchase. But DAP did not process the payment (or) did not add me as a member (or) is not creating a new member.
Make sure that the product name within DAP and the product name in your “buy” button (i.e., your shopping cart) are EXACTLY the same. Don’t just look at the two and say, “oh yeah, they’re the same”.We recommend “copying” the product name that you set up in DAP, and then “pasting” it when creating your “buy” button. If you are using Paypal, then this is the “Item Name” when you are creating your Paypal “buy” button. If you are using 1ShoppingCart, then this is the “Product Name” when creating a new product.
(Paypal users, skip ahead)
1ShoppingCart/ClickBank:
1) Make sure you have set up the “Email Order Processing” correctly.
2) Is your Cron Job dap-emailorder.php set up and running correctly?
3) Make sure you have not “removed” the 1Shoppingcart or ClickBank payment notification email from your server. Log in to your email server, and make sure that the email is still there, and also it needs to be “Unread”. If your email client (like Outlook or Thunderbird, or Gmail) already accessed it and marked it as read, then simply mark it unread, and the next time DAP runs (which should be in 10 minutes) it will pick up the email and process it.
Paypal Users:
1. If you are using Paypal IPN, then make sure you have enabled IPN within your Paypal account.
2. Make sure you put the correct IPN “notify_url” text in your button.
3. Make sure the Paypal button you set up is a “Buy Now” or “Subscribe” or “Add to Cart” button.
Also see these troubleshooting guides:
The flow of subscriber in this model, is “FROM DAP TO Aweber“. User signs up at DAP first, then DAP adds her to Aweber.
If you are looking for the other way, i.e, “FROM Aweber TO DAP”, then click here.
When DAP adds a subscriber to your Aweber list, it can currently “send” only the user’s Name and Email address to Aweber. DAP cannot (and does not) send the user’s unique password in DAP, or their affiliate id, etc. If you want Aweber to send out the password, then here’s how you can do it.
With the “DigitalAccessPass.com” Aweber Email Parser, integrating DAP with Aweber is a total breeze.
1. Login to your account at Aweber.com and from the “Current List” drop-down, pick the list to which you want DAP to add users to.
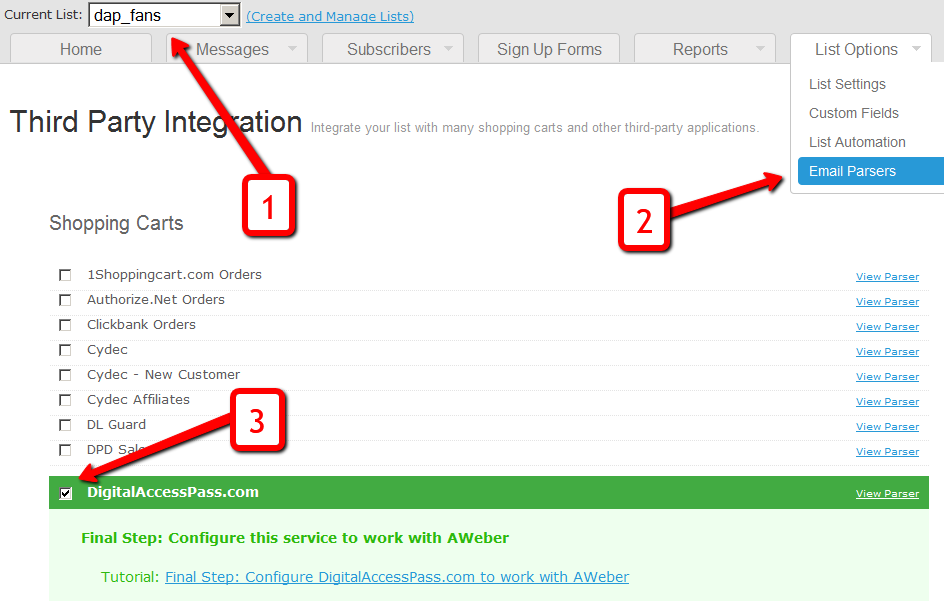
2. Click on “List Options”, and from the drop-down, select “Email Parser”
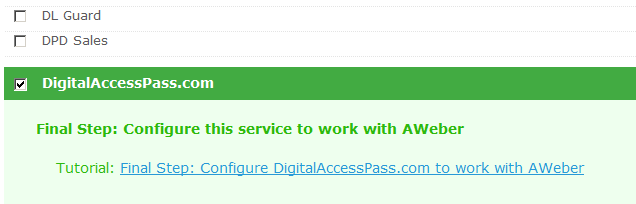
3. On the Email Parsers page, select the check-box next to the “DigitalAccessPass.com”
That’s it for the Email Parser activation at Aweber. You will be shown something like the image below – but note that there is no “Final Step”. So nothing further to do on this Aweber page.
4. Log in to your DAP Admin Dashboard and pick the product (whose members you wish to add automatically to your Aweber list from step 1 above)
5. Go back to Aweber and select the right list. Then, under List Options > List Settings, under “Basic Information” section, you’ll see “List Name” and right below that, you’ll see “Unique List ID“.
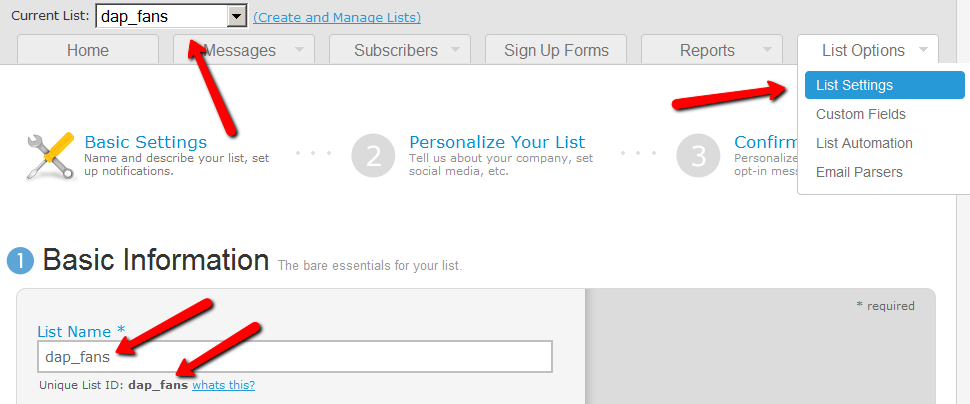
Add the text “@aweber.com” to the end of that text – that now becomes your “Aweber List Email”. So if your list’s unique list id is “dap_fans”, then your Aweber List Email becomes “dap_fans@aweber.com”.
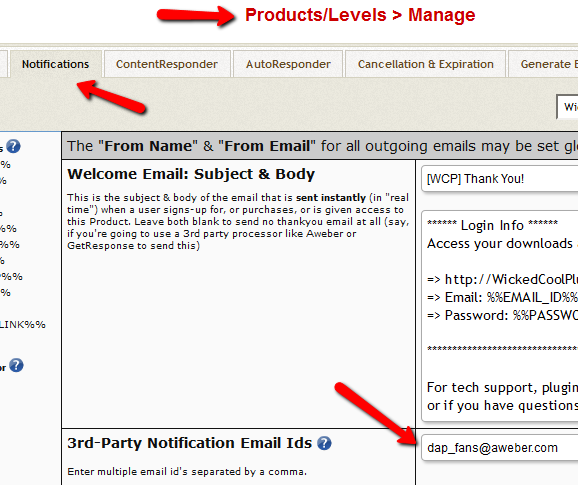
Copy this, go to the DAP Products > Manage page, and under the “Notifications” tab, add this Aweber List Email to the “3rd Party Notification” field, and save.
That’s it!
So let’s say you picked the list “dap_fans” in your Aweber account, and the DAP Product “Example Subscription Product” (as shown in the screenshots above).
So once you add “dap_fans@aweber.com” to the product’s “3rd Party Notification Email Ids” field and save it, every time someone gets access to the “Example Subscription Product” product (regardless of whether they buy it, or you give them access on the backend), an email is sent out to the email id dap_fans@aweber.com , which looks like this:
From: Joe Subscriber <joe@subscriber.com>
Subject: New User Signup (3rd Party Notification)
Body:
Name: Joe Subscriber
Email: Joe@Subscriber.com
Product: Example Subscription Product
And because you have already activated the DigitalAccessPass.com parser in your “dap_fans” list, Aweber automatically adds “Joe Subscriber” with the email id (Joe@Subscriber.com) to your dap_fans list. And the parser has been written in such a way, that the product name will be used as your “Ad Tracking” field for the subscriber. So you will be able to group them and run reports on them in your Aweber account.
A: Short answer: No. Aweber doesn’t have a “Remove” parser, only an “Add” parser. So if someone who DAP automatically added to your Aweber list when they purchased a product, cancels or asks for a refund, you will have to manually remove them from the Aweber list. But wait, this may not be such a bad thing after all.
ExtraTip: As soon as someone cancels their subscription (or just doesn’t pay, or their credit card is declined), then their membership account in DAP automatically expires. Which means they can no longer access any content (unless you have specifically set DAP Config to deliberately give ex-members access to content that they paid for previously when they were a member).
So that means, their access in DAP has expired, but they are still on your Aweber list.
This may not be bad, because if you keep sending them emails (through Aweber) about new content and new videos and new stuff you are adding to your membership site even after they’ve cancelled, when they come back to your site through the link in your email, they won’t be able to access the actual content.
So it’s a great way of continuing to keep even ex-members curious and coming back to the site, only to be presented with a “Sorry, you don’t have access to this”, which may be a great incentive for them to come back and join your web site.
Of course, for this to work, you must put all the key content on your web site, and use the emails just to get them curious about the content, and eventually bring them back to the site to deliver the content. However, if you are going to send out all the good stuff in your emails (which doesn’t make sense anyway) then this may be an issue for you.
The link is really between the DAP Product and your Aweber List. So regardless of who gets access to that product – for free, by paying, or admin added – they will automatically be added to your Aweber list. So if you don’t want your free members to be added to your Aweber list, then keep your “Free” products and your “Paid’ products separate, and don’t set up this integration for the Free products.
For paid products, here’s the flow:
Payment Processor (For ex – Paypal) == > DAP ==> Aweber
1) User pays via Paypal.
2) Paypal notifies DAP (ofcourse you need to integrate Paypal with DAP first either using Paypal hosted buttons (http://www.digitalaccesspass.com/doc/setting-up-your-paypal-button-and-paypal-ipn/) or using DAP generated button for paypal (http://www.digitalaccesspass.com/blog/2010/12/dap-v4-0/).
3) If the Paypal payment was successful, DAP creates the membership account and sends out the thankyou email to user with their membership login info (you can configure thankyou/welcome in the DAP products page).
4) In the DAP products page, you can select the product and set the Aweber list name in the 3rd party notification Ids field. In this field, you can specify a comma-separated list of email Ids.. one of the email ids can be your Aweber list email i.e. mylist@aweber.com
5) After DAP adds the user to purchased product, it sends out notifications to all email Ids listed in the 3rd party notification id field for that product.
Here’s more info on how to integrate DAP -> Aweber for paid products. Make sure to login to your Aweber account, Click on “My Lists†and within that, select “Email Parserâ€Â. On the Email Parsers page, check the check-box next to the parser named “DigitalAccessPass.com†as described above in this post.
First Name: Veena
Last Name: Prashanth
Email: veena@digitalaccesspass.com
Product: Digital Access Pass with WP LiveLinks
Use the “File Browser” on the “Products/Lists” page to browse through a folder on your web site, and next to each file, you will see an “Add” link. Clicking on that link will add that file to the product.
1. Are you already logged in a a user who has access to that link? Maybe logged in as DAP Admin, and that is why you are able to access the link? If so, either log out of DAP, or visit your blog in a completely new browser (if you’re logged in as DAP Admin in FireFox, then visit your blog using Internet Explorer).
2. After you set up DAP, did you visit the “Permalinks” section and click on the “Save” button at least once (even if you didn’t make any changes to your permalinks structure)?
3. Have you added the blog post to a Product? If you don’t add it to a DAP Product, the post or file won’t be protected.
Yes, absolutely!
See Protecting An Entire WordPress Category.
Make sure you have “Sneak-Peek” turned off in the DAP Admin Config section. Once you do that, posts that are protected will not be displayed on the home page as well as if someone tried to visit the link directly.
(OR)
On looking at the Error Console of the browser it shows the error”Error: missing ) in parenthetical”
Source File: http://www.yoursite.com/dap/admin/addEditProducts.php?productId=1
Line: 29, Column: 8
Source Code: (Unable to open ../../../AdminSorry, too many files being returned. Please use filter to reduce the number.)
Answer: Those are all symptoms of the same issue: Too many files to load in the little “file browser” section, and DAP is timing out.
If you know the path to the file, then just form the URL directly in your text editor – like…
http://www.yoursite.com/wp-content/uploads/interview.mp3 (example)
Visit the link to make sure that there is no typo in the URL, and make sure that the file is there for download (you’ll see the “Download or Save as” popup).
Then simply paste that URL into the Add URL field and protect it.
See “Minimum web-hosting requirements”
See this post for more details about errors .
DAP can process Paypal payments using Paypal IPN (Instant Payment Notification). All you need to basically do is to enable IPN within your Paypal account and create your Buy button with a few extra parameters. It’s all explained below.
So here’s what you need to do to process orders through Paypal using IPN, and have your buyers automatically added to DAP on your site.
Follow this post to enable IPN first, and then come back here to this post.


On the Create New Button Page:
1: Choose any one of the following button types based on the type of product you wish to sell.
* Shopping Cart (for multiple-item purchases)
* Buy Now (for one-time products)
* Subscriptions (for subscription-based recurring products)
2: After selecting the button type, enter item name and price.

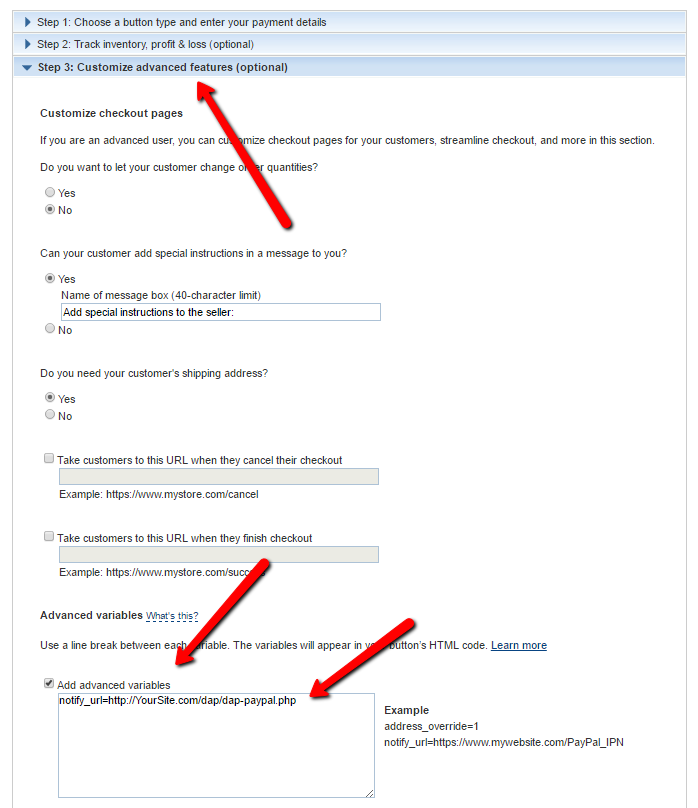
Under “Step 3: Customize advanced features (optional)” tab, within the “Advanced Variables” text box, enter the following (change the text YourSite.com below to your domain name).
notify_url=http://YourSite.com/dap/dap-paypal.php
4. Copy the HTML code for this button
5. Publish the code on your web site’s sales page
..or WP page or post.
That’s it!
So when someone subscribes to, or purchases your product using this button, Paypal will send an IPN notification to your web site to the above link. DAP will then verify the product and payment status, and then will automatically add give the buyer/subscriber access to that product.
If the email id used in this purchase is not already associated with an account on your site, then DAP automatically creates a new account, and sends the buyer an “activation” email that requires them to click on a link to confirm and activate their account.
But If this email id belongs to someone who already has an account in DAP (existing buyer, purchased a different product this time), then DAP doesn’t create a new account for this user. It simply gives the existing account access to this new product.
So when the user logs in, they will see that they now have access to TWO products, with each product and the available URL’s listed separately.
Note: If you’re going to be using Paypal to process payments, then you don’t need to set up the Email Processing info in your DAP Admin > Config > Payment Processing screen. You don’t need to set up the DAP Email Order cron job either.
Nah, just kidding 🙂
Contrary to popular belief, or what some people would have you believe, web sites – especially “membership” sites – cannot run themselves. Nor will they keep going on autopilot for ever while you “relax at the beach”. Whoever said that to you, has never owned a web site.
Running a regular web site takes time and effort. Running a membership site can take more time effort, because you also have something called “customer service” and “billing” involved.
While DAP will make your life a lot easier, by putting a great deal of automation at your fingertips, there are still a few moving parts that need to be considered.
First, there web host related issues – like web hosts not having the required libraries or running outdated software, web hosts randomly disabling required libraries (like PDO or JSON) months after you have launched your web site, email server issues, payment processing issues, database issues, web site not being available because of a hacker-attack, your server crashing and causing files and data to go missing, and so on.
Then there are the “User” errors. People do all kinds of things – intentionally or unintentionally – like overwriting or deleting files, deleting databases, entering incorrect database settings, setting up their cron job incorrectly, deleting their cron job settings by mistake, putting the files in the wrong directories, incorrectly uploading files, not uploading the right files – you get the point.
To help with many of these issues, we offer free installation, so we can take all of the hassle out of your hands, even if it means we spend more of our time upfront on your purchase.
But even after doing that, it’s not like things will just continue to run themselves for ever and you can walk happily ever after into the sunset.
People change web hosts, change domains, move servers, move databases, move or rename wordpress installations, install new plugins that may break old plugins, upgrade old plugins that may break new plugins, upgrade to a newer version of WordPress that could break old and new plugins alike, delete plugin files by mistake, etc. Yup, we deal with a number of such “duh!” moments from site owners every other day 🙂
Just the task of managing so many moving parts itself can be a daunting task at times.
So it is critical for your business – and for your peace of mind – that you have reliable, accessible, helpful tech support. Especially when the whole idea of launching a membership site is because you’re hoping that it will become your primary source of income (or at least add a big chunk to your existing income).
Your membership site is your cash cow. Which is why you get Unlimited free tech support via our ticketing system for free for 6 months. During this time, you also get unlimited software updates & upgrades for free.
Free Support means we will answer any questions you may have about using DAP. We will point you to the right documentation for troubleshooting tips. If we are unable to resolve it via the ticketing system, we may optionally (at our discretion) work with you one-on-one via skype or gotomeeting.
But if it requires logging in to your web host to troubleshoot issues, then depending on the complexity of the issue (“I just moved my site to a new host and now nothing is working”), we will have to charge you for premium support.
There may be occasions when you need support right away, need more personalized support or hand-holding, or simply don’t have the time or patience to resolve it via our ticketing system. Or you did “something” and need us to log in to your server and troubleshoot.
In that case, we can work with you 1-on-1 via skype, phone or gotomeeting, for a premium support fee of $45 for 1/2 hour, or $90 per hour. You may need to schedule this in advance depending on our support resources available.
The first thing to note, is that the DAP license never expires. So once you buy a copy of DAP, you can use it for life, on as many sites as your license permits you to (like 1-site, or Unlimited-sites), without ever having to pay us a single penny ever again.
So DAP is really a one-time purchase.
When you first buy DAP, you automatically get 6 months of free Software Upgrades & Support. During these 6 months, you get unlimited access to support via our ticketing system, plus you also get to download all new versions of DAP we release during this time.
That said, there’s also the subject of ongoing access to new versions of DAP as and when they are released, as well as ongoing support.
If you see our release history, you will see that we are constantly updating DAP by adding new features, as well as enhancements to existing features. Plus we are very proud of our “FANATIC’nical” support. All of that takes a tremendous amount of time, money and resources.
So after your first free 6 months, any time you want access to support or the newest version of DAP, then there is a small renewal fee, which gives you access to yet another 6 months of free support & upgrades.
Now please note that this is not a forced continuity or subscription.This is a voluntary purchase, and nothing will be charged to you automatically. And you don’t have to renew right away after 6 months. You need to upgrade only IF and WHEN you need access to the latest versions of DAP, as well as support.
Click here to renew your access to DAP Software & Support.