Author Archives: DAP Admin
Author Archives: DAP Admin
OTO’s are now part of DAP. And they’re available for free to all DAP users.
This OTO script can also be used for making Upsells and Downsells too!
Only thing you have to remember is, that these won’t be 1-Click Upsells or 1-Click Downsells. If you want true 1-Click Upsells, then do check out our plugin, Upsell-Tree, which allows you to do exactly that.
When you set up your buy button, after the sale, configure the “return url” to be:
http://YourSite.com/dap/continue.php?url=/upsell1.html
Of course, you should have already created a page called upsell1.html and uploaded it to the root of your web site (where your home page is).
So after your buyer has purchased your product, and arrive at this first upsell page, the URL they see in their browser will actually look like…
http://YourSite.com/dap/continue.php
They will not see the text “/upsell1.html” in the url, because continue.php would have already stripped out the file name from the end of the link.
So even if they bookmark it or share it with others, the URL they see will just be http://YourSite.com/dap/continue.php – which means they can’t get back to that page, and neither will the people they have shared the link with.
On each upsell page, you can make any offer you want. Let’s say you put the buy button on this upsell page to buy a different product. Now when you create the buy button for this new upsell product, make sure the “return url” for that button, is now…
http://YourSite.com/dap/continue.php?url=/upsell2.html
And you can also put a “No Thanks” button on each of these upsell pages, which could in turn take them either to a downsell page, or to an order completion page (where you thank them for your purchase).
If your “No Thanks” button is going to lead to a downsell page, then here’s the code:
<form action=“http://YourSite.com/dap/continue.php?url=/downsell1.html” method=”post” >
<input type=”submit” value=”No, Thanks. I’ll skip this special offer” />
</form>
If your “No Thanks” button is going to lead to a final thank you page, where there are no more upsells or downsells, and where you simply thank your buyer for the purchase, then the code for that is:
<form action=“http://YourSite.com/dap/continue.php?url=/thankyou.html” method=”post” >
<input type=”submit” value=”No, Thanks. I’ll skip this special offer” />
</form>
Yes, you do need to be just a little bit technical for this. So, if you absolutely did not understand anything written above, then you should probably not be attempting to be doing OTO’s.
But if you simply have questions about how to use this for what you’re thinking to do, please feel free to ask them in the comments below.
– Ravi Jayagopal
IMPORTANT: PLEASE NOTE
The latest version of Paypal Payments Pro (called PAYFLOW) is not compatible with DAP and Recurring Billing Cycles, You will have to open a Paypal account with the older version of their Payments Pro Merchant service that is compatible with DAP. Please make sure to use the older version of PPP which has to be specially requested through their support team. In a future DAP release, we will make it compatible with the new version of PPP.
Please read this for more on Payflow and Paypal Payments PRO :
http://www.digitalaccesspass.com/forums/threads/1044-Recurring-transaction-failed-in-paypal?highlight=payflow
This post includes information about generating buy buttons for Paypal Website Payments Pro. It also has information about setting up 1-Click Upsells.
Even if you don’t wish to do upsells, you should follow the setup instructions in this page, for integrating your site with Paypal Website Payments Pro .
a) Log in to your Paypal account and click on the “Profile” link.
b) Go to Instant Payment Notification
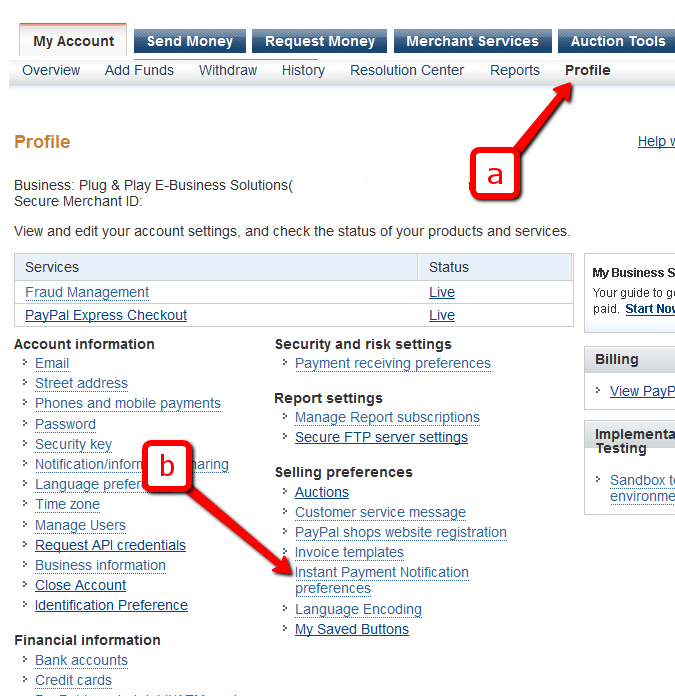
c) If IPN is already enabled, and you already have a URL in that field, then skip ahead to Step 2.
Else, if IPN is not already enabled, then click on “Choose IPN Settings”
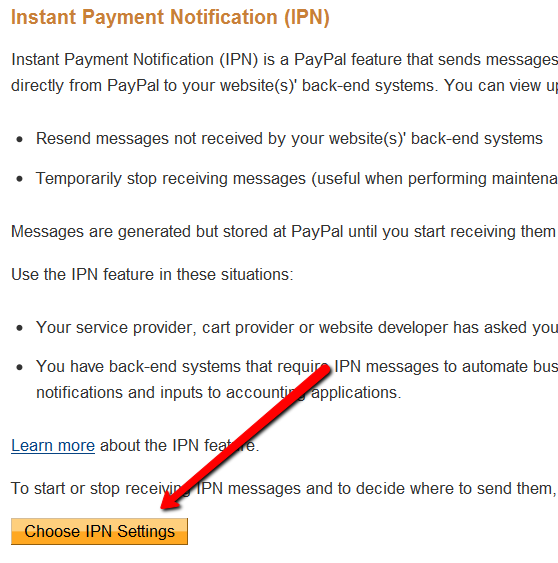
d) On the next screen, in the Notification URL field, enter…
http://YourSite.com/dap/dap-paypal.php
Don’t forget to replace “YourSite.com” with your actual web site’s domain name.
e) Make sure “Receive IPN Messages” is selected.
f) Click on “Save”.
Log in to your Paypal account.
Go to Profile.
Click on Website Payment Preferences
Turn Auto Return to On (see image below)
Set Return URL to http://YourSite.com/dap/dap-thankyou.php
Scroll down further to the Payment Data Transfer (optional) section
Set Payment Data Transfer to On
Scroll all the way to the bottom of the page, and then Save the changes.
You will now see a green check mark image, with a long string of characters on line 2. That is your Paypal Identity Token. Copy that string.
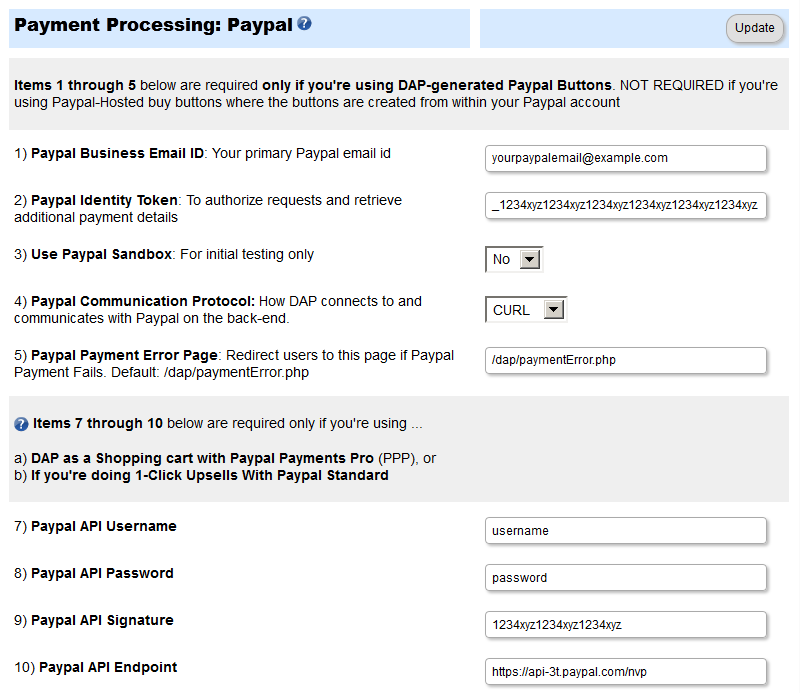
Go back to DAP Dashboard > Setup > Config > Payment Processing > Paypal Identity Token field, and enter this string there, and save it.
 The current page will then skip to the “Payment Processing: Paypal” section about half-way down the page.
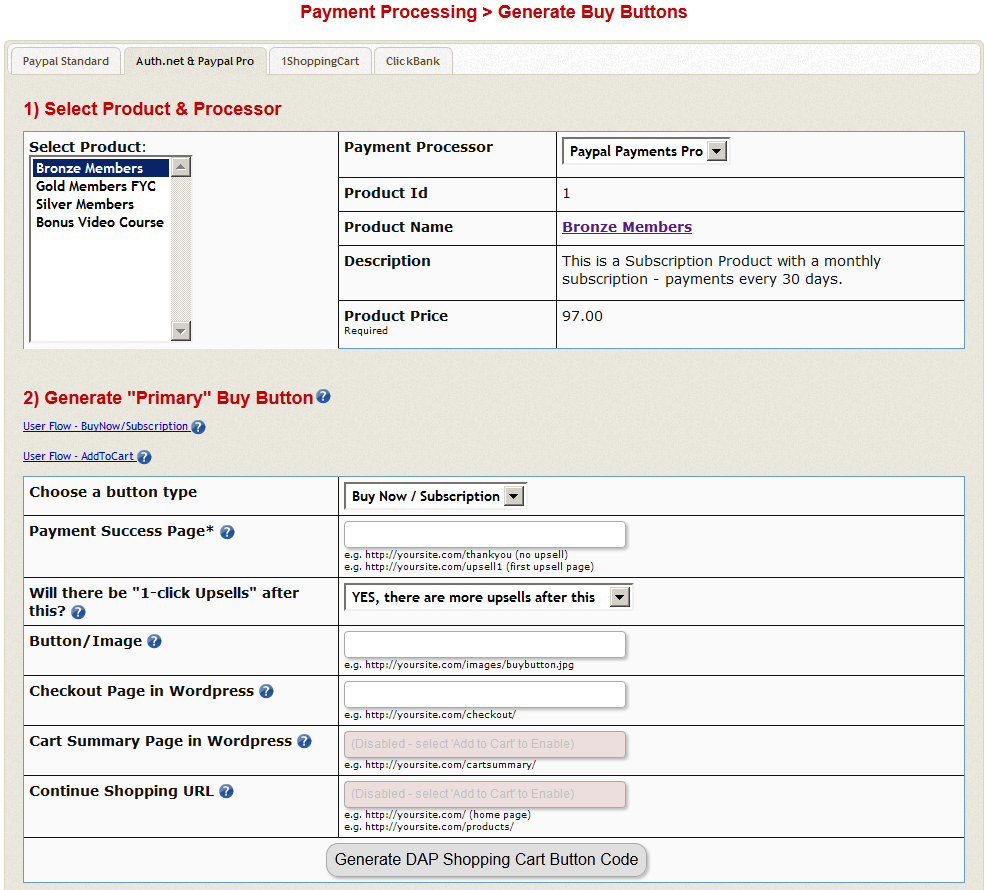
<form name="DAPCartPaymentForm" method="post" action="https://yoursite.com/dap/checkout.php">

<input type="hidden" name="payment_succ_page" value="http://yoursite.com/members/"/>

<input type="hidden" name="item_name" value="Bronze Members" />

<input type="hidden" name="is_submitted" value="Y" />

<input type="hidden" name="btntype" value="buynow" />

<input type="hidden" name="is_last_upsell" value="N" />

<input type="hidden" name="payment_gateway" value="paypal" />

<div align="center"><input type="image" src="https://yoursite.com/dap/images/addtoorder1click.jpg" width="200" height="100" border="0" name="submit" /></div>

</form>That’s it for Paypal Pro button generation.
You can either use the standalone cart page, and then customize the header and footer.php file.
Or you can put the cart right within a WordPress page on your site, so the cart will then take on your theme’s look and feel, and look like it were completely a part of your wordpress site.
To create custom header and footer, create two files by name cartheader.php & cartfooter.php
Upload them to the dap/inc/ folder.
Whatever HTML snippet you put in the above two files will show up as header & footer on the check out page.
See http://www.digitalaccesspass.com/doc/dap-shopping-cart-overview/
While it looks like a LOT of steps, that is only because we have to explain the steps in detail so they are clear. In reality, it is very simple to set up, and starting from scratch, if you have DAP & SSL already installed, it shouldn’t take you more than 1/2 hour to set up your 1-Click Upsells/Downsells/OTO’s. And if you’re not using Upsells/Downsells, then it can be done even faster.
If you have any further questions, feel free to open a support ticket, and we will assist you in getting this going.
Selling through Authorize.net, 1-Click Upsells, Downsells and One-Time Offers (OTO’s) are all now extremely simple to implement using the new Shopping Cart Plugin for DAP.
This post explains how to create buy buttons for selling through Authorize.net.
Your site visitors never have to leave your site in order to make a purchase, if you are selling through Authorize.net. DAP itself will act as your shopping cart, and buyers can checkout and make purchases by staying right on your web site.
The DAP Shopping Cart itself is your actual shopping cart that connects to Authorize.net. You need to install this plugin whether you wish to accept one-time or subscription payments via Authorize.net, or whether you wish to do Upsells, and Downsells.
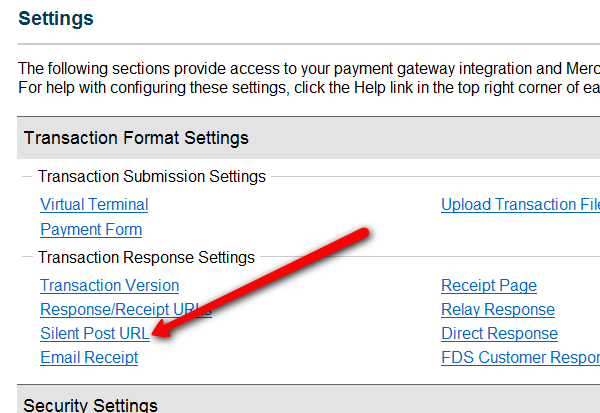
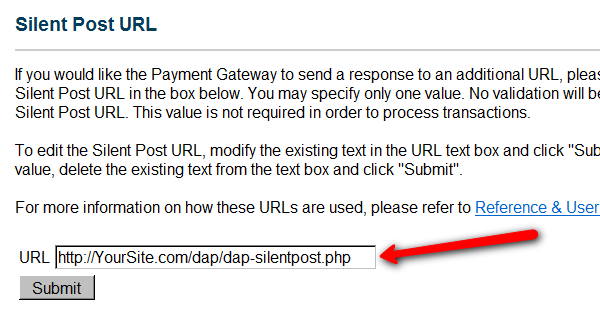
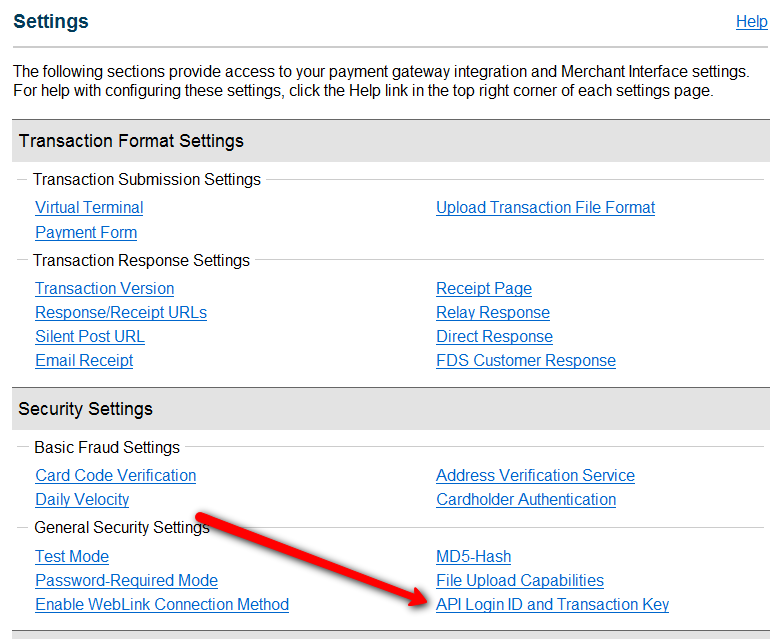

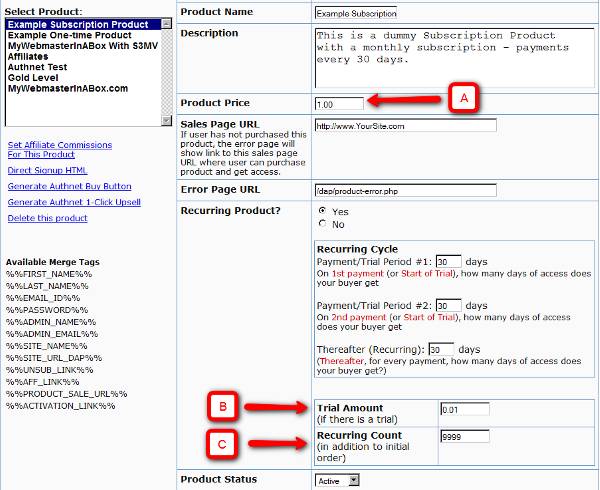
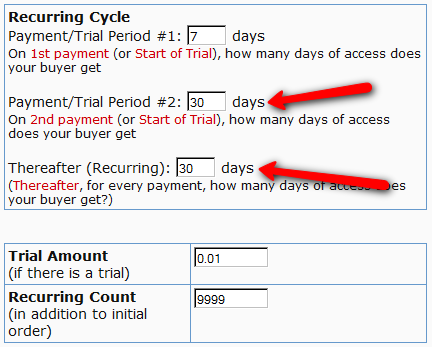
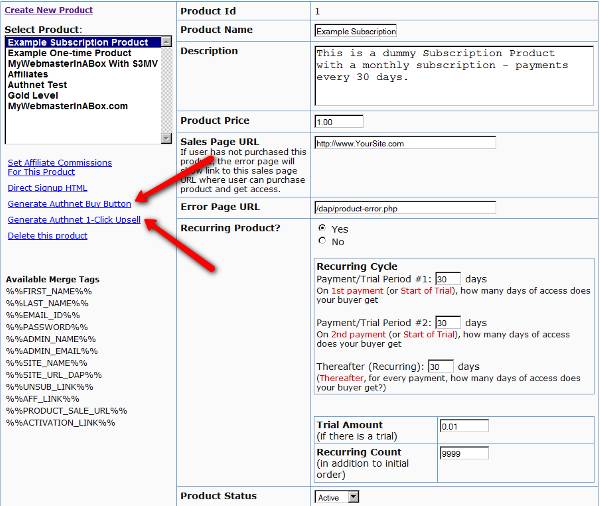
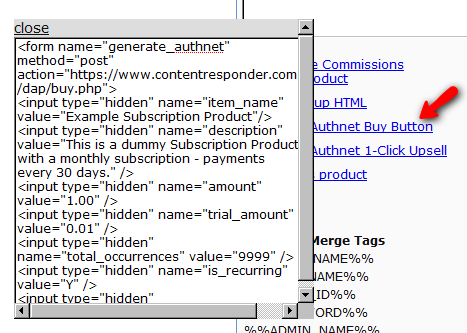
<form name="generate_authnet" method="post" action="https://www.contentresponder.com/dap/buy.php">

<input type="hidden" name="item_name" value="Example Subscription Product"/>

<input type="hidden" name="description" value="This is a dummy Subscription Product with a monthly subscription - payments every 30 days." />

<input type="hidden" name="amount" value="1.00" />

<input type="hidden" name="trial_amount" value="0.01" />

<input type="hidden" name="total_occurrences" value="9999" />

<input type="hidden" name="is_recurring" value="Y" />

<input type="hidden" name="recurring_cycle_1" value="30" />

<input type="hidden" name="recurring_cycle_2" value="30" />

<input type="hidden" name="recurring_cycle_3" value="30" />

<input type="hidden" name="payment_succ_page" value="https://www.contentresponder.com/dap/continue.php?url=/dap/upsell1.html" />

<input type="hidden" name="payment_gateway" value="authnet" />

<input type="hidden" name="is_submitted" value="Y" />

<input type="submit" value="Buy Now" />

</form>That’s it.
While it looks like a LOT of steps, that is only because we have to explain the steps in detail so they are clear. In reality, it is very simple to set up, and starting from scratch, if you have DAP & SSL already installed, it shouldn’t take you more than 1/2 hour to set up your 1-Click Upsells/Downsells/OTO’s. And if you’re not using Upsells/Downsells, then it can be done even faster.
If you have any further questions, feel free to open a support ticket, and we will assist you in getting this going.
How does DAP fare when compared to the competition?
We have created a WordPress Membership Plugin Review Chart to help you decide for yourself.
All Facts. No Opinions. Fair as fair can be.
Obviously, we don’t know our competitors’ products as well as we know ours.
So if we missed something, then do let us know below and we’ll do our best to fix any errors and/or omissions asap.
Also, if you have any other questions, comments, corrections or suggestions, feel free to leave them below.
– Ravi Jayagopal
When your visitor encounters a “Sorry, you’re unable to access this content” page that has the DAP Padlock image on it, you can customize the text that shows up below the padlock by doing this:
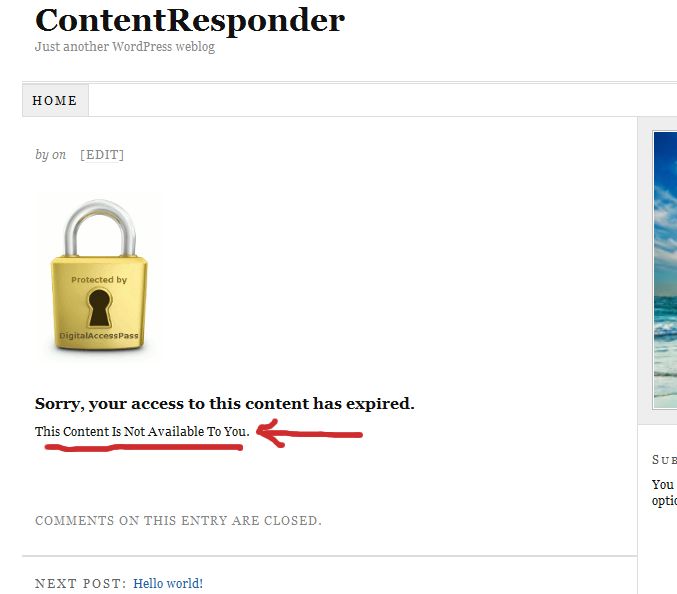
1) Open the file error.php that is stored in the /dap/inc/ folder.
2) RENAME it as (or COPY it as) customerror.php.
3) You can put ANY kind of HTML content within this. Images, javascript, css,, buttons, text, whatever. Any HTML can be used in this file.
4) Upload this new file customerror.php back to same folder /dap/inc/
5) error.php doesn’t matter any more. Whether you delete it, or just leave it alone, the fact that there is a customerror.php file in the same directory means that DAP won’t even bother about error.php any more.
6) Future updates of DAP will not touch your customerror.php file. So updates or upgrades will not mess with your custom error page copy.
Last updated: 12/01/2019
DAP works off-the-shelf on almost all web hosts.
But as in any industry, some hosts are just outdated, some run old and outdated software, or do not offer a choice to upgrade to the latest server software (like a recent version of PHP or MySQL). Some are just not helpful at all. And some just don’t have a clue!
So, if you had the choice of picking a new web host, then here are the web hosts we use ourselves, and highly recommend, and they have everything readily available that DAP needs to run smoothly.
If keeping your site(s) running almost all the time, and having insanely great support from your web host, are both important to you, then you should go with a VPS server from LiquidWeb or SiteGround. For about $50 a month, you can get yourself a great server, with terrific up-time and support. And did we say support is crazy good?
If you can’t afford the $50 a month for a VPS server, or don’t (yet) see the value of high site availability and great support, then the next best option is shared hosting, where you share a server with other business owners. Not all shared hosts are made equal. And that’s why we still recommend Siteground as our #1 choice for shared hosting as well.
DAP also works on “Managed WordPress Hosting” accounts like nexcess.net, etc. You’ll have to work with the hosting team to help you setup DAP hourly cron.
But DAP does not work with WP Engine as it does not support “PHP Sessions”. If you want to use a Managed WP hosting platform, be sure to check if they support PHP session.
DAP works fine on all of the following web hosts – unless we specifically mention that it won’t.
But just because DAP works fine on these hosts, doesn’t mean their service or support is good enough for the long term.
So if you are already hosting with one of these hosts below, then you already know how well they work (or don’t), but if you’re happy with them, then there’s no further issue.
GoDaddy is great for registering your domain names. For hosting? Not so much.
We do have a large number of DAP users who use Godaddy for hosting, and they all either totally love it, or hate it. More hate it than love it. No middle ground.
We’ve ourselves have witnessed many issues with some GoDaddy-hosted sites. Their email systems don’t always work consistently on all servers. It works great for some, while some of our other users have reported that even simple admin notification emails from DAP don’t get sent correctly. To compound the issue, Godaddy queues up even real-time emails on their end, and only send them out as batches. Which means even instant “Thank You” emails sent to your buyers with their membership login info, may not get sent for a couple of hours, even though DAP has actually sent them out, but are being intercepted and put on a queue by Godaddy to be sent out “later” in a “batch”.
And then there are the random blank pages and “internal server errors” (500 error). If you search Google for “Godaddy internal server error”, you will see enough folks to form a small nation, complaining about it. And most them aren’t even using DAP (we wish!).
1and1.com
These guys are still stuck in the 90’s, and provide you with some really primitive admin tools.
For instance, the process for setting up a cron job on 99.99% of the other hosts takes about 2 minutes, because it’s point-and-click-and-type. On 1and1, if you see the tutorial they’ve provided ( http://faq.1and1.com/scripting_languages_supported/cron_jobs/3.html ), they’ve made it very complicated, that it would take us too much time just to setup a simple cron job!
And spending 20 minutes for something that normally takes 2 minutes on other hosts, is simply not worth our time. So if you’re on 1and1, we won’t be able to set up cron jobs for you for free. We would have to charge you to set it up for you, so just be aware of that.
And for some reason, their servers always seem to give us a lot of grief with installation & support. So we do not recommend them.
Windows-based hosts
Make sure your server is running some for of Unix (Linux/BSD/etc). DAP and WickedCoolPlugins.com plugins do not work well on Windows-hosted servers. Please see this post for more details.
If your host is not shown here, then don’t worry – it doesn’t necessarily mean that DAP won’t work on your host. DAP works well on most hosting platforms.
We just recommend that we use ourselves or have done countless installations on, for our DAP users, and highly recommend (or recommend against, in some cases) if you have the option of picking a new web host.
This is exactly why we offer a 30-day money-back guarantee when you purchase DAP – so that you can make sure DAP can run on your current web site, and also help you decide if DAP will work for you.
So there’s no risk to you, regardless of who you are hosting with.
NOTE:
Installation Details
First, go to https://www.DigitalAccessPass.com/support/
Then, open a new ticket, and enter the information below into the ticket – after filling in the blanks, of course.
Your Email Id Used During Purchase: __________
Domain name: __________
FTP Host name: __________
FTP Username: __________
FTP Password: __________
Link to Your WordPress Blog: __________
WordPress Admin Username: __________
WordPress Admin Password: __________
Which one of these Payment Processors do you wish to use to accept payments for your membership site?
(Paypal/1Shoppingcart/ClickBank/etc): ______________
Web Site Control Panel Info (to create cron jobs):
Control Panel Link: __________
Username: __________
Password __________
.
Here are the merge-tags that you can use in your WP posts, and what they mean. (Click here for merge tags for Autoresponder & Broadcast Emails)
This is better suited for a WP “page”. This text will be replaced by a login form using which your members can log in to your membership site.
%%AFFDETAILS%%
This will be replaced by the entire Affiliate section from the default home page at YourSite.com/dap/ . Better suited for a Page.
This will be replaced by the user profile from the default home page at YourSite.com/dap/. Better suited for a Page.
This will be replaced by the user links section (the list of what products and what links user currently has access to) from the default home page at YourSite.com/dap/. Better suited for a Page.
%%FIRST_NAME%%
This will be replaced by the first-name of the user.
%%EMAIL%%
This will be replaced by the email id of the user.
%%AFF_LINK%%
This will be replaced by the raw affiliate link of the member. If you want it to show up as a link in your blog post, use it like this:
<a href=”%%AFF_LINK%%”>%%AFF_LINK%%</a>
%%USER_NAME%%
This will display the DAP user’s “Username” on the page.
%%USER_ID%%
This will display the DAP user’s ID on the page (ID is a number).
%%FEEDLINK%%
Replaces with user’s personalized RSS feed URL.
%%PRODUCT_DETAILS_<insert-product-id>%%
Replaces merge tag with Product-specific details (including links available to the member as part of that Product) on a specific WordPress page/post.
%%DAPCUSTOMFIELD_<insert-custom-field-name>%%
You can display the value of the user’s own custom fields on your pages, using a merge tag like this:
%%DAPCUSTOMFIELD_tax_id%%
In the above example, tax_id is the custom field that you have created in DAP. So if the name of the custom field in DAP were “ssn”, then the above merge tag would become %%DAPCUSTOMFIELD_ssn%%
Displays data of the user’s “upline” affiliate.
Displays upcoming drip-feed scheduled content.
[DAPRefAffId]
Displays id of affiliate who referred visitor to site. If no affiliate set, displays DAP Admin’s id.
[DAPShowTransactions]
Shows list of all transactions/orders by logged-in user.
[DAPUserSubscriptions]
Shows list of all subscriptions by logged-in user.
DAP has a Login/Logout Widget that you can use in any widget-ready theme.
Log in as WP admin, and look under “Appearance > Widgets”.
You’ll see the widget. Drag this widget on to any customizable part of your theme.
The widget puts the DAP login form right on your sidebar.
When a user is not logged in, they will see the login form.
When they are logged in, they just see a “Logout” button.
With this license, you can install and use DAP only on web sites you ow (as an individual or business entity).
This includes (but not restricted to)…
1) You CANNOT use it for a “JV” (say a partnered membership site) with another business owner. Example: You tell your partner, “You bring the content, I’ll bring the membership software”. Not allowed.
2) You CANNOT use it for your clients’ web sites, say, if you are a web , designer or virtual assistant (or perform any kind of services for clients).
3) You CANNOT redistribute, re-purpose, re-package the license in any way whatsoever. It is strictly to be used only on sites you own.
4) If you want to install DAP for clients, feel free to use your own affiliate link to purchase a license on their behalf, and you can bill them separately. Don’t forget to use a unique email id when purchasing a license on somebody’s behalf, so that we can track it as a new sale and give you the correct affiliate credit for the sale. Or you could also simply give your affiliate link to your client, and ask them to sign-up for DAP using that link.
5) When you buy this license for yourself, installation is free only for the first web site. Additional installations can be purchased for just $19.97 per installation, or you could do it yourself.
* When you purchase the unlimited license, you own the license for life. But you get free support and updates for 6 months.
* While the software itself will never expire, your ability to get free support and upgrades does expire after 6 months. At which time, you may sign up for our extremely affordable Upgrades & Support program. But again, this is optional. You don’t have to sign up for anything or pay us another penny ever again if you don’t want support or upgrades after 6 months.