6
Data Loading Errors
Progress Bar Never Stops
You’re seeing the green “Loading… Please Wait” progress bar continuosly running – it never stops and comes back with any data.
If this is a new setup, then it’s possible that your web host does not have a library called “JSON” enabled. Just ask them to enable it for your server. It’s rather simple to do, and we’ve never seen a host that won’t do this for their customers.
If it’s an old setup, and it was working previously, then your host made some changes that caused the library to stop working. So you still need their help in resolving the issue.
Error Message: “There was an error returning data'”.
One possibility is that your database or web site is temporarily down, slow, or plain not responding for some reason. So DAP cannot connect to your database, and comes back with this error.
Or it could also be the “Progress Bar Never Stops” issue from above.
11
Disabling The Built-In Affiliate Program
There are many reasons for wanting to have more control over the affiliate program – or even completely disable it for the entire web site.
1) You simply don’t wish to let people know that you have an affiliate program – maybe it is because you don’t want to confuse the mom-and-pop niche that you are in with crazy words like “Affiliate” and “Commission” :-). Or you just don’t need affiliates and don’t wish to pay commissions
2) You want to allow only certain users to be affiliates. You don’t want every member to automatically become affiliates.
3) You are using a 3rd party affiliate service – like ClickBank – and don’t wish to use DAP’s built-in affiliate program.
Completely Disabling The Affiliate Program
This is easy to do. Don’t announce any affiliate program. Don’t say anywhere that you have one, or that you’re offering commissions. Do not setup commissions for your products. Do not create an “Affiliate Info” page, so no one will know what their affiliate link is, and since no commissions are set, no one will get paid anything.
Basically, don’t do anything to set up any of the the affiliate stuff, and that’s as good as having no affiliate program.
Signing Up Affiliates
Allowing Only Hand-Picked Affiliates
If you do not want all members to become affiliates, and only want people you want – like your business associates and JV partners – to be the only affiliates, then…
a) Create a separate product called Affiliates. But do not publish a public sign-up form for that product. So no one can sign-up for that, and the only way to get access to it is if you manually added them in from the DAP Admin Users > Add screen.
b) Create the Affiliate Info page that displays all of the affiliate information and stats. But add that page only to this Affiliates product, and not to any other product. So only those with access to the Affiliates product can even get to the Affiliate Info page.
Hide Affiliate Info On dap/index.php (Non WP)
If you are using DAP with a non-WordPress site, or simply using the the default http://YourSite.com/dap/index.php page as your members’ area, then all you have to do is go to…
DAP Admin > Setup > Config > Display Affiliate Details
… and set it to “N”.
That will essentially “hide” the affiliate section from showing up on the default DAP home page (at http://YourSite.com/dap/index.php)
—
NOTE: In a future version of DAP, we will have the ability to selectively turn off an individual’s ability to use their affiliate link, so DAP will completely ignore all referrals from the affiliate, and won’t track anything from them.
14
Cancellation or Refund Requests
The Question
How does a customer, once they have signed up and become a member, cancel their membership (or get for a refund)?
Cancellations
If it’s Paypal, they could go into their Paypal account, and cancel their subscription themselves.
If it’s ClickBank, they can log in to their CB account, and cancel their subscription themselves.
If it’s any other payment processor or cart – like 1SiteAutomation.com, Authorize.net, Paypal Payments Pro, etc – then they have to ask you (the membership site owner) to cancel.
Refunds
Except with CB, in all other cases, they have to ask you for a refund
Action Steps For DAP Admin
Whether it’s a cancellation or a refund, log in to your Payment Processor (1shoppingcart, Authorize.net, etc), and make sure you perform the cancellation or refund there. DAP does not store any of the payment information of your subscriber. So both cancellations and refunds have to be performed at your Payment Processor.
Now that you’ve cancelled the actual charging of the customer at the payment processor level, you have to also take care of the customer within DAP – only for refunds.
Cancellation Of Ongoing Subscription in DAP
If this is the cancellation of an ongoing subscription, then no action required within the DAP Dashboard as far as the User is concerned. DAP already does “Pay As You Go” processing – which means, their account will automatically expire at the end of the current recurring period (eg., end of current month). The “Access End Date” of the user’s access to the Product will automatically expire if no new payments come in. And then they’ll automatically lose all access to the content that is part of that Product.
However, if this is the cancellation of a “trial”, where if the user comes back and signs up again for another trial a few weeks or months later, then you want the user to start all the way AT THE BEGINNING. So if it’s the cancellation of a “trial” then you must manually remove the user’s access to the product. So for that, follow the process below.
Refunds (and Cancellation of Trial) in DAP
If it’s a refund of the entire purchase, then…
- Search for that user by email on the “Orders” page, which will bring up their Order (a.k.a “Transaction”)
- Click on the “Refund” button on that screen. That will create a new negative transaction in the Orders table. Then it also roll-backs any affiliate commissions earned on that sale and make a negative entry in the database for that affiliate. Then it rolls back user access by the number of days entered in one of the “Recurring Cycles” entered on that Product’s page (depending on how far along they were in as a member).
- Now search for that user by email on the “Users > Manage” screen. Make sure that they no longer have access to the Product.
If it’s a refund of just one recurring payment from among a series of subscription payments, or the cancellation of a trial, then you can go into the “Users > Manage” screen, search for the user, and do a “Rollback Access for Selected User(s) to the Product by 1 Recurring Cycle“.
For a big-picture view, also see Cancellations & Refunds
21
Moving DAP From One Host (or Domain) To Another
NOTE: We do not provide support for server or domain moves as part of Standard DAP Support that you get with your purchase of DAP. Please see our Terms Of Support which explains why. If you want our help with moving a DAP installation, you may purchase Premium Support slots from http://DigitalAccessPass.com/buynow.php#store (see “Installations & Support” tab)
Moving a DAP installation
DAP does not store the domain name anywhere in the database. So if you want to move an existing installation to a new domain, the only place where you need to change your domain name in the DAP installation (if you’re moving across domains) is in the dap-config.php file.
Moving a DAP installation consists of basically moving the files, and moving the database. Only 2 components.
- Log in to your web hosting control panel, go to “phpMyAdmin”, select your WordPress database (which is where the DAP tables are also installed, by default)
- Do an “Export” of just the DAP tables. Select the “SQL” option and select “Save as File”. All DAP database tables start with the text “dap_”. Save this file on your desktop – let’s say you call it “dapexport.sql” (it could also be “dapexport.txt” – does not matter what the exact extension is – .txt or .sql).
- Make a back up of the dap-config.php file (located in the “dap” directory on your old site/domain) on your desktop
- At your new site, install WordPress (if not already installed)
- Log in to your web hosting control panel of your new site, go to “phpMyAdmin”, select your WordPress database, go to the “SQL” tab, open the export file from above (dapexport.sql), copy the contents, paste into the SQL tab and hit “Go”. All dap data from your old site is now on your new site.
- Copy the database credentials (db name, db username, dp password and db host) from your new blog’s “wp-config.php” to the “dap-config.php” file stored on your desktop.
- If you’re also changing domain names, then open dap-config.php, and modify SITE_URL_DAP to point to your new domain name.
- Upload all dap files to your new site (don’t do full installation – just upload the files).
- Upload the DAP-WP-LiveLinks folder to wp-content/plugins/
- Upload the modified dap-config.php file from your desktop to the “dap” folder on your new site.
- Log in as WP admin, and activate the DAP-WP-LiveLinks plugin. It should give you a warning that DAP is already installed. That’s ok – that’s what we want it to say.
- That’s it. DAP is now moved over from your old site to your new site.
- Log into your DAP Dashboard using your old DAP admin login info, and you’re all set.
12
Last Cookie
Last Cookie Before Initial Signup Wins
DAP uses “Last Cookie” to award commissions.
So if someone (who has never purchased anything from you before) clicks on the affiliate link of Jack, and then a few hours (or days) later, clicks on the affiliate link of Jill, and then goes on to purchase your product, then DAP awards the commission to Jill, whose affiliate link was the one clicked most recently.
So, in general, to protect your affiliates, you shouldn’t be promoting your site generally on the web using your own affiliate link (as DAP admin). That way, you never compete with them for commissions on your own site.
However, using your own affiliate link works great, say, when you’re marketing in specific markets, like say on Adwords. Even though Adwords allows you to set up and track goals, using a special affiliate can help you figure out exactly how much revenue you have earned through this affiliate.
So, for Adwords marketing, you could create a new user called “Adwords Affiliate” and then use this user’s affiliate link as your landing page URL. Of course, you could also customize this affiliate’s link to land on any page of your web site (or any site for that matter) by adding the text “&p=yoursite.com/anypage.html” to the end of your standard affiliate link, like this…
http://YourSite.com/dap/a/?a=1234&p=yoursite.com/googleoffer1.html
LifeTime Affiliates: Cookie Not Relevant
Once a member has signed up and is attached to an affiliate, then it’s that same affiliate who will get lifetime commissions for all purchases made by that member, for life. Once an affiliate is assigned to a user, it cannot change again for life. So after someone has become a member and is credited to an affiliate, it does not matter what cookie they have on their computer when they make a purchase – the credit will always go to original affiliate that they’re already attached to.
25
WordPress User Sync
NOTE: This content is for advanced users only, who understand the concept of user tables, database, etc. If you don’t understand any of this, then just ignore this – you don’t really need to know this in order to use DAP. This is only an explanation for those who wish to go under the hood of DAP and its integration with WordPress.
As you probably already know, WordPress has its own user database.
DAP has its own User database, and doesn’t use the WordPress database – for many reasons, not limited to the following…
1) Ability to store more user information than what WordPress allows
2) More powerful user search, profile updates, affiliate information, etc.
So, if you want to use any WordPress based plugins – like WordPress Forums or Subscribe2Blog – these forums are looking at WordPress’ native user database.
Now comes the necessity of “syncing” the DAP user data and your WordPress user data.
In the DAP Dashboard, in “Setup > Config > Advanced“, you will see two settings for syncing DAP & WP user data.

(1) Sync DAP User data and WP User data
If you turn this to “Y” (for “Yes”), then every time someone logs into DAP, their DAP user data (just name and email) is automatically “synced” with WordPress user data. If you set this to “N”, then no data will be transferred from DAP to WordPress.
(2) Sync WP data only for PAID users
This one matters only if you have set (1) above to “Y”.
If you want only your “PAID” members to be synced with WordPress, then set this to “Y“.
If you want both “FREE” and “PAID” members synced with WordPress, then set this to “N“.
Here’s how it actually works:
- For the sync to work, you must first setup and save the above 2 config settings
- After you save the above two config settings, make sure you log out of DAP and re-log in (if you are/were logged in and testing as a regular user), because only then, the Config settings above will take effect.
- Your user must log in through a DAP login form (not the WP login form).
- Make sure the user is redirected to any part of your WordPress blog after log in. This can be done via “Logged In URL” setting in DAP Config.
- The user can be redirected to any WP page, WP post or even your blog home page – that’s the only time the ‘syncing’ kicks in.
- When user lands on any page/post of your WP blog, then the DAP LiveLinks plugin (which you have already installed & enabled) kicks of the “sync”, copies the logged in member’s name and email over to the WordPress user table, and also automatically logs him into your WordPress blog.
That’s all there is to it.
Also see: Forum Integration
7
Creating Multiple DAP Admins
Adding new User and giving them “Admin” access
1) Add new user
2) Go to “Users > Manage”, search for user (that you wish to make an Admin) by email id or last name. User is displayed in search results.
3) Click on user’s “Full Name” – it will bring you to their profile page where you can edit their user information
4) Change “Account Type” field to “Admin”
5) Click “Update User” button
Giving existing User “Admin” access
Start from step (2) above
That’s it.
NOTE: These newly created admins will have the exact same access and privileges as you do (as the ‘original’ admin who created these other admins). They can do whatever you can do – add/delete/modify users, products, access reports, change affiliate info, etc. They can do ANYTHING that you can do in the Admin Dashboard. Just be aware of that.
33
How Do Members Get Added To Your Membership Site
(OR) How do members get access to the content
(OR) How does someone become a member?
With DAP, you can add users to your membership site in 3 different ways.
1. PURCHASE: Someone buys your product or subscribes (“Paid” member with access to both free and paid content)
2. FORM SIGNUP: Someone signs up through a signup form (“Free” members with access to only free content)
3. ADMIN ADDED: You add them as a member directly through the DAP Admin Control Panel (you can mark them as either “free” or “paid”)
All three are explained in detail below.
1. PURCHASE
*You first create a “Sales Page”.
On your sales page, depending on which payment processor you use, you go to Paypal/1ShoppingCart/ClickBank and create a new product with the EXACT same name as the product you created within DAP, and get the ‘Buy Button’ link from your Payment Processor. Publish this “Buy Button” on your sales page.
* Your visitor goes to your sales page
* They purchase your product
* Your payment process (Paypal/1ShoppingCart/ClickBank) notifies DAP that you have a new purchase.
* If the product names match, DAP automatically creates an account for them, generates a random password, and sends them an email with their email/password. You can customize the contents of this email on the “Templates” screen in your DAP Admin Control Panel. Integration with your shopping cart explained elsewhere (see documentation for setup).
That’s it!
That’s how “buyers” get added to your membership site and get access to the product they just purchased.
2. FORM SIGNUP:
You wish to give someone a “Free” membership.
NOTE: “Free” members who do not have a payment associated in DAP (which means they have not purchased anything) will have access only to content that you have marked as “Free”.
Once you have created a Product in DAP, and have added content (blog post/page links, links to files, etc), and have saved it, on the Product page, below the Product name list, you will see a link called “Direct Signup HTML”. (See image below). You must first select a Product before you can copy the correct form HTML.
Fig 1. Direct Signup Link on Products page

Fig 2. Form HTML that you get on clicking the Direct Signup Link

This HTML gives you the full HTML form code that you can publish on any page of your web site. This form only collects an email address and a first name.
Take this HTML code and publish it on page of your web site where you want sign up users. This could be a WP page or post too.
Note: When you see the above HTML code, there’s a field in there that looks like this:
<input type=”hidden” name=”redirect” value=”http://YourSite/Your-login-page-link/?msg=Success!%20Your%20membership account%20has%20been%20created.%20%20Check%20your%20email%20address%20in%20a%20few%20minutes%20for%20your%20password“>
Don’t forget to change the text above, where it says “http://YourSite/Your-login-page-link/?…” to point to your actual domain name and to your actual login page (if you have customized it).
Then, when someone enters their email address and first name and signs up through the signup form, DAP creates an account for them using that email address, creates a random password, and sends them an email with their email/password.
After that, you can drip any content or emails on them that are marked as “Free” (when adding content or emails).
At some later point, if they purchase any of your “Paid” products (see the “1. Purchase” section above), then as long as they use the same email id during purchase, DAP will automatically give them access to all of the “Paid” content in the Product that they just purchased.
3. ADMIN ADDED:
If you wish to directly give someone access to a Product and all its content and emails, you can add them directly from the DAP Admin screen (Users > Add/Edit).
You just need their email id and their first name (both of which they can change subsequently) to add them to a Product.
While adding them, you have the option of marking them as a “Paid” user by checking the “Mark as Paid” checkbox.
If you don’t check this check box, then they will be added as a “Free” user and get access only to “Free” resources (content/emails).
But if you check the “Mark as Paid” checkbox, then they will get access to all “Paid” content and emails, just like someone who is actually a “Paid” member.
55
Paypal Hosted Buy Buttons
DAP can process Paypal payments using Paypal IPN (Instant Payment Notification). All you need to basically do is to enable IPN within your Paypal account and create your Buy button with a few extra parameters. It’s all explained below.
So here’s what you need to do to process orders through Paypal using IPN, and have your buyers automatically added to DAP on your site.
1. Enable IPN within your Paypal account.
Follow this post to enable IPN first, and then come back here to this post.
2. Create your “Buy Now” or “Subscribe” or “Add to Cart” button
- Log in to your Paypal account.
- Click on Profile => Profile and Settings => My selling tools => Paypal Buttons => Update

- Click on the “Create New Button”

On the Create New Button Page:
Step 1: Choose a button type and enter your payment details
1: Choose any one of the following button types based on the type of product you wish to sell.
* Shopping Cart (for multiple-item purchases)
* Buy Now (for one-time products)
* Subscriptions (for subscription-based recurring products)
2: After selecting the button type, enter item name and price.

- “Item Name”
Make sure the Paypal “Item Name” EXACTLY matches the “Product Name” that you created within DAP. In fact, login as DAP admin, edit the product, copy the text from the “Product Name” field, then paste this into your Paypal “Item Name” field, so that there are no typos. If the product names don’t match, DAP will ignore any IPN posts coming in from Paypal, which means no account will be created for your new member.
Step 3: Customize advanced features (optional)
- just add a custom variable to the button as follows:
Under “Step 3: Customize advanced features (optional)” tab, within the “Advanced Variables” text box, enter the following (change the text YourSite.com below to your domain name).
notify_url=http://YourSite.com/dap/dap-paypal.php
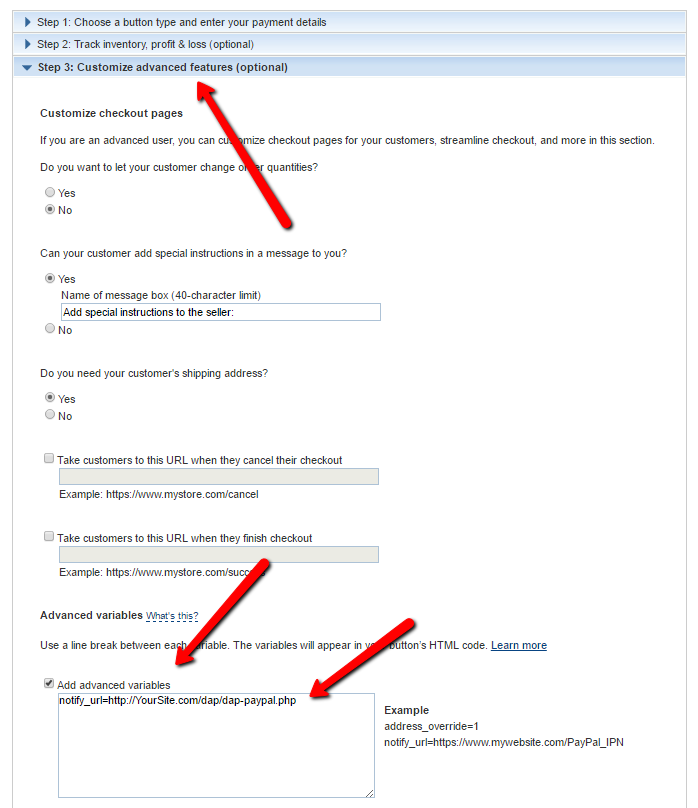
(change the text YourSite.com to your domain name).
Save the button.
4. Copy the HTML code for this button
5. Publish the code on your web site’s sales page
..or WP page or post.
That’s it!
So when someone subscribes to, or purchases your product using this button, Paypal will send an IPN notification to your web site to the above link. DAP will then verify the product and payment status, and then will automatically add give the buyer/subscriber access to that product.
If the email id used in this purchase is not already associated with an account on your site, then DAP automatically creates a new account, and sends the buyer an “activation” email that requires them to click on a link to confirm and activate their account.
But If this email id belongs to someone who already has an account in DAP (existing buyer, purchased a different product this time), then DAP doesn’t create a new account for this user. It simply gives the existing account access to this new product.
So when the user logs in, they will see that they now have access to TWO products, with each product and the available URL’s listed separately.
Note: If you’re going to be using Paypal to process payments, then you don’t need to set up the Email Processing info in your DAP Admin > Config > Payment Processing screen. You don’t need to set up the DAP Email Order cron job either.
10
Changing A Password
If you want to change the password of a user, then just go to the Users > Manage link, search for either that user (if you know her email id), or search for all users. See more about searching in another post.
Then click on the “Name” of the user, and you will go to the “Edit User” screen. There you can change the user’s password.
If you are the admin and looking to change your own password, then you can do the same as above (as the “admin” is also a user in the system, except with the user type “admin”).
Or you can go to “User Home” and click on “Edit Profile” and change your password there.
Now the “User Home” is the page that all your users would see when they are logged into your members-only area powered by DAP. So, we’ve basically provided you, the admin, a way to see what they see, when you visit the “User Home” page.