35

Setting Up Cron Jobs

(Note: You can get this setup as part of your free installation. But if you would like to do it yourself, keep reading…

There is just one cron job (back-end, scheduled jobs) that you need to setup.

dap-cron.php (mandatory – once an hour)

This is the main one. It sends out broadcast emails, autoresponder emails, handles bulk member imports, affiliate commissions processing, clean up, etc. This one is mandatory.

Please Note: If you use 1ShoppingCart as your shopping cart, you need to setup another cron:
dap-emailorder.php (only if you use 1shoppingcart – every 10 minutes)

This is the email order processing cron, used ONLY for 1ShoppingCart. Skip setting this cron up if you’re not using 1ShoppingCart or 1SiteAutomation.com.

Path to DAP

Visit the url below in a browser window (replace YourSite.com with your actual domain name):

http://YourSite.com/dap/getpath.php

This will show something like this in your browser:

/home/path/to/dap 

This is your “Path to DAP” to your root folder.

To the end, add “/dap-cron.php”. So that makes your new “Path to DAP” to be:

/home/path/to/dap/dap-cron.php

This is your new “Path to DAP”. Make a note of this on a piece of paper, or in a notepad/text editor window.

Setting up the Cron jobs

A) dap-cron.php

This one is mandatory. Should be set up to run Once Every Hour. This hourly process is what sends out all the scheduled broadcast (bulk) emails and processes different types of “bulk actions” – like importing a large list of customers into DAP from an external system, for instance.

  1. Log in to your web host’s control panel (or cpanel)
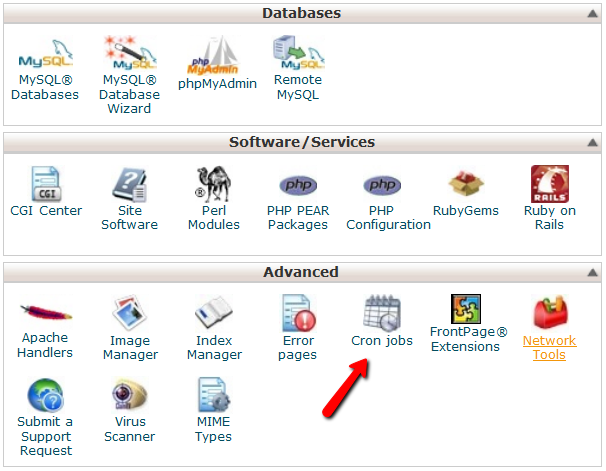
  2. Look for the icon “Cron Jobs” in the “Advanced” section – usually towards the bottom of that page, and click on it.
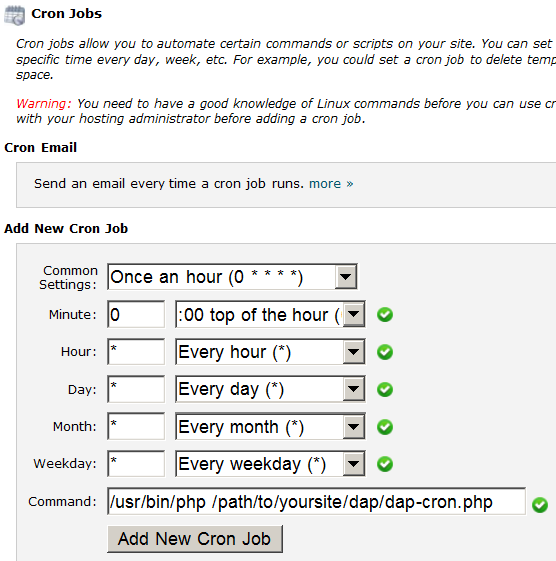
  3. On the next window, in the “Common Settings” drop down, select “Once an hour (0 * * * *)“.
    And in the “Command” field, enter this:/usr/bin/php<insert space>/home/path/to/yoursite.com/dap/dap-cron.php

    NOTE: <insert space> above is just a note to you that means you must hit the spacebar and insert an actual space between the two pieces of text.
  4. Click on “Add New Cron Job”.

That’s it for this one.

B) dap-emailorder.php

Follow this step ONLY if you’re using 1ShoppingCart or any private label of 1SC – like 1SiteAutomation.com.

This cron job should be set up to run once every 10 minutes. This is the script that processes all of your recurring orders initiated by 1ShoppingCart or private label. So, if you set this up to run once every 10 minutes, then every 10 minutes, it will log in to your billing email address (you can configure what this email id is within the admin control panel on the “Config” screen) and process the email notifications that you have received from 1ShoppingCart (and its private labels).

Running it sooner than once every 10 minutes – like say, once every minute or even once every 5 minutes – is resource intensive, and is not a good idea. Your web host may not not even allow it in the first place. But even if they do, it’s not recommended.

Follow steps A(1) through A(4) above. Only difference is in what you’re going to be entering in the “Command” field.

For this cron job, it is…

/usr/bin/php<insert space>/home/path/to/yoursite.com/dap/dap-emailorder.php

Only difference between the two cron jobs is in the name of script that is being run. For the hourly cron (A), it was dap-cron.php. For the 10-minute cron (B), it is dap-emailorder.php.

MISCELLANEOUS NOTES:

1. Where you see the text <insert space>, replace with an actual space (hitting the space bar).

2. Cron Email Reports:

By default, your webhost will send you an hourly cron report. If you don’t want to receive hourly cron emails, you can turn it off in your hosting cpanel. You can login to your Webhost Control Panel > Cron Jobs page, and remove your email address from that page (where it says “Please enter an email address where the cron output will be sent”).

3. To check if you have set up the cron job correctly, you can set DAP Admin -> Setup -> Config -> Log Level to “Log All Activity (During Troubleshooting)” . Then go to DAP Admin -> System -> Logs . Empty the logs by clicking on the “Empty Logs” link, and then revisit the screen and refresh the page, after say 10 minutes (to verify the running of dap-emailorder.php) or at the top of the hour (to verify the running of dap-cron.php).

4. To force run a cron (manually), click on this link:

http://YourSite.com/dap/dap-cron.php
(to run hourly cron)

http://YourSite.com/dap/dap-emailorder.php
(to run the email order cron that runs every 10 minutes)

Replace YourSite.com with the actual domain name of your web site.

5

Products: Random Stuff

The Product Name within DAP should be the exact same (even the case) as the Product Name in your Shopping Cart.

So if you were using a 1ShoppingCart (or private label) to accept payment for selling your digital info product or for access to your membership site, then the Product Name you use in your 1ShoppingCart admin panel should be the exact same name as what you use within DAP.

This is the only way for DAP to know about a new purchase through your 1ShoppingCart cart. And when it parses your 1ShoppingCart notification email, it can figure out that your buyer who purchased that product needs to be added to DAP, so that your buyer can get access to either your info product files, or to your subscription-based site.

12

Modifying Config

The Configuration data of your DAP installation can be customized online.

  1. Log in to DAP as admin at:
    http://YourSite.com/dap/
  2. Click on the “Config” link in the nav bar at the top.
  3. You will see a drop-down (showing “Basic” by default). You can modify option by option (“Basic”, “Payment Processing”, etc) or view them all together at one time (“All”).
  4. WARNING: Save each modified config field individually. This means, every time you modify one row of config data, hit the “Save” button at the end of that row. You will not be able to change multiple rows and have all of them saved all at once. It has to be saved row by row*.
  5. Modify fields like “Site Name”, “Admin Name”, “Admin Email” etc.

NOTE: The reason why we allow only one row to be “Saved” at a time, is to prevent you from messing up (by accident) config stuff that was already working. So, this way, you can mess up only one row at a time 🙂

See more details about the config screen below.

Config Screen Details

Config > Basic
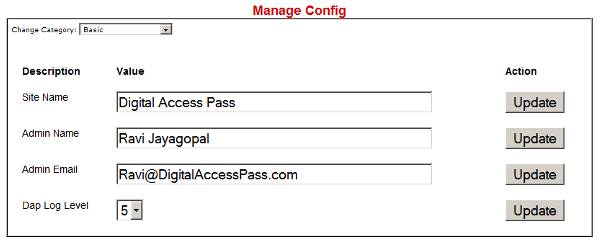
config-basic

1. Site Name:

This is where you put in the descriptive name for your web site. When sending emails, you may sometimes wish to use a “name” for your site rather than just a domain name. “Welcome to Digital Access Pass”, you can say.

2. Admin Name:

This is the “from name” used in outgoing emails.

3. Admin Email:

This is the “from email” used in outgoing emails.

4. DAP Log Level:

When set to “Log All Activity”, it logs all kinds of verbose details to the logs, to help during installation and troubleshooting. When set to “Log Errors Only” it logs only major errors and issues.

So during installation and setup, set this field to “Log All Activity”. Once everything is up and running and you are ready to launch your site, turn this up to “Log Errors Only”.

Config > Payment Processing
config-pp

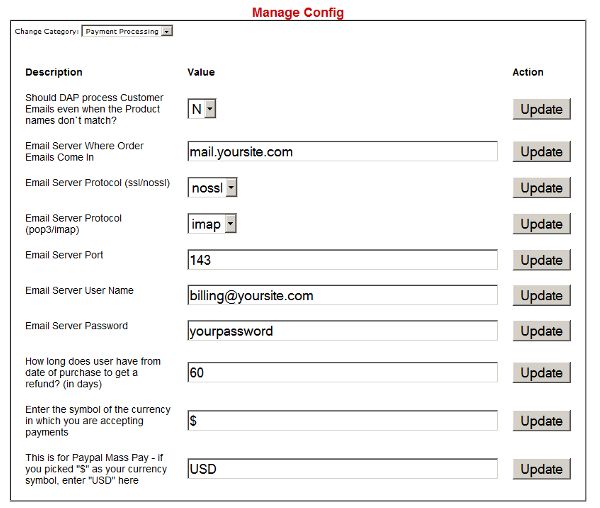
The first 7 fields on this page are required ONLY if you are going to be using a) 1ShoppingCart.com (incl. private labels) or b) ClickBank.

The 7 fields are:

1. “Should DAP process Customer Emails even when the Product names don`t match?”

2. “Email Server Where Order Emails Come In”

3. “Email Server Protocol (ssl/nossl)”

4. “Email Server Protocol (pop3/imap)”

5. “Email Server Port”

6. “Email Server User Name”

7. “Email Server Password”

If you are going to be using 1ShoppingCart.com or ClickBank, then read the explanation for the fields below. But Iif you are going to be using Paypal, then you can skip reading the explanation for these 7 fields.

So here is the documentation for the Payment Processing tab, which includes the 7 fields.

The way DAP integrates with 1ShoppingCart (1SC) and ClickBank (CB) is via Email. Whenever someone makes a purchase through 1SC or CB, they send you the site owner – what is called a “Payment Notification Email”. This email lets you know that someone just purchased one of your products, and contains the buyer information like name, email address, mailing address, etc.

We call this the email id at which you receive these payment notification emails – as the “Billing Email”. So all you need to do to set up integration between DAP and 1SC/CB, is to tell DAP what this billing email id is, and how to access it, so that DAP can log in to this email, look at all the payment notification emails, pick out the ones you want it to process, automatically create an account for your member on your membership site, and send them an email notifying them how to log in to their account on your membership site and access the product that they just purchased from you.

1. “Should DAP process Customer Emails even when the Product names don`t match?”

Now, you may have multiple web sites with multiple products, and you may be receiving payment notifications for many web sites at one single “Billing Email”. But you don’t want to add them all to your membership site, right? You just want to add those who purchase a specific product, to your membership site. So this field is where you tell DAP whether it should add ALL buyers to your membership site, or just those who purchased a specific product. By default, this is set to “N”, which means, DAP will ONLY process emails where the Product name you created in DAP exactly matches the Product name in the billing email. If you still don’t understand this, watch the videos, and just leave this at the default “N” for now until you understand more.

2. “Email Server Where Order Emails Come In”

This usually looks like “mail.yoursite.com”. You can find this info in your web host control panel, on the “Emails” tab, where you would normally create new email ids for your web site.

3. “Email Server Protocol (ssl/nossl)”: Leave this at the default, which is “nossl”.

4. “Email Server Protocol (pop3/imap)”: Leave this at the default, “imap”.

5. “Email Server Port”: Leave this at the default, “143”.

6. “Email Server User Name”:

This is the actual billing email id. Ex: billing@yoursite.com or whatever email id it is where you get the Payment Notification Emails from 1SC/CB.

7. “Email Server Password”:

This is the password to check that email id.

The following fields apply to everyone, not just to users of 1SC/CB.

8. “How long does user have from date of purchase to get a refund? (in days)”

“60” is recommended and is the default. But you can change this to any number you want.

9. “Enter the symbol of the currency in which you are accepting payments”

Default is “$”. If you are going to be using any other currency, then enter the symbol here.

10. “This is for Paypal Mass Pay – if you picked “$” as your currency symbol, enter “USD” here

If you are going to be paying your affiliates in US dollars, and picked the “$” in field #9 above, then enter USD here.

Config > Advanced
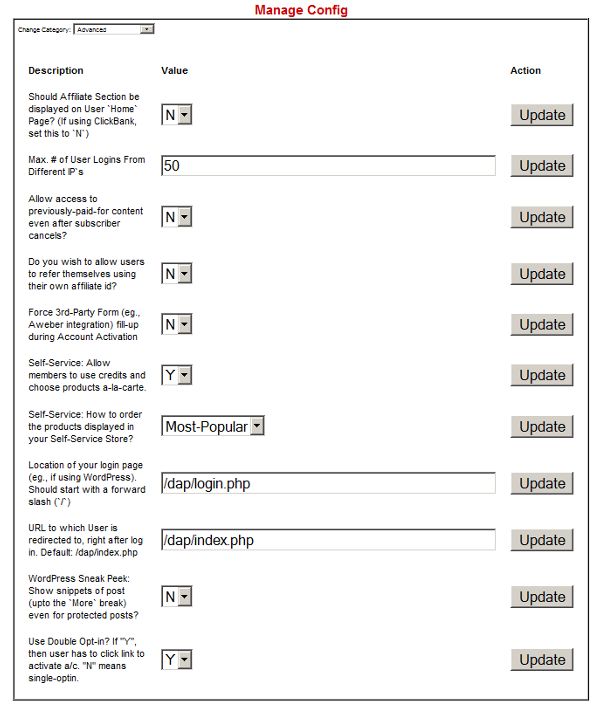
config-advanced

1. “Should Affiliate Section be displayed on User `Home` Page? (If using ClickBank, set this to `N`) 

If you are in a mom-and-pop, or non Internet Marketing Niche, where you dont want to confuse users by displaying the affiliate section on the default user home page, then set this to “N”. All users will be signed up as affiliates by default they just wont see their affiliate link and affiliate stats on their user home page.

2. “Max. # of User Logins From Different IP`s”

This is a security feature. This is where you restrict the number of different IPs that a user can log in to their account on your membership site. This is to prevent password sharing, so if you see the email id being used to log in from more IPs than the above limit, then DAP will automatically lock their account, and send them and you an email notifying you both that the account has been locked. You can then either wait for them to contact you by email to get their account unlocked, or if you trust/know the user, you can unlock the account yourself on the “Edit User” screen. Once you unlock the user, both you and the user will get an email notifying you both that the account has been unlocked.

You can customize the content of the lock and unlock notification emails on the Templates page.

3. “Allow access to previously-paid-for content even after subscriber cancels?”

Set to “N” by default. If you want people who have cancelled their account, or unsubscribed from your membership site to have access to content that they had access previously, then set this to “Y”.

NOTE: If you set this to “Y”, then remember this: Say you are offering a free 1 month trial. And you are giving them access to a few videos or blog posts, then even if they cancel their free trial, then they will continue to have access to the 1st months content. If you had set this to “N”, then at the end of the 1st month, if they cancel their trial, then they wont be able to access 1st months content. Thats the difference.

4. “Force 3rd-Party Form (eg., Aweber integration) fill-up during Account Activation”

This is for advanced users only, if you are planning to use Aweber, and want every new member who signs up for a membership in DAP, to also be automatically added to your Aweber account. This requires some advanced set up, which is explained at http://www.digitalaccesspass.com/doc/aweber-integration/ . This is not something you should be looking to set up when youre first trying to set up DAP. This is a power-user feature, and you should get back to this towards the end of your membership setup, rather than at the beginning.

5. “Self-Service: Allow members to use credits and choose products a-la-carte.”

This is for those who have purchased the “Self-Service Store” (SSS) plugin only. If you dont have this, then skip ahead to the next one.

If you have purchased SSS, then set this to “Y” to enable your Self-Service Store where users can cash in their credits and buy the products they want for this month, rather than you (as the site owner) deciding what content they get this month.

6. “Self-Service: How to order the products displayed in your Self-Service Store?”

Again, this is for those who have purchased the “Self-Service Store” (SSS) plugin only. If you dont have this, then skip ahead to the next one.

This setting allows you to control how the products in your SSS are displayed Most popular first, Ascending order by name, etc.

7. “Location of your login page (eg., if using WordPress). Should start with a forward slash (`/`)”

By default, your membership site login page is: http://YourSite.com/dap/login.php

Instead of sending them to this page, you can put the login form on a “WordPress Page” within your own blog, so that the look and feel is always the same, and your member never has to leave the familiar look and feel of your blog just to login.

So if you put the login form on a WP page (not post) called “Login”, then your full link to your login page would be: http://YourSite.com/blog/login/

So to change the login page from the default page, and point it to your custom login page, just remove the domain name section from the above WP login page link, and paste the remaining text in this field. So you would enter”¦

/blog/login

“¦in this field.

8. “URL to which User is redirected to, right after log in. Default: /dap/index.php”

After your member logs in, by default, theyre redirected to http://YourSite.com/dap/index.php

You can change this to whatever URL you want (just leave out the domain name from the link).

9. “WordPress Sneak Peek: Show snippets of post (upto the `More` break) even for protected posts?”

With this turned off (set to “N” by default), when someone visits your blog, they will ONLY see posts that they are “eligible” to view. This applies to your blogs main page as well as individual posts. For instance, if you have 100 posts, and have protected 95 of them, then on your blogs home page, your casual visitor will see only 5 blog posts in TOTAL. They wont even see the titles or bodies of the protected posts until they become a member.

If set to “Y” (Show snippets even of protected blog posts), then your users will see content from each blog post of even protected posts, but only up to the “More” button. Clicking on the “More” link would then ask them to login first before they can access the remainder of the content.

So when Googles spider (or your visitor) arrives at your blog after you publish a new post, it/they will see a summary of the post, instead of being redirected to a login page. This is extremely powerful from an SEO perspective.

10. “Use Double Opt-in? If “Y”, then user has to click link to activate a/c. “N” means single-optin.”

By default, “Double Optin” is set to “Y”. It means, when your member first joins your membership site (she doesnt have an account so far), then only the very first time when an account is being created using her email address, then an “Activation Email” (customize on Templates page) with an activation link is sent to your member. They have to click on the activation link to set their account status to “Active”. This process also records their IP address, in case you need them for as “Anti Spam” proof.

But if you set this to “N”, then whenever their account is first created, their account is directly activated by DAP, and no activation link is required to be clicked, and no activation email is sent to your member.

– Ravi Jayagopal
12

Creating a Product

The “Products/Levels > Manage” page has 3 sections.

1. Product details

2. ContentResponder

3. Email Autoresponder

All three are explained below.

1. Product Details

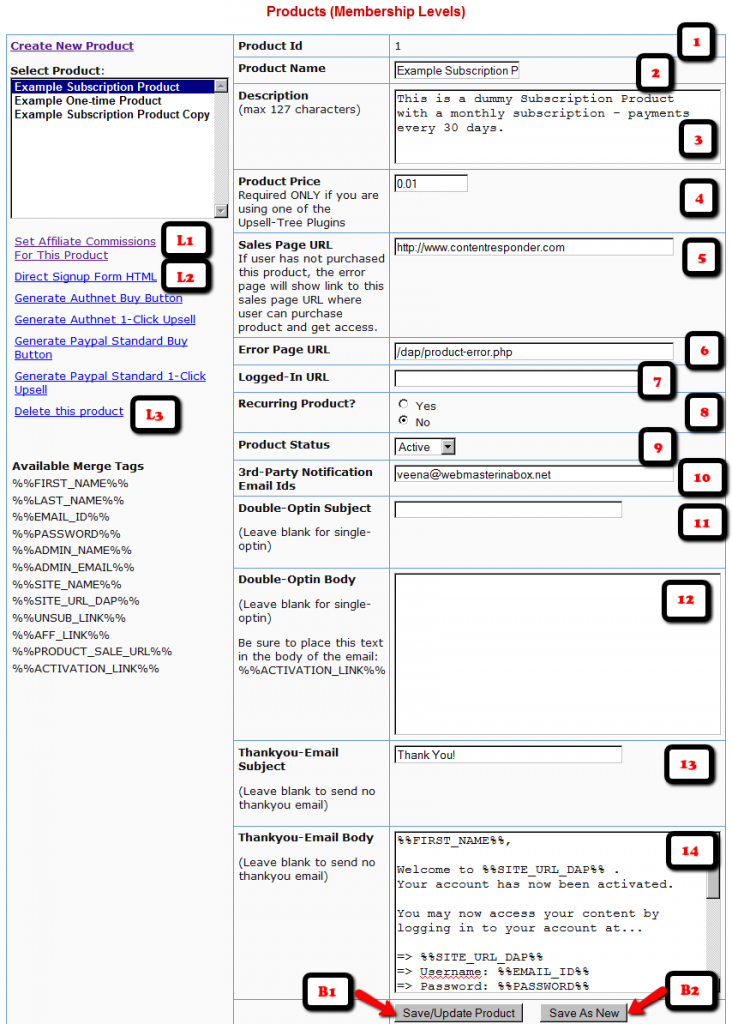
1. Product Id

This is an internal number assigned to every product that is created. Nothing for you to do. It will automatically show a number after you save a new product.

2. Product Name (reqd):

Obviously, this is the name you give your product. So if you are creating a product (subscription-based, or one-time purchase) about how to make money online, then you would call it “How to make money online”. This name will be used by DAP on various screens, emails and reports. So, name it something intuitive, and not something cryptic.

3. Description (reqd)

Use this to expand on what your product does. This field is used on auto-generated error pages and such.

4. Product Price

Required only if you are using DAP itself as a shopping cart, by using one of our “Upsell Tree” Plugins. If you are using a 3rd party cart (like http://1SiteAutomation.com, e-junkie, Paypal standard where the buttons are hosted at Paypal), then you don’t need to enter anything here. Just leave it at 0.00

5. Sales Page URL (optional)

When a user who doesn’t have access to the links in this product, DAP shows her a default error page with a “Lock” symbol, and on that error page, it will say something to the effect of “Sorry, you don’t have access to this Product. Click here to get access.”. And the text “Click here” will point to this “Sales Page URL” will be shown, which the user can then follow to read your sales page and then purchase the product.

6. Error Page URL (optional)

Default value: /dap/product-error.php

If you leave at this default value above, then DAP will show the default error page when a user tries to access a URL that she doesn’t have access to yet, URL to which access has expired, or she hasn’t purchased the product of which the URL is a part of.

Is this a recurring product? (optional):

Pick “Yes” or “No” depending on if this product is a recurring product for which you expect periodic payments to come in.

If you pick “No”, then when the user purchases this product (or you give her direct access from the admin area), then the user is given access from Day 1 to Day 9999.

Price

Enter the price of your product, regardless of whether it is one-time or recurring. This price is used only if you are using the Authorize.net plugin. If you’re using direct Paypal, ClickBank or 1ShoppingCart, then this field is ignored by DAP.

Billing Cycle (optional):

Applicable only if recurring is set to yes. If this is a recurring product, then you need to enter how often billing is done (in days). So, if your product is available for a monthly subscription, then enter “30” (as in, billing occurs once every “30” days).

Product Status (optional):

If you want to temporarily take this product offline, thus revoking access to this product by all users, then change the status to “Inactive”.

3rd Party Notification Email Ids

If you want DAP to send email notifications to 3rd party email addresses (like autoresponder services – eg., Aweber – or to JV partners), then enter one or more email addresses here. Separate multiple email addresses by a comma.

Every time a user subscribes to this product (by paying, or because Admin gave her access), an email is sent out by DAP to all of these email addresses. The “From name” is the subscriber’s name, and the “From email” is the subscriber’s email address.

This is very useful for automatically adding your subscriber to a 3rd party list service that has a “subscribable” email address – like yourlist@aweber.com or 1sa-listid@1siteautomation.com.

Once you fill out the fields, click on the “Save/Update Product” button to save the changes.

Use the same form to make changes to the fields as well.

Integrating With A Payment Processor

The Product Name within DAP should be the exact same (even the case) as the Product Name in your Shopping Cart.

So if you were using a 1ShoppingCart (or private label) to accept payment for selling your digital info product or for access to your membership site, then the Product Name you use in your 1ShoppingCart admin panel should be the exact same name as what you use within DAP.

This is the only way for DAP to know about a new purchase through your 1ShoppingCart cart. And when it parses your 1ShoppingCart notification email, it can figure out that your buyer who purchased that product needs to be added to DAP, so that your buyer can get access to either your info product files, or to your subscription-based site.

13

What is a Product?

In DAP, a “Product” is the same as what some would call as a “Membership Level“.

We call it a “Product” because you really are selling access to this “Product/Membership Level” as an actual product on your web site.

A Product is basically a collection of…

1. “Content” (blog posts/pages/category links),

2. “Files” (.pdf, .mp3, .mp4, etc) and

3. “Emails“ (autoresponder emails)

Think of a Product as one big bucket, into which you add some content, you add some files, you add some autoresponder emails, you set up how the content should “drip”, how the files should drip, how the “emails” should drip, specify if this is a “Recurring” product or a “One-Time” product, specify the price, is there a trial, etc.

Basically, this “Product” is what your members “Buy” access to (or you can also give them access on the backend, without them having to buy – for eg., to your JV partners or business associates).

Whatever content you want your members to have access to when they become a member, is what you would add to this product.

For example, if you are running a subscription site on “How To Train Dogs”, you could give your product the same name “How to Train Dogs”. And to this product, you would add blog posts that you have created (like “Tools to buy”, “Dog Training 101”, “How to reward your dog”, etc).

You can set up Unlimited Products/Membership Levels in DAP. For instance, you can have 3 recurring membership levels (3 different products, called “Platinum Members”, “Silver Members” and “Gold Members”) – and you can add different content to each of these levels.

At the same time, you can have a 4th product – a one-time-sale product – called “Puppy Potty Training” where the buyer just gets access to 1 PDF report.

And you can have a 5th product – a one-time “Video” product – where the buyer gets access to a series of videos, all at the same time (no “dripping”).

A member can have access to one or more (unlimited) products at any given time.

Any time we say content, we mean WordPress blog posts, blog pages and regular files (PDF, zip, doc, mp3, mp4, swf, .jpg, etc).

Adding content/files means that as an admin, you can specify what content on your web site is part of this product, and you can go into each link and specify the access control for that file – like, is this content free or paid, when is it accessible to the user (on day #1, day #7, etc) – and for how long.

You can add content from your web site using the provided file browser within the “Manage Products” page, or you can also add using full URLs (like http://www.YourSite.com/dogtraining/protect-this-post.html).

Adding emails means you can setup an email autoresponse to be a part of this Product, and that email can be configured to go out to the user after “X” number of days after she has joined, or on a specific date (in case your email is date- or time- sensitive.

6

DAP Installation for Non-WordPress, Plain HTML Web Sites

NOTE: If you are using WordPress, then click here for instructions on how to install DAP as a WordPress Plugin.

This documentation below is only for installing DAP on a Non-WordPress, plain HTML web site.

But you don’t need to be doing this!

Did you know you get free installation along with your purchase of DAP? Yes, even if you are only trying out the free trial and haven’t paid us a dime! 🙂

But for some reason, if you do not wish to take us up on the free offer, and wish to do it yourself, then here are the instructions.

We’ve tried to make DAP installation extremely simple. To do a full installation of DAP (non-WordPress version), it will take about 15-20 minutes.

Uploading the files

Download dap.zip from the members area:

Unzip to your desktop. You should see a folder named dap

Upload the entire dap folder on your computer, to the root of your web site. The root directory is where your web site’s home page is usually located. This directory also goes by the name “public_html” or “www” or “htdocs”.

Once this is done, the dap folder should now be accessible by typing in http://www.Example.com/dap/ – but wait – don’t visit that link yet.

Creating the Database

You will first need to create a database for DAP to use and store its data. So log in to your web host control panel, go to the “MySQL Databases” section, create a new database, then create a new user (with password), then finally make sure you “Add” the newly created database user to the newly created database (to give the user access to create, read, update and delete data from the database).

Note down the new database name, username and password.

Installing DAP

Visit http://YourSite.com/dap/install/

Fill out the form there with the above database details.

Put in “localhost” for the database host name (unless your host has specifically asked you to use something else).

Submit the form.

That should create the dap-config.php file within your dap folder.

And you’ll see a series of messages about how the installation went.

That’s it for the basic DAP installation. You just need to set up the cron jobs to complete installation.

Updating .htaccess File

Add the following text to the .htaccess file in your root directory. [NOTE: If you don’t already have one, then simply copy the .htaccess file from /dap/client/website/ to your root directory]

#Paste this at the very end of your .htaccess file
#in your web site’s root folder

<IfModule mod_rewrite.c>
#dap
RewriteEngine On
RewriteBase /
RewriteCond %{REQUEST_FILENAME} -f
RewriteCond %{REQUEST_FILENAME} !-d
RewriteCond %{REQUEST_FILENAME} !dapclient.php
RewriteCond %{REQUEST_URI} !^/dap/
RewriteCond %{REQUEST_FILENAME} !(.*)(\.php|\.css|\.js|\.jpg|\.gif|\.png|\.txt)$
RewriteRule (.*)   /dap/client/website/dapclient.php?dapref=/$1&plug=wp&%{QUERY_STRING}  [L] RewriteCond %{REQUEST_FILENAME} !-f
RewriteCond %{REQUEST_FILENAME} !-d
RewriteCond %{REQUEST_FILENAME} !dapclient.php
RewriteCond %{REQUEST_URI} !^/dap/
RewriteCond %{REQUEST_FILENAME} !(.*)(\.php|\.css|\.js|\.jpg|\.gif|\.png|\.txt)$
RewriteRule (.*)   /dap/client/website/dapclient.php?dapref=/$1&plug=wp&%{QUERY_STRING}  [L] </IfModule>

Setting Up the Cron Jobs

See this link to set up the cron jobs.

That’s it!

For support, open a ticket at http://www.DigitalAccessPass.com/support/

3

Personalization For Your Blog Posts

1) Personalize post Titles and Content with MERGE variables:

%%FIRST_NAME%% –  Gets replaced with their first name
%%EMAIL%%  – Gets replaced with their email
%%MEMBER_HOME_PAGE%%
–  Gets replaced with the ‘login’ page

So if you create a blog post with the title “Welcome %%FIRST_NAME%%“, then when your member views that post after they’ve logged in, they will see “Welcome John“.

2) Personalize the Login Form:

You can put the Login Form on any WP “Page”.

3) Personalize Member and Affiliate Information:

Put Member & Affiliate Info on any WP Page

1 33 34 35