7

Creating Multiple DAP Admins

Adding new User  and giving them “Admin” access

1) Add new user

2) Go to “Users > Manage”, search for user (that you wish to make an Admin) by email id or last name.  User is displayed in search results.

3) Click on user’s “Full Name” – it will bring you to their profile page where you can edit their user information

4) Change “Account Type” field to “Admin

5) Click “Update User” button

Giving existing User “Admin” access

Start from step (2) above

That’s it.

NOTE: These newly created admins will have the exact same access and privileges as you do (as the ‘original’ admin who created these other admins). They can do whatever you can do – add/delete/modify users, products, access reports, change affiliate info, etc. They can do ANYTHING that you can do in the Admin Dashboard. Just be aware of that.

4

Troubleshooting Content Access

User Can’t Access Content

By far, this is the most frequently asked support question. So let’s start by addressing that real quick…

If a User can’t access a piece of content (blog Post, Page, File, etc), then there are only a very few reasons for that…

  1. User doesn’t have any access to the DAP Product (where the content in question is protected as part of).
  2. User is a FREE user having FREE access to this specific Product, but the content within the Product itself has been marked as being available to PAID users ONLY.
  3. User does have access, but access has expired
  4. User account status is Inactive because they’ve not yet double-opted in
  5. User account status is Locked (because they reached the IP login limit, and got locked out of their account)

In all cases, the main place to start troubleshooting is with the Users > Manage page. Search for the user’s email id (who is reporting or experiencing the content-access issue). See what Products they have access to, check their Access Start & End dates, check their account status, etc.

So let’s go over some of the basics, and some more detailed solutions for such issues.

Important Basics

Use two different browsers for testing. Not two different browser tabs, but 2 completely different browsers – like Chrome and FireFox, or FireFox and Internet Explorer. Log in as DAP admin using one browser, and then as a regular user in another browser. That way, you keep the access separate, and your testing will be clean and easy.

If you are using, say, Firefox, you are logged in to DAP admin, and are browsing your blog or trying to access content on your blog, then you will only have access to the content that the admin user has access to. You, as the DAP Admin, DO NOT have automatic access to every product by default. You will have to manually give yourself access to every product you create. And if you want yourself to have “PAID” access, then you have to mark yourself as “PAID”.

That is because, if DAP gave you automatic access to all products, then you will go ahead and protect a blog post, try to access that blog post, and DAP will give you access to that content because you as admin have automatic access to the product. And then you will wonder “Hey, I protected a blog post, but I’m still seeing it.

It’s Probably Not DAP

We realize that your first gut reaction is to blame DAP :-). That’s what we would’ve done too, if we hadn’t developed DAP.

But please note that whatever issue it is, you can be 99% sure that it’s not a bug. Because access-related bugs are extremely rare. We also do a lot of pre-release testing, then we release a beta version, then we get hundreds, if not thousands of people to try the beta, iron out the issues, and then release the final version to everyone else. So if there were a bug, it would’ve been caught a long time before it gets to you.

So we request you to approach things with an open mind, and try to think through calmly (and logically 🙂 why a certain user does not have access to a certain piece of content.

Now, on to more specific issues and specific answers…

1) I have protected a blog post as part of a Product. But I can still access it.

Short Answer: If you have protected a post/page/file, try to access it, and are able to do it, then it means you DO have access to it. Now let’s troubleshoot so that you understand the “how” and the “why”.

  • Have you protected the page/post by adding it to a Product? If you don’t add it to a DAP Product, the post/page/file won’t be protected.
  • Who are you logged in as? As DAP Admin? Or as a regular member?
  • Now by logging in as DAP Admin, if you search for this logged-in user by email id or last name on the “Users > Manage” page, you will see that the user probably does have access to the product to which the post belongs
  • Are you already logged in a a user who has access to that link?
  • Maybe logged in as DAP Admin, who maybe already has access to the Product, which is why you are able to access the link? If so, either log out of DAP, or visit your blog in a completely new browser (if you’re logged in as DAP Admin in FireFox, then visit your blog using Internet Explorer).

2) I have protected a blog post as part of a Product. The User’s account shows as having access to it when I look him up in the DAP Dashboard, but the actual user cannot access it in their browser.

Short Answer: If you have protected a post/page/file, try to access it, and are able to do it, then it means you DO NOT have access to it. Now let’s troubleshoot so that you understand the “how” and the “why”.

  • Who are you logged in as? As DAP Admin? Or as a regular member?
  • Whoever you are logged in as, make sure that user (admin user or regular user) has access to the product to which the post belongs
  • Have you added the post as a “PAID” or as “FREE”?
  • If you have marked the post as “PAID”, make sure the user also is a “PAID” user (either there must have been a real transaction, or you must have manually marked him as “PAID”). Because free users cannot access content that has been marked as “PAID”.
  • Maybe the user’s access to the product has expired. Check the user’s “Access Start Date” and “Access End Date” for that product. The start date should be current (not be in the future) and the end date should be current (shouldn’t be in the past, which means his access to the product has expired)

3) Free user can’t see protected content

You’ve created a free product with pages or posts that are only accessible to this membership type. The problem is that the users can’t actually access this content.

1. Log into your DAP system and go to the Products/Levels > Manage page.
2. Select your product in the General Settings tab, then click the ContentResponder tab.
3. In the Content Responder tab, you’ll see “edit” hyperlinks beside each of the pages/posts you’ve protected. Click the one for the page that’s causing the problems.
4. The “Drip Settings” popup will open now. In that popup, set “Is Free? (i.e., Accessible toFree users too?” to “YES”.
5. Click Save/Update resource.

4) I don’t want the links to all my protected blog posts showing up on my blog’s home page

Make sure you have “Sneak-Peek” turned off in the DAP Admin Config section. Once you do that, posts that are protected will not be displayed on the home page as well as if someone tried to visit the link directly.

5) Why do I see the “Lock” symbol on my blog’s home page?

It’s possible that you have no published posts (it’s a new blog), or you have probably protected all of the posts by adding them all to a DAP Product.

6) I have protected a blog post, but the entire blog post shows up, with the lock image at the very bottom

This is probably because you have turned on “Sneak-Peek”, but have not inserted the “More” tag into the post/page in question.

  • Do you want a part of the protected content (like a “snippet”) to show even for users who are not eligible to access the post or page? If yes, then go to “Setup > Config > Advanced > WordPress Sneak Peek: Show snippets of post (upto the `More` break) even for protected posts?” and change the setting to “Y”, and save.
  • If you turn on Sneak-Peek, then you *must* insert the WordPress “More” tag into every single blog post and page that you currently have protected.

So for the above issue, do one of the following…

1) Turn Sneak-Peek to off (set it to “N”)

– OR-

2) Insert the WordPress “More” tag into the post/page.

Doing either one should resolve this issue.

7) Members getting locked out because access end date is in the past

The only time a member’s access end date goes into the past, if their recurring payments are no longer coming in.

Which means, either they have canceled (or gotten a refund), or your membership level’s lifecycle has ended (like, if your Product/Level was a micro-continuity subscription program that lasts only for 6 months).

If the payments are still coming in, their end dates should keep getting extended by DAP automatically.

If payments are coming in, but the dates are not getting extended, then the payment link between DAP and your Payment Processor somehow broke, and you need to visit the Payment Processor integration documentation for your specific payment processor, and troubleshoot why the payments are coming in fine, but DAP is not processing them.

To ensure members’ access does not stop, make sure that their payments do not stop, and the recurring cycles in the product match that of your payment processor. Say, if your payment processor is processing recurring payments every 30 days, then DAP’s recurring cycles (on the Product page) should also be 30. If it’s 31, then DAP’s should also be 31.

Tip: It’s not a bad idea to set DAP’s recurring cycle day to 1 more than your payment processor’s recurring cycle, just in case your payment processor takes an extra day to process the actual payments. So in that case, if you have set your Payment processor to charge every 30 days, you could set DAP’s recurring cycle to 31 (one extra day grace period, just in case the recurring payment does not get processed on time).

8) I have newly setup DAP. Protected a blog post as part of a Product. But I can still access it, and I am not logged in.

If this is a new site that has just setup DAP, it is possible that the DAP changes that need to go into your .htaccess file at the main folder of your blog in question, didn’t go in correctly.

  • Step AA: Open the .htaccess file at the root of your blog, then see if there’s text that looks like this:
    #—– START DAP —–
    RewriteCond %{REQUEST_FILENAME} -f
    RewriteCond %{REQUEST_FILENAME} !-d
    RewriteCond %{REQUEST_FILENAME} !(.*)(\.php|\.css|\.js|\.jpg|\.gif|\.png|\.txt)$
    RewriteCond %{REQUEST_FILENAME} (.*)/wp-content/uploads/(.*)
    RewriteRule (.*) /dap/client/website/dapclient.php?dapref=%{REQUEST_URI}&plug=wp&%{QUERY_STRING}  [L] #—– END DAP —–If you see it, then simply open a ticket, and we’ll troubleshoot.
  • Step BB: If you don’t see it, then log in as WP Admin, go to “Settings > Permalinks”. Then pick a permalink structure OTHER than “default”. Then save the setting. Even if something other than “default” is already picked, simply hit the save button anyway. That’s when the .htaccess gets updated. Now go to Step AA above and verify the text in the .htaccess file. If it’s still not there, just open a ticket.

9) After a member logs in, they’re unable to view the member page – they get a “Sorry, cannot access” type error.

Some questions to ask that will hopefully lead you to the answer…

  • Did you log in as them in a fresh browser and was your experience the same problem? Or is it a user-error on their behalf?
  • What product did they purchase?
  • Do they have valid “non-expired” access to the product?
  • What is the “Logged-In URL” field of that Product in DAP? Is that the right URL to which they should be going to after they log in?
  • If so, then is the “Logged-In URL” page or post actually protected as part of that same product that they actually purchased?
  • If that field is empty, what is the value of the global setting under “Setup > Config > URL to which user is redirected to, right after log in” field?
  • What is the actual URL that they’re “Supposed” to see after they login? If you went there directly, what do you see?


NOTES

1)  DAP Admin does not have access to content by default. You need to give access to the DAP admin to the products in the DAP Manage Users Page.

2)  If a user reports they cannot access content, it could be because their access has expired. So…

a) Login as DAP Admin, go to DAP Users > Manage page, search for user by email id (or other).

b) Make sure they have “valid” access to the product

c) Look at their access start and end dates. If access end date is earlier than the current date then you can manually extend access for legitimate users by clicking on the ‘Modify link’ under ‘Product Access’ in DAP manage users page.

d) Make sure that if it’s a PAID USER, then the user record is marked as ‘Paid or has a transaction Id’ under the ‘Trans Id’ column in DAP manage users page.

Users marked as “FREE” can only access content that is marked as “Free” in the DAP products page -> Content Protection area.

13

1-Click Upsells With Paypal Standard

1-Click Upsells, Downsells and OTO’s are now extremely simple to implement using the new “Upsell Tree” plugin for DAP.

And this particular plugin works with Paypal Standard! Which means you don’t need a merchant account any more.

All you need is a regular Paypal Business Account.

Please note that this is not “True 1-Click”, like you can do with a real merchant account – because of the very fact that Paypal expects your buyers to log in at least once into their paypal account through Paypal.com, and then at the end of the Upsell-flow, there is one final confirmation page. So it’s more like “2-Click Upsells” really.

If you want true 1-Click Upsells, then you need to have a merchant account through Paypal Website Payments Pro or Authorize.net.

IMPORTANT: What you need before you can use this plugin

  1. You need a Paypal (Standard) Business or Premier account
  2. You must have SSL (secure server) enabled on your web site. Ask your web host to enable SSL for your site.
  3. You must have a working version of DAP 3.7+
  4. You cannot sell a “Recurring” product as an Upsell – recurring products have to be the first product in the flow.
  5. Here’s what you CAN do: You can have a recurring product as the very FIRST product that they purchase (when they first click on the “Buy” button on your main sales page, and then you can offer any number of “One-Time” Products as upsells or downsells.
  6. Here’s what you CANNOT do: Offer a “One-Time” product as your first product that they buy, and then try to upsell them to a “Recurring” Product. Unfortunately, this is a Paypal problem at this time.

Installation & Setup of UpsellTree For Paypal Standard

  1. You need to be running at least DAP v3.7 for this plugin to work
  2. Purchase the UpsellTree plugin if you haven’t already done so, login to your DAP account and download the plugin zip file, PaypalStandardUpsellTree.zip .
  3. Unzip the file to your desktop. That will create a new folder on your desktop, called “PaypalStandardUpsellTree” which will have all of the files inside.
  4. Upload all the files inside, directly to your “dap” folder on your web site.
  5. DO NOT upload the folder itself. Just the files inside.
  6. Installation of Paypal Upsell-Tree Plugin is complete.
  7. Next, log in to your Paypal account.
  8. Click on “Profile”
  9. Click on “Request API Credentials” (under ‘Account Information’ section). It will bring you to the API access page.
  10. Under Option 2, click on “Request API credentials” to create your own API username and password.
  11. Click on “Request API signature”
  12. Click on “Agree & Submit”
  13. Note down the following pieces of information:
    * API Username
    * API Password
    * API Signature
  14. That’s it as far as your Paypal account is concerned. Now back to DAP on your site.
  15. Log in to your DAP Dashboard
  16. Go to “Setup > Config“. On that page, click on the “Paypal” link in the links towards the very top of that page (or scroll down to the “Payment Processing: Paypal” section).
  17. Enter the 3 pieces of information (from Step #13 above) into the Config fields 7, 8 & 9 on that screen: Paypal API Username, Paypal API Password, and Paypal API Signature. Cick  “Update” and save the changes.
  18. Generating the Paypal Upsell Buy Buttons:
    In the DAP Dashboard menu, go to Payment Processing > Generate Buy Button
    You will now see that you’re on the default tab “Paypal Standard”.
  19. So now select the DAP Product for which you’re trying to generate the buy button, from the Product list.
  20. Now, once the page has refreshed, scroll down to the bottom of this page, and you’ll see an expandable section with the heading “Paypal Standard 1-Click Upsells
    Expand that section by clicking on the “+” image.
  21. You will see the following two links in that section…Generate Paypal Standard 1-Click Primary Button
    Generate Paypal Standard 1-Click Upsell ButtonThe first one is for generating the buy-button code for your primary product (the very first product in the flow). The second one is for all upsells.So if this is the first time you’re doing this, and for your main product, click on the first link.
  22. If all of your Product’s settings are correct, then you’ll see a small popup that contains the buy-button HTML code. Paste this code into a blank notepad (or text editor) window.
    So let’s say this is what the code you got looks like…<form name=”generate_paypal” method=”post” action=”/dap/PaypalSetExpressCheckout.php”>
    <input type=”hidden” name=”item_name” value=”Facebook Secrets Subscription”/>
    <input type=”hidden” name=”description” value=”This is a Subscription Product with a monthly subscription – payments every 30 days.” />
    <input type=”hidden” name=”amount” value=”10.00″ />
    <input type=”hidden” name=”trial_amount” value=”0.00″ />
    <input type=”hidden” name=”total_occurrences” value=”9999″ />
    <input type=”hidden” name=”is_recurring” value=”Y” />
    <input type=”hidden” name=”recurring_cycle_1″ value=”365″ />
    <input type=”hidden” name=”recurring_cycle_2″ value=”365″ />
    <input type=”hidden” name=”recurring_cycle_3″ value=”365″ />
    <input type=”hidden” name=”payment_succ_page” value=”https://YourSite.com/dap/continue.php?url=/dap/upsell1-paypalstandard-sample.html” />
    <input type=”hidden” name=”payment_err_page” value=”https://YourSite.com/dap/paymentError.php” />
    <input type=”hidden” name=”payment_cancel_page” value=”https://YourSite.com/dap/cancel.php” />
    <input type=”hidden” name=”payment_gateway” value=”paypal” />
    <input type=”hidden” name=”is_submitted” value=”Y” />
    <input type=”image” src=”/dap/images/btn_xpressCheckout.gif” align=”left” width=”200″ height=”50″ style=”margin-right:7px;” value=”Submit” alt=”Submit”>
  23. Look at the payment_succ_pagetag in the generated button code and have it point to your sales page for your upsell.In the above example, the upsell page is called upsell1-paypalstandard-sample.htmland it’s under the dap folder.Put this HTML code on the primary product’s sales page. This is the first product in the flow.
  24. Now, you need to generate a button for your upsell product. So go back to Payment Processing > Generate Buy Button . This time, pick the Upsell product from the list.
  25. Now scroll down to the bottom of this page, expand the section “Paypal Standard 1-Click Upsells” , and this time, click on the second link there, because you’re now generating a buy-button for the Upsell product.Generate Paypal Standard 1-Click Primary Button
    Generate Paypal Standard 1-Click Upsell Button
  26. Say this is the button code you get this time…<form name=”generate_paypal” method=”post” action=”/dap/PaypalAddToCart.php”>
    <input type=”hidden” name=”item_name” value=”Upsell 1″/>
    <input type=”hidden” name=”description” value=”This is a dummy Subscription Product with a monthly subscription – payments every 30 days.” />
    <input type=”hidden” name=”amount” value=”10.00″ />
    <input type=”hidden” name=”trial_amount” value=”0.00″ />
    <input type=”hidden” name=”total_occurrences” value=”9999″ />
    <input type=”hidden” name=”is_recurring” value=”Y” />
    <input type=”hidden” name=”recurring_cycle_1″ value=”365″ />
    <input type=”hidden” name=”recurring_cycle_2″ value=”365″ />
    <input type=”hidden” name=”recurring_cycle_3″ value=”365″ />
    <input type=”hidden” name=”payment_succ_page” value=”/dap/PaypalCheckoutConfirm.php” />
    <input type=”hidden” name=”payment_gateway” value=”paypal” />
    <input type=”hidden” name=”is_submitted” value=”Y” />
    <input type=”submit” value=”AddToCart” />
    </form>
  27. Now again, notice the payment_succ_page in the generated button code. You will see its pointing to /dap/PaypalCheckoutConfirm.php.
    a) If this is the last upsell, then leave it pointed to /dap/PaypalCheckoutConfirm.php.
    b) If this is NOT the last upsell, then update it to point to the url of the 2nd Upsell page (like we did for the primary product to point to the first Upsell sales page) and repeat the process above for the next upsell page.Bottom-line: Make sure that both the buy-button code as well as “No Thank You” link on the last upsell or downsell page, points to /dap/PaypalCheckoutConfirm.php
  28. When your buyer reaches the final checkout confirmation page (PaypalCheckoutConfirm.php) then they can review all of the products in their “Upsell Cart”, and buy them all instantly and all together, without having to go back to Paypal ever again.
  29. Things To Note:
    a) If you’re doing upsells, the only thing you need to do is, look for the “payment_succ_page” field in the above form. By default it will point to:
    https://www.example.com/dap/continue.php?url=/dap/upsell1.html
    b) Modify the file upsell1.html within your dapfolder, to create your 1-Click Upsell offer. Or if you don’t wish to use 1-Click upsells, you can make just about any kind of upsell offer on that page. The upsell1.html that comes with the plugin has a sample upsell page already created for you, just so you get an idea of what that will look like.b) On the upsell page, if you want to upsell say, Product B, then make sure you set up “Product B” ahead of time in DAP, and set up the price and recurring options.
    c) Then for upsell products only, click on the “Generate Authnet 1-Click Upsell” link to generate the 1-Click Upsell Buy button code, as the upsell buy button is slightly different than the ‘regular’ buy button code. Now take the upsell buy button code like you did before, and paste it in upsell1.html.Repeat this process for unlimited upsells, downsells and one-time offers. No limits.

“No, Thank You” Buttons & Links

On every upsell page, you must also include a “No, Thank You” button or link that will allow your buyer to skip your upsell or downsell, and go to the next part of the sale.

For all upsells that are not the last upsell, you can link this button or link to the next upsell in the chain. So basically, on Upsell 1, they can either take the upsell1 (whatever your offer is) by clicking on the buy button, or click on the “No, Thank You” button/link, and you could then either taken them to the URL of Upsell2, or Downsell 1, or if this is the last upsell in the flow, then you could send them directly to the Paypal Upsell Summary Page /dap/PaypalCheckoutConfirm.php

Creating a “No, Thank You” button

Button to take them to next Upsell/Downsell:

<form name=”nothankyou”>
<input type=”button” name=”nothankyoubutton” value=”No, thank you, I wish to skip this incredible offer” onClick=”location.href=’https://YourSite.com/dap/continue.php?url=/dap/upsell2.html‘;”>
</form>

Feel free to copy the above HTML button code for the no-thankyou button. However, paste it into a text editor and be careful and don’t delete any of the HTML code, and only change actual URL’s or the button’s value (which is the text your buyer will see on the button).

Button to take them to final Checkout Summary page:

<form name=”nothankyou”>
<input type=”button” name=”nothankyoubutton” value=”No, thank you, please complete my order” onClick=”location.href=’/dap/PaypalCheckoutConfirm.php‘;”>
</form>

Creating a “No, Thank You” link

Link to take them to next Upsell/Downsell:

<a href=”https://YourSite.com/dap/continue.php?url=/dap/upsell2.html“>No, thank you, I wish to skip this incredible offer</a>

Link to take them to final Checkout Summary page:

<a href=”/dap/PaypalCheckoutConfirm.php“>No, thank you, please complete my order</a>

That’s it.

While it looks like a LOT of steps, that is only because we have to explain the steps in detail so they are clear. In reality, it is very simple to set up, and starting from scratch, if you have DAP & SSL already installed, it shouldn’t take you more than 1/2 hour to set up your 1-Click Upsells/Downsells/OTO’s. And if you’re not using Upsells/Downsells, then it can be done even faster.

If you have any further questions, feel free to open a support ticket, and we will assist you in getting this going.


Click here to buy our Paypal Upsell-Tree Plugin

18

Customizing Error Messages On Protected Pages

When an unauthorized visitor tries to access a protected page or post, you can choose from among two things that can happen:

1) Display an “In-Page Error Message“: They can be presented with an error message that shows a “lock” image. You can show the standard DAP version, or you can customize this message and add your own text.

-OR-

2) Redirect to Error Page: They can be redirected to any other page of your choice (WordPress page or post, or a completely non-WP page)

1. Display “In-Page” Error Message

“In-Page” basically means that this message will be shown on the same page that the user is trying to access (to which they do not have access). So basically, the content of the very post or page they’re trying to access, will be replaced by this “In-Page” error message.

The default error messages shown by DAP are as follows.

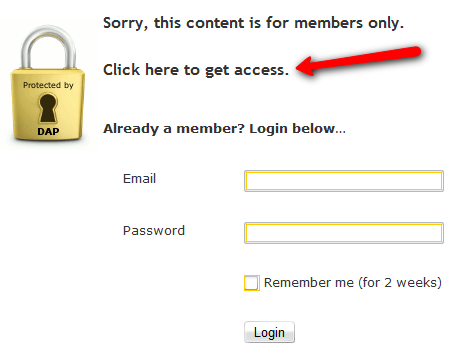
A) If a visitor is NOT logged in, then they will see…

(Image A)

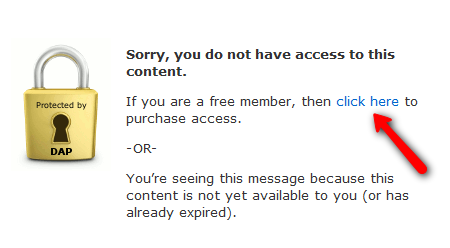
B) If a visitor IS logged in, then they will see…

(Image B)

If you see Image A above, there is a line of text that says: “Click here to get access”.

And in Image B above, there is a line of text that says: “If you are a free member, then click here to purchase access”.

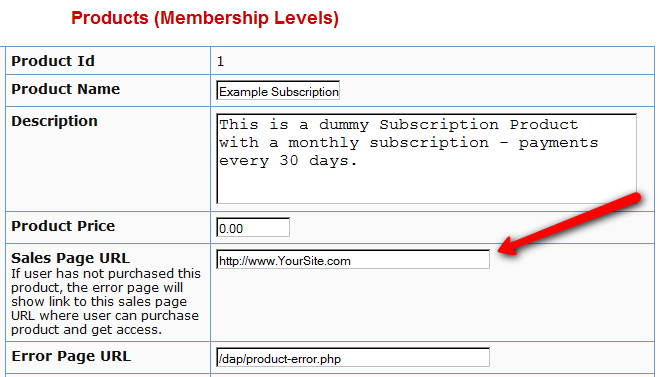
In both cases, the text “click here” is actually a link. And by default, that link will point to whatever you put in the “Sales Page URL” in your DAP Product (to which the above post/page is part of). See Image C below.

(Image C)

Displaying Custom Error Message

If you wish to customize the above standard error messages, then here’s what you need to do:

  1. Go to /dap/inc/ folder. There are two files there:error-loggedin.php , and
    error-notloggedin.php
  2. Make a copy of both files on your computer, and add the text ‘custom‘ to the front of each of the file names of the newly copied files. So the new files are now called: customerror-loggedin.php , and
    custom
    error-notloggedin.php
  3. Open customerror-loggedin.php and customerror-notloggedin.php and modify them as you please, change the text, formatting, font size, color, etc.
  4. Upload the new files to the same folder – /dap/inc/ – as the original error files.That’s it. DAP will then ignore the old error files, and start displaying your new “custom” error messages.

2. Redirect to Error Page

Instead of showing an error page (default or custom, from (1) above) you can also redirect the un-authorized user to a completely new page/post of your choice.

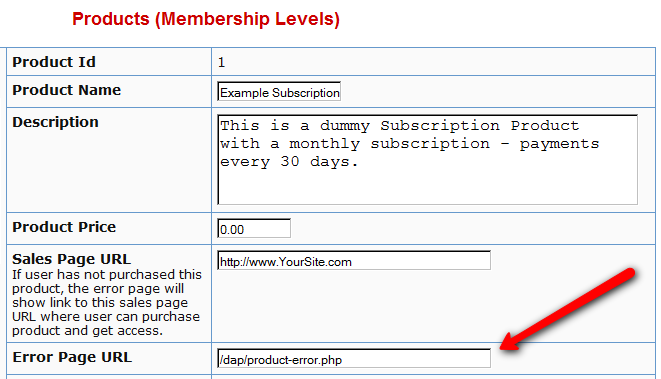
If you see Image D below, you will see that on the DAP Products page, there is a field called “Error Page URL“.

By default, this is pointing to /dap/product-error.php

(Image D)


Change this to any link you want. Examples…

http://YourSite.com/myerrorpage.html , or

http://YourSite.com/myerrorpage/

Whatever you put in the above field (Error Page URL) is what page the user will be redirected to, when they access a page that they don’t have access to (either because they have not logged in, or because they are logged in, but don’t have access to it yet).

66

Forum Integration

DAP currently integrates with all WordPress-based Forum plugins (some of them mentioned below) as well as two non-WP based (vB & XenForo).

So if a member logs in to your membership site via the DAP login form, then they will also automatically be logged in to your forum. That’s called “Single Sign-on” and DAP supports it with all of the above forum software.

Which Forum To Use With DAP?

The WordPress-based forums listed above (Simple:Press, Mingle, etc) are not really full-featured (like XenForo or vBulletin). DAP doesn’t – and cannot – protect individual forum posts or threads if you used the basic WordPress-based forums. But they’re all free, have pretty decent forum features, easy to set up and use, and will work just fine for most people.

However, if you want a more full-featured forum software that will give you greater control over many details, allow you to protect content at a thread or forum level, and want tons of user and admin features, then we highly recommend going with XenForo (XF) or vBulletin (vB). XF and vB are not free, have a slightly bigger learning curve than the simple WP forum plugins, and require more setup and maintenance overall. And if you want the best forum plugin, and are willing to pay the price (dollar-wise as well as effort-wise) and put in the time to set it up, then XF is the way to go, and DAP integrates extremely well with XF.

Now, the rest of this post is about integration of DAP with the WordPress-based forums.

(For XenForo integration details, click here
)

(For vB integration details, click here)


Integration with BuddyPress, bbPress, Simple:Press, Mingle, etc

What this essentially achieves, is that once your forum plugin has been integrated with DAP (explained below), anyone who is a member in your DAP-powered membership site, will also be automatically be logged in to your forum when they log in to your membership site.

So they won’t have to log in twice [like, once into DAP and once into your forum].

Here’s how you set up the DAP/forum integration.

  1. Download the 3rd party WordPress forum plugin
  2. Install it as per their instructions. We don’t support the installation or setup of the forum plugin itself.
  3. Log in to your DAP Admin Dashboard and click on “Setup > Config”.
  4. You have two settings on the page that applies to forum integration:
    Sync DAP User data and WP User data
    Sync WP data only for PAID users
  5. Pick “Y” or “N” for each of them, and you’re all set.

Now, a quick explanation of both settings.

1) Sync DAP User data and WP User data

If you turn this to “Y” (for “Yes”), then every time someone logs into DAP, they’re automatically logged into WordPress too (with a “user” WordPress role). And because they’re logged into WordPress, that means they’re also logged into your forum (because you are using a WordPress-based Forum Plugin which already integrates with your WordPress installation)

2) Sync WP data only for PAID users

This one matters only if you have set (1) above to “Y”.

So once you have decided to turn on the DAP/Forum plugin integration, then if you want only your “PAID” members to have access to the forum, then set this to “Y”.

If you want both FREE and PAID users accessing your forum, then set this to “N”.

26

DAP Scenarios (Use Cases)

The Basics

When you configure a product as “Free”, you can use a “Free Signup Form” to sign up users for that Product.

If not, then the only way for people to get access to that Product, is to either buy it, or for the DAP Admin to give them access to it manually.

Now, let’s see the different ways in which you can use DAP.

Case 1: How to use DAP as an Email List

  1. Create and save a Product (a DAP “Product” is same as “Membership Level” same as “Email List”)
  2. Just add the Autoresponder email sequence to this product.
  3. No need to add any content, because you’re not dripping content, but dripping just emails.
  4. Click on the “Direct Signup HTML” link and copy the HTML
  5. Publish the HTML on any page of your site, just like you would publish a signup form from Aweber or GetResponse.
  6. The form collects “First Name” and “Email” from your visitor
  7. Anyone who signs up through this form is given access to that Product, and added as a “Free” user
  8. You can continue to drip autoresponder emails on them, and also send them email broadcasts.

Case 2: Free Sign-up. Then Promote Paid One-off Products

  1. There are no time limits or trials here. User signs up for free. You continue to promote your products to them.
  2. You will need to create 2 products here – 1 Free and 1 Paid
  3. Create your paid Product – “Paid Product 1” as a Non-Subscription product (Is Recurring = No)
  4. Set up the content protection, dripping (if any) and emails.
  5. Create a new free Product  – “Free Product” – (which contains just free content and autoresponder emails)
  6. Use Direct-Signup to signup users for “Free Product”.
  7. “Joe Customer” signs up for free through this form, and becomes a free member.
  8. Keep dripping free content and emails on them. In the emails, you can promote the sales page(s) for your Paid Product(s).
  9. When Joe Customer eventually buys “Paid Product 1”, then now Joe automatically get access to “Paid Product 1”.
  10. When you search for Joe Customer’s email on the Users > Manage screen, you will see that Joe now has access to 2 products: “Free Product” and “Paid Product 1”

Case 3: Free Trial with Forced Continuity Forever

  1. You offer a 30-day free trial. After trial, subscription payments every 30 days, forever, until they cancel their subscription.
  2. Set up a Product in DAP as…
    Is Recurring: Yes
    Recurring Cycle 1: 30
    Recurring Cycle 2: 30
    Recurring Cycle 3: 30
  3. You can’t really do a “free” trial. You must charge at least 1 penny ($0.01) [because otherwise, Paypal (for instance) doesn’t send the right information in the IPN. And credit card processors won’t even validate the credit card if you try to charge $0.00, so when it’s time for the subscription to be charged after a month, you will see a lot of declines and rejected cards].
  4. Set up your buy button (in Paypal, ClickBank, 1ShoppingCart, etc) to match the above subscription set up in DAP (from Step #2 above): A $0.01 trial for 30 days, then recurring payments of $X every 30 days, forever (never ends).
  5. Make sure you use the same Product Name in both DAP and in your buy button.
  6. Publish the button on your sales page. When someone clicks on the button and signs up (you’ve already set up the payment processor integration during setup), DAP will automatically give them access to this product for 30 days (Recurring cycle 1).
  7. After 30 days, if subscription payment comes in as scheduled, then the user’s “Access End Date” is extended by another 30 days. So they will get access to all the dripped content from Day #31 to Day #60.
  8. If user cancels before the trial is over (or their subscription payment fails for some reason), then their “Access End Date” stays the same, which means it automatically expires.

Case 4: Paid Monthly Recurring Product with No Free Trial

  1. Create a Product in DAP as…
    Is Recurring: Yes
    Recurring Cycle 1: 30
    Recurring Cycle 2: 30
    Recurring Cycle 3: 30
  2. Set up your buy button (in Paypal, ClickBank, 1ShoppingCart, etc) to match the above subscription set up in DAP (from Step #1 above): Instant payment of $X + Recurring payments of $Y every 30 days, with an forever (never ends).
  3. Make sure you use the same Product Name in both DAP and in your buy button.
  4. Publish the button on your sales page. When someone clicks on the button and signs up (you’ve already set up the payment processor integration during setup), DAP will automatically give them access to this product for 30 days (Recurring cycle 1).
  5. After 30 days, if subscription payment comes in as scheduled, then the user’s “Access End Date” is extended by another 30 days. So they will get access to all the dripped content from Day #31 to Day #60.
  6. If user cancels before the trial is over (or their subscription payment fails for some reason), then their “Access End Date” stays the same, which means it automatically expires.

Case 5: All Free Content, Available only to “Registered” Members, Dripped Content

  1. You wish to make all of your content available for free, but users must “Register” first (i.e., sign-up using their email id) so that you can continue to send them emails and drip content so that they don’t get it all on day #1 and then un-subscribe from your list.
  2. Create a Product, say, called “Marketing Tips”.
  3. Set “Is Recurring” to “N”.
  4. Add content to this product (blog posts, files, etc). Set up the drip for this content (day #1, day #7, etc)
  5. Set up email autoresponders, if any, and add to this product.
  6. Click on “Direct-Signup HTML” on the Product page, copy signup-form HTML, publish on any page of your web site.
  7. “Joe Member” signs up for free through this form, and becomes a free member.
  8. DAP will keep dripping free content and emails on members.

Case 6: All Free Content, Available only to “Registered” Members,All available Day 1

  1. Almost everything is the same as Case 5 above.
  2. Except when you set up the dripping, set all of your content to be available on Day #1.
  3. So when user signs up through your squeeze page, they have access to all of the content right away.

Case 7: Packaging Same Content In Different Ways

So you would like the ability for a reader to buy access to a single blog post, or purchase a “Day Pass” to view all posts, or purchase a “Month Pass” or even a “Annual Pass”.

Here’s how you would do it:

1) Create a separate product for each scenario. So you end up with 4 Products:

i) “Single Post“: Has just one blog post as part of it

ii) “One-Day Pass“: Contains all blog posts, dripping for all set to start on Day #1, and also end on Day #1 itself

iii) “One-Month Pass“: Contains all blog posts, dripping for all set to start on Day #1, and end on Day #30

iv) “Annual Pass“: Contains all blog posts, dripping for all set to start on Day #1, and end on Day #365

Create 4 buy-buttons and publish them all on your sales page. Whichever product your reader purchases access to, DAP will automatically give them access to all of the content within that product, and drip it on them just the way you have set it up.

Case 8: Selling An Ebook/Report/Zip/Doc

So you would like the ability for a visitor to buy your ebook/PDF/report

Here’s how you would do it:

1) Create a separate product for your ebook – call it “Super-Duper-Report” .

2) Create a single WP page/post that has some copy about the ebook, and then directly links to the ebook from the page/post itself.

3) Protect both WP page/post as well as the direct link to your ebook on your server (like http://YourSite.com/wp-content/uploads/super-duper.pdf) as part of the product from Step 1.

4) Set the “Logged-In URL” for the Product to be the WP page that talks about and links to the ebook.

5) Create buy-button for DAP Product, and publish it on your sales page.

Case 9: Upgrading From Lower-level to Higher-level

So you would like the ability for a member to upgrade from one membership level to another (lower level to higher level – eg., Silver to Gold).

Please note that if a member is already subscribed via, say, Paypal, and their subscription is already stored as say 9.99 a month, then there’s no way to automatically upgrade them to another level that requires a payment of $19.99. There’s no way to modify the stored monthly amount in Paypal from 9.99 to 19.9 – Paypal won’t allow you to modify stored subscriptions.

So your only option is to get them to sign up newly for the higher-level, and then cancel their subscription to the lower level. Or if you’re using say a payment gateway like Authorize.net, then you can log in to your merchant back-office, and modify the subscription to start charging 19.99 going forward. That’s one of the greatest flexibilities offered by having your own merchant account.

Case 10: Selling New Product To Existing Members

So you would like the ability for an existing member/buyer to buy a new product from you (one-time or subscription).

This is exactly the same as when you set up the first product. No difference. Somewhere near the buy button, just let them know to use their existing member email during the purchase, if they’re a current member, that’s all.

As long as they use the same email id from their existing DAP account, then DAP will simply add the access to the new product to their existing account once they’ve purchased it.


Case 11: “Magazine Subscription” Model

You want to deliver content as if it were a monthly magazine. Only those who were in for that month, should be able to access that month’s content, and keep access to that content going forward.

You want to set up content to drip for a month.

So, for example…

a) For the month of April, you want only those who joined in April to get access to April’s content and onwards (if they stayed on, of course).

b) Those who joined any time in May should only get access to May content and onwards (but nothing before May).

So here’s what you do…

1) Make sure you set “Setup > Config > Advanced > Give access to previously paid for content” to “Y”.
2) Then, for each piece of content, you would set You also set up actual access start and end dates (note: “dates”, not “days”).

Then, for a post, you would set up…

Start Date: 04-01-2011
End: 04-31-2011

That way, anyone who joins in the month of April, will get access to April content now and onwards.
But anyone who joins on or after 05-01-2011, won’t get access to April content, but they’ll get access to May content now and onwards.

Case 12: Trial Sign-up. Then Promote Manual “Recurring” Upgrade

This assumes that your recurring is not forced-continuity. You want people to sign up for a trial first, and then manually “upgrade” to a recurring subscription. If they don’t do anything at the end of the trial, then their access to the trial product will automatically expire. But you can continue marketing to them to make them upgrade. We will set it up so that once they upgrade, they will be “moved” from the “Trial” product to the “Recurring” product (using “Product Chaining”). So they will no longer receive emails asking them to upgrade.

  1. You will need to create 2 products here: 1 Trial and 1 Recurring
  2. Create a new One-time Product  (Is Recurring = No) called “Trial” and set access duration to be (say) 14 days (assuming 14 day trial)
  3. This contains all content and autoresponder emails that should be available to them during the trial period
  4. Generate buy button for this “Trial” product and put it on your sales page.
  5. Create a new product, “Monthly Subscription” (Is Recurring = Yes) which is a (say) monthly recurring subscription, with payments every 30 days.
  6. Generate buy button for “Monthly Subscription” product and put it on same or different sales page.
  7. Set up a Product Chain that says “If added to Monthly Subscription, remove from Trial”, so if someone upgrades to monthly, then they will no longer have access to trial product. So it makes it easier for you to keep marketing to your trial subscribers without any overlap or confusion.
  8. “Joe Customer” arrives at your web site and signs up for for the trial. He is given access to “Trial” product.
  9. DAP starts dripping content and emails on them. In the emails, you can promote the sales page(s) for your subscription product
  10. Joe eventually signs up for “Monthly Subscription”, then now Joe automatically get access to “Monthly Subscription”, and thanks to the Product Chain that you set up earlier, his access to the “Trial” product is removed. So he is no longer in that trial group.
  11. When you search for Joe Customer’s email on the Users > Manage screen, you will see that Joe now has access to just 1 product: “Monthly Subscription”.
  12. So basically, users will have access to any one of the two distinct products at any given time, which segments them so that marketing to them is straightforward, as you know who you are marketing to.


Case 13: One-Time Offer (or Page) After Free Signup

Q: I am wanting to collect some information from subscriber, but not until they have completed free registration. But page should be shown only once and only the first time they’re logging in.

  1. Create free product in DAP and generate signup form code
  2. In the form code, you will see the hidden form field “request” which will allow you to redirect new subscriber to any page immediately after signup (they will already be logged in to DAP by that time). Set that “request” URL to your page where you have created a set of custom profile fields form them to fill out (see this link for creating custom fields, and see this link for customizing profile page and showing only certain fields on a page).
  3. You can even drip that custom profile page so that it’s available only on first day (start day: 1, end day: 1)

That’s it! So subscriber signs up through your signup form, automatically gets logged in, lands on custom profile page which only shows a few fields that you want them to sign up, and once they submit the form, at the bottom of the form, you can have a link that says “Click here to enter member’s area”, and once they move away from that page, they will never see that page again because there’s no link to that page anywhere in your navigation menus.

Creating a new site (WP) where I would like the ability for a reader to
buy access to
a single blog post,
or purchase a "Day Pass" to view all posts,
or purchase a "Month Pass" or even a "Annual Pass".
22

One-Time Offers (OTO)

OTO’s are now part of DAP. And they’re available for free to all DAP users.

This OTO script can also be used for making Upsells and Downsells too!

Only thing you have to remember is, that these won’t be 1-Click Upsells or 1-Click Downsells.  If you want true 1-Click Upsells, then do check out our plugin, Upsell-Tree, which allows you to do exactly that.

The Basics

  1. There is a file in your dap folder, called continue.php . This is the OTO script.
  2. Create and upload as many upsell and downsell pages – named, say, upsell1.html, downsell1.html, upsell2.html, downsell2.html – etc and store them in your root folder – the folder where your home page is (not in the dap folder).

Setting up continue.php

When you set up your buy button, after the sale, configure the “return url” to be:

http://YourSite.com/dap/continue.php?url=/upsell1.html

Of course, you should have already created a page called upsell1.html and uploaded it to the root of your web site (where your home page is).

So after your buyer has purchased your product, and arrive at this first upsell page, the URL they see in their browser will actually look like…

http://YourSite.com/dap/continue.php

They will not see the text “/upsell1.html” in the url, because continue.php would have already stripped out the file name from the end of the link.

So even if they bookmark it or share it with others, the URL they see will just be http://YourSite.com/dap/continue.php – which means they can’t get back to that page, and neither will the people they have shared the link with.

On each upsell page, you can make any offer you want. Let’s say you put the buy button on this upsell page to buy a different product. Now when you create the buy button for this new upsell product, make sure the “return url” for that button, is now…

http://YourSite.com/dap/continue.php?url=/upsell2.html

And you can also put a “No Thanks” button on each of these upsell pages, which could in turn take them either to a downsell page, or to an order completion page (where you thank them for your purchase).

Button Code For “No Thanks”

If your “No Thanks” button is going to lead to a downsell page, then here’s the code:

<form action=“http://YourSite.com/dap/continue.php?url=/downsell1.html” method=”post” >
<input type=”submit” value=”No, Thanks. I’ll skip this special offer” />
</form>

If your “No Thanks” button is going to lead to a final thank you page, where there are no more upsells or downsells, and where you simply thank your buyer for the purchase, then the code for that is:

<form action=“http://YourSite.com/dap/continue.php?url=/thankyou.html” method=”post” >
<input type=”submit” value=”No, Thanks. I’ll skip this special offer” />
</form>

Yes, you do need to be just a little bit technical for this. So, if you absolutely did not understand anything written above, then you should probably not be attempting to be doing OTO’s.

But if you simply have questions about how to use this for what you’re thinking to do, please feel free to ask them in the comments below.

– Ravi Jayagopal

10

Paypal Website Payments Pro Integration

IMPORTANT: PLEASE NOTE

The latest version of Paypal Payments Pro (called PAYFLOW) is not compatible with DAP and Recurring Billing Cycles, You will have to open a Paypal account with the older version of their Payments Pro Merchant service that is compatible with DAP. Please make sure to use the older version of PPP which has to be specially requested through their support team. In a future DAP release, we will make it compatible with the new version of PPP.

Please read this for more on Payflow and Paypal Payments PRO :

http://www.digitalaccesspass.com/forums/threads/1044-Recurring-transaction-failed-in-paypal?highlight=payflow

This post includes information about generating buy buttons for Paypal Website Payments Pro. It also has information about setting up 1-Click Upsells.

Even if you don’t wish to do upsells, you should follow the setup instructions in this page, for integrating your site with Paypal Website Payments Pro .

What you need before you can use this plugin

  1. You need a Paypal Website Payments Pro merchant account with Recurring Billing enabled.
  2. You must have SSL (secure server) enabled on your web site. Ask your web host to enable SSL for your site.
  3. You must have a working version of DAP 4.2+.
  4. Login to the DigitalAccessPass.com member’s area and download the file, DAPShoppingCart.zip .
  5. Unzip it to  your desktop. It will unzip the files to a new folder on your desktop, called “DAPShoppingCart”.
  6. Upload all the files inside, directly to your “dap” folder on your web site. DO NOT upload the folder itself.
  7. After the files are uploaded, check to make sure that you find the files checkout.php and checkout-submit.php (just to name 2) directly under the dap folder. If you don’t, then you haven’t uploaded the files to the right directory.

Installation & Setup

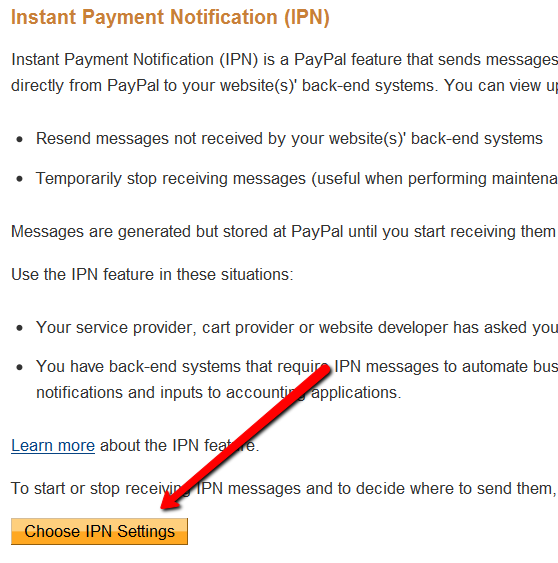
  1. Enabling Instant Payment Notification (IPN) within your Paypal account.

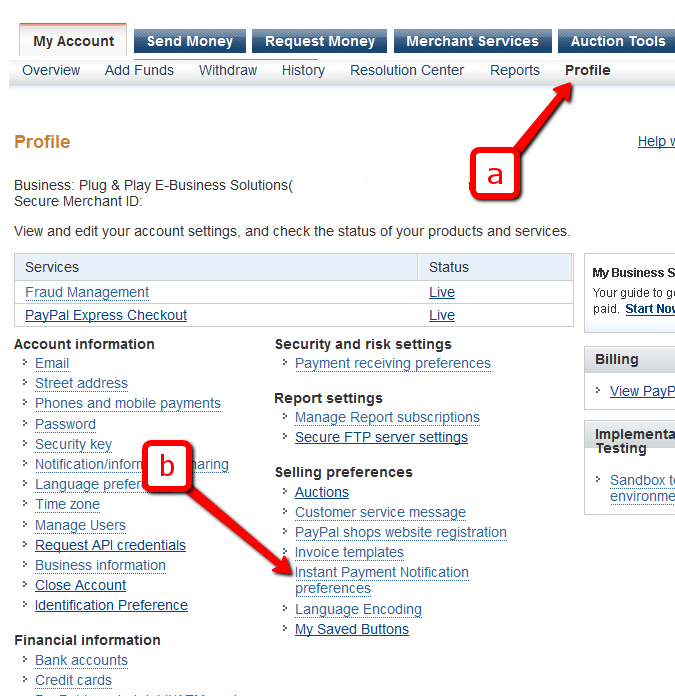
    a) Log in to your Paypal account and click on the “Profile” link.
    b) Go to Instant Payment Notification

    c) If IPN is already enabled, and you already have a URL in that field, then skip ahead to Step 2.
    Else, if IPN is not already enabled, then click on “Choose IPN Settings”

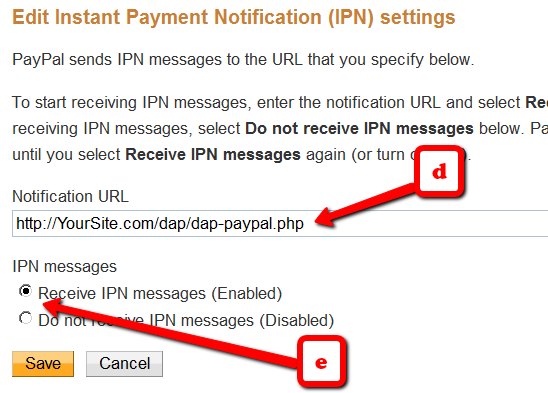
    d) On the next screen, in the Notification URL field, enter…
    http://YourSite.com/dap/dap-paypal.php

    Don’t forget to replace “YourSite.com” with your actual web site’s domain name.
    e) Make sure “Receive IPN Messages” is selected.

    f) Click on “Save”.

  2. Enable “Auto-Return” and “Payment Data Transfer”

    Log in to your Paypal account.

    Go to Profile.

    Click on Website Payment Preferences

    Turn Auto Return to On (see image below)

    Set Return URL to http://YourSite.com/dap/dap-thankyou.php

    Scroll down further to the Payment Data Transfer (optional) section

    Set Payment Data Transfer to On

    Scroll all the way to the bottom of the page, and then Save the changes.

    You will now see a green check mark image, with a long string of characters on line 2. That is your Paypal Identity Token. Copy that string.

    Go back to DAP Dashboard > Setup > Config > Payment Processing > Paypal Identity Token field, and enter this string there, and save it.

  3. Log in to your Paypal account and retrieve the following 3 pieces of information:
    Paypal API Username
    Paypal API Password
    Paypal API Signature
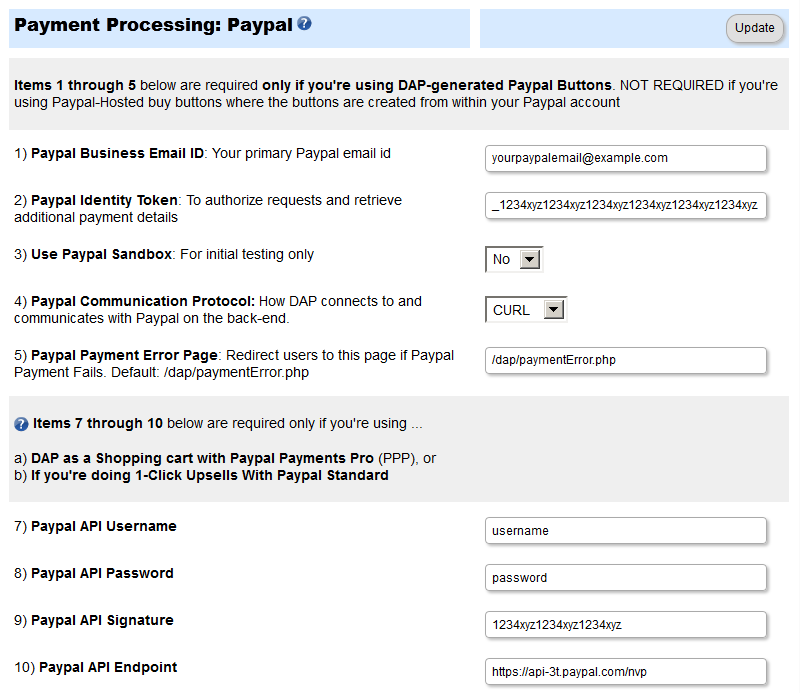
  4. Now log in to your DAP Dashboard and go to “Setup > Config“. Click on the “Paypal” link in the sub-menu at the top. The current page will then skip to the “Payment Processing: Paypal” section about half-way down the page.
    The current page will then skip to the “Payment Processing: Paypal” section about half-way down the page.
  5. Fill out items (1) through (10). 
  6. Into fields 7, 8 and 9, enter the Paypal API Username, Paypal API Password, and Paypal API Signature that you noted down earlier.
  7. This step applies to you only if you are already using 1ShoppingCart with DAP (if not, skip to next step):
    Be sure to disable the “Email Order” cron job from your web hosting control panel (“Cron Jobs” screen), because you don’t want your orders to be double-processed.
  8. We’re going to assume that you’ve already setup the pricing and recurring options on the Products/Levels > Manage page, on the Pricing & Recurring tab.
  9. Now click on Payment Processing > Generate Buy Button on the DAP Admin Main Menu.
  10. Switch to Auth.net & Paypal Pro tab.
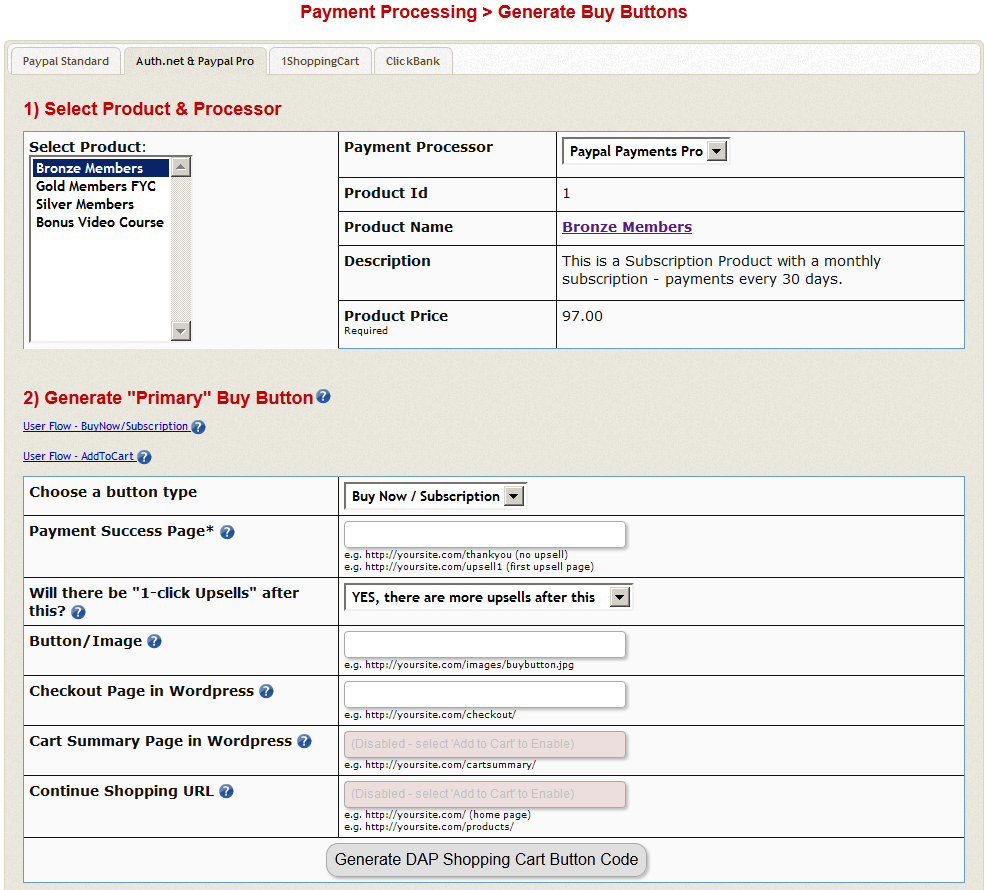
  11. Select the product name for which you wish to generate the buy button. Sections 1 and 2 are self-explanatory.

  12. If you want to put the shopping cart page right within a WordPress page, then do this…
    a) Set the Payment Success Page to point to the page where you want users to be redirected upon purchase. It can be your login page, or a static thank-you page that informs the buyer to check their email id
    b) Create a WP Page with the title Checkout containing the tag %%DAPCART%% tag and publish it. The permalink of this page would now become https://yoursite.com/checkout. Remember to add the “s” to “http” to make it “https://”. This page is not something you should access directly, but only through clicking a buy-button.
    c) In the above screenshot, where it asks for “Checkout Page in WordPress”, enter the URL of your new checkout page from Step (b) above. Replace yoursite.com with the name of your site.
    NOTE: The checkout page URL should start with https (SSL-enabled) and not http.
  13. When done with sections 1 & 2, at the bottom of section 2, click on the Generate DAP Shopping Cart Button Code
    This generates the buy button HTML code for your product, which you can then directly paste into your sales page. When you click on this link, you will get a pop-up that shows the actual HTML code for your button. The price, trial price, and recurring options are all taken from your Product settings. So make sure you have saved your Product changes before you click on this link.
  14. Here’s what the HTML code looks like:
    <form name="DAPCartPaymentForm" method="post" action="https://yoursite.com/dap/checkout.php">
    <input type="hidden" name="payment_succ_page" value="http://yoursite.com/members/"/>
    <input type="hidden" name="item_name" value="Bronze Members" />
    <input type="hidden" name="is_submitted" value="Y" />
    <input type="hidden" name="btntype" value="buynow" />
    <input type="hidden" name="is_last_upsell" value="N" />
    <input type="hidden" name="payment_gateway" value="paypal" />
    <div align="center"><input type="image" src="https://yoursite.com/dap/images/addtoorder1click.jpg" width="200" height="100" border="0" name="submit" /></div>
    </form>
  15. Put the button code on your sales page. Now click on the button, it will take you to the checkout page (if you customized the checkout page as per step 12 above, then you’ll be taken to https://yoursite.com/checkout).
  16. Enter the CC details and other info and hit submit.
  17. The purchase will complete and DAP will redirect you to whatever you set in the Payment Success Page in the button.

That’s it for Paypal Pro button generation.

1-Click Upsells

  1. If you’re doing upsells, the only thing you need to do is, look for the “payment_succ_page” field in the above form.
  2. Point it to the URL of your Upsell offer. This can be either a static HTML page, or a WordPress Page.
  3. On the upsell page, if you want to upsell say, Product B, then make sure you set up Product B ahead of time in DAP, and set up the price and recurring options. Then generate the buy button code for Product B and have it already published on that page.
  4. You can repeat this process for unlimited upsells, downsells and one-time offers. No limits.


Creating Custom Header & Footer for Checkout Page

You can either use the standalone cart page, and then customize the header and footer.php file.

Or you can put the cart right within a WordPress page on your site, so the cart will then take on your theme’s look and feel, and look like it were completely a part of your wordpress site.

Header & Footer for Stand-alone Cart page

To create custom header and footer, create two files by name cartheader.php & cartfooter.php

Upload them to the dap/inc/ folder.

Whatever HTML snippet you put in the above two files will show up as header & footer on the check out page.

Shopping Cart Overview

See http://www.digitalaccesspass.com/doc/dap-shopping-cart-overview/


Summary

While it looks like a LOT of steps, that is only because we have to explain the steps in detail so they are clear. In reality, it is very simple to set up, and starting from scratch, if you have DAP & SSL already installed, it shouldn’t take you more than 1/2 hour to set up your 1-Click Upsells/Downsells/OTO’s. And if you’re not using Upsells/Downsells, then it can be done even faster.

If you have any further questions, feel free to open a support ticket, and we will assist you in getting this going.

17

Buy Buttons, 1-Click Upsells, Downsells & OTO’s using Authorize.net

Selling through Authorize.net, 1-Click Upsells, Downsells and One-Time Offers (OTO’s) are all now extremely simple to implement using the new Shopping Cart Plugin for DAP.

This post explains how to create buy buttons for selling through Authorize.net.

Your site visitors never have to leave your site in order to make a purchase, if you are selling through Authorize.net. DAP itself will act as your shopping cart, and buyers can checkout and make purchases by staying right on your web site.

The DAP Shopping Cart itself is your actual shopping cart that connects to Authorize.net. You need to install this plugin whether you wish to accept one-time or subscription payments via Authorize.net, or whether you wish to do Upsells, and Downsells.

What you need before you can use this plugin

  1. You need an Authorize.net merchant account
  2. If you want to sell subscription-based products, then you also need Automated Recurring Billing (ARB) enabled in your Authorize.net account.
  3. You must have SSL (secure server) enabled on your web site. Ask your web host to enable SSL for your site.
  4. You must have a working version of DAP 3.5+.

Installation & Setup of UpsellTree

  1. You need be using at least DAP v3.5 for this.
  2. If you haven’t installed DAP already, then install DAP first.
  3. Log in to our member’s area and download the plugin file, DAPShoppingCart.zip .
  4. Unzip DAPShoppingCart.zip to your desktop. It will unzip the files to a new folder on your desktop, called DAPShoppingCart.
  5. Upload ALL of the files inside, DIRECTLY to your “dap” folder on your web site. DO NOT upload the folder itself – just the files inside.
  6. Log in to your Authorize.net account, and go to the “Settings” page.
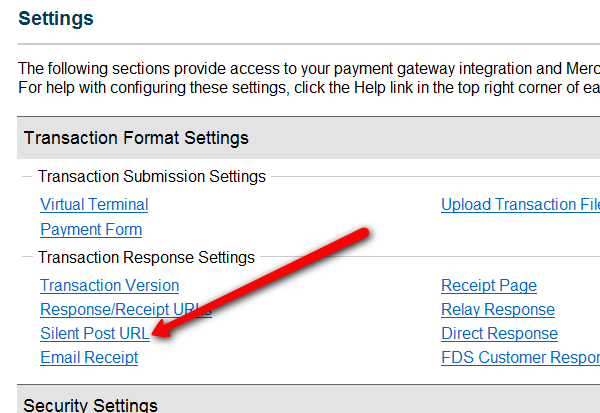
  7. Click on Silent Post URL.
    authnet_silentpost
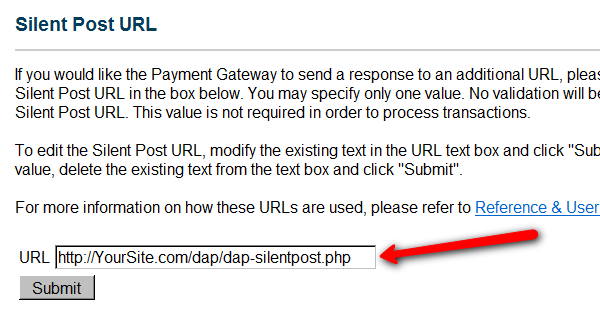
  8. On the next page, set the URL field, to  http://YourSite.com/dap/dap-silentpost.php . Be sure to change the text “YourSite.com” to your actual domain name. Click “Submit”. It will take you back to the Settings page.
    authnet_silentpost_submit
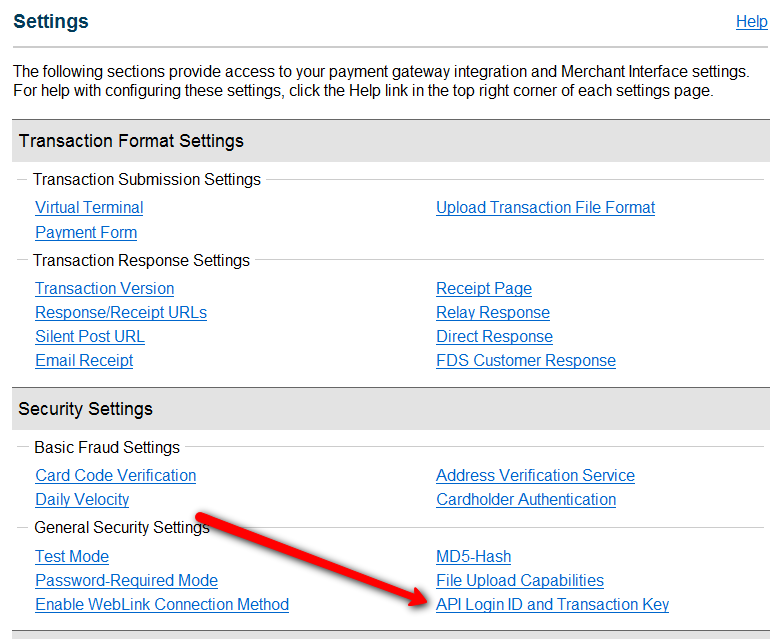
  9. On the Settings page, now click on the “API Login ID and Transaction Key” link towards the bottom.
    authnet_settings
  10. On the next page, make a note of your “API Login ID” and “Transaction Key” on a piece of paper (or copy/paste it into a text file). That page also lets you create a new Transaction key or modify your existing one.
  11. That’s it for Authnet.
  12. Now, log in to your DAP Dashboard on your side, and go to “DAP Admin > Setup > Config > Payment Processing“.
  13. Enter the “API Login ID” and “Transaction Key” that you noted down earlier (Step #9 above) into the respective fields, and click  “Update” next to the fields to save the changes.
    authnet_dap_config
  14. This step applies to you only if you are already using 1ShoppingCart with DAP (if not, skip to next step):
    Be sure to remove the “Email Order” cron job from your web hosting control panel (“Cron Jobs” screen), because you don’t want your orders to be double-processed.
  15. Go to the Products > Manage.
    newproductspage
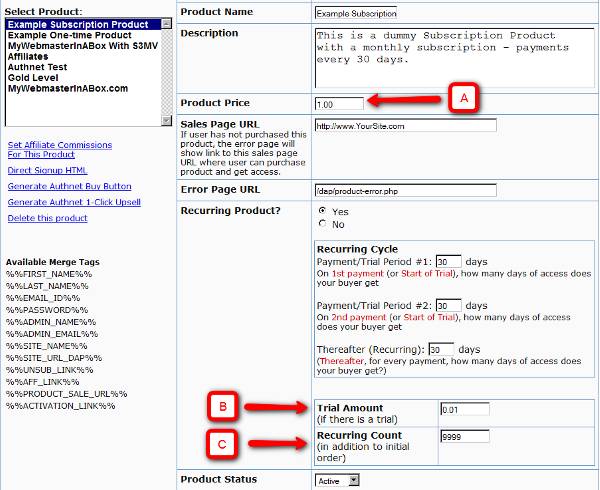
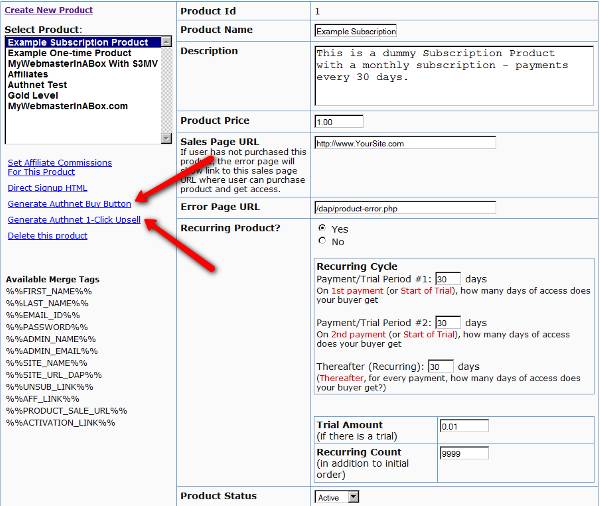
    A) Product Price: For a 1-time purchase product, this is the product’s purchase price. For a recurring product, this is the “recurring” price (what the customer gets charged month after month).
    B) Trial Amount: This is only if there’s a trial amount. If no trial, leave this empty.
    C) Recurring Count: How long is your subscription? If you said “Forever”, then enter the number 9999 here. If it ends after 6 months, then enter 6 here.
  16. Set these fields to valid values.
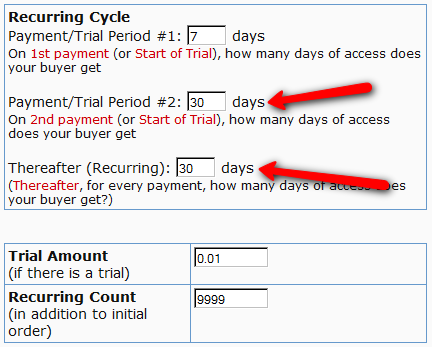
  17. NOTE: The DAP Authorize.net allows 1 trial. So in the recurring cycle fields, make sure “Payment/Trial Period #2” and “Payment/Trial Period #3” are both the same (set to same number of days: like 30). Example below shows the setting for a “7 day” trial period, followed by recurring payments every “30 days”.
    authnet_recurring_cycle
  18. If you are not offering a trial, then just set the Trial Amount to $0.00. But if you really wanted to offer a FREE TRIAL, then you must set the Trial Amount to at least $0.01 (1 penny).
  19. Once you’ve saved the product, you can now click on any of the two new “Generate… Button Code” links that are located right below the product list combo box.
    newproductspage2
  20. “Generate Authnet Buy Button” link:
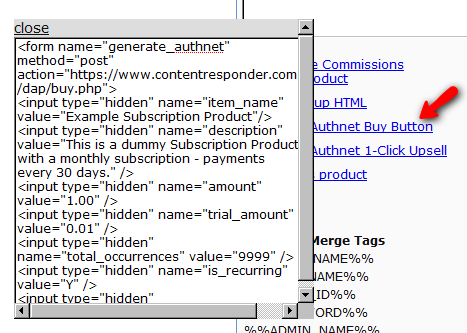
    This generates the buy button HTML code for your product, which you can then directly paste into your sales page. When you click on this link, you will get a pop-up that shows the actual HTML code for your button. The price, trial price, and recurring options are all taken from your Product settings. So make sure you have saved your Product changes before you click on this link.
    authnet_buybutton_code
  21. Here’s what the HTML code looks like:
    <form name="generate_authnet" method="post" action="https://www.contentresponder.com/dap/buy.php">
    <input type="hidden" name="item_name" value="Example Subscription Product"/>
    <input type="hidden" name="description" value="This is a dummy Subscription Product with a monthly subscription - payments every 30 days." />
    <input type="hidden" name="amount" value="1.00" />
    <input type="hidden" name="trial_amount" value="0.01" />
    <input type="hidden" name="total_occurrences" value="9999" />
    <input type="hidden" name="is_recurring" value="Y" />
    <input type="hidden" name="recurring_cycle_1" value="30" />
    <input type="hidden" name="recurring_cycle_2" value="30" />
    <input type="hidden" name="recurring_cycle_3" value="30" />
    <input type="hidden" name="payment_succ_page" value="https://www.contentresponder.com/dap/continue.php?url=/dap/upsell1.html" />
    <input type="hidden" name="payment_gateway" value="authnet" />
    <input type="hidden" name="is_submitted" value="Y" />
    <input type="submit" value="Buy Now" />
    </form>
  22. If you’re doing upsells, the only thing you need to do is, look for the “payment_succ_page” field in the above form. By default it is pointing to:
    https://www.contentresponder.com/dap/continue.php?url=/dap/upsell1.html
  23. Modify the “upsell1.html” file within your dap folder, to make your 1-Click Upsell offer. Or if you don’t wish to use 1-Click upsells, you can make just about any kind of upsell offer on that page. The upsell1.html that comes with the plugin has a sample upsell page already created for you, just so you get an idea of what that will look like.
  24. On the upsell page, if you want to upsell say, Product B, then make sure you set up “Product B” ahead of time in DAP, and set up the price and recurring options. Then for upsell products only, click on the “Generate Authnet 1-Click Upsell” link to generate the 1-Click Upsell Buy button code, as the upsell buy button is slightly different than the ‘regular’ buy button code. Now take the upsell buy button code like you did before, and paste it in upsell1.html. That’s it.
  25. You can repeat this process for unlimited upsells, downsells and one-time offers. No limits.

That’s it.

While it looks like a LOT of steps, that is only because we have to explain the steps in detail so they are clear. In reality, it is very simple to set up, and starting from scratch, if you have DAP & SSL already installed, it shouldn’t take you more than 1/2 hour to set up your 1-Click Upsells/Downsells/OTO’s. And if you’re not using Upsells/Downsells, then it can be done even faster.

If you have any further questions, feel free to open a support ticket, and we will assist you in getting this going.

23

DAP -vs- The Competition

How does DAP fare when compared to the competition?

We have created a WordPress Membership Plugin Review Chart to help you decide for yourself.

All Facts. No Opinions. Fair as fair can be.

Obviously, we don’t know our competitors’ products as well as we know ours.

So if we missed something, then do let us know below and we’ll do our best to fix any errors and/or omissions asap.

Also, if you have any other questions, comments, corrections or suggestions, feel free to leave them below.

– Ravi Jayagopal

1 28 29 30 31 32 35