3

Recommended Refund Policy

There really is no one-size-fits-all when it comes to refund policies.

There are so many factors involved. The main one being, that Visa/Master/Amex/Paypal all give a buyer up to 60 days to ask for a refund, at least with most merchants.

Unless you’ve already negotiated the refund terms with your merchant account provider, and have both specifically agreed that there would be no refunds (like say, if you were selling an expensive item, like a car, or a boat, or a service), or that it’s only going to be a 30-day refund period, then you really have no control over the refund period. You just have to comply with at least the mandatory 60-day refund period required by the credit card companies.

So that brings us to the question:

How much should you set your refund period to be within DAP?

Now remember, it is this Refund Period setting (under Setup > Config > Advanced) that also makes affiliates eligible for payment.

So it really comes down to the question:

What is the waiting period for an affiliate to get paid for a referral?

Our recommendation: 60 days.

That’s because if you end up paying too soon (say like within 15 or 30 days), and then the buyer comes back and asks for a refund, now you’re out-of-pocket for the affiliate commissions that you have already paid on a purchase that you just refunded.

Now remember that when you do the actual refund within DAP, DAP will roll-back any commissions credited towards this purchase. If you have not yet paid your affiliates, then in the next report, it will ignore the refunded purchase, and will not calculate commissions on that purchase.

But if you have already paid your affiliates (like within 15 or 30 days after purchase), then DAP will include the negative commission in the next pay-period’s report. And any future commissions earned by this affiliate will be accordingly adjusted.

However, if the affiliate doesn’t refer any more members, then you have two choices at this point:

1) Ask the affiliate to pay back the over-paid commissions

2) Just swallow the loss, write it up to the cost of doing business, and move on.

Content Protection, Security and DRM

We frequently get asked questions like…

“Can DAP protect my Videos/PDF’s/Audio files from being copied? Is there some kind of tracking that I can build into my videos that will let me track the video on torrent sites?”

“Can DAP prevent people from downloading my videos/audio/pdf and uploading it to a torrent or third-party site?”

“Can DAP force people to only watch my videos online? I don’t want my members to download any of my content to their hard disk – I want to force them to see/read/hear/watch everything online.”

Short Answer: No.

Long Answer: Keep reading…

The Nitty-Gritty

There are so many ways to steal your content from your web site – no matter what technology you use.

Let us explain what that means…

1) Let’s say you implement a technology where only paying members can even get to your videos. Like you can already do with DAP. So then a paying member can download your video because they are already a paying member, and they actually have access to the videos. And once your video has been downloaded to their hard disk, you have lost all control over it – no matter what anyone tells you, that’s the truth. Because they can upload it to any illegal warez sharing site, and there’s nothing you can do about it.

Of course, you could spend all your time, money and efforts monitoring the thousands of illegal sharing sites whether your video or ebook is found anywhere – assuming you can even find it in the first place, which would be like finding a needle in a hay stack – no, make that “hay factory” – wait, make that “finding a needle in New York City” – and then write to those site owners and ask them to take it down.

Or you could focus on the 99% of legitimate members of your site, and create great content for them, and keep them paying month after month, and sell more products to them, and keep them happy.

2) Let’s say you use a plugin that only allows true-streaming – like one based on Amazon CloudFront technology, that will not allow the users to directly download your videos, but force them to watch online only. Then there’s any number of “screen-capture” tools – even free ones – that your members can use to capture another video of your video, and then share it with their friends, or upload to illegal sharing sites.

The list goes on and on. No matter how hard you make it, there’s always going to be a way around.

So, unless you’re a NASA, NetFlix, or Amazon or Apple who has a real reason to protect their content that is worth real millions of dollars, there is *no technology* available today that will let you track a video or pdf *after* it has been downloaded. If someone is saying they can do this, then they’re outright lying to you, and playing on your fears.

DAP already has a built-in password-sharing prevention security built in. If someone tries to share their account info with others, DAP will lock their account the moment their account gets log-ins from multiple IP’s (you can configure this setting) and deny further access to any of their content, until you investigate the user and “un-lock” their account.

DAP already protects all of your media from illegal access.

DAP also prevents your Amazon S3 videos and audio and other content from being accessed by anyone directly. Using a script like http://S3MediaVault.com , you can make it such that your videos and audio and other media can only be downloaded from approved sites (where the plugin is installed), and then on top of that, there’s DAP already sitting like a monster watch-dog, making sure only authorized users can even get into the site in the first place.

So hope that helps if you’ve gotten too worried about protecting your content – so worried that you’re missing the big picture.

Don’t Forget What Is Important (Hint: It starts with “Mem” and ends with “bers”)

The best membership sites allow people to consume the content they’ve paid for in multiple ways – view the video, download the video, download mp3 audio version of the video, download the presentation as a powerpoint, download the transcripts as a PDF, and so on.

Instead of making it easy for your members to download the content, if you’re going to spend your limited resources trying to figure out how to prevent people from downloading content that they’ve actually paid for, and force people to only view your content online and not be able to view it offline (like in their spare time or when going for a jog in the park), you run the risk of upsetting 99% of your legitimate paying members, in order to secure your content from the 1% of pirates, who will steal and share your content no matter what.

So forget about the 1%, and focus on the 99%. DAP already has enough security in place to stop the 1%. So don’t worry about that. Your content is very secure with DAP.

Anything else is just a total waste of your time. So don’t get distracted by the noise, and just get on with the real important tasks on hand: Building a long-term recurring income stream by building a large community of highly satisfied, loyal fans who are thrilled about what you have to offer, and will continue to pay month after month because whatever it is that you’re selling, is making their life better in some way.

The hardest thing to do online, with a membership site is still this: Creating great content, Attracting buyers, and then getting your members to keep paying month after month.

And that, is the big picture.

31

Mailchimp Integration

Subscriber Flow

The flow of subscriber is “FROM DAP TO Mailchimp“. User signs up at DAP first, then DAP automatically adds the user to Mailchimp list.. Admin removes the user’s access to a product, and DAP automatically removes the user from Mailchimp list. This feature is available starting DAP v4.1.

How it works

[s3mv]mailchimp.mp4,640,378,false,false[/s3mv]

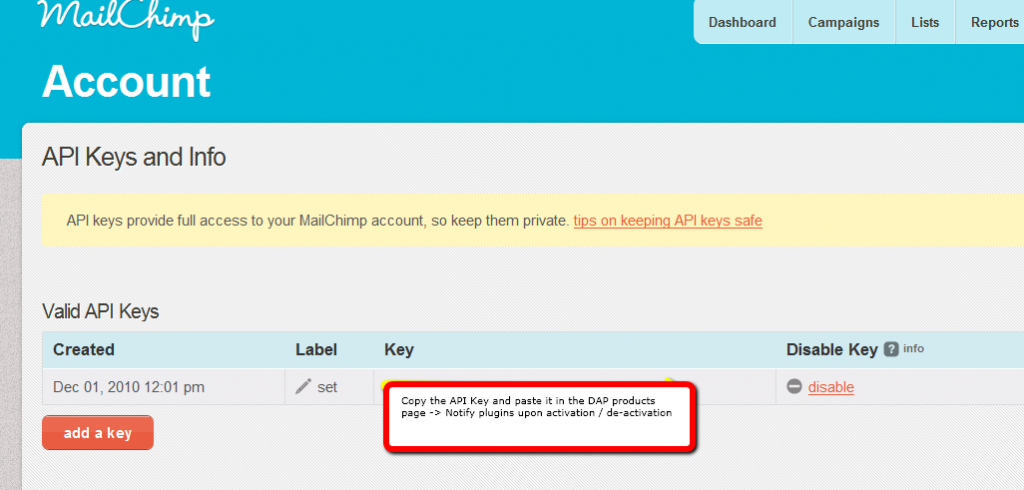
1. Login to your account at http://admin.mailchimp.com/account/api/ and note down the API Key.

Image 1:

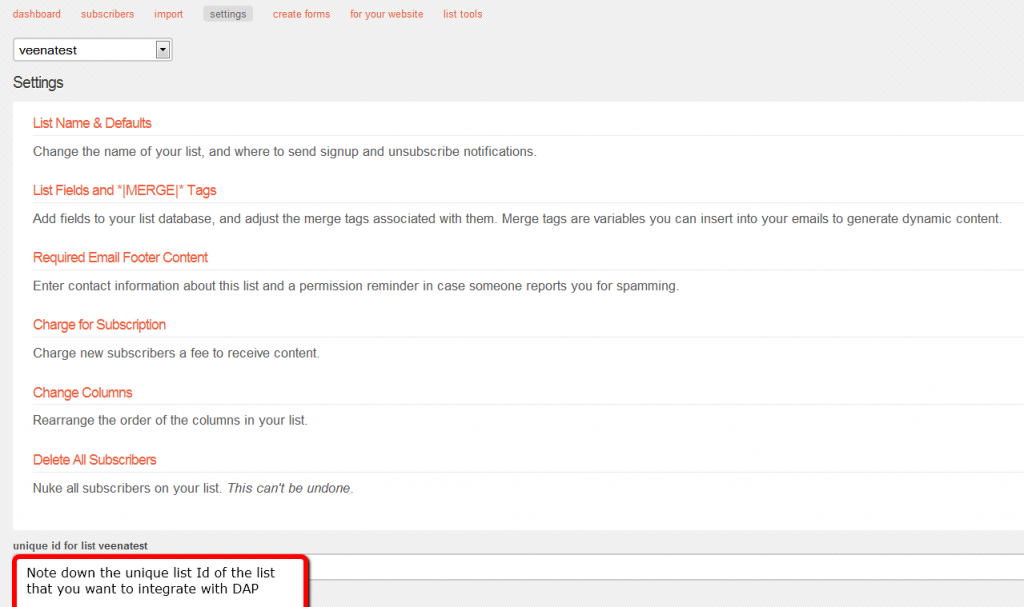
2. Go to http://admin.mailchimp.com/lists/ and grab your List’s Unique Id. Click the “settings” link for the list – the Unique Id is at the bottom of that page.

Image 2:

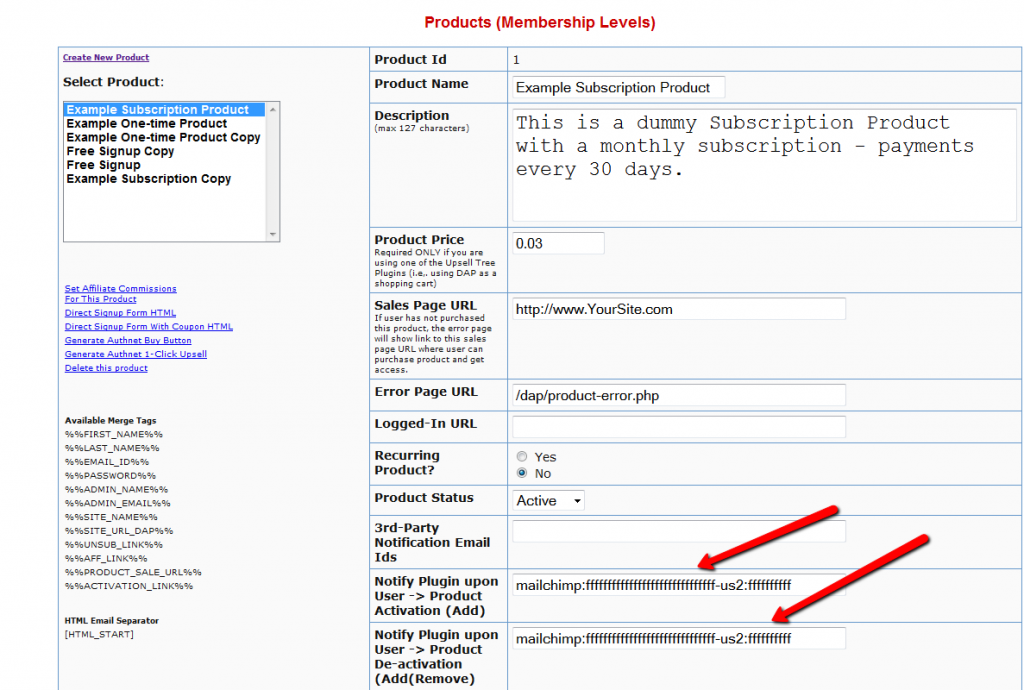
3. Log in to your DAP Admin Dashboard -> Products Page and select the product (whose members you wish to add automatically to your Mailchimp list.

4. If the list Id of the mailchimp list that you want to integrate with a DAP product/membership is say “ffffffffff”, and say your Mailchimp API Key is ‘ffffffffffffffffffffffffffffff-us2’ then add the following to the “Notify Plugin upon User -> Product Activation (Add)” in DAP products page and HIT Save/Update Product.

mailchimp:ffffffffffffffffffffffffffffff-us2:ffffffffff

Image 3:

That’s it!

Save the product and this completes the DAP->Mailchimp integration.

How This Works

So let’s say you picked the list “ffffffffff” in your Mailchimp account, and the DAP Product “Example Subscription Product” (as shown in the screenshots above).

So once you add “mailchimp:ffffffffffffffffffffffffffffff-us2:ffffffffff” to the product’s “Notify plugin upon user->product activation” and “Notify plugin upon user->product de-activation” field and save it, every time someone gets access to the “Example Subscription Product” product (regardless of whether they buy it, or you give them access on the backend), DAP will  automatically  add them to the list – ffffffffff. And everytime you remove the user’s access to product (click on ‘Remove’ in DAP manage users page), DAP will automatically remove the user from the list.

df11c84ab4
20

DAP IPN Script Generator – 3rd party Shopping Cart integration

While DAP already supports a large number of shopping cart systems and payment providers, if you wish to integrate DAP with one that we don’t support yet, then you can custom create DAP integration for any 3rd party shopping cart providers that support Instant Payment Notification (IPN) via HTTP POST to 3rd party scripts.

NOTE: While you’re welcome to use the documentation below and develop your own custom integration with any payment processor that supports IPN, during development if you need our support, then we charge an hourly fee if you want help with your code.

Instant Payment Notification (IPN)

Instant Payment Notification (IPN) is basically a message service provided by a shopping cart service or payment processor, that enables them to notify third-party systems like DAP about events related to Payment transactions. You can use it to automate membership sign-ups and cancellations, and extend membership access (for recurring products).

Paypal pioneered the concept of IPN, and different systems may have a different name for it (for eg., ClickBank calls it “INS – Instant Notification Service”). But they all essentially mean the same.

So, using IPN, the cart/processor notifies DAP when a payment-related event occurs. Typically, these events represent various kinds of payments. The notification includes info about the buyer’s email id, product name purchased, product price, payment status etc.

And you can use the DAP IPN Generator script below to generate a PHP script that can receive (and understand) the IPN notification from your cart/processor.

DAP – IPN Script Generator

DAP provides the ability to generate an IPN Script/handler for any 3rd party shopping cart that support IPN.  Once the script is generated, upload it to the dap folder on your site and update the shopping cart IPN URL settings with the URL to this script.

1) Go to DAP Admin > Setup > Generate IPN Script

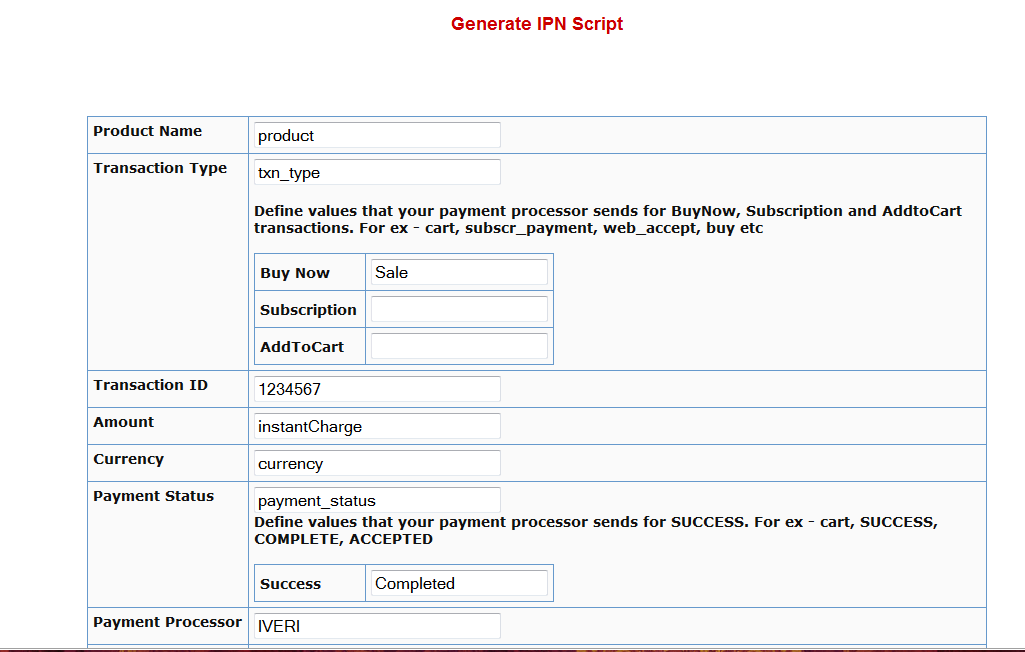
2. Fill in the boxes with the exact TAG NAME / FIELD NAME that your shopping cart sends for each of the fields listed there.

Say that in the IPN notification, your shopping cart sends the product name in the tag/field called item_name. Then you need to enter item_name in the product name text box.

The transaction type indicator tells DAP what type of transaction it is… whether it’s an add-to-cart or buy now or subscription type of transaction. The tag name itself goes into the Transaction Type text box but the actual value for each type (buynow, cart, subscription) goes into the text boxes that say BUY NOW, Subscription, AddToCart.

In the text box in the picture above, the value of  ‘Sale’ is an example value that a shopping cart might send to identify a ‘buy now’ transaction/button. Check your shopping cart’s IPN documentation and make sure you fill in the right values in each of the text boxes in the dap generate ipn page.

3.  After filling up all the text boxes, hit the ‘Generate IPN’ button. It will open a small window with the actual dap IPN script.

Copy the whole script and put it in a file and lets say you call this file – dap-IPN-script.php.

Upload this file to the dap folder on your site.

4. Go back to Generate IPN Page in your DAP admin panel.

Now click on the ‘Test IPN Script’ button at the bottom. It will bring up a form where you can fill in actual values (you can give this form to your shopping cart provider so they know what fieldnames/tags to send to dap ipn handler/script). In the IPN URL text box, put in the full URL of the IPN Script you generated in step 3 (for ex – http://yoursite.com/dap/dap-IPN-script.php).

Run the test. It will simulate a real purchase transaction by a buyer and show you how DAP automatically manages the creation of membership account upon successful purchase.

46

Login And Login Redirect Issues

1) If you click on  Digital Access Pass’ link in the left sidebar of your WP admin dashboard but get a ‘Page Not Found’ error, then do this :

Login to your dap admin dashboard here:

http://yoursite.com/dap/login.php   (replace yoursite.com with the name of your site)

Then after you login, go to dap setup -> config -> advanced -> URL of your login page and make sure the ‘URL of login page’ points to a VALID working url.

When you click on the dap link in the WP admin dashbaord, dap takes you to whatever you set as the login page in ‘URL of login page’.

You can also login to dap admin dashboard outsite of WP here:
http://yoursite.com/dap/login.php

2)  If upon login, DAP is not redirecting users to the configured/desired page, then please read on…

There are 2 logged-in redirect settings:
1) Product-level login-redirect URL which is Logged-In URL field on the dap Products/Levels page
2) Global login redirect under DAP Setup -> Config -> Advanced -> ‘URL to which the user is redirected to upon login’

If the user has access to only 1 product and product level Logged-In URL is set, then DAP uses the product level settings.

If the user has access to multiple products OR if the product level Logged-In URL is NOT set, dap uses the global login redirect.

Make sure these settings are setup correctly when you have login redirect issues.

3) If your users complain that when they login, they are told :

Sorry! You do not have access to this content
Sorry You cannot access this page.

[You are already logged in. Please click here to continue…]

BUT when they click on the link.. it says… the same thing again.

Then here’s the solution:

It can happen when the users are being redirected to a page upon login to which they do not have access.

So check your product level / global level login redirect settings.

Then check the user and make sure the user has access to the content to which you are redirecting the user upon login.

So… if you say redirect user to a protected page upon login and say the protected page is marked as ‘available only to paid users’, then make sure your users are marked as paid in manage users page.

Or make the content (to which you redirect user upon login) be available to all registered users (free / paid). Just mark the content as ‘available to free users’ in the content protection area in dap products page.

4) Endless Redirect – or “Too Many Redirects”

If upon login, you receive an error message that there’s an endless redirection, and the browser eventually times out,  then the possible reason could be that you created a custom error page and protected the error page itself. So when a non-member or user that does not have access to content, tries to access it, DAP will try to redirect to the error page, but if the error page itself is protected, then that will result in another redirect to error page… resulting in endless redirects.

Another possibility: Your “Error Page URL” has %%LOGIN_FORM%% code.

In that case, when you log in as a member, member does not have access to post-login URL (check if you have added that to the product), DAP redirects to error page, error page has login form code which redirects to post-login URL, member does not have access to it, DAP redirects to error page…. and on and on. That’s how it ends up in too many redirects.

So, the main highlights…

  1. Do not protect the error page as part of ANY DAP product
  2. Do not put the %%LOGIN_FORM%% code in your error page
  3. Do not protect the login page as part of ANY DAP product
  4. Add the “Post-Login URL” page to the product in question, so anyone who has access to that product will also have access to that page.

If you protect content under 1 product, then it automatically gets protected from all non-members. A casual visitor can not access content that is protected under any of the dap products. Only members that have access to the product, can access content dripped under the product.  If a member says that they are not able to access content, it could be because:

1) their access has expired (check dap manager users page for user->product access start and access end date)

2) their access is still valid, but the user has been a member for just say 2 days and the content they are trying to access, is set to drip on say day 3.

3) the user is marked as a free user (in dap manage users page) but the content they are trying to access is marked as ‘available to paid users only’ in dap products -> content protection area.

4) their product status is unconfirmed (check Product Status in DAP manage users page). If it’s a double-opt-in product, the user is going to receive a confirmation email upon signup. The user needs to complete confirmation to get access to the product. DAP admins can manually change user’s product status by clicking on ‘Modify’ under ‘Product Access’ in dap manage users page and updating the product status to Active.

5) The user has access to multiple membership levels and the some of the same content is being dripped under multiple membership levels.

Generally you should use Product Chaining rules to automatically remove user’s access to lower level product/ membership level upon upgrade to higher level product / membership level to prevent some of the  same content being dripped on the same user with different drip settings. This way a user will not have access to same / duplicate content under 2-3 different products that he/she owns.

5) Auto-Redirection to previous page after logging in

Starting DAP v4.1, here’s how the log-in redirects work….

1) If they’re logging in from a stand-alone login page or from the widget on your home page, then DAP treats that just as a “Member just trying to log in to their member’s area” and it will use the global or product-level login-redirect URL for that user.

2) However, if they tried to visit a  protected URL, and DAP challenged them because they weren’t logged in, and presented them with a login form on that same protected page, and if they log in from that form on the protected page, then DAP treats that as someone was trying to get to a protected URL, they couldn’t because they weren’t logged in, now that they’ve logged in, let’s take them back to that same page that they were on before the logged in.

IMAP/POP connection errors

This error can happen if you have the dap emailorder cron setup in your webhost control panel to process 1shpppingcart order/payment emails to grant automatic membership access to users that purchase products via 1sc.

1) If you are not using 1SC and are getting this error, you can turn off the cron job in your webhost control panel -> Under cron settings -> look for a cron command that has dap-emailorder.php set to run once every 10 minutes or so and remove that cron job.

2) if you are using 1SC and are getting this error, then that indicates an issue with your DAP config setup.

See step 3 in this document – http://digitalaccesspass.com/doc/troubleshooting-1shoppingcart-clickbank-integration/
If you use IMAP, then set port to 143, if you use pop3, set port to 110 (in dap setup -> config ->payment processing section)

3) If you still get that error, then it could be that your webhost preventing pop/imap connection to external email server.
Make sure you use an order email account/id that’s hosted on your host. Do not use say a gmail.com or yahoo.com account
under dap setup – config -> payment processing section. Also make sure that you update your 1sc settings so all the notifications get sent to this email address. Refer this troubleshooting guide step by step for any 1sc -> dap integration issues.
http://digitalaccesspass.com/doc/troubleshooting-1shoppingcart-clickbank-integration/

Types of Users

There are 3 types of users:

1) Casual visitors / public
If you want a post / page to be accessible by all non-members, just leave it open. Do not protect it in dap products page at all.

2) Free users
Users that register via direct sign up form are marked as ‘FREE’ in manage users page. The users marked as ‘free’ only have access to content that are marked as available to ‘free users’ in content protection area.

See – http://digitalaccesspass.com/doc/adding-users-via-dap-signup-form/

3) Paid users
Users that purchase a product and have a transaction id/number in the dap manage users page that links to their order Or the users that are marked as ‘PAID’ by admin manually. These users have access to both free and paid content that are dripped under that product. The content becomes available to these users based on the drip settings. If the user has been a member of a product for 10 days, the user will have access to all content under that product that is set for day 1 – day 10 dripping.

23

Using DAP to protect multiple blogs on a single site/domain

Protecting multiple blogs on 1 domain

DAP needs to be installed to the root of your website and not inside a subfolder.

So if you have a domain called yoursite.com, and if you installed dap correctly, you should be able to access dap login page via http://yoursite.com/dap in a browser.

To protect multiple blogs on the same domain, you just need to install and activate the DAP live links plugin in each of the blog (under wp-content/plugins folder).

When you activate the dap live links plugin in more than 1 blog, it will throw a warning about DAP already installed/activated. Ignore that warning about dap already installed.

Two things to note:

1) The list of available blog posts and pages that you see on the DAP Products page will only show the list from the last blog that was most recently updated. So if you just updated Blog A, and go into the Products page, DAP will show the list of all available pages & posts from Blog A. So if you want to protect Blog B content, then simply go into Blog B’s WP admin, edit and update any page or post (no need to make any changes, just a forced update of any post will do), and then when you go back to the DAP Products page, you will see the list now from Blog B.

DAP will still protect both blogs but whats displayed in dap admin panel -> products page depends on the blog last updated.

2) Make sure you think about what happens when DAP/WP sync is turned on. DAP could be syncing users to 2 different forums/wp databases based on which blog the user is on. If the user logs in to DAP, and accesses blog1, dap will sync the user to blog1. If the user logs in to DAP, and accesses blog2, dap will sync the user to blog2. The user will have 1 account in the dap database but the user account will be created in both WP databases (blog1/blog2).

So other than a few simple logistical issues to think about, DAP can very well support additional blogs on which installed. Just be sure to add the LiveLinks plugin to each new blog that you want DAP to support.

4

Troubleshooting Login Issues

1. “You are already logged in… click here to continue”

Q: When users log in, they aren’t redirected to the page that I have set either in the global or the product settings. They remain on the login form and see the message “You are already logged in… click here to continue”. And when they click the link, then they are redirected to the correct page. How can I avoid showing my users this message?

A: Make sure you enter the your actual login page’s URL (where you have the login form) into DAP Admin > Setup > Config > “Login URL” field. Save changes. Then in a different browser, visit your log out link by going to http://YourSite.com/dap/logout.php (even if you aren’t already logged in) which would then reload all Config changes, and the next time you or your users log in, they won’t see that message, and will go directly to your member’s home page (or “Post-Login URL” as per global or product settings).

2. You are unable to log in as DAP Admin (OR)
You don’t remember your DAP Admin Email/Password

Starting DAP v4.3.1, if you log in to the WordPress Admin panel on your site, you’ll also be logged in automatically as DAP Admin. And when you click on the “Digital Access Pass” link towards the bottom-left part of your screen in the WP Admin panel, you’ll be taken to the DAP Admin Home Page.

So this is for those of you who haven’t upgraded to 4.3.1 yet, or for some reason, you’re locked out of DAP Admin. So keep reading…

Your DAP Admin Email/Password is NOT THE SAME as your WP admin Username/Password. Make sure you use the right DAP admin email Id/Password to access DAP admin panel.

a) If you do not remember what your DAP Admin Password is, then you can find it by putting in your DAP admin email and clicking on the “Forgot Password” link in the login form at…

http://YourSite.com/dap/login.php .

And then DAP will email you the right password for that email id.

b) If you do not remember what your DAP Admin Email id is, go to WP Admin -> Settings -> General -> E-mail address . Try the email address there and do a “Forgot Password” with that.

c) If even that doesn’t work, then login to your Webhost Control Panel ; Go to the phpMyAdmin icon to access your dap/WP database, look for the dap_users table, “browse” through the data, and you will find the dap admin id/password there with the account_type of “A” (for Admin).

3. Login Page Shows 404 / Page Not Found Error

If you get a 404 page or an incorrect login page when you click on the DigitalAccessPass link in the WP admin panel menu, then do this:

Login to your DAP admin dashboard outside of WP (if you are unable to login from within your WP admin panel), by going to:

http://yoursite.com/dap/login.php

(Note: replace yoursite.com with the name of your site).

After logging in, check this setting in Setup -> Config -> Advanced category to make sure it is pointing to the right page:

Location of your login page (eg., if using WordPress). Should start with a forward slash (`/`)

You can change the login page to /dap/login.php (default dap login page).

Or you may create a custom login page and set the URL of that custom login page in the  ‘Location of your login page’

When you click on the DigitalAccessPass link in the left sidebar of your WP admin panel, the page that shows up is the page configured here: ‘Location of your login page’

So if you set ‘Location of your login page’ to say /login but if there is no such page (http://yoursite.com/login), then the result will be a 404 error. So make sure you set ‘Location of your login page’ (under Setup -> Config -> Advanced) correctly.

NOTE: Admin will always be redirected to dap admin panel upon login. The users will be redirected to whatever the product-level login redirect is set to in DAP products page (or global login redirect under dap Setup->Config->Advance->’URL to which the user is redirected to upon login’ if no product level login redirect is set).

To customize the login page or to customize members area page, see –

http://www.digitalaccesspass.com/doc/creating-a-login-page-within-wordpress/
-and-
http://www.digitalaccesspass.com/doc/creating-member-affiliate-sections-within-wordpress/

23

2-Tier Affiliate Program

DAP supports (up to) a 2-tier affiliate program. So you could pay just one level (“tier”) of commissions (A gets paid when he refers B), or you could also set up DAP to pay 2 “tiers” of commissions (User 1 gets paid when he refers User 2 AND User 1 also gets paid something when User 2 refers User 3).

[NOTE: Paypal has an Acceptable Use Policy – especially for a product or service that could be considered “MLM” or “Pyramid”. Make sure you’re not violating their terms. For eg., requiring your members to keep paying subscription fees in order to remain an affiliate, could be considered a Pyramid scheme. So, in general (nothing to do with using DAP or paying 2 levels of commissions), if you are running an affiliate program and will be paying out commissions via Paypal, make sure you are not violating their terms.]

How The 2-Tier Affiliate Program Works

In a typical “1-Tier” affiliate program, when a buyer makes a purchase, the affiliate who referred the buyer is the only one who gets paid an affiliate commission. Which is why it’s called “1-tier”, because there’s only one level of commissions paid.

However, in a “2-tier” affiliate program, the “Affiliate’s Affiliate” (2nd level above) can also be paid a portion of the sale in commissions.

So consider this this example…

You are selling Product A that costs $100.

You’ve set up your commission structure for Product A as follows:

Tier 1: 50% Per Sale

Tier 2: 10% Per Sale

Joe Customer is referred by Charlie to your web site. Joe went on to purchase Product A for which commissions are set up above.

So Charlie (tier-1 affiliate) gets paid 50% of the sale – which is $50.

Now, normally a 1-tier affiliate program would stop there, and that would be the end of affiliate commissions for that purchase. But you have set up 2 tiers.

So now DAP looks at who referred Charlie, the affiliate. It finds that David originally referred Charlie to your web site (regardless of how Charlie got in to your membership site).

So now David (tier-2 affiliate) gets paid 10% of the sale – which is $10.

So for that one sale of $100, $50 was paid to Charlie, and $10 was paid to David, which totals $60.

So $40 is your earnings, as the site owner.

How To Set It Up

The 2-tier or “n” tier setup is the exact same as the 1-tier setup.

Only difference is, set up a new record on the “Affiliates > Set Commissions” page for each tier – one for Tier 1, one for Tier 2, and so on.

1 20 21 22 23 24 35