Troubleshooting Admin Home Page Reports
If you find something not right with the numbers on the admin home page reports, then it’s probably because…
1) You’ve not chosen a wide enough date range at the top of the page. So make sure you select a wider date range and click “Run All Reports” to load all reports on that page for the new date range
-OR-
2) You have manipulated some dates for one or more users, which is making the earnings report not match the member summary report. In that case, keep reading.
On the DAP Admin Home page, the Earnings Report by Product basically reports on all actual orders (payments received) based on transactions listed on the “Payment Processing > Orders” page.
However, the Member Summary report shows a summary of members based on start date, end date, and trans id (free/paid/actual number) of the users on the Users > Manage page.
So let’s a new member joined today.
Normally, on the Admin home page, if you chose the date range for all reports for just today’s date, then the order would show up under Earnings Report by Product for today’s date, and also shows as a new paid member under the Member Summary report.
However, if you went to the Users > Manage page, and manipulated the user’s start date to some date from last month, then the new order will still continue to show under Earnings Report by Product for today’s date, but now under Member Summary, number of new PAID members who joined today, would show as ZERO. That’s because you manipulated the dates such that DAP will now be reporting an extra member joining last month.
So if you truly want the data to match under both reports, then don’t manipulate the user’s data (so user paid today, but you moved his start date back by a few months just to test dripping or just to give him extra access).
Automated Reminder Emails For Admin
In DAP, you can not only send automated pre-scheduled emails to your members (Autoresponders), but you can also set up similar pre-scheduled “Reminder” emails to be sent to you (the admin) every time a member reaches a day milestone.
Eg: Let’s say you (the admin) want DAP to send you or someone on your team a reminder email to follow up with each member by email once they reach day #7 – meaning, it’s been 7 days since they signed up for a specific product.
This is how you do it in DAP:
- Go to DAP Admin > Emails > Autoresponders
- Click on “Compose New Email“
- For subject, enter (say) “Follow Up with %%FIRST_NAME%%”
- In the body of that email, you may use merge-tags for the member – like “Be sure to email %%FIRST_NAME %%LAST_NAME%% , ask them about their progress, see how they’re doing and upsell Platinum Coaching program. Their email id is: %%EMAIL_ID%%”
- Further below on that page, in the “Send to 3rd Party (instead of member)” field, select “Yes (like admin or staff)” and you will see an additional text box show up below, where you can enter your (or your staff’s) email id where you want the reminder to be sent.
- Save the email.
- Go to the DAP Product where you want this email to be added to the sequence.
- Go to “ContentResponder” tab.
- Add this new email to the product, click on the “Edit” icon, and set it to be dripped on Day #7.
That’s it!
Now for each member that signs up for that product, regardless of when they join, every time they reach day #7, the reminder email will be sent to the 3rd party email id specified for that message (instead of being sent to member).
Reverse Dripping
If you want to be sent this same email say 3 days before member’s access expires to that Product, then set the email to be dripped on day “-3”. (See Expiration Notifications / Renewal Reminders)
Automated Email Dripping
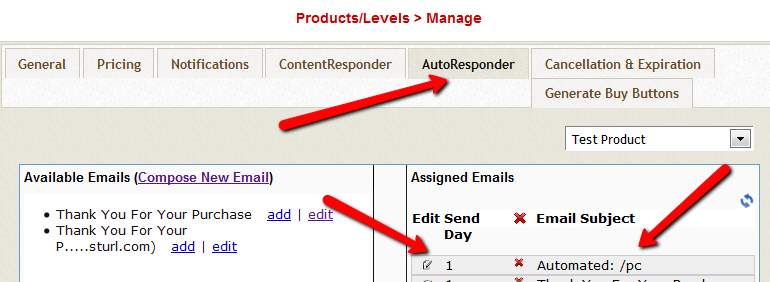
In dap 4.4, we have added a new feature where when you setup content for dripping, dap will automatically setup an email auto-responder to drip corresponding to each dripped content. The autoresponder drip setting will match the content drip setting. When you enable the automated dripping, an email will automatically get dripped ( you will find it in dap products page -> autoresponder tab) for every content you have dripped. An automated email alert will get sent to your participants and you can configure what you want in that email in the dap setup->templates section.
You can configure/customize the email you want sent automatically when any content is dripped and the email will automatically get sent at the top of the hour (when dap hourly cron runs).
But there are a few things that it does not support :
1) You cannot control what type of content should result in automated dripping (post/page/files etc). It will apply to all dripped content.
2) If you have content already dripped before you install the autodrip module, then when you install the autodrip, it will get a list of ALL of your dripped content .. even the ones you had dripped in past (and not just the ones you drip from that point onwards).
And it will set up an automated email to drip for each of your post/page regardless of when it was actually created. in this release, you CANNOT set a point in time to make the autodrip apply to posts created only after that point in time.
3) When automated dripping is configured, it will apply to all products. You cannot configure it at product level. It’s a global setting. So any post/page you drip under any product.. an automated email will get setup for that page/post. If you have product A and B, then you cannot have the autodrip only apply to say product A. It will automatically apply to both products – A and B.
4) You cannot use it if you are ALSO using SSS/ Credit Store. It’s not compatible currently.
Here’s how it works :
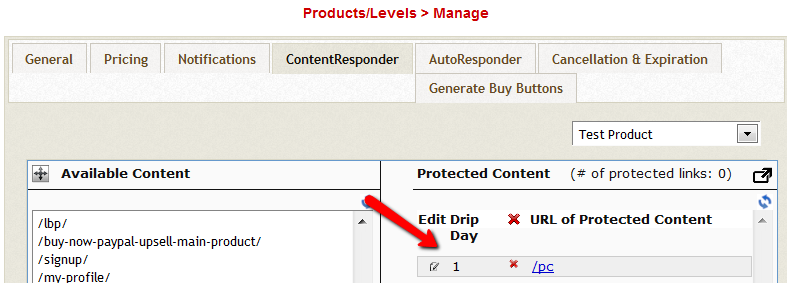
If you have a content set to drip day 10 as shown below:, then an automated email will get setup and it will get sent to users that’s on day 10 of their membership. If you have new users that just joined, they will not receive the email until they reach day 10.
If you have content set to drip day 1 as shown below:
Then an automated email will get setup (as shown below) and it will ONLY get sent to users that’s on day 1 of their membership. If you have new users that are on day 2 or more, they will never receive the email as they are already past that drip day.
Setup Instructions :
Just like the hourly dap cron (dap-cron.php), you will have to configure another cron for autodripping.
The name of this cron script is /dap/dap-autodrip.php. You can configure it to run once every 1/2 hour. This way it will pick up any new posts added in the 1/2 hour and create autodrip entries for it.
Say your cron command for the hourly dap cron (dap-cron.php) in your webhost cpanel -> cron tab is :
/usr/bin/php /var/html/wordpress/dap/dap-cron.php
Then for autodrip, the command will be:
/usr/bin/php /var/html/wordpress/dap/dap-autodrip.php
Set it up in your webhost cpanel -> cron tab to run once every 1/2 hour. Everything for this cron will mirror the dap-cron.php except the name and it will run once every 1/ 2 hour instead of once every hour like dap-cron.php.
Here’s how can test this feature :
1) Lets say you have a NEW product
2) Now add a new user to that product via dap admin -> add users page
3) Now say you dripped testpost1 under that product. Set drip start day = 1
4) Now go to autoresponder tab and make sure there are NO automated emails set for drip
5) Now either wait for the dap-autodrip.php cron to run (depending on whether you set it to run once every 1/2 hour or 1 hour)
OR
For testing purpose, you can run the cron manually by visiting this URL in a browser:
http://YOURSITE.com/dap/dap-autodrip.php
6) After you run it manually or after it runs via cron, if you go and check the Email Autoresponder tab for that product, you shd see a new AUTOMATED autoresponder email dripped for that testpost.
7) Now wait for the main dap cron job to run. It will run once every hour.
When it runs the email will get sent. To make sure email got sent, go check dap system -> job queue. See if you find the email there with “completed successfully” status. If yes, the email got sent and you are all set.
NOTE: If you dont want to wait that long and want to quickly test it, then just run dap-cron.php manually by visiting this URL in a browser:
http://YOURSITE.com/dap/dap-cron.php
How To Test Member Access
We do NOT recommend testing what your regular member’s user-experience, while you are logged in as DAP/WP Admin.
Being logged in as DAP Admin and WP admin gives you certain privileges that your regular user/member won’t have. So you may see things that your members won’t be seeing. Or you may not see things that a regular user would normally see.
Either way, you may not be seeing what you’re supposed to see when you mix user testing with admin privileges.
So we recommend that you use two completely different browsers for testing: say, Chrome (or your primary browser) for WP & DAP Admin, and Firefox (or other) for logging in as regular user.
That way, you won’t have to keep logging in and out of DAP and or WP to test as both admin and user.
Keep them both separate.
If you are wondering how can the DAP Admin actually login as a member to see what they’re seeing – a critical feature during initial testing as well as troubleshooting a live site when a member says they’re having trouble accessing certain content, then continue reading.
You can use our “Login As Member” feature, where the DAP Admin would go to http://YourSite.com/dap/loginAs.php.
This page will present 3 form fields:
1) Email id of member you wish to log in as.
2) DAP Admin Email
3) DAP Admin Password
If you do not know what your DAP admin email / password is, you can click on your admin name in DAP Admin -> Users-> Manage page and update your admin password. The DAP Admin password is NOT the same as your WP admin password.
Once DAP verifies that it is indeed the DAP Admin trying to log in as someone else, DAP will log you into the site as that member whose email id you entered in (1) above.
NOTE: The Login As Member (LAM) feature does NOT mean that you can use just one browser to log in as both DAP Admin and regular member. You still need to use two separate browsers – one for DAP admin (like Chrome) another for regular member (Firefox). All LAM does is give you a workaround for logging in as someone else, because starting 4.4.x, the DAP Admin can no longer see what the member’s password is in order to log in as them.
Dripping Content
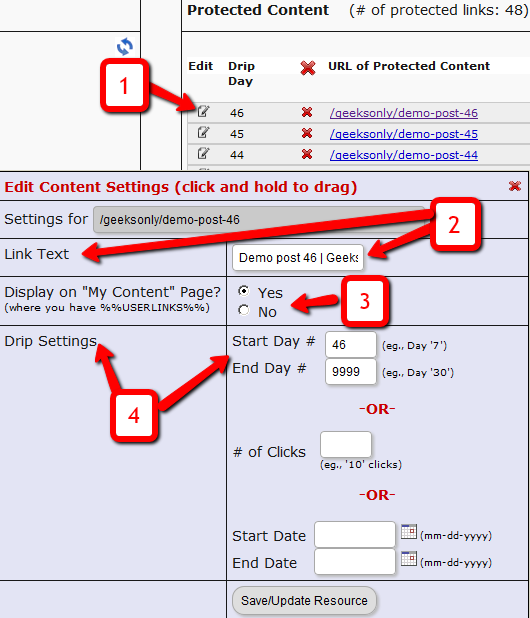
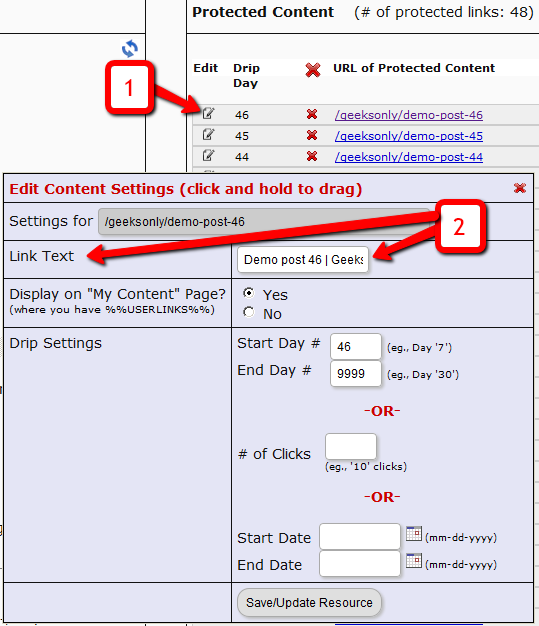
Once you have protected content by adding it from left-to-right on the “ContentResponder” tab of the Products > Manage page, you can set the dripping day/date and link display text and other drip options, by launching the “Drip Settings” popup (see “1” below) by clicking on the “Edit” icon next to the content you wish to drip.
By default, when you add any content (WP page/post or file), it is set to drip on day #1 by default. Which effectively means “no dripping” – and that the content is available to the member from day 1 of their purchase/signup.
1. Shows the “Edit” icon on the “ContentResponder” tab, and clicking it will bring up the “Drip Settings” popup (that shows 2, 3 & 4).
2. On the drip settings popup, the “Link Text” refers to the display text of the link that will be shown to the member on the “My Content” page.
3. If you wish to protect a link, but just NOT show it in the list of links on the “My Content” page, then set this to “No”.
4. Drip Settings: In DAP, you can drip content by Day, Date or restrict access by # of Clicks. You can only choose one method (eg., you cannot drip by day and date at the same time).
Modifying Link Text For Content
When you protect a page, post or file URL in DAP on the “ContentResponder” tab, every protected link – and eligible (for display, based on dripping) link will show up on the “My Content” page.
If you wish to modify the “Link Text” (the actual text that is displayed when the user sees the link), then…
1) Click on the “Edit” icon next to any protected link under the “Protected Content” section, and that will bring up the “Drip Settings” popup.
2) In that popup, you can customize the “Link Text” field with any text you want.
Creating Member-specific Content
If you have a coaching program, or have clients for whom you’re doing custom work (like if you were a teacher, CPA, web designer, personal trainer or coach) and wish to publish content that is available to and downloadable by only that specific client/student/customer, then there are THREE ways in which you can do Member-Specific Content in DAP.
1) BEST SOLUTION: Using a combination of a special page for each member PLUS DAP’s “For Your Eyes Only” Shortcode
2) Creating Separate Products for each Member
3) Using DAP’s “For Your Eyes Only” Shortcode
Let’s take a look at each one in detail.
SOLUTION #1: BEST OPTION: Special page for each member PLUS DAP’s “For Your Eyes Only” Shortcode
This is partly manual, partly automated, but is the absolute best solution for multiple reasons, as explained below.
1) For each new member, you would create a separate page. So, for Joe Customer, you would create a new page in WP – http://YourSite.com/joe-customer/
This page would be created after someone has become a member, of course. But creating a WP page for every member will probably take you about what, 30 seconds? So it’s not going to be a big deal (unless you wish to make it one 😉
2) Then, assuming Joe Customer’s “userid” in DAP is 144 (you can find this out on the Users > Manage page). So within the above new page, you would add the following shortcode…
[DAP userId=”144″]protected content[/DAP]
(See DAP’s “Member-Specific Content” Shortcodes )
3) You can start adding any amount of private content between the shortcode start and end tags (where you see protected content above).
4) You can use a simple, free plugin like Exclude Pages to make sure the customer’s page http://YourSite.com/joe-customer/ does not show up in any of your menu’s. Even if it did, it’s not like anyone else can see the contents of the page – only Joe Customer – after he’s logged in to DAP – can see the contents of the page. So it’s secure from everyone else.
Solution #2: Separate Products for each Member
Here, you would create separate products, one per member – and only give that member access to that product. The advantage here, is that you can protect the entire page (not just the content section) and make it available just to that one client, so you can be a lot more creative with this page, use special templates, add sidebar widgets that show content just for that client, use the commenting system to communicate back and forth with the client.
So if you had a client named John Customer, then you would create a DAP Product by name “John Customer”, then take John’s email id and give John access to his product.
And within this DAP Product, you would’ve protected files, pages and posts that only John should get access to. So since only John has access to the product, only he can get access to the content protected as part of this product.
Obviously, it takes a few minutes of additional setup per customer to create a DAP Product specifically for him, but then the few extra minutes of creating a DAP Product would be nothing compared to the few hours (or tens of hours) that you’re actually going to be taking to create the actual custom content for John. So it’s a very small overhead compared to the whole process, where you are actually creating custom content for each member.
Solution #3: No special pages, just DAP’s “Member-Specific Content” Shortcode
If you wish to automated this a bit more than Option #2, then one way is to implement this is using DAP’s “Member-Specific Content” Shortcodes, which look like this:
Using the “userId” parameter in the DAP shortcode, you can now protect a piece of content so that only John Customer (who has the user id “144” in your membership site) user can see it.
[DAP userId=”144″]protected content[/DAP]
So on a single page, you may publish a number of these shortcodes, with content meant only for specific members protected within those shortcodes.
And doesn’t matter which one of your members visits the above page, they will all only see content intended only for them, and will be unable to see content intended for others.
So those are the three ways in which you can create Member-Specific Content.
Member-specific Chat Room
Using our WPChatR Chatroom plugin for WordPress, you can also create a separate page per user, then put a chat room on that page specific to that user, so you can have unlimited back-and-forth real-time or off-line chats with one specific member.
Hiding Protected Links On Member Home Page
When you have hundreds of posts or pages protected as part of a DAP Product, the list of links on the DAP Member Home Page (that is the result of using the merge tag %%USERLINKS%%) can get quite long and unwieldy.
So you can choose to hide some of those links from being displayed on the member’s home page.
Here’s how you hide a link from being shown on the member’s home page…
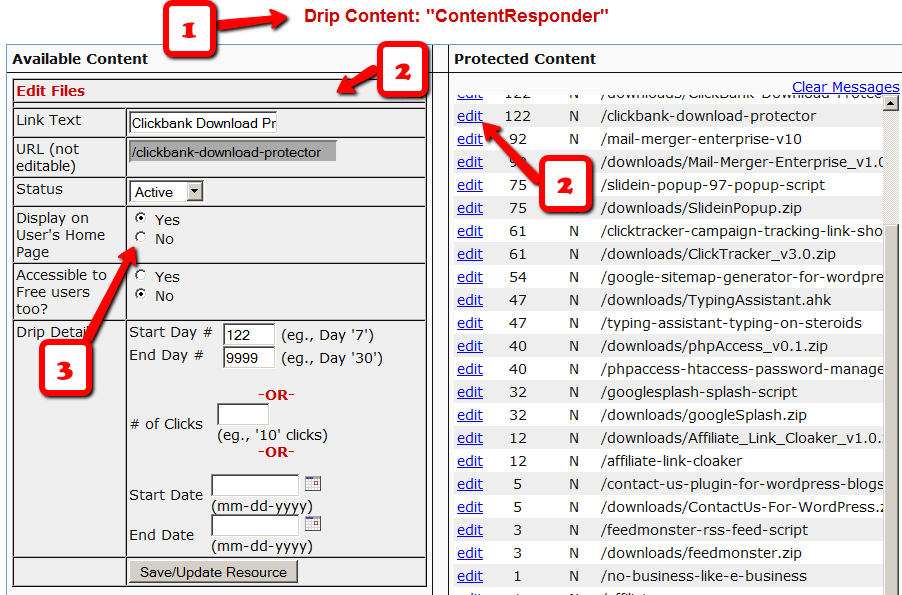
1) Go to the DAP Product in question, scroll down to the ContentResponder section
2) Click on the edit link next to the content in question on the right. The “Edit Files” popup will then show up on the left.
3) Set “Display On User’s Home Page” to “N”.
That’s it.
The content is still part of that product, it is still being protected, but the link simply won’t be displayed on the member home page.
DAP’s “Pause Membership” Feature
How It Works
Joe Member joins your site on 01/01/2011.
He stays a member for about 3 months. Let’s say it’s now mid March. He wants to take a couple of months break. So he goes on a 2 month break. Comes back end of May and wants to resume his membership.
DAP allows him to pick up right where he left off – which is continuing to receive content as of April (04/01/2011), even though today’s date is May 25th, 2011.
So while he took a break, other members who did not take a break in membership, continued to pay for those 2 months, and continued to receive content dripped through those months. So it is only fair that when he does come back end of May and resumes his subscription, he does not resume from June’s content, but from April’s content (when he last put his membership on “Pause”).
It’s ok if you’re not dripping content on a monthly-basis, but rather on a “day” basis. So to put it in terms of “days”, when Joe resumes his subscription, since he was already 90 days old in the system when he put his subscription “On Hold”, and comes back another 60 days later (roughly about 2 months), then DAP will start dripping Day #91 content onwards for him, and NOT Day #151 onwards (he didn’t pay for 2 months in between).
This is how DAP works right out of the box. Nothing special to configure. And DAP automatically takes care of pausing the dripping when he is not paying.
WARNING: Just remember that in order for you to put his actual payments on hold, you will need to have a payment gateway like Authorize.net or Paypal Website Payments Pro. Or you must be using a shopping cart like http://1SiteAutomation.com . Using something like Paypal Standard or ClickBank will not allow you to put the actual charging of his credit card on hold.
NOTE: If you actually did want him to start receiving current content even though he left for 2 months, then all you have to do is, once he comes back and starts paying again, just extend his access end date on his account (which will initially be showing 03/31/2011 – end of March, when he left) and modify it and make it 05/31/2011. So when his next payment comes in after he resumes, DAP will extend his access end date to 06/30/2011 – which means, he can now access all of the current content.
Un-Protecting Content
Once a post or page is added to ANY DAP product, then it becomes protected, and will be available to only those who have authorized access to that Product.
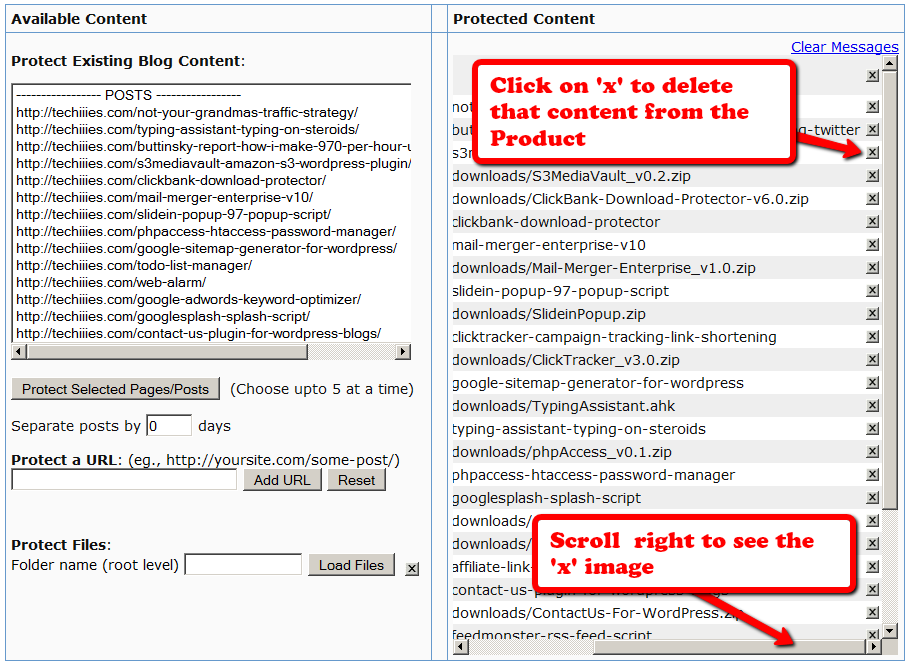
So to completely Un-protect a page or post that you have protected previously, and make it “public” (a.k.a “open”) again, so that any casual visitor to your blog or web site can see it, you just scroll to the right in the “Protected Content” section, and click on the “X” image next to the content that you wish to Un-protect.
Of course, also make sure that you do the same for all products – because if you forget to delete it from even one Product, then it will continue to remain protected.
