65
DAP-to-Aweber Integration
UPDATE April 2, 2015: Starting DAP 4.8, DAP now integrates with Aweber via their API.
UPDATE July 23, 2014: The DAP-to-Aweber integration below has slightly changed – the documentation below has already been updated with the new information.
Subscriber Flow
The flow of subscriber in this model, is “FROM DAP TO Aweber“. User signs up at DAP first, then DAP adds her to Aweber.
If you are looking for the other way, i.e, “FROM Aweber TO DAP”, then click here.
Please Note
When DAP adds a subscriber to your Aweber list, it can currently “send” only the user’s Name and Email address to Aweber. DAP cannot (and does not) send the user’s unique password in DAP, or their affiliate id, etc. If you want Aweber to send out the password, then here’s how you can do it.
How it works
With the “DigitalAccessPass.com” Aweber Email Parser, integrating DAP with Aweber is a total breeze.
1. Login to your account at Aweber.com and from the “Current List” drop-down, pick the list to which you want DAP to add users to.
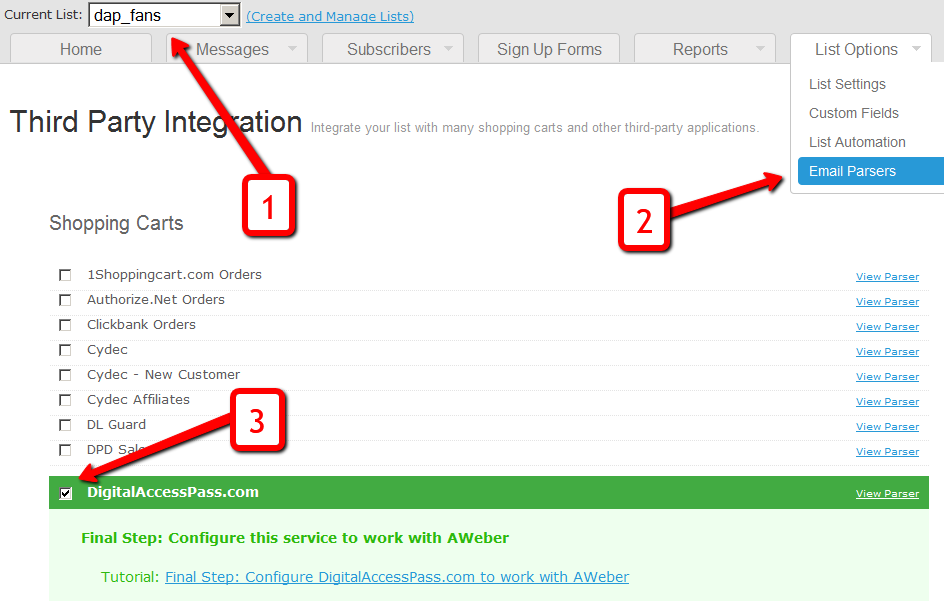
2. Click on “List Options”, and from the drop-down, select “Email Parser”
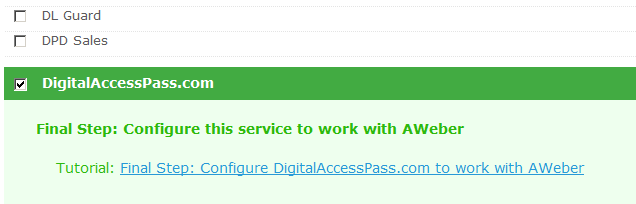
3. On the Email Parsers page, select the check-box next to the “DigitalAccessPass.com”
That’s it for the Email Parser activation at Aweber. You will be shown something like the image below – but note that there is no “Final Step”. So nothing further to do on this Aweber page.
4. Log in to your DAP Admin Dashboard and pick the product (whose members you wish to add automatically to your Aweber list from step 1 above)
This step is where things changed on Aweber’s end sometime in June/July 2014. So if you previously performed this step and your Aweber integration has stopped working, please double-check the steps here.
5. Go back to Aweber and select the right list. Then, under List Options > List Settings, under “Basic Information” section, you’ll see “List Name” and right below that, you’ll see “Unique List ID“.
In the image below, both appear to be the same. But on most Aweber accounts, especially new lists recently created, these may not be the same.
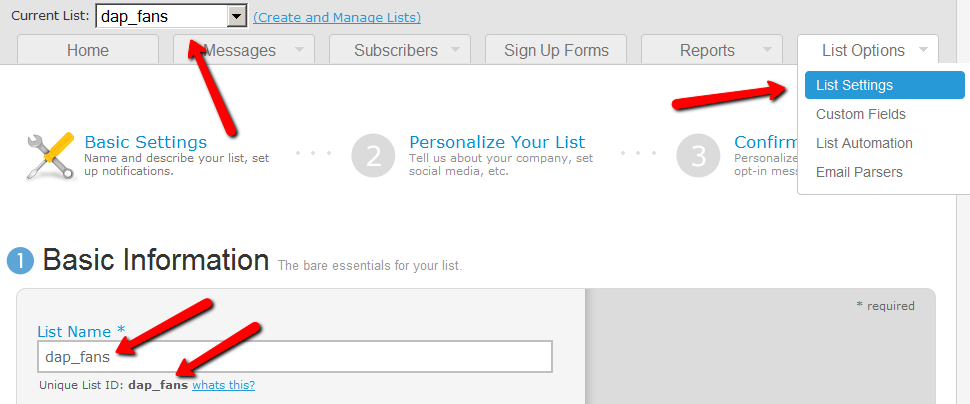
Take the “Unique List ID” (NOT THE “List Name”, like it used to be earlier)
Add the text “@aweber.com” to the end of that text – that now becomes your “Aweber List Email”. So if your list’s unique list id is “dap_fans”, then your Aweber List Email becomes “dap_fans@aweber.com”.
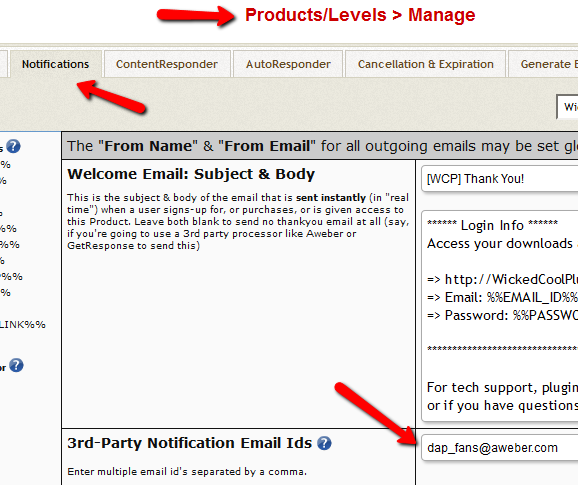
Copy this, go to the DAP Products > Manage page, and under the “Notifications” tab, add this Aweber List Email to the “3rd Party Notification” field, and save.
That’s it!
How This Works
So let’s say you picked the list “dap_fans” in your Aweber account, and the DAP Product “Example Subscription Product” (as shown in the screenshots above).
So once you add “dap_fans@aweber.com” to the product’s “3rd Party Notification Email Ids” field and save it, every time someone gets access to the “Example Subscription Product” product (regardless of whether they buy it, or you give them access on the backend), an email is sent out to the email id dap_fans@aweber.com , which looks like this:
From: Joe Subscriber <joe@subscriber.com>
Subject: New User Signup (3rd Party Notification)
Body:
Name: Joe Subscriber
Email: Joe@Subscriber.com
Product: Example Subscription Product
And because you have already activated the DigitalAccessPass.com parser in your “dap_fans” list, Aweber automatically adds “Joe Subscriber” with the email id (Joe@Subscriber.com) to your dap_fans list. And the parser has been written in such a way, that the product name will be used as your “Ad Tracking” field for the subscriber. So you will be able to group them and run reports on them in your Aweber account.
Frequently Asked Questions
Q: If I integrate DAP with Aweber and someone signs up to my membership site and then later on cancels or stops paying, can DAP automatically remove people from Aweber?
A: Short answer: No. Aweber doesn’t have a “Remove” parser, only an “Add” parser. So if someone who DAP automatically added to your Aweber list when they purchased a product, cancels or asks for a refund, you will have to manually remove them from the Aweber list. But wait, this may not be such a bad thing after all.
ExtraTip: As soon as someone cancels their subscription (or just doesn’t pay, or their credit card is declined), then their membership account in DAP automatically expires. Which means they can no longer access any content (unless you have specifically set DAP Config to deliberately give ex-members access to content that they paid for previously when they were a member).
So that means, their access in DAP has expired, but they are still on your Aweber list.
This may not be bad, because if you keep sending them emails (through Aweber) about new content and new videos and new stuff you are adding to your membership site even after they’ve cancelled, when they come back to your site through the link in your email, they won’t be able to access the actual content.
So it’s a great way of continuing to keep even ex-members curious and coming back to the site, only to be presented with a “Sorry, you don’t have access to this”, which may be a great incentive for them to come back and join your web site.
Of course, for this to work, you must put all the key content on your web site, and use the emails just to get them curious about the content, and eventually bring them back to the site to deliver the content. However, if you are going to send out all the good stuff in your emails (which doesn’t make sense anyway) then this may be an issue for you.
Q) Will DAP add only paid customers to Aweber? Or both Paid and Free members?
The link is really between the DAP Product and your Aweber List. So regardless of who gets access to that product – for free, by paying, or admin added – they will automatically be added to your Aweber list. So if you don’t want your free members to be added to your Aweber list, then keep your “Free” products and your “Paid’ products separate, and don’t set up this integration for the Free products.
Q) I have a question about how Aweber integrates with DAP. In this instance i am selling a monthly and yearly membership. The reader clicks on the subscribe button on my sales page and gets taken to Paypal. Assuming i have integrated Aweber properly, does the person get added to my Aweber List as well as the DAP list? Or is the only way they get added to Aweber is through a webform? I would like to be able to email the subscribers from time to time through Aweber but i am not using a Web form on my sales page, only a subscribe paypal button.
For paid products, here’s the flow:
Payment Processor (For ex – Paypal) == > DAP ==> Aweber
1) User pays via Paypal.
2) Paypal notifies DAP (ofcourse you need to integrate Paypal with DAP first either using Paypal hosted buttons (http://www.digitalaccesspass.com/doc/setting-up-your-paypal-button-and-paypal-ipn/) or using DAP generated button for paypal (http://www.digitalaccesspass.com/blog/2010/12/dap-v4-0/).
3) If the Paypal payment was successful, DAP creates the membership account and sends out the thankyou email to user with their membership login info (you can configure thankyou/welcome in the DAP products page).
4) In the DAP products page, you can select the product and set the Aweber list name in the 3rd party notification Ids field. In this field, you can specify a comma-separated list of email Ids.. one of the email ids can be your Aweber list email i.e. mylist@aweber.com
5) After DAP adds the user to purchased product, it sends out notifications to all email Ids listed in the 3rd party notification id field for that product.
Here’s more info on how to integrate DAP -> Aweber for paid products. Make sure to login to your Aweber account, Click on “My Lists†and within that, select “Email Parserâ€Â. On the Email Parsers page, check the check-box next to the parser named “DigitalAccessPass.com†as described above in this post.
First Name: Veena
Last Name: Prashanth
Email: veena@digitalaccesspass.com
Product: Digital Access Pass with WP LiveLinks
5
I’m getting an error during installation
How do I setup Cron?
Installation / Pre-Installation FAQs
What are the minimum web-hosting requirements to run DAP?
See “Minimum web-hosting requirements”
What web hosts to you recommend?
I’m getting an error during installation
See this post for more details about errors .
How can I avail of Free Installation?
How do I setup Cron?
55
Paypal Hosted Buy Buttons
DAP can process Paypal payments using Paypal IPN (Instant Payment Notification). All you need to basically do is to enable IPN within your Paypal account and create your Buy button with a few extra parameters. It’s all explained below.
So here’s what you need to do to process orders through Paypal using IPN, and have your buyers automatically added to DAP on your site.
1. Enable IPN within your Paypal account.
Follow this post to enable IPN first, and then come back here to this post.
2. Create your “Buy Now” or “Subscribe” or “Add to Cart” button
- Log in to your Paypal account.
- Click on Profile => Profile and Settings => My selling tools => Paypal Buttons => Update

- Click on the “Create New Button”

On the Create New Button Page:
Step 1: Choose a button type and enter your payment details
1: Choose any one of the following button types based on the type of product you wish to sell.
* Shopping Cart (for multiple-item purchases)
* Buy Now (for one-time products)
* Subscriptions (for subscription-based recurring products)
2: After selecting the button type, enter item name and price.

- “Item Name”
Make sure the Paypal “Item Name” EXACTLY matches the “Product Name” that you created within DAP. In fact, login as DAP admin, edit the product, copy the text from the “Product Name” field, then paste this into your Paypal “Item Name” field, so that there are no typos. If the product names don’t match, DAP will ignore any IPN posts coming in from Paypal, which means no account will be created for your new member.
Step 3: Customize advanced features (optional)
- just add a custom variable to the button as follows:
Under “Step 3: Customize advanced features (optional)” tab, within the “Advanced Variables” text box, enter the following (change the text YourSite.com below to your domain name).
notify_url=http://YourSite.com/dap/dap-paypal.php
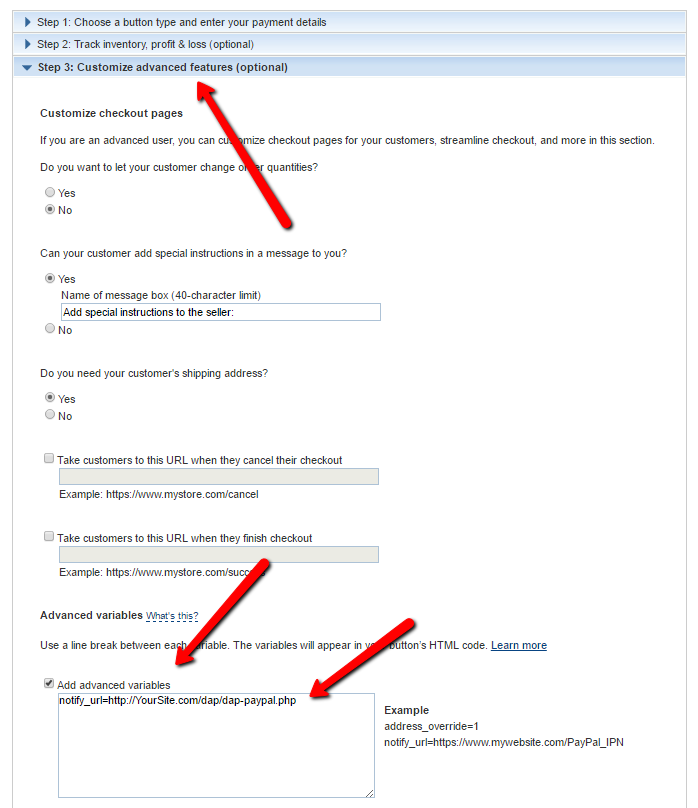
(change the text YourSite.com to your domain name).
Save the button.
4. Copy the HTML code for this button
5. Publish the code on your web site’s sales page
..or WP page or post.
That’s it!
So when someone subscribes to, or purchases your product using this button, Paypal will send an IPN notification to your web site to the above link. DAP will then verify the product and payment status, and then will automatically add give the buyer/subscriber access to that product.
If the email id used in this purchase is not already associated with an account on your site, then DAP automatically creates a new account, and sends the buyer an “activation” email that requires them to click on a link to confirm and activate their account.
But If this email id belongs to someone who already has an account in DAP (existing buyer, purchased a different product this time), then DAP doesn’t create a new account for this user. It simply gives the existing account access to this new product.
So when the user logs in, they will see that they now have access to TWO products, with each product and the available URL’s listed separately.
Note: If you’re going to be using Paypal to process payments, then you don’t need to set up the Email Processing info in your DAP Admin > Config > Payment Processing screen. You don’t need to set up the DAP Email Order cron job either.
24
1ShoppingCart Email Order Processing
If you’re using 1ShoppingCart or 1SiteAutomation.com (our private label of 1SC), if you want your users to be automatically logged in to their DAP membership area upon completion of purchase, then refer to this documentation on how to setup Login Xpress with 1ShoppingCart.
If you only sell one-time products, then the 1SC Login Xpress is the only thing you will need to integrate DAP and 1SC.
However, if you sell RECURRING products via 1SC, then you need to set up the email parsing of orders to allow DAP to process recurring payment notification from 1SC, as described below.
The reason for this, is that 1ShoppingCart, while very robust as a cart, does not trigger payment notification messages on the backend (like Paypal can do with IPN) when recurring payments comes in for a member.
So, we at DAP have created an exclusive “Email Order Processing” feature, where DAP will log in to your billing email inbox (where your 1SC email notifications come in) and then check your emails as if it were your personal assistant, and then process any orders that match your DAP Product names.
That is how DAP is able to do automated processing of Cancellations and Failed Recurring Payments.
For 1ShoppingCart and ClickBank, DAP does “Email Parsing” of orders.
Setting Up “Email Parsing”
Basically all you will be doing here is telling DAP where your payment notification emails from 1SC come in, and how to go fetch those emails so the recurring payments can be processed automatically, without you having to lift a finger.
1. Log in to your 1SC account. Then go to “Setup > Orders”. Copy the email id that you have entered into the “Order Notice Email – Primary Destination” field. Please note that 1SC DOES NOT send recurring billing notifications to the email id in the “Secondary Destination”. So be sure you use the email id from the “Primary Destination” field.

So let’s say you have set the primary destination email currently, to point to say ‘billing@yoursite.com’. Now make sure that the emails in your billing@yoursite.com inbox remain in ‘Unread‘ status, because when DAP logs in to check your recurring notifications, it will be looking at only Unread emails. It will not touch the ones that are already read.
2. Go to DAP Admin Dashboard > Setup > Config > Payment Integration .
3. On this screen, configure the following fields…
Email Server Where Order Emails Come In : mail.yoursite.com
Email Server Protocol (pop3/imap) : imap (no need to change this)
Email Server Port : 143 (probably won’t need to change this)
Email Server Protocol (ssl/nossl) : nossl (probably won’t need to change this)
Email Server User Name : billing@yoursite.com (enter email id copied from Step #1 above)
Email Server Password : yourpassword (the password to your email inbox for the above email address)
That’s it as far as setup is concerned.
Additional Notes
4. Set up your sales page as you would normally do when accepting payment through 1ShoppingCart. The only thing you need to make sure is to use the exact same “Product Name’ in your cart as well as within DAP.
So, if you set up a product called “My Membership Site” within DAP, then use the same name “My Membership Site” in your 1SC product name.
5. During installation, a Cron job (dap-emailorder.php) would have already been set up in your web hosting cpanel, to run every 10 minutes. So, every 10 minutes, DAP will automatically check the email id specified in Email Server User Name (the email id from Step 1).
If there is a payment notification (first time or recurring payment) for a product name that matches a product name in DAP, then it will automatically add that customer to DAP as a member if they’re a new member, or if they’re an existing member and it was a recurring payment notification, then DAP will “extend” their membership access by a month (or whatever your recurring cycle is), so that they will continue to get access to your membership site until the next payment comes in.
Testing
Try out some test purchases first. Make sure you try out the full purchase and full user experience, end-to-end.
WARNING 1: If you ever change the name of your product in 1ShoppingCart, or within DAP, make sure that both DAP and 1SC Product names are in sync.
WARNING 2: Do not use SKU in 1SC while defining the product. DAP will not parse the emails correctly if you use SKU.
35
Path to DAP
Setting Up Cron Jobs
(Note: You can get this setup as part of your free installation. But if you would like to do it yourself, keep reading…
There is just one cron job (back-end, scheduled jobs) that you need to setup.
dap-cron.php (mandatory – once an hour)
This is the main one. It sends out broadcast emails, autoresponder emails, handles bulk member imports, affiliate commissions processing, clean up, etc. This one is mandatory.
Please Note: If you use 1ShoppingCart as your shopping cart, you need to setup another cron:
dap-emailorder.php (only if you use 1shoppingcart – every 10 minutes)
This is the email order processing cron, used ONLY for 1ShoppingCart. Skip setting this cron up if you’re not using 1ShoppingCart or 1SiteAutomation.com.
Path to DAP
Visit the url below in a browser window (replace YourSite.com with your actual domain name):
http://YourSite.com/dap/getpath.php
This will show something like this in your browser:
/home/path/to/dap
This is your “Path to DAP” to your root folder.
To the end, add “/dap-cron.php”. So that makes your new “Path to DAP” to be:
/home/path/to/dap/dap-cron.php
This is your new “Path to DAP”. Make a note of this on a piece of paper, or in a notepad/text editor window.
Setting up the Cron jobs
A) dap-cron.php
This one is mandatory. Should be set up to run Once Every Hour. This hourly process is what sends out all the scheduled broadcast (bulk) emails and processes different types of “bulk actions” – like importing a large list of customers into DAP from an external system, for instance.
- Log in to your web host’s control panel (or cpanel)
- Look for the icon “Cron Jobs” in the “Advanced” section – usually towards the bottom of that page, and click on it.

- On the next window, in the “Common Settings” drop down, select “Once an hour (0 * * * *)“.
And in the “Command” field, enter this:/usr/bin/php<insert space>/home/path/to/yoursite.com/dap/dap-cron.php

NOTE:<insert space>above is just a note to you that means you must hit the spacebar and insert an actual space between the two pieces of text. - Click on “Add New Cron Job”.
That’s it for this one.
B) dap-emailorder.php
Follow this step ONLY if you’re using 1ShoppingCart or any private label of 1SC – like 1SiteAutomation.com.
This cron job should be set up to run once every 10 minutes. This is the script that processes all of your recurring orders initiated by 1ShoppingCart or private label. So, if you set this up to run once every 10 minutes, then every 10 minutes, it will log in to your billing email address (you can configure what this email id is within the admin control panel on the “Config” screen) and process the email notifications that you have received from 1ShoppingCart (and its private labels).
Running it sooner than once every 10 minutes – like say, once every minute or even once every 5 minutes – is resource intensive, and is not a good idea. Your web host may not not even allow it in the first place. But even if they do, it’s not recommended.
Follow steps A(1) through A(4) above. Only difference is in what you’re going to be entering in the “Command” field.
For this cron job, it is…
/usr/bin/php<insert space>/home/path/to/yoursite.com/dap/dap-emailorder.php
Only difference between the two cron jobs is in the name of script that is being run. For the hourly cron (A), it was dap-cron.php. For the 10-minute cron (B), it is dap-emailorder.php.
MISCELLANEOUS NOTES:
1. Where you see the text <insert space>, replace with an actual space (hitting the space bar).
2. Cron Email Reports:
By default, your webhost will send you an hourly cron report. If you don’t want to receive hourly cron emails, you can turn it off in your hosting cpanel. You can login to your Webhost Control Panel > Cron Jobs page, and remove your email address from that page (where it says “Please enter an email address where the cron output will be sent”).
3. To check if you have set up the cron job correctly, you can set DAP Admin -> Setup -> Config -> Log Level to “Log All Activity (During Troubleshooting)” . Then go to DAP Admin -> System -> Logs . Empty the logs by clicking on the “Empty Logs” link, and then revisit the screen and refresh the page, after say 10 minutes (to verify the running of dap-emailorder.php) or at the top of the hour (to verify the running of dap-cron.php).
4. To force run a cron (manually), click on this link:
http://YourSite.com/dap/dap-cron.php
(to run hourly cron)http://YourSite.com/dap/dap-emailorder.php
(to run the email order cron that runs every 10 minutes)
Replace YourSite.com with the actual domain name of your web site.
Customizing Header and Footer
This applies only if you have not integrated the DAP login form into your WordPress blog.
Header and Footer are now part of DAP Templates.
12
Creating a Product
The “Products/Levels > Manage” page has 3 sections.
1. Product details
2. ContentResponder
3. Email Autoresponder
All three are explained below.
1. Product Details

1. Product Id
This is an internal number assigned to every product that is created. Nothing for you to do. It will automatically show a number after you save a new product.
2. Product Name (reqd):
Obviously, this is the name you give your product. So if you are creating a product (subscription-based, or one-time purchase) about how to make money online, then you would call it “How to make money online”. This name will be used by DAP on various screens, emails and reports. So, name it something intuitive, and not something cryptic.
3. Description (reqd)
Use this to expand on what your product does. This field is used on auto-generated error pages and such.
4. Product Price
Required only if you are using DAP itself as a shopping cart, by using one of our “Upsell Tree” Plugins. If you are using a 3rd party cart (like http://1SiteAutomation.com, e-junkie, Paypal standard where the buttons are hosted at Paypal), then you don’t need to enter anything here. Just leave it at 0.00
5. Sales Page URL (optional)
When a user who doesn’t have access to the links in this product, DAP shows her a default error page with a “Lock” symbol, and on that error page, it will say something to the effect of “Sorry, you don’t have access to this Product. Click here to get access.”. And the text “Click here” will point to this “Sales Page URL” will be shown, which the user can then follow to read your sales page and then purchase the product.
6. Error Page URL (optional)
Default value: /dap/product-error.phpIf you leave at this default value above, then DAP will show the default error page when a user tries to access a URL that she doesn’t have access to yet, URL to which access has expired, or she hasn’t purchased the product of which the URL is a part of.
Is this a recurring product? (optional):
Pick “Yes” or “No” depending on if this product is a recurring product for which you expect periodic payments to come in.
If you pick “No”, then when the user purchases this product (or you give her direct access from the admin area), then the user is given access from Day 1 to Day 9999.
Price
Enter the price of your product, regardless of whether it is one-time or recurring. This price is used only if you are using the Authorize.net plugin. If you’re using direct Paypal, ClickBank or 1ShoppingCart, then this field is ignored by DAP.
Billing Cycle (optional):
Applicable only if recurring is set to yes. If this is a recurring product, then you need to enter how often billing is done (in days). So, if your product is available for a monthly subscription, then enter “30” (as in, billing occurs once every “30” days).
Product Status (optional):
If you want to temporarily take this product offline, thus revoking access to this product by all users, then change the status to “Inactiveâ€Â.
3rd Party Notification Email Ids
If you want DAP to send email notifications to 3rd party email addresses (like autoresponder services – eg., Aweber – or to JV partners), then enter one or more email addresses here. Separate multiple email addresses by a comma.
Every time a user subscribes to this product (by paying, or because Admin gave her access), an email is sent out by DAP to all of these email addresses. The “From name” is the subscriber’s name, and the “From email” is the subscriber’s email address.
This is very useful for automatically adding your subscriber to a 3rd party list service that has a “subscribable” email address – like yourlist@aweber.com or 1sa-listid@1siteautomation.com.
Once you fill out the fields, click on the “Save/Update Product” button to save the changes.
Use the same form to make changes to the fields as well.
Integrating With A Payment Processor
The Product Name within DAP should be the exact same (even the case) as the Product Name in your Shopping Cart.
So if you were using a 1ShoppingCart (or private label) to accept payment for selling your digital info product or for access to your membership site, then the Product Name you use in your 1ShoppingCart admin panel should be the exact same name as what you use within DAP.
This is the only way for DAP to know about a new purchase through your 1ShoppingCart cart. And when it parses your 1ShoppingCart notification email, it can figure out that your buyer who purchased that product needs to be added to DAP, so that your buyer can get access to either your info product files, or to your subscription-based site.
3
Personalization For Your Blog Posts
1) Personalize post Titles and Content with MERGE variables:
%%FIRST_NAME%% – Gets replaced with their first name
%%EMAIL%% – Gets replaced with their email
%%MEMBER_HOME_PAGE%% – Gets replaced with the ‘login’ page
So if you create a blog post with the title “Welcome %%FIRST_NAME%%“, then when your member views that post after they’ve logged in, they will see “Welcome John“.
2) Personalize the Login Form:
You can put the Login Form on any WP “Pageâ€Â.
3) Personalize Member and Affiliate Information: