9
Google Checkout Integration with DAP
1) Update DAP Setup > Config -> Secret Authorization Key to be…
YourGCmerchant_id|YourGCmerchant_key
2) Point the Google Checkout IPN handler to
http://yoursite.com/dap/dap-gc-responsehandler.php
(replace yoursite.com with the name of your site).
3) Create a DAP product and make sure the item name that your GC Item Name exactly matches the DAP Product Name.
That’s it!
NOTE
You will find a file by name dap-gc-responsehandler.php in your dap folder.
Use this file as is, with no changes, during testing. Nothing to change.
But once you’re ready to go live, open the file, and find the line below:
$server_type = “‘sandbox”;
And change it to:
$server_type = “‘production”;
6
DigiResults.com Integration With DAP
1) Go to DigiResults.com “Manage” Listings tab at https://www.digiresults.com/manage/listings
2) Click on the List Name

3) Click on “Edit Product” below the Products section on the listings page.
4) In the Edit Product page, click on “Edit” next to Direct Receipts.

Set the Direct Receipt URL to point to the dap script on your site…
The direct receipt format should be set to Clickbank Instant Notification.
http://YOURSITE.com/dap/dap-digiresults.php

5) Create a product in DAP and make sure the dap Product Name exactly matches the digiresults Product Name.
That’s it!
Now run a test purchase via digiresults and see if the account gets created in dap automatically.
29
JVZoo Integration with DAP
DAP supports full fledged integration with JVZoo including automated login to membership where users can instantly get access without any manual action. No waiting for welcome email or having to pick a username/ password on the thank-you page after purchase. All automatic.
1) Auto-Login
If you want the users to be auto-logged-in to their membership right after purchase, then please do this step. Otherwise skip this step.
(Click image below to see enlarged version)
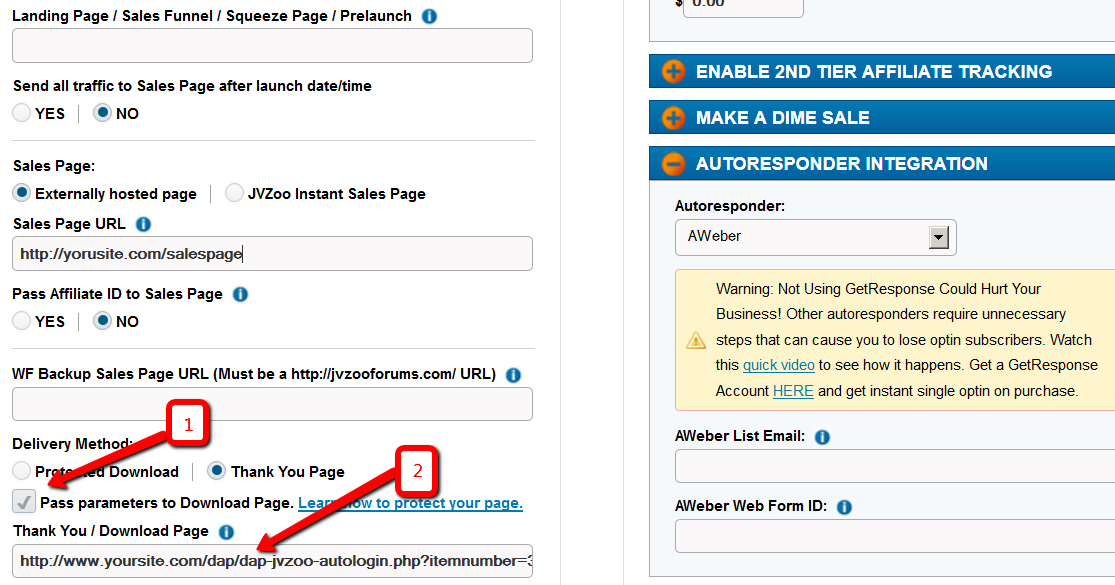
i. Delivery Method -> Pass Parameters : Make sure to check the box that says ‘Pass Parameters to Download Page‘
ii. Download Page: Say that after the purchase is complete, you want the users to land on a members area page where they can download/access their purchased content. Say the url of that page is http://YOURSITE.com/member-home
If you want DAP to auto-login the users to their membership and then redirect to /member-home, enter this in the Thankyou / Download Page textbox and then they can get redirected to the /member-home.
http://www.YOURSITE.com/dap/dap-jvzoo-autologin.php?itemnumber=3&redirect=member-home&errorurl=error-page
Please note:
Replace YOURSITE.com with the actual name of your site.
Here /member-home is just an example. You can enter the url of any page where you want users to be redirected after login.
In the autologin URL, we have omitted “/” in front of member-home and “/” in front of errorurl because JVZoo messes up the formatting if you include “/” in the querystring.
http://www.YOURSITE.com/dap/dap-jvzoo-autologin.php?itemnumber=3&redirect=member-home&errorurl=error-page
itemnumber=It should be the product ID of the DAP product you want the users to get access to
redirect=It should be the URL of the page where the users should land after they get logged-in. If you want them to go to /member-home after automated login, set redirect=/member-home (just the relative path is good, no need to enter full url).
errorurl=It should be the URL of the page where the users should land if there are any errors during account creation
2) External Program Integration
Check the check box next to this field.
In that same section, set the Recommended: Method #1 field to the following URL:
http://yoursite.com/dap/dap-jvzooipn.php
(NOTE: replace yoursite.com with the actual domain name of your site).
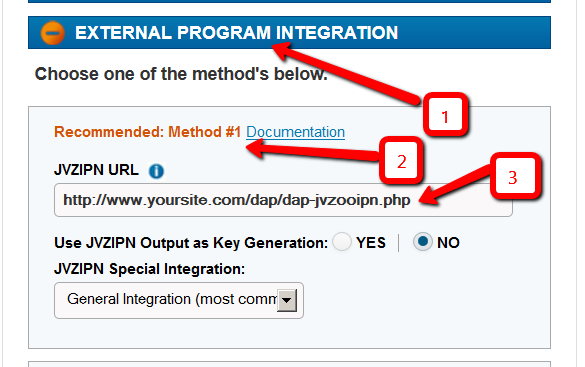
NOTE 1: Make sure your JVZoo Product Name exactly matches your DAP Product Name
NOTE 2: Also make sure you have the “Welcome Email” Subject & Body configured in the DAP Product page with the right merge tags to send out user login/password.
3) Set your JVZoo and DAP Secret Key
Set the JVZoo My Account => JVZIPN Secret Key to match the Secret key in your DAP setup -> config -> Payment Processing => Secret Authorization Key.
You can pick any secret key you want. Just make sure it exactly matches in dap setup -> config area and the JVZoo My Account page.
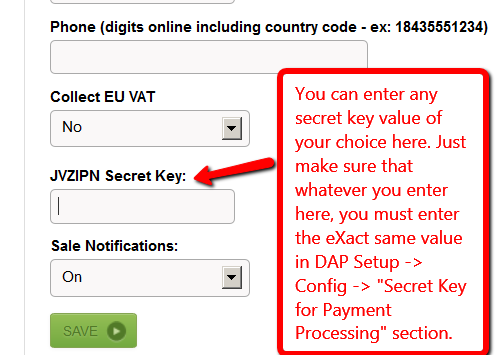
NOTE: You can put in ANYTHING you want in the DAP secret key (in dap setup -> config). Say that you set it to DAPKEY. Now when you go to JVZoo My Account => JVZIPN Secret Key, make sure to set the jvzoo secret key to DAPKEY there too. It has to EXACTLY match whatever you set the dap secret key to.
How it works
When a user completes purchase of the product, JVZoo will send payment notification to DAP to the IPN URL specified above. And if you have setup auto-login, then after the user completes the final purchase, JVZoo will land the users on the final receipt page where if they click on “Access My Purchase”, dap will auto-login the users to their membership and allow them instant access to the product.
UserFlow
NOTE: Use DAP to deliver/protect downloads by protecting the downloads/content in dap products page => ContentResponder section.
* Buyer clicks on the button (button created within your JVZoo account) on your sales page
* Buyer is taken to the JvZoo page where they can complete payment
* Buyer completes the payment successfully
* Buyer is transferred back to whatever you set in the thankyou URL in JvZoo for the product or to the upsell page
* In the meantime, JVZoo notifies DAP about the purchase via IPN
* DAP automatically creates the member account, and sends thankyou email (configured in your dap products page) with login info to the buyer.
* Now if regardless of whether you had 1 product in the sales funnel or multiple upsells/downsells, ultimately the users will land on the final receipt purchase where they will find the ‘access my purchase’ link. When they click on that, dap will automatically login the user to their membership account and allow them instant access to content. The users do NOT have to wait for welcome email to login to membership.
Make sure to setup the thankyou email in the DAP products page for all the products you deliver via DAP.
* When the users login to their membership area or are auto-logged-in, by default, they will be redirected to either product-level logged-in URL or global logged-in url based on whether they have access to just 1 product or multiple products. The product level logged-in url is used if the user has access to just 1 product. The global logged-in url (under dap setup -> config -> post-login redirect url) is used when user has access to multiple products.
If you want to send users to a different page, then just set the ‘redirect’ url in the ‘thank-you/download page’ in JVZoo to point to wherever you want them redirected (see step # 1 for detail at the top of this page) and dap will use that url for post-login-redirect.
* Note: You can create a members area page and redirect users to that page upon purchase. When the users login and access their members area, they can access the purchased products/downloads.
5
Customizing vBulletin Login For Single-Signon
Here’s what you need to do to disable the standard vB login form at the top-right corner of your forum pages, and customize it so that you force your members to log in via the DAP login form, so that they’re logged in to your membership site as well as DAP.
- Log in to VB Admin control panel at http://yoursite.com/forums/admincp/
- Go to Styles & Templates > Style Manager > Default (or whatever style you’re currently using)
- From the big list on the left, select the “header” template. Then on the right, under the “Controls” section, click on Edit
- On the resulting page, copy the full code from this text file and paste into the main “Template” body, and click on “Save”
- Next, download the file forums/register.php from your server, to your desktop and save the original copy somewhere safe.
- Replace the contents of that file with the contents of this text file.
That’s it!
11
Premium Web Cart Integration
Starting v4.2.1, DAP now integrates with Premium Web Cart (PWC)
PWC=>DAP integration is very simple to set up.
NOTE:
- If your DAP version is 4.2 or earlier, you must upgrade to DAP v4.2.1 & LiveLinks v1.7.
- If you are already using DAP v4.2.1, then download the very latest dap_v4.2.1 zip from the member’s area, unzip the contents to your desktop, and upload just the dap-pwc.php (within the main dap folder on your desktop) to the dap folder on your site.
Integration Steps
- Login to your PWC account.
- Go to Cart Settings > Advance Integration.
- Select PWC IPN tab.
- Set the PWC IPN URL to http://yoursite.com/dap/dap-pwc.php (Note: replace yoursite.com with the name of your site)
- Make sure the product name in PWC eXactly matches the Product Name in DAP.
User Flow
- Buyer clicks on the buy button (button created within your PWC account and published on your sales page).
- Buyer completes the payment successfully and is transferred to the thankyou page.
- PWC notifies DAP via IPN about the purchase.
- DAP automatically creates the member account, and sends thank-you email (configured in your dap products page) with login info to the buyer. NOTE: Make sure to setup the thankyou email in the DAP products page for all the products you sell via DAP.
- When the user logs in to their membership area, they will be redirected to either product-level logged-in URL or global logged-in url based on whether they have access to just 1 product or multiple products. The product level logged-in url is used if the user has access to just 1 product. The global logged-in url (under dap setup -> config -> advanced -> url to which user is redirected upon login) is used when user has access to multiple products.
Note: You can create a member’s area and redirect users to that page upon purchase.
12
Upgrading or Downgrading of Subscriptions
There are two main items that need to be addressed when it comes to a member wanting to Upgrade or Downgrade their Subscription from one membership “level” (a.k.a “Product” in DAP) to another.
1) Modifying the actual recurring payments to reflect the new amount
2) Giving them appropriate access as per the upgrade (or downgrade)
So let’s see how both of these are accomplished.
1) Modifying Recurring Payments
You do need to take some manual action for this. The way to do it is….
- Ask your members to sign up for the new product/level/subscription separately, like it were a new sign up
- Cancel their old subscription manually. When using Paypal standard, this can be done by both you (as the admin) and the member themselves. But with all of the other payment solutions, you (the admin) will have to log in to the payment gateway (Authorize.net or Paypal Website Payments Pro) and manually delete the member’s old subscription). DAP will not automatically remove users old subscription profile in your payment gateway.
2) Giving your member access to new level
Set up automation rules using DAP’s Product Chaining feature, so that if they sign up for one Product (or “level”), they’re automatically removed from another Product (or level).
So if they are currently signed up to your “Gold Membership”, then when they sign up afresh for the “Platinum Membership”, then set up a Product Chaining rule that says, “If member signs up for Platinum Membership, then remove them from Gold Membership”. This is just to make sure that they don’t have access to two products (or “levels”) at the same time.
5
Optimizing Your WordPress Blog For Speed
If you want to speed up your web site, you must address the core issue, which is — your web site is getting more traffic than your web server (web hosting account) can handle.
So here are a few ways in which you can speed up your web site:
- The easiest thing you can do is to revisit all of your plugins that you have enabled and see if you still need all of them. Remember that every single additional plugin running on your site, adds some overhead to (basically, “slows down”) your web site or blog. So use only as few plugins as you absolutely must. With so many cool plugins freely available for WordPress, it is very easy to get carried away, and install tens of plugins, most of them adding very little value, but sometimes causing the most overhead in terms of server resources. So keep only a bare minimum of other plugins (some social plugins are a real pain – making calls to third-party web sites to get their information from).
- Using a “cache” plugin for speeding up your site is like putting band-aid on a gaping wound. It’s only a temporary fix, and not a real long-term solution, but every bit helps. We recommend WP Super Cache, and be sure to whitelist all of your member pages from getting cached.
- Make sure you are always using the latest version of WordPress, or at worst, one version behind the very latest and greatest (you definitely want to be sure first that there are no conflicts with other critical plugins that you’re using on your site).
- Make sure you update all of the plugins and themes you’re using to their individual latest versions (get rid of every single plugin and theme that you’re not using).
- If you are hosting on a shared (a.k.a “cheap”) web host paying just a few dollars a month for hosting, then your web site is basically competing for server resources (like memory and bandwidth and database access) with possibly tens (or even hundreds) of other web sites on that same server (many may not belong to you, but to others with whom you are sharing the server – and hence the name “shared hosting”). Search for the keywords “digg effect” or “slashdot effect” on Google, and you’ll see how many WordPress sites crash when a link to the site appears among the top results in popular social sites like Digg.com, Reddit.com or Slashdot.com.If your traffic levels have outgrown your server, then the best thing you can do is to upgrade to a bigger server, or get a Virtual Private Server, or even get a dedicated host, depending on your budget. See our recommended web hosts list.
5
DAP Shopping Cart
WARNING
This is the old, deprecated version of the DAP Shopping Cart add-on. This is still here for archive purposes only, and should only be used with DAP versions 4.4.x or EARLIER.
If you are wanting to use the new DAP Shopping Cart Plugin that supports Stripe and has a unified checkout page, etc, then you can download it from http://digitalaccesspass.com/dappers/new-dap-shopping-cart-plugin/
__________________________________________________________
ARCHIVE ONLY:
This plugin replaces ALL files from both the “Paypal Payments Pro” Upsell-Tree plugin as well as the “Authorize.net” Upsell-Tree Plugin
Starting DAP v4.2, we have consolidated both the Authorize.net & Paypal Payments Pro Upsell-Tree Plugins into one simple set of files, and it has been named the DAP Shopping Cart, which will allow you to both accept one time and recurring payments, as well as do 1-Click Upsells.
This consolidated set of files is named DAPShoppingCart.zip , and is available for download from the members’ area at http://DigitalAccessPass.com/dap/ .
Upgrading from DAP v4.2
If you are upgrading to DAP v4.2 from a previous DAP version, and you’ve been using Authorize.net or Paypal Payments Pro to accept payments, then you must also upgrade to the new DAP Shopping Cart.
So all you need to is…
1) Download the DAPShoppingCart.zip file from the members area
2) Unzip it to your desktop
3) Upload all files inside directly to your main “dap” folder on your site. (do not upload the folder named DAPShoppingCart – upload only the files inside this folder)
12
Setting up Paypal IPN
1. Enabling Instant Payment Notification (IPN) within your Paypal account.
a) Log in to your Paypal account and click on the “Profile” link in the menu, then on the next page, click “My selling tools.”
b) Under “Getting paid and managing risk” section, click “Update” beside “Instant payment notifications”

c) If IPN is already enabled, you are all set. If IPN is not already enabled, then click on “Choose IPN Settings”

d) On the next screen, in the Notification URL field, enter…
http://YourSite.com/dap/dap-paypal.php
Don’t forget to replace “YourSite.com” with your actual web site’s domain name.
e) Make sure “Receive IPN Messages” is selected.

f) Click on “Save”.
22
Conflict With “Cache” Related Plugins
DAP Now Works With WP Super Cache
If you’re having weird issues – like members logging in and seeing other people’s profile information, or logging in as a valid user and being told “Sorry, you don’t have access to this content” – then it’s probably because of a “cache” plugin.
Do not use cache plugins on your membership site
DAP now fully works with WP Super Cache (and possibly other cache plugins too).
You just need to make sure that you exclude your member content (including the login page) from being cached.
Cleaning Up After Your Cache Plugin
Follow the steps below to clean up some the junk left behind by cache plugins (regardless of whether you see them in your plugins section, and regardless of whether they are currently active).
1) You wish to disable your cache plugin that is currently enabled
2) You previously had one enabled at some point in the past
3) You don’t believe you ever had a cache plugin enabled in the past
4) You were redirected to this page by the DAP support team because of potential caching-related issues
- De-activate the plugin if it is still active
- Open your wp-config.php file.
- If there are lines in there that look like this…
define(‘WP_CACHE’, true); //Added by WP-Cache Manager
define( ‘WPCACHEHOME’, ‘/home/wp-content/plugins/wp-super-cache/’ ); //Added by WP-Cache Manager - Then comment out both lines, by adding a “//” at the beginning of each line, like this.
- //define(‘WP_CACHE’, true); //Added by WP-Cache Manager
//define( ‘WPCACHEHOME’, ‘/home/wp-content/plugins/wp-super-cache/’ ); //Added by WP-Cache Manager - Go to your /wp-content/plugins/ folder. See if there’s a folder in there called “cache”. If yes, then rename it to “_cache”.
Now re-test whatever the issue was before, and it would have probably been resolved now.
That should do it.
If the issue still persists, let us know via a support ticket.