1
Troubleshooting 1ShoppingCart Integration
There are a few different reasons why this may not be working.
1. Check if Cron is running
The DAP email-processing cron that processes the 1SC emails may not be running. Check your webhost control panel -> Cron job settings. Make sure dap-emailorder.php is setup to run once every 10 minutes.
2. Incorrect Setup of Billing Email Id
The billing email id you have entered in DAP at Setup > Config > Payment Processing , should be entered into the “Order Notice Email – Primary Destination” field in your 1SiteAutomation/1Shoppingcart account, on the Setup > Orders > Notifications section. If by chance you enter it into the “Order Notice Email – Primary Destination” field, it WILL NOT WORK.
3. No Notification Emails from 1SC
The DAP cron is running but 1SC payment notification emails are not reaching your mail server. Check the email account where you expect to receive your 1SC payment notification emails and see if the order notification email from 1SC is in that mail box.
4. Incorrect Mail Server Settings
The cron is running and the 1SC order notification email is reaching your mail server – but you did not configure the mail server settings correctly in DAP Dashboard -> Setup -> Config -> Payment Processing.
Email Server Where Order Emails Come In
Email Server User Name
Email Server Password
5.”Read” Or Deleted Emails
DAP only processes order notification emails that are in the “Unread” status, to prevent previously processed emails and other non-DAP emails from being repeatedly processed.
Also, if you “pop” off the emails from that mail box (means, your email client like Outlook or Thunderbird or Gmail is “removing” your emails from the server when it retrieves them), it means that when DAP logs in to that billing email address, there are no emails there to be processed – the mailbox is empty, or the 1SC payment notification emails have somehow gotten deleted from that mailbox.
So it is possible that DAP is able to connect to your email server, but DAP is not finding any “unread” emails. Please login to your email server and mark all the payment emails that you want DAP to process… as “unread”. And also make sure that your email client does not remove the emails from that mail box.
6.Product Name Mismatch
There might be a “Product Name” mismatch. The product name has to be EXACTLY the same (including case, spaces, etc) in both DAP as well as in 1ShoppingCart. So if you have created a product by name “Widget A”, make sure your 1shoppingcart product also has the exact same name “Widget A”.
If everything is setup correctly, DAP cron will run every 10 minutes and try to process all 1SC emails.
The next time the DAP cron will run (every 10 minutes), it will pick up all the unread payment emails from 1SC.
7. Empty “Thankyou-Email Body/Subject”
Welcome email is not getting sent.
Select the product, and make sure there is some text in the “Thankyou-Email Subject” and “Thankyou-Email Body”. Whatever is in these fields is what gets sent immediately after someone purchases that product (or right after you give them access from the backend).
Now go to DAP Dashboard -> Users -> Add .
Select the product and manually add user. Now see if the thankyou email gets sent to that email id. If it got sent, then your product setup is correct.
Also check the DAP Dashboard -> Orders . Search for all orders, look up the order for the particular user in question by email.
Check the payment status and make sure there is no error there.
If you did all this and things are still not working, please do this:
1. Set DAP Dashboard > setup -> Config -> Log Level -> Log All activity
2. Re-run the 1SC test purchase
3. Check the DAP Logs (DAP Dashboard > System > Logs) and send us the log text in there for troubleshooting by pasting it into a new support ticket.
8. Sending Email & Password To Buyer
Make sure you have set the thank-you message with the right merge tags for Email and Password.
9. Manually Running Cron
First set DAP Dashboard > setup -> Config -> Log Level -> Log All activity
If you feel that the orders were not processed in dap, then just login to the 1SC email account where the sales/payment notification emails are sitting, and mark those orders/emails as UNREAD that you want dap to process.
Then manually run the cron script dap-emailorder.php cron by visiting the following link in the browser.
http://www.yoursite.com/dap/dap-emailorder.php
Replace yoursite.com with the name of your site.
It will just display an empty screen when complete.
Then check “Users > Manage” to see if user has been created.
– Veena Prashanth
13
1-Click Upsells With Paypal Standard
1-Click Upsells, Downsells and OTO’s are now extremely simple to implement using the new “Upsell Tree” plugin for DAP.
And this particular plugin works with Paypal Standard! Which means you don’t need a merchant account any more.
All you need is a regular Paypal Business Account.
Please note that this is not “True 1-Click”, like you can do with a real merchant account – because of the very fact that Paypal expects your buyers to log in at least once into their paypal account through Paypal.com, and then at the end of the Upsell-flow, there is one final confirmation page. So it’s more like “2-Click Upsells” really.
If you want true 1-Click Upsells, then you need to have a merchant account through Paypal Website Payments Pro or Authorize.net.
IMPORTANT: What you need before you can use this plugin
- You need a Paypal (Standard) Business or Premier account
- You must have SSL (secure server) enabled on your web site. Ask your web host to enable SSL for your site.
- You must have a working version of DAP 3.7+
- You cannot sell a “Recurring” product as an Upsell – recurring products have to be the first product in the flow.
- Here’s what you CAN do: You can have a recurring product as the very FIRST product that they purchase (when they first click on the “Buy” button on your main sales page, and then you can offer any number of “One-Time” Products as upsells or downsells.
- Here’s what you CANNOT do: Offer a “One-Time” product as your first product that they buy, and then try to upsell them to a “Recurring” Product. Unfortunately, this is a Paypal problem at this time.
Installation & Setup of UpsellTree For Paypal Standard
- You need to be running at least DAP v3.7 for this plugin to work
- Purchase the UpsellTree plugin if you haven’t already done so, login to your DAP account and download the plugin zip file, PaypalStandardUpsellTree.zip .
- Unzip the file to your desktop. That will create a new folder on your desktop, called “PaypalStandardUpsellTree” which will have all of the files inside.
- Upload all the files inside, directly to your “dap” folder on your web site.
- DO NOT upload the folder itself. Just the files inside.
- Installation of Paypal Upsell-Tree Plugin is complete.
- Next, log in to your Paypal account.
- Click on “Profile”
- Click on “Request API Credentials” (under ‘Account Information’ section). It will bring you to the API access page.
- Under Option 2, click on “Request API credentials” to create your own API username and password.
- Click on “Request API signature”
- Click on “Agree & Submit”
- Note down the following pieces of information:
* API Username
* API Password
* API Signature - That’s it as far as your Paypal account is concerned. Now back to DAP on your site.
- Log in to your DAP Dashboard
- Go to “Setup > Config“. On that page, click on the “Paypal” link in the links towards the very top of that page (or scroll down to the “Payment Processing: Paypal” section).
- Enter the 3 pieces of information (from Step #13 above) into the Config fields 7, 8 & 9 on that screen: Paypal API Username, Paypal API Password, and Paypal API Signature. Cick “Update” and save the changes.
- Generating the Paypal Upsell Buy Buttons:
In the DAP Dashboard menu, go to Payment Processing > Generate Buy Button
You will now see that you’re on the default tab “Paypal Standard”. - So now select the DAP Product for which you’re trying to generate the buy button, from the Product list.
- Now, once the page has refreshed, scroll down to the bottom of this page, and you’ll see an expandable section with the heading “Paypal Standard 1-Click Upsells”
Expand that section by clicking on the “+” image. - You will see the following two links in that section…Generate Paypal Standard 1-Click Primary Button
Generate Paypal Standard 1-Click Upsell ButtonThe first one is for generating the buy-button code for your primary product (the very first product in the flow). The second one is for all upsells.So if this is the first time you’re doing this, and for your main product, click on the first link. - If all of your Product’s settings are correct, then you’ll see a small popup that contains the buy-button HTML code. Paste this code into a blank notepad (or text editor) window.
So let’s say this is what the code you got looks like…<form name=”generate_paypal” method=”post” action=”/dap/PaypalSetExpressCheckout.php”>
<input type=”hidden” name=”item_name” value=”Facebook Secrets Subscription”/>
<input type=”hidden” name=”description” value=”This is a Subscription Product with a monthly subscription – payments every 30 days.” />
<input type=”hidden” name=”amount” value=”10.00″ />
<input type=”hidden” name=”trial_amount” value=”0.00″ />
<input type=”hidden” name=”total_occurrences” value=”9999″ />
<input type=”hidden” name=”is_recurring” value=”Y” />
<input type=”hidden” name=”recurring_cycle_1″ value=”365″ />
<input type=”hidden” name=”recurring_cycle_2″ value=”365″ />
<input type=”hidden” name=”recurring_cycle_3″ value=”365″ />
<input type=”hidden” name=”payment_succ_page” value=”https://YourSite.com/dap/continue.php?url=/dap/upsell1-paypalstandard-sample.html” />
<input type=”hidden” name=”payment_err_page” value=”https://YourSite.com/dap/paymentError.php” />
<input type=”hidden” name=”payment_cancel_page” value=”https://YourSite.com/dap/cancel.php” />
<input type=”hidden” name=”payment_gateway” value=”paypal” />
<input type=”hidden” name=”is_submitted” value=”Y” />
<input type=”image” src=”/dap/images/btn_xpressCheckout.gif” align=”left” width=”200″ height=”50″ style=”margin-right:7px;” value=”Submit” alt=”Submit”> - Look at the payment_succ_pagetag in the generated button code and have it point to your sales page for your upsell.In the above example, the upsell page is called upsell1-paypalstandard-sample.htmland it’s under the dap folder.Put this HTML code on the primary product’s sales page. This is the first product in the flow.
- Now, you need to generate a button for your upsell product. So go back to Payment Processing > Generate Buy Button . This time, pick the Upsell product from the list.
- Now scroll down to the bottom of this page, expand the section “Paypal Standard 1-Click Upsells” , and this time, click on the second link there, because you’re now generating a buy-button for the Upsell product.Generate Paypal Standard 1-Click Primary Button
Generate Paypal Standard 1-Click Upsell Button - Say this is the button code you get this time…<form name=”generate_paypal” method=”post” action=”/dap/PaypalAddToCart.php”>
<input type=”hidden” name=”item_name” value=”Upsell 1″/>
<input type=”hidden” name=”description” value=”This is a dummy Subscription Product with a monthly subscription – payments every 30 days.” />
<input type=”hidden” name=”amount” value=”10.00″ />
<input type=”hidden” name=”trial_amount” value=”0.00″ />
<input type=”hidden” name=”total_occurrences” value=”9999″ />
<input type=”hidden” name=”is_recurring” value=”Y” />
<input type=”hidden” name=”recurring_cycle_1″ value=”365″ />
<input type=”hidden” name=”recurring_cycle_2″ value=”365″ />
<input type=”hidden” name=”recurring_cycle_3″ value=”365″ />
<input type=”hidden” name=”payment_succ_page” value=”/dap/PaypalCheckoutConfirm.php” />
<input type=”hidden” name=”payment_gateway” value=”paypal” />
<input type=”hidden” name=”is_submitted” value=”Y” />
<input type=”submit” value=”AddToCart” />
</form> - Now again, notice the payment_succ_page in the generated button code. You will see its pointing to /dap/PaypalCheckoutConfirm.php.
a) If this is the last upsell, then leave it pointed to /dap/PaypalCheckoutConfirm.php.
b) If this is NOT the last upsell, then update it to point to the url of the 2nd Upsell page (like we did for the primary product to point to the first Upsell sales page) and repeat the process above for the next upsell page.Bottom-line: Make sure that both the buy-button code as well as “No Thank You” link on the last upsell or downsell page, points to /dap/PaypalCheckoutConfirm.php - When your buyer reaches the final checkout confirmation page (PaypalCheckoutConfirm.php) then they can review all of the products in their “Upsell Cart”, and buy them all instantly and all together, without having to go back to Paypal ever again.
- Things To Note:
a) If you’re doing upsells, the only thing you need to do is, look for the “payment_succ_page” field in the above form. By default it will point to:
https://www.example.com/dap/continue.php?url=/dap/upsell1.html
b) Modify the file upsell1.html within your dapfolder, to create your 1-Click Upsell offer. Or if you don’t wish to use 1-Click upsells, you can make just about any kind of upsell offer on that page. The upsell1.html that comes with the plugin has a sample upsell page already created for you, just so you get an idea of what that will look like.b) On the upsell page, if you want to upsell say, Product B, then make sure you set up “Product B” ahead of time in DAP, and set up the price and recurring options.
c) Then for upsell products only, click on the “Generate Authnet 1-Click Upsell” link to generate the 1-Click Upsell Buy button code, as the upsell buy button is slightly different than the ‘regular’ buy button code. Now take the upsell buy button code like you did before, and paste it in upsell1.html.Repeat this process for unlimited upsells, downsells and one-time offers. No limits.
“No, Thank You” Buttons & Links
On every upsell page, you must also include a “No, Thank You” button or link that will allow your buyer to skip your upsell or downsell, and go to the next part of the sale.
For all upsells that are not the last upsell, you can link this button or link to the next upsell in the chain. So basically, on Upsell 1, they can either take the upsell1 (whatever your offer is) by clicking on the buy button, or click on the “No, Thank You” button/link, and you could then either taken them to the URL of Upsell2, or Downsell 1, or if this is the last upsell in the flow, then you could send them directly to the Paypal Upsell Summary Page /dap/PaypalCheckoutConfirm.php
Creating a “No, Thank You” button
Button to take them to next Upsell/Downsell:
<form name=”nothankyou”>
<input type=”button” name=”nothankyoubutton” value=”No, thank you, I wish to skip this incredible offer” onClick=”location.href=’https://YourSite.com/dap/continue.php?url=/dap/upsell2.html‘;”>
</form>
Feel free to copy the above HTML button code for the no-thankyou button. However, paste it into a text editor and be careful and don’t delete any of the HTML code, and only change actual URL’s or the button’s value (which is the text your buyer will see on the button).
Button to take them to final Checkout Summary page:
<form name=”nothankyou”>
<input type=”button” name=”nothankyoubutton” value=”No, thank you, please complete my order” onClick=”location.href=’/dap/PaypalCheckoutConfirm.php‘;”>
</form>
Creating a “No, Thank You” link
Link to take them to next Upsell/Downsell:
<a href=”https://YourSite.com/dap/continue.php?url=/dap/upsell2.html“>No, thank you, I wish to skip this incredible offer</a>
Link to take them to final Checkout Summary page:
<a href=”/dap/PaypalCheckoutConfirm.php“>No, thank you, please complete my order</a>
That’s it.
While it looks like a LOT of steps, that is only because we have to explain the steps in detail so they are clear. In reality, it is very simple to set up, and starting from scratch, if you have DAP & SSL already installed, it shouldn’t take you more than 1/2 hour to set up your 1-Click Upsells/Downsells/OTO’s. And if you’re not using Upsells/Downsells, then it can be done even faster.
If you have any further questions, feel free to open a support ticket, and we will assist you in getting this going.
Click here to buy our Paypal Upsell-Tree Plugin
17
Buy Buttons, 1-Click Upsells, Downsells & OTO’s using Authorize.net
Selling through Authorize.net, 1-Click Upsells, Downsells and One-Time Offers (OTO’s) are all now extremely simple to implement using the new Shopping Cart Plugin for DAP.
This post explains how to create buy buttons for selling through Authorize.net.
Your site visitors never have to leave your site in order to make a purchase, if you are selling through Authorize.net. DAP itself will act as your shopping cart, and buyers can checkout and make purchases by staying right on your web site.
The DAP Shopping Cart itself is your actual shopping cart that connects to Authorize.net. You need to install this plugin whether you wish to accept one-time or subscription payments via Authorize.net, or whether you wish to do Upsells, and Downsells.
What you need before you can use this plugin
- You need an Authorize.net merchant account
- If you want to sell subscription-based products, then you also need Automated Recurring Billing (ARB) enabled in your Authorize.net account.
- You must have SSL (secure server) enabled on your web site. Ask your web host to enable SSL for your site.
- You must have a working version of DAP 3.5+.
Installation & Setup of UpsellTree
- You need be using at least DAP v3.5 for this.
- If you haven’t installed DAP already, then install DAP first.
- Log in to our member’s area and download the plugin file, DAPShoppingCart.zip .
- Unzip DAPShoppingCart.zip to your desktop. It will unzip the files to a new folder on your desktop, called DAPShoppingCart.
- Upload ALL of the files inside, DIRECTLY to your “dap” folder on your web site. DO NOT upload the folder itself – just the files inside.
- Log in to your Authorize.net account, and go to the “Settings” page.
- Click on Silent Post URL.

- On the next page, set the URL field, to http://YourSite.com/dap/dap-silentpost.php . Be sure to change the text “YourSite.com” to your actual domain name. Click “Submit”. It will take you back to the Settings page.

- On the Settings page, now click on the “API Login ID and Transaction Key” link towards the bottom.

- On the next page, make a note of your “API Login ID” and “Transaction Key” on a piece of paper (or copy/paste it into a text file). That page also lets you create a new Transaction key or modify your existing one.
- That’s it for Authnet.
- Now, log in to your DAP Dashboard on your side, and go to “DAP Admin > Setup > Config > Payment Processing“.
- Enter the “API Login ID” and “Transaction Key” that you noted down earlier (Step #9 above) into the respective fields, and click “Update” next to the fields to save the changes.

- This step applies to you only if you are already using 1ShoppingCart with DAP (if not, skip to next step):
Be sure to remove the “Email Order” cron job from your web hosting control panel (“Cron Jobs” screen), because you don’t want your orders to be double-processed. - Go to the Products > Manage.

A) Product Price: For a 1-time purchase product, this is the product’s purchase price. For a recurring product, this is the “recurring” price (what the customer gets charged month after month).
B) Trial Amount: This is only if there’s a trial amount. If no trial, leave this empty.
C) Recurring Count: How long is your subscription? If you said “Forever”, then enter the number 9999 here. If it ends after 6 months, then enter 6 here. - Set these fields to valid values.
- NOTE: The DAP Authorize.net allows 1 trial. So in the recurring cycle fields, make sure “Payment/Trial Period #2” and “Payment/Trial Period #3” are both the same (set to same number of days: like 30). Example below shows the setting for a “7 day” trial period, followed by recurring payments every “30 days”.

- If you are not offering a trial, then just set the Trial Amount to $0.00. But if you really wanted to offer a FREE TRIAL, then you must set the Trial Amount to at least $0.01 (1 penny).
- Once you’ve saved the product, you can now click on any of the two new “Generate… Button Code” links that are located right below the product list combo box.

- “Generate Authnet Buy Button” link:
This generates the buy button HTML code for your product, which you can then directly paste into your sales page. When you click on this link, you will get a pop-up that shows the actual HTML code for your button. The price, trial price, and recurring options are all taken from your Product settings. So make sure you have saved your Product changes before you click on this link.

- Here’s what the HTML code looks like:
<form name="generate_authnet" method="post" action="https://www.contentresponder.com/dap/buy.php">

<input type="hidden" name="item_name" value="Example Subscription Product"/>

<input type="hidden" name="description" value="This is a dummy Subscription Product with a monthly subscription - payments every 30 days." />

<input type="hidden" name="amount" value="1.00" />

<input type="hidden" name="trial_amount" value="0.01" />

<input type="hidden" name="total_occurrences" value="9999" />

<input type="hidden" name="is_recurring" value="Y" />

<input type="hidden" name="recurring_cycle_1" value="30" />

<input type="hidden" name="recurring_cycle_2" value="30" />

<input type="hidden" name="recurring_cycle_3" value="30" />

<input type="hidden" name="payment_succ_page" value="https://www.contentresponder.com/dap/continue.php?url=/dap/upsell1.html" />

<input type="hidden" name="payment_gateway" value="authnet" />

<input type="hidden" name="is_submitted" value="Y" />

<input type="submit" value="Buy Now" />

</form> - If you’re doing upsells, the only thing you need to do is, look for the “payment_succ_page” field in the above form. By default it is pointing to:
https://www.contentresponder.com/dap/continue.php?url=/dap/upsell1.html - Modify the “upsell1.html” file within your dap folder, to make your 1-Click Upsell offer. Or if you don’t wish to use 1-Click upsells, you can make just about any kind of upsell offer on that page. The upsell1.html that comes with the plugin has a sample upsell page already created for you, just so you get an idea of what that will look like.
- On the upsell page, if you want to upsell say, Product B, then make sure you set up “Product B” ahead of time in DAP, and set up the price and recurring options. Then for upsell products only, click on the “Generate Authnet 1-Click Upsell” link to generate the 1-Click Upsell Buy button code, as the upsell buy button is slightly different than the ‘regular’ buy button code. Now take the upsell buy button code like you did before, and paste it in upsell1.html. That’s it.
- You can repeat this process for unlimited upsells, downsells and one-time offers. No limits.
That’s it.
While it looks like a LOT of steps, that is only because we have to explain the steps in detail so they are clear. In reality, it is very simple to set up, and starting from scratch, if you have DAP & SSL already installed, it shouldn’t take you more than 1/2 hour to set up your 1-Click Upsells/Downsells/OTO’s. And if you’re not using Upsells/Downsells, then it can be done even faster.
If you have any further questions, feel free to open a support ticket, and we will assist you in getting this going.
33
How Do Members Get Added To Your Membership Site
(OR) How do members get access to the content
(OR) How does someone become a member?
With DAP, you can add users to your membership site in 3 different ways.
1. PURCHASE: Someone buys your product or subscribes (“Paid” member with access to both free and paid content)
2. FORM SIGNUP: Someone signs up through a signup form (“Free” members with access to only free content)
3. ADMIN ADDED: You add them as a member directly through the DAP Admin Control Panel (you can mark them as either “free” or “paid”)
All three are explained in detail below.
1. PURCHASE
*You first create a “Sales Page”.
On your sales page, depending on which payment processor you use, you go to Paypal/1ShoppingCart/ClickBank and create a new product with the EXACT same name as the product you created within DAP, and get the ‘Buy Button’ link from your Payment Processor. Publish this “Buy Button” on your sales page.
* Your visitor goes to your sales page
* They purchase your product
* Your payment process (Paypal/1ShoppingCart/ClickBank) notifies DAP that you have a new purchase.
* If the product names match, DAP automatically creates an account for them, generates a random password, and sends them an email with their email/password. You can customize the contents of this email on the “Templates” screen in your DAP Admin Control Panel. Integration with your shopping cart explained elsewhere (see documentation for setup).
That’s it!
That’s how “buyers” get added to your membership site and get access to the product they just purchased.
2. FORM SIGNUP:
You wish to give someone a “Free” membership.
NOTE: “Free” members who do not have a payment associated in DAP (which means they have not purchased anything) will have access only to content that you have marked as “Free”.
Once you have created a Product in DAP, and have added content (blog post/page links, links to files, etc), and have saved it, on the Product page, below the Product name list, you will see a link called “Direct Signup HTML”. (See image below). You must first select a Product before you can copy the correct form HTML.
Fig 1. Direct Signup Link on Products page

Fig 2. Form HTML that you get on clicking the Direct Signup Link

This HTML gives you the full HTML form code that you can publish on any page of your web site. This form only collects an email address and a first name.
Take this HTML code and publish it on page of your web site where you want sign up users. This could be a WP page or post too.
Note: When you see the above HTML code, there’s a field in there that looks like this:
<input type=”hidden” name=”redirect” value=”http://YourSite/Your-login-page-link/?msg=Success!%20Your%20membership account%20has%20been%20created.%20%20Check%20your%20email%20address%20in%20a%20few%20minutes%20for%20your%20password“>
Don’t forget to change the text above, where it says “http://YourSite/Your-login-page-link/?…” to point to your actual domain name and to your actual login page (if you have customized it).
Then, when someone enters their email address and first name and signs up through the signup form, DAP creates an account for them using that email address, creates a random password, and sends them an email with their email/password.
After that, you can drip any content or emails on them that are marked as “Free” (when adding content or emails).
At some later point, if they purchase any of your “Paid” products (see the “1. Purchase” section above), then as long as they use the same email id during purchase, DAP will automatically give them access to all of the “Paid” content in the Product that they just purchased.
3. ADMIN ADDED:
If you wish to directly give someone access to a Product and all its content and emails, you can add them directly from the DAP Admin screen (Users > Add/Edit).
You just need their email id and their first name (both of which they can change subsequently) to add them to a Product.
While adding them, you have the option of marking them as a “Paid” user by checking the “Mark as Paid” checkbox.
If you don’t check this check box, then they will be added as a “Free” user and get access only to “Free” resources (content/emails).
But if you check the “Mark as Paid” checkbox, then they will get access to all “Paid” content and emails, just like someone who is actually a “Paid” member.
32
Payment: Setup and Integration – FAQs
Q: I just made a test purchase. But DAP did not process the payment (or) did not add me as a member (or) is not creating a new member.
Make sure that the product name within DAP and the product name in your “buy” button (i.e., your shopping cart) are EXACTLY the same. Don’t just look at the two and say, “oh yeah, they’re the same”.We recommend “copying” the product name that you set up in DAP, and then “pasting” it when creating your “buy” button. If you are using Paypal, then this is the “Item Name” when you are creating your Paypal “buy” button. If you are using 1ShoppingCart, then this is the “Product Name” when creating a new product.
(Paypal users, skip ahead)
1ShoppingCart/ClickBank:
1) Make sure you have set up the “Email Order Processing” correctly.
2) Is your Cron Job dap-emailorder.php set up and running correctly?
3) Make sure you have not “removed” the 1Shoppingcart or ClickBank payment notification email from your server. Log in to your email server, and make sure that the email is still there, and also it needs to be “Unread”. If your email client (like Outlook or Thunderbird, or Gmail) already accessed it and marked it as read, then simply mark it unread, and the next time DAP runs (which should be in 10 minutes) it will pick up the email and process it.
Paypal Users:
1. If you are using Paypal IPN, then make sure you have enabled IPN within your Paypal account.
2. Make sure you put the correct IPN “notify_url” text in your button.
3. Make sure the Paypal button you set up is a “Buy Now” or “Subscribe” or “Add to Cart” button.
Also see these troubleshooting guides:
Troubleshooting Paypal Integration
Troubleshooting 1ShoppingCart & ClickBank
http://www.digitalaccesspass.com/doc/troubleshooting-paypal-integration/
55
Paypal Hosted Buy Buttons
DAP can process Paypal payments using Paypal IPN (Instant Payment Notification). All you need to basically do is to enable IPN within your Paypal account and create your Buy button with a few extra parameters. It’s all explained below.
So here’s what you need to do to process orders through Paypal using IPN, and have your buyers automatically added to DAP on your site.
1. Enable IPN within your Paypal account.
Follow this post to enable IPN first, and then come back here to this post.
2. Create your “Buy Now” or “Subscribe” or “Add to Cart” button
- Log in to your Paypal account.
- Click on Profile => Profile and Settings => My selling tools => Paypal Buttons => Update

- Click on the “Create New Button”

On the Create New Button Page:
Step 1: Choose a button type and enter your payment details
1: Choose any one of the following button types based on the type of product you wish to sell.
* Shopping Cart (for multiple-item purchases)
* Buy Now (for one-time products)
* Subscriptions (for subscription-based recurring products)
2: After selecting the button type, enter item name and price.

- “Item Name”
Make sure the Paypal “Item Name” EXACTLY matches the “Product Name” that you created within DAP. In fact, login as DAP admin, edit the product, copy the text from the “Product Name” field, then paste this into your Paypal “Item Name” field, so that there are no typos. If the product names don’t match, DAP will ignore any IPN posts coming in from Paypal, which means no account will be created for your new member.
Step 3: Customize advanced features (optional)
- just add a custom variable to the button as follows:
Under “Step 3: Customize advanced features (optional)” tab, within the “Advanced Variables” text box, enter the following (change the text YourSite.com below to your domain name).
notify_url=http://YourSite.com/dap/dap-paypal.php
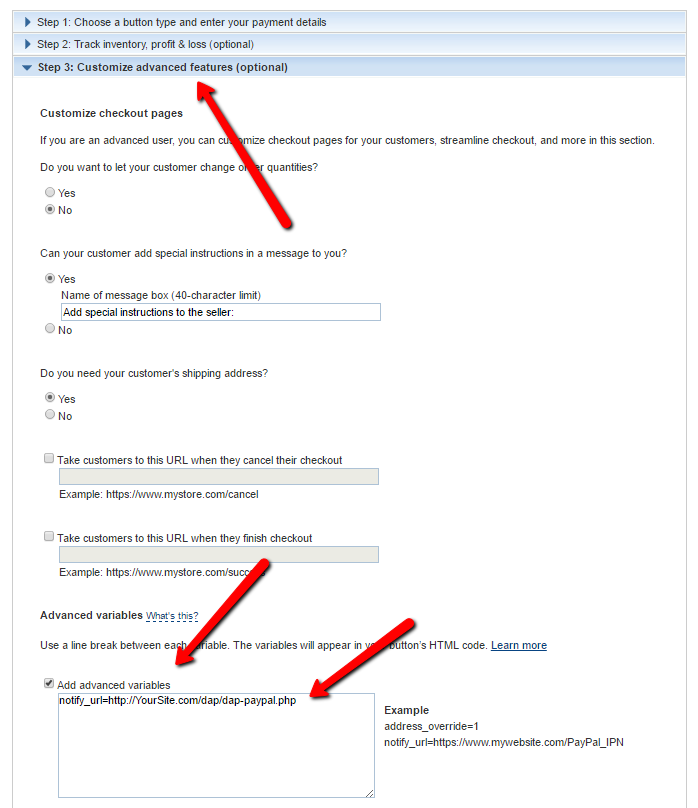
(change the text YourSite.com to your domain name).
Save the button.
4. Copy the HTML code for this button
5. Publish the code on your web site’s sales page
..or WP page or post.
That’s it!
So when someone subscribes to, or purchases your product using this button, Paypal will send an IPN notification to your web site to the above link. DAP will then verify the product and payment status, and then will automatically add give the buyer/subscriber access to that product.
If the email id used in this purchase is not already associated with an account on your site, then DAP automatically creates a new account, and sends the buyer an “activation” email that requires them to click on a link to confirm and activate their account.
But If this email id belongs to someone who already has an account in DAP (existing buyer, purchased a different product this time), then DAP doesn’t create a new account for this user. It simply gives the existing account access to this new product.
So when the user logs in, they will see that they now have access to TWO products, with each product and the available URL’s listed separately.
Note: If you’re going to be using Paypal to process payments, then you don’t need to set up the Email Processing info in your DAP Admin > Config > Payment Processing screen. You don’t need to set up the DAP Email Order cron job either.
24
1ShoppingCart Email Order Processing
If you’re using 1ShoppingCart or 1SiteAutomation.com (our private label of 1SC), if you want your users to be automatically logged in to their DAP membership area upon completion of purchase, then refer to this documentation on how to setup Login Xpress with 1ShoppingCart.
If you only sell one-time products, then the 1SC Login Xpress is the only thing you will need to integrate DAP and 1SC.
However, if you sell RECURRING products via 1SC, then you need to set up the email parsing of orders to allow DAP to process recurring payment notification from 1SC, as described below.
The reason for this, is that 1ShoppingCart, while very robust as a cart, does not trigger payment notification messages on the backend (like Paypal can do with IPN) when recurring payments comes in for a member.
So, we at DAP have created an exclusive “Email Order Processing” feature, where DAP will log in to your billing email inbox (where your 1SC email notifications come in) and then check your emails as if it were your personal assistant, and then process any orders that match your DAP Product names.
That is how DAP is able to do automated processing of Cancellations and Failed Recurring Payments.
For 1ShoppingCart and ClickBank, DAP does “Email Parsing” of orders.
Setting Up “Email Parsing”
Basically all you will be doing here is telling DAP where your payment notification emails from 1SC come in, and how to go fetch those emails so the recurring payments can be processed automatically, without you having to lift a finger.
1. Log in to your 1SC account. Then go to “Setup > Orders”. Copy the email id that you have entered into the “Order Notice Email – Primary Destination” field. Please note that 1SC DOES NOT send recurring billing notifications to the email id in the “Secondary Destination”. So be sure you use the email id from the “Primary Destination” field.

So let’s say you have set the primary destination email currently, to point to say ‘billing@yoursite.com’. Now make sure that the emails in your billing@yoursite.com inbox remain in ‘Unread‘ status, because when DAP logs in to check your recurring notifications, it will be looking at only Unread emails. It will not touch the ones that are already read.
2. Go to DAP Admin Dashboard > Setup > Config > Payment Integration .
3. On this screen, configure the following fields…
Email Server Where Order Emails Come In : mail.yoursite.com
Email Server Protocol (pop3/imap) : imap (no need to change this)
Email Server Port : 143 (probably won’t need to change this)
Email Server Protocol (ssl/nossl) : nossl (probably won’t need to change this)
Email Server User Name : billing@yoursite.com (enter email id copied from Step #1 above)
Email Server Password : yourpassword (the password to your email inbox for the above email address)
That’s it as far as setup is concerned.
Additional Notes
4. Set up your sales page as you would normally do when accepting payment through 1ShoppingCart. The only thing you need to make sure is to use the exact same “Product Name’ in your cart as well as within DAP.
So, if you set up a product called “My Membership Site” within DAP, then use the same name “My Membership Site” in your 1SC product name.
5. During installation, a Cron job (dap-emailorder.php) would have already been set up in your web hosting cpanel, to run every 10 minutes. So, every 10 minutes, DAP will automatically check the email id specified in Email Server User Name (the email id from Step 1).
If there is a payment notification (first time or recurring payment) for a product name that matches a product name in DAP, then it will automatically add that customer to DAP as a member if they’re a new member, or if they’re an existing member and it was a recurring payment notification, then DAP will “extend” their membership access by a month (or whatever your recurring cycle is), so that they will continue to get access to your membership site until the next payment comes in.
Testing
Try out some test purchases first. Make sure you try out the full purchase and full user experience, end-to-end.
WARNING 1: If you ever change the name of your product in 1ShoppingCart, or within DAP, make sure that both DAP and 1SC Product names are in sync.
WARNING 2: Do not use SKU in 1SC while defining the product. DAP will not parse the emails correctly if you use SKU.
5
Products: Random Stuff
The Product Name within DAP should be the exact same (even the case) as the Product Name in your Shopping Cart.
So if you were using a 1ShoppingCart (or private label) to accept payment for selling your digital info product or for access to your membership site, then the Product Name you use in your 1ShoppingCart admin panel should be the exact same name as what you use within DAP.
This is the only way for DAP to know about a new purchase through your 1ShoppingCart cart. And when it parses your 1ShoppingCart notification email, it can figure out that your buyer who purchased that product needs to be added to DAP, so that your buyer can get access to either your info product files, or to your subscription-based site.